1
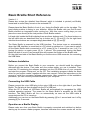
HandyTech
ElektronikGmbH
Basic Braille Short Reference
Version 1.1
Please also review the detailed User Manual, which is included in printed (not Braille)
format and in audio Daisy format on the enclosed CD.
Please place the Basic Braille in front of you, facing the Braille cells on the top edge. The
hand resting surface is facing in your direction. Above the Braille cells you find for each
Braille element an integrated cursor routing key. With this cursor routing keys you can
place the cursor directly at the text position of that Braille module.
Left and right beside the Braille display there are three buttons each. The three buttons on
the left hand side are described from top to button as [1], [2] and [3]. On the right hand
side this three buttons are correspondingly described as [4], [5] and [6].
The Basic Braille is powered by the USB interface. The device turns on automatically
when the USB interface is connected to a PC which is switched on. If you want to switch
off the Basic Braille while connected to a PC, press [4] for 5 seconds to turn it off. For
turning the device on again press [4] for 1 second. We recommend turning the Basic
Braille off while it is not in use because this will increase the lifetime of the Braille cells.
On the right hand side of the Basic Braille you find the micro USB connector for connecting
the USB cable.
Software Installation
Before you connect the Basic Braille to your computer, you should install the software
delivered with the device. First make sure the screen reader you use is installed. Then
insert the CD containing the software package into the CD-ROM drive of your computer
and start the program "Setup.exe" on the CD. This installation program installs the latest
driver for your screen reader, together with this user manual. Follow the instructions on the
screen to install the necessary software components. After completion of the installation
procedure, you can connect your Basic Braille to your computer.
Connecting the USB Cable
Please connect the micro USB plug to the micro USB port on the right side of your Basic
Braille. The flat plug is then plugged into the PC's USB port.
When the PC is turned on, the Basic Braille will automatically be recognized by USBenabled operating systems. The power for the Basic Braille is supplied via the USB
interface. The Basic Braille will turn on automatically as soon as the USB cable is
connected and the PC is turned on.
Additionally you can turn on the Basic Braille by pressing [4] for 1 second and turn it off by
pressing [4] for 5 seconds.
Operation as a Braille Display
Please make sure that your Basic Braille is properly connected and switched on before
starting up the screen reader program, because otherwise the screen reader will not be
HandyTech
ElektronikGmbH
able to detect it. As a rule, the screen reader will display the currently selected position
within the active window on the Braille display. For example, if you are moving through a
menu, the selected menu item is displayed. The various screen reader program functions
are assigned to specific keys on your Basic Braille.
Brailleeingabe mit den Funktionstasten der Basic Braille
In order to use these functions you need to install the latest version of the screen reader
driver for Handy Tech Braille displays. We recommend installing the driver from the
enclosed CD.
Key Basic Braille
1 or 4
3 or 6
2
5
1 + 2 or 4 + 5
2 + 3 or 5 + 6
1+3
4+6
1+4
3+6
1+6
1+2+3
4+5+6
1+3+5
2+4+5+6
2+3+4+5
1+2+3+4+5+6
Any key
Function
Move the Braille display to the left.
Move the Braille display to the right.
Go to focus
Window-Eyes: drag mouse to focus
JAWS: JAWS- or PC Cursor
NVDA: mouse to object
Line up (column wise)
Line down (column wise)
Beginning of line
End of line
Page up
Page down
Handy Tech configuration dialog
Top of file
End of file
Braille cursor tracking on/off, default: on
Toggle between Window-Eyes cursor and mouse cursor
Top of window
Config mode Basic Braille (internal)
Wake up from sleep mode (falls to sleep after 30 minutes)