1
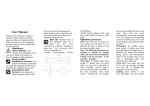
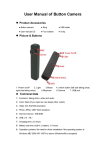
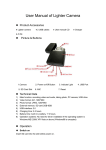
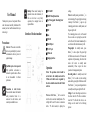
Use Manual
Thank you for your use of our product. Please
read this manual carefully beforehand. We
assume you have read this manual when you
start using it.
Backup Please make backups for
important data and information; if
files are lost due to any faulty
operation, the company bears no
responsibilities.
⑴LED On/Off
settings.
⑵On/Off/Video/Option button
Video: In standby mode, press Button ② to
start videotaping. The green light is on during
videotape. Press Button ② again to stop
videotaping and return to standby mode, and
the green light is off.
The videotaping time can be set. Recorded
files are saved on a recycling basis, and the
earlier files will be deleted automatically to
save the latest file when the memory is full.
Photographic: In standby mode, press
Button ③ to take a photo. The green light
will flash once and soon be off. It means the
completion of photo-taking, after which the
device will return to standby mode
automatically. Please repeat the above
procedure for taking another photo.
Recording Audio: In standby mode, hold
Button ③ for 2 seconds to start recording
audio and the green light will flash on and off.
Press Button ③ to stop recording and return
to standby mode; the green light will be off.
Settings: To enter the setting mode, turn on
the device when the TV cable is inserted or
insert the TV cable after the device is on.
Settings can be made for the following
options:
⑶Play/ Photographic / Recording /Enter
⑷1W LED
⑸MIC
Interface of the host machine:
⑹Lens
⑺3W LED
Precautions:
⑻Mini USB port
Safe start Please do not start this
device in a particularly dry or moist
environment in order to prevent it
against damage.
⑼TV OUT port
Qualified repair service requested
Only qualified serviceman is
allowed to repair this device. Please
do not disassemble it without
permission.
Operation:
Connection to other devices
Please read the manual for detailed
safety instruction before it is
connected to other devices, and
avoid any unsuitable devices.
⑽T-Flash slot
⑾Charging interface
Notice: The operations below should be
carried out in the standby mode and the
T-Flash card which can be recognized by
the device should be inserted in the T-Flash
card slot.
Power on: Hold Button ② for 2 seconds to
start the device and enter standby mode. The
red light will be on. If the device is turned on
with a TV cable inserted, it displays the
In all the settings below, press Button ② for
the main menu and Button ③ for the sub
menu.
1.
Mode: options including Recording,
Photographic and Playback.
2.
3.
Date and Time: Enter
Year: From 2009 to 2020
Mouth: From 01 to 12
Date: From 01 to 31
Hour: From 01 to 24
Minute: From 01 to 60
Second: From 01 to 60
Resolution :
Options including
1280*720/720*576/640*480 (for
instance, if Photographic Mode is on,
options include
2560*1920/1600*1200/640*480)
4.
Sound: Open/Close (for videotaping)
5.
Time Slice (min) (Recording
(minutes)):1/35/10/20/30/40/50/60
6.
Frame(fps): 30/40/50/60 (If video
resolution is 1280*720 or 720*576,only
the option of 30 frames is applicable.)
7.
System: PAL/NTSC
Troubleshooting
time
Power off: When the device is on, hold Button
② for two seconds. If all the lights stop
shining, the device is off.
Charging the battery: When green light
flashing quickly,it means the host machine is
running out of power and please recharge the
battery in time. Please use the provided charger.
When the red light is on, the device is on
charge; after the red light is off and the green
light is on, the charge is finished. Please take
away the charger in time after completing
charging to protect the battery from long time
charge.
Question: Why the device does not respond
after I press Button ① and ②?
Answer: The device needs to return to the
standby mode before executing the next order.
Please refer to instructions in the manual for
specific operation.
Question: Why the time watermark of video
is still not precise after I update the time of
the system for many times?
Answer: The time of the system is supported
by battery. Do not use up the battery when
videotaping and recharge it in time, or make
sure of enough electricity before use and set
the time.
Question: Why the removable disk cannot
be found after the host machine is connected
to a computer?
Answer: Please make sure that the operation
system
of
your
computer
is
WINDOWS98SE/ME/2000/XP/MAS
OS/
LINUX which can automatically recognize
and install a related driver while the driver in
WINDOWS98 needs to install manually. The
driver is in the CD supplied together with the
equipment.
Question: Why the photos I take are not
clear?
Answer: Anti-shake is not available for the
device. Please make sure your hand is stable
and the object keeps still.