1
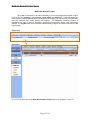
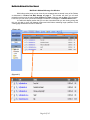
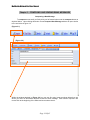
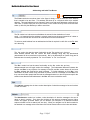
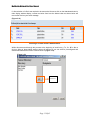
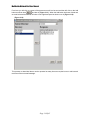
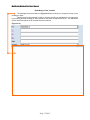
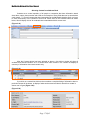
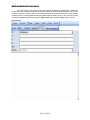
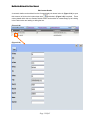
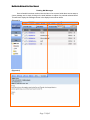
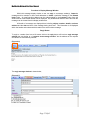
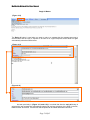
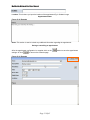
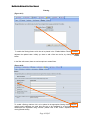
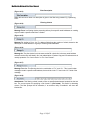
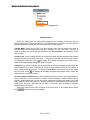
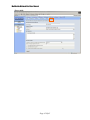
MailEnable Webmail End User Manual
Webmail User Manual
Table of Contents
Chapter 1
INTRODUCTION TO MAILENABLE SOFTWARE................................................ 3
MailEnable Webmail Introduction
MailEnable Requirements and Getting Started
Chapter 2
MAILENABLE KEY FEATURES OVERVIEW....................................................... 5
MailEnable Webmail Toolbar
MailEnable Webmail Folders and Storage
MailEnable Webmail Message List Window
MailEnable Webmail Message Display Window
Chapter 3
COMPOSING AND SENDING EMAIL MESSAGES.............................................. 10
Composing a New Message
Addressing and Label Text Boxes
Selecting a Contact stored in Address Book
Email Body of Text, Text Box
Attaching a File/Document
Email Send/Arrival Options
Notify Arrival Option
Email Message Priority Option
Selecting Contact from Address Book
Editing Contact Stored Details
Chapter 4
RECEIVING AND READING EMAIL MESSAGES.............................................. 20
Receiving and Viewing Email Messages
Reading Mail Messages
Functions in Display Message Window
Reply, Reply all, Forward, Delete Buttons
Add to Contacts button on Message Display Window
Attachments View
Chapter 5
MAILENABLE CALENDAR.............................................. 28
Creating an appointment
Appointment Settings and features
Appointment Description
Attendees
Date settings
Time settings
Appointment Location
Appointment Notes
Appointment Editing
Saving or updating an Appointment
Page 1 Of 45
MailEnable Webmail End User Manual
Chapter 6
MAILENABLE EMAIL ACCOUNT OPTIONS...................................................... 34
Options Button
Password Change
Set-up POP email account retrieval, Pop Account Add, Edit and Delete
Mail Box Redirect Options
Mail Box Auto Response Options
Mail and Account Options
Viewing or Opening Email Attachments
Generic Mail Settings
Page 2 Of 45
MailEnable Webmail End User Manual
Chapter 1
INTRODUCTION TO MAILENABLE SOFTWARE
MailEnable Webmail Introduction.
W ebmail is an email service that uses a web browser as an interf ace allowing the viewing,
sending, receiving, editing and deleting of email just as you would with your standard email clients
such as Outlook or Eudora. Webmail has many advantages for business and consumers alike, there
is also a distinct advantage f or mobil e users as access to email can be achieved through any
computer in the world that has access to the internet and contains a web browser.
The MailEnable Webmail service is similar to services such as hotmail, yahoo and other
Webmail services that are available through the internet, with easy access emails can be viewed
while on a remote server instead of having to download messages with each account login. A unique
advantage with MailEnable Webmail is larger files can be attained through the service than with the
other industry email services previously mentioned. With MailEnable there is no limit on email size
this ensures that all files are receiv ed which can be detrim ental to business and users ali ke as files
can be received anywhere in the world without rejection.
A positive feature of MailEnable is it's virus protection as all scanning and cleaning of email
and files is seamless, it can be completely configured at a server level so a user is not aware of the
scanning but can be sure that viruses are not accepted and are not inadvertently sent to other users.
Most virus protection applications are configurable and supported using the MailEnable Webmail
service this allows v arying degrees of protection and gives the f reedom to set and personalise the
attribute of email virus scanning.
MailEnable Webmail Requirements and Getting Started.
To access MailEnable Webmail a user has to firstly have an account, this should be arranged
through the department of Manager MIS, MEPCO Compuer Center, Multan.
Once an account has been established an authorized user simply logs on to a PC and
accesses the internet then using a web browser the user can access the Webmail internet sight logon
screen where logging into a user inbox is required.
(If unsure how to access the internet and use a browser on a PC, contact [email protected])
(If unsure what your web address for MailEnable is contact [email protected]).
(In this case and the case throughout this manual we will use MAILENABLE.COM for our example where you
see this you should change MAILENABLE.COM to your respective DNS name.
(Figure 1.1)
www.mail.mepco.com.pk/mewebmail
Page 3 Of 45
MailEnable Webmail End User Manual
MailEnable Logon Screen.
Once your internet sight is accessed the following logon screen will appear;
(Figure 1.2)
Your user information to access your email is entered here;
(Figure 1.3)
Username
Password
Username = Your username by this time has been supplied to you by your administrator and usually
resembles the first section of your email address. This username is entered into the Login: section
above.
Password = Your password should be known at this time and will be entered into the Password: text
box as above.
Skin = The skin is the design of the displayed interface within Web Mail, at present there is only one
interface Enterprise but in subsequent editions to follow more skins and displays will follow.
Logging In = To log in now all you have to do is click the left mouse button on the
shown here and in Figures 1.2 and 1.3.
Page 4 Of 45
button as
MailEnable Webmail End User Manual
Chapter 2
MAILENABLE KEY FEATURES OVERVIEW
The MailEnable Web Mail Interface
The Webmail interface is the home of all functions and services for your email service from
here you can perform all email, maintenance and storage tasks. The interface is designed for ease of
use and acts similar to any other email client you may have used in the passed. Using this interface
is the only way to Send, Receive, Delete, Check, Create and manage Webmail.
(For a more in-depth view of the Web Mail Interface advance to Chapter 3)
(Figure 2.1)
Page 5 Of 45
MailEnable Webmail End User Manual
MailEnable Webmail Toolbar.
The toolbar is the source of all mail functionality it is from the orange square below in figure
2.2 that you can compose a new message, check inbox and delete mail. From this toolbar you
have access to mailbox options which includes password change, pop mail retrieval, mail redirection,
mail auto response and modify generic mail settings. The Enterprise calendering feature is
accessible here and is used for reminders, organising meetings and obtains usual calendering
features. The Log Off option here provides a fast secure way to log off any mail box and return to the
log on screen.
(Figure 2.2)
(Figure 2.3)
(For a more in-depth view of the Web Mail Interface Toolbar advance to Chapters 3, 4 and 5.)
Page 6 Of 45
MailEnable Webmail End User Manual
MailEnable Webmail Folders and Storage.
Contained in this side window called Folders you will find organisation or storage folders for
your mail. Typically this section on a new mail box will contain Contacts, Drafts, Inbox and Sent
Items folders. The folders section can be modified and will be covered later in this manual for the
moment though be aware that this button instigates modification of these folders.
(Figure 2.4)
(Figure 2.5)
Page 7 Of 45
MailEnable Webmail End User Manual
MailEnable Webmail Message List Window.
Within this preview pane you can view all your messages that are stored in any of the Folders
as discussed in Folders and Mail Storage on page 6. This window will show you all email
properties such as who the mail is From, Subject, the Date of delivery and the Size of the message.
From here you can move a particular message or selection of messages to a Deleted Items folder.
It is within this display section that you can also view what folder you are viewing, along with
this you are able to move mail between folders and with folders containing large quantities of mail
viewing page advancements can be achieved.
(Figure 2.6)
(Figure 2.7)
Page 8 Of 45
MailEnable Webmail End User Manual
MailEnable Webmail Message Display Window
When a mail message is clicked on in the previous pane the Message List Window shows
further details and the body of the message is displayed. From here you can Reply, Reply All,
Forward or Delete a particular message. Within this screen you will also find whether a message
contains an attachment.
(Figure 2.8)
(Figure 2.9)
Page 9 Of 45
MailEnable Webmail End User Manual
Chapter 3
COMPOSING AND SENDING EMAIL MESSAGES
Composing a New Message
To compose a new email you firstly click your left mouse button onto the compose button as
depicted below. Upon clicking this button a new Compose-New Message window will open similar
to the one below in figure 3.2.
(Figure 3.1)
(Figure 3.2)
Within the window depicted in (Figure 3.2) you can see five entry boxes as shown below they are
where you enter all information required to send an email message. Each section requires a left
mouse click at the beginning of the white text box as shown above.
Page 10 Of 45
MailEnable Webmail End User Manual
Addressing and Label Text Boxes.
Combo Box Drop Down Arrow
The From: combo box as shown here in the figure is simply a way to select the email address
that is wanted to be sent from. This address will show up at a recipients inbox as a senders
address. This email address can be changed if there is several email addresses configured for a
user inbox, to select simply left click your mouse on the combo box drop down arrow and then
select (or left click) the address you want to send from.
The To combo box is where an email address in entered for the destination of a sent
email . It is important that the address is correctly typed as one incorrect keystroke of a letter or
number in this combo box will ensure an email does not reach it s destination.
To select an email address from an address book all that is required is a left click on the To: label
as in abov e fig.
The Cc: combo box has the same f unctionality as the T o: combo box in that any
email address entered here will receive the email message along with any attachments
(attachments will be covered later in the manual). Cc: is an abbreviation of Carbon Copy and in
business terms is usually equated to For Your Inclusion or For Your Perusal .
The Bcc: combo box has the same f uncti onality as the Cc: combo box and any
address entered here will again receive the message. The fundamental difference between the
two Cc: and Bcc: is any recipient of a message in the To: and Cc: combo boxes will not know
the Bcc: address has received the email message. To further elaborate on this, Bcc: is an
abbreviation of Blind Carbon Copy and when a person receives a message from the Bcc: box
they can see all other people that received the message however no other recipient except for the
sender knows that the email addresses in the Bcc: box have received the email.
The Subject: message box is where a short description of what the message to be sent is about
or what it contains.
The Attachments: combo box is where a short description of what the message to be sent is
about or what it contains. From here after clicking as with previous message boxes a further
screen will appear as below where you can browse your computer in a standard windows
explorer window for files to attach (one at a time). When you navigate to a file that is needed to
be attached to a message select it and then click with left mouse button on the below add button.
Page 11 Of 45
MailEnable Webmail End User Manual
Figure (3.9)
Attaching a file is quite simple all is required is a left mouse click on the Browse button which is
shown. Once this is done the MailEnable program will invoke a typical windows file browser window
shown below where a user can navigate their computer environment and select a file
for attaching.
Once selected the text box will resem ble something similar to the one below where
the text box displays the location of the file selected. From here the final step is to left mouse click on
the add button and the file attachment will be complete and your attachment should show as in
Page 12 Of 45
MailEnable Webmail End User Manual
If, after selection of a file it was required to be removed a left mouse click on the Attachment button in
main display window display a screen as below from here the delete button as shown below will
remove the file from your email message.
(Figure 3.12)
Selecting a Contact stored in Address Book.
Within this screen and through this process at the beginning of each line e.g To:, Cc: BCc: after a
click on either of these labels another screen will appear so you can select a preconfigured and
stored email address this screen is shown below in (Figure 3.13).
(Figure 3.13)
Add Button
Page 13 Of 45
MailEnable Webmail End User Manual
From here you left click on a name of the person an email is to be sent and then left click on the Add
and also in (Figure 3.13). When the Add button has been clicked and
button as shown here
an email selected the address will show in the right hand panel as shown over in (Figure 3.14).
(Figure 3.14)
This process as described above can be repeated as many times as required so as to add several
receivers of the one email message.
Page 14 Of 45
MailEnable Webmail End User Manual
Email Body of Text, Text Box
The message box pictured below in (Figure 3.15) and is where you can type the body of your
message or letter.
Finally from here the message is ready to be sent providing an attachment is not required to
be sent along with the message or some options on the email are required to be set. The attachment
of files and email options will be covered later in this manual.
(Figure 3.15)
Page 15 Of 45
MailEnable Webmail End User Manual
Email Send/Arrival Options
There are email sending or delivery options displayed after the compose button has been
pressed. In this tab you will find the option of being notified when a recipient of an email opens the
email to read, an auto reply from the recipient back to the sender notifies of a particular message
being opened.
From this tab a priority tag can be placed on an email to alert the email recipient to the
importance that the mail be read or opened. The choices available for these tags are Low, Normal
or High.
(Figure 3.14)
Send When you are ready for an email to be sent click on the send button and the email will be
delivered.
(Figure 3.14a)
Cancel A click on this button will clear all that is currently being created and return back to the
Inbox, there is no way to return back to message you were working on so be careful when using the
Cancel button.
(Figure 3.14b)
Attachments
This button will allow the user to enter the attachment screen and enable
organization, addition and deletion of attachments.
(Figure 3.14c)
Message Priority This is where a message priority tag can be set, this setting is displayed to a
recipient and allows them to know the importance you the sender place on them reading the email.
(Figure 3.14d)
When you place a tick in the box by clicking in it as below
An email will be auto replied when a recipient reads the message. Please note that the recipient is
able to prevent this from happening, if they have their client verify whether to send notification.
Page 16 Of 45
MailEnable Webmail End User Manual
Selecting Contact from Address Book
Contacts are a central repository of all people or companies that have information stored
about them, name, phone number and email are an example of some fields that can be stored about
each contact. To view all contacts that have been added to the MailEnable interface firstly you have
to enter the directory of the contacts to do this left mouse click on the Contacts button as shown
below, this will display a list of all contacts that are associated with this current user.
(Figure 3.18)
After the Contacts button has been selected as above a list similar to below will show all
available and entered contacts. As it is shown below each contact in the contact list displays a
summary of information about each contact entry.
(Figure 3.19)
If you click on a contact line similar to the one above a complete listing of information about a
particular contact will be shown. A display of what can be stored and what is stored for a contact is
shown over in figure (Figure 3.20)
(Figure 3.20)
Page 17 Of 45
MailEnable Webmail End User Manual
From this screen if it is required to send an email to the particular contact there is a short cut
to open up a new message screen that will already contain the contacts email address in the To: line.
All that is required to send an email to the contact selected is a left mouse click on the email address
depicted above in purple(sometimes the email address will be shown in blue). This will then invoke a
new email message screen shown below in (Figure 3.21) where a new message can be created.
(Figure 3.21)
Page 18 Of 45
MailEnable Webmail End User Manual
Edit Contact Details
A contact s details can be edited from the Contact display tab shown below in (Figure 3.23) to open
this screen a left click on the button shown here
and below in (Figure 3.22) is required. These
contact details within this new Contact Details screen can be edited or created simply by left clicking
in the Field text box and adding or editing the text.
(Figure 3.22)
(Figure 3.23)
Page 19 Of 45
MailEnable Webmail End User Manual
Chapter 4
RECEIVING AND READING EMAIL MESSAGES
Receiving and Viewing Email Messages
Receiving emails and reading emails is a relatively simple task using MailEnable Webmail,
after an email account has been configured for use, a simple log in as discussed earlier is all that is
required for a receive of all emails. After logging into an email account all email addresses that are
configured will be ready for viewing at any time a left button mouse clicking on the inbox will display
all received emails. An email check can also be made by clicking on the get mail button within the
Opening Webmail Interface as discussed earlier in this manual, below is (Figure 4.1) that shows the
location of the button within the Interface.
(Figure 4.1)
(Figure 4.2)
Page 20 Of 45
MailEnable Webmail End User Manual
Reading Mail Messages
Once all emails have been received into the inbox of an account holder there are two ways to
view a message one is simply clicking on the email address or subject of a particular selected email.
This will inturn display the message content in the display box as shown below.
(Figure 4.3)
(Figure 4.4)
Page 21 Of 45
MailEnable Webmail End User Manual
Functions in Display Message Window
Within this message display window a user can reply to a message sender(s), forward a
message and its contents to other email addresses or delete a particular message to the Deleted
Items folder. An email sender s address can be added straight to the Contacts Folder from this
window and an email header details can be displayed. Any attachments that have been sent with the
message can be viewed from this display window also.
All details of a message are displayed here including subject, sender s details, receivers
address and the date and time of the message having been sent. This information is all displayed
within the header and underneath this header is the actual written message.
Reply Button
To reply to a sender from here a left mouse click on the reply button will invoke a reply message
window that acts similar to a compose new message window but the address of the recipient
and sender are automatically entered.
(Figure 4.6)
The reply message window is shown below;
(Figure 4.7)
Page 22 Of 45
MailEnable Webmail End User Manual
(Figure 4.8)
(Figure 4.9)
As you can see the From: and To: boxes are automatically filled and the message that was originally
sent is added to the message so the new receiver (previous sender) can read what was originally
written and then knows what the reply is to. These From: and To: boxes can be edited and added to.
Page 23 Of 45
MailEnable Webmail End User Manual
Reply All Button
(Figure 4.10)
The Reply all button is used when you want to reply to a message but the message was sent to
several users and the reply is required to be sent to all original recipients these fields are again
automatically entered as shown below.
(Figure 4.11)
(Figure 4.12)
As seen previously in (Figure 4.11 and 4.12) it is noticed that after the reply all button is
selected the new message box automatically entered all previous recipients of the email in the To:,
From: and Cc: text boxes. These boxes and recipients can be edited and deleted as before.
Page 24 Of 45
MailEnable Webmail End User Manual
Forward Button
(Figure 4.13)
(Figure 4.14)
When an email is received and the message is to be sent on to another email address the
Forward button can be used this is similar to the reply buttons previously mentioned in that a new
window containing the message that is desired to be sent is displayed. This time however the From:
box is the only one automatically filled. From here you just enter a To: address of where you want to
send the message and it s details then the message will be sent along with any attachments.
(Figure 4.15)
(Figure 4.16)
Page 25 Of 45
MailEnable Webmail End User Manual
Delete Button
(Figure 4.17)
(Figure 4.18)
If a message is required to be deleted into the deleted Items folder a left mouse click on the delete
button will remove the file from the inbox and place it in the deleted items folder.
Add to Contacts button on Message Display Window.
Using the Add to Contacts button will allow the user to conveniently add the sender of an
email to the Contacts folder, once this button is clicked the Add Contact entry form will be displayed
with the fields of Name, Nickname and email address automatically entered as below in (Figure
4.19). This information can be edit ed by clicking in the relevant text box as displayed below again in
(Figure 4.20).
(Figure 4.19)
(Figure 4.20)
Page 26 Of 45
MailEnable Webmail End User Manual
Attachments View Button
Within the Display message screen you will find an icon with the picture of an envelope this
button will allow a user to view an attachment that was sent with a message. An attachment is a file
or document that is sent through with a message.
(Figure 4.21)
(Figure 4.22)
Once this button has been clicked the following screen over page will appear, it is through this
screen that you can view or execute the file that was attached with an email. There is a summary
of information about the file placed in this screen; below you will see that the Name, Type and
Size of the attached file are displayed.
(Figure 4.23)
To view the file a left mouse click on the file name will prompt the user to either save the file
to a directory or run the file in the relevant program e.g. If it was a Microsoft Word file then the
document would be opened in Word.
Page 27 Of 45
MailEnable Webmail End User Manual
Chapter 5
MAILENABLE CALENDAR
Mailenable Webmail Enterprise version incorporates a calendar feature which allows users
to schedule appointments. This calendar is used to navigate between months so that a user can view
scheduled appointments.
Figure (5.1)
Creating an appointment
To create new appointments simply click the new appointment button located under the calendar.
Figure (5.2)
Page 28 Of 45
MailEnable Webmail End User Manual
Appointment Settings and features
Figure (5.3)
Figure (5.4)
From: This setting is used to select the address of the individual who created the appointment or who
is hosting the appointment. Use the dropdown menu to select a different contact.
Appointment Description
Figure (5.5)
Description: This text box is used to give the appointment an appropriate name. This description is
used in the scheduled time slots.
Figure (5.6) Example:
Page 29 Of 45
MailEnable Webmail End User Manual
Attendees
Figure (5.7)
Attendees: This text box is used to input peoples email addresses that will be attending the
appointment. (Please note that when an attendee is specified in the attendee s text box, a notification
is sent to attendee.) Another way of quickly choosing attendees is by clicking the
button and
selecting attendees from the contacts window. (Refer to (Figure 5.8) (Please refer to the Contacts
section of this manual)
Figure (5.8)
Date settings
Figure (5.9)
Date: This where you set the appointment date.
Time settings
Figure (5.10)
Start and Finish times: These two dropdown menus are used to set the start and finish time for the
appointment.
Appointment Location
Figure (5.11)
Page 30 Of 45
MailEnable Webmail End User Manual
Location: This is where you input the location of the appointment Eg: In Student lounge
Appointment Notes
Figure (5.12) Example
Notes: This section is used to include any additional information regarding the appointment.
Saving or cancelling an appointment
After the appointment configuration is complete click on the
settings. Or click
to return to the Calendar page.
Figure (5.13) Example
Page 31 Of 45
button to save the appointment
MailEnable Webmail End User Manual
Appointment Editing
Once an appointment has been created you can always go back and edit the appointment if
there is any additional information to be added. Editing an existing appointment is simple, just click on
the scheduled appointment window.
Figure (5.14) Example:
Click here to
open appointment
edit window.
(Please note: If an appointment is created and there are no attendees, you not able to add any
attendees in the appointment editing screen.)
Figure (5.15)
Figure (5.16)
Status: Displays if the appointment has been created and attendees have received a confirmation
note regarding the appointment. To once again save changes made to the existing appointment you
click the
button. To delete an existing appointment you click the
you back to the Calendar page.
Page 32 Of 45
button, and it takes
MailEnable Webmail End User Manual
Saving or updating an Appointment
When the appointment is freshly created or edited, the
or
appointment and return to the Calendar window. (Refer to Fig. 5.17).
Figure (5.17)
Page 33 Of 45
buttons will finalise the
MailEnable Webmail End User Manual
Chapter 6
MAILENABLE EMAIL ACCOUNT OPTIONS
Options Button.
Within the MailEnable Webmail Interface below there is a button called options as shown
below this will after being selected with a left mouse click bring up a new options screen. Within
this screen you can change a log in password, create an auto response or change the generic
settings of the MailEnable program. Generic settings in this example include, time zone,
displayed language characters and a signature can be created to be inserted automatically on all
email settings.
(Figure 6.1)
Page 34 Of 45
MailEnable Webmail End User Manual
When the Options button is clicked the following window will appear within this window you will
find three to five tabs depending how the software has been configured. Login, Pop Retrieval,
Redirection, Auto Response and Settings are the possible tab options, the first and foremost left
tab, Login allows a user to change their Login Password.
(Figure 6.2)
(Figure 6.3)
Within these text box fields it is an easy task to change the login password by typing in the
current password in the Current Password: text box as pictured above. Following this the new
password that a user is wanting to set gets typed in both the New Password: and Confirm New
Password: text boxes. Once this is completed the Update button as shown here
and above
is clicked using the left mouse button.
The old password upon completing this has then been changed and a success message as
shown below will be displayed.
(Figure 6.4)
Page 35 Of 45
MailEnable Webmail End User Manual
Pop Retrieval Options
The next tab of options allows the configuring of a POP account for retrieval, once clicking on
the Pop Retrieval Tab the following will be presented. From here if a user right mouse clicks on the
Add button as depicted above then the following screen (Figure 6.5) will be generated.
The POP protocol has been around for quite a few years and is supported by a large number
of e-mail clients. POP was designed to be used as an "offline" protocol in which users connect to a
server and download messages in their inbox to their local PC or MAC system. The user has the
option of removing messages from the server or leaving them on the server (not recommended.)
Leaving messages in the inbox on the server can create a great deal of extra load on the server
system, since each time the user reconnects, the POP server must once again scan all of the
messages in the inbox to determine which ones are new. Once the messages are downloaded, the
user then processes them in offline mode; responding to messages, filing messages to various local
folders, etc. The POP protocol does not allow you to create, manage, or manipulate folders or
messages on the mail server.
(Figure 6.5)
Page 36 Of 45
MailEnable Webmail End User Manual
Add Pop Retrieval Account
After the Add button as shown here
following configuration screen appears.
and above is clicked with the left mouse button the
(If unsure of any following settings contact the IT department or Administrator of your account)
(Figure 6.6)
When this screen is displayed it is simply a case of entering the name of the mail server into the
Mail Server: text box and the username and password of the Pop mail account into their
respective text boxes.
Once this is done there are three settings that have to be entered, a tick in the small white
text box has a setting of yes into any of the above settings. The setting descriptions for each of
the three Pop settings are below.
APOP Authentication This is a setting that will have to be set if the server that the mail is
stored on uses APOP Authentication.
Download new messages only
MailEnable will keep track of messages that have been
downloaded from the remote server, and will not download a message twice.
Enabled
If enabled the email will be retrieved from the remote server.
Once these configurations are all set and correct, click on the Update button as shown here
and above then on the next mail receive, the POP mail will be received into the Inbox.
The configuration settings are saved and shown for future reference similar to the example below.
Page 37 Of 45
MailEnable Webmail End User Manual
(Figure 6.7)
Pop Retrieval Account Edit
To edit the account settings that are configured as above simply click on the Edit button as
shown here
and above, the edit screen will appear in the same format as in (Figure 6.7).
Pop Retrieval Account Deletion
To delete a POP mail account simply click on the Delete button as shown here
and
on the previous page in (Figure 6.7). The window below will then appear asking to confirm
deletion if certain the account settings are to be deleted and the account is no longer required to
be checked confirm by left clicking the Delete button as shown below.
(Figure 6.8)
Email Redirection Options.
Redirection of email is a useful utility allowing email that is received into the MailEnable
Webmail account be transferred to any another email account this can be for many reasons often
sent for backup or storage.
If email is required to be redirected a tick is to be placed in the check box below adjacent to
Redirect mail to text box then the desired email address that is to receive the redirected mail is
then written in the Redirect mail to text box.
If a copy of the messages after redirection is to be kept in the mailbox so in effective
duplication is required then a tick is to be placed in the tick box adjacent to the Keep a copy in
mailbox. If a tick is not placed into this box then the mail will be moved from the mailbox to the
account selected for redirection if the box is ticked then the mail is copied rather than moved.
Page 38 Of 45
MailEnable Webmail End User Manual
(Figure 6.9)
Email Auto Response Options.
Auto Response is a function that automatically replies to any email address that sends an
email to a user. Often used when a staff member of a business goes on holidays, this utility can
write an auto Response message letting everyone who sends mail to the person on holidays
know that he/she is on holidays and cannot be contacted or will be back into the office on a
certain date.
To enable this tick is to be placed into the Auto Response Enabled check box by clicking
the left mouse button on the check box adjacent to the Auto Response Enabled text. Upon
doing this it is simply then a requirement to enter the body of text that is required to be sent in the
automatically replied message. The text is entered into the text box shown below under the Auto
Response Enabled check box. Once the text is entered then a left button click of the mouse on
the Update button as shown here
and below will confirm the Auto Response.
To disable the function a removal of the tick from the Auto Response Check box will ensure
the Auto Response is no longer generated.
(Figure 6.10)
Page 39 Of 45
MailEnable Webmail End User Manual
Filtering
(Figure 6.11)
To enable the filtering feature a tick has to be placed in the Enable Mailbox Filtering tick box
adjacent the update button. Initially you have to add a filter into the list, by clicking the
button.
In the filter edit screen, there are various options to create filters.
(Figure 6.12)
To enable a filtering criteria a tick is to be placed in the appropriate filtering criteria tick box. If
multiple email addresses are used then they are to be separated by a semi-colon. Multiple
attachments are separated using commas. (Please refer to the Action dropdown menu for
moving filtered emails)
Page 40 Of 45
MailEnable Webmail End User Manual
Filter Description
(Figure 6.13)
Within this text box a name or a description is given to the filter being created. Eg: Spamming
Filter .
Filtering Criteria
(Figure 6.14)
Message From: is a filtering criteria preventing delivery from specific email addresses or creating
ways to handle a specific email from a Sender.
(Figure 6.15)
Message To: similar to From:, the To: address field allows the creation of criteria, based on the
delivery to an email address or a group of receiving email addresses.
(Figure 6.16)
Message Cc: The Cc: criteria line is the same as the To: criteria line in that any email address
entered here the filter will identify. Cc: is an abbreviation of Carbon Copy and in business terms is
usually equated to For Your Inclusion or For Your Perusal .
(Figure 6.17)
Message To or Cc: This filtering criteria is a combination of To: and Cc: . This is useful when
messages contain a specific email address, that could be in the To and in the CC fields of the
message.
(Figure 6.18)
Attachments: This filtering criteria is used to filter out specified attachments inputted into the text
box. The correct syntax for specifying a file format is *.(file format). This useful for detecting
viruses. The filter pickups the file extension, if an antivirus utility is installed it will clean the
infected file.
Page 41 Of 45
MailEnable Webmail End User Manual
(Figure 6.19)
Message Subject Contains: This filtering criteria is used to block emails that contain specific
subject contents.
(Figure 6.20)
Message Contains: This filtering criteria is used to block emails that contain any type of text
inputted into the text box. Most spam these days is blocked by filtering what the email contains.
Eg: An Email contains Sexual content, then in the filtering criteria Message Contains: we can
input the word sex and all emails with content sex will be filtered.
Action
(Figure 6.21)
The action conditions in the dropdown menu are the actions the filter takes when the filtering
criteria is met.
(Figure 6.22)
Delete the message: If this is selected in the action menu the message will be deleted and sent
to the deleted items folder.
(Figure 6.23)
(Figure 6.24)
Move Message to Folder: If this is selected in the action menu the message is moved to a folder
that is created when a folder name is given.
Page 42 Of 45
MailEnable Webmail End User Manual
(Figure 6.25)
(Figure 6.26)
Copy Message to Folder: This action makes a copy of the filtered message and puts it in the
folder that gets created
(Figure 6.27)
(Figure 6.28)
Move Message to Junk Mail Folder: This action moves the filtered message to a created folder
called Junk in the folders tree.
(Figure 6.28)
(Figure 6.30)
Move Message to Quarantine Folder: This action moves the filtered message to a created
folder called Quarantine in the folders tree.
Page 43 Of 45
MailEnable Webmail End User Manual
(Figure 6.31)
Settings Options.
Within this Settings tab the configuration settings allow the change of Character sets for
alternate languages, it allows the selection of the senders/users Time Zone and also allows a
Friendly Name to be entered that will be sent along with an email address.
Friendly Name: within this text box a so called friendly name can be entered, this name is
delivered along with the email address usually a nickname is used in this field. This entry is
made by clicking in the email text box adjacent to the Friendly Name: title and typing in the
desired name.
Character Set: this is a setting that can be configured to allow different languages and different
language characters to be sent in an email. To change the Character set a left mouse click on
the combo box drop down arrow
will display the available languages and another click to
select the desired language setting from there is required.
Time Zone: any of the 24 regions of the globe (loosely divided by longitude) throughout which the
same standard time is used. This setting is used in message headers and helps in the display of
times of email sends and receives. To change the Time Zone: a left mouse click on the combo
box drop down arrow
will display the available languages and another click to select the
desired time zone setting from there.
An auto signature enabled function can be enabled within this tab screen, an auto signature is a
body of text that is sent on the bottom of emails usually containing a senders details such as
location, contact details and in some cases even a disclosure informing a recipient of an email
that if received it is for their eyes only. An auto signature can be selected by firstly clicking and
selecting the check box and placing a tick within. From there type the details of the auto
signature within the text box.
After these settings have been configured a left mouse click on the Update button shown
here
and below confirms the settings.
Page 44 Of 45
MailEnable Webmail End User Manual
(Figure 6.32)
Page 45 Of 45