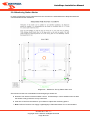
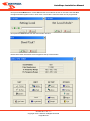
1
AutoSlope Installation Manual AutoSlope Installation Manual Module 5 Manual Version 1.1 Softrock Solutions specialise in slope monitoring. We have developed software and systems that will assist you with your slope monitoring needs. October 2011, Rev. 1.1 Copyright © 2011 Softrock All Rights Reserved Page 1 of 75 AutoSlope Installation Manual Softrock Manuals Overview Softrock has produced a range of manuals to assist the user of its systems and software to gain the most from these products. Each manual has a unique numbering system, which allows for easy crossreferencing: Module Number Module 1 Module 2 Module 3 Module 4 Module 5 Module 6 Module 7 Module 8 Module 9 Module 10 Module 11 Module 12 Module 13 Content QuikSlope Manual AutoSlope Manual QuikCom Manual Softrock Automated site – At A Glance AutoSlope Installation Manual Leica Onboard Slope Monitoring Manual FieldSat Manual AutoSat Manual ATS Pocket PC Manual Analyzer Manual QuikSlope5 Manual GeoMos Training Manual AutoWeather Manual A quick example of cross-referencing Module 2 Index number Refers to AutoSlope Manual 2.15.3.1 Instrument Settings Module 2; Chapter 15; Section 3, Subsection 1. This cross-referencing scheme can be easily be used across any Softrock manual. For example in Module 1 QuikSlope Manual, 1.2.1.4 Database creation. We regularly make use of cross-referencing to other manuals within our software collection. This avoids repetition, makes for easy updating, and provides an efficient method to record information. It is therefore important that the user understands this unique numbering system, as all the information for our programs cannot fit into a single manual. Release Information Prepared By : Harsha Seneviratne (HS) Reviewed By : Bernie Malone (BM) Authorised By : Bernie Malone Configuration History Version No. Date 1 1.1 7/10/11 Change Details Initial Draft Re-format to A4 & format clean-up October 2011, Rev. 1.1 Copyright © 2011 Softrock All Rights Reserved Page 2 of 75 Author BM DM AutoSlope Installation Manual Contents INTRODUCTION .............................................................................................................................. 6 PART 1 FIELD SETUP .................................................................................................................. 7 5.1.0 Survey Control ........................................................................................................................................ 7 5.1.1 Monitoring Station Installation ............................................................................................................... 7 5.1.2 Reference Station Installation ................................................................................................................. 9 5.1.2.1 Reference Pillar .................................................................................................................................... 9 5.1.2.2 Reference Prism ................................................................................................................................. 11 5.1.3 Co-ordination of Station ........................................................................................................................ 11 5.2.0 Monitoring Station Shelter .................................................................................................................... 12 5.3.0 Monitoring Prisms ................................................................................................................................. 14 5.3.1 Prism Quality ........................................................................................................................................ 14 5.3.2 Installation ............................................................................................................................................ 14 5.3.3 Co-Ordination ....................................................................................................................................... 17 5.4.0 Survey Instruments ............................................................................................................................... 17 5.4.1 Geodimeter ATS .................................................................................................................................... 17 5.4.2 Leica TPS1000 series.............................................................................................................................. 17 5.5.0 Automated Monitoring Components .................................................................................................... 18 5.5.1 Power Supply (Solar Panel) ................................................................................................................... 18 5.5.2 Weather Station .................................................................................................................................... 19 5.5.3 Communications ................................................................................................................................... 20 5.5.4 Repeater ............................................................................................................................................... 21 5.5.5 Alarms................................................................................................................................................... 23 5.6.0 Computer Requirements ....................................................................................................................... 24 5.7.0 Software Installation ............................................................................................................................. 25 5.7.1 AutoSlope & QuikSlope ......................................................................................................................... 25 5.7.2 ClickYes ................................................................................................................................................. 26 5.7.3 OfficeSMS ............................................................................................................................................. 27 October 2011, Rev. 1.1 Copyright © 2011 Softrock All Rights Reserved Page 3 of 75 AutoSlope Installation Manual PART 2 TELEMETRY .................................................................................................................. 32 5.8.0 What is Telemetry? ............................................................................................................................... 32 5.8.1 Applications .......................................................................................................................................... 32 5.8.2 Also telemetry could be used to ............................................................................................................ 32 5.8.3 Where telemetry can be applied? ......................................................................................................... 33 5.8.4 Radio Selection ..................................................................................................................................... 34 5.8.5 Site Evaluation ...................................................................................................................................... 35 5.9.0 Frequently Asked Questions ................................................................................................................. 37 5.10.0 ELPRO 905U-D Radio Modem .............................................................................................................. 44 5.10.1 Simple and Reliable ............................................................................................................................. 44 5.10.2 High Speed Wireless Data ................................................................................................................... 44 5.10.3 Radio Communications ....................................................................................................................... 44 5.10.4 RS232/485 ........................................................................................................................................... 45 5.10.5 Transparent Mode .............................................................................................................................. 46 5.10.6 Controlled Mode ................................................................................................................................. 47 5.10.7 Specifications ...................................................................................................................................... 48 5.10.7.1 Power Supply ................................................................................................................................... 48 5.10.7.2 General ............................................................................................................................................ 48 5.10.7.3 Serial Port ........................................................................................................................................ 48 5.10.7.4 Radio Transceiver ............................................................................................................................. 49 5.10.8 Data Transmission ............................................................................................................................... 49 5.10.9 Operation ............................................................................................................................................ 50 5.11.0 RF Innovations Radio Modems ............................................................................................................ 51 5.11.1 Applications ........................................................................................................................................ 52 5.11.1.1 LAN Extension .................................................................................................................................. 52 5.11.1.2 Link Extension .................................................................................................................................. 53 5.11.1.3 Repeater Application ....................................................................................................................... 54 October 2011, Rev. 1.1 Copyright © 2011 Softrock All Rights Reserved Page 4 of 75 AutoSlope Installation Manual 5.11.1.4 Repeater Network Application ......................................................................................................... 55 5.12.0 High Speed Radio Modem ................................................................................................................... 56 5.12.1 Features .............................................................................................................................................. 56 5.12.2 Applications ........................................................................................................................................ 57 5.12.2.1 Point to Multipoint Data Acquisition and Control ............................................................................ 57 5.12.2.2 Linking of local and remote RS232 serial ports ................................................................................. 57 5.12.3 Specifications -Model RFI 9526 Series 3 .............................................................................................. 57 5.12.3.1 Physical ............................................................................................................................................ 57 5.12.3.2 General ............................................................................................................................................ 57 5.12.3.3 Transmitter ...................................................................................................................................... 57 5.12.3.4 Receiver ........................................................................................................................................... 58 5.12.3.4 Data System ..................................................................................................................................... 58 5.12.4 Intelligent Radio Model ....................................................................................................................... 58 5.12.4.1 Features ........................................................................................................................................... 58 5.12.4.2 Applications ..................................................................................................................................... 59 5.13.0 Specifications Model RFI 045, 195, 595 ............................................................................................... 60 5.13.1 General ............................................................................................................................................... 60 5.13.2 Transmitter ......................................................................................................................................... 60 5.13.3 Receiver .............................................................................................................................................. 61 5.13.4 Data System ........................................................................................................................................ 61 5.13.5 Configuring RFI595F for Geodimeter ATS ............................................................................................ 61 5.13.6 Configuring RFI9256 for Geodimeter ATS ............................................................................................ 67 APPENDIX A DIAGRAMS .......................................................................................................... 75 October 2011, Rev. 1.1 Copyright © 2011 Softrock All Rights Reserved Page 5 of 75 AutoSlope Installation Manual Introduction System Overview Softrock Solutions automated slope monitoring system is designed to provide real time data on wall movements in open pit mines. The system utilises robotic total station survey equipment, and radio, or satellite telemetry to provide the Surveyor or Geotechnical Engineer with data of movement over time. The system also incorporates alarming features which can be used to alert staff and pit personnel of impending dangers. Diagram 1 – Typical Monitoring System Setup October 2011, Rev. 1.1 Copyright © 2011 Softrock All Rights Reserved Page 6 of 75 AutoSlope Installation Manual Part 1 Field Setup 5.1.0 Survey Control The establishment of any survey control is fundamental to the overall quality of any survey conducted using that control (accuracy should ideally be 1:50,000 or better). If the Control is in error then the error will propagate throughout the entire survey control network. This is of particular important when using the control for Slope Monitoring. 5.1.1 Monitoring Station Installation The location of the Monitoring Station Pillar has to answer the following questions. Has a geotechnical inspection prior to the establishment of the control point been conducted? Can you clearly see your REF Prism station? Is the area around the survey control pillar clear and free from shadow or other obstructions that may impact on the placement of solar power or visibility to prism groups or communications? From the survey control point do you have a clear line of sight to your repeater/office? Do you have an adequate shelter over the survey control point to protect the instrument and telemetry equipment? The survey pillar usually consists of a steel pipe filled with concrete. (An old drill rod can be used to drill down into solid rock until the rod bogs. The rod is then cut off at an appropriate level and the pipe concreted over the top). A 150mm diameter (minimum) plate with a 5/8” bolt in the centre is required for the top, so the Survey instrument can be fastened. The top of the pillar should be as close to level (horizontal) as possible. October 2011, Rev. 1.1 Copyright © 2011 Softrock All Rights Reserved Page 7 of 75 AutoSlope Installation Manual Diagram 2 – Survey Station October 2011, Rev. 1.1 Copyright © 2011 Softrock All Rights Reserved Page 8 of 75 AutoSlope Installation Manual 5.1.2 Reference Station Installation The location of the Reference Station has to answer the following questions. Has a geotechnical inspection prior to the establishment of the control point been conducted? Can you clearly see your Monitoring station? Is the area around the Reference station clear and free from other obstructions that may impact on the visibility to Monitoring Station? When observing the reference prism are you shooting through the same column of air as you will be when observing the monitoring prisms? Additional questions have to be asked if you are using an existing or new survey station with a prism adaptor. Do you know the prism constant for the prisms being used on your Ref prism? Do you know the height of the Ref prism? 5.1.2.1 Reference Pillar Installing a pillar for the Reference Station is the preferred option. There are two options for the reference pillar. First is the use of a Survey Station Pillar with the prism fixed in an adaptor. The pillar installation should meet the requirements set out in “Monitoring Station Installation”. Second is installation of a dedicated Reference pillar. This usually consists of a steel pipe filled with concrete and the Prism Star Picket concreted inside. See diagram next page. October 2011, Rev. 1.1 Copyright © 2011 Softrock All Rights Reserved Page 9 of 75 AutoSlope Installation Manual Diagram 3 – Reference Station October 2011, Rev. 1.1 Copyright © 2011 Softrock All Rights Reserved Page 10 of 75 AutoSlope Installation Manual 5.1.2.2 Reference Prism This option is to use a Monitoring prism. This is NOT the preferred method for the installation of a Reference Prism. Diagram 4 – Monitor Prism Spikes Design and Construction The monitoring Prism spike is hammered into the ground, or concreted into a short drill hole in the ground. Note that the closer the prism is to the ground or a glaring line of site, the greater the effect of refraction. 5.1.3 Co-ordination of Station Monitoring Station pillar and Reference Station, have to be surveyed to an order of accuracy that will allow reliable and comparable measurements to be made to other survey control (accuracy should ideally be 1:50,000 or better). That is, has it been tied into the existing control network and adjusted. (With GPS surveys the quality of the “Z” is often overlooked and it is wise to run conventional level traverse as a check. Multi-pathing of GPS signals can also be an issue and the location of the survey control should take this into account). Get Surveyor to Survey or use GPS. October 2011, Rev. 1.1 Copyright © 2011 Softrock All Rights Reserved Page 11 of 75 AutoSlope Installation Manual 5.2.0 Monitoring Station Shelter In order to protect the survey instrument from rain and dust it is essential that an adequate shelter be constructed around the instrument. Diagram 5 – Shelters for Survey Station Plan View Some factors to take into consideration when designing a shelter are: Direction from which inclement weather comes. Unfortunately in some situations will not allow the shelter to fully protect the survey instrument. Clear line of site from the shelter to your reference object and monitoring prisms. Note: Softrock Solutions can supply a lightweight pre fabricated shelter for on-site insulation. October 2011, Rev. 1.1 Copyright © 2011 Softrock All Rights Reserved Page 12 of 75 AutoSlope Installation Manual Diagram 6 – Shelters for Survey Stations II October 2011, Rev. 1.1 Copyright © 2011 Softrock All Rights Reserved Page 13 of 75 AutoSlope Installation Manual 5.3.0 Monitoring Prisms This monitoring system uses only Passive Prisms. 5.3.1 Prism Quality The requirements for prisms used for monitoring are: 64mm diameter prism. Standard 5/8” thread. Single angle cut 1 second (for distance measurements of greater than 1500m to one prism). Single angle cut 2 second (for distance measurements of less than 1500m to one prism). Optional aluminium coated inside surface (used to prevent precision being effected from moisture). i.e. This prism is a Yellow case, single angle cut 1 second, non aluminium coated inside surface. 5.3.2 Installation Prior to installing the prisms, the surface of the prism should be coated with a water prevention treatment (like RainEx) to reduce the possibility of moisture build up. Prism spikes should face the Monitoring Station with a clear line of sight. Monitoring Prisms should be installed into the rock mass that requires monitoring. When installing prisms, if possible use a Surveyor (or other person) setup on the monitoring station to assist with aligning the prism for optimum performance. October 2011, Rev. 1.1 Copyright © 2011 Softrock All Rights Reserved Page 14 of 75 AutoSlope Installation Manual Diagram 7 – Monitor Prism Spikes – Design and Construction Note: Installing a pillar for the Monitoring Prism is the preferred method. October 2011, Rev. 1.1 Copyright © 2011 Softrock All Rights Reserved Page 15 of 75 AutoSlope Installation Manual Diagram 8 – Monitor Prism Design and Construction October 2011, Rev. 1.1 Copyright © 2011 Softrock All Rights Reserved Page 16 of 75 AutoSlope Installation Manual 5.3.3 Co-Ordination The surveyed position of the prism is to be within 100mm. Get Surveyor to Survey with survey instrument or GPS (RTK or static). Survey with Monitoring Instrument. 5.4.0 Survey Instruments For a Manual Slope Monitoring System, using QuikSlope the following instruments (data formats) are supported: Geodimeter / Trimble data format. Leica data format (8 & 16 bits). Leica APS-Win Sokkia SDR 2x data format. Sokkia SDR 33 data format. Nokia data format. Topcon data format. For an Automated Slope Monitoring System, using AutoSlope to control the survey instruments, there are only 2 types of instruments supported. The instruments are required to have: 1 second accuracy angular or better. Autolock or ATR (Automatic Target Recognition). Distance accuracy of 1mm ±2ppm. 5.4.1 Geodimeter ATS Specifications. Autolock distance to 1 prism = 3000m 5.4.2 Leica TPS1000 series This following instruments are supported from the series: TCA1100 TCA1800 TCA2003 Specifications. ATR distance to 1 prism = 1200m October 2011, Rev. 1.1 Copyright © 2011 Softrock All Rights Reserved Page 17 of 75 AutoSlope Installation Manual 5.5.0 Automated Monitoring Components For an Automated Slope Monitoring System additional items are required. These items may be different from site to site due to individual requirements. 5.5.1 Power Supply (Solar Panel) 12Volt power is required to be supplied to each instrument and communications device. Where the setup area does not have a constant source of power, a 12Volt 200AmpHour (or better) battery is required to supply power. The battery is connected to a Solar panel for recharging. The Solar Panel is fastened to the shelter, antenna mast or steel pipe concreted into the ground. The panel is aligned to where the sun’s movement path is strongest. i.e. in Australia the panels are aligned North. Note: the closer to the equator the flatter the panel inclination. Diagram 9 – Power Supply (Solar Panel) October 2011, Rev. 1.1 Copyright © 2011 Softrock All Rights Reserved Page 18 of 75 AutoSlope Installation Manual 5.5.2 Weather Station A Weather Station is an integral part of the automated system. The Temperature & Pressure readings are performed every 4 prisms with an update of the “ppm” constantly being made to the Survey instrument. The weather station is fastened onto a pipe and positioned at least 1 meter above the shelter roof (or office roof). Communications to the AutoSlope system is through a MODEM (radio, wireless network adaptor, satellite). The communication wires from the weather station connect to a control unit then connect to the modem. Power is connected to the modem and weather station controller. Diagram 10 – Weather Station October 2011, Rev. 1.1 Copyright © 2011 Softrock All Rights Reserved Page 19 of 75 AutoSlope Installation Manual 5.5.3 Communications All communication devices that are required should be installed into an enclosure that is moisture and dust resistant. Diagram 11 – Communications The communication antennas should be located where the most convenient line of site allows. Diagram 12 – Convenient Location for Antennas There are 3 types of communication device supported (or being developed) for use with AutoSlope. Radio Modem Wireless Ethernet Adapter Satellite Data Modem Further details of each can be found in Appendix 1 – Communication References. October 2011, Rev. 1.1 Copyright © 2011 Softrock All Rights Reserved Page 20 of 75 AutoSlope Installation Manual 5.5.4 Repeater The communications system may require a repeater where there is no line of site from the instrument station to the control computer (usually the mine site office). Note: A 6m Telescopic Repeater Antenna Mast is available through Softrock Solutions. Diagram 13 – Telescopic Repeater Mast This mast is available through Softrock Solutions October 2011, Rev. 1.1 Copyright © 2011 Softrock All Rights Reserved Page 21 of 75 AutoSlope Installation Manual Diagram 14 – Telescopic Repeater Mast II October 2011, Rev. 1.1 Copyright © 2011 Softrock All Rights Reserved Page 22 of 75 AutoSlope Installation Manual 5.5.5 Alarms Various alarms are supported by AutoSlope. E-mail SMS Radio Tone ASOR Light Siren Refer to AutoSlope Software Manual, Module 2, Section 2.7.0 Alarms, on details about alarm control. October 2011, Rev. 1.1 Copyright © 2011 Softrock All Rights Reserved Page 23 of 75 AutoSlope Installation Manual 5.6.0 Computer Requirements Hardware: Intel 80486 processor or higher, or 100% compatible. 3 or more Serial Com Ports (depends on installed equipment). 512 MB RAM Minimum. 10/100 Network connection. 60GB Hard disk. Operating System / Platform Windows XP Professional, or Windows NT, or Windows 2000 Other Programs and Requirements User Login (with Administrator / power user access), for software installation, setting changes and operation. Microsoft Outlook for AutoSlope PC (optional). Email account for AutoSlope PC UPS (with no serial interface required) October 2011, Rev. 1.1 Copyright © 2011 Softrock All Rights Reserved Page 24 of 75 AutoSlope Installation Manual 5.7.0 Software Installation 5.7.1 AutoSlope & QuikSlope Install AutoSlope into the C:\Program Files\AutoSlope directory. o This automatically creates the Program Manager group “Softrock Software”. Install QuikSlope into the C:\Program Files\QuikSlope directory. For the Program Manager group select where AutoSlope was created “Softrock Software”. Setup QuikSlope o o o o o o o o Start in Demo mode first. (Help - Register) to get computer No: Close QuikSlope. Create the ‘QuikSlope2.LF’ file and copy to the C:\Program Files\QuikSlope directory. Start QuikSlope again. Setup ‘New Project’ or open an existing QuikSlope project. Add Control Points. Add a new line (NB. date has to be 1 day before starting) Setup Graphing. A4 location plot, Crest & Toe, Logo, Title Block. Setup AutoSlope o o o o o o o o o o o o o o Start “AutoSlope Setup” program. Add a project and follow the prompts. Select Multi Instruments (only set to single instrument after AutoSlope is finished installed). Do not select SMS alarm until after Office SMS is installed. (No Setup for SMS directory or Graphic directory) Start “AutoSlope Setup” Adjust settings if required. Start “AutoXYZ” Enter Control Prisms. Enter Monitoring Prisms. Setup Groups Start AutoSlope in Demo mode. (Help – About) to get Computer ID: Close AutoSlope. o Create the ‘AutoSlope.LF’ file or contact Softrock Solutions for the file, and copy to the C:\Program Files\AutoSlope directory. o Start AutoSlope again o Setup Graphics. o Photo & Co-ordinates. o Setup Alarms o (set SMS directory) Do not activate SMS alarm until after Office SMS is installed. October 2011, Rev. 1.1 Copyright © 2011 Softrock All Rights Reserved Page 25 of 75 AutoSlope Installation Manual 5.7.2 ClickYes Express ClickYes is a tiny program that sits in the taskbar and clicks the Yes button on behalf of you, when Outlook's Security Guard opens prompt dialog saying that a program is trying to send an email with Outlook or access its address book. You can suspend/resume it by double-clicking its taskbar icon. Please note this option is not required if you are using AutoSlope’s internal email system. ClickYes works with: Outlook 2000 SP1+SR1 Outlook 2000 SP2 Outlook 2002 Outlook 2003 N.B. ClickYes doesn't work with Outlook Express. There is an appropriate option in the Outlook's Express settings. To turn the prompts off, click Options on the menu, switch to the Security tab, and clear the Warn me when other applications try to send mail as me checkbox. The setup program is located on the SoftRock Solutions CD in the PROGRAMS directory. ClickYesSetup.exe After install ensure that ClickYes is running and “Start on Logon” is ticked. October 2011, Rev. 1.1 Copyright © 2011 Softrock All Rights Reserved Page 26 of 75 AutoSlope Installation Manual 5.7.3 OfficeSMS Setup terminal 1. Connect the Serial cable to the PC com port & the SMS terminal. Insert the active SIM card into the slot. Connect the Antenna. 2. Plug in the Power to the terminal & switch on. (Wait until the Status light slowly flashes). 3. Check that the SMS Terminal is set correctly to communicate with Office SMS. Use the RMU Manager program. Diagram 15 – RMU Manager October 2011, Rev. 1.1 Copyright © 2011 Softrock All Rights Reserved Page 27 of 75 AutoSlope Installation Manual NB. Office SMS only communicates with terminals at 9600 baud rate. 4. Install Office SMS Multi User version. 5. Click on the Office SMS icon to start the program. 6. The Registration Screen should popup now. (only available for the Multi User version) Diagram 16 – Registration The Office SMS software needs to be registered. To do this you will have to call Call-Direct in Sydney. If you could call John at Call-Direct on 02-9209-4258, say the unit is purchased through Softrock Solutions. You will need to enter the unlock code that you receive from the phone call. Changing Serial Ports If the Office SMS software does not recognise the terminal automatically then the Serial Port may need to be changed. October 2011, Rev. 1.1 Copyright © 2011 Softrock All Rights Reserved Page 28 of 75 AutoSlope Installation Manual 7. Select the SMS menu then click on Preferences. Diagram 17 – SMS Alerts - Preferences 8. Click on Advanced. Diagram 18 SMS Alerts – Advanced Configuration October 2011, Rev. 1.1 Copyright © 2011 Softrock All Rights Reserved Page 29 of 75 AutoSlope Installation Manual 9. Change the Serial Port & press the “Reconnect Now” button. 10. Once the program is talking to the terminal click on OK in the “Advanced Configuration” window Ok in the “Preferences” Office SMS is now operational. The program does not need to be running for AutoSlope to communicate with it. October 2011, Rev. 1.1 Copyright © 2011 Softrock All Rights Reserved Page 30 of 75 AutoSlope Installation Manual Communication References Appendix 1 October 2011, Rev. 1.1 Copyright © 2011 Softrock All Rights Reserved Page 31 of 75 AutoSlope Installation Manual Part 2 Telemetry 5.8.0 What is Telemetry? Telemetry is the ability to monitor and control processes remotely. Data is transferred back and forth, between master and slave controllers by means of various communication schemes, including radio, fibre-optic, satellite, dial-up or dedicated phone line, RS-485, ETHERNET etc. Distances can be small, (RS-485), medium, (radio, dedicated phone line, fibre-optic) or large, (dial-up phone line and satellite). 5.8.1 Applications Security applications (entrances and alarms) Fluid level pressure monitoring Fire and smoke detection Temperature Switch and valve status Vending machine product levels Gas pressure 5.8.2 Also telemetry could be used to Power up/down heavy machinery remotely Operate electric door locks (vehicle or fixed site) Switch on pumps and generators Open and close Electro-mechanical valves Activate sirens and warning lights October 2011, Rev. 1.1 Copyright © 2011 Softrock All Rights Reserved Page 32 of 75 AutoSlope Installation Manual 5.8.3 Where telemetry can be applied? Power Distribution networks Water supply networks Residential water networks Meteorological stations Fire prevention networks Security networks Remote Broadcast equipment Vending machines Public Transport Note: Understanding Your System is the Key In this manual, we will explore the options that make up a telemetry system to support Softrock Solutions products. From initial site layout to radio modems and antennas you will know and understand your system, the key to making it work. As can be seen from above the application and the areas telemetry can be applied are many, as are the various systems used to transmit data. SoftRock Solutions systems use simple radio modems to transfer data to and from a base computer to a remote survey instrument, weather station, alarms, or repeater radio. Having this wireless capability makes our systems efficient and cost effective for our clients. Softrock Solutions currently supports several radio types and the aim of this manual is to inform our users of the technical aspects of the radios such as configuration, limitations, and problem solving for their specific application. October 2011, Rev. 1.1 Copyright © 2011 Softrock All Rights Reserved Page 33 of 75 AutoSlope Installation Manual 5.8.4 Radio Selection SoftRock Solutions have selected the radios we use based on their suitability to a specific application, client request or simply because the particular radio meets all of SoftRock Solutions requirements, requirements such as: Ease of programming Unique ID address Licence free Size and construction Power requirements Input/Output Technical support Range Frequency Range Inter-visibility, line of sight, Topography October 2011, Rev. 1.1 Copyright © 2011 Softrock All Rights Reserved Page 34 of 75 AutoSlope Installation Manual Important considerations when selecting a radio modem for data transfer. Radios currently being supported by SoftRock Solutions include: Elpro 905U-D R F Innovations Pacific Crest Each of these radios have their own unique characteristics set up features and operating features we will provide information on each radio. Before we go into revealing all the technical aspects of individual radios we need to review how to put a telemetry system together and what considerations we need to allow for? 5.8.5 Site Evaluation Prior to any equipment being put in place a through site evaluation should be conducted to establish possible impediments to the telemetry. Consideration should be given to the physical location of the units, when this has been established a visual inspection of the site will allow such things as: Line of sight, inter-visibility (need for repeaters) Multi-pathing of signal (signal being bounced off surrounding objects causing signal degradation) Range distance between units (antenna selection and placement) Determination of other frequencies being used on site (this is import, to prevent cross talk and the possibility of conflicting frequencies) To be identified to ensure that the new system will work unimpeded. When this evaluation has been conducted then the purchase and placement of the radio units can proceed. October 2011, Rev. 1.1 Copyright © 2011 Softrock All Rights Reserved Page 35 of 75 AutoSlope Installation Manual A typical SoftRock Solutions installation is shown below with 7 radio modems to be put in place. There is a base radio, instrument #1 radio, instrument #2 radio, two repeater radios, alarm radio, and weather station radio. The site evaluation will allow you to place these units for optimal coverage. Diagram 19 – Typical Softrock Solutions Installation Repeaters may be needed to jump over hills or obstructions. It is best to keep repeater numbers to a minimum. Weather stations can alternatively be installed at the office with a direct link to the control computer, so saving another link. October 2011, Rev. 1.1 Copyright © 2011 Softrock All Rights Reserved Page 36 of 75 AutoSlope Installation Manual 5.9.0 Frequently Asked Questions What is the difference between a licensed radio and license-free radio? A licensed system requires a radio licence from the government for every installation. The government only issues one licence on each radio channel in each geographic area. Licensed radio products operate on a single frequency channel - any other user on this channel causes interference. Unlicensed systems require the product to be approved by the government but a licence is not required for each application, provided the installation meets the licence-free requirements. Unlicensed systems must use a spread spectrum technique and share the licence-free radio band with other users - although the band is very large to cater for a large number of users. License-free bands are also called ISM bands (Industrial, Scientific and Medical). There are two common license-free ISM bands in North America, at 900MHz and 2.4GHz. A radio "band" is a collection of individual radio "channels" - each channel can carry an individual radio transmission. The ISM bands require the radio device to use a spread spectrum technique such that many users can share the band. We use a frequency hopping spread spectrum technique - the radio frequency continually changes or "hops". The hopping pattern of different products appears to be random to each other, providing a high degree of reliability against interference. The 900MHz band has better radio propagation and penetrating properties than 2.4GHz, however the 2.4GHz band has wider channels allowing much higher data rates. Wireless LAN's are common in the 2.4GHz band where high data rates over short distance is required. For instrumentation and automation applications, where the amount of data transmitted is small however radio paths can be very congested, the 900MHz band gives better performance. The licence-free bands which ELPRO uses are :USA/Canada 902 - 928 MHz, spread spectrum, 4 W maximum power Australia 915 - 928 MHz, spread spectrum, 1 W maximum power New Zealand 921 928 MHz, spread spectrum, 1 W maximum power. What is "spread spectrum"? Spread spectrum is a technique of transmitting on multiple radio channels. The technique was originally developed for the US Navy in WW2 - they were using radio guided torpedos but the enemy had learnt how to jam the radio channel. A research team (which included the actress Heddy Lamarr) developed a way for the radio transmissions to continually change frequency to avoid the enemy jamming. October 2011, Rev. 1.1 Copyright © 2011 Softrock All Rights Reserved Page 37 of 75 AutoSlope Installation Manual Spread spectrum techniques are now used in license-free bands to allow many users to share the band without significant interference. There are two common types of spread spectrum: Direct sequence devices change frequency many times per data bit - effectively transmitting a radio message on many frequencies at the same time. The RF power is divided over the different channels. This technique can provide high band widths and throughput high data rates, with high reliability because of the "spread" transmission method. The disadvantage is that the effective RF power is reduced, reducing the radio range and penetrating capability. Frequency hopping devices transmit a data packet on one frequency and then change to a different frequency. The RF power is concentrated on one radio channel at any one time. The devices "hop" frequencies, and as each device hops to its own pre-set frequency pattern, the patterns of any two devices are different (or "pseudo-random"). This is how a large number of devices are able to share the same radio band. If two devices do hop onto the same channel and their transmissions "collide", they will then hop to different channels and re-transmit the message. Because the frequency hopping technique concentrates the radio power on one channel at any one time, these devices perform better in industrial plants and factories where a strong penetrating radio signal is more important than high data rates. Studies in recent years have shown that spread spectrum devices do provide a high degree of reliability of congested license-free bands carrying a large number of simultaneous users. What is radio noise and interference? Radio noise is the background "hiss" or "hash" that a radio receiver can hear. Every radio or television transmission produces harmonics on different frequencies. Electrical equipment also produces radio harmonics. On every radio frequency there is a mixture of these harmonics. Fortunately the ISM bands are at very high frequencies where this background noise is very low. Generally noise only creates a problem where a high power radio or TV transmitter is located close by. Radio interference is other users on the same channel - that is, other radio devices transmitting on the same frequency in the same geographic area. Radio interference will "kill" your transmitted message. But with spread spectrum technology, the message can be transmitted again on another frequency. Any radio transmission will be reliably received if the "signal-to-noise ratio" is adequate. This means that if the radio message being received is stronger than the noise or interference that is also on the radio channel, then the radio message will be received reliably. In plant or factory applications, distances are short and the radio signal is very strong - a very high degree of noise can be tolerated and still have reliable communications. How far will the products transmit ? Our products can transmit more than 20 miles (USA/Canada) or 20 km (Australia/NZ) - however the antennas must be elevated to overcome obstacles and the earth curvature. To reach the maximum distance, a line-of-sight path is required. The products will work over a path obstructed by buildings, trees or industrial plant, however the distance is reduced. A typical industrial application is less than one mile - the radio path can have a lot of obstructions and still operate reliably. October 2011, Rev. 1.1 Copyright © 2011 Softrock All Rights Reserved Page 38 of 75 AutoSlope Installation Manual Do I require "line-of-site" ? Only if you want to transmit the maximum distance. Typical applications in industrial plants are normally less than 1 mile (2 km) and a large number of obstructions can be tolerated. Over these distances, our products will operate reliably thru buildings and thru plant steelwork. Our products have similar radio properties to mobile cell-phones, and will operate in obstructed areas in the same way as cell-phones. In addition, our products have a repeater function whereby other units can repeat radio messages for other units - our philosophy is to break a difficult radio path into several easy radio paths. An "easy" radio path is a reliable radio path. Are the products affected by cell phones or two-way radios? No. These devices operate on different radio bands. If one of our units is installed beside a cell tower or a high power radio repeater, then the background noise heard by our units will be greatly increased. This can have an affect if the transmitted radio message has a weak signal because of long distance. But in normal applications, cell phones and two-way radios have no affect. What are the reasons for using wireless products? Lower cost than wired installations. If the cost of wiring means that you cannot justify a project, then the project will not proceed and the resulting benefits will not be realized. Using our wireless products, the savings may be enough for the project to be approved. Long distances where cabling is not even considered, or when there is an unpassable obstacle to wiring - public roads, railway lines, tarmacs, waterways. Movable or moving equipment. Areas where wiring installations cannot occur for safety reasons - wireless systems can transmit straight thru. No secondary costs for shutting down plants or digging up roads/pavements while wiring is installed. Temporary installations for testing - a wireless link can save installing a temporary cable and removing the cable later. Temporary replacement for a cable failure while the cable is being repaired. To provide "airgap" isolation for connections suffering from ground-loop or voltage isolation problems. October 2011, Rev. 1.1 Copyright © 2011 Softrock All Rights Reserved Page 39 of 75 AutoSlope Installation Manual Is a wireless system better than a wired system? There are advantages and disadvantages of both methods. Wired connections are faster than wireless, where fast speed and response is important. A wired data link can handle much higher data rates than wireless. For distances of up to ½ mile (1km), a wired system will normally be more reliable than wireless. The big advantage of wireless is cost - a simple wireless link is equivalent to the cost to 300' (100m) of installed overhead wire/conduit. For distances above this, a wireless link will be cheaper. If underground installation is required, then this "break-even" distance will be less. A wireless link does not increase greatly with distance - whereas the cost of a wired link is proportional to distance. If the cost of a project cannot be justified because of cabling costs, then the decision becomes: USE WIRELESS, OR DON'T DO THE JOB ! What does Exception-Reporting mean and what are other communication methods? Exception-reporting is also known as "change of state" - transmitting when something changes. With wireless I/O, an exception reporting product will transmit when an input signal changes. The common communication methods are polling or timed updates. In a polling system, a master unit sends a "poll" to a unit and the unit responds with its input signal values. The disadvantage of this method is that if there is a change, a unit cannot report the new value until it receives a poll. For a plant with 100-200 wireless applications, there can be long delays before a master unit can poll all units, and there will be a very high level of radio traffic. With timed updates, a unit reports input signal values based on a time period. Again, for a plant with 100-200 wireless applications, there will be a very high level of radio traffic with most radio traffic reporting no change from the previous update. The advantage of exception reporting is that every transmission reports something of value - a change. Radio traffic is minimized as transmissions only occur when they need to - when there is a change. And when there is a change, there is no delay - the transmission is sent immediately - the unit does not have to wait for a timed update or a poll. Our products use exception reporting AND timed updates. The timed updates are a backup, to check the radio link integrity and check the input-to-output integrity. As it is a backup, the timed update periods (which are user-configurable) can be much longer to greatly reduce radio traffic. What is peer-to-peer and what are other communications methods? "Peer-to-peer" is an addressing system. This type of system allows any unit to communicate directly with any other unit. Most other systems use "master-slave" addressing where there is a master unit and all other units (the slaves) must communicate with the master. Direct communications between slave units is not possible. If the master unit fails, then all communications within the network fails. With a peer-to-peer system, if any unit fails, then only communications to that unit fails. Communications between all other units continues without affect. Softrock normally use a Master slave relationship. October 2011, Rev. 1.1 Copyright © 2011 Softrock All Rights Reserved Page 40 of 75 AutoSlope Installation Manual What are the security considerations? There are three levels of security consideration: Operating reliability Protection against mal-operation, and Protection against malicious operation, or "hacking". Operating Reliability The big risk to operating reliability with wireless products is radio interference. Our products have been designed to operate reliably in the presence of a large amount of radio interference. Aspects of this design are: Frequency hopping provides a high level of security against interference. As our products use radio transceivers, they are able to listen before transmitting to ensure that the radio channel is clear - if not, our product will move to another channel. If a transmission clash does occur, the receiving unit will detect corruption of the radio message via the encryption and error-checking techniques we design in and the receiver unit will not send an acknowledgment. This will prompt the transmitting unit to change frequency and re-transmit the message. The transmitting unit will try five times, on five different frequency channels to send the message providing an extremely high level of reliability. The probability of "radio noise attack" is proportional to the time it takes to transmit a radio message. In order to reduce this time, we transmit at a high rate (19.2Kbaud to 115.2Kbaud) and we transmit a very short message (only 12 bytes). Each message is transmitted in less than 30 msec. If a radio link does fail, we provide two levels of alarm to alert the user. We provide an alarm on "failing to transmit" a message, and also an alarm on "failing to receive" a message within a user-configurable time. Protection against Mal-operation Mal-operation occurs when a system operates when it shouldn't, and occurs when one wireless system "triggers" another because of cross-talk between systems. To avoid this, we have implemented the following features: Our products use a unique frequency code signature as well as data encryption. It is almost impossible for a different wireless product to trigger one of our products. To avoid cross talk between two Elpro systems, we use two levels of protection. Each system is configured with a unique system address. Only systems with the same system address will listen to each other. Users can also configure an encryption PIN code. If this security feature is used, units on a different system will not be able to understand messages from other systems. October 2011, Rev. 1.1 Copyright © 2011 Softrock All Rights Reserved Page 41 of 75 AutoSlope Installation Manual Protection against Malicious Operation, or "hacking" Because of the design features mentioned above, it is almost impossible for someone to obtain the message from a radio transmission or to generate a radio message which will be understood by one of our products. It is not impossible to do this, however it will be extremely difficult and take a long time. There will be many easier ways to cause damage than trying to "hack" into one of our systems via the radio channel. It is possible for someone to purchase a similar Elpro product and cause mal-operation if they are able to obtain the configuration of an operational unit. To protect against this, our configuration files are protected by a user-configurable PIN. This PIN is also loaded into the unit to prevent up-loading of the configuration from the unit. Can the products be used in hazardous/explosive areas? Yes. Our products have been certified for use in Class 1 Division 2 areas in North America. If your application is in a Class 1 Div 1 area (or in other countries), you can wire out of the Div 1 area to a Div 2 area - or use a "flame-proof" enclose or a pressurized/purged enclosure inside the Div 1 area. The use of non-metallic pressurized enclosures is ideal for wireless applications, using a small whip antenna inside the enclosure. The non-metallic box decreases radio range, but not significantly. With flame-proof enclosures, an external antenna is required. The antenna is connected to the wireless unit by a length of coaxial cable. An antenna is a passive element like a wire, and requires protection against mechanical abuse like a wire. Mounting the antenna inside a heavy-duty PVC pipe is a common way of achieving this requirement. The PVC pipe reduces radio range, but again, not significantly. What is a master, slave and repeater radio? The master radio is attached to the control computer via the RS232 port. Each radio modem at any device is called a slave. The instrument will have attached a radio with a unique address number (usually called 1, 2, 3 etc). These are all slave radios. A weather station or an alarm will also have a radio with a unique address (like 50 or 60). These are also slaves. Repeaters transmit the signal onwards to its destination. What is an address route name? dWhen using the Elpro radio system we can send a signal to slave via specific repeater radios. In the example diagram above, the route name to the alarm would be 101,102,60 where 101 is the repeater #1 address, 102 is the repeater #2 address and 60 is the address for the alarm radio. Is my Elpro 905U-D radio is connected through to the slave? Simply check the DCD light at the bottom of the light stack on the unit. When connected this will be lit. October 2011, Rev. 1.1 Copyright © 2011 Softrock All Rights Reserved Page 42 of 75 AutoSlope Installation Manual Is my RFI radio is connected through to the slave? If you are using an RFI unit then it is a little more complicated. The RFI system typically uses 2 types of radios. The 9256 is normally installed at the control computer. If there are multiple repeaters, then the 9256s will be installed for all links. The last repeater will have a 9256 and a 595F radio modem. The 9256 should show mostly solid green lights at each end of the light stack to show there is a connection. Light #1 is the network light. However, unlike the Elpro, the success of this connection is only for that link, so you may have to hunt down more links. The 595F does not show a connection light as such. The top “Clear to send” will flash green. This shows it has power. The “Modem active” light will flash red when a signal is received. Note: “Fault finding” in an RFI system is not as simple as the Elpro system. You must be aware of how many repeater links you have. October 2011, Rev. 1.1 Copyright © 2011 Softrock All Rights Reserved Page 43 of 75 AutoSlope Installation Manual 5.10.0 ELPRO 905U-D Radio Modem SERIAL DATA LINKS Wireless serial links (RS232 or RS485) Class 1 Div 2 Approved The ELPRO 905U-D radio modem module provides RS232 or RS485 connections by radio. It can be used instead of serial cable to link PLC's, data loggers, supervisory computers and intelligent transducers. The 905U-D has been designed to be easy to use and simple to install. It uses a frequency hopping 900MHz spread spectrum radio which does not require a radio license in several countries*. The module is fully integrated with radio, power supply, serial ports and microprocessor controller housed in a strong industrial aluminium case. 5.10.1 Simple and Reliable The 905U-D includes a radio transceiver, allowing communications in both directions, so the modules can check and control the transfer of information. The 905U-D is suitable for both simple and complex systems. It can operate in a transparent mode, where the host devices provide error checking and communications control. For less intelligent host devices, the 905U-D can provide the addressing, error checking and control of communications. The 905U-D can also accept Hayes compatible commands for selective addressing. 5.10.2 High Speed Wireless Data Host devices can connect to the 905U-D via RS232 or RS485 serial ports, at data rates up to 115.2 Kb. The 905U-D has an internal buffer of 2 Kbytes, and the radio can transmit data packages of up to 530 bytes, at speeds configurable up to 115,200 bits/sec. The 905U-D radio modem is both low cost and very flexible. 5.10.3 Radio Communications The 905U-D operates in the 902 - 928 MHz spread spectrum band. The 905U-D radio is available with transmit power of 1W and meets FCC radio regulations. The 905U-D has been designed to operate reliably on an open channel with other users. The average radio range of the 905U-D is 15 miles line-of-sight with 6dB gain antennas. The 905U-D module may also be configured to act as an intermediate repeater to provide longer radio paths. In controlled mode, up to five repeater modules may be configured for each link, and in transparent mode, an unlimited number of repeater modules may be configured for each link. The transmission rate of the 905U-D radio may be configured between 19200 and 115200 bits/sec, half-duplex. October 2011, Rev. 1.1 Copyright © 2011 Softrock All Rights Reserved Page 44 of 75 AutoSlope Installation Manual 5.10.4 RS232/485 The 905U-D connects to host devices using RS232 full duplex or R5485 half duplex. The RS232 connection provides standard CTS/RTS control, with the 905U-D module operating as a DCE device. The CTS/RTS signals may be configured to reflect the status of the 905U-D input buffer, or to reflect the CT5/RTS signals at the remote module. The R5485 connection is a industry standard half-duplex twisted pair mulitdrop connection. Only one serial connection (R5232 or RS485) can be supported at each module, however different types of serial data can be connected to different modules in the same system. Diagram 20 – Datalogger Polling Network The 905U-D accepts data at standard rates between 1,200 and 115,200 baud. It may be configured to accept 10-bit or 11-bit characters, with 7 or 8 data bits, even/odd/no parity, and 1 or 2 start and stop bits. The 905U-D will connect to almost any host device! *dependent on the radio regulations in each country The 905U-D module may be configured to operate in two different modes, to suit the type of host device. In each mode, data is sent in packets of up to 530 bytes, with a superimposed "system address". Only a module with the same system address will accept data from another module - this avoids cross-talk between systems operating in the same radio range. Modules may be configured manually or by the host device using standard Hayes codes. October 2011, Rev. 1.1 Copyright © 2011 Softrock All Rights Reserved Page 45 of 75 AutoSlope Installation Manual 5.10.5 Transparent Mode Transparent mode is suitable for host devices which provide their own data checking and control the flow of data. As data is received at the serial port, it is transmitted by radio and re-created at the serial port of all other modules with the same system address. There is no error checking carried out by the 905U-D modules and modules are not individually addressed - this is performed by the host devices. Modules listen to the radio channel and hold off transmitting until the channel is clear, apart from this there is no other transmission delay. Transparent mode is suitable for PLC networks, or for a broadcast system where the same serial data is to be sent to multiple devices. In transparent mode, one repeater may be configured - the repeater will re-transmit any radio message it receives. Diagram 21 – Transparent Mode October 2011, Rev. 1.1 Copyright © 2011 Softrock All Rights Reserved Page 46 of 75 AutoSlope Installation Manual 5.10.6 Controlled Mode Softrock uses controlled mode for most Elpro installations. In controlled mode, each module is configured with a unit address, and the 905U-D modules perform error checking and acknowledgments. If a message is corrupted during the radio transmission, the source module will retransmit the data up to four times until the data is received correctly. If reliable radio communications cannot be achieved, a communications failure output is provided as a discrete signal. Controlled mode is suitable for host devices such as data loggers or intelligent transducers which do not carry out error checking or control the flow of data. In controlled mode, up to five intermediate repeaters may be configured in any one link. Destination addresses, and repeater messages may be preset using the configuration switches on the module, or they may be set from the host device using standard Hayes AT codes. This type of system would be suitable for a master device (such as a PC) polling several slave devices (for example, data loggers) to download information. Diagram 22 – Controlled Mode October 2011, Rev. 1.1 Copyright © 2011 Softrock All Rights Reserved Page 47 of 75 AutoSlope Installation Manual 5.10.7 Specifications 5.10.7.1 Power Supply The 905U-D module may be powered from either a 10 - 30 VDC or 13 - 24 VAC supply. Normal current drain 70mA (@12VDC) or 50mA (@24VDC). Current when transmitting 350mA (@ 12V), 250mA (@ 24V). Low power mode, normal current drain is 20mA (@ 12VDC), 15mA (@24VDC). 5.10.7.2 General Environmental -40 to 60 degC. 0 to 99 %RH. EMC Compliant FCC Part 15 Class A. Housing, extruded aluminium case 4.5" x 7.3" x 1.2" (114 x 185 x 30 mm), DIN rail mounting, removable terminal blocks for ease of module replacement, terminals suitable for 12 gauge (2.5sqmm) conductors. LED indication for unit OK, radio TX and RX, serial TX and RX, DCD (comms OK). CSA Class 1 Div 2. 5.10.7.3 Serial Port Standard data rates 1200 to 115200 baud. RS232 and RS485 standard interface connections provided, each connected to the same serial port. Serial interfaces are asynchronous non-return-zero (NRZ) format. The following characters are supported (selectable) - 7 data bits, even or odd parity,1 start bit,1 or 2 stop bits; 7 data bits, no parity,1 start bit, 2 stop bits; 8 data bits, even or odd or no parity, 1 start bit,1 stop bit. RS232 connection provides full duplex operation as a DCE device with RTS/CTS hardware handshaking- standard D9 connector. RS485 connection provides half duplex operation for twisted-pair multidrop networks. Terminal connectors provided for RS485. October 2011, Rev. 1.1 Copyright © 2011 Softrock All Rights Reserved Page 48 of 75 AutoSlope Installation Manual 5.10.7.4 Radio Transceiver Frequency Hopping Spread Spectrum Transceiver. Frequency USA/Canada 902 - 928 MHz, Australia 915 - 928 MHz, NZ 921 - 928MHz. Frequency hopping, hopping sequence 8 x 50 Transmit Power 1W. RSSI -60 to -120 dBm. Expected line-of-sight range, depending on local conditions. USA/Canada 20+ miles, Australia/NZ 20+ km. RF Data Transmission Rate - 19200 baud, 57600 baud, 115200 baud. Range may be extended by: - up to five intermediate repeaters for controlled mode. - unlimited repeaters for transparent mode. Conforms to FCC Part 15 Class A and FCC Part 15.247. Antenna connection is SMA coaxial. 5.10.8 Data Transmission Transparent mode: Data is transmitted as a maximum 530 byte packet with a system address. Data transmission begins as soon as serial data is received For RS232, DCD signal is always high, and CTS is high while there is space in the input buffer. All modules, with correct system address, which receive the data packets, output the data without error checking. Controlled mode: Data is transmitted in packets with a system address, source address, destination address, up to five intermediate repeater addresses, and a 16 bit CRC error check. If the packet is received with a correct error check, only the destination module will output the data and will also return an ACK transmission. If the source module does not receive the ACK, it will retry a further four times before resetting the DCD output. For RS232, the CTS signal is high if there is room in the input buffer. Destination and repeater addresses may be configured by host using Hayes AT commands. October 2011, Rev. 1.1 Copyright © 2011 Softrock All Rights Reserved Page 49 of 75 AutoSlope Installation Manual 5.10.9 Operation Power-up and Normal Operation When power is initially connected to the 905U-D module, the module will perform internal diagnostics to check its functions. The following table details the status of the indicating LEDs on the front panel under normal operating conditions. LED Indicator Condition OK On Radio RX GREEN flash RED flash Radio TX Flash Serial RX GREEN flash RED flash Serial TX GREEN flash DCD On DCD Off Meaning Normal Operation Radio receiving data Weak radio signal Radio Transmitting Serial Port Receiving CTS low Serial Port Transmitting Transparent mode - always on Controlled mode on when communications link is established Communications failure or link not established Other conditions indicating a fault are described in Chapter Six Troubleshooting of the Elpro User’s Manual. SoftRock Solutions will provide the configuration setting for your radios on the completion of installation. Configuration of your radios should not be attempted unless instructed by SoftRock Solutions. It is a good policy to complete a thorough check of all connections and radio pathways for any problems before embarking on a radio configuration. In the event of any radio problems contact SoftRock Solutions for advice. All radio are bench tested by SoftRock Solutions prior to shipment and again prior to installation to ensure product quality and reliability. The supplied copy of the Elpro User’s Manual provides detailed information on the various configurations and operating modes as well as other fault finding protocols. Once the radios are in place there should be no need to bother with the radios. October 2011, Rev. 1.1 Copyright © 2011 Softrock All Rights Reserved Page 50 of 75 AutoSlope Installation Manual 5.11.0 RF Innovations Radio Modems RFI-9256 RFI-2256 Diagram 23 – RF Radio Modems RF Innovations radio modems have been used in many applications across a number of industries, so it is not possible to give a concise listing of all types of applications that our products are suited for. Instead this page lists a few generic situations in which our radio modems have been used. If you have a specific application in mind please contact our sales engineers who will let you know how our products can suit your needs. October 2011, Rev. 1.1 Copyright © 2011 Softrock All Rights Reserved Page 51 of 75 AutoSlope Installation Manual 5.11.1 Applications 5.11.1.1 LAN Extension RFI radio modems can be used to extend the link between a server and a workstation. The radio modems can emulate PSTN radio modems using Hayes dialup commands. Creating a cost free connection over many kilometres. Diagram 24 – LAN Extension October 2011, Rev. 1.1 Copyright © 2011 Softrock All Rights Reserved Page 52 of 75 AutoSlope Installation Manual 5.11.1.2 Link Extension RFI modems can establish a transparent link to form part of a large connection. Using the link data can be sent through the radio modems without the sending or receiving devices knowledge. Diagram 25 – Link Extension October 2011, Rev. 1.1 Copyright © 2011 Softrock All Rights Reserved Page 53 of 75 AutoSlope Installation Manual 5.11.1.3 Repeater Application RFI modems can be set up in a back-to-back configuration to be used as repeaters. This greatly increases the possible coverage of a radio link, depending on the number of repeaters installed. Diagram 26 – Repeater Application October 2011, Rev. 1.1 Copyright © 2011 Softrock All Rights Reserved Page 54 of 75 AutoSlope Installation Manual 5.11.1.4 Repeater Network Application Using strategically placed repeater (base) stations RFI modems can be used to cover a considerable area. In this set up a base computer can request and receive data from more than 1000 remote devices. Diagram 27 – Repeater Network Application October 2011, Rev. 1.1 Copyright © 2011 Softrock All Rights Reserved Page 55 of 75 AutoSlope Installation Manual 5.12.0 High Speed Radio Modem RFI 9256 Series 3 SPREAD SPECTRUM 900MHz RADIO MODEM The RFI 9256 is a license free high performance data radio capable of functioning in hostile RF environments with data throughput of 115 Kbps. Receiver design provides superior rejection of unwanted signals in hostile crowded spectrum environments. 5.12.1 Features • Economical • Dual RS-232 ports • Suitable for voice and data • Forward error correction • ARQ is software selectable • Air data speeds 115 Kbps • In built diagnostic channel • Up to 30 Kms point to point • User friendly intuitive software • Interface speeds 110 to 115000 bps • RF power up to 1 Watt software selectable • Programmable I/O for SCADA applications • Front panel indicators for RSSI, TX power and status • Can be installed and commissioned without test equipment October 2011, Rev. 1.1 Copyright © 2011 Softrock All Rights Reserved Page 56 of 75 AutoSlope Installation Manual 5.12.2 Applications 5.12.2.1 Point to Multipoint Data Acquisition and Control Intelligent built in Modem can interface with virtually any standard Data logger, PLC, computer; i.e. any RS232 device. In built buffers handshake with Input/output devices at data speeds up to 115,000 bps and transparently move data to the other end. 5.12.2.2 Linking of local and remote RS232 serial ports Depending upon the geography and terrain, the Radio modems can communicate reliably over considerable distances. Good line of site paths from mountain top to hill can extend useful range up to 30 km. The RFI 9256 can be used as a repeater to extend range indefinitely. Parallel digital I/O and expansion 8 parallel digital I/O in addition to the standard RS232 serial port, are provided in the RFI 9256 model Radio modems. Expansion radio interface modules (RIM) permit very large SCADA capability. For more details regarding interface parameters, contact the manufacturer. Diagnostics functions The second RS 232 port can be used as a diagnostics channel for monitoring network performance, and for additional data routing if required. 5.12.3 Specifications -Model RFI 9526 Series 3 MODEL RFI 9256 Series 3 5.12.3.1 Physical Dimensions: Weight: Construction: 190mm L x 80mm W x 35mm H 260 grams Alodined aluminium chassis and cover, with integrated display 5.12.3.2 General Operating voltage: Operating current: Standby mode: Transmit mode: Operating temperature range: Operating Humidity: Parameter and mode settings: 9 to 16VDC negative ground 150 mA (1Watt) Averages 350mA -10 to +60 deg C rangeUp to 95% non-condensing RH @ 50 deg C In built software 5.12.3.3 Transmitter Output Power: Spurious emissions: Output protection: 1mW to 1 Watt software selectable <-60 dBc Transmitter is fully protected for any load @ full power @ 60 deg C October 2011, Rev. 1.1 Copyright © 2011 Softrock All Rights Reserved Page 57 of 75 AutoSlope Installation Manual 5.12.3.4 Receiver Sensitivity: End to end performance: Frequency range: <-108dBm for BER 1 part in 10^-4 Better than 1 in 10^-6 BER for S/N 20 dB or better 915–928 MHz (Australia) 902–928 MHz (FCC) 921929 MHz (NZ) -110 to -60 dBm in 5 dB steps RSSI display range: 5.12.3.4 Data System RS 232 handshaking: Protocol modes: Hardware/ software/ none software selectable All common variants / PLCs supported including point / point, point / multipoint and Hayes modes 110 to 115,000 bps, software selectable all modes Interface data speed: 5.12.4 Intelligent Radio Model RFI 045, 195, 595 The RFI 045, 195, 595 series are low speed radio modems capable of functioning in hostile RF environments with data throughput of up to 2400 bps*. Intelligent integrated software allows many different data configurations. 5.12.4.1 Features •Economical •Built in Path testing •Air data speeds 2400 bps •Up to 50 Kms in one Hop * •User friendly intuitive software •Interface speeds 1200 to 9600 bps •Programmable I/O for SCADA applications •Front panel indicators for Tx/Rx, power, Carrier •RF power 100mW to 2.5 Watts software selectable •Can be installed and commissioned without test equipment. October 2011, Rev. 1.1 Copyright © 2011 Softrock All Rights Reserved Page 58 of 75 AutoSlope Installation Manual 5.12.4.2 Applications Point to Multipoint Data Acquisition and Control Intelligent built in Modem can interface with virtually any standard Data logger, PLC, computer; i.e. any RS232 device. In built buffers handshake with Input/output devices at data speeds up to 38400 bps and transparently move data to the other end. Linking of local and remote RS232 serial ports. Depending upon the geography and terrain, the Radio modems can communicate reliably over considerable distances. Good line of site paths from mountain top to hill can extend useful range beyond 100 km. In any event, repeater facility permits extension of useful range when clear line-ofsite paths are not available. In built calibration and test parameters permit system performance evaluation without visiting the remote site. Features such as a Terminal program, signal strength indicators, Loop back functions etc, are all provided free of charge, as part of every Radio Modem’s extensive software suite. NOTE: Normally software parameters are factory set and require no intervention from the operator, unless parameter changes are required to customize the device for specific requirements. October 2011, Rev. 1.1 Copyright © 2011 Softrock All Rights Reserved Page 59 of 75 AutoSlope Installation Manual 5.13.0 Specifications Model RFI 045, 195, 595 Specifications may be frequency or device dependent 5.13.1 General Operating voltage: Operating current: Solar ‘sleep’ mode: Standby mode: Transmit mode: Operating temperature range: Operating Humidity range: Parameter and mode settings: Channel selection: Channel spacing: Air Data Rate: RFI 045: RFI 195: RFI 595: Antenna port: Connector: Dimensions: Weight: 10.8 to 17VDC negative ground. Average 25 mA. 100 mA (2.5Watts) 850mA. -10 to +65 DegC. Up to 95% non-condensing RH @ 50 DegC. In built software Windows™ based. Hardware and software selectable 25 KHz (25 KHz, 12.5 KHz, 6.25 rater) 1200 bps. 1200 bps 2400 bps BNC D type standard 25 pin including power. 170mm L x 110mm W x 50mm H 260 grams 5.13.2 Transmitter Output Power: RFI 045: RFI 195: RFI 595: Modulation: Deviation: Spurious emissions: Duty cycle: Output protection: 100mW to 1.0 Watts software selectable. 100mW to 2.0 Watts software selectable. 100mW to 2.5 Watts software selectable. FFSK 2 level with packet coding. +/- 5 KHz 25 Khz channelling, otherwise +/2.5 Khz. <-30 dBm 100% @ 60 degrees C Transmitter is fully protected for any load @ full pwr @ 60 deg C. October 2011, Rev. 1.1 Copyright © 2011 Softrock All Rights Reserved Page 60 of 75 AutoSlope Installation Manual 5.13.3 Receiver Sensitivity: RFI 045: RFI 195: RFI 595: <-110dBm for 12 dB SINAD <-116dBm for 12 dB SINAD <-118dBm for 12 dB SINAD Frequency range: RFI 045: RFI 195: Fixed ISM 40.695 MHz. All VHF channels from 140 to 173 MHz (10MHz band). All UHF channels from 390 to 512 MHz. (10MHz Band) -130 to –60 dBm accurate to +/- 1 dB RFI 595: RSSI output: 5.13.4 Data System End to end performance: Error detection: RS 232 handshaking: Interface data speed: I/O: Character size: Better than 1 in 10^-6 BER for 20 dB SINAD CRC + FEC encoding under software control. Hardware/ software/ none software selectable 1200 to 9600 bps, software selectable. Asynchronous RS 232C 8 bits plus no parity and 1 stop bit. 5.13.5 Configuring RFI595F for Geodimeter ATS This radio is generally used from the repeater to the instrument. It can be programmed on the fly by the ATS control software to select a certain radio by its Rx address. So each 595F at each instrument usually has a Rx address of 1, 2, 3, 4 etc which corresponds to instrument number 1,2, 3, 4 etc. Global settings are shown here and details (how to actually set the changes) are given below. Suggested frequency here is 470.025. Be aware of other devices on site (see below). RFI 595F Repeater Radio (465-475) 470.025 RFI 595F No.1 Radio RFI 595F No. 2 Radio RFI 595F No 3 Radio (465-475) 470.025 (465-475) 470.025 (465-475) 470.025 Rx Frequency (465-475) 470.025 (465-475) 470.025 (465-475) 470.025 (465-475) 470.025 Tx Address 1 10 10 10 Rx Address 10 1 2 3 Tx Frequency To configure the RFI595F you need the RFI universal device programmer (Fisetup.exe). Start the program. It should look like this: October 2011, Rev. 1.1 Copyright © 2011 Softrock All Rights Reserved Page 61 of 75 AutoSlope Installation Manual Press the Model button and select the correct model – 595F October 2011, Rev. 1.1 Copyright © 2011 Softrock All Rights Reserved Page 62 of 75 AutoSlope Installation Manual Now press Local Mode button. Press YES and the local mode will be set on the radio. Note that ALL the lights will flash together when in local mode. Local mode is when the radio can be programmed. Now press the Read button from the main window. Hit YES. Note that the radio information will now appear at the top of the window. October 2011, Rev. 1.1 Copyright © 2011 Softrock All Rights Reserved Page 63 of 75 AutoSlope Installation Manual Now we will set Transmit frequencies. Hit the Tx Freq button and we will enter the frequency we wish to use. Note that: Geodimeter one-man system uses 472.0373, 472.0625, 472.0875 Trimble GPS uses ~ 467.025 You can enter a range from 465.0 to 475.0 We will use 470.025 mhz for Tx and Rx. From the main window select Rx Freq and type 470.025 (or your choice) October 2011, Rev. 1.1 Copyright © 2011 Softrock All Rights Reserved Page 64 of 75 AutoSlope Installation Manual Now select Modem button from main window. Choose the following: 595F at Repeater: o Tx address to 1 (this will be changed by ATS program when choosing each instrument) o Rx address to 10 595F at Instrument No. 1 o Tx address to 10 o Rx address to 1 595F at Instrument No. 2 o Tx address to 10 o Rx address to 2 595F at Instrument No. 3 o Tx address to 10 o Rx address to 3 That is it. Now we write it to the chip in the radio. Use the update button from the main window. October 2011, Rev. 1.1 Copyright © 2011 Softrock All Rights Reserved Page 65 of 75 AutoSlope Installation Manual When finished, you should get the following window come up. Sometimes, if you are a little slow in the whole process, it may not update the chip. So, it is always a good idea to cut the power (pull the plug out of the radio), plug it back in, and just go through the process again and check that the data has indeed been saved. Do this until you become familiar with the radio and this program. October 2011, Rev. 1.1 Copyright © 2011 Softrock All Rights Reserved Page 66 of 75 AutoSlope Installation Manual 5.13.6 Configuring RFI9256 for Geodimeter ATS Start Hyper-terminal on PC and configure port to 19200,N,8,1. Use the smaller AUX cable out of the radio. Hold little black button down until light rotates to “Config” light and release. After a few seconds, a menu (as below) should appear. Master Radio (Base) Slave Radio (Repeater or ATS) Set Unit as Master Slave Connection Point to Point Point to Point Network Address 0-63 (same as slave) 0-63 (same as master) Hopping Pattern 0-31 (same as slave) 0-31 (same as master) Serial Port ConfigMain Port Baud=9600 Baud=9600 Note: The above table shows the items that need to be set when configuring new radios. We will firstly configure the Base Radio. This is the main menu below: Press “R” to go to the Radio Configuration menu. *** MiROS MAIN MENU (Version 2.0) *** RFI-9256 Version 1.24 Rev.B Unit Name: Unit is a: SLAVE Serial No: 111081CF1980 Manufactured Date: 09/05/2002 (R) Radio Configuration Menu (L) Protocol Port Selection (S) Serial Port Configuration Menu (M) Modem and I/O Configuration Menu (P) Radio Personality Menu (D) Diagnostics Menu (Esc) To Exit Menu Enter Choice: R October 2011, Rev. 1.1 Copyright © 2011 Softrock All Rights Reserved Page 67 of 75 AutoSlope Installation Manual Below, we will press M to set the radio as MASTER. *** Radio Configuration Menu *** Unit is a: MASTER Network Address = 32 Rx Address = 20 Hopping Pattern = 0 Point to Multipoint Dialup Connection (M) Set unit as Master (S) Set unit as Slave (N) Set Network address (L) Set Local Rx address (P) Set ports as Point to Point Direct (D) Set ports as Point to Multipoint Dialup (R) Set ports as Dialup Repeater (1) Special Controls Menu (2) Link Control Menu (3) Radio Characteristics Menu (F) Restore Factory defaults (Esc) Previous Menu Enter Choice: M October 2011, Rev. 1.1 Copyright © 2011 Softrock All Rights Reserved Page 68 of 75 AutoSlope Installation Manual We will now set the radio as Point to Point by pressing P and setting the remote Tx address to the default 20. *** Radio Configuration Menu *** Unit is a: MASTER Network Address = 32 Rx Address = 20 Hopping Pattern = 0 Point to Multipoint Dialup Connection (M) Set unit as Master (S) Set unit as Slave (N) Set Network address (L) Set Local Rx address (P) Set ports as Point to Point Direct (D) Set ports as Point to Multipoint Dialup (R) Set ports as Dialup Repeater (1) Special Controls Menu (2) Link Control Menu (3) Radio Characteristics Menu (F) Restore Factory defaults (Esc) Previous Menu Enter Choice: P Point to Point requires a Tx Address Enter Remote Tx Address (0-9999): 20 October 2011, Rev. 1.1 Copyright © 2011 Softrock All Rights Reserved Page 69 of 75 AutoSlope Installation Manual Now we will press N to set the Network address. This should be the same address as we will set into the SLAVE radio at the repeater. This address must be different to other systems using the same radio types on the same site. In this case we are setting 18 as the network address. Also, we can press P to set the radio to Point to Point connection. Unit is a: MASTER Network Address = 32 Rx Address = 20 Hopping Pattern = 0 Point to Point Connection (M) Set unit as Master (S) Set unit as Slave (N) Set Network address (L) Set Local Rx address (P) Set ports as Point to Point Direct (D) Set ports as Point to Multipoint Dialup (R) Set ports as Dialup Repeater (1) Special Controls Menu (2) Link Control Menu (3) Radio Characteristics Menu (F) Restore Factory defaults (Esc) Previous Enter Choice: N Enter Network Address (0-63): 18 October 2011, Rev. 1.1 Copyright © 2011 Softrock All Rights Reserved Page 70 of 75 AutoSlope Installation Manual Now we need to go to the Radio Characteristics menu. Press 3 on the keyboard. *** Radio Configuration Menu *** Unit is a: MASTER Network Address = 18 Rx Address = 20 Hopping Pattern = 0 Point to Point Connection (M) Set unit as Master (S) Set unit as Slave (N) Set Network address (L) Set Local Rx address (P) Set ports as Point to Point Direct (D) Set ports as Point to Multipoint Dialup (R) Set ports as Dialup Repeater (1) Special Controls Menu (2) Link Control Menu (3) Radio Characteristics Me (F) Restore Factory defaults (Esc) Previous Menu Enter Choice: 3 October 2011, Rev. 1.1 Copyright © 2011 Softrock All Rights Reserved Page 71 of 75 AutoSlope Installation Manual And from the Radio Characteristics Menu, press H for Hopping Pattern. We are setting the Hopping Pattern here to 22. The hopping pattern must also be the same as the slave radio, but different from other systems on the same site. *** Radio Characteristics Menu *** Hopping Pattern = 0 Tx Power Level = 20 dBm RSSI trigger level = -110 Frame Time = 20 milliseconds Max Tx bytes per frame = 113 Directional Bias is Disabled (H) Hopping Pattern (P) Tx Power Menu (R) RSSI trigger level (F) Frame Time Menu (B) Directional Bias Menu (Esc) Previous Menu Enter Choice: H Enter Hopping Pattern (0-31): 22 October 2011, Rev. 1.1 Copyright © 2011 Softrock All Rights Reserved Page 72 of 75 AutoSlope Installation Manual Use ESC (twice) to return to the Main Menu. From the main menu, choose S for Serial Port Configuration Menu. *** MiROS MAIN MENU (Version 2.0) *** RFI-9256 Version 1.24 Rev.B Unit Name: Unit is a: MASTER Serial No: 111081CF1980 Manufactured Date: 09/05/2002 (R) Radio Configuration Menu (L) Protocol Port Selection (S) Serial Port Configuration Menu (M) Modem and I/O Configuration Menu (P) Radio Personality Menu (D) Diagnostics Menu (Esc) To Exit Menu Enter Choice: S Then choose M to configure the Main Port. *** Port Selection Main Port: Main Port: Aux Port: Aux Port: 19200 Baud, No Parity, 8 Data, 1 Stop, No Flow Packet Timers: Output = Disabled, Input = Disabled 19200 Baud, No Parity, 8 Data, 1 Stop, No Flow Packet Timers: Output = Disabled, Input = Disabled (M) Main Port (A) Aux Port (Esc) Previous Menu Enter Choice: M October 2011, Rev. 1.1 Copyright © 2011 Softrock All Rights Reserved Page 73 of 75 AutoSlope Installation Manual Choose B to change the baud rate to 9600. Note the Aux port baud rate is still at 19200. *** Serial Port Configuration Menu *** Main Port: 19200 Baud, No Parity, 8 Data, 1 Stop, No Flow Main Port: Packet Timers: Output = Disabled, Input = Disabled Main Port: Rx Buffer Limit = 3072 (B) Baud Rate Menu (F) Flow Control Menu (N) No Parity (E) Even Parity (O) Odd Parity (1) One Stop Bit (2) Two Stop Bits (7) Seven Bit Data (8) Eight Bit Data (A) Advanced Functions Menu (D) Set to Defaults (Esc) Previous Menu Enter Choice: B October 2011, Rev. 1.1 Copyright © 2011 Softrock All Rights Reserved Page 74 of 75 AutoSlope Installation Manual Appendix A Diagrams Diagram 1 – Typical Monitoring System Setup ................................................................................................... 6 Diagram 2 – Survey Station................................................................................................................................. 8 Diagram 3 – Reference Station ......................................................................................................................... 10 Diagram 4 – Monitor Prism Spikes Design and Construction ........................................................................... 11 Diagram 5 – Shelters for Survey Station Plan View .......................................................................................... 12 Diagram 6 – Shelters for Survey Stations II ....................................................................................................... 13 Diagram 7 – Monitor Prism Spikes – Design and Construction ........................................................................ 15 Diagram 8 – Monitor Prism Design and Construction ...................................................................................... 16 Diagram 10 – Weather Station ........................................................................................................................ 19 Diagram 11 – Communications......................................................................................................................... 20 Diagram 12 – Convenient Location for Antennas ............................................................................................. 20 Diagram 13 – Telescopic Repeater Mast .......................................................................................................... 21 Diagram 14 – Telescopic Repeater Mast II ....................................................................................................... 22 Diagram 15 – RMU Manager ............................................................................................................................ 27 Diagram 16 – Registration ................................................................................................................................ 28 Diagram 17 – SMS Alerts - Preferences ............................................................................................................ 29 Diagram 18 SMS Alerts – Advanced Configuration .......................................................................................... 29 Diagram 19 – Typical Softrock Solutions Installation........................................................................................ 36 Diagram 21 – Transparent Mode ...................................................................................................................... 46 Diagram 22 – Controlled Mode ........................................................................................................................ 47 Diagram 23 – RF Radio Modems ....................................................................................................................... 51 Diagram 24 – LAN Extension ............................................................................................................................. 52 Diagram 25 – Link Extension ............................................................................................................................. 53 Diagram 26 – Repeater Application .................................................................................................................. 54 Diagram 27 – Repeater Network Application ................................................................................................... 55 October 2011, Rev. 1.1 Copyright © 2011 Softrock All Rights Reserved Page 75 of 75