1
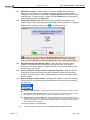
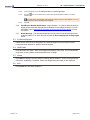
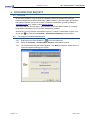
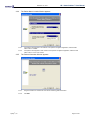
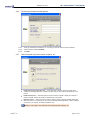
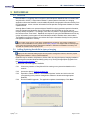
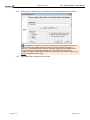
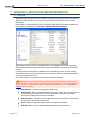
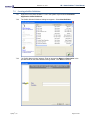
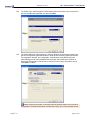
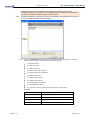
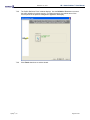
NAME GRABBER™
Apteryx Inc.
313 S. High St. Suite 200
Akron, OH 44308
330-376-0889 voice
330-376-0788 fax
[email protected]
www.apteryx.com
NAME GRABBER™
User Manual
Abstract
Abstract
Abstract
This document contains work instructions related to utilizing the
integration application, Name Grabber™ Version 2.1 Build 10 or above.
Copyright © 2004-2012 Apteryx, Inc. Apteryx® is a registered trademark of Apteryx, Inc.
All rights reserved. All other trademarks and tradenames are the property of their respective owners.
Controlled Document: Printed or downloaded copies are considered uncontrolled and are for reference only.
QMS_WI_TS_NameGrabber_UserManual
Apteryx®, Inc.
Page 1 of 25
WI – Name Grabber™ User Manual
November 12, 2012
REVISION HISTORY
Revision
Level
1.0
Apteryx®, Inc.
Revision
Date
07/02/2012
Description of
Revision
Initial Release
Effective
Date
11/12/2012
Revision
Author
(Initials)
SN
Approver(s)
(Initials)
PW
Doc
Change
Task#
173
Page 2 of 25
November 12, 2012
WI – Name Grabber™ User Manual
TABLE OF CONTENTS
REVISION HISTORY .................................................................................................................................... 2
TABLE OF CONTENTS ................................................................................................................................ 3
1
INTRODUCTION ................................................................................................................................... 4
1.1
Overview ....................................................................................................................................... 4
1.2
Invoking Name Grabber™ ............................................................................................................ 4
2
INITIAL SETUP ..................................................................................................................................... 5
2.1
Overview ....................................................................................................................................... 5
2.2
Start Automatically ........................................................................................................................ 5
3
PREFERENCES ................................................................................................................................... 6
3.1
Overview ....................................................................................................................................... 6
3.2
Options .......................................................................................................................................... 6
3.3
Technical Support ......................................................................................................................... 8
3.4
Web Links...................................................................................................................................... 8
3.5
About ............................................................................................................................................. 8
3.6
Exit ................................................................................................................................................ 8
4
CUSTOMIZATION REQUEST .............................................................................................................. 9
4.1
Overview ....................................................................................................................................... 9
4.2
Creating a Customization Request ............................................................................................... 9
5
DATA DRILLS ..................................................................................................................................... 13
5.1
Overview ..................................................................................................................................... 13
5.2
Adding/Updating DataDrills in Apteryx Imaging .......................................................................... 13
5.3
Configuring DataDrill Options ...................................................................................................... 14
6
USING NAME GRABBER™ TO BRIDGE PATIENTS ....................................................................... 16
6.1
Overview ..................................................................................................................................... 16
6.2
Bridging a Patient from the PM to the Apteryx Imaging .............................................................. 16
6.3
How Name Grabber™ And DataDrills Work Together................................................................ 16
7
APPENDIX A: APPLICATION SNIFFER DEFINITIONS .................................................................... 17
7.1
Overview ..................................................................................................................................... 17
7.2
Creating a Sniffer Definition ........................................................................................................ 18
8
APPENDIX B: OPERABILITY IN REMOTE ACCESS ENVIRONMENTS .......................................... 23
8.1
Overview ..................................................................................................................................... 23
8.2
Basic Setup ................................................................................................................................. 23
8.3
Using Name Grabber™ in a Remote Desktop Environment ...................................................... 24
Apteryx®, Inc.
Page 3 of 25
November 12, 2012
WI – Name Grabber™ User Manual
1 INTRODUCTION
1.1 Overview
Name Grabber™ is a bridging application located in the Windows System Tray that understands
how to bridge patients from a Practice Management (PM) application to Apteryx Imaging
(XrayVision® or XVLite™). Name Grabber™ works with most third-party PM applications.
For example, if you have patient "John Doe" open in your PM application and then click on the
icon in the system tray: Name Grabber™ will automatically open that patient in Apteryx Imaging.
Using Name Grabber™, the cumbersome and time consuming practice of manually starting
applications, finding a specific patient and then opening that patient is automated with a single
click of the mouse.
1.2 Invoking Name Grabber™
The Name Grabber™ application is invoked by single-clicking on the
icon in the system tray
with your left mouse button. Once this icon is clicked, Name Grabber™ will search for any open
patients, and if found Name Grabber™ will then open that patient in XrayVision® or XVLite™.
Apteryx®, Inc.
Page 4 of 25
November 12, 2012
WI – Name Grabber™ User Manual
2 INITIAL SETUP
2.1 Overview
After installation, Name Grabber™ simply has to be run, which places the Name Grabber™ icon
in the system tray, indicating the application is ready to use.
Name Grabber™ 2.1 build 10 adds the ability to bridge patient information through Remote Access
Protocol (RDP) sessions. Refer to Appendix B: Operability in a Remote Desktop Environment for additional
information including basic setup and use information.
2.2 Start Automatically
When this option is enabled, Name Grabber™ will automatically be started when the computer
starts. If this option is disabled, then the Name Grabber™ application will have to be manually
started by the user when they want to use it.
The first time the program is launched, users will be prompted to enable or disable this option.
To add Name Grabber™ to the Startup Group:
2.2.1
Double-click on NameGrabber.exe
2.2.2
The ‘Start Name Grabber Automatically?’ window appears
2.2.3
To ensure that Name Grabber™ starts automatically, click Yes Start Automatically!
2.2.4
Name Grabber™ will now start automatically each time Windows starts.
This option can also be accessed by right-clicking on the Name Grabber™ icon in the system tray,
selecting Options and then enabling or disabling the Start automatically when Windows starts
option.
Apteryx®, Inc.
Page 5 of 25
November 12, 2012
WI – Name Grabber™ User Manual
3 PREFERENCES
3.1 Overview
The Name Grabber™ menu can be accessed by right-clicking on the Name Grabber™ icon
located in the system tray. The Name Grabber™ menu, seen below, provides several tools and
utilities that allow users to manually launch patients, manage launched applications, edit
application sniffer definitions, as well as modify Name Grabber™ invocation settings.
3.2 Options
Name Grabber™ Options controls how the interface and application perform.
Apteryx®, Inc.
Page 6 of 25
November 12, 2012
WI – Name Grabber™ User Manual
3.2.1
Application to Launch – Name Grabber™ is typically installed when XrayVision is
installed and resides in the same installation directory. By default, Name Grabber is
configured to run XrayVision’s executable file XVAssistant.exe that resides in the same
install directory. To launch XVLite™ instead, select the Browse button and navigate to
the install directory and select XVLite.exe.
3.2.2
Verify Names Before launch - When this option is enabled, Name Grabber™ will
display a Verify Patient dialog displaying the extracted patient's information. This dialog is
displayed when the user left clicks on the
icon in the system tray.
Depending on your office's setup, the Verify Names Before Launch option may violate
HIPAA regulations regarding the display of sensitive patient information. Before enabling this
option, you should determine if the HIPAA regulations pertain to your particular implementation.
3.2.3
Start Automatically when Windows Starts - When this option is enabled, Name
Grabber™ will automatically be started when the computer starts. If this option is
disabled, then the Name Grabber™ application will have to be manually started by the
user when they want to use it.
3.2.4
Launch the patient’s Image Bar when bridging to XrayVision – When this option is
enabled and a patient that already has images is bridged, the patient’s record will be
opened in XrayVision and the floating image bar feature will be invoked, display all the
patient’s images.
3.2.5
Display floating invocation button - A floating Name Grabber™ icon can be enabled,
allowing users to click and bridge using a floating button rather than the icon located in
the system tray.
Display as standard window - This option allows a floating button to be placed on the desktop. It will no
Keep the button on top of other windows - This option functions the same as the one listed above, but
the floating icon will be kept above all other windows on the desktop so it does not get ‘lost’.
Marry the button to a specific application - This option allows the Name Grabber™ floating icon to be
married to another window. For example, the floating Name Grabber™ icon can be married to the practice
management application so any time the practice management window is displayed, the button will also
appear. (See below for instructions.)
To marrying a button to an application:
3.2.5.1
Apteryx®, Inc.
Access Name Grabber™ Options and select the Display floating invocation button option.
Page 7 of 25
November 12, 2012
WI – Name Grabber™ User Manual
3.2.5.2
From the dropdown menu, select Marry the button to a specific application.
3.2.5.3
Drag the
married to.
icon over the title bar of the window which the floating Name Grabber™ icon will be
This action defines the application window that will be used to marry the Name Grabber™ icon. Any
time this window is opened, the floating icon will appear.
3.2.5.4
Click OK.
3.2.6
Send/Receive Remote Notifications – Name Grabber™ 2.1 build 10 adds the ability to
bridge patient information through Remote Desktop Protocol (RDP) sessions. For more
information, refer to Appendix B: Operability in Remote Access Environments for more
information..
3.2.7
Reset Warnings - The reset warnings button may be used to reset all warnings issued
by Name Grabber™ for which the user selected the Do not display this message again
option.
3.3 Technical Support
If answers are not found in the help guide, the Technical Support menu provides the phone
number and email address for Apteryx Technical Support.
3.4 Web Links
Using the Web Links option, users can navigate to the Apteryx home page, or to our downloads
page where all new updates can be downloaded free of charge.
3.5 About
Click About to display a scrolling window containing Name Grabber™ version and build number
information. Additionally, Trademark, Patent, and Registration information is also displayed.
3.6 Exit
Clicking Exit will close Name Grabber™.
Apteryx®, Inc.
Page 8 of 25
November 12, 2012
WI – Name Grabber™ User Manual
4 CUSTOMIZATION REQUEST
4.1 Overview
At first, Name Grabber™ may not have the capability to detect the patient name from your
practice management software automatically. If Name Grabber™ does not support your practice
management software, and you do not wish to make the customization yourself by adding an
Application Sniffer entry, please contact Apteryx Support.
Our support staff can remotely login to your computer, and modify Name Grabber™ to properly
bridge patient information from your practice management software.
Alternatively, you may submit a customization request. To submit a customization request, rightclick on the
icon, and select Customize > Customization Request the menu options.
4.2
Creating a Customization Request
4.2.1
Right-click on the Name Grabber™ (
4.2.2
Select the Customize > Customization Request Customization Request.
4.2.3
The Customization Request window appears. Click Next if the Apteryx website does not
contain an update containing your request.
Apteryx®, Inc.
) icon in the system tray.
Page 9 of 25
November 12, 2012
4.2.4
The Patient Name Location Window appears.
4.2.4.1
If the patient’s name appears in the Title Bar of the practice management application, select the radio
button under ‘In a titlebar’.
4.2.4.2
If the patient’s name appears in other locations in the practice management application, select the radio
button under ‘In one or more controls’.
4.2.5
Apteryx®, Inc.
WI – Name Grabber™ User Manual
The ‘Patient Information Window’ appears.
4.2.5.1
Drag the crosshair icon onto title bar of the window containing patient information.
4.2.5.2
Click Next.
Page 10 of 25
November 12, 2012
4.2.6
WI – Name Grabber™ User Manual
The Contact Information window appears.
4.2.6.1
Enter your information so that Apteryx, Inc. can notify you when the request has been completed.
4.2.6.2
Select a response method (Fax/Email).
4.2.6.3
Click Next.
4.2.7
Select a method to send the request to Apteryx, Inc.
Fax/Print the request and screen shot … - Select this option to send the request to a printer with a
screenshot of the target application. If printed to a printer, Apteryx's fax number is printed directly on the
printout.
Fax/Print the request … - Select this option to send the request to a printer or directly to a fax driver. If
printed to a printer, Apteryx's fax number is printed directly on the printout.
Email the request … - Select this option to send the request to Apteryx via email. Emailing requires that
MAPI is set up on your computer (if you use one of the Microsoft Outlook applications, it will be). If MAPI is
not set up on your computer, you will be prompted to do so.
Sending a cover page is not necessary when faxing requests to Apteryx, Inc.
Apteryx®, Inc.
Page 11 of 25
November 12, 2012
4.2.8
Apteryx®, Inc.
WI – Name Grabber™ User Manual
Click Finish to complete the customization request.
Page 12 of 25
November 12, 2012
WI – Name Grabber™ User Manual
5 DATA DRILLS
5.1 Overview
Name Grabber™ is typically used in conjuction with PM-Specific DataDrills that are installed with
XrayVision® or XVLite™. When Name Grabber™ passes patient information, the imaging
application utilizes the DataDrill to extract additional patient demographic information directly from
the PM database. It then uses the information from the practice management database to create
a patient record.
Although Name Grabber can operate without a DataDrill to simply grab basic patient information,
(such as firstname and lastname) from a PM interface, this information on its own may not
uniquely identify the patient. For example, more than one patient in a PM application may share
the common name “John Smith”. DataDrills are required to query the PM database and fill in any
unique information (such as patient ID and birthdate) that Name Grabber alone cannot obtain.
The DataDrill in XrayVision/XVLite can retrieve this unique information directly from the practice
management's database or memory.
On occasion, there may be a case where a DataDrill does not exist for your practice management
software. Should a DataDrill not exist, please contact Apteryx Support. Our support staff can remotely login
to the system and review the practice management software to determine if a DataDrill is necessary and
what files are needed in order to produce one.
5.2 Adding/Updating DataDrills in Apteryx Imaging
Apteryx is also continually adding support for new practice management versions, which may require
updating Name Grabber™ and any relevant DataDrills.
DataDrills may be added to XrayVision or XVLite either by using the Apteryx Imaging installation
CD (through the standard Windows Modify option) or by running the appropriate upgrader from
the Apteryx Product Updates site.
To download and install/upgrade DataDrills:
5.2.1
Close every instance of XrayVision/XVLite running on any server/workstation on the
network.
5.2.2
Access the Apteryx Product Updates Site.
5.2.3
Expand the ‘Name Grabber™ and DataDrill Updates’ section and click on the link
corresponding to the practice management software to download the appropriate
DataDrill.
5.2.4
Run the DataDrill upgrader. The application updater wizard displays. Click Next.
Apteryx®, Inc.
Page 13 of 25
November 12, 2012
WI – Name Grabber™ User Manual
If XrayVision/XVLite is still running, a warning message will appear indicating that the
application MUST be closed before the upgrader can be run.
5.2.5
The DataDrill Upgrader installs or updates all the necessary DataDrill and support files for
XrayVision/XVLite.
5.2.6
Click Finish.
5.3 Configuring DataDrill Options
DataDrill options allow users to specify where databases can be located on your network, but
also various options such as database caching that can be used to improve the performance of
data retrieval.
To access and configuring DataDrill Options in XrayVision or XVLite:
5.3.1
Launch the imaging application (XrayVision/XVLite).
5.3.2
XrayVision®: Select Database > DataDrills > DataDrill Options.
XVLite™: Select Preferences > Database > DataDrill Options.
5.3.3
The ‘Data Drills’ window appears.
The DataDrill options display all the DataDrills currently installed with XrayVision/XVLite and
whether or not they point to a valid practice management database.
Apteryx®, Inc.
Page 14 of 25
November 12, 2012
5.3.4
WI – Name Grabber™ User Manual
Double-click on the Data Drill to be modified. The Data Drill Options window appears.
Each DataDrill has a different set of options depending on what type of database each one
utilizes as well as what additional options are offered by the target practice management
application. Some DataDrills require that each workstation specify a Windows ODBC driver to
connect to the practice management database. This is typically the case if the practice
management software utilizes a database engine (e.g. SQL, MS Access). Please contact Apteryx
Support for assistance with this setup.
5.3.5
Apteryx®, Inc.
Click OK after all modifications are complete.
Page 15 of 25
November 12, 2012
WI – Name Grabber™ User Manual
6 USING NAME GRABBER™ TO BRIDGE PATIENTS
6.1 Overview
Name Grabber™ and DataDrills are used in tandem to grab patient information from a practice
management application and automatically open or create the patient in a third-party imaging
program.
Name Grabber™ understands how to extract what patient is currently open in a third-party
practice management application using Sniffer Definitions.
When launched on each workstation in a dental practice, it simply resides as an icon in the
system tray (typically in the lower right-hand corner of the computer screen).
6.2 Bridging a Patient from the PM to the Apteryx Imaging
To automatically open or create a corresponding patient record in XrayVision®/XVLite™:
6.2.1
Open the patient file in the practice management application and view the window
defined in a matching sniffer definition (typically a patient information or patient chart
screen).
6.2.2
Click on the Name Grabber™ icon in the system tray.
6.2.3
Name Grabber™ proceeds to extract patient name (and any additional identification and
demographic information, if available) from the PM application, and creates a new or
opens an existing patient record in XrayVision®/XVLite™.
Patient identification and demographic information is typically extracted from the practice management
database using a DataDrill. DataDrills are the main work horses when it comes to extracting patient
information from practice management applications. DataDrills are the components that actually
understand how to burrow into an application's database and extract the necessary patient information.
Unlike Name Grabber™, DataDrills operate behind the scene unbeknownst to the user. Refer to How Name
Grabber™ And DataDrills Work Together for detailed information.
6.3 How Name Grabber™ And DataDrills Work Together
6.3.1
The user clicks on the Name Grabber™ icon in the system tray.
6.3.2
Name Grabber™ checks to see which application the user is currently using and extracts
as much patient information from the open application (i.e. the patient's first name and
last name).
6.3.3
Name Grabber™ passes the patient name to the appropriate DataDrill installed to have it
find out the patient's SSN, ID#, DOB and sex.
6.3.4
The DataDrill mounts the PM application’s database and extracts the information and
then passes it to the XrayVision®/XVLite™, automatically launching it if is not already
running.
Apteryx®, Inc.
Page 16 of 25
November 12, 2012
WI – Name Grabber™ User Manual
7 APPENDIX A: APPLICATION SNIFFER DEFINITIONS
7.1 Overview
Application sniffer definitions let Name Grabber™ determine exactly which practice management
applications it should search for when trying to determine which patient the user is currently
working with.
Name Grabber™ sniffer definitions can be accessed by right-clicking on the Name Grabber icon
in the system tray and selecting Customize > Application Sniffer Definitions.
Application are listed by practice management name. Each application commonly has multiple
sniffer definitions that correspond with different versions and pages in the practice management
interface.
In general, sniffer entries identify an application and child window to search for when tracking
down patient names as well as the format that is to be used to extract out the patient information
once the window has been found.
The ‘Sniffer Definitions’ window provides users the following functionality:
Warning: Apteryx recommends that you do not use these wizards directly unless you are
on-line with Apteryx technical support or have had training from Apteryx in generating Application
Sniffer definitions. To have Apteryx create a custom sniffer definition for you, a Customization
Request may be submitted.
New Definition - Creates a new application sniffer entry.
Edit Definition - Edits a selected application sniffer entry. Entries are selected by clicking
on them with the left mouse button. For more information, please refer to the Sniffer
Window Entry Dialog section of this documentation.
Delete Definition - Deletes the selected application sniffer entry. Entries are selected by
clicking on them with the left mouse button.
Reset - Resets the application sniffer entries to the application defaults.
Definition Test - Tests the selected definition against all open applications.
Apteryx®, Inc.
Page 17 of 25
November 12, 2012
7.2
WI – Name Grabber™ User Manual
Creating a Sniffer Definition
7.2.1
Right-click on the Name Grabber™ icon in the system tray and select Customize >
Application Sniffer Definitions.
7.2.2
The ‘Sniffer Window Definitions’ dialog box appears. Select New Definition.
7.2.3
The ‘Sniffer Name window’ appears. Enter an appropriate Name and Description in the
provided fields for the sniffer definition being created. Click Next to continue.
Apteryx®, Inc.
Page 18 of 25
November 12, 2012
WI – Name Grabber™ User Manual
7.2.4
The ‘Sniffer Type’ window appears. Define where patient information can be found in the
practice management application and then click Next.
7.2.5
The ‘Sniffer Definition’ window appears. Drag the Window pull crosshairs overtop of the
practice management application window or child window containing patient information.
The ‘Application Window’ and, if applicable, ‘Child Window’ fields (Name and Class
Search Strings) will be auto-populated with information that assists Name Grabber in
identify the PM application and window to search for when trying to find patient names.
Click Next to continue.
Patient and practice information is sometimes extracted by Name Grabber™ and included in
the Application and Child Window Name and Class search string. This unique information should
Apteryx®, Inc.
Page 19 of 25
November 12, 2012
WI – Name Grabber™ User Manual
be removed, leaving only the Application name (if present) in the title bar of the practice
management software. For example, given an application title bar of "Dentrix Chart - Bob Smith",
the search string should be edited to specify just "Dentrix Chart "
7.2.6
If patient information is specified to be found in the practice management title bar (refer to
7.2.4), the ‘Sniffer Extraction’ window displays.
7.2.6.1
Click on the Add Definition button and specify the extraction format in the field provided. This format is
based off of the information contained in the practice management field.
%f - patient's first name
%l - patient's last name
%i – patient’s ID number
%s - patient's SS number (formatted)
%u - patient's SS number (unformatted)
%d - patient's date-of-birth
%n - patient's name (first last)
%p - patient's name (last, first)
%x - discardable string of characters
%c - discardable single character
%g – the rest of the string is garbage (can only appear at the end of an entry)
Examples:
Apteryx®, Inc.
PM Title Bar Entry
Corresponding Extraction Format
(John Doe)[DDS]
(%f %l)%g -or- (%n)%g
Doe, John M. - DDS
%l, %f - %g -or- %p -%g
(Doe, John M.)
(%l, %f) -or- (%p)
John Doe (1234)
%f %l (%i)%g -or- %n (%i)%g
Page 20 of 25
November 12, 2012
WI – Name Grabber™ User Manual
7.2.6.2
Additional definitions may be added to accommodate the variety of ways a patient name may be
displayed in the title bar. For example, some patient records may include a middle initial that must be
captured as part of the first name while others don’t.
7.2.6.3
When Name Grabber™ searches for windows matching the specified formats, it will use the first matching
format in the list. For this reason, entries should be ordered from most complex to least. For example,
“Dentrix Chart - %f %c. %l” should be listed above “Dentrix Chart - %f %l”. Otherwise, a patient’s middle
initial would be incorrectly appended to the beginning of their last name. Use Window drag-and-drop
feature to reorder the list from most complex to least.
7.2.6.4
Click on Next to continue. (Skip to 7.2.8.)
7.2.7
If patient information is specified to be found in one or more controls (refer to 7.4.4), the
Sniffer Definition Controls’ specification window displays.
7.2.7.1
Drag the appropriate patient information crosshairs over each applicable control in the PM application to
specify it’s address in the PM window.
7.2.7.2
Specify the extraction format in the corresponding ‘Format’ field. The formatting characters are:
%f - patient's first name
%l - patient's last name
%i – patient’s ID number
%s - patient's SS number (formatted)
%u - patient's SS number (unformatted)
%d - patient's date-of-birth
7.2.7.3
Apteryx®, Inc.
Click Next to continue.
Page 21 of 25
November 12, 2012
WI – Name Grabber™ User Manual
7.2.8
The ‘Sniffer Definition Finish’ window displays. Use the Definition Test button to ensure
the sniffer definition functions properly. If configured properly, the patient name of the
record opened in the practice management application will display.
7.2.9
Click Finish when done to exit the wizard.
Apteryx®, Inc.
Page 22 of 25
November 12, 2012
WI – Name Grabber™ User Manual
8 APPENDIX B: OPERABILITY IN REMOTE ACCESS
ENVIRONMENTS
8.1 Overview
8.1.1
Name Grabber™ 2.1 build 10 adds the ability to bridge patient information through
Remote Desktop Protocol (RDP) sessions. It will also work with other remote access
utilities, such as Citrix, if the remote session’s CLIENTNAME environment variable
matches the local computer name.
8.1.2
This functionality is useful for customers who have Practice Management (PM) software
only running inside a remote access window, and want to be able to connect back to their
imaging software running on the local computer.
This method is only possible if the local computer is capable of running Name Grabber™ at
Windows startup. This may not be possible for certain thin clients.
8.2 Basic Setup
The following information is approached from the perspective that Name Grabber™ is installed only on
the server, and every location is launching Name Grabber™ from the same directory, however, these steps
should be identical in other scenarios where Name Grabber™ is installed in various locations.
8.2.1
On each local computer, start Name Grabber™ and set it up to start automatically at
Windows startup.
8.2.2
Follow the instructions below to setup Name Grabber™ on the local computers:
8.2.2.1
Apteryx®, Inc.
Right-click the Name Grabber™ icon and select Options. The ‘Name Grabber™ Options’ dialog box
displays.
Page 23 of 25
November 12, 2012
WI – Name Grabber™ User Manual
8.2.2.2
Select Enable the receiving of remote notifications under the Receive Remote Notifications section.
8.2.2.3
Specify a path on the server where the notifications should be communicated (e.g. \\server\Name
Grabber\Notifications).
8.2.2.4
Click OK to save the settings on the local computer.
8.2.3
From the local computer, access the server through a remote desktop connection, start
Name Grabber™, and set it up to start automatically at Windows startup.
8.2.4
Follow the steps below to set up Name Grabber™ on the remote server:
8.2.4.1
Right-click the Name Grabber™ icon and select Options. The ‘Name Grabber™ Options’ dialog box
displays.
8.2.4.2
Select Enable the sending of remote notifications under the ‘Send Remote Notifications’ section.
8.2.4.3
Specify the same path in 8.2.2.3 (e.g. \\server\Name Grabber\Notifications).
8.2.4.4
Click OK to save the settings on the remote server.
8.3 Using Name Grabber™ in a Remote Desktop Environment
Follow the steps below to invoke the bridge in a remote access environment.
8.3.1
Open the proper patient window in the PM application.
8.3.2
Click on the Name Grabber™ icon located inside the remote desktop window.
8.3.3
Note that the imaging software launches on the local workstation.
Technical description: Name Grabber™ will temporarily store the patient information in a text
document that is named specifically after the "Client Name" value reported by Windows, which should
typically be the local computer's name. Likewise, the local computer's Name Grabber™ monitors that
directory for a text file containing its local computer name. When it finds the text file, it will read the patient
information from the file, remove the text file, and send the patient information to the imaging software.
Apteryx®, Inc.
Page 24 of 25
November 12, 2012
WI – Name Grabber™ User Manual
*** END OF DOCUMENT ***
Apteryx®, Inc.
Page 25 of 25