1
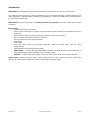
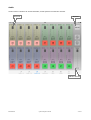
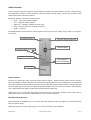
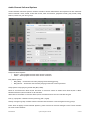
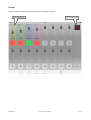
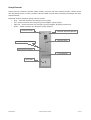
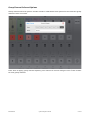
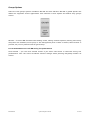
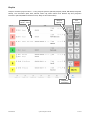
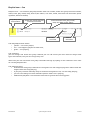
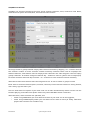
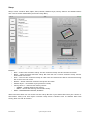
User Manual
designed and created by
Gregor Krasevec
www.mix16apps.com
[email protected]
iMiX16 Band
© 2014 Gregor Krasevec
1 of 19
Introduction
iMiX16 Band is an application for professional audio support for live shows or rehearsals.
It is ideal for bands, of course other performers such as theatre engineers, stage managers, live
show producers, choreographers, magicians, puppeteers, cruise ship comedians, school teachers,
etc. will find it useful too!
iMiX16 Band is made on the basis of iMiX16 Theatre Show System, the most stable app in show
business!
Key Features
• 64 audio channels, 16 groups,
• assign audio channels to groups to play multiple audio channels simultaneously with a
single tap,
• adjust volume, panning, fade-in and fade-out for each audio channel,
• adjust master volume for all audio channels,
• adjust volume for each group channel,
• loop audio,
• trim audio,
• load and save audio and groups channels settings (create setup file for each
performance),
• import/export audio from/to other apps,
• MIDI IN/OUT – control the app with MIDI controller via USB (Camera Connection Kit) or
WIFI; control other apps and MIDI devices with the app,
• PLAYLIST – create audio and groups cues and control your show with a single button.
iMiX16 Band supports default iPad's audio library (synced with iTunes) and also iTunes file
sharing. It also supports import and export audio files with other apps.
iMiX16 Band
© 2014 Gregor Krasevec
2 of 19
Audio
Audio screen contains 16 audio channels, audio options and master volume.
Channel
Options
Master Volume
iMiX16 Band
© 2014 Gregor Krasevec
3 of 19
Audio Channel
Audio channel contains channel name button, channel info and options button, volume slider
and Play/Stop button. It also contains channel name vertical label, volume percentage, time
elapsed and time remaining labels.
Play/Stop button indicates channel status:
• gray – no audio loaded (empty),
• red – stopped, never played,
• light red – stopped, played at least once,
• blue – paused, when in Play/Pause mode,
• green – playing.
Play/Stop button also contains group number and icons for Play Mode, Loop, Fade-in and Fadeout status.
Channel Name
Channel Info and Options
Volume Slider
Channel Name (vertical)
Volume Percentage
Time Elapsed,
Time Remaining
Play/Stop
Load Audio File
To load an audio file press channel name button (Load...). Default iPad's audio library (Library
Source iTUNES) or iTunes file sharing documents library (Library Source DOCS) will be displayed
on screen (depends of the selected library source from the Setup screen). Select an audio file you
wish to load. Once audio file is loaded Play/Stop button will turn red and channel name button
will contain first few letters of the title of the selected audio file.
Note that you can also press Play/Stop button to load an audio file. However once audio file is
loaded you must use channel name button to load a new audio file.
Rewind and Fast Forward
When channel is stopped you can rewind and fast forward audio by tapping on the time label
and pan left or right.
Note that when channel is playing you can not use rewind or fast forward!
iMiX16 Band
© 2014 Gregor Krasevec
4 of 19
Audio Channel Info and Options
Audio channel info and options window contains audio information and options for the selected
audio channel: color, name, audio file artist, title and album, playback mode, play mode, loop,
fade-in, fade-out, pan and group.
Playback Mode option:
• Single – stop playback of all other audio channels,
• Multi – allow playback of all other audio channels.
Play Mode option:
• Play/Stop – audio file will start playing from the beggining,
• Play/Pause – audio file will resume playing from the current position.
Loop option: loop playing audio file (ON / OFF).
Fade-in and fade-out: fade-in/out duration in seconds. Value 0 means that fade-in/out is OFF.
Maximum fade-in/out duration is 60 seconds.
Note that if audio file is shorter fade-in/out duration will be set to audio file length.
Pan (L / R) option: standard audio panning (left / right).
Group: assigned group number. Value 0 means that channel is not assigned to any group.
Press Save to apply audio channel options, press Cancel to discard changes. Press “trash” button
to clear audio channel.
iMiX16 Band
© 2014 Gregor Krasevec
5 of 19
Audio Options
There are three options available: ON AIR, Lock Volume and Sync Master. ON AIR is global option
and affects all segments of the application. Lock Volume is local option and affects only current
audio screen. Sync Master is also a local option but affects all audio screens of the application.
ON AIR – if turned ON functions like loading audio, setting channel options, loading and saving
setup files are disabled, music plays in the background (even if iPad is locked or home button is
pressed) and it prevents iPad to go to sleep.
It's recommended to turn this ON during live performance!
Lock Volume – you can lock volume sliders if you don't need them in real-time during live
performance. This can avoid accidental volume change while pressing Play/Stop buttons on
screen.
Sync Master – you can synchronize master volume of all audio screens.
iMiX16 Band
© 2014 Gregor Krasevec
6 of 19
Groups
Groups screen contains 16 group channels and groups options.
Group Channel
iMiX16 Band
Groups Options
© 2014 Gregor Krasevec
7 of 19
Group Channel
Group channel contains channel name button, channel info and options button, volume slider
and Play/Stop button. It also contains channel name vertical label, volume percentage and time
elapsed labels.
Play/Stop button indicates group channel status:
• gray – no audio channels are assigned to a group,
• red – audio channels are assigned, group stopped, never played,
• light red – audio channels are assigned, group stopped, played at least once,
• green – audio channels are assigned, group playing.
Channel Name
Channel Info and Options
Volume Slider
Channel Name (vertical)
Volume Percentage
Time Elapsed
Play/Stop
iMiX16 Band
© 2014 Gregor Krasevec
8 of 19
Group Channel Info and Options
Group channel info and options window contains information and options for the selected group
channel: color and name.
Press Save to apply group channel options, press Cancel to discard changes. Press “trash” button
to clear group channel.
iMiX16 Band
© 2014 Gregor Krasevec
9 of 19
Groups Options
There are two groups options available: ON AIR and Lock Volume. ON AIR is global option and
affects all segments of the application. Lock Volume is local option and affects only groups
screen.
ON AIR – if turned ON functions like loading audio, setting channel options, loading and saving
setup files are disabled, music plays in the background (even if iPad is locked, home button is
pressed, etc.) and it prevents iPad to go to sleep.
It's recommended to turn this ON during live performance!
Lock Volume – you can lock volume sliders if you don't need them in real-time during live
performance. This can avoid accidental volume change while pressing Play/Stop buttons on
screen.
iMiX16 Band
© 2014 Gregor Krasevec
10 of 19
Playlist
Playlist contains playlist items – cues, playlist options (ON AIR, Display Mode, GO Mode, Playback
Mode), cue functions (Add, Edit, Delete, Move Up, Move Down and Delete All) and playback
functions (Set GO/TIME to Selected Cue, Stop All and GO button).
Playlist
Items - Cues
Playlist
Options
Cue
Functions
Playback
Functions
iMiX16 Band
© 2014 Gregor Krasevec
11 of 19
Playlist options:
• ON AIR (global option) – when ON options and functions are disabled (turn it ON during
the show).
• Display Mode:
◦ FULL – cues are displayed in full mode (cue number, channels, time, etc.),
◦ NAME – cues are displayed with cue number, name and note only.
• GO Mode:
◦ GO NEXT – GO button will trigger next cue,
◦ TIME – cues will be triggered automatically based on time (if cue time is not set, cue
will be ignored and not triggered – only in TIME mode of course).
• Playback Mode:
◦ DEFAULT – when next cue is started all other cues will continue to play or stop based
on current cue channels settings (see channel playback mode option),
◦ SINGLE – when next cue is started all other cues will be stopped regardless of current
cue channels settings.
Cue functions:
• Add Cue – add new cue to the playlist.
• Edit Cue – edit selected cue in the playlist.
• Delete Cue – delete selected cue from the playlist.
• Move Up Cue – move selected cue in the playlist up (cue no. 5 -> cue no. 4).
• Move Down Cue – move selected cue in the playlist down (cue no. 4 -> cue no. 5).
• Delete All – delete all cues from the playlist.
Playback functions:
• Set GO/TIME to Selected Cue:
◦ GO NEXT Mode – GO button will be set to trigger selected cue in the playlist,
◦ TIME Mode - current time will be set to selected cue time.
• Stop All – stop all cues.
• GO button:
◦ GO NEXT Mode – GO button will trigger next cue in the playlist,
◦ TIME mode – GO button will start/stop time, cues will be triggered automatically
based on time.
Note that you can assign MIDI message to trigger GO button.
iMiX16 Band
© 2014 Gregor Krasevec
12 of 19
Playlist item – Cue
Playlist item – cue contains play/stop button with cue number, audio and group channel number,
name, time, play mode, loop, fade in/out status, cue time, name, note and edit functions (move
up/down, edit and delete).
Play/Stop with
Cue Number
Audio and group channel
number and name
Audio channel time, play mode,
loop and fade in/out status
Cue time, name
and note
Cue edit
functions
Cue Play/Stop button status:
• yellow – cue never played,
• red – cue stopped, played at least once,
• green – cue playing.
Cue channels:
you can assign one audio and group channel per cue. Of course you don't have to assign both
types of channels, but you can assign only one.
Note that you can edit audio and group channels settings by taping on the channels icons next
to cue Play/Stop button.
Cue playback logic:
• if both audio and group channels are assigned cue will stop playing when media with the
longest time will stop playing,
• if you play cue and manually stop all channels assigned to cue, cue will stop playing,
• you can not change cue and channels options when cue is playing,
• TIME mode playback: cues without time will be ignored and not triggered.
iMiX16 Band
© 2014 Gregor Krasevec
13 of 19
Add/Edit Cue Window
Add/Edit cue window contains audio and group channel selection, time, name and note fields,
Auto Next Cue option and Add/Save, Cancel and Insert buttons.
To assign audio or group channel simply select desired channel by tapping + or – buttons next to
the channel number or enter channel number manually. Channel name will be displayed for
loaded channels, “Not loaded.” text for empty audio channels and “Not assigned.” text for empty
groups channels. To remove assigned channel tap – button to value 0 („None“ will be displayed).
For faster channel selection tap and hold + or – buttons or enter channel number manually.
Note that at least one channel must be assigned to cue. It can be audio or group or both.
Enter time in hh:mm:ss format (hours, minutes, seconds). If time will be entered in wrong format,
don't worry, app will warn you.
Turn on Auto Next Cue option if you want next cue to start automatically when current cue has
finished playing. Auto Next Cue option works only when GO NEXT mode is selected.
Note that time, name and note are optional, but:
• when using TIME Mode you will need to set time if you want cue to be triggered,
• when using NAME Display Mode you will want to set name or note (or both), otherwise
playlist will contain cue numbers only.
iMiX16 Band
© 2014 Gregor Krasevec
14 of 19
Setup
Setup screen contains New, Open, Save, Delete, Toolbar Style, Library Source and RATE buttons
and a list of saved iMiX16 files (channels setup files).
Buttons:
• New – create new channels setup. Current channels setup will be cleared. No undo!
• Open – open selected channels setup file from the list. Current channels setup will be
overwritten. No undo!
• Save – save current channels setup to a file. You can choose new file or overwrite existing
file. In this case no undo!
• Delete – delete selected channels setup file. No undo!
• Toolbar Style – set toolbar style (normal or small).
• Library Source – select audio library source:
◦ iTUNES – default iPad's audio library,
◦ DOCS – iTunes file sharing documents library.
• RATE – PLEASE RATE THIS APP, THANKS!
Note that audio files are not saved into the setup file! So if you delete files from your iTunes or
Documents library and then open channels setup which contains links to deleted files from
library, files will not be loaded.
iMiX16 Band
© 2014 Gregor Krasevec
15 of 19
DOCS library
DOCS library contains audio files which were manually added to the application via iTunes file
sharing.
Supported audio formats and file extensions: AIF, AIFC, AIFF, CAF, M4A, MP3 and WAV.
Open in...
Trim Audio
Buttons and controls:
• Done – load selected audio file to a channel,
• Cancel – cancel DOCS library window,
• Trim Audio – open trim audio window for selected audio file,
• Open in... – open selected audio file in other apps,
• Delete – delete audio file from iPad. No undo!
• Rename – rename selected audio file. No undo!
• Search – search files by file name.
Rename file: first enter new file name and then press Rename button.
iMiX16 Band
© 2014 Gregor Krasevec
16 of 19
Trim Audio
Trim audio window contains audio file name, start and end time labels. It also contains Save,
Cancel, Stop, Play from Start Time and Play from End Time buttons.
How it works?
Very simple. :) Set new start and/or end time, use Play from Start/End Time buttons to listen to
the trimming adjustments you've made and press Save button to save trimmed audio file.
Important! Original file will not be overwritten. Trimmed audio will be saved in m4a format with
“trimmed” text at the end of the file name.
iMiX16 Band
© 2014 Gregor Krasevec
17 of 19
MIDI
MIDI screen contains New, Open, Save and Delete buttons, a list of saved iMiX16 MIDI mapping
files, information about connected MIDI devices and MIDI network session, last received MIDI
message, channel note, Assign, Remove and Assign Manually buttons, MIDI mapping list and
search options for MIDI mapping list.
Buttons and controls:
• New – create new MIDI mapping. Current MIDI mapping will be cleared. No undo!
• Open – open selected MIDI mapping file from the list on the left. Current MIDI mapping
will be owerwritten. No undo!
• Save – save current MIDI mapping to a file. You can choose new file or overwrite existing
file. In this case no undo!
• Delete – delete selected MIDI mapping file. No undo!
• Assign – assign last received MIDI message (auto learn from MIDI source) and channel
note to a selected channel.
• Remove – remove MIDI message and channel note from a selected channel.
• Assign Manually – manually assign MIDI message and channel note to a selected
channel.
• Search – search current MIDI mapping list by channel type, number and action and/or
filter the list by MIDI type and action.
Important! When app is on MIDI screen, assigned MIDI actions will not be executed. Change to
any other screen to test and run assigned MIDI actions.
iMiX16 Band
© 2014 Gregor Krasevec
18 of 19
MIDI Mapping List
MIDI mapping list contains a list of channels which are able to receive and send MIDI messages.
Each MIDI map (channel + MIDI) in the list tells the app which MIDI message from MIDI source
will trigger channel action (MIDI IN) and also which MIDI message will be sent to other apps and
MIDI devices (MIDI OUT) when channel action is performed for example Play button pressed,
Volume slider changed, etc.
MIDI map line in MIDI mapping list:
<MIDI Type>: <Channel Type> <Channel Number> <Channel Action>: <MIDI Action>, <MIDI
Channel>, <MIDI Id>
Example: “IN: Audio 1 Volume: Control Message, 1, 52”
•
•
•
•
•
•
•
•
MIDI Type – receive / sent MIDI message (IN – receive, OUT – send).
Channel Type – Audio, Group and Master Volume.
Channel Number – from 1 to 64 for Audio, from 1 to 16 for Groups (0 if channel type is
„special“ channel like Master Volume).
Channel Action – Play and Volume.
Channel Note – a short text for your own purposes (optional).
MIDI Action – first part of MIDI message (Note On, Control Message, etc.).
MIDI Channel – second part of MIDI message (from 1 to 16).
MIDI Id – third part of MIDI message (from 0 to 127).
Note that fourth part of MIDI message (MIDI Value) is not assignable, but it is automatically used
when controlling master or channels volume (applies for both MIDI IN and MIDI OUT).
MIDI OUT
MIDI messages will be sent manually only. Which means that MIDI messages will be sent when
you manually press Play button or change Volume slider. MIDI messages will NOT be sent when
volume slider is changed automatically (during fade in/out) or when channel is stopped because
of media reached the end, etc.
How to use
Connect MIDI controller via USB (Camera Connection Kit) or WIFI to iPad. Go to MIDI screen.
Press note key or control button/slider on a MIDI controller. MIDI message will be displayed in
the MIDI message textbox. Set channel note (optional), select desired channel from the mapping
list and press Assign button. MIDI message and channel note will be assigned to a selected
channel and default MIDI mapping will be automatically saved. Go to other screens (Audio and
Groups) to test and use assigned note keys and control buttons/sliders.
Note that you can assign the same MIDI message to a multiple channels, for example: assign
MIDI controller slider to all Audio Master Volume channels to control audio master volume for
all audio sections at the same time. Or assign MIDI controller note key to Audio Channel 1 Play
and Audio Channel 17 Play to control Play/Stop for multiple audio channels at the same time.
And so on.
iMiX16 Band
© 2014 Gregor Krasevec
19 of 19