1
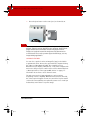
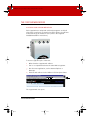
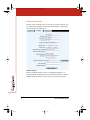
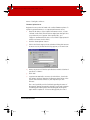
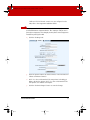
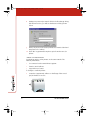
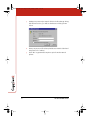
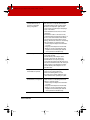
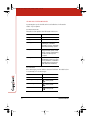
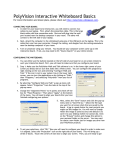
Userguide_RevA_4.fm Page -1 Friday, January 18, 2002 11:07 AM User Guide Part number 370-0111-01 ©2002 PolyVision Corporation All rights reserved Printed in USA Userguide_RevA_4.fm Page 0 Friday, January 18, 2002 11:07 AM Information in this document is subject to change without notice. Reproduction in any manner without written permission of PolyVision Corporation is forbidden. PolyVision Corporation reserves the right to make changes in product design, or detail, and to discontinue any product or material without notice. CopyCam is a trademark of PolyVision Corporation, a Steelcase Company. The Bluetooth trademarks are owned by Bluetooth SIG, Inc., USA. Userguide_RevA_4.fm Page 1 Friday, January 18, 2002 11:07 AM TABLE OF CONTENTS Welcome to CopyCam . . . . . . . . . . . . . . . . . . . . . . . . . . . . . . . . . . . . . . . .2 CopyCam Quick Start . . . . . . . . . . . . . . . . . . . . . . . . . . . . . . . . . . . . . . . . 3 What to Expect . . . . . . . . . . . . . . . . . . . . . . . . . . . . . . . . . . . . . . . . 3 CopyCam Quick Start . . . . . . . . . . . . . . . . . . . . . . . . . . . . . . . . . . . . . . . . 3 Three Ways to Make Copies. . . . . . . . . . . . . . . . . . . . . . . . . . . . . . . . 4 What You Can Copy . . . . . . . . . . . . . . . . . . . . . . . . . . . . . . . . . . . . 4 What You Can’t Copy . . . . . . . . . . . . . . . . . . . . . . . . . . . . . . . . . . . 4 Copying to the Printer . . . . . . . . . . . . . . . . . . . . . . . . . . . . . . . . . . . . 4 Copying to a Floppy Diskette. . . . . . . . . . . . . . . . . . . . . . . . . . . . . . . 5 Copying to the Web . . . . . . . . . . . . . . . . . . . . . . . . . . . . . . . . . . . . . . 7 Copying in any Combination . . . . . . . . . . . . . . . . . . . . . . . . . . . . . . .8 The CopyCam Web Server . . . . . . . . . . . . . . . . . . . . . . . . . . . . . . . . . . . . .9 Accessing Your CopyCam Web Server. . . . . . . . . . . . . . . . . . . . . . . .9 Using the Saved Shots Tab . . . . . . . . . . . . . . . . . . . . . . . . . . . . . . . 10 Saving Copies to your Hard Disk. . . . . . . . . . . . . . . . . . . . . . . . . 11 Printing From the Web . . . . . . . . . . . . . . . . . . . . . . . . . . . . . . . . . 11 Using the Settings Tab . . . . . . . . . . . . . . . . . . . . . . . . . . . . . . . . . . . 12 Using the Camera Info Tab. . . . . . . . . . . . . . . . . . . . . . . . . . . . . . . . 16 Changing Printers. . . . . . . . . . . . . . . . . . . . . . . . . . . . . . . . . . . . . . . 18 CopyCam Maintenance . . . . . . . . . . . . . . . . . . . . . . . . . . . . . . . . . . . . . .23 Cleaning . . . . . . . . . . . . . . . . . . . . . . . . . . . . . . . . . . . . . . . . . . . . . . 23 Camera Arm Lens . . . . . . . . . . . . . . . . . . . . . . . . . . . . . . . . . . . . . . . 23 Web Site Maintenance. . . . . . . . . . . . . . . . . . . . . . . . . . . . . . . . . . .23 Printer . . . . . . . . . . . . . . . . . . . . . . . . . . . . . . . . . . . . . . . . . . . . . . . . 23 Troubleshooting . . . . . . . . . . . . . . . . . . . . . . . . . . . . . . . . . . . . . . . . . . .24 LED and Voice Status Messages . . . . . . . . . . . . . . . . . . . . . . . . . . .26 LED Status Indicators. . . . . . . . . . . . . . . . . . . . . . . . . . . . . . . . . .26 Voice Messages . . . . . . . . . . . . . . . . . . . . . . . . . . . . . . . . . . . . . .26 1 Userguide_RevA_4.fm Page 2 Friday, January 18, 2002 11:07 AM WELCOME TO COPYCAM Welcome to CopyCam, your quick and easy tool to capture information from a whiteboard or chalkboard. This manual provides instructions for operating your CopyCam. Refer to the CopyCam Installation Guide for installation instructions. Camera arm Control pad with floppy drive Color printer 2 WELCOME TO COPYCAM Userguide_RevA_4.fm Page 3 Friday, January 18, 2002 11:07 AM COPYCAM QUICK START Step 1: Write on the board. Step 2: Press a button on the control pad. Step 3: You’re done! CopyCam captures the board and you can continue your presentation without interruption. WHAT TO EXPECT In good lighting conditions, CopyCam captures the board just five seconds after you press one of the control pad buttons. In poor light, it might take a few seconds longer. NO TE : To avoid shadows across the image, be sure you stand away from the board when you press the control pad button. A voice prompt quietly says “captured.” At the same time, the LED changes from blinking yellow to solid yellow to indicate that you can erase the board and continue writing. Refer to “LED and Voice Status Messages” on page 26 for a summary of all status messages. When you use the printer, it can take up to 45 seconds before a copy starts printing, but you can continue with your presentation during that time. When you use the floppy diskette, it can take up to a minute to save the file, but you can continue with your presentation during that time as well. COPYCAM QUICK START 3 Userguide_RevA_4.fm Page 4 Friday, January 18, 2002 11:07 AM COPYCAM OPERATION THREE WAYS TO MAKE COPIES CopyCam gives you a choice of three ways to make copies of your whiteboard or chalkboard: • on the printer • on a floppy diskette • on the web You can use any combination to save copies during a presentation. Refer to “Copying in any Combination” on page 8. WHAT YOU CAN COPY CopyCam can copy writing and drawings in any color on whiteboards or chalkboards. You can use any chalk color or any marker color. You can even copy overhead projections if they use line art. CopyCam captures an area of up to 4' x 8' on a wall, whether or not there is a board there. WHAT YOU CAN’T COPY CopyCam will not produce a clean image from large blocks of solid color, photos, or 3D objects. COPYING TO THE PRINTER CopyCam comes with its own color printer. The color printer receives its data using Bluetooth wireless technology. (You can also configure CopyCam to use ethernet network printers. Refer to “Changing Printers” on page 18.) CopyCam emits radio signals to the printer’s antenna, so no physical connection is required between them. The printer should be within 30 feet of the CopyCam camera arm, but it does not need to be in the same room. If a wall is between CopyCam and the printer, the antenna range may be slightly reduced. To print a copy of the board: 1 4 Be sure the printer is turned on, and has paper and ink. COPYCAM OPERATION Userguide_RevA_4.fm Page 5 Friday, January 18, 2002 11:07 AM 2 When you are ready to capture, press the button on the control pad once for each copy you want to print. 3 Continue your presentation after you hear the voice prompt say “captured” and the LED changes from blinking yellow to solid yellow. COPYING TO A FLOPPY DISKETTE You can save a copy of the board to a floppy diskette as an image file (.png). One floppy diskette holds 10 to 15 copies, depending on the complexity of the images. Files are named CCam0001.png, CCam0002.png, etc. Each copy that you save receives the next sequential number. After 1000 copies have been saved, the number wraps back to 0001. The date and time of capture are part of the file details. CopyCam uses only formatted MS-DOS high-density 3.5" floppy diskettes. Formatted floppy diskettes are available from most office supply stores. NO TE : CopyCam will not erase files on a diskette, so be sure that the diskette you use has sufficient space for your copies. COPYCAM OPERATION 5 Userguide_RevA_4.fm Page 6 Friday, January 18, 2002 11:07 AM To copy to a floppy diskette: 1 Insert a formatted diskette in the control pad, as shown below. 2 When you are ready to capture, press board to the floppy diskette. 3 Continue your presentation after you hear the voice prompt say “captured” and the LED changes from blinking yellow to solid yellow. The disk drive begins to write after about 30 seconds. Writing to disk may take up to a minute. to save a copy of the NO TE : If the LED blinks red, one of the following may have occurred: • • • No diskette is inserted in the control pad. A bad or unformatted diskette is inserted in the control pad. The diskette is full. The voice prompt provides additional information. To remove the floppy diskette from the control pad: 1 6 Wait until the LED changes to green or the voice prompt says “ready,” indicating that writing is complete. COPYCAM OPERATION Userguide_RevA_4.fm Page 7 Friday, January 18, 2002 11:07 AM 2 Press the eject button on the control pad, as shown below. NO TE : Most computers can read the .png format images on the floppy diskette. Simply insert the diskette in your computer, browse to the floppy diskette drive and double-click the image file to view it. Images can easily be inserted in word processing documents or e-mail as well. To use only a portion of your board image, use any image editing application. COPYING TO THE WEB You can also copy the board as an image file (.png) to the built-in CopyCam web server. Access the copies with any computer sharing the same Local Area Network (LAN). The computer can be a Windows-based computer, a Macintosh, or any other computer with web access. All you need is a web browser such as Internet Explorer or Netscape. Refer to “The CopyCam Web Server” on page 9 for information about how to access the web server. The web server can hold approximately 40 copies at a time, depending on their complexity. When the web server becomes full, the oldest copies disappear as new ones are added. Copies remain on the web server until they are replaced by newer ones or until you delete them, even if there is a power outage. COPYCAM OPERATION 7 Userguide_RevA_4.fm Page 8 Friday, January 18, 2002 11:07 AM To copy to the web: 1 When you are ready to copy, press the copy of the board to the web. button to save a 2 Continue your presentation after you hear the voice prompt say “captured” and the LED changes from blinking yellow to solid yellow. When the LED changes to green and the voice prompt says “ready,” your copy is available on the web server. W AR NIN G Copies saved to the web can be seen (and deleted) by anyone in your organization who has access to the LAN, since the web page where copies are saved does not require a password to view. Save to the web only when you are willing to share the information. Print or save confidential information to a diskette to avoid public viewing. COPYING IN ANY COMBINATION You can use the CopyCam buttons in any order to print and save copies of the board. For example, if you want to print ten copies of the board during your presentation for the purpose of distributing them to your class, and you also want to save a copy on a floppy diskette to use in a word processing document, press the button ten times, then press once. CopyCam captures the board once. The same image appears on both the diskette and the printed pages. 8 COPYCAM OPERATION Userguide_RevA_4.fm Page 9 Friday, January 18, 2002 11:07 AM THE COPYCAM WEB SERVER ACCESSING YOUR COPYCAM WEB SERVER Each CopyCam has a unique web address that appears on the left edge of the control pad, as shown below. (This address should have been labeled by your installer. If it isn’t, refer to the CopyCam Installation Guide for instructions.) http:// 206.168.155.50 To access CopyCam copies on the web: 1 Write down the CopyCam web address. 2 Turn on a computer that shares the same LAN as CopyCam. 3 Run a browser application, such as Internet Explorer or Netscape. 4 Enter the web address in the “Address” field and press Enter. 206.168.155.50 The CopyCam web site opens. THE COPYCAM WEB SERVER 9 Userguide_RevA_4.fm Page 10 Friday, January 18, 2002 11:07 AM NO TE : You can add the CopyCam web site to Favorites or create a shortcut. (In most browsers, you can drag the address to a “Links” area, and it will create a shortcut for you.) Rename the shortcut to make your CopyCam easier to identify. USING THE SAVED SHOTS TAB On the CopyCam web site, the “Saved Shots” tab, shown below, displays miniature images of each capture, including the date and time. These miniature images are called “thumbnails.” Click a thumbnail to see the corresponding full-size image. The fullsize image opens in a new window using whatever application is available on your computer to view .png files. The .png format images on the “Saved Shots” tab can easily be printed, inserted in word processing documents, or sent in e-mail. If a copy on the web will be valuable in the future, preserve it by: 10 • saving it to your computer’s hard disk, or • printing it from your web browser THE COPYCAM WEB SERVER Userguide_RevA_4.fm Page 11 Friday, January 18, 2002 11:07 AM SAVING COPIES TO YOUR HARD DISK Copies that you save to your computer’s hard disk can later be printed, used in documents, sent in e-mail, or edited. To save a copy to your computer’s hard disk: 1 Click a thumbnail to see the full-size image. 2 Choose “Save As” from the File menu. 3 Browse to the desired location on the hard disk and give the image a unique name. 4 Click “Save.” PRINTING FROM THE WEB You can print one or more copies from the CopyCam web application at any time. To print a copy from the web application with your default printer: 1 Click on a thumbnail to view the full-size image. 2 Choose “Print” from the File menu. 3 Select the number of copies to print. 4 Click “OK.” THE COPYCAM WEB SERVER 11 Userguide_RevA_4.fm Page 12 Friday, January 18, 2002 11:07 AM USING THE SETTINGS TAB The web server “Settings” tab, shown below, provides a way for you to view and change important CopyCam web settings. A description of each field is presented below. Submit Changes Click the “Submit Changes” button to implement changes to a setting. Settings are password protected. The first time you submit a change during an Internet browser session, the Password dialog 12 THE COPYCAM WEB SERVER Userguide_RevA_4.fm Page 13 Friday, January 18, 2002 11:07 AM appears, as shown below. 1 Enter your password. The factory default user name is blank and password is “admin.” 2 Click “OK.” Use DHCP Check this box if your LAN uses DHCP protocol. Remove the check mark if your LAN uses fixed IP addressing. Consult your system administrator if you are unsure. IP Address During configuration, the CopyCam web server IP address is determined automatically by DHCP or you may assign it here manually if the “Use DHCP” checkbox is not checked. (Refer to the CopyCam Installation Guide for information about how to configure CopyCam the first time.) Subnet Mask This network reference is determined automatically by DHCP or you may assign it manually here if the “Use DHCP” checkbox is not checked. Gateway CopyCam uses this gateway address only when updating firmware over the Internet. It is determined automatically through DHCP or you may assign it manually here if the “Use DHCP” checkbox is not checked. THE COPYCAM WEB SERVER 13 Userguide_RevA_4.fm Page 14 Friday, January 18, 2002 11:07 AM Board Name Enter a name that will help you identify the location of this CopyCam. This name appears at the top of the web page. Capture Type CopyCam normally captures images in color but it can also capture in monochrome. Changing to monochrome capture type can improve image quality when using a blackboard or when printing exclusively to black and white printers, such as network laser printers. Printer Type CopyCam comes with its own color printer that uses wireless Bluetooth technology. However you can also print to any PCL-4 compatible printer sharing the same LAN. Bluetooth is the default printer type. If you need to change printers, refer to “Changing Printers” on page 18. Bluetooth Printer Channel This field displays the Bluetooth device address of the wireless printer for this CopyCam. If you need to change printers, refer to “Changing Printers” on page 18. Ethernet Printer Address To print to a networked printer instead of the wireless printer that comes with CopyCam, enter the networked printer IP address in this field. If you need to change printers, refer to “Changing Printers” on page 18. Control Pad Volume Choose the control pad voice message volume from five volume levels: off, soft, medium soft, medium loud, or loud. Date/Time Set the correct date and time. This information is associated with saved copies to help you identify when each copy was saved. Low Light Warning Remove the check to disable the control pad voice message that 14 THE COPYCAM WEB SERVER Userguide_RevA_4.fm Page 15 Friday, January 18, 2002 11:07 AM warns of low light conditions. Firmware Update Server Registered users receive information about free firmware updates. To update CopyCam firmware on a computer with Internet access: 1 Enter the IP address of the PolyVision firmware server, or leave “default” in this field. (This IP address might have changed since you purchased your CopyCam. If the update fails, go to “Support” at www.websterboards.com to find the appropriate IP address and enter it in this field.) 2 Click the “Start Update” button. 3 If this is the first change you have submitted during this Internet browser session, the Password dialog appears, as shown below. 4 Enter your password. The factory default user name is blank and password is “admin.” 5 Click “OK.” 6 CopyCam automatically connects to the IP address, downloads the update, and then upgrades the firmware. Depending on the speed of the Internet connection, this may take up to two minutes. The control pad LED provides feedback regarding the status of the upgrade. During the upgrade, the LED goes through a pattern of blinking yellow then green, then blinking yellow and green again. At the completion of a successful upgrade, the control THE COPYCAM WEB SERVER 15 Userguide_RevA_4.fm Page 16 Friday, January 18, 2002 11:07 AM pad voice prompt says “hello” and the LED stays green. If the upgrade fails, the control pad LED flashes red. Press any control pad button to resume use with the original firmware version. W AR NIN G Do not disconnect the power while the control pad LED is flashing. Permanent damage may result. 7 After the upgrade, click the browser’s “Back” button to return to the CopyCam web page. (Do NOT click the browser’s “Refresh” button, as this will initiate the upgrade again.) NO TE : You can also update firmware from a floppy diskette provided by PolyVision Corporation. Contact Technical Support if you need such a diskette. New Password CopyCam settings are password protected. To change the password, enter a new password here, and enter it again in the next box. Confirm Password Enter your new password a second time here to confirm it. USING THE CAMERA INFO TAB The web server “Camera Info” tab provides a summary of information about CopyCam. 16 THE COPYCAM WEB SERVER Userguide_RevA_4.fm Page 17 Friday, January 18, 2002 11:07 AM Board Name: The name, entered from the “Settings” tab, associated with this CopyCam. Total Memory: The total memory in the CopyCam. This memory is used for storing copies of the board, plus the settings used to operate CopyCam. Free Memory: The memory available to store new copies. When free memory becomes low, old copies are deleted as new copies are saved. Total Images Captured: The total number of copies saved or printed from this CopyCam. Date/Time: The current date and time, which can be adjusted on the “Settings” tab. Powered On: The time of the last power on. Power on occurs when the CopyCam power adapter is plugged into a power outlet. (Images and settings are preserved during power outages.) Last Capture: The time of the last use of CopyCam to save or print a copy of the board. Serial Number: The CopyCam serial number. The serial number is also located on the top of the camera arm. MAC Address: The unique ethernet hardware adapter address. Firmware Revision: The version number of the CopyCam firmware. THE COPYCAM WEB SERVER 17 Userguide_RevA_4.fm Page 18 Friday, January 18, 2002 11:07 AM CHANGING PRINTERS The CopyCam “Settings” tab on the web server includes provisions for changing the printer associated with a CopyCam. You can change to a different wireless printer, or change settings so CopyCam prints to a network printer on the LAN instead of a wireless printer. Refer to “Changing to a Network Printer” on page 20. CHANGING WIRELESS PRINTERS If your CopyCam is connected to a LAN and the wireless color printer needs to be changed (such as for a warranty replacement), follow the steps below. To change the color printer: Find your printer’s Bluetooth device address. It can be obtained from a Bluetooth wireless printer by holding the printer’s “X” button for a few seconds until the printer produces an information page that contains the address, or from a printer with the Bluetooth adapter by pressing the small button on the adapter so the printer produces an information page that contains the address. Make a note of this number. 2 Locate the CopyCam web address on the flange of the control pad and make a note of it. 3 On a computer connected to the same LAN as CopyCam, run a web browser and enter the CopyCam web address in the http:// 206.168.155.50 1 18 THE COPYCAM WEB SERVER Userguide_RevA_4.fm Page 19 Friday, January 18, 2002 11:07 AM “Address” field. If the web server is not yet configured on the LAN, refer to the CopyCam Installation Guide. NO TE : Every CopyCam has its own web address which is uniquely associated with one CopyCam device. The “Settings” tab you see is for only one CopyCam, even though you may have several CopyCams installed as part of your LAN. 4 Click the “Settings” tab. 5 Enter the printer’s Bluetooth device address in the field labeled “Bluetooth Printer Channel.” 6 Add “-1” to the serial number if the new printer is the HP995C Bluetooth wireless printer. Add “-6” to the serial number if the new printer uses a Bluetooth adapter. 7 Click the “Submit Changes” button to save the change. THE COPYCAM WEB SERVER 19 Userguide_RevA_4.fm Page 20 Friday, January 18, 2002 11:07 AM 8 Settings are password protected. If this is the first change during this Internet session, you will see the Password dialog shown below. 9 Enter your password. The factory default user name is blank and the password is “admin.” 10 Click “OK.” CopyCam will now print copies from the new color printer. CHANGING TO A NETWORK PRINTER CopyCam can print to other printers on the same network. The network printer must: • be connected on the same LAN as CopyCam. • have its own IP address. • support PCL-4 or better. To change to a network printer: 1 Locate the CopyCam web address on the flange of the control pad, and make a note of it. http:// 206.168.155.50 20 THE COPYCAM WEB SERVER Userguide_RevA_4.fm Page 21 Friday, January 18, 2002 11:07 AM 2 On a computer connected to the same LAN, run a web browser and enter the CopyCam web address in the “Address” field. If the web server is not yet configured on the LAN, refer to the CopyCam Installation Guide. NO TE : Every CopyCam has its own web address which is uniquely associated with one CopyCam device. The “Settings” tab you see is for only one CopyCam, even though you may have several CopyCams installed as part of your LAN. 3 Click the “Settings” tab. 4 Click the “Ethernet” radio button beside “Printer Type.” 5 Enter the network printer’s IP address in the field labeled “Ethernet Printer Address.” 6 Click the “Submit Changes” button to save the change. THE COPYCAM WEB SERVER 21 Userguide_RevA_4.fm Page 22 Friday, January 18, 2002 11:07 AM 22 7 Settings are password protected. If this is the first change during this Internet session, you will see the Password dialog shown below. 8 Enter your password. The factory default user name is blank and the password is “admin.” 9 Click “OK.” CopyCam will now print copies from the network printer. THE COPYCAM WEB SERVER Userguide_RevA_4.fm Page 23 Friday, January 18, 2002 11:07 AM COPYCAM MAINTENANCE CLEANING Wipe the control pad and camera arm cover with a soft damp cloth. Use ONLY warm soapy water. Avoid harsh cleaners or detergents. CAMERA ARM LENS The camera arm houses a sensitive camera lens. As a rule, clean ONLY if necessary. Any contact with the critical optical surface risks damage to the surface. If in doubt, do not clean. If necessary, use soft, abrasive-free lens paper or lens cloth to clean the lens. Never use spray cleaners or solvents, as they may harm the lens. WEB SITE MAINTENANCE Regularly save and delete image files as needed to prevent them from being overwritten. PRINTER Refer to the printer manual for maintenance information. (Printer manuals are also available on-line at the manufacturer’s web site.) COPYCAM MAINTENANCE 23 Userguide_RevA_4.fm Page 24 Friday, January 18, 2002 11:07 AM TROUBLESHOOTING ISSUE RESOLUTION The printed copy is unclear, off center, or crooked. The system may require calibration. Refer to the Installation Guide for instructions. Copy quality on a blackboard remains poor after calibration. • Dusty blackboards can reduce contrast for CopyCam. Be sure that your board is cleaned thoroughly before writing. • If color is not important to you, you can dramatically improve contrast by changing capture type from color to monochrome. Refer to “Using the Settings Tab” on page 12. Writing along the bottom edge of the printed copy is unclear or whited out. Glare from the eraser tray along the bottom edge of the board is interfering with the capture. You may need to change the lighting near your board or calibrate CopyCam with the bottom calibration sheets two inches or so above the bottom of the board. For best results, lighting should not be directly over the board. CopyCam cannot be located from a browser. • Confirm that the CopyCam configuration has properly obtained the CopyCam address. Try performing the configuration again as described in the Installation Guide. • Check the ethernet cable connection in the camera arm. • If the ethernet cable is connected to a hub, confirm that the hub’s link indicator light is on. When the button is pressed, the CopyCam voice prompt says “printer problem.” 24 • Confirm that the printer is powered on and loaded with ink and paper. • CopyCam may be unable to find your printer. Move the printer closer to the CopyCam arm. • Check for interfering devices, such as microwave ovens, wireless telephones, and other network devices operating at 2.4 GHz. TROUBLESHOOTING Userguide_RevA_4.fm Page 25 Friday, January 18, 2002 11:07 AM No CopyCam systems appear in the list when “Start” is pressed in “setup.html” during configuration. • Confirm that you are configuring the CopyCam web server from a computer that shares the same LAN segment as the CopyCam system. • Double-click “setup.html” again and click “Start” again. CopyCam may be attempting to squat on an address. • Check the ethernet cable connection in the camera arm. • If the ethernet cable is connected to a hub, confirm that the hub’s link indicator light is on. • If an incorrect network address was entered, you may need to reset the system to factory settings, which results in the loss of all settings and stored images. To reset the system: 1 Remove the power adapter from the wall for 5 seconds. 2 Plug the power adapter back into the wall. 3 Within 10 seconds of plugging the power adapter back into the wall, press all three control pad buttons simultaneously. The control pad LED is not lit. • Confirm that the power adapter is properly connected to the wall. • Confirm that the power adapter cable is properly connected in the camera arm. • Confirm that the control pad is properly connected in the camera arm. The larger jack is reserved for the ethernet cable. The control pad cable connector looks similar but is smaller. • Confirm that the power adapter is not on a switched outlet. The printer sometimes stops in the middle of a printout. • The printer may be too far away. Move the printer closer to the CopyCam arm. • Check for interfering devices, such as microwave ovens, wireless telephones, and other network devices operating at 2.4 GHz. The password for the Setup • Reset the system to factory settings, which tab has been lost or forgotten. results in the loss of all settings and stored images. To reset the system: 1 Remove the power adapter from the wall for 5 seconds. 2 Plug the power adapter back into the wall. 3 Within 10 seconds of plugging the power adapter back into the wall, press all three control pad buttons simultaneously. TROUBLESHOOTING 25 Userguide_RevA_4.fm Page 26 Friday, January 18, 2002 11:07 AM LED AND VOICE STATUS MESSAGES CopyCam gives you both LED and voice feedback to indicate the status of your capture. LED STATUS INDICATORS The table below explains the LED status indicators. LED INDICATOR SYSTEM STATUS No light No power. Solid green Unit is idle and ready to copy. Blinking yellow Board capture in progress, unit is powering on, or firmware upgrade in progress. Stand away from the board during captures. Solid yellow Copy is being processed for the floppy disk drive, printer, or web server. You may continue writing on the board. The capture is complete. Blinking red System error such as missing or full diskette, printer out of paper or not powered on, or calibration required. (The voice prompt provides additional information.) VOICE MESSAGES Voice messages provide additional status feedback. The table below is a summary of voice messages. VOICE MESSAGE STATUS “Hello” Power restored “One copy”, “Two copies”,... “Another copy” button pressed button pressed “Save disk” button pressed 26 TROUBLESHOOTING Userguide_RevA_4.fm Page 27 Friday, January 18, 2002 11:07 AM “Save web” button pressed “Captured” Board capture complete “Ready” Printing, save to floppy diskette, or save to web complete “Working” Please wait while CopyCam writes a floppy diskette or reboots “Printer problem” Printer out of paper, printer out of ink, or printer unavailable “No printer” Printer is not on-line or could not be found “Full” CopyCam cannot capture because the printing buffer is full “No disk” Floppy diskette missing “Problem” A problem occurred and CopyCam needs to reboot “Disk full” Floppy diskette is full “Web problem” Web server not responding: contact Technical Support “Disk problem” Floppy diskette unformatted or bad “Low light” Low light conditions result in longer capture time “Hardware problem” Hardware failure: contact Technical Support “Calibration needed” Cannot detect borders and calibration has not been performed “Calibration done” Calibration is complete and CopyCam is ready for use “Calibration problem” Calibration unsuccessful TROUBLESHOOTING 27 Userguide_RevA_4.fm Page 28 Friday, January 18, 2002 11:07 AM 28 TROUBLESHOOTING