1
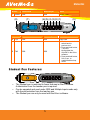
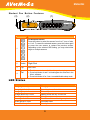
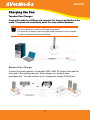
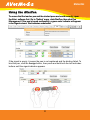
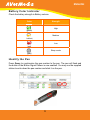
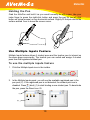
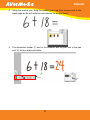
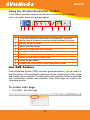
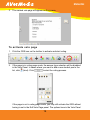
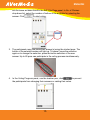
ENGLISH Federal Communication Commission Interference Statement This equipment has been tested and found to comply with the limits for a Class B digital device, pursuant to Part 15 of the FCC Rules. These limits are designed to provide reasonable protection against harmful interference in a residential installation. This equipment generates, uses and can radiate radio frequency energy and, if not installed and used in accordance with the instructions, may cause harmful interference to radio communications. However, there is no guarantee that interference will not occur in a particular installation. If this equipment does cause harmful interference to radio or television reception, which can be determined by turning the equipment off and on, the user is encouraged to try to correct the interference by one of the following measures: - Reorient or relocate the receiving antenna. - Increase the separation between the equipment and receiver. - Connect the equipment into an outlet on a circuit different from that to which the receiver is connected. - Consult the dealer or an experienced radio/TV technician for help. This device complies with Part 15 of the FCC Rules. Operation is subject to the following two conditions: (1) This device may not cause harmful interference, and (2) this device must accept any interference received, including interference that may cause undesired operation. FCC Caution: Any changes or modifications not expressly approved by the party responsible for compliance could void the user's authority to operate this equipment. IMPORTANT NOTE: FCC Radiation Exposure Statement: This equipment complies with FCC radiation exposure limits set forth for an uncontrolled environment. End users must follow the specific operating instructions for satisfying RF exposure compliance. This transmitter must not be co-located or operating in conjunction with any other antenna or transmitter. C E NOTICE This is a Class B product. Class I LED Product ENGLISH D I SCLA I ME R No warranty or representation, either expressed or implied, is made with respect to the contents of this documentation, its quality, performance, merchantability, or fitness for a particular purpose. Information presented in this documentation has been carefully checked for reliability; however, no responsibility is assumed for inaccuracies. The information contained in this documentation is subject to change without notice. In no event will AVerMedia be liable for direct, indirect, special, incidental, or consequential damages arising out of the use or inability to use this product or documentation, even if advised of the possibility of such damages. TR ADEMARK S AVerMedia and AVerPen are registered trademarks of AVerMedia INFORMATION, Inc. IBM PC is a registered trademark of International Business Machines Corporation. Macintosh is a registered trademark of Apple Computer, Inc. Microsoft is a registered trademark and Windows is a trademark of Microsoft Corporation. All other products or corporate names mentioned in this documentation are for identification and explanation purposes only, and may be trademarks or registered trademarks of their respective owners. COPYR IGHT © 2009 by AVerMedia INFORMATION, Inc. All rights reserved. No part of this publication may be reproduced, transmitted, transcribed, stored in a retrieval system, or translated into any language in any form by any means without the written permission of AVerMedia INFORMATION, Inc. THE MARK OF CROSSED-OUT WHEELED BIN INDICATES THAT THIS PRODUCT MUST NOT BE DISPOSED OF WITH YOUR OTHER HOUSEHOLD WASTE. INSTEAD, YOU NEED TO DISPOSE OF THE WASTE EQUIPMENT BY HANDING IT OVER TO A DESIGNATED COLLECTION POINT FOR THE RECYCLING OF WASTE ELECTRICAL AND ELECTRONIC EQUIPMENT. FOR MORE INFORMATION ABOUT WHERE TO DROP OFF YOUR WASTE EQUIPMENT FOR RECYCLING, PLEASE CONTACT YOUR HOUSEHOLD WASTE DISPOSAL SERVICE OR THE SHOP WHERE YOU PURCHASED THE PRODUCT. ENGLISH Table of Contents Package Contents ........................................................................... 1 AVerPen Specifications .................................................................. 2 Introduction ..................................................................................... 3 Minimum System Requirements ................................................... 3 Teacher Pen Features ..................................................................... 4 Teacher Pen Button Features............................................................... 4 Student Pen Features: .................................................................... 5 Student Pen Button Features ............................................................... 6 LED Status ....................................................................................... 6 Charging the Pen ............................................................................ 7 Teacher Pen Charger ........................................................................... 7 Student Pen Charger............................................................................ 7 Using the AVerPen .......................................................................... 8 Battery Color Indicator ......................................................................... 9 Identify the Pen .................................................................................... 9 Holding the Pen.................................................................................. 10 Use Multiple Inputs Feature ......................................................... 10 To use the multiple inputs feature....................................................... 10 Using the Student Annotation Toolbar ................................................ 12 Use GRS Feature........................................................................... 12 To create vote page............................................................................ 12 To activate vote page ......................................................................... 14 Troubleshooting ............................................................................ 16 Limited Warranty........................................................................... 17 ENGLISH Packa ge Contents Make sure the following items are included in the package. Starter Pack Classroom Pack Add on Pack Teacher Pack QTY QTY QTY QTY Installation CD 1 1 0 1 User Manual CD 1 2 1 1 AC Adapter 1 2 1 0 USB Cable 1 1 0 1 Lanyard Chord 1 1 0 1 Pen Pouch 1 2 1 0 Warranty Card 1 2 1 1 Quick Guide 1 2 1 1 Pen Sticker 1 2 1 1 Teacher Pen 1 1 0 1 Student Pen 4 8 4 0 Charger 1 2 1 0 Cradle 1 1 0 1 Mouse Pad 5 9 4 1 Items 1 ENGLISH AV e r P e n S p e c i f i c a t i o n s Color Teacher pen: blue & metallic gray ; Student pen: orange & metallic gray Length 5.94in (151mm) Weight 1.14oz (32.4g) Buttons 6 response / presenter buttons, right-click button, tail button, pen tip button Wireless technology 2.4GHz RF Wireless Range 50ft (15m) Bandwidth supports up to 7 AVerPen simultaneous operation Memory register up to 60 AVerPens Pen tip technology proprietary optical sensor Connectivity USB charging cradle Battery Built-in rechargeable lithium-ion polymer Battery time 5 days per full charge, under typical usage time Power adapter input : 100-240V / 50-60Hz / 0.4A output : 5V / 3A Operating temperature 0-40°C (32-104°F) Warranty 2 years for the AVerPen, charger and cradle. 1 year for the battery and accessories. Certifications FCC, CE 2 ENGLISH Introduction AVerPen uses optical sensor technology which allows you to use it as a digital pen, mouse, and wireless presentation/media player controller for teacher, or 6button response tool for student. This pen tool is especially designed for classroom and group discussion to promote participation, improve comprehension, and increase retention. You can hold AVerPen like you would normally hold a pen and together with the bundled AVer+ software you can enjoy its empowering ability. The bundled AVer+ software allows the students to interact with each other, vote with student GRS (Group Response System) feature, and write on the same page at the same time. This ultimate AVerPen tool can register up to 60 student pens to 1 teacher pen. AVerPen makes your classroom discussion interactive and fun. Please note that this guide only talks about the AVer+ software features which pertains to the AVerPen. Please go through the online help available through the AVer+ software menu to learn more about the full functionalities of the AVer+ software. M i ni m u m S y s t e m Re q u i r em en t s For Windows XP Intel Pentium III 1 GHz or later x86 processor (Intel Core 2 Duo 1.66GHz recommended) 512 MB of RAM (1 GB recommended) 100 MB free hard disk space for basic installation (w/o Gallery content) CD-ROM and USB 1.1 or compatible For Windows Vista Intel Core Duo 1.5 GHz or later x86 processor (Intel Core 2 Duo 1.66GHz recommended) 1 GB of RAM (2 GB recommended) 100 MB free hard disk space for basic installation (w/o Gallery content) CD-ROM and USB 1.1 or compatible For Mac OS 10.4 and later 1GHz G4 processor or Intel Core Duo 1.83 GHz or later x86 processor (Intel Core 2 Duo 2.0 GHz recommended) 1 GB of RAM (2 GB recommended) 100 MB free hard disk space for basic installation (w/o Gallery content) CD-ROM and USB 1.1 or compatible 3 ENGLISH Te a c h e r P e n F e a t u r e s The Teacher pen behaves like a master pen. It can fully control all the functions in AVer+. Collaboration with student pens in GRS (Group Response System) and Multiple Inputs features (Refer to “GRS” and “Multiple Inputs” for more details). Enable/disable student pen to operate in GRS and multiple input mode. Can be used as a typical optical wireless mouse. The pen tip can be used as the left mouse button and the right mouse button can be accessed using the index finger. Can be used as a wireless presentation tool when using PowerPoint and as a media player controller when you need to present video. Temporarily turn on/off the screen when presenting PowerPoint. Te ac he r Pe n But to n F eat ur es To operate PowerPoint or media player using the AVerPen, make sure the AVer+ Control is running in the taskbar. (8) (7) (6) (5) (4) (3) (2) (1) Button PowerPoint Media Player AVer+ 1 Start/stop slide show Play/pause video playback N/A 2 Go to next slide Fast Forward Next Page 3 Go to previous slide Rewind Previous Page 4 Turn screen on/off Stop N/A 5 Volume up Volume up N/A 6 Volume down Volume down N/A 4 (9) ENGLISH Button PowerPoint Media Player AVer+ 7 N/A N/A Right Click Index (8) (7) (6) (5) (4) (3) (2) (1) (9) Button PowerPoint Media Player AVer+ 8 N/A N/A Left Click N/A Enable eraser tool or switch back to previous tool. Press and hold button 7 and 9 to bind/register the AVerPen in the AVer+ software. Press and hold button 9 for 3 sec. to enable/disable sleep mode. 9 Tip Tail N/A S t u d e n t Pe n Fe a t u r e s : The Student pen is restricted to fewer features in AVer+ software. Authorization from the teacher pen is required. Can be operated and used under GRS and Multiple Inputs mode only with the authorization from the teacher pen. The Student pen can only be used with the AVer+ software. 5 ENGLISH St ude nt Pe n But ton F eat ur es (3) (2) Button (4) Function Six Response Button Press the button to select the answer from A to F, true or false, or 1 to 6. To cancel the selected answer, press the button again or press the new answer to replace the previous answer. Depending on the selected GRS setting, you may select either single or multiple answers. 1 2 Index Right Click 3 Tip Left Click 4 (1) Tail Enable eraser tool or switch back to previous tool. Press hold button 4 and 2 to bind/register the AVerPen in the AVer+ software. Press hold button 4 for 3 sec. to enable/disable sleep mode. L E D St at u s LED Status Orange light steady Orange light flash 3 times Orange light up in 3 sec Orange flash every 0.5 sec Green light steady Green light flash 3 times Green light up in 3 sec Green flash every 3 sec Pen Status Charging Searching the cradle to bind Enter sleep mode. Battery power low only 10-20% left Charge complete Found the cradle and binding completed. Exit sleep mode Standby mode 6 ENGLISH C h a r g i n g t h e Pe n Te ac he r Pe n Ch ar ger Connect the cradle to a USB port of a computer first, then put an AVerPen in the cradle. The system will automatically detect the newly installed hardware. Before using the AVerPen, it is recommended to charge the AVerPen for 2.5 hours minimum or until the LED light turns green. It is important to always keep the single cradle connected to the computer to receive commands from the AVerPens. St ude nt Pe n Ch ar ger Connect the power adapter to a standard 100V~240V AC power outlet and the other end to the cradle power port. Each charger can charge 4 pens simultaneously. You may connect up to 5 chargers to charge 20 AVerPens. 7 ENGLISH U s i n g t h e AV e r P e n To ensure that the teacher pen and the student pens are bound correctly, open the AVer+ software first. Go to “Setting” menu, click AVerPen, then click Pen Management. If the pen is bound successfully, a green color indicator will appear in the Signal column. Red indicates undetected. If the signal is empty, it means the pen is not registered and the binding failed. To bind the pen, click the Assign button, then press and hold both the tail and index buttons until the signal indicator appears. 8 ENGLISH Battery Color Indicator Check the battery strength in Battery column. Color Strength High (green) Medium (yellow) Low (red) Sleep mode (gray) Identify the Pen Press Query to synchronize the pen number to the pen. The pen will flash and the button in the Button Signal Pattern is now enabled. You may use the supplied sticker to write down the pen number and stick it on the pen. 9 ENGLISH Holding the Pen Grab the AVerPen and hold it as you would normally do with a pen. Use your index finger to press the right-click button and press the pen tip (as left click button on typical mouse) on any horizontal surface. Slightly lift the pen above the surface around 1mm to move the screen cursor. U s e M u l t i p l e I n p u t s Fe a t u r e Multiple Inputs feature allows 6 student pens and the teacher pen to interact on the same page concurrently. The teacher pen can switch and assign 6 student pens from the registered student pen. To use the multiple inputs feature 1. Click the Multiple Inputs icon in the toolbar. 2. In the Multiple Inputs panel, you will see the available registered pen in the pen pool (2). If the registered pen is not detected, the student pen icon is (bind) (1) to start binding a new student pen. To deactivate disabled. Press the pen, press the Reset icon (3). (1) (3) (2) 10 ENGLISH 3. Using the teacher pen, drag the enabled pen icon from the pen pool to the blank page as this will authorize and activate the student pens. 4. The annotation toolbar (1) are for the students and the pen icon in the pen pool (2) will turn black and white. (1) (2) 11 ENGLISH Using the Student Annotation Toolbar In the student annotation toolbar, you can use the student pen to select the colors, line width, eraser size and pen speed. (1) (2) (3) No. 1 2 3 4 5 6 7 8 9 (4) (5) (6) (7) (8) (9) Function Close the toolbar and deactivate the student pen. Only the teacher pen is allowed to close the student annotation toolbar. Display the pen number. Switch to cursor mode. Switch to another pen color selection. Select the line color. Switch to eraser mode. Select the line width or eraser size. Select the pen speed. Expand and minimize the student annotation toolbar. U s e G R S Fe a t u r e Group Response System (GRS) promotes group participation. You can show or hide the answer of the participants. Questions can be set with true or false, single and multiple answer formats. The GRS feature also provides 4 different animated voter participation indicator and countdown timer. Each page can support one Vote page question. To create vote page 1. Click GRS > Edit Vote Page. 12 ENGLISH 2. In the Edit Vote Page Panel, you may create/edit the question and select the GRS options. (8) (3) (1) (4) (2) (6) (5) (9) (10) (7) No. 1 2 3 4 5 6 7 8 9 10 Function Type the question. Type the answer selection on each number. You can display maximum of 6 answer selections on the screen. The check box beside the number can be used to mark the correct answer. If you want to remove an answer selection, click on the number to make a selection and press . To add, press . to hide and to show the answer of the Click participants. Select the answer type. Click for question answerable by true or false and for single or multiple answers selection. Select from 4 different indicators. This will show the voter participation graph. Select from 4 different countdown timers. The countdown timer is set to 5 seconds. After 5 second, the participants can cast their votes. Insert a new vote page. A new page will be added in the page browser. Switch to previous or next voting page. Close and display the created/edited vote page. Cancel creating/editing vote page. 13 ENGLISH 3. The created vote page will appear on the screen. To activate vote page 1. Click the GRS icon on the toolbar to activate and start voting. 2. If the page is in voting page mode, the answer type selection will be disabled in the Vote Panel. In cases where you want to add a new student pen to the (bind). Click to start the voting process. list, click If the page is not in voting page mode, you may still activate the GRS without having to set in the Edit Vote Page panel. The options here in the Vote Panel 14 ENGLISH are the same as those found in the Edit Vote Page panel. In No. of Choices drop-down list, select the number of buttons to be available for selecting the answer. Click to start voting. 3. The participants may now press their answer(s) using the student pens. The button of the selected answer will light up. To cancel, press the selection again or to change the selection, press the button selection of the new answer. Up to 60 pens can participate in the voting process simultaneously. 4. In the Voting Progress panel, use the teacher pen, click to prevent the participants from changing their answers or casting their votes. 15 ENGLISH 5. The answers of the participants can be viewed in 3 different graphical charts: Pie, Bar, or Table. In the Pie and Bar type, you will see the number of participants that selected the answers. In Table format, the gold, silver and bronze stars represent the first three participants that sent back their feedbacks. Tr o u b l e s h o o t i n g This section provides many useful tips on how to solve common problems while using the AVerPen. I couldn’t seem to control the mouse cursor on the screen after leaving the AVerPen on the table for a few minutes. The AVerPen automatically switches to sleep mode whenever there is no activity. This method is primarily utilized to conserve battery power. To “wake” up the pen, press and hold the tail for around 3 seconds. The LED light will turn on. I can’t use the GRS and Multiple Inputs. The icons are disabled. The software could not find the teacher cradle. Connect the teacher cradle to computer’s USB port again or to a different USB port for the computer to detect the teacher cradle. 16 ENGLISH I couldn’t seem to identify which ID each student pen belongs to. In the AVer+ menu bar, click Settings > AVerPen > Pen Management. Press Query to synchronize the pen number to the pen (Do this only when the pens are “awake” and out of the charging cradle). The pen will flash and the button in the Button Signal Pattern is now enabled. You may use the supplied sticker to write down the pen number and stick it on the pen. I have clicked (bind) in Multiple Inputs or Vote Panel but still the icon(s) in the pen pool remains gray. The student pen could be in sleep mode, low battery or out of range. Check the student pen status in Pen Management and refer to Using the AVerPen section. The pen number in student annotation toolbar suddenly turns black. The user must have switched the student pen into sleep mode. Press the tail button for 3 sec to switch back to active mode. Li m i ted War r anty For a period of time beginning on the date of purchase of the applicable product and extending as set forth in the “Warranty Period of AVerMedia Product Purchased” section of the warranty card, AVerMedia Information, Inc. (“AVerMedia”) warrants that the applicable product (“Product”) substantially conforms to AVerMedia’s documentation for the product and that its manufacture and components are free of defects in material and workmanship under normal use. “You” as used in this agreement means you individually or the business entity on whose behalf you use or install the product, as applicable. This limited warranty extends only to You as the original purchaser. Except for the foregoing, the Product is provided “AS IS.” In no event does AVerMedia warrant that You will be able to operate the Product without problems or interruptions, or that the Product is suitable for your purposes. Your exclusive remedy and the entire liability of AVerMedia under this paragraph shall be, at AVerMedia’s option, the repair or replacement of the Product with the same or a comparable product. This warranty does not apply to (a) any Product on which the serial number has been defaced, modified, or removed, or (b) cartons, cases, batteries, cabinets, tapes, or accessories used with this product. This warranty does not apply to any Product that has suffered damage, deterioration or malfunction due to (a) accident, abuse, misuse, neglect, fire, water, lightning, or other acts of nature, commercial or industrial use, unauthorized product modification or failure to follow instructions included with the Product, (b) misapplication of service by someone other than the manufacturer’s representative, (c) any shipment damages (such claims must be made with the carrier), or (d) any other causes that do not relate to a Product defect. The Warranty Period of any repaired or replaced Product shall be the longer of (a) the original Warranty Period or (b) thirty (30) days from the date of delivery of the repaired or replaced product. Limitations of Warranty AVerMedia makes no warranties to any third party. You are responsible for all claims, damages, settlements, expenses, and attorneys’ fees with respect to claims made against You as a result of Your use or misuse of the Product. This warranty applies only if the Product is installed, operated, maintained, and used in accordance with AVerMedia specifications. Specifically, the warranties do not extend to any failure caused by (i) accident, unusual physical, electrical, or electromagnetic stress, neglect or misuse, (ii) fluctuations in electrical power beyond AVerMedia specifications, (iii) use of the Product with any accessories or options not furnished by AVerMedia or its authorized agents, or (iv) 17 ENGLISH installation, alteration, or repair of the Product by anyone other than AVerMedia or its authorized agents. Disclaimer of Warranty EXCEPT AS EXPRESSLY PROVIDED OTHERWISE HEREIN AND TO THE MAXIMUM EXTENT PERMITTED BY APPLICABLE LAW, AVERMEDIA DISCLAIMS ALL OTHER WARRANTIES WITH RESPECT TO THE PRODUCT, WHETHER EXPRESS, IMPLIED, STATUTORY OR OTHERWISE, INCLUDING WITHOUT LIMITATION, SATISFACTORY QUALITY, COURSE OF DEALING, TRADE USAGE OR PRACTICE OR THE IMPLIED WARRANTIES OF MERCHANTABILITY, FITNESS FOR A PARTICULAR PURPOSE OR NONINFRINGEMENT OF THIRD PARTY RIGHTS. Limitation of Liability IN NO EVENT SHALL AVERMEDIA BE LIABLE FOR INDIRECT, INCIDENTAL, SPECIAL, EXEMPLARY, PUNITIVE, OR CONSEQUENTIAL DAMAGES OF ANY NATURE INCLUDING, BUT NOT LIMITED TO, LOSS OF PROFITS, DATA, REVENUE, PRODUCTION, OR USE, BUSINESS INTERRUPTION, OR PROCUREMENT OF SUBSTITUTE GOODS OR SERVICES ARISING OUT OF OR IN CONNECTION WITH THIS LIMITED WARRANTY, OR THE USE OR PERFORMANCE OF ANY PRODUCT, WHETHER BASED ON CONTRACT OR TORT, INCLUDING NEGLIGENCE, OR ANY OTHER LEGAL THEORY, EVEN IF AVERMEDIA HAS ADVISED OF THE POSSIBILITY OF SUCH DAMAGES. AVERMEDIA’S TOTAL, AGGREGATE LIABILITY FOR DAMAGES OF ANY NATURE, REGARDLESS OF FORM OF ACTION, SHALL IN NO EVENT EXCEED THE AMOUNT PAID BY YOU TO AVERMEDIA FOR THE SPECIFIC PRODUCT UPON WHICH LIABILITY IS BASED. Governing Law and Your Rights This warranty gives you specific legal rights; You may also have other rights granted under state law. These rights vary from state to state. For warranty period, please refer to the warranty card. 18