1
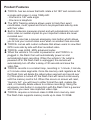
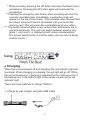
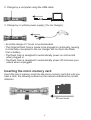
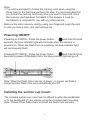
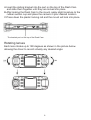
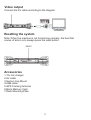
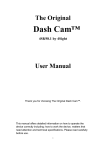
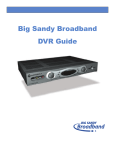
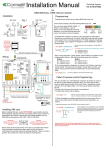
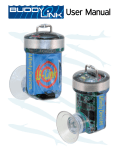
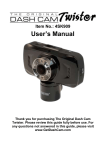
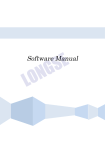
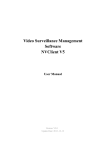
4SKCO1
4SKCO1
Contents
Product Features......................................................................1
About this manual.....................................................................2
Notices for use.........................................................................3
Knowing the product.................................................................4
Using TODC+…..…..................................................................5
Charging.................................................................................5
Inserting Micro Memory card.....................................................6
Powering ON/OFF ...................................................................7
Installing Suction Cup Mount.....................................................7
Rotating lenses........................................................................8
Basic operations......................................................................9
Switching between modes……………………................................9
Video mode..............................................................................9
Recording video.......................................................................9
Video Mode Hot-Keys...............................................................9
Special functions....................................................................10
Video Mode Menu Settings......................................................11
Still Photo Mode…………….....................................................12
Taking a picture.....................................................................12
Still Photo Menu settings........................................................12
Playback Mode.......................................................................13
Playback settings...................................................................14
Using TODC media player........................................................14
Video Output..........................................................................17
Resetting the system..............................................................17
Accessories...........................................................................18
Product Features
◆ TODC2+ has two lenses that both rotate a full 180° and records onto
a single split screen in crisp 1080p HD:
- One lens is 140° wide angle
- One lens is telephoto
◆ The GPS Tracking antenna allows users to track their exact
coordinates, route, speed and time to be played back side by side
with their video
◆ Built in G-Sensor measures impact and will automatically lock and
store video on sudden impact so your important videos are never
recorded over
- TODC2+ also has a manual emergency lock button which allows
you to lock your current video even when no accident has occurred.
◆ TODC2+ comes with custom software that allows users to view their
GPS route side by side with their recorded video
◆ TODC2+ uses H.264 .MOV advanced codec
◆ When the vehicle’s 12v outlet is powered on and TODC2+ is
plugged in, the Dash Cam will automatically power on and
automatically begin recording. When the vehicle’s 12v outlet is
powered off or the Dash Cam is unplugged, the camera will
automatically turn off after a delay of 30 seconds and save the
video files.
◆ TODC2+ records in a constant loop, recording in 1 minute, 3 minute,
or 5 minute video segments. Once the memory card registers as full,
the Dash Cam will delete the oldest video segment and record over
it (if this option is turned off, the Dash Cam will record continuously
until the memory card is full. When this occurs on screen will read,
“memory full”; you will have to either format the card, replace the
card, or manually delete videos to continue recording). Using the
emergency lock button in conjunction with the Dash Cam’s g-sensor
will insure you never lose important video clips.
◆ TODC2+ requires a minimum class 6 4GB micro memory card.
The Dash Cam supports memory cards up to class 10 32GB.
1
About this manual
The Original Dash Cam team continually makes updates and
improvements to our devices, some functions of the device may vary
slightly from what is contained within this manual. The Original Dash
Cam shall be entitled to modify the content or software without prior
notice and the manufacturer shall be entitled to modify technical
specifications without prior notice. The accessories included with your
device may differ with what is outlined in this manual.
2
Notices for use
● Do not charge in extreme temperatures or high-humidity
environments. Do not leave outdoors or exposed to direct sunlight
for a prolonged period of time.
● Please charge TODC2+ fully prior to first use. An initial charge time
of 7 hours is recommended.
● Do not adjust TODC2+ in any way while driving; be sure to make any
necessary adjustments to the camera’s settings before driving.
● Do not use or place the Dash Cam in dusty, dirty, or sandy areas -the components will be damaged.
● Operating temperature: 0°~140°F
● Do not drop, strike or puncture the Dash Cam.
● Be sure to remove any lens-protector prior to first use, to ensure
your videos will be clear
● Please keep the lens clean and clear, do not use foreign objects,
oils, or cleaners to clean the lens. If necessary, use a certified
microfiber cloth to clean the lens without scratching.
● When using a new micro memory card, please format the card in the
Dash Cam to be sure it is set to the correct settings.
● If you will be out of the vehicle for a long period of time in direct
sunlight, it is recommended that the Dash Cam is removed and
placed in a cooler area.
3
Knowing the product
Power button
Power/Charging/Status Indicator
Micro Memory card slot
UP button*
RESET button
Menu button
AV out
Emergency lock button**
DC in
TFT-LCD display
Mount slide
Switch screens button***
GPS connector
Microphone
Confirm button (OK key)
Down button
Mode button
Lens 1
GPS indicator
Lens 2
4
* While recording, pressing the UP button will mute the Dash Cam’s
microphone. Pressing the UP button again will reactivate the
microphone
** Pressing the emergency lock button while recording will store the
currently recorded video immediately, a protection mark will
appear on the top of the screen . The recorded video files will then
be locked, stored and cannot be deleted until you format the
memory card. This will insure the completeness of your video.
*** The switch screens button is only active when both lenses are in
use simultaneously. The user can switch between viewing only
lends 1, only lens 2, or displaying both lenses simultaneously.
The screen switch button is inactive when only one lens is being
used to record.
Using
● Charging
When the unit is powered off and charging, the red indicator light will
illuminate. When charging is complete, the red light will go off. While
the unit is powered on, charging is indicated by the continue scroll of
the battery icon in the bottom right of the screen as well as the red
indicator light.
There are three methods to charge TODC2+:
1. Charge by wall charger using the USB Cable
5
2. Charge by a computer using the USB cable
3. Charge by in vehicle power supply (12v car charger).
- An initial charge of 7 hours is recommended.
- The Original Dash Cam is made to be plugged in continually, leaving
it continually connected to the car charger will not harm the Dash
Cam’s battery.
- The Dash Cam is designed to automatically power on and record
when plugged in.
- The Dash Cam is designed to automatically power off and save your
videos when unplugged.
Inserting the micro memory card
Insert the micro memory card into the micro memory card slot until you
hear a click; the drawing outlined on the camera indicates the correct
direction.
SD card insert
6
Note:
1.You will be prompted to format the memory card when using the
Dash Cam for the first time; perform this step. It is recommended that
you format the memory card every time you insert a new card. Once
the memory card has been formatted in this camera, it must be
formatted in a computer for use with any other camera.
Remove the micro memory card by using your fingernail; push the card
in until you hear a click-- the card will pop out.
Powering ON/OFF
Powering on TODC2+: Press the power button
and hold for three
seconds, the blue indicator light will illuminate when the camera is
powered on. When the Dash Cam is recording, the blue indicator light
will continuously flash.
Powering off TODC2+: Press the power button
and hold for three
seconds to power off the Dash Cam, the blue indicator light will go off.
Note: When the Dash Cam runs out of power, on screen will flash a
prompt and the Dash Cam will automatically shut off.
Installing the suction cup mount
The included suction cup mount can be affixed to either the windshield
or to the dashboard of your vehicle using the included dash mounting
plate. Please follow these steps to mount the Dash Cam securely:
7
A.Insert the sliding bracket into the port on the top of the Dash Cam
and slide them together until they are locked into place
B.After locking the Dash Cam to the mount, apply slight moisture to the
rubber suction cup and place the camera in your desired location
C.Press down the plastic locking rod and the mount will lock into place.
The bracket port on the top of the Dash Cam
Rotating lenses
Each lens rotates up to 180 degrees as shown in the picture below
allowing the driver to record virtually any desired angle:
8
Basic operations
The Original Dash Cam 2+ has three basic modes: Video Mode, Still
Photo Mode, and Playback Mode
Switching between modes
Press the MODE button to switch between video, still photo and
playback modes (recording must be stopped in order to switch
between modes).
Video Mode
Recording Video
When the memory card is inserted, connecting an active car charger
to the Dash Cam will automatically power on the camera and recording
will begin automatically. When the Dash Cam is unplugged or the 12v
outlet becomes inactive, the Dash Cam will automatically power down
after a 30 second delay and save the video files.
Video Mode Hot-Keys
1. In video mode, pressing the OK button will start and stop recording.
2. Pressing the MODE button while the Dash Cam is recording will
adjust the lens’ exposure value (EV). Adjusting the EV allows more
or less light into the lens depending on the recording situation.
3. While recording, the MENU button remains inactive.
4. While recording, pressing the emergency lock button
will
immediately store the video file being recorded. The video for 60
seconds before and after pressing the button will be captured and
stored, and will not be deleted. One third of the device’s memory is
set aside for this function, when it indicates full, store the videos
you wish to keep on your computer, or if you do not wish to keep any
files, perform a format of the memory card to delete ALL videos.
CAUTION: Performing a format of the memory card will erase ALL
data including locked videos.
5. In video mode, pressing the UP button will turn off the Dash Cam’s
microphone and display this following icon
in the top left of the
display screen. Press the UP button again to turn the microphone
back on. The following icon indicates the microphone is on:
6. In video mode, pressing the DOWN button will turn off the display
screen to save power. Press the DOWN button again to turn the
display screen back on.
9
7. The switch screens button is only active when both lenses are in
use simultaneously. The user can switch between viewing only
lends 1, only lens 2, or displaying both lenses simultaneously.
The screen switch button is inactive when only one lens is being
used to record.
Special functions
1. Understanding the G-sensor
In the system settings, the G-sensor can be set to high sensitivity,
middle sensitivity, low sensitivity or OFF; When turned on, the screen
will display this icon
(Default setting). The number of “S” in the icon
represents the current selected sensitivity level. One S reflects low
sensitivity and three S’s reflect high sensitivity.
-When an emergency event is detected (a violent shake, bump, or
abrupt breaking) the display screen will show this icon indicating
that the file has been locked and will be stored. That video file
cannot be overwritten and can only be deleted by formatting the
memory card.
2.Using the GPS tracking antenna
-To get started with the GPS tracking antenna, first power on the
Dash Cam and enter the Dash Cam’s menus by pressing the MENU
button (recording must be stopped).
-Press the MODE button twice to access the settings menu.
-Using the DOWN button, scroll down until GPS is highlighted and
press OK.
-Use the UP or DOWN button to highlight ON and press OK (a check
mark will appear next to the option you select to confirm you have
selected it).
-Press the MENU button twice to exit the GPS and settings menus
and return to the home screen. To confirm that the GPS function has
been turned on, this icon
will appear on the top of the screen.
-To connect the GPS tracking antenna to TODC2+, simply plug in
the trackers’ miniUSB plug into the plug labeled GPS on the top of
the Dash Cam as show below:
10
-Once the Dash Cam is connected to the GPS tracker and signal has
been acquired the GPS icon
as well as the GPS indicator light
will begin to flash.
-Using the tracker ’s sticky pad, mount the GPS tracker anywhere in
the vehicle that has an open view of the sky (this will allow the
tracker to easily communicate with the satellite).
-TODC2+ is now logging your exact route, speed, and coordinates!
-For information on how to view your Dash Cam video side by side
with your GPS overlay refer to pages 10-17 of this manual.
Video mode menu settings
In video mode, pressing the MENU button will display the video mode
menu on screen (recording must be stopped). Once the menu is open,
use the MODE button to switch between Video Resolution, Recording
Time, and System Settings. Use the UP and DOWN buttons to move
the highlighted box; use the OK button to select what is highlighted.
To return to the home screen, press the MENU button at any time.
Menu Names
Sub-Menu Options
1
Resolution
VGA/1080P-UD/1080P-LR*
2
Recording Time
3
System Settings
Menu Names
1
Resolution
1 Min/2Min/5Min/Off **
1
Brightness
Auto/Sunlight/Fluorescence/Cloudy/Sky/Tungsten
2
Exposure
-3/-2/-1/0/1/2/3
3
Color
Null/Black And White/Negative/Ancient/Reseda
4
Motion Detector
OFF/ON*
5
Time Stamp
OFF/ON**
6
Audio Record
OFF/ON***
7
Auto Record
OFF/ON
8
Language
English/Russian/Spanish/German/Japanese/ Korean
9
Frequency
50Hz/60Hz
10
TimeZone
Time Zone GMT -12 ~Time Zone +12****
11
G_SENSOR
High/Medium/Low/Close
12
GPS
OFF/ON
13
IRLed Mode
OFF/ON
14
Date Set
Time/Date Setup*****
15
Format
Yes/No******
16
Default Set
Yes/No
17
Version
FDV VER3.3H
Sub-Menu Options
11
VGA/1080P-UD/1080P-LR*
* When ON, the TODC2+ will begin recording when motion is
sensed. When motion is ceased for more than 15 seconds,
recording will stop.
** Turn this option on in order to have the Time Stamp
watermarked on your video
*** Turning this option ON or OFF will activate or deactivate the
Dash Cam’s microphone
**** Eastern Standard Time = -5, Central Time Zone = -6, Mountain
Time Zone = -7, Pacific Time Zone = -8
***** Use the UP and DOWN buttons to adjust the date/time currently
selected in red. Press OK to move to the next item. When you
are finished entering the correct date and time, press OK one
last time to activate and return to the System Settings menu.
****** CAUTION; formatting the memory card will erase all data
including locked video files
Still photo mode
Taking a picture
From video mode, press the MODE button once to switch into still
photo mode (recording must be stopped). In still photo mode, the 140°
wide angle lens is used to take still pictures. Pressing the OK button in
this mode will take a single picture.
Still photo mode menu settings
In still photo mode, pressing the MENU button will display the still
photo mode menu on screen. Once the menu is open, use the MODE
button to switch between Photo Resolution, and System Settings. Use
the UP and DOWN buttons to move the highlighted box; use the OK
button to select what is highlighted. To return to the home screen,
press the MENU button at any time.
12
Menu Names
Sub-Menu Options
1
Resolution
VGA/1080P-UD/1080P-LR*
2
Recording Time
3
System Settings
1 Min/2Min/5Min/Off **
1
Brightness
Auto/Sunlight/Fluorescence/Cloudy/Sky/Tungsten
2
Exposure
-3/-2/-1/0/1/2/3
3
Color
Null/Black And White/Negative/Ancient/Reseda
4
Motion Detector
OFF/ON*
5
Time Stamp
OFF/ON**
6
Audio Record
OFF/ON***
7
Auto Record
OFF/ON
8
Language
English/Russian/Spanish/German/Japanese/ Korean
9
Frequency
50Hz/60Hz
10
TimeZone
Time Zone GMT -12 ~Time Zone +12****
11
G_SENSOR
High/Medium/Low/Close
* Turn this option12on GPS
in order to have
the Time Stamp watermarked
OFF/ON
on your video
13 IRLed Mode
** Use the UP and
DOWN buttonsOFF/ON
to adjust the date/time currently
Time/Date
Date OK
Set to move
selected in red.14Press
to theSetup*****
next item. When you are
finished entering
correct date
and time, press OK one last
15 the
Format
Yes/No******
time to activate16andDefault
return
System Settings menu.
Setto theYes/No
*** CAUTION; formatting
the memory
card will erase all data
17 Version
FDV VER3.3H
including locked video files
Menu Names
Sub-Menu Options
1
Resolution
VGA/1080P-UD/1080P-LR*
2
Recording Time
1 Min/2Min/5Min/Off **
1
Delete
One/All*
Playback Mode
From video mode, press the MODE button twice to enter video
Auto/Sunlight/Fluorescence/Cloudy/Sky/Tungsten
1 Brightness
3
System
Settings
playback
mode
(recording
must be stopped).
On screen will appear
Exposure
2 that
-3/-2/-1/0/1/2/3
the last video or photo
you captured.
Video files are saved as AVI
format and photos are
Null/Black And White/Negative/Ancient/Reseda
3 saved
Color in JPG format.
1. Use the UP and
buttons
to scroll through your files and
4 DOWN
Time Stamp
OFF/ON*
select the video
wish to playback.*
Language
5 you
OFF/ON**
2. Press the OK 6button
to start playing
back your selected video.
Frequency
OFF/ON***
3. Press the OK button to pause and resume playback
7 Date Set
OFF/ON
4. While video is playing, use the UP button to rewind and the
DOWN button8 to Format
fast forward English/Russian/Spanish/German/Japanese/ Korean
5. Press the MENU
9 Default
buttonSetto exit50Hz/60Hz
out of the video you currently
have selected10to Version
begin scrolling
through
FDV
VER3.3Hyour files again.
*The
file number Sub-Menu
is displayed
on the top of the screen as “1 of 20,
Options
Menu Names
2 of 20” etc.
13
Playback settings
In playback mode, pressing the MENU button will display the playback
mode menu on screen. Use the UP and DOWN buttons to move the
highlighted box; use the OK button to select what is highlighted. To
return to the home screen, press the MENU button at any time.
Menu Names
Sub-Menu Options
1
Resolution
VGA/1080P-UD/1080P-LR*
2
Recording Time
3
System Settings
1 Min/2Min/5Min/Off **
* CAUTION; choosing “All” will erase all data including locked video files
1
Brightness
Auto/Sunlight/Fluorescence/Cloudy/Sky/Tungsten
2
Exposure
-3/-2/-1/0/1/2/3
Custom video player
3 Color
Null/Black And White/Negative/Ancient/Reseda
Introduction
4 Motion Detector OFF/ON*
The software included with TODC2+ is a custom media player
5 Time Stamp
OFF/ON**
specifically for viewing TODC2+ video side by side with the GPS
6 Audio Record
OFF/ON***
overlay.
7
Auto Record
OFF/ON
English/Russian/Spanish/German/Japanese/ Korean
Minimum system requirements
8 Language
CPU: Pentium 4 3.0Ghz
9 Frequency
50Hz/60Hz
Screen: minimum resolution
1280x1024
10 TimeZone
Time Zone GMT -12 ~Time Zone +12****
RAM: 1 GB
High/Medium/Low/Close
11 G_SENSOR
OS: Windows XP、Windows Vista (32bit/64bit) & Windows 7
OFF/ON
(32bit/64bit) 12 GPS
13
IRLed Mode
OFF/ON
Installing software 14 Date Set
Time/Date Setup*****
Step 1: Download the
Cam media
player .exe file to your
15 Dash
Format
Yes/No******
computer ’s hard drive
16 Default Set
Yes/No
Step 2: Run the DashCam Player.exe and follow the install
Version
FDVnot
VER3.3H
instructions.17
If the
installer does
launch immediately,
Options
Menu
Names
you
will need Sub-Menu
to run the
file as administrator (right click and
select, “run asVGA/1080P-UD/1080P-LR*
administrator)
1
Resolution
Note:
In orderTime
for the 1software
to work** optimally, please install
Recording
2
Min/2Min/5Min/Off
“Windows Media Player” and “QuickTime Player” software
3
System Settings
1
Brightness
Auto/Sunlight/Fluorescence/Cloudy/Sky/Tungsten
2
Exposure
-3/-2/-1/0/1/2/3
3
Color
Null/Black And White/Negative/Ancient/Reseda
4
Time Stamp
OFF/ON*
5
Language
OFF/ON**
6
Frequency
OFF/ON***
7
Date Set
8
Format
OFF/ON
14
9
Default Set
English/Russian/Spanish/German/Japanese/ Korean
50Hz/60Hz
The interface home screen is shown below:
Language
Google Maps
Overlay
Video
display area
G-Sensor
Data
Thumbnails
of imported
photos
Thumbnails
of imported
videos
Speed &
Distance
Video control
options
Settings
Video control options
Play progress
Time
Maximize
Take a Snapshot
KML
Save video file
Volume
Next file
Fast-Forward
Play
Rewind
Last file
Pause
15
Thumbnails of imported videos
Thumbnails of imported photos
Video import
Photo import
Delete
Delete
1. Playing Video in the custom media player
Select the video you wish to playback, then press the PLAY button to
view the video in the video display area.
When the video has been captured with GPS information, to the right
of your video will display a Google Maps overlay and display the
driving route on the map (must have an active internet connection).
The G-SENSOR information displays the change of gravity on 3 axes.
This is displayed in the G-Sensor area. This allows you to detect the
driving conditions and see whether there was an impact, hard stop, or
simply bumpy roads.
2. Viewing Photos in the custom media player
Select an image you wish to view; the photo will be shown in the video
display area.
16
Video output
Connect the AV cable according to the diagram.
Resetting the system
Note: When the machine is not functioning normally, the best first
course of action is to always press the reset button.
RESET
Accessories
1.12v Car charger
2.AV cable
3.Suction Cup Mount
4.USB cable
5.GPS Tracking Antenna
6.Micro Memory Card
7.Dash Mounting Plate
17
FCC STATEMENT
FCC declaration of conformity
Responsible party:
4Sight, Inc
3325 E. Shelby St.
Ontario, CA 91764
(909) 944-5511 Fax: (866) 285-5828
This device complies with Part 15 of the FCC Rules. Operation is
subject to the following two conditions:
(1) This device may not cause harmful interference, and
(2) This device must accept any interference received, including
interference that may cause undesired operation.
Note:
This equipment has been tested and found to comply with the limits for Class B
digital devices, pursuant to Part 15 of the FCC rules. These limits are designed
to provide reasonable protection against harmful interference in a residential
installation. This equipment generates, uses and can radiate radio frequency
energy and, if not installed and used in accordance with the instructions, may
cause harmful interference to radio communications. However, there is no
guarantee that interference will not occur in a particular installation. If this
equipment does cause harmful interference to radio or television reception,
which can be determined by turning the equipment off and on, the user is
encouraged to try to correct the interference by one or more of the following
measures:
● Reorient or relocate the receiving antenna
● Increase the separation between the equipment and receiver
● Connect the equipment into an outlet on a circuit different from that to which
the receiver is connected
● Consult the dealer or an experienced radio/TV technician for help2
Use of shielded cable is required to comply with Class B limits in Subpart B of
Part 15 of the FCC rules.
Do not make any changes or modifications to the equipment unless otherwise
specified in the manual. If such changes or modifications should be made, you
could be required to stop operation of the equipment.
Canada
Industry Canada (IC)
Unintentional emitter per ICES-003/NMB-003
This digital apparatus does not exceed the Class B limits for radio noise
emissions from digital apparatus as set out in the radio interference regulations
of Industry Canada.
Le present appareil numerique n'emet pas de bruits radioelectriques depassant
les limites applicables aux appareils numeriques de Classe B prescrites dans le
reglement sur le brouillage radioelectrique edicte par Industrie Canada.
18