1
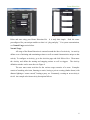
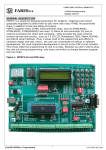
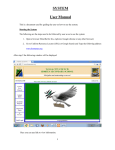
home kinection Homework 13: User Manual Team Code Name: __Home Kinection___________________________ Group No. ___1_ NOTE: This is one of the last sections needed to finish the Final Report. This homework will count toward each team member’s grade, and therefore all team members should participate equally in completing it. The User Manual should be about 5 pages in length (one page per bullet). User Manual Outline: § Brief (marketing-style) product description § Product illustration annotated with callouts for each control/display § Product setup instructions § Product use instructions § Product troubleshooting instructions Evaluation: SCORE DESCRIPTION Excellent – among the best papers submitted for this assignment. Very few 10 corrections needed for version submitted in Final Report. Very good – all requirements aptly met. Minor additions/corrections needed for 9 version submitted in Final Report. Good – all requirements considered and addressed. Several noteworthy 8 additions/corrections needed for version submitted in Final Report. Average – all requirements basically met, but some revisions in content should 7 be made for the version submitted in the Final Report. Marginal – all requirements met at a nominal level. Significant revisions in 6 content should be made for the version submitted in the Final Report. Below the passing threshold – major revisions required to meet report * requirements at a nominal level. Revise and resubmit. * Resubmissions are due within one week of the date of return, and will be awarded a score of “6” provided all report requirements have been met at a nominal level. 1 home kinection home kinection KINESICS APPLIED TO HOME CONTROL User Manual T he Home Kinection is a novel interface to traditional home automation systems. Where existing control systems fail, the Home Kinection excels. While home automation systems fail to enable the effortless control of appliances, the Home Kinection enables the user with nearly limitless control opportunities unencumbered by the confines of traditional remote control, touch panel, and remote sensor systems. The key advance in the Home Kinection product is the use of the Microsoft Kinect sensor for gesture and speech recognition. The Kinect is capable of watching a space for human subjects and detecting their movements. It then analyzes the observed motions with a skeletal model. The Home Kinection makes use of the skeletal model generated by the Kinect to detect user gestures. In addition, the Kinect has a directional microphone array that, in conjunction with advanced voice recognition software, allows the user to issue commands from anywhere in a room. Vision By using the Kinect to recognize gestures and voice commands, the Home Kinection allows unprecedented control of your home appliances. Imagine all the freedom afforded by a system that allows full home control from any point in a room without the need to have a physical remote in hand or move to a wall control unit. As soon as you enter a room, you could begin gesturing and speaking “at the room” to turn on lights, adjust the sun coming through the windows, change the channel on a television, increase the volume, and even browse the internet with full virtual touchscreen capabilities. Perhaps the greatest advantage of the Home Kinection is its situational awareness. Depending on the activity occurring, the Home Kinection system understands commands to mean different things. This powerful concept allows for the reuse of the limited number of basic gestures, for example. 2 home kinection Home Kinection Kit Your Home Kinection kit comes with all the components necessary to control and automate a typical living room. Included in the kit are the controller module, a dimmer module, an IR module, a shade module, and a USB Human Interface Device (HID) module. NB: These are not final images of the product. Power Button Kinect AC input Controller Module and Kinect Dimmer Dial IR Blaster port IR Module Dimmer Module Walwart in Shade PSU input IR receiver Shade control Output USB plug Shade Module Figure 1: Home Kinection Kit Contents USB HID module 3 home kinection Product Installation and Setup The Home Kinection is easy to install and setup. The wireless communications among modules avoids the use of running wires through walls. The modules were all designed to be plugged in and instantly identified by the system for configuration. The controller module provides an easy-to-use program to configure each unique Home Kinection installation. Outlined below are the steps for installation of the provided Home Kinection kit. Installation Instructions 1. Unbox all components and ensure no missing parts according to the diagram on the previous page. 2. Plug the controller module into wall power socket. Plug the Kinect into the controller’s designated Kinect port. Plug your TV or monitor display cable into the controller module. 3. Plug an incandescent light into the plug on the dimmer module and plug the dimmer module into the wall power socket. 4. Plug the USB HID device into any USB port on the computer you wish to control. This can be the controller module if you so choose. 5. Place the IR module near the equipment you wish to control (eg. in an A/V cabinet). Plug the wall power adapter (Walwart) into the wall power socket and module. Plug in the IR blaster cables and place the IR LEDs at the end of each cable in front of the equipment you wish to control. 6. The specific shade module provided in this kit interfaces with Lutron electronic shades. The power supply for the Lutron shade plugs into the shade module. The shade module must then be wired to the Lutron shade control box. Consult your Lutron manual for specific instructions to your shade model. Note: For reliable wireless communications, ensure that all modules are within approximately 10 meters of the controller module. Once the product is installed, all products LED status should have a slow beating green color indicating all is well. See the troubleshooting section for details on what to do should your LED status indicator have problems. 4 home kinection Setup Instructions 1. Launch the Home Kinection application on the controller module, if it isn’t already loaded. 2. Follow any on-screen configuration dialog boxes to configure your modules (figure 2). Figure 2: New Module Dialog 3. All modules should begin working immediately with default settings except the IR module. 4. To configure the IR module, you must train Home Kinection using your existing remote controls. Click the Record button under the IR module settings (screenshot below) and click the button of interest on the remote, pointing it at the IR module box. Enter the Device (eg. TV, receiver, etc.) and command name (eg. Power, Channel Up, Volume Down, etc.) as in Figure 3. You may now assign a gesture to that command. Repeat this procedure for each remote button command you with to use. 5 home kinection Figure 3: New IR Command Dialog Figure 4: Activity Definition Dialog Relax and start using your Home Kinection Kit. It is truly that simple. Each kit comes preconfigured for your unique modules so that it is “plug and play.” For system customization, see Normal Usage section below. Normal Usage All usage of the Home Kinection is centered around the idea of an Activity. An activity defines a set of initiating and terminating actions as well as control characteristics unique to that activity. To configure an Activity, go to the Acivities page and click Edit or New. Then name the Activity and define the starting and stopping actions as well as triggers. The Activity definition window can be seen above in Figure 4. The user must create activities for the various usage scenarios of a room. Examples consist of watching television, listening to music, having a private evening (shades down) with dimmer lighting to “create a mood,” hosting a party, etc. Fortunately, creating an new activity is trivial. An example television activity description follows. 6 ECE 477 Digital Systems Senior Design Project Rev 8/09 TV Activity Example Your Home Kinection kit comes preconfigured with a watch television activity that is general enough to work in most living room settings. For complete details on this activity, view its definition in the activities page of the Home Kinection application. What follows is a brief introduction to the capabilities of the television activity. To activate the television activity, simply say, “watch television” out loud. Assuming you connected the IR module to the television and configured the basic remote commands, the television will turn on. To change channels, you can swipe your right hand to the left or right. To increase volume on the television, say “volume up.” You may raise or lower the shades by saying, “shade up” or “shade down.” Troubleshooting Symptom A module’s LED status doesn’t light up. A module’s LED blinks red. The dimmer module doesn’t dim. A module’s LED blinks blue. A module’s LED blinks white. Solution Plug in the module. Otherwise, service the defective module. This indicates a failure to connect to the wireless network. Move the module closer to the control module. Check that the light is an incandescent type. The dimmer module was designed to work with incandescent lights only. This is normal activity. You can safely ignore it. This indicates a failed communication. If it persists, identify sources of noise in the 2.4 GHz spectrum (eg. microwaves, medical equipment) and eliminate them.