1
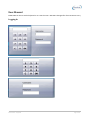
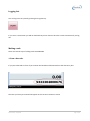
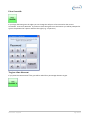
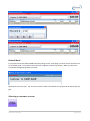
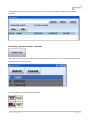
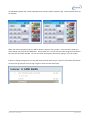
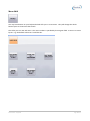
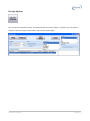
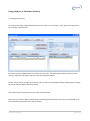
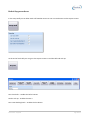
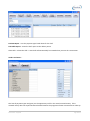
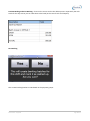
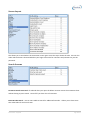
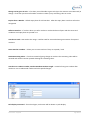
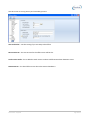
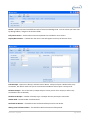
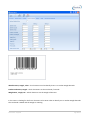
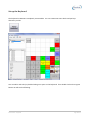
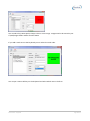
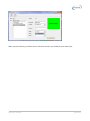
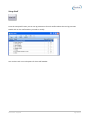
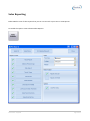
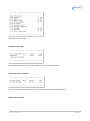
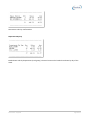
EBS POS Guide
ExoBiz POS is a touch screen point of sale system which enabled fast, easy sale entry.
EXOBIZ Services
www.exobiz.com.au
Ph: +61 7 3390 4900
EBS POS User Guide
Table of Contents
Revision 17-01-2014
User Manual ...................................................................................................................................................... 5
Logging In....................................................................................................................................................... 5
Logging Out.................................................................................................................................................... 7
Making a sale ................................................................................................................................................. 7
1. Scan a barcode....................................................................................................................................... 7
2. Type in the barcode. .............................................................................................................................. 8
3. Press a Stock code Key........................................................................................................................... 8
4. Type in a full or partial stock code or description ................................................................................. 8
5. Do a product search............................................................................................................................... 9
Stock Level Enquiry ........................................................................................................................................ 9
Selling multiple items .................................................................................................................................. 10
1. Scan or enter the item multiple times................................................................................................. 10
2. Type the number of items you are selling and then press the * button ............................................. 10
3. Press the * button then type the number of items ............................................................................. 11
Deleting a line .............................................................................................................................................. 11
Cancelling a transaction .............................................................................................................................. 11
Price Override .............................................................................................................................................. 12
To give a line discount ................................................................................................................................. 12
Total Discount (% and $).............................................................................................................................. 13
Refund Mode ............................................................................................................................................... 14
Selecting a customer account...................................................................................................................... 14
Receiving a payment from a customer ........................................................................................................ 15
Paying off an account .................................................................................................................................. 17
Menu Shift ................................................................................................................................................... 18
Hold Transaction.......................................................................................................................................... 19
Revision Date: 17/1/2014
Page 2 of 62
Retrieve Held ............................................................................................................................................... 19
View Stock Item ........................................................................................................................................... 19
Charge To Account ...................................................................................................................................... 19
Receipt Options ........................................................................................................................................... 20
Using Laybys (or Customer Orders) ............................................................................................................. 21
Shifts ................................................................................................................................................................ 23
Starting a shift ............................................................................................................................................. 23
End of day procedures................................................................................................................................. 24
How do I handle the Float? ......................................................................................................................... 27
System Setup ................................................................................................................................................... 29
Banking ........................................................................................................................................................ 29
General Setup .............................................................................................................................................. 31
Kits ............................................................................................................................................................... 32
Set up Laybys (or Customer Orders)............................................................................................................ 32
Pricing .......................................................................................................................................................... 33
Printing ........................................................................................................................................................ 34
Screen Layout .............................................................................................................................................. 35
Search Screens ............................................................................................................................................. 35
Stock Search Screen..................................................................................................................................... 37
Stock Transfers ............................................................................................................................................ 37
Tender.......................................................................................................................................................... 38
Transactions................................................................................................................................................. 38
Vouchers ...................................................................................................................................................... 39
WET Tax ....................................................................................................................................................... 42
Local Settings ................................................................................................................................................... 42
Setup Store .................................................................................................................................................. 44
Set up the Keyboard .................................................................................................................................... 49
Revision Date: 17/1/2014
Page 3 of 62
Set up Mix and Match Pricing ...................................................................................................................... 52
Setup Staff ................................................................................................................................................... 54
Setting up sounds for not found barcodes. ................................................................................................. 56
Sales Reporting ................................................................................................................................................ 57
Revision Date: 17/1/2014
Page 4 of 62
User Manual
ExoBiz POS can be run with a keyboard or as a touch screen. EBS POS is designed for fast transaction entry.
Logging In
Revision Date: 17/1/2014
Page 5 of 62
You will see one of the above screens when you log in depending on the setup of the system. To log a staff
member in you can either enter your pin number or enter your username and pin number. You should
change these to at least 4 digit pins.
When you log in you will see only the buttons you are allowed to see.
By default ExoAdmin login has the Setup button on their screen.
Revision Date: 17/1/2014
Page 6 of 62
Logging Out
You can log out at any time by pressing the Log Out Key.
If you are in a transaction you will be warned that you are about to lose the current transaction if you log
out.
Making a sale
There are several ways of selling items with EBS POS.
1. Scan a barcode.
If you pass a barcode in front of you scanner the barcode will be entered into the data entry box.
The item you have just scanned will appear in the current transaction screen
Revision Date: 17/1/2014
Page 7 of 62
2. Type in the barcode.
If you barcode is not readable you can type in the barcode. If it is not found a search screen will appear to
enable you to find your item.
3. Press a Stock code Key
You may have keys on your screen which relate to products. If you press one of these keys the item will
appear in the current transaction screen.
4. Type in a full or partial stock code or description
Type in a stock code or description into the search box using an external keyboard.
If you have typed in the stock code exactly the item will appear in the current transaction screen. If you
have typed in a partial search or the system cannot find the item a search screen will appear.
Revision Date: 17/1/2014
Page 8 of 62
Once the search box appears you can change the search using the on screen keyboard and press Select to
enter your selection into the current transaction screen.
5. Do a product search
You can search for a product by pressing the Stock Search button. The stock search screen will appear. You
can then use the onscreen keyboard to enter a partial search. Click the Search button to list all searched
items. Press Select to enter your selection into the current transaction screen.
Stock Level Enquiry
If you want to find out he stock levels in this or other locations you can press the Stock Level Enquiry
button.
Revision Date: 17/1/2014
Page 9 of 62
Selling multiple items
If you are selling more than one of an item there are several ways of letting the program know how many
you are selling.
1. Scan or enter the item multiple times.
Each time you enter the item another one will be added to the screen. In the following example the item
has been scanned 3 times.
2. Type the number of items you are selling and then press the * button
Revision Date: 17/1/2014
Page 10 of 62
3. Press the * button then type the number of items
This will bring up the multiply box. From here you can type in your multiplier and then press ok.
Deleting a line
You can delete a line by selecting it from the current transaction screen and then pressing the Delete Line
button. This will remove the line from the transaction.
Cancelling a transaction
You can cancel the whole transaction by pressing the Void Trans button. This will ask you for confirmation
then cancel the whole transaction.
Revision Date: 17/1/2014
Page 11 of 62
Price Override
If your login has been given the rights you can change the sell price of an item within the current
transaction. Press Price Override. If you do not have the rights to use this button you will be prompted to
type in the password of a person who has this right (e.g. a supervisor)
To give a line discount
If you press the Line Discount % key you will be asked for a percentage discount to give.
Revision Date: 17/1/2014
Page 12 of 62
Line discounts can be set by user. You can have a limit for each staff member for the amount of discount
they can give.
Total Discount (% and $)
When pressed these buttons set the discount over the whole transaction. The percentage discount simply
changes the line discount for each line of the transaction. The $ discount will create a pro-rata discount for
each line of the transaction to bring the transaction total to the selected amount.
e.g.
Revision Date: 17/1/2014
Page 13 of 62
Refund Mode
If you press this key the Refund Mode label will change to red. Everything you do for that transaction will
act in refund mode. If you sell an item it will sell a negative amount of that item. When you finish the
transaction the POS will go back to normal.
Refunds can be set by user. You can have a limit for each staff member for the amount of refund they can
give.
Selecting a customer account
Revision Date: 17/1/2014
Page 14 of 62
Pressing this button allows you to select an account. The transaction will be charged to the selected
customer.
Receiving a payment from a customer
When this key is pressed you will be taken to a payment type list screen. You can select how the customer
is going to pay for their purchase.
Or you can press one of the payment type keys.
Revision Date: 17/1/2014
Page 15 of 62
An individual payment key can be programmed to match a specific payment type. These payment keys are
an example.
When you select a payment type you will be shown a payment entry screen. If the customer hands you
exact change you can press the OK button. If they hand you a not you can press the image that represents
the note you have been handed. You can also enter the payment amount by typing it in on the screen.
If there is change to be given the screen will show you how much to give. Then the transaction will remain
on the screen greyed out until you log in again or start the new transaction.
Revision Date: 17/1/2014
Page 16 of 62
Paying off an account
If a customer wants to pay an amount off their account you can do this by pressing the Pay Account button.
You can only do this if you have an account that is not the cash sale account selected. You also cannot be in
the middle of a sale.
An account payment line will show in the transaction window.
You can then receive payment as you would a normal transaction. The system will also calculate change.
There is no facility for allocating payments at the point of sale. The individual payments will be shown on
the end of day sales reports. The person in the back office can then decide how to allocate the payments.
Revision Date: 17/1/2014
Page 17 of 62
Menu Shift
You may have buttons on your keyboard which shift you to a new menu. They will change the whole
button layout to show items that match.
This shifts you to a new sub menu. The menu number is specified by the Program field. A menu is a screen
layout. E.g. the default sub menu 1 looks like this:
Revision Date: 17/1/2014
Page 18 of 62
Hold Transaction
This allows you to store a transaction temporarily. IF you press the button a new screen will pop up asking
you for a reference. It then saves the transaction and brings you back to a new transaction screen.
Retrieve Held
This shows you all currently held transactions and allows you to retrieve the transaction. This will then
remove the item from the held list and put it back into your current transaction screen.
View Stock Item
This will give you a view of the stock item. You can see from here the sell price details and the stock levels
across all locations.
Charge To Account
This button allows you to invoice an account customer without receiving payment at the time. This will
only work if your customer is not a cash sale customer.
Revision Date: 17/1/2014
Page 19 of 62
Receipt Options
You can reprint a customer receipt. This button will list all recent receipts. From here you can reprint a
receipt or reverse or copy a transaction if you have the access rights.
Revision Date: 17/1/2014
Page 20 of 62
Using Laybys (or Customer Orders)
1. Creating a new Layby
To create a new layby simply add new items to the screen as if to sell them. Then press the Layby button
(or customer orders button)
The items you have added will then be shown on the screen. You will be given details as to how much
money is required to be paid in order to reach the minimum deposit.
On this screen you can change the customer, enter a reference and address details, add payments, change
the expiry date and add or remove products.
You cannot remove a payment after you have saved the layby.
Every time you save the layby a docket will print detailing the total items on the sale, the total paid so far,
the total remaining and the terms and conditions.
Revision Date: 17/1/2014
Page 21 of 62
Revision Date: 17/1/2014
Page 22 of 62
Shifts
Starting a shift
Exobiz POS automatically creates a shift when you do your first transaction of the day.
You can also create a shift by going to the reports screen and entering your opening cash.
This opening cash figure is reflected in your end of day reports.
If you do not enter an opening cash float then you must not count the float into the end of day takings. If
you do then your count will be wrong.
Revision Date: 17/1/2014
Page 23 of 62
End of day procedures
In the setup staff you can allow each staff member access to one or more buttons on the reports screen.
At the end of each shift you can go to the reports screen to end the shift and cash up.
Can close shifts – enables the left 3 buttons.
Can do cash up - enables the next 3
Can create backing batch – enables the last button
Revision Date: 17/1/2014
Page 24 of 62
Preview Report – Lists the payment type break down for the shift.
Print Shift Report – Prints the shift report to the docket printer
Close Shift – Closes the shift. A new shift will automatically be created when you next do a transaction.
Unders and Overs –
This lists all payment types and gives you the opportunity to fill in the actual counted money. If the
counted money does not equal the POS calculated amount the program will enter transactions to make up
Revision Date: 17/1/2014
Page 25 of 62
the unders and overs amounts. These go to a GL code as specified in the stock item you have nominated
for unders and overs.
Revision Date: 17/1/2014
Page 26 of 62
How do I handle the Float?
If you have entered an opening balance then you must count your float and add it to the end of day cash
amount. If you did not enter an opening balance at the beginning of the day you must not include the float
in the end of day money count.
Example 1 – with beginning of day opening cash.
You start the day with 371.00 in cash as an opening float. If you enter this value in as opening cash then
you need to also count it at the end of the day.
If you finish the day with $1,400.00 in the cash draw then you will have to enter $1,400 in the “Actual
Takings” column beside cash. The program will deduct the initial $371.00 before calculating the end of day
total.
Example 2 – without beginning of day opening cash.
You start the day with 371.00 in cash as an opening float. If you do not enter this value in as opening cash
then you need to remove this before counting the end of day takings.
If you finish the day with $1,400.00 in the cash draw then you will have to manually deduct the opening
cash of $371 and enter $1029 in the “Actual Takings” column beside cash.
Revision Date: 17/1/2014
Page 27 of 62
Preview Banking and Print Banking – show on the screen and on the docket printer respectively the cash
totals for the day so that you can take them to the bank (in the case of cash and cheques).
Post Banking
This creates banking batches in EXO based on the payment groups.
Revision Date: 17/1/2014
Page 28 of 62
System Setup
Banking
Unders and Overs Stockcode – the stockcode that unders and overs will be posted to. Allows you to set up
a GL code for unders and overs (linked to that stock code)
Auto fill unders and overs – when you open the unders and overs screen it will fill in all the values based on
the system values except for cash.
Blind Cash Up – hides the variance amounts from the cash up screen so you cannot fudge the figures.
Revision Date: 17/1/2014
Page 29 of 62
Revision Date: 17/1/2014
Page 30 of 62
General Setup
End of transaction notify – if ticked the transaction item area will show the following text after each
transaction is completed.
Eftpos Multi Tender – if paying by eftpos this allows you to override the payment value on the payment
screen. Otherwise it assumes you are paying the full amount by Eftpos.
Require password to close – if not full screen and you click on the x to close the POS screen it will ask you
for a password before allowing you to close.
Stock Search Front Screen – allows you to to a simple stock search on the front screen if you are not logged
in.
Training Database – this makes the transaction area show red and prints *** Training *** on receipts so
you don’t accidentally think the training database is a live database.
Back office software – POS can connect to MYOB EXO or MYOB Premier.
Shifts per terminal – If you have more than one terminal in a store you may wish to break down your shifts
per terminal so that you can cash up each terminal at the end of each day.
Revision Date: 17/1/2014
Page 31 of 62
Show Stock code on display – By default the transaction entry screen only shows the description. You may
wish for it to show the stock code as well.
Show Stock code alerts – if ticked the EXO popup alert will show for each sold stock item.
Sale Grid Font Size – this defaults to size 14 font but you can make it smaller or larger depending on the
length of your stock descriptions.
Seconds to auto log out – if no keys are pressed an you are not in a transaction your session will log out
after x seconds if not zero.
Kits
Activate Kits – If ticked then Kits will be activated. Kits are worked out when the sale is completed. The
screen will only show the kit but the invoice can show the kit items if required.
Set up Laybys (or Customer Orders)
Revision Date: 17/1/2014
Page 32 of 62
Laybys are a way of creating an order for a customer, taking a deposit and supplying it later.
Layby Deposit Percent: This is the minimum deposit the customer can make before you can save the order.
Layby Stock Location: If this is set to anything other than 0 it will move the stock to this location before
creating the order. This is useful with Laybys as it takes the stock away from your normal inventory.
Default Layby Customer: If you want all Laybys to go to the same customer then put that layby account
here. If you leave this at -1 then it will ask you for a customer for each layby.
Layby Screen Description: Some people prefer to have the layby described as Customer Orders or similar.
This changes all screen labels to match.
Layby Sales Order Status: EXO sales orders if they have a status of 5 they are marked as Laybys. If you
select 0 then they will be marked as Sales Orders. It just effects how the orders interact with the rest of the
system.
Pricing
Stock Prices Entered GST Inclusive – if ticked then sell prices in EXO will be assumed to be GST inclusive.
Price Overrides GST inclusive – any prices you enter at the front screen will be assumed to be Inclusive or
Exclusive based on this tick.
Revision Date: 17/1/2014
Page 33 of 62
Printing
Clarity Filename – this is where your clarity exe is – for printing invoices.
Connection Name – this is the database it will be connecting to to print invoices. Should be the same as
your logged in database
Print Slash A – stops the box coming up asking whether to print or preview your invoice.
Charge sales to A4 – Sales that are not cash sales to go to A4 instead.
Print Docket Before Saving – In order to speed the checkout process we can print the docket before saving
it.
Revision Date: 17/1/2014
Page 34 of 62
Screen Layout
This allows you to set whether the transaction screen goes across the top or down the side. You can also
select which columns show and whether your login screen asks for username and password or just the
password.
Search Screens
Customer Search Auto Load – If selected when you open the debtor account screen the customers show
without having to press search. Leave off if you have a lot of customers.
Extra Barcode Search – uses an extra table to search for additional barcodes. Allows you to have more
than 3 barcodes for each stock item.
Revision Date: 17/1/2014
Page 35 of 62
Search Screen Auto Search – reruns the search every time you press a key. Narrows down the search as
you type but slow with large amounts of stock.
Revision Date: 17/1/2014
Page 36 of 62
Stock Search Screen
Use this screen to centrally control the stock search screen look and feel.
Stock Transfers
Stock Transfers into negative. 0 = Allowed, 1 = Allowed with warning, 2 = Not allowed
Revision Date: 17/1/2014
Page 37 of 62
Tender
Auto Fill tender for cash screen – Fills in the cash amount when pressing the cash button. Allows you to
simply press OK to complete the transaction – saves you having to type in the cash amount.
Eftpos Multi Tender – allows you to enter a dollar figure into the eftpos tender screen. Otherwise it
assumes the whole amount is paid by eftpos.
Require entry of decimal places – makes you enter the cents in a transaction.
Transactions
Manually complete transactions – will not cash off a transaction when the payment matches the invoice.
You will have to press the CHARGE button to finish the transaction.
Revision Date: 17/1/2014
Page 38 of 62
Refund Requires Signature – makes the program print 2 invoices if a refund is given. One for the customer
to sign.
Retrieve held auto open – if you open the retrieve held screen and scan a code it will auto press the take
off hold button.
Vouchers
Vouchers Active – if not set then no voucher features will be available.
Next Voucher number – if you want the POS to create your voucher numbers then this will determine the
next number given out.
Enter own serial number – if selected then whenever you sell a voucher you will be prompted to enter a
voucher number.
Voucher stock code – The stockcode of your Voucher stock item. This item must have zero GST. Sales of
vouchers will go to the GL code against that stockcode.
Revision Date: 17/1/2014
Page 39 of 62
Change can be given in cash – if set then you will be able to give cash (up to the amount set in Max Cash) in
change. If not then you must sell another voucher to make up any remaining value on a sale.
Expires after x Months – default expiry date of sold vouchers. After the expiry date a voucher will not be
recognized.
Self Print Voucher – if set then when you sell a voucher a voucher docket will print with the terms and
conditions and expiry date etc printed on it.
Voucher GL Code – Not used at this stage. It will be used for auto GL balancing transactions for expired
vouchers.
Reuse Voucher numbers – allows you to reuse vouchers if they are expired / used.
Retain Remaining Value – If set then instead of giving change on vouchers the remaining value will be
retained and another voucher printed showing the remaining value.
Vouchers use random number, Voucher Random Number Length – instead of using one number after
another it uses a randomized number with the specified length.
Pole display connected – If set then logins, stock items will be shown on pole display.
Revision Date: 17/1/2014
Page 40 of 62
Pole Com Port – which com port is the pole display connected to
Number Lines, Line Length – these are generally 2 and 20 respectively.
Use On Screen Pole Display – For demo purposes. Shows the pole display on the screen.
Revision Date: 17/1/2014
Page 41 of 62
WET Tax
WET Tax - for Australian liquor dealers
Local Settings
Revision Date: 17/1/2014
Page 42 of 62
Use this screen to set up primary and secondary printers.
Use Local Cache – use this setting if you are setup to be offline.
Next Invoice No – the next invoice for the offline store will be this.
Local Invoice Prefix – this is added to each invoice number to differentiate them between stores.
Remote Server – the head office server where the master database is.
Revision Date: 17/1/2014
Page 43 of 62
Setup Store
Select the store you wish to edit. You can also add a new store from here.
Store Name – the name of the store
Location – The EXO stock location
Branch – the EXO sales branch
Cash Sale Account – The default sale account for cash sale transactions.
Auto Sign Off – if ticked you will have to log in before each transaction
Skip Change Question – if not ticked you will get a reminder after each transaction to tell you how much
change to give.
Pole Display Text – the text that shows on the pole display if nothing else is happening.
Pole Display Scroll Speed – how fast items scroll on the pole display. Bigger numbers are slower.
Revision Date: 17/1/2014
Page 44 of 62
Theme – Different themes have different look of buttons and background. You can create your own ones
by editing folders / images in the Themes folder.
Fully Touch Screen – If ticked then onscreen keyboards are included in most screens.
Display Menu Names – if ticked then the menu name will appear at the top of the main form.
Print Receipts – Options are Always, Ask each time or Never. Always will print a docket after every
transaction, Ask will ask each time you do a transaction and Never will not print a receipt at all.
Number Receipts – This is how many receipts will print when you ask for a receipt (or after every
transaction if that is selected)
Number KP Receipts – number of Receipt Type 2 receipts that are printed per transaction.
Header Bold – Docket header and footer bold.
Stockcode on Docket – if ticked then the stockcode will be printed on the docket.
Always print held transactions – if ticked then Held transactions will be printed.
Revision Date: 17/1/2014
Page 45 of 62
Identifier Start, Length, value – the characters used to identify that it is a random weight barcode
Product Code Start, Length – which characters are the stockcode / barcode
Weight Start, Length, DP – which characters are the weight of the item.
In this case it is looking for the first 2 characters to be 02 in order to identify it as a random weight barcode.
The stockcode is 10001 and the weight is 3.003 kg.
Revision Date: 17/1/2014
Page 46 of 62
Select your eftpos type and which dockets you want to be printed out from your docket printer.
Auto end of shift will create a new shift if you do a transaction after the specified time. In this case the first
transaction of a morning will create a new shift regardless of whether the last shift was closed or not.
Revision Date: 17/1/2014
Page 47 of 62
This allows you to set up your stores the same as far as the payment types but when it sends back to head
office database it remaps the transactions to different payment types. This is useful if you have a bank
account per store.
Revision Date: 17/1/2014
Page 48 of 62
Set up the Keyboard
The keyboard in EBS POS is completely customizable. You can create new menu levels and put keys
wherever you like.
You can add or edit a key by double clicking on a space on the keyboard. If we double click on the Log Out
button we will see the following.
Revision Date: 17/1/2014
Page 49 of 62
You can edit a key’s Description, Shape, Colour or even image. Images need to be stored in your
C:\POS\Images folder and be stored as JPEGs.
If you add a stock item to the keyboard you can select the stock code.
You can put a menu shift key on the keyboard and select which menu it shifts to.
Revision Date: 17/1/2014
Page 50 of 62
When you press this key you will be sent to sub menu 3 where you would put your brake parts.
Revision Date: 17/1/2014
Page 51 of 62
Set up Mix and Match Pricing
Exobiz POS has promotional pricing in addition to EXO price policies.
Create and Edit Mix N Match key
The Mix and Match screen lists your mix and match headers
To qualify for a promotional price the sale needs to sell at least x number of products from the listed stock
items. For this example you need to sell 2 Ovalchrome Air Filters.
If the sale qualifies for the promotional price it gets the selected of the 3 options.
Revision Date: 17/1/2014
Page 52 of 62
1. Discount – all items in the mix and match get the specified discount
2. Sell Price – All items are sold for the specified price.
3. Sell Stock Item – a specified stock item is sold at the specified price. You could use this to give away an
item – or even ‘sell’ a ‘discount’ stock item at a negative price.
Revision Date: 17/1/2014
Page 53 of 62
Setup Staff
From the setup staff screen you can set up permissions for each staff member that can log into POS.
Double click on the staff member you wish to modify.
You can then tick or un-tick options for that staff member.
Revision Date: 17/1/2014
Page 54 of 62
The Login Password is the password used to log into the pos from the front screen.
If you have Offline POS then you will have to make changes to this on the server and then synchronise the
POS stations in order to see changes.
You can also change other staff access rights from this screen.
You can log in using a barcode if you make the login password match the numbers on the barcode.
Just print a barcode on a piece of paper and laminate it. Make the Login Password match the numbers on
the barcode and if you scan this barcode whenever it asks for a login number you will login.
You can print a barcode directly from the setup staff screen by clicking “Print Barcode”
Revision Date: 17/1/2014
Page 55 of 62
Setting up sounds for not found barcodes.
1. Go into general setup.
2. Select Hardware
Make sure the Sounds on Scanning Items box is ticked.
Revision Date: 17/1/2014
Page 56 of 62
Sales Reporting
Exobiz POS has a set of sales reports that you can run to Excel or print out on a POS printer.
To enable the reports create a button Sales Reports.
Revision Date: 17/1/2014
Page 57 of 62
This gives you a screen which lists all generic sales reports.
You can print each report one at a time by pressing the button the report label is printed on. You can print
multiple by pressing the Print Selected Reports button. You can select which reports are to be part of this
by clicking on the tick boxes to the left of the reports to add or remove them. If the box is ticked then the
report will be part of the Selected Reports when you print.
Hourly Report
This report breaks down your sales into hourly report breaks. This is useful if you want to know when are
you busiest times.
Debtors Primary Group
This report breaks down your sales by customer type. This is your standard debtor group.
Daily Report
Revision Date: 17/1/2014
Page 58 of 62
Lists total daily sales by day
Revision Date: 17/1/2014
Page 59 of 62
Tender Types
This report breaks down the payment types. It also breaks down payment groups. You can subtotal all
eftpos style payments by attaching them to the same payment group.
List Payouts
All payout figures
Sales Statistics
Revision Date: 17/1/2014
Page 60 of 62
Sales statistics for the day
Description Overrides
Lists all description overrides. Usually used for misc items that do not scan.
List Account sales / Payments
Lists all account sales and payments. Only lists transactions that were not cash sales.
Sales Person Summary
Revision Date: 17/1/2014
Page 61 of 62
Summarises sales by staff member.
Department By Day
Breaks down sales by department (stock group) The Excel version also breaks them down by day of the
week.
Revision Date: 17/1/2014
Page 62 of 62