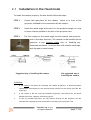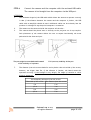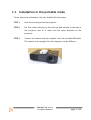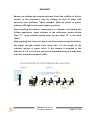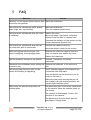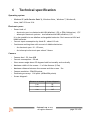
1
EasyBoard
Polish Interactive Whiteboard
manual 2.0
www.etablica.eu
funtronic sp. z o.o.
Thank You for choosing the Polish Interactive Whiteboard,
designed and produced in Poland.
Thank You for supporting Polish electronic industry.
IMPORTANT SECURITY RULES
•
•
•
•
•
Please, read this manual thoroughly in order to use this product effectively,
Should you need any servicing help, contact the Funtronic company service centre,
The Funtronic company is not responsible for any lost benefits or losses caused by the product
inefficiency,
All brand names and names of products appearing in this manual are registered trademarks and
belong to their owners,
Technical data given in this manual can be changed without previous warning.
DANGER
•
Do not try to modify this device in any way. You may cause fire, injury, electrical shock or serious
damage of this device. All testing and servicing can be done only by the Funtronic company
service centre.
WARNING
•
•
•
•
•
Use batteries only of the type which fulfils technical requirements of this device. Do not connect
cables in a forbidden way, do not heat or burn batteries. Do not install batteries with incorrect
polarity.
The product cannot be placed close to a source of fire or direct sunlight. Avoid electrical
discharge and short-circuits, they may damage this device.
Be careful and do not look for a longer period of time straight into the lens, the pen and projector
light attached to the product (very important for children).
While attaching the camera to a computer with a USB cable make it sure the cable will not be
pulled out accidentally (for example during walking by). It is suggested to use an original USB
cable delivered with the board.
The most convenient attaching the camera is directly and permanently on the projector, making it
impossible to move accidentally.
A worn out device should not be thrown away, it should be returned to the producer or a
utilization company .
funtronic sp. z o.o.
all rights reserved
page: 2 z 30
List of content
1 General information................................................................................4
1.1 Product description...........................................................................4
1.2 What is in the box?............................................................................5
1.3 System requirements.........................................................................5
1.4 Classroom ......................................................................................5
2 How to install?.......................................................................................6
2.1 Installation in the fixed mode...............................................................7
2.2 Installation in the portable mode..........................................................9
2.3 The software installation...................................................................10
2.3.1 Window.....................................................................................10
2.3.2 MacOS.......................................................................................10
2.3.3 Linux.........................................................................................11
2.4 Remarks for installator.....................................................................12
2.5 FAQ.............................................................................................15
3 Starting up..........................................................................................16
3.1 The E-Chart software.......................................................................17
3.1.1 The E-Chart application..................................................................17
3.1.2 The E-Chart graphical panel.............................................................20
3.2 Positioning and the first camera calibration............................................24
3.3 Electronic pen operation...................................................................26
3.4 FAQ.............................................................................................26
4 Maintenance instruction..........................................................................28
4.1 Battery replacing............................................................................28
5 FAQ..................................................................................................29
6 Technical specification...........................................................................30
funtronic sp. z o.o.
all rights reserved
page: 3 z 30
1
General information
1.1
Product description
The Polish Interactive Whiteboard is designed with the thought of every school.
It offers high quality, possibility of fast writing, reliability and a good price. It gives two
modes of operation: a mouse mode to navigate applications like a multibook and a
graphic mode.
The Polish Interactive Whiteboard enables writing with the electronic pen on
every, non-reflective surface on which a picture from the projector is presented. The
surface can be: a non-reflective whiteboard, a screen or a wall. The camera attached to
the projector watches the movement of the electronic pen and sends the information to
the computer through the USB cable.
The software which steers the board enables the work of the electronic pen in a
mouse mode. The enclosed free graphical software has many functions useful while
conducting a presentation or a lesson: writing, marking, erasing, drawing, enlarging
(zoom), etc. There is also a possibility of storing the screen and printing it. The software
works transparently and allows to navigate any programme or a desktop of a computer .
The usage of an electronic pen is very similar to a one-button mouse and it
operates intuitionally. An ergonomic construction and the only one button makes the
pen a very friendly tool for everyone – whatever the age and skills. The Polish
Interactive Whiteboard offers high resolution, short time of reaction and proper
sensitivity .
More information available on: www.etablica.eu.
funtronic sp. z o.o.
all rights reserved
page: 4 z 30
1.2
What is in the box?
Set content:
•
1 optical module,
•
2 electronic pens with batteries,
•
1 CD with manual,
•
1 USB cable (5 m),
•
1 installation kit (anti-slip pad),
•
printed version of short manual and warranty document.
Optional:
•
1.3
telescopic e-pointer with batteries
System requirements
For proper interactive whiteboard operation there is a need for PC with Windows
XP/Vista/7, Linux or MacOS operation system, USB port and CD drive (for SW
installation).
1.4
Classroom
Classroom, where interactive whiteboard is going to be used, must have dark and
impervious curtains or roller blinds (i.e. not letting sunlight going through), allowing full
overshadowing in case of sunny day.
funtronic sp. z o.o.
all rights reserved
page: 5 z 30
2
How to install?
The Polish Interactive Whiteboard is designed for the installation done by the
users. All details are presented in the User Manual available on the enclosed CD. The
user may find more information on the www.etablica.eu.
The Polish Interactive Whiteboard can be installed without any help of the
producer. To make it properly the user should follow the steps :
STEP 1:
the optical camera installation
STEP 2:
the software installation
POLISH INTERACTIVE WHITEBOARD INSTALLATION
NOTE: ZOOM in the projector should be set to minimum.
funtronic sp. z o.o.
all rights reserved
page: 6 z 30
2.1
Installation in the fixed mode
To install the camera properly, the user should follow the steps :
STEP 1:
Choose the right place for the camera – above or in front of the
projector intended to be connected with the camera .
STEP 2:
Install the metal angle and screw it to the projector hanger in a way
to be as close as possible to the axis of the projector lens.
STEP 3:
Put the camera on the metal angle so both camera and projector
look in the same direction. The camera can be installed on the
projector in any, however stable way i.e. disabling any
unwanted movement. It can be done with double sided tape,
anti-slip pad or metal clamp.
Suggested way of installing the camera
Not suggested way of
installing the camera
ATTENTION:
1.
If the ceiling is the place for installing the camera (projector), it should be placed
upside-down (the bottom of the camera facing oriented to the ceiling just like the
projector).
2.
If the screen is the one with the backside projection, the camera can be placed
behind the screen, together with the projector.
3.
In case of portable operation, put the camera directly on the projector (on the
enclosed anti-slip pad) as close as possible to the axis of the projector lens.
funtronic sp. z o.o.
all rights reserved
page: 7 z 30
STEP 4:
Connect the camera and the computer with the enclosed USB cable.
The camera is fed straight from the computer via the USB port.
ATTENTION:
1.
The maximum length of the USB cable which allows the camera to operate correctly
is 10m. If the distance between the camera and the computer is farther, the USB
cable with an amplifier should be used. Additional cables can be ordered from the
producer’s or bought in any shop with computers’ accessories.
2.
The camera can be connected with the computer all the time .
3.
The camera should be placed near or directly to the projector on its top surface.
Such placement of the camera allows the user to expose intuitionally the areas
pointed with the electronic pen.
The pen might be overshadowed instead
of full visibility of a picture.
5.
Full (correct) visibility of the pen
The distance from the screen should be twice farther than the width of the screen,
however, not bigger than 5m. If the distance is farther, the board cannot be
operated correctly. If the sunlight is very bright, the usage of curtains or roller
blinds is suggested.
The exemplary distances from the screen
The width of the screen
The distance from the screen
1m
2m
1,5 m
3m
2m
4m
2,5 m
5m
funtronic sp. z o.o.
all rights reserved
page: 8 z 30
2.2
Installation in the portable mode
To run interactive whiteboard, the user should follow the steps :
STEP 1:
Stick the anti-slip pad on the projector
STEP 2:
Put the camera directly on the anti-slip pad parallel to the axis of
the projector lens so it looks into the same direction as the
projector.
STEP 3:
Connect the camera and the computer with the enclosed USB cable.
The camera is fed straight from the computer via the USB port.
funtronic sp. z o.o.
all rights reserved
page: 9 z 30
2.3
The software installation
The latest SW version is always available for free download at www.etablica.eu.
2.3.1
Window
The person who is going to install the E-Chart software should have the
administrator rights of operating system in the computer.
To install the E-Chart software the user should put the enclosed CD to the drive,
double click on the icon of the installation programme E-Chart_Installation.exe and
next follow the commands shown on the screen. Installation software can been located
in the following catalog: E-Chart_software_for_business/WINDOWS/
The process of the E-Chart software installation runs automatically. After having
been installed, the E-Chart software will be available from the menu START. To make
the usage more convenient, the shortcut for the E-Chart application will be placed on
the computer desktop.
The E-Chart software can be removed at any time with available de-installer.
2.3.2
MacOS
The person who is going to install the E-Chart software should have the
administrator rights of MacOS operating system in the computer.
To install the E-Chart software the user should put the enclosed CD to the drive,
mount in the system (double click) the image file E-Chart-1.0.dmg and next move the
icon
“E-chart”
to
“Applications”
folder
and
run
(double
click)
driver
FTDI
FTDIUSBSerialDriver.mpkg installation software. Installation software can been located
in the following catalog: E-Chart_software_for_business/MacOsX/
The process of the E-Chart software installation runs automatically. After having
been installed, the E-Chart software will be available from the menu “Applications”.
funtronic sp. z o.o.
all rights reserved
page: 10 z 30
2.3.3
Linux
The person who is going to install the E-Chart software should have the
administrator (root) rights of Ubunt Linux operating system in the computer.
To install the E-Chart software the user should put the enclosed CD to the drive,
double click on the icon of the installation package E-Chart_1.0.0-all.deb and next
follow the commands shown on the screen. Installation software can been located in the
following catalog: E-Chart_software_for_business/Ubuntu_Linux/.
The process of the E-Chart software installation runs automatically. After having
been installed, the E-Chart software will be available from the menu “Applications”.
WARNING: The E-Chart software is compatible with XFCE windows manager.
funtronic sp. z o.o.
all rights reserved
page: 11 z 30
2.4
Remarks for installator
Before you start installing Polish Interactive Whiteboard please read carefully
below comments. In case of further question please contact local or producer's service
centre.
•
The working surface (the screen) as well as the optical camera should be installed
as far from the windows as it is possible, however, there must be some room for
the user, about 0.5 metre from each side.
•
The projector should be installed under the classroom ceiling, about 2.5 – 3
metres from the screen, giving the picture about 1.3 – 1.5 m wide, 0.9 – 1.0 m
height so the user can reach easily the upper edge of the screen.
•
The projector as well as the camera must be installed under the celling in the
upside-down position. If the projector has already been installed in a standard
position, it is suggested to change it for “upside-down”.
•
The projector and the camera should be delivered separately - with the mounting
tray - the power supply, video (and eventually audio) signal for the projector and
the USB cable for the camera. An electric outlet can also be placed on the ceiling
next to the projector.
•
The optimum distance between the projector and the floor is about 2-2.4 m. If
the projector is placed higher, in correctness in positioning the pen may increase.
•
ZOOM of the projector should be set to minimum.
•
The camera should be placed above the projector as it offers higher comfort of
work - the possibility of overshadowing the pen is smaller. If the board is placed
under or beside the projector, it will also work correctly, however, the possibility
of overshadowing the pen during work will increase.
•
The camera should be installed steadily, with a clumping ring or an strong
adhesive tape. It is also possible to use an metal angle and mount it for example
to the projector hanger. The position of the camera may change if the USB cable
is stressed too much.
•
The camera should be more bent (around 10 degrees) towards the floor than the
projector so after calibration, the green working field (projector view) is placed
funtronic sp. z o.o.
all rights reserved
page: 12 z 30
in the lower part of the camera view window (camera view).
•
It should be made sure that there are no any reflective objects in the camera
view such as aluminium frames giving sharp light's reflections in case of sunshine
or lamps shining towards the camera. An aluminium frame of the existing board
should be pasted with black tape.
•
As a screen, any mat or half-mat whiteboard can be used. In case there is no
physical board, any MDF or HDF furniture board (available in all D-I-Y stores) can
be installed for this purpose.
•
Before the camera is finally installed it should be properly positioned. First of all
the camera should be connected to the power supply (a computer USB port). The
control LED light of the camera will be red and after 3 seconds from the
connection it will blink green confirming proper functionality. The control LED
light of the camera should be watched during movement of the electronic pen
with button pressed on the working area: red light – the pen is invisible, yellowgreen colour – the pen is visible. A correctly positioned camera reacts to the pen
in every corner of a working area (projected picture).
•
With the pen switched off, the yellow-green colour CANNOT occur at any time.
The control LED camera diode should emit red light all the time. If it does not
happen, it means:
◦
bright sunshine,
◦
reflections in the view area of the camera,
◦
light sources which lights into camera’s eye.
Otherwise, (if for example the camera blinks with the closed lens), the user
should contact the manufacturer’s service.
•
Classroom, where interactive board is installed must have blinders or curtains to
be able to fully shadow the room if case of sunlight. Ordinary fabric material
roller blinds are not recommended as they diffuse the light instead of eliminate.
Usually, the one tight blind for the window close to the interactive board is
enough.
funtronic sp. z o.o.
all rights reserved
page: 13 z 30
REMEMBER!
•
Before you calibrate the interactive board, check the visibility of all four
corners of the projector's view by clicking on each of them with
electronic pen (indicator "Signal strength" lights up yellow or green,
indicator LED light in the camera lights up yellow)
•
After installing the camera, connecting to a computer and starting the
E-Chart application, signal indicator in the calibration window should
show "0" - gray indicator should cover up just letter "N" in the word
"None"
•
After applying the electronic pen to the board and pressing the button,
the signal strength should show more than 1/3 the length of the
indicator (yellow or green color). If the camera is mounted in the
distance of 2.5 m from the wall and recommended board is used than
indicator should shows almost 100%.
POLISH INTERACTIVE WHITEBOARD INSTALLATION
funtronic sp. z o.o.
all rights reserved
page: 14 z 30
2.5
FAQ
Question
Answer
Where can I find the installation manual?
The enclosed CD contains the detailed
installation manual
Should I buy a projector to use the
interactive whiteboard?
Yes, you should. Typically every interactive
whiteboard requires a projector which is
an additional (peripheral) element
Can I use my own projector?
Yes, you can. To make your work more
comfortable you need an ordinary
projector, NOT a short throw one. In case
you have a short throw one, the camera
must be placed in the double distance of
the screen, behind the projector. ZOOM in
the projector should be set to minimum.
What screen do I need for the interactive
whiteboard?
Any non-reflective. This can be a
whiteboard or white sheet of hardboard
mounted on a wall, or even a wall itself.
Can I install the E-Chart software on more
than one computer in my school?
Yes, you can. The E-Chart software on the
enclosed CD can be installed on any
numbers of the computers in the school.
Can I order more pens?
Yes, you can. The pens are available in
constant sale. Please, contact our sales
department
Can I use two pens to write on the board in No, you cannot. The whiteboard can
the same time?
operate only one pen at a time.
Is the installation by the producer required No, it is not. The installation is not
for the interactive whiteboard?
complicated and can be done without
producer’s help.
There is a detailed manual on the CD which
is delivered in the box
Is the full overshadowing of the classroom
with interactive whiteboard required?
No, it is not. However, the classroom must
have the curtains or roller blinds to
overshadow the room in sunny days.
funtronic sp. z o.o.
all rights reserved
page: 15 z 30
3
Starting up
To start the Polish Interactive Whiteboard successfully the user should take
following steps:
STEP 1:
Start the projector (ZOOM set to minimum) and the computer with
the E-Chart software installed.
STEP 2:
Make sure that the camera and the computer are connected with the
USB cable .
STEP 3:
Start E-Chart application (from the Start menu or desktop icon)
STEP 4:
Make the initial calibration of the camera (see point 3.2) – this refers
to the first starting of the interactive whiteboard or starting after
changing of the camera position.
The Polish Interactive Whiteboard set is ready to be used.
funtronic sp. z o.o.
all rights reserved
page: 16 z 30
3.1
The E-Chart software
To start the E-Chart software the user has to choose (double click) the E-Chart
icon from the desktop or Start menu. The E-Chart steering panel will show up in the top
right corner of the screen (default position).
Button
allows to calibrate interactive whiteboard or to change settings. To
activate E-Chart session, the user should click on the button
3.1.1
The E-Chart application
The initial screen of E-Chart application will appear on the screen after choosing
(double click) button Settings.
Select button Settings in order to calibrate or change settings of interactive
whiteboard. Otherwise select button Close to close the window. There is also possibility
to change the language in this window.
funtronic sp. z o.o.
all rights reserved
page: 17 z 30
Calibration window will show up on the screen after selecting the Camera
Settings option.
The window Camera Settings is divided into 3 parts:
•
calibration panel,
•
camera status,
•
settings.
Calibration
Panel
allows
to
calibrate
the
interactive whiteboard. Press the Calibrate button
in order to start calibration. There will be 4
calibration points showing up on the screen. Using
the electronic pen, the user should click on every
point. The pen must be pointed precisely at the
funtronic sp. z o.o.
all rights reserved
page: 18 z 30
centre (cross) of each point, the button must be pressed and kept pressed until
the full green rotation is done. The calibration should be done very precisely in
order to get best possible comfort in using interactive whiteboard. If camera was
properly positioned then after calibration the view window will be green.
Otherwise camera position should be corrected (see chapter 3.2).
Attention: the view window shows the picture seen by the camera. This window is updated after
every calibration. The colorful area inside the window shows the working screen (the picture
shown by the projector) on the area seen by the camera (white rectangle inside the gray frame).
If the camera is set incorrectly, which means it does not “see” the whole working screen, it will
be notified with the color change to yellow (one corner cannot be seen) or red (part of the screen
cannot be seen) and an announcement of the necessity of correcting the camera position. The
board works correctly when the green color is shown. When red color appear then board will stop
operating mouse cursor (the option “Move mouse cursor” will be unchecked) and will work to a
limited extend; camera position should be corrected and calibration repeated. ZOOM in projector
should be set to minimum.
Camera status panel allows to trace working
parameters and to update firmware in the camera.
•
Signal strength: the information of the level of the visibility of the
electronic pen. The value changes constantly during the operating the
board. The best comfort is obtained in the green colour.
•
Firmware version: firmware version of the camera. Firmware is updated
automatically. If the firmware version in not up-to-date, the button
Upgrade will be visible. Just click the button Upgrade and follow the
instruction on the screen. If the firmware version in up-to-date, the button
Upgrade will not be visible.
•
Internal coordinates: electronic pen position - vertical and horizontal coordinates of the electronic pen changing in the range 0–9999; helpful in
camera positioning (see part 3.2).
funtronic sp. z o.o.
all rights reserved
page: 19 z 30
Settings panel allows to change interactive
whiteboard working parameters as well as support
for proper camera positioning.
•
Smoothing: causes the decreasing the effect of roughness of lines. The bigger
value the line is smoother but the cursor follows the pen more slowly. Default
parameter value is Smoothing normal.
•
Move Mouse Cursor: box checked (default) causes that the movement of the
electronic pen on the board is changed into the mouse movement. Otherwise help
in proper camera positioning (see chapter 3.2).
Once calibration is done the windows Camera Settings should be closed.
3.1.2
The E-Chart graphical panel
To activate E-Chart session, the user should click on the Start button.
After the E-Chart session activation all other functions of the computer are not
active (are “frozen”). When the Store button is clicked on, the computer comes back to
the ordinary mode of work.
The user operates the E-Chart software with the electronic pen or finger touch
pen. To make the operation easier, E-Chart offers context help. After pointing at the
field it will show the full function title.
funtronic sp. z o.o.
all rights reserved
page: 20 z 30
Every tool block (Color, Tool, Boards) can remain „closed” or „open” after
clicking in the block title.
Description of the particular symbols on the toolbar
Start/stop the session
Opens the toolbar of the E-Chart software.
The present picture will be frozen and it will be possible to operate
graphically on it
Closes the E-Chart toolbar but keeps the session active.
Closes the E-Chart permanently. Interactive whiteboard will stop
working.
History
Allows to swap between screens which are being stored on line during
each session – i.e. till shut down of E-Chart application. Screens are
being stored automatically and can be edited.
Screens are saved as graphic png files and are being stored in the
catalog „Users/user_name/E-Chart Docs/date”.
There are max. 500 files to be stored during one session.
Pen
Allows to select writing style:
• pen – covering line
• marker – transparent line
Size
Allows to select the line width of all graphic element like a free
draw, a straight line, an arrow, a triangle, a rectangle.
Color
Allows to select color.
The chosen color is obligatory for all graphic functions
funtronic sp. z o.o.
all rights reserved
page: 21 z 30
Tool
Free draw – allows free writing on the screen. To write the user has
to press the button on (or touch the finger pen) and move the pen.
Straight line - allows drawing a straight line. The pen should be put
at the beginning of the line and next, keeping the button pressed (or
touch the finger pen), moved till the end of the line.
Arrow – allows drawing an arrow. The pen should be put at the
beginning of the arrow and next, keeping the button pressed (or
touch the finger pen), moved till the end of the arrow.
Double arrow – allows drawing an double arrow. The pen should be
put at the beginning of the arrow and next, keeping the button
pressed (or touch the finger pen), moved till the end of the arrow.
Rectangle - allows drawing a rectangle. Point with the pen (or touch
the finger pen) at the corner of the rectangle and next, keeping the
pen button pressed move it to reach the wanted size of the
rectangle. The outline of the rectangle will be plotted on the screen.
Rhombus - allows drawing a rhombus. Point with the pen (or touch
the finger pen) at the corner of the rhombus and next, keeping the
pen button pressed move it to reach the wanted size of the rhombus.
The rhombus will be plotted on the screen.
Circle - allows drawing a circle. Point with the pen (or touch the
finger pen) at the beginning of the circle and next, keeping the pen
button pressed, move it to reach the wanted size of the circle. The
outline of the circle will be plotted on the screen.
Triangle - allows drawing a triangle. Point with the pen (or touch
the finger pen) at the corner of the triangle and next, keeping the
pen button pressed, move it to reach the wanted size of the triangle.
The triangle will be plotted on the screen.
X (no) - sign – allows to put X sign - a symbol of a proper answer.
V (yes) - sign – allows to put V sign - a symbol of a wrong answer.
Eraser - allows to erase parts of pictures created with the E-Chart
tools.
Text entry – allows to write a text in the place pointed by the
electronic pen. It is activated by pressing the button of the electronic
pen or touching the finger pen.
Text can be entered from the opened virtual keyboard or PC
keyboard.
funtronic sp. z o.o.
all rights reserved
page: 22 z 30
Undo last operation – allows to undo last operation.
Screen magnification (zoom) – allows to enlarge the screen in the
place pointed by the electronic pen. It is activated by pressing the
button of the electronic pen or touching the finger pen.
Magnification factor according to the selection in Size function.
Curtain – allows to shadow the screen:
• To drag the curtain point with the pen the selected edge of the
window and drag it. Curtain can be drag from up, down, left or
right sides.
• To activate „telescope” user should point the place with
electronic pen and press the button. Size of the „telescope”
according to the selection in Size function.
Print – allows to print the current screen.
At the time of printing graphic panel E-Chart temporarily disappears.
Appears again after clicking on any point of the screen.
Boards
Blank whiteboard – allows to open a white background window.
Graph-paper whiteboard - allows to open a graph-paper white
background window.
Flipchart - allows to open a flipchart-paper white background
window.
SWOT - allows to open a SWOT-paper white background window.
Right mouse button
Right mouse button – to activate keep the electronic pen button
pressed for about 3 seconds. Mouse icon will appear on the screen.
Pressing the button again will return to normal operation.
funtronic sp. z o.o.
all rights reserved
page: 23 z 30
3.2
Positioning and the first camera calibration
The positioning and the first calibration of the camera must be done during the
initial launching the system. The procedure should be repeated in case of the computer
change and/or the camera position change.
To conduct the first setting and the camera calibration the user must follow the
following steps:
STEP 1:
Camera positioning
The camera should be located in a way to “see” the whole working
area – that means the picture displayed by the projector. The EChart application will help by giving coordinates of the electronic
pen read from the camera in the range from 0 to 9999 both vertically
and horizontally.
Firstly, turn off the mouse mode to read the position of the
electronic pen (without moving the mouse cursor). To make it the
user should remove the marking of “Move mouse cursor” option in
the menu of the Camera Settings window:
Now, moving the electronic pen (with the button pressed) the user
can define the camera working area. The electronic pen movement
will be reflected by co-ordinates change [Internal coordinates]. It is
enough to check the visibility (response for pressing and depressing
the button of the pen) in every corner of working area. Moving the
electronic pen out of the camera's view will cause stopping the
changes of the cursor coordinates and no reaction for pressing the
button of the pen.
Hint: sometimes it is more convenient to trace camera light instead
of coordinates. During pen visibility camera lights in green-yellow
funtronic sp. z o.o.
all rights reserved
page: 24 z 30
(otherwise is red).
Once finished the marking of “Move mouse cursor” option in the
menu of the E-Chart application window should be checked again:
STEP 2:
Calibration
Press the Calibration button in the E-Chart application window.
There will be 4 calibration points showing up on the screen (up-left,
down-left, up-right, down right). Using the electronic pen, the user
should click on every point in the following way:
•
the pen must be pointed precisely at the centre (cross) of
each point,
•
the button must be pressed and kept pressed until the full
green rotation is done (less then 1 second).
The calibration should be done very precisely in order to get best
possible comfort in using interactive whiteboard. If camera was
properly positioned then after calibration the view window will be
green. Otherwise camera position should be corrected.
funtronic sp. z o.o.
all rights reserved
page: 25 z 30
3.3
Electronic pen operation
Electronic pen operation is similar to handling one-button mouse. There is a
button in the body of the electronic pen that activates the pen. Only after pressing the
button the pen performs the action. Pen without the button pressed remains inactive.
Double click is performed by quick, double-pressing the button.
Example: to draw a line place the pen tip at the beginning, press and hold the
button to move the pen in place of the end of the line, then release the button.
3.4
FAQ
Question
Answer
How often do I have to do calibration?
Every time when the camera or screen
change their position. It will be visible as a
shift between mouse cursor and electronic
pen position.
Do I have to repeat the calibration if the
camera is attached permanently on the
projector hanged under the ceiling?
No, you do not. In such a case the user do
not have to repeat the calibration. It can be
repeated at any moment when the user is
not sure if the board is calibrated correctly.
New calibration is necessary when a new
computer is launched to the set
The application does not see the camera. Check if the USB cable is attached both to
The announcement says “The camera is
the camera and the computer.
not connected”.
Check if there is the red light in the camera.
I cannot calibrate the board. No reaction Correct the camera position (see chapter
for pressing electronic pen's button. I can 3.2). Darken the classroom.
funtronic sp. z o.o.
all rights reserved
page: 26 z 30
calibrate only 2 points.
I am moving the electronic pen on the
screen and nothing is happening .
Check whether camera and computer are
connected with USB cable.
Push the button on the electronic pen in
order to activate it.
Make sure that while moving the pen on the
screen (with the button pressed), the
camera light twinkles green.
Make sure that camera is properly positioned
(see chapter 3.2).
While moving the pen the lamp does not
twinkle green
The electronic pen is out of the visual area
of the camera. Move the camera closer to
the screen.
The camera is disarranged. Correct the
position of the camera (see chapter 3.2).
The battery in the electronic pen is
discharged
While moving the electronic pen on the
screen, the lamp twinkles with breaks.
Make sure that you hold the electronic pen
at a proper angle.
Check the batteries in the electronic pen.
Change the battery.
The camera is on the edge of working range
(up to 5 m from the screen). Move the
camera closer to the screen. The camera
does not work in the distance farther than 5
m from the screen .
funtronic sp. z o.o.
all rights reserved
page: 27 z 30
4
Maintenance instruction
4.1
Battery replacing
The only elements of the Polish Interactive Whiteboard which need periodical
checking are the electronic pen and the telescopic electronic pointer. Both are powered
with the batteries. When the batteries are discharged the pen stops working. In such a
case the batteries should be replaced.
To replace the batteries in the electronic pen the user should follow the steps:
•
unscrew two screws and disconnect both parts of the pen ,
•
take the old batteries out and put in new batteries keeping the same
polarity (plus down that is to the diode),
•
put together and screw the pen up .
To replace the batteries in the telescopic electronic pointer the user should
follow the steps:
•
unscrew the cap of the pointer,
•
take the old batteries out and put in new batteries keeping the same
polarity,
•
screw the cap pf the pointer.
funtronic sp. z o.o.
all rights reserved
page: 28 z 30
5
FAQ
Question
Answer
„Writing” on the screen doesn't match with Make the calibration.
electronic pen position.
The interactive whiteboard works upsidedown (right-left, top-bottom).
Make the calibration.
The interactive whiteboard does not want
to calibrate
Darken the room .
Turn the camera upside-down.
Move out lamps, light bulbs, reflective
objects from the area of camera view.
Decrease the distance of the camera to the
screen (maximum distance 5m).
The interactive whiteboard does not see
the electronic pen in some areas
Position the camera correctly .
While moving the electronic pen, the
cursor is skipping, leaving zigzag lines.
Remove the reflective objects from the
area of camera view darken the room .
Move the camera closer to the screen.
Darken the classroom.
The line drawn by the pen is not smooth
Increase „Sensitivity correction”
parameter.
Theinteractive whiteboard stops seeing the Replace the batteries in the electronic
electronic pen
pen.
I am moving the electronic pen on the
screen and nothing is happening .
Check whether camera and computer are
connected with USB cable.
Push the button on the electronic pen in
order to activate it.
Make sure that while moving the pen on
the screen (with the button pressed), the
camera light twinkles green.
While using the pen the lamp does not
twinkle green
The electronic pen is out of the visual area
of the camera. Move the camera closer to
the screen.
The camera is disarranged. Correct the
position of the camera.
The batteries in the electronic pen are
discharged. Change them.
funtronic sp. z o.o.
all rights reserved
page: 29 z 30
6
Technical specification
Operating system
•
Windows XP (with Service Pack 3), Windows Vista, Windows 7, Windows 8,
Linux, MAC OS from 10.6.
Electronic pens:
•
Power feed of:
◦ electronic pen: two batteries AA LR6 (alkaline) 1,5V or FR6 (lithium-ion ) 1,7V
◦ telescopic electronic pointer: two batteries AAA LR3 (alkaline) 1,5V
It is also possible to use alkaline rechargeable batteries. Don't use accu NiCd and
NiMH batteries.
•
Current input consumption by diode IR – about 110 mA.
•
Continuous working time with one set of alkaline batteries :
◦
for electronic pen: 10 - 15 hours,
◦
for telescopic electronic pen: about 3 hours.
Camera:
•
Camera feed - 5V from USB
•
Current consumption < 50 mA
•
View camera angle about 35 degrees both horizontally and vertically
•
Maximum width of the screen = ½ of the distance (2.5m)
•
Maximum distance between the camera and the screen – 5m
•
Camera resolution: 256x256 points.
•
Positioning accuracy: 1/16 point (4096x4096 points)
•
Screen diagonal:
Distance to screen
Screen diagonal
2m
55"
3m
82"
4m
110"
funtronic sp. z o.o.
all rights reserved
page: 30 z 30