1
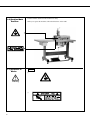
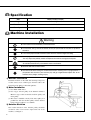
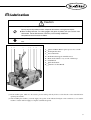
R
USER ’S MANUAL
KM-76
Leather Skiving Machine
1) FOR AT MOST USE WITH EASINESS,
PLEASE CERTAINLY READ THIS MANUAL
BEFORE STARTING USE.
2) KEEP THIS MANUAL IN SAFE PLACE
FOR REFERENCE WHEN THE MACHINE
BREAKS DOWN.
SunStar CO., LTD.
MME-090929
lity
a
u
tQ
Besst Pricevice
Be st Ser
Be
1. Thank you for purchasing our product. Based on the rich expertise and
experience accumulated in industrial sewing machine production, SUNSTAR
will manufacture industrial sewing machines, which deliver more diverse
functions, high performance, powerful operation, enhanced durability, and
more sophisticated design to meet a number of user’s needs.
2. Please read this user’s manual thoroughly before using the machine. Make
sure to properly use the machine to enjoy its full performance.
3. The specifications of the machine are subject to change, aimed to enhance
product performance, without prior notice.
4. This product is designed, manufactured, and sold as an industrial sewing
machine. It should not be used for other than industrial purpose.
R
SunStar CO., LTD.
Table of Contents
Safety Rules
4
Summary
7
1. Specification
8
2. Machine Installation
1) Machine Installation
2) Motor Installation
3) Rotation Direction
8
8
8
8
3. Lubrication
9
4. Adjustment
1) Presser Foot
2) Knife
3) Feeding Roller
4) Ruler
10
10
11
11
11
5. Sharpening the Knife
12
6. Using the Dresser
12
7. Replacing Parts
1) Replacing Knife Sharpening Stone
2) Replacing Feeding Roller
3) Replacing Knife
4) Replacing Warm and Warm Wheel
13
13
13
14
14
8. Adjusting Knife Shaft
15
9. Cause of Trouble and Troubleshooting
16
Safety Rules
Safety instructions on this manual are defined as Danger, Warning and Caution.
If you do not follow the instructoins, physical injuries and machine damages might be occurred.
Danger : This indication should be observed definitely. If not, there will be a danger during the installation, conveyance and
maintenance of the machine.
Warning : When you follow this indication, injuries from the machine can be prevented.
Caution : When you follow this indication, error on the machine can be prevented.
1-1) Machine
Delivery
Personnel with a full understanding of the safety guide must deliver the machine.
Note the following directions when delivering the machine.
ⓐ At least 2 persons are required to carry the machine.
ⓑ Thoroughly wipe off any oil on the machine to prevent accident during delivery.
Danger
1-2) Machine
Installation
Caution
Meet the following conditions for proper installment of the machine. Otherwise, it may
cause physical damage on the machine, including mechanical problem or failure.
ⓐ Open the package from the top in the reverse order of how it was originally packed.
Be extra careful of the nails on the box.
ⓑ Install air controller and clean the machine regularly to prevent pollution and rust from
dust and moisture.
ⓒ Avoid direct sunlight.
ⓓ Leave open space of at least 50cm around the machine for easy access in case of
repair.
ⓔ Do not operate in an environment where there is danger of explosion.
Do not operate in areas where there is danger of explosion, including places where
large quantities of spray products (e.g. aerosol) are used or oxygen is stored, unless the
product has specific indications that it guarantees the prevention of explosion.
ⓕ This machine does not come equipped with lighting, so the user has to install the
lighting at the workplace himself.
[Note] For details of machine installment, refer to “2. Machine Installation”
1-3) Machine
Repair
Only our authorized and trained technician in charge of A/S should perform machine
repair.
Danger
ⓐ Before cleaning and repair, be sure to turn the power off and wait for about four
minutes for the machine to discharge completely.
ⓑ No part of the machine or specifications may be modified without prior consultation
with our company. Unauthorized modifications may jeopardize safe operation.
ⓒ In case of repair, replace only with SunStar’s standard OEM parts.
ⓓ After repair, return safety cover back on the machine.
4
1-4) Operating
machine
Warning
KM-76 is made for industrial use.
Follow the following indications when operating the machine.
ⓐ Read through this manual carefully and completely before operating the machine.
ⓑ Wear proper clothes for work.
ⓒ Keep hands or other parts of the body away from the machine’s operation parts(needle,
shuttle, thread take-up lever, pulley, etc.) when the machine is operating.
ⓓ Keep the covers and safety plates on the machine during operation.
ⓔ Be sure to connect the earthing conductor.
ⓕ Turn off the main power and check if the switch is turned“off”before opening electric
boxes such as the control box.
ⓖ Do not step on the pedal when turning the power on.
ⓗ If possible, install the machine away from source of strong electrical noise such as high
frequency welding machines.
[ Warning ]
Keep motor cover in place before operating, turn off power before inspecting or adjusting.
1-5) Safety
devices
ⓐ Safety label : It describes cautions during the machine operation.
ⓑ Belt cover : It prevents any contact between body and take-up lever.
ⓒ Motor cover : A device to prevent hands, feet and clothing from getting jammed by the
motor.
ⓓ Label for specification of power : It describes cautions for safety to protect electric
shock during the motors’ rotation. (Voltage input / use Hz)
Caution
ⓒ
ⓐ
ⓑ
ⓓ
5
1-6) Caution Mark
Position
1-7) Contents of
Marks
Caution mark is attached on the machine for safety.
When you operate the machine, follow the directions on the mark.
Caution
1)
Warning
2)
6
Summary
SUNSTAR leather skiving machine is built on new technology and
materials with high precision, durability, and easy usage.
It is most suitable for edge skiving and whole skiving any kind of leather,
vinyl, and rubber products for shoes, bags, belts, purses, gloves, and etc.
Its main features are as follows:
① Maximum working width is 50mm per cut.
Perform two or more rounds of cut to get desired width.
② Additional waste disposing device (patented)
③ Additional knife sharpening clutch device
④ Easy replacement of parts (patented)
7
1 Specification
Size
530(W) x 340(D) x 370(H)
Weight
39kg
Motor Power
200W~400W
Motor Speed
1000rpm~1200rpm
2 Machine Installation
Warning
▶ The machine must be installed by a trained technician.
▶ For electrical wiring, consult the dealer where you purchased the machine or qualified
technician.
▶ Two or more people should install the machine since the machine weighs over 39kg.
▶ Do not plug in until the installation is complete.
You may step on the pedal by mistake and operate the machine causing physical injuries.
▶ Connect the ground (earth) wire.
An unstable connection may cause electric shock or malfunction.
▶ Mount the belt cover on the machine.
▶ Use both hands when leaning the machine backwards or returning it to its up-right position. If
you perform with one hand, your hand may slip and get caught between objects due to the
machine’s heavy weight, resulting in injury.
1) Machine Installation
Install the machine on the table with the hinge, hinge bar,
wooden screws. Leave 150mm space from the table to the
bottom tip of the knife to collect dust particles.
2) Motor Installation
(1) Use 200W~400W motor.
(2) Use A-type, V-motor pulley of 50~60mm in diameter.
Mount A-type, V-belt around the machine pulley and
motor pulley.
(3) The motor is installed correctly if the motor pulley is in
parallel line with the machine pulley and the distance
between the two pulleys is over 300mm.
3) Rotation Direction
The rotation direction of the machine pulley should be
clockwise when seen from the right hand side of the
machine, as in Figure 1.
8
[Figure 1]
3 Lubrication
Caution
▶ Do not plug in until the oil supply is complete.
You may step on the pedal by mistake and operate the machine causing physical injuries.
▶ When handling lubricants, use safety goggles and gloves to protect your eyes and skin from
inflammation. Do not drink lubricants, which may cause vomiting and diarrhea.
Keep lubricants out of the reach of children.
▶ You must supply oil when using the machine for the first time or if it has not been used for a long
time.
A
B
C
D E
F
G
H
A
B
C
D
E
F
G
H
Warm and Warm Wheel: replace grease once a month
Feeding Roller Shaft
Presser Bar Lifter
Roller Bracket Support Arm Pillar Screw
Knife Shaft: lubricate every second or third usage
Clutch Block
Knife Shaft Warm
Clutch Lever Shaft Handle
[Figure 2]
(1) Clean machine parts, which are oil-coated to prevent rusting, with dry cloth to avoid oil stains on the materials before
operating the machine.
(2) After installing the machine, you must supply oil at points A~H, indicated in Figure 2. Be careful not to ever start the
machine’s rotation until oil supply is complete at all indicated points.
9
4 Adjustment
The machine has been adjusted prior to delivery. However, check rotation direction, number of rotation, and lubrication before
repeating the following adjustment and performing desired skiving.
1) Presser foot
(1) Push the presser bar lifter① down.
(2) Insert the presser foot control screw②, and determine
the desired distance(A) between the presser foot⑦ and
the knife⑧, as in Figure 4.
②
①
A. Narrow (small) Cutting
Turn control screw② counterclockwise to lower the
presser foot after determining an adequate cutting
width for the material.
B. Wide (large) Cutting
Turn control screw② clockwise to lift the presser
foot. Measure the distance(A) from the left hand
side of the machine.
④
③ ⑥
⑤
⑦
⑧
[Figure 3]
(3) Cutting side-ways (Figure 5)
Turn control screw③ clockwise or counterclockwise to
get the desired angle of the presser foot.
(4) Cutting with shapes
Switch the presser foot to desired shape, such as stripe or
sandpaper.
(5) Removing the presser foot
Lift the presser bar lifter up, dismount the presser foot
spring④ horizontally, loosen the presser foot tension
screw⑤, and take the loop⑥ out, which will allow you
to remove the presser foot and the fixation pin. (1 set
includes 4 presser foots )
A
[Figure 4]
[Figure 5]
Note) When replacing the presser foot, lift the presser foot up with the presser foot control screw② before pushing the
presser bar lifter① down. Be careful with the presser foot because it may scratch the feeding roller if it is not lifted up to
a certain level. Now loosen the screw⑤ and remove the loop from the back, which will allow you to dismount the
presser foot and the fixation pin (Refer to Figure 3).
10
2) Knife
(1) The knife will gradually shrink with constant sharpening
and usage, so you will have to adjust the distance(B)
between the presser foot and the blade each time.
(2) As in Figure 6, if you turn the control grip①
counterclockwise (left), the knife will move towards the
indicated direction (left).
(3) As in Figure 7, distance(B) between the presser foot and
the blade may vary according to the working material,
nevertheless, the standard distance(B) generally used is
as follows.
A. Thin material
0.2~0.3mm
B. Medium material
0.3~0.5mm
C. Thick and strong material
0.5~0.8mm
①
[Figure 6]
B
3) Feeding roller
(1) Feeding roller① must always maintain a certain parallel
distance from the inner surface of the knife. As in Figure
9, the distance(C) can be adjusted depending on the
material’s thickness.
(2) To increase the distance(C), turn the control screw⑤
clockwise and to close the distance, turn it
counterclockwise.
(3) Distance(C) between the feeding roller and the knife
(Figure 9)
A. Thin material
0.3~0.5mm
B. Thick material
1~1.5mm
(4) Sideways (Figure 9)
Turn the control screw② clockwise and the feeding roller
will turn on its side vis-a-vis the inner surface of the knife.
(5) Material
A. If it is hard leather, pull the spring lever③ forward to
readjust it more tightly.
B. If it is soft leather, loosen the spring④.
(6) Soft leathers, such as those from horse and sheep, roll
easily around the feeding roller. So use thin feeding
roller or rubber roller.
4) Ruler
When edge skiving, determine the width by using the ruler
④.
(1) Fix the ruler on the plate③ with washer① and fixation
screw② leaving a certain distance(D). Align the ruler so
that it is fixed on the left hand side of the presser foot.
(2) By changing the ruler’s location, edge skiving width(D)
can be adjusted at anywhere between 0~50mm
according to user’s needs.
[Figure 7]
①
③
④
②
⑤
[Figure 8]
C
[Figure 9]
②
④
D
①
③
[Figure 10]
11
5 Sharpening the Knife
A
③
④
②
①
[Figure 11]
[Figure 12]
The knife will produce bad cuts as it becomes dull during usage, so you need to sharpen the knife according to the following
procedures.
(1) Knife sharpening clutch device
A. The sharpening stone rotates when you turn the shifting knob① clockwise.
B. When sharpening is complete, you must lift the clutch lever up and stop the sharpening stone.
(2) The distance(A) between the knife and the presser foot should be about 0.5mm.
(3) If you turn the stone control grip② slowly counterclockwise, the sharpening stone③ will come into close contact with the
knife and start the sharpening process.
Note) Be careful not to bring the sharpening stone too close to the knife, because the knife can get overheated and this
may lead to knife oscillation.
(4) If the sharpened edge of the knife has the sharp-end shifted to the opposite direction, bring the rod stone in parallel contact
with the knife’s inner surface to re-sharpen the blade to its proper direction.
(5) After sharpening process is complete, return the sharpening stone to its original place and turn the clutch off.
6 Using the Dresser
You will not be able to sharpen the blade if iron builds up or
oil stains on the sharpening stone. In such cases, grind the
stone using the dresser①, without brining it too close to the
stone.
①
Note) To prevent stone particles from flying into your
eyes, wear safety goggles before grinding to
smooth the surface of the stone.
[Figure 13]
12
7 Replacing Parts
1) Replacing Knife Sharpening Stone
①
②
④
⑤
10mm
③
[Figure 14]
[Figure 15]
[Figure 16]
(1) Carefully observe how the flat belt is mounted before removing it.
(2) As in Figure 14, hold sharpening stone① with your left hand and pulley③ with your right hand. Turn your right hand
counterclockwise to separate the pulley from the stone.
(3) Insert the stone knot spanner④, as in Figure 15, in the knot’s holes⑤. Turn it counterclockwise to separate it from the
stone (Figure 15).
(4) When remounting the flat belt, as in Figure 16, remount it so that the stone rotates clockwise when seen from the top of
the machine.
Note) If you have separated the stone from the knot to replace a new one, be sure to install the stone and the knife so that
they are 10mm apart, as in Figure 16.
Note) Be careful not to leave oil stains on the stone.
2) Replacing feeding roller
(1) Relocate the spring lever① to the bed’s lever peg②.
(2) Hold the support arm③ with your left hand and loosen
the center pin fixation screw④. Pull the center pin⑤ to
remove the support arm③.
③
Note) Be careful when you are replacing the feeding
roller, since the knife may come into contact with
other objects, forcing the blade to lose its sharp
edge. Take special note of the fact that the joint
which rotates the feeding roller is separately
assembled and may easily come into contact with
the knife as you try to remove it. To avoid this
from happening, support the joint with your hand
as you remove it.
(3) Loosen the screw② of the roller base① and remove the
roller shaft③ which will allow you to separate the roller④.
(4) Remove the feeding roller support arm③, as in Figure 17.
⑤
②
①
④
[Figure 17]
④
③
②
①
[Figure 18]
13
3) Replacing knife
(1) Remove the waste disposing plate① by using the
disposing plate removal shaft③, as in Figure 19.
(2) Remove the four screws② that hold the knife in its place
and remove the knife slowly.
③
①
②
Note) Since the knife is compressed, you need a tool,
such as a driver, to push it out with even pressure
as you twist the knife out of its place with your
hand.
(3) When replacing the knife, remember to clean it
completely with petroleum since new knives are oilcoated to prevent rusting.
(4) Empty the waste inside the knife and on the sides where
the knife shaft is installed. Install the knife by pushing it
back into its place.
[Figure 19]
(5) Twist the knife in as you tighten the screws② with even strength for installation.
Note) Be careful not to tighten the screws unevenly, since it may lead to knife oscillation.
4) Replacing warm and warm wheel
(1) Remove the cover② of the warm container① and lid
screw③.
②
④
⑤
⑥
Note) Be careful of the leaking oil.
(2) Loosen the fixation screw⑤ of the warm wheel, and take
the warm wheel ④out from the top by pushing the
driving shaft⑥ inward.
(3) Take the warm gear⑦ out of the place where you
removed the lid screw.
(4) Install everything back to where it belongs according to
proper key groove after replacement.
①
⑦
③
[Figure 20]
14
8 Adjusting Knife Shaft
④
③
⑥
⑤
①-1
①
①-2
②
[Figure 21]
The most important feature to bear in mind for these kinds of machines is certainly the rotation without knife oscillation. But
after a long period of usage, oscillations do take place. In such cases, adjust as follows.
(1) Vertical knife oscillation
Tighten the knot⑤ of the knife shaft knot④ with the knife shaft knot spanner②.
Note) Be careful not to tighten the knot too much since the knife will not move at all. Tighten the knot just so that it
does not become loose during operation.
(2) Horizontal knife oscillation
Tighten the knot ①-1 of the knife shaft metal little by little and tighten the ①-2. Do not tighten too much: allow the knife
to rotate smoothy. Repeat to adjust the gap on both right and left.
(3) You must adjust the knife shaft when replacing the knife.
15
9 Cause of Trouble and Troubleshooting
Trouble
16
Cause
Troubleshooting
Knife oscillation
1. Knife oscillation due to bad installation
2. Horizontal knife shaft oscillation
3. Knife shaft metal is loose
4. After sharpening, the sharp-end shifted
to the opposite position
5. Presser foot is loose
6. presser foot and feeding roller are too
close together
7. Feeding roller has bad quality (凹 凸)
8. Center pin of the feeding roller support
arm is not inserted completely
1. Remove knife, thoroughly clean sides
that come into contact with the knife
2. Adjust and tighten knife shaft knot
3. Adjust knife shaft metal knot
4. Re-sharpen the blade to its proper
direction with the rod stone
5. Retighten presser foot tension screw
6. Lift presser foot with presser foot control screw
7. Replace bad feeding roller
8. Tighten center pin fixation screw after
pushing the center pin in completely
Wobbly cuts
1. Blade is damaged
2. Knife shaft oscillation from front to back
3. Knife shaft oscillation up and down
1. Sharpen the knife
2. Adjust and tighten knife shaft knot
3. Adjust by slowly tightening knife shaft
metal knot
Material does not enter
smoothly
1. Distance between the feeding roller and
knife is too close
2. Presser foot surface oscillation from
front to back
3. Bad cuts (dull blade)
4. Spring on the spring lever is too strong
1. Lower feeding roller slowly when the
material is thick
2. Replace presser foot with a new one
3. Sharpen the knife
4. Loosen the spring on the spring lever or
grind the presser foot path to allow the
material’s smooth entry
Material gets stuck in
the knife
1. Blade protrudes forward more than
presser foot
2. Presser foot protrudes downward more
than the blade
3. Feeding roller and knife are too wide apart
1. Adjust the distance between presser
foot and blade to 0~0.5mm
2. Lift presser foot up
3. Adjust with control screw
Waste not disposed
properly
1. Rotates too fast
2. Feeding roller’s surface has bad quality
(凹 凸)
1. Replace motor pulley with a smaller one
2. Replace bad feeding roller
Feeding roller does not
operate
1. V-belt is cut
2. Warm container is running out of oil
3. Feeding roller’s shaft is melting down
1. Replace V-belt
2. Mix oil and grease in the warm container
3. supply oil to feeding roller shaft
Warm wheel erodes too
quickly
1. Not enough oil
2. Feeding roller’s shaft is melting down
1. Supply oil
2. Supply oil to feeding roller shaft
Knife shaft gets heated
1. Insufficient oil supply
2. Knife shaft and knife shaft metal knot
are too tight
2. Make adjustment
Knife is still dull even
after sharpening
1. Sharpening stone has oil stain
2. Sharpening stone has iron build-up
3. Flat belt is idling due to oil stain
Noisy sound
1. Machine rotates too fast
2. Warm wheel shrank due to grinding
3. Insufficient oil supply
4. Clutch block is too eroded
5. Clutch lever is loose when clutch is
turned off
1. Rotate sharpening stone and grind
stone with dresser
2. Place back the clutch that cleans the
flat belt oil stain
1. Change rotation to 1000~1200rpm
2. Replace
3. Supply oil on regular basis
4. Replace clutch block
Supply oil to clutch block
5. Adjust the clutch lever up so it does not
move