
1
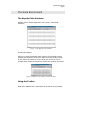
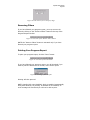
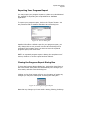
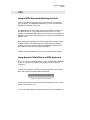
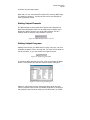
Kapelle Clefs 1.0
User Manual
Scott L. Foglesong
Comment [SLF1]:
Table of Contents
TABLE OF CONTENTS ................................ ..........................................................................3
INTRODUCTION................................ ...................................................................................5
ABOUT KAPELLE CLEFS................................................................................................ ...........5
THE WORK ENVIRONMENT ................................................................ ................................6
T HE KAPELLE CLEFS I NTERFACE ...............................................................................................6
Resizing the Window................................................................................................ ...........6
USING THE T OOLBAR ................................................................................................ ..............6
Floating the Toolbar................................................................................................ ...........7
Docking the Toolbar................................................................................................ ...........7
Resizing the Toolbar................................................................................................ ...........8
T HE STATUS BAR ................................ ...................................................................................8
USING THE M ENUS ................................................................................................ .................8
File Menu ................................ .........................................................................................9
View Menu................................................................ ...................................................... 10
Clefs Menu................................................................ ...................................................... 10
Levels Menu................................ .................................................................................... 10
Help Menu................................................................ ...................................................... 10
USING CONTEXT M ENUS................................ ........................................................................ 11
USING THE KEYBOARD................................................................ .......................................... 11
CLEF EXERCISES ................................................................................................ ............... 13
DOING ANE XERCISE................................................................ ............................................. 13
SELECTING A CLEF ................................................................................................ ............... 15
SELECTING A L EVEL OF DIFFICULTY................................ ......................................................... 15
DOING ANE XERCISE W ITH M ULTIPLE CLEFS ................................ ............................................. 16
PROGRESS REPORTS ................................................................................................ ......... 18
T HE CONTENTS OF YOUR P ROGRESS REPORT ................................ ............................................. 18
UNDERSTANDING THE P ROGRESS REPORT W INDOW ................................ .................................... 18
SORTING ENTRIES ................................................................ ................................................ 19
SELECTING ENTRIES ................................................................ ............................................. 19
DELETING E NTRIES................................................................................................ ............... 20
FILTERING E NTRIES ................................ .............................................................................. 20
Filter by Date................................................................................................ .................. 21
Filter by Clef................................................................ ................................................... 22
Filter by Level ................................ ................................................................................. 22
Filter by Score................................ ................................................................................. 22
REMOVING FILTERS ................................ .............................................................................. 23
P RINTING YOUR P ROGRESS REPORT ................................ ......................................................... 23
E XPORTING YOUR P ROGRESS REPORT ................................ ...................................................... 24
CLOSING THE PROGRESS REPORT D IALOG BOX ........................................................................... 24
MIDI ................................ ................................................................................................ ... 26
USING A MIDI K EYBOARD W ITH K APELLE CLEFS................................ ....................................... 26
USING KAPELLE CLEFS W ITHOUT AMIDI KEYBOARD................................ ................................. 26
T HE MIDI SETTINGS D IALOG BOX ................................................................ ........................... 27
SETTING THE MIDI I NPUT AND O UTPUT PORTS ........................................................................... 27
SETTING OUTPUT CHANNELS................................ .................................................................. 28
SETTING OUTPUT P ROGRAMS................................ .................................................................. 28
SETTING MIDI T HRU ................................................................................................ ............ 29
SUMMARY OF COMMANDS................................ ............................................................... 30
NEW E XERCISE ................................ .................................................................................... 30
STOP E XERCISE................................ .................................................................................... 30
P ROGRESS REPORT ................................................................................................ ............... 30
MIDI SETTINGS ................................................................ ................................................... 31
E XIT................................................................ .................................................................. 31
VIEW T OOLBAR ................................................................ ................................................... 31
VIEW STATUS BAR ................................................................................................ ............... 31
VIEW KEYBOARD ................................ ................................................................................. 31
COLOR, CORRECT NOTES................................................................ ....................................... 31
COLOR, I NCORRECT NOTES ................................................................ .................................... 32
DEFAULT COLORS ................................................................ ................................................ 32
T REBLE CLEF ................................................................ ...................................................... 32
SOPRANO CLEF ................................ .................................................................................... 32
M EZZO SOPRANO CLEF ................................................................................................ ......... 32
ALTO CLEF ................................................................ ......................................................... 33
T ENOR CLEF ................................ ....................................................................................... 33
BARITONE ( C ) CLEF ................................................................................................ ............ 33
BARITONE ( F ) CLEF ................................................................ ............................................. 33
BASS CLEF................................ .......................................................................................... 34
M ULTIPLE CLEFS ................................ ................................................................................. 34
L EVEL 1 ................................ ............................................................................................. 34
L EVEL 2 ................................ ............................................................................................. 34
L EVEL 3 ................................ ............................................................................................. 35
L EVEL 4 ................................ ............................................................................................. 35
L EVEL 5 ................................ ............................................................................................. 35
HELP T OPICS................................ ....................................................................................... 35
ABOUT KAPELLE CLEFS................................................................................................ ......... 36
KEYBOARD SHORTCUTS ................................................................................................ ... 37
SYSTEM REQUIREMENTS ................................ .................................................................. 38
INDEX ................................................................................................ ................................. 39
Kapelle Clefs Manual
Page 5
Introduction
About Kapelle Clefs
Kapelle Clefs is an application in the Kapelle series of eartraining
programs. All of the Kapelle series applications share a common
base in the Apollo music notation library, which provides music
notation as well as MIDI-based playback and entry of musical
notation. In addition to the underlying Apollo library, Kapelle-series
programs share a similar interface, in order to facilitate the learning
of each individual program in the series.
Kapelle Clefs is a simple application that concentrates on the
learning of the various clefs—F,C, and G clefs—by playing notes in
those clefs on a keyboard, either the onscreen-supplied keyboard
or a MIDI keyboard connected to your computer.
Kapelle Clefs Manual
Page 6
The Work Environment
The Kapelle Clefs Interface
Kapelle Clefs is simple application with a clean, uncluttered
interface:
Figure 1: The Kapelle Clefs window
Resizing the Window
When you resize the Kapelle Clefs window, the enclosed musical
notation will expand or contract in order to fill the window evenly.
If you resize the window to a very small size, there will not be
enough space within the window to display the notation accurately:
Figure 2: Kapelle Clefs window resized too small
Using the Toolbar
Most of the Kapelle Clefs c ommands can be found on the Toolbar.
Kapelle Clefs Manual
Page 7
Figure 3: Kapelle Clefs toolbar
The Toolbar can be docked to any one of the window’s four
boundaries, and can be floated as an independent window and
resized.
Floating the Toolbar
To float the Toolbar, position the mouse cursor over any point in
the Toolbar not occupied by an icon, hold down the mouse button,
and drag the Toolbar to a location away from the edge of a window.
The Toolbar will then “float”—that is, be an independent palettetype window.
Figure 4: Floating Toolbar
Docking the Toolbar
To fasten (“dock”) the Toolbar to one size of the main window,
position the moust cursor over the floating Toolbar’s title bar, and
drag the Toolbar towards one of the edges of the window. When
you approach the edge of the window, release the mouse button
and the Toolbar will dock itself to that side of the window.
In this illustration, the Toolbar has been docked to the left side of
the window:
Figure 5: Docked Toolbar
Kapelle Clefs Manual
Page 8
Resizing the Toolbar
A floating Toolbar can be resized. Simply position the mouse cursor
over any of the four edges, or any of the four corners, and drag the
cursor to resize the Toolbar.
If you drag from one of the four corners, the Toolbar is resized in
both dimensions simultaneously. If you drag from the left or right
sides, the Toolbar is resized horizontally; if you drag from the top
or bottom sides, the Toolbar is resized vertically.
Figure 6: Resized Toolbar
The Status Bar
Kapelle Clef’s status bar runs along the bottom of the window.
Given that Kapelle Clefs is a simple program, the status bar does
very little:
Figure 7: The Status Bar
If you prefer not to see the status bar, you may remove it from the
window by selecting the command STATUS BAR from the EDIT M ENU.
Using the Menus
Menus provide easy access to all of the program’s commands. The
menu bar runs along the top of the main window:
Figure 8: The Menu Bar
You activate a menu by clicking the mouse over any one of the
menu names:
Kapelle Clefs Manual
Page 9
Figure 9: An activated menu
You can also activate a menu from the keyboard. To do this, hold
down the Alt key (usually located directly to the left of the
spacebar) and then press the underlined letter of the menu. For
example, pressing Alt, then F (which is the underline letter for the
File menu), produces this:
Figure 10: Activated File Menu
After a menu has been activated, its commands may be given
either by clicking on the command with the mouse, or by pressing
the underlined letter on the command.
Note also that many commands have keyboard accelerators, which
are indicated on the right-hand side of the menu command. In this
illustration, the keyboard accelerator is Control+N:
Figure 11: Keyboard Accelerator
If a command has a keyboard accelerator, you can activate the
command from the keyboard without using the menu bar at all. For
example, a keyboard accelerator of Ctrl+N indicates that you hold
down the Control key while typing the letter ‘n’.
Kapelle’s five menus are as follows:
File Menu
The File Menu contains commands for starting and stopping
Kapelle Clefs Manual
Page 10
exercises, showing your progress report, controlling MIDI settings,
and exiting the program:
Figure 12: File Menu
View Menu
The View Menu contains commands for viewing various onscreen
elements such as the Toolbar or the onscreen Keyboard, as well as
setting the display colors:
Figure 13: View Menu
Clefs Menu
The Clefs Menu contains commands for setting the clef of an
exercise:
Figure 14: Clefs Menu
Levels Menu
The Levels Menu contains commands for setting the level of
difficulty for an exercise:
Figure 15: Levels Menu
Help Menu
The Help Menu contains commands for accessing Kapelle Clefs’s
help systems as well as information about the program:
Kapelle Clefs Manual
Page 11
Figure 16: Help Menu
Using Context Menus
Clicking the alternate mouse button (usually the right button on
most systems) over various parts of the Kapelle Clefs window will
result in a context menu, or a menu containing most of the
commands that are suitable to that location.
The context menu that appears for the main window body is as
follows:
Figure 17: Main Window context menu
NOTE: if an exercise is not currently under way, the first command
on the menu will read NEW EXERCISE instead of STOP EXERCISE.
The context menu that appears if you right-click on the Toolbar, the
Menu Bar, or the Status Bar is as follows:
Figure 18: Secondary context menu
Using the Keyboard
If you do not have a MIDI keyboard attached to your computer,
you may use the built- in onscreen keyboard.
To make the keyboard visible, select
KEYBOARD
from the
V IEW M ENU.
Kapelle Clefs Manual
Page 12
Figure 19: Keyboard
Play a note on the keyboard by clicking on that note (the location of
middle ‘c’ is marked). The note continues to sound for as long as
you hold down the mouse button. (Note that some MIDI sounds
might feature decay and thus the sound may not sustain.)
Kapelle Clefs Manual
Page 13
Clef Exercises
Doing an Exercise
Kapelle Clefs is not a complicated application. An exercise consists
of a screenful of notes, each in its own measure.
The object of the exercise is to play the notes of the exercise—
either on a MIDI keyboard connected to your comp uter or using the
onscreen keyboard —until the end of the exercise. You are scored
by the number of notes you have played correctly.
To start an exercise, select the clef (or clefs) that you wish to work
with, and the level. (See the following sections for information
about doing that.)
Then start the exercise by any of the following techniques:
•
Select
NEW E XERCISE
from the
•
Select
NEW E XERCISE
from the Context Menu
•
Click on the New Exercise icon
•
Press Control+N.
FILE M ENU
on the Toolbar
This illustrations shows a Kapelle Clefs exercise:
Kapelle Clefs Manual
Page 14
Figure 20: A Kapelle Clefs exercise
After you play an individual note, that note will be colored. The
color of the note changes for correct notes versus incorrect notes.
In this illustration, the first seven notes have been played:
Figure 21: Exercise with seven notes played
The exercise stops automatically when you reach the last note, and
presents you with a summary of your performance:
Figure 22: Summary of an exercise
If you wish to stop the exercise before you have reached the last
note, use the Stop Exercise command, which can be given using
Kapelle Clefs Manual
Page 15
any of the following techniques:
•
Select
STOP EXERCISE
from the
•
Select
STOP EXERCISE
from the Context Menu
•
Click on the Stop Exercise icon
•
Press Control+X
FILE M ENU
on the Toolbar
NOTE: if you stop an exercise before you reach the last note, the
score of your performance is not retained: you must finish the
exercise in order for it to be evaluated.
Selecting a Clef
You may select the clef for the exercise a number of different ways:
•
Select the clef from the Clefs Menu
•
Click on a clef icon on the Toolbar
Figure 23: Clef icons on the Toolbar
•
Select the clef from the Context Menu
•
Press the key combination for the clef (see the “Keyboard
Shortcuts” chapter for a listing of those key combinations.)
The clef that you have selected will be used for the next exercise
you do, not the current one.
Selecting a Level of Difficulty
Kapelle Clefs offers five levels of difficulty. They are:
•
Level 1: Stepwise motion only, no accidentals or leger lines
Kapelle Clefs Manual
Page 16
•
Level 2: Some leaps up to a fourth, no accidentals or leger lines
•
Level 3: Same as Level 2 but with accidentals added
•
Level 4: Same as Level 3 but with leger lines added
•
Level 5: Large leaps, all accidentals possible, leger lines
You may select the level of difficulty a number of ways:
•
Select the level from the Levels Menu
•
Select the level from the Context Menu
•
Click on a ‘level’ icon on the Toolbar
Figure 24: Level icons
•
Press the Control key + the level you desire (Control+1 is
Level 1, Control+2 is Level 2, and so forth.)
The level that you choose will be applied to the next exercise you
do, not the current exercise.
Doing an Exercise With Multiple Clefs
Normally a Kapelle Clefs exercise features only a single clef.
However, you may mix clefs within the exercise. To do this, select
the command M ULTIPLE CLEFS from the CLEFS M ENU . You are presented
with the Multiple Clefs dialog box:
Figure 25: Multiple Clefs dialog box
Select at least one clef from this dialog box by clicking in the
Kapelle Clefs Manual
Page 17
checkbox to the left of the clef’s name.
NOTE: if you do not select any clefs, clicking OK will result in the
following:
Figure 26: Warning message for clef selection
Kapelle Clefs will choose the location of the various clefs at random.
Here is an example which mixes Treble, Soprano, Tenor, and both
varieties of Baritone clefs:
Figure 27: A mixed clef exercise
Kapelle Clefs Manual
Page 18
Progress Reports
The Contents of Your Progress Report
A progress report is a special file created for you automatically by
Kapelle Clefs the first time you used the application. It contains a
record of all of the exercises you have performed, together with
their scores, the time it took to do the exercise, and the date/time
when you did each individual exercise.
The progress report is shown in a special dialog box which allows
you to manipulate the contents of your progress report: you can
delete entries, sort the report by various criteria, filter out entries,
as well as print or export your progress report as a text file.
Understanding the Progress Report Window
Figure 28: The Progress Report Window
The main area of the progress report window is devoted to a list
box which displays each entry in the progress report. Each entry
represents a single exercise, and each entry contains the following
fields:
•
Date: the date and time for this exercise.
•
Level: the exercises’s level of difficulty
•
Clefs: the clef or clefs used in the exercise
Kapelle Clefs Manual
Page 19
•
Grade: the score you received for your performance
•
Time: the length of time it took to perform the exercise
Sorting Entries
You may sort the entries by any of the five fields—Date, Level,
Clefs, Grade, and Time. Sort them by clicking on the field header:
Figure 29: Sorting the entries by Date
Selecting Entries
To select an entry, click on the Date field for that entry:
Figure 30: Selecting an entry
To select an inclusive range of entry, click on the Date field for the
first entry in the range, and then hold down the Shift key and click
on the Date field for the last entry in the range:
Figure 31: Selecting a range of entries
To select multiple, non-continguous entries, hold down the Control
Kapelle Clefs Manual
Page 20
key and click on each entry you wish to select:
Figure 32: Selecting multiple, non-contiguous entries
Deleting Entries
To delete an entry, select the entry or entries you wish to delete
(see the above section on selection techniques) and then click on
the “Delete Item” button on the top of the window:
Figure 33: Deleting an item
NOTE: the item will not be permanently deleted unless you click on
the “Save/Close” button, which saves the changes you have made
in your progress report. If you click on the “Close” button instead,
you will be given the option to close your report without saving
changes.
Filtering Entries
You may filter the entries in the progress window—that is, include
only those entries which you want to see. This feature can be very
useful if you are printing a progress report since reports can grow
very long quickly. You may filter by Date, by Clef, by Level, or by
Score.
Note that filtering does not remove the items from your
Kapelle Clefs Manual
Page 21
Progress Report: it determines how they are displayed and
printed only; the contents of the actual file remain
unchanged.
To reach the filters, click on the “Filter” button:
Figure 34: Location of the Progress Report buttons
You will be presented with the Filters property sheet, which is a
“tabbed” dialog box—each tab controls one specific filter. Go to
each property page by clicking on its tab:
Figure 35: The Filters Property Sheet (Tabbed dialog)
Filter by Date
You may filter entries to those occurring within a specific time
frame, measured from the present:
Figure 36: Filter by Date Property Page
To select an option, click on the radio button that selects that filter,
and then select a range of options. In this illustration, only those
exercises which have been done within the last 3 days will be
displayed:
Kapelle Clefs Manual
Page 22
Figure 37: A sample filter
Date filters operate up to a year in the past —you may show those
entries cre ated up the last 365 days, or the last 52 weeks, or the
last 12 months.
Filter by Clef
You may restrict the display to only those clefs you choose:
Figure 38: The Filter by Clefs Property Page
Any clef with a check mark beside it will be displayed.
Filter by Level
You may restrict the display to only those levels you choose:
Figure 39: The Filter by Levels Property Page
Any level with a check mark beside it will be displayed.
Filter by Score
Finally, you may restrict your display to just those exercises that
fall within a range of scores:
Kapelle Clefs Manual
Page 23
Figure 40: The Filter by Score Property Page
Removing Filters
If you have filtered your progress re port, you may remove the
filters by clicking on the “Remove Filters” button at the top of the
Progress Report window:
Figure 41: Location of the Remove Filters button
NOTE: the “Remove Filters” button is activated only if you have
filtered your progress report.
Printing Your Progress Report
To print your progress report, click the “Print” button:
Figure 42: Location of the Print button
If you have filtered your progress report, you will be asked if you
want to print the filtered set of records, or the entire report:
Figure 43: Printing a filtered report
Printing will then proceed.
NOTE: Kapelle Clefs uses WordPad, which is installed automatically
along with Windows, for printing. If WordPad is not installed, an
error message will result and you will not be able to print.
Kapelle Clefs Manual
Page 24
Exporting Your Progress Report
You may export your progress report to a plain-text, tab-delimited
file, suitable for importing into a spreadsheet or database
application.
To export your progress report, click on the “Export” button. You
are presented with a standard Windows Save As dialog box:
Figure 44: Save As dialog box
Kapelle Clefs offers a default name for your progress report; you
may change this to suit yourself. Use the Save As dialog box to
navigate to the location where you want to save the exported
progress report, then click Save.
NOTE: an exported progress report is always the complete set of
entries, whether or not the report has been filtered.
Closing the Progress Report Dialog Box
To close the Progress Report dialog box, click either Save/Close or
the Close button. Save/Close will automatically save changes you
have made, and then close the dialog box.
Clicking on the Close button will give you the option of saving any
changes you may have made prior to closing the dialog box:
Figure 45: Closing the Progress Report
Note that any changes you have made—sorting, filtering, deleting—
Kapelle Clefs Manual
Page 25
are not saved permanently to the progress report file unless you
specifically indicate that the changes are to be saved, either by
clicking the Save/Close button, or by clicking on Close and then
clicking “Yes” in response to the query about saving your changes.
Kapelle Clefs Manual
Page 26
MIDI
Using a MIDI Keyboard With Kapelle Clefs
If there is a MIDI instrument (usually a keyboard) connected to
your computer via a standard MIDI cable, you can use that MIDI
keyboard for Kapelle Clefs input.
The MIDI OUT port of the MIDI keyboard should be connected to
the MIDI IN port on your computer for input to work. In most
setups, the keyboard’s MIDI IN port is connected to the computer’s
MIDI OUT port as well, although that isn’t required for MIDI input in
Kapelle Clefs.
Most computers nowadays have sound cards which contain a builtin MIDI interface. The MIDI ports are usually combined with the
joystick connector; a special cable is required that splits the port
into separate connectors for joystick and MIDI.
Consult the documentation for your sound card for more details.
Using Kapelle Clefs Without a MIDI Keyboard
If you do not have a MIDI keyboard, or do not have MIDI capability
at all, you can still use Kapelle Clefs with the built-in onscreen
keyboard.
To show the keyboard, select the command KEYBOARD from the VIEW
M ENU. The onscreen keyboard will be displayed:
Figure 46: The onscreen keyboard
The onscreen keyboard may be positioned anywhere on the screen
that is convenient for you.
To close it, select again the command
KEYBOARD
from the
V IEWM ENU ,
or
Kapelle Clefs Manual
Page 27
click on the keyboard’s close box (on the right-hand side of the
keyboard’s title bar.)
To play a note on the keyboard, click it and hold the mouse button
down for as long as you wish the note to continue sounding. The
key will be highlighted in inverse video. If you have a sound card in
your computer, you should hear the note as it is being played.
Note that the location of middle ‘c’ is marked on the keyboard.
The MIDI Settings Dialog Box
Kapelle Clef’s MIDI Settings are all reached via the MIDI Settings
dialog box. Use this dialog box to set input and output ports, output
channels, output programs, and the MIDI Thru feature.
To adjust your MIDI settings, select the command
the FILE M EN u.
MIDI SETTINGS
from
The MIDI Settings dialog box is displayed:
Figure 47: MIDI Settings dialog box
Setting the MIDI Input and Output Ports
To set your MIDI Input and Output ports, use the list boxes in the
MIDI Settings dialog box. Both of these will allow you to choose
from available devices on your system:
Figure 48: MIDI Input and Output ports
NOTE: most systems will have only one MIDI Input port, but may
Kapelle Clefs Manual
Page 28
well have several output ports.
Note that you can set a particular channel for receiving MIDI input.
The default is channel 1, and should not have to be changed for
most equipment setups.
Setting Output Channels
The MIDI Output Channel determines which of the standard 16
MIDI channels Kapelle Clefs uses for MIDI output. Kapelle Clef’s
playback is always through one single MIDI channel. Use the
Channel slider to select a value between 1 and 16:
Figure 49: MIDI Output Channel selector
Setting Output Programs
Kapelle Clefs will set your MIDI device to play using any one of its
available programs, from 1 through 256. You may use the slider to
set the program, or you may select the output by name.
Figure 50: Output program slider
To select the MIDI program by name, click on the Select By Name
button. This presents you with the Select Program dialog box:
Figure 51: Select Program dialog box
Select an instrument from the Instrument drop down list, then
select a program from the list of available programs by clicking on
the program name and then clicking on the OK button (or double -
Kapelle Clefs Manual
Page 29
click on the program’s name).
Setting MIDI Thru
MIDI Thru allows you to route the output of your MIDI instrument
to the input of a MIDI playback device (such as the internal sound
card on your computer.) You may select which channel receives the
routed output information by using the slider.
Figure 52: MIDI Thru controls
Use the MIDI Thru channel slider to set the channel. Make sure that
the MIDI Thru check box is checked for MIDI Thru to be enabled.
Kapelle Clefs Manual
Page 30
Summary of Commands
New Exercise
Use this command to start a new exercise. The command is
disabled if an exercise is already in progress.
•
Keyboard: Control+N
•
Icon:
•
Menu: File, Context
Stop Exercise
Use this command to stop an exercise that is currently in progress.
The command is disabled if there is no current exercise.
Using this command will result in the score for the current exercise
being discarded.
•
Keyboard: Control+X
•
Icon:
•
Menu: File, Context
Progress Report
Shows the progress report dialog box.
•
Keyboard: Control+P
•
Icon:
•
Menu: File, Context
Kapelle Clefs Manual
Page 31
MIDI Settings
Shows the MIDI Settings dialog box.
•
Menu: File
Exit
Exits the Kapelle Clefs application.
•
Menu: File
View Toolbar
Shows or hides the Toolbar.
•
Menu: View, Context
View Status Bar
Shows or hides the Status Bar.
•
Menu: View, Context
View Keyboard
Shows or hides the onscreen keyboard.
•
Menu: View, Context
Color, Correct Notes
Displays the standard Windows Color dialog box, enabling the
selection of the color for correctly -played notes.
•
Menu: View
Kapelle Clefs Manual
Page 32
Color, Incorrect Notes
Displays the standard Windows Color dialog box, enabling the
selection of the color for incorrectly-played notes.
•
Menu: View
Default Colors
Resets the colors for correctly- and incorrectly -played notes to the
program defaults.
•
Menu: View
Treble Clef
Sets the clef for the next new exercise to Treble.
•
Menu: Clefs, Context
•
Icon:
•
Keyboard: Control+T
Soprano Clef
Sets the clef for the next new exercise to Soprano.
•
Menu: Clefs, Context
•
Icon:
•
Keyboard: Control+S
Mezzo Soprano Clef
Sets the clef for the next new exercise to Mezzo -Soprano.
•
Menu: Clefs, Context
Kapelle Clefs Manual
Page 33
•
Icon:
•
Keyboard: Control+M
Alto Clef
Sets the clef for the next new exercise to Alto.
•
Menu: Clefs, Context
•
Icon:
•
Keyboard: Control+A
Tenor Clef
Sets the clef for the next new exercise to Tenor.
•
Menu: Clefs, Context
•
Icon:
•
Keyboard: Control+E
Baritone ( C ) Clef
Sets the clef for the next new exercise to the C-clef Baritone.
•
Menu: Clefs, Context
•
Icon:
•
Keyboard: Control+C
Baritone ( F ) Clef
Sets the clef for the next new exercise to the F-clef Baritone.
•
Menu: Clefs, Context
Kapelle Clefs Manual
Page 34
•
Icon:
•
Keyboard: Control+F
Bass Clef
Sets the clef for the next new exercise to Bass.
•
Menu: Clefs, Context
•
Icon:
•
Keyboard: Control+B
Multiple Clefs
Displays the Multiple Clefs dialog box, enabling the selection of
multiple clefs for an exercise.
•
Menu: Clefs, Context
•
Icon:
Level 1
Sets the level for the next exercise to Level 1.
•
Menu: Levels, Context
•
Icon:
•
Keyboard: Control+1
Level 2
Sets the level for the next exercise to Level 2.
•
Menu: Levels, Context
•
Icon:
Kapelle Clefs Manual
Page 35
•
Keyboard: Control+2
Level 3
Sets the level for the next exercise to Level 3.
•
Menu: Levels, Context
•
Icon:
•
Keyboard: Control+3
Level 4
Sets the level for the next exercise to Level 4.
•
Menu: Levels, Context
•
Icon:
•
Keyboard: Control+4
Level 5
Sets the level for the next exercise to Level 5.
•
Menu: Levels, Context
•
Icon:
•
Keyboard: Control+5
Help Topics
Displays the Help dialog box, for accessing the Kapelle Clefs help
system.
•
Menu: Help
Kapelle Clefs Manual
Page 36
About Kapelle Clefs
Displays the About Kapelle Clefs dialog.
•
Menu: Help
Kapelle Clefs Manual
Page 37
Keyboard Shortcuts
Command Name
New Exercise
Stop Exercise
Progress Report
Treble Clef
Soprano Clef
Mezzo-Soprano Clef
Alto Clef
Tenor Clef
Baritone (C) Clef
Baritone (F) Clef
Bass Clef
Level 1
Level 2
Level 3
Level 4
Level 5
Keyboard
Control+N
Control+X
Control+P
Control+T
Control+S
Control+M
Control+A
Control+E
Control+C
Control+F
Control+B
Control+1
Control+2
Control+3
Control+4
Control+5
Kapelle Clefs Manual
Page 38
System Requirements
Kapelle Clefs is a 32-bit Windows application and will run only
under a 32-bit Windows operating system. It has been tested for
reliable operation on the following platforms:
•
•
•
•
Windows 95
Windows NT 3.51
Windows NT 4.0
Windows 98
Kapelle will not run under the following operating systems:
•
•
•
Any 16-bit version of Windows (such as Windows 3.1)
Windows for Workgroups 3.11
OS/2 Warp 3.0 or 4.0
Kapelle Clefs has not been tested under any of the Windows
emulators, such as SoftWindows for the Macintosh or UNIX
systems.
Kapelle Clefs is not processor intensive, and can run adequately on
any computer system that is capable of running any of the
supported operating systems.
In order to hear any sound with Kapelle Clefs, your computer
should contain either a Windows-compatible MIDI interface, or a
sound card with a built- in MIDI interface. Since Kapelle Clefs
communicates with the MIDI hardware via the Windows multimedia
interface, any sound card/MIDI interface which works correctly with
Windows should work with Kapelle Clefs.
Kapelle Clefs Manual
Page 39
Index
Clef
multiple clefs, 14
selecting, 13
Exercise
general remarks about doing, 11
starting, 11
stopping, 12
Keyboard
MIDI, 24
onscreen, 10, 24
using MIDI keyboard, 24
Keyboard accelerator, 7
Level
description of the five levels, 13
Menu
Clefs, 8
context menus, 9
File, 8
Help, 9
keyboard activation, 7
keyboard shortcut, 7
Levels, 8
View, 8
MIDI
input port, 25
output channel, 26
output port, 25
output program, 26
settings, 25
Thru, 27
Progress Reports
closing the progress report
window, 22
deleting entries, 18
exporting, 22
filtering entries, 19
general information, 16
printing, 21
removing filters, 21
selecting entries, 17
sorting entries, 17
Status Bar, 6
Toolbar, 4
docking, 5
floating, 5
resizing, 6
Window
resizing, 4


![Overview cPR67 and cPR84 [v00]](http://vs1.manualzilla.com/store/data/005648847_1-d158a5d3d4b92d14c7a3179652b88ffd-150x150.png)