1
Writing and Using CORBA Components
Frank Pilhofer
April 2002
Abstract
This is a user tutorial for the CORBA Component Model and its usage within the MicoCCM platform.
It is targeted at users already familiar with CORBA. The purpose of this document is threefold. First of
all, it is a tutorial that introduces the reader into the basic concepts of the CORBA Component Model by
building a short “Hello World” example component. Second, it is part reference that provides a quick
overview of the features of the CORBA Component Model. Third, it is a user manual that describes the
tools available in the MicoCCM implementation of the CORBA Component Model and the building and
using of components within that platform.
1 Introduction
The CORBA Component Model (CCM) is one major new part of the upcoming CORBA 3.0 standard. The
CCM specification [1] is currently in finalization at the OMG. CORBA Components will provide us with
a new means of integrating – well, of integrating components. This affects both the client side, of how
CORBA Components are used, and the server side, how CORBA Components are implemented.
The two important new ideas in the CCM are the Component Model and the Container Programming
Model. The Component Model uses ports to describe a component’s interconnectivity; a component can
for example express that it provides certain interfaces, or that it uses certain interfaces. For example, a
coffeemaker could provide a user interface and use a socket interface - the latter would then be provided
by your power company. Event ports are also available; the coffemaker could declare to consume on and
off events coming from a power switch - without effort, you could later upgrade the power switch to a
time-controlled switch. It could also declare to emit emit events if water or coffee needs to be refilled.
Containers are the runtime environment for a component on the server side. It has been recognized that
in CORBA 2, large amounts of code are reinvented each time for common tasks such as object reference
management or Naming Service registration. Such monotonous tasks are taken from your hand and handled
automatically. A CORBA Component implementaion never deals with the ORB or the POA by itself. In the
future, more and more common services (or “non-functional aspects”) will be integrated into the Container
environment, such as security or transactions. The Implementation need then only provide the “functional
aspects,” – the business methods.
The MicoCCM Project [5], sponsored by Alcatel and implemented by FPX, aims at providing a reference implementation of the CORBA Component Model based on the Open Source ORB Mico [4]. The
project is still ongoing, and this documentation is based on the current MicoCCM Work in Progress release.
Please make sure that you have the right MicoCCM release that matches this document, or vice versa.
This document matches the April 15, 2002 CVS snapshot.
1
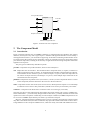
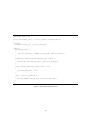
Facets (provided Interfaces)
Component
Event Sinks
Event Sources
Receptacles (used Interfaces)
Attributes and supported Interfaces
Figure 1: External view of a Component
2 The Component Model
2.1 Introduction
Figure 1 shows the external view of a CORBA Component. A component may have attributes, may support
interfaces, and may have any of five types of ports. Attributes and supported interfaces can be used by a
client application as before - you can think of “supporting” an interface as inheriting of that interface. Ports
are used to express the connectivity of a component. Lateron, an Assembly tool may be used to interconnect
ports between components, resulting in the assembly of applications from existing components rather than
application development.
The port types are reflected by their IDL keywords:
provides Components can provide interfaces, which are also called facets.
uses Components can use interfaces. This documents that a component wants, or requires, a reference to
another component in order to operate. An example might be an Editor component that uses a Printer.
Used interfaces are also called receptacles. There are simplex receptacles, where the component can
use at most one object reference, and multiplex receptacles, where multiple object references can be
connected to the same receptacle.
publishes Components can publish events (event source). Clients (or other components that act as client
to this component) can then subscribe to the event as in the Event Service.
emits Components can also emit events (also an event source). While publishes implies a 1:n relationship
in which the event is sent to many subscribers, emitted events can only be received by one listener.
consumes A component can declare that it consumes events of a certain type (event sink).
Note that ports do not really offer features that wouldn’t have been possible with “classic” CORBA operations and attributes – you could easily design interfaces that have e.g. readonly attributes for facets and
operations to connect receptacles. Technically, in terms of object orientation, CORBA Components are not
an extension of CORBA objects but they are rather a specialization of objects.
However, components embrace a different point of view by explicitly expressing the connections that
they offer to the outside world, and what connections they expect the outside world to offer to them. This is
a huge difference to the concept of CORBA servers, which was mostly concerned with standalone services.
2
2.2 Components in IDL
Components are described using the new component keyword in IDL. A component declaration formally
looks like
component <name>
[ : <base> ]
[ supports <iface> [, <iface>]* ]
{
<attribute declaration> *
<port declaration> *
};
A component can optionally extend one base component – multiple inheritance is not permitted – and can
support zero or more interfaces. Supporting an interface means to make all of its attributes and operations
available on the component and can probably be best described as “inheriting” that interface, but using a
separate keyword. As with valuetypes, it was decided that using the syntax of inheritance is not appropriate
between different types.
Attribute declarations in a component look exactly the same as they do for interfaces. Port declarations
look very similar to attributes, using the new provides, uses, publishes, emits and consumes
keywords that represent each type of port:
provides <Interface> <name>;
uses [multiple] <Interface> <name>;
publishes <Eventtype> <name>;
emits <Eventtype> <name>;
consumes <Eventtype> <name>;
A component can have zero or more ports of each type. The optional multiple keyword on a receptacle
discriminates between simplex and multiplex receptacles (see above).
Eventtypes are a new IDL construct using the eventtype keyword, but with the same rules and semantics
as valuetypes.
2.3 Client-Side View
There are said to be two types of clients, component-aware and component-unaware clients. Componentaware clients are usually components themselves, and you will probably use some sort of tool to interconnect ports between them. With component-aware clients, you need not be aware of a component’s ports, as
they will be configured by some tool behind the scenes, before your client is even run.
However, components can also be accessed from component-unaware clients using the same means of
communication as for classic CORBA objects, using an object reference. Once a component-unaware client
has obtained an object reference for a component, it can invoke a component’s attributes and operations as
usual.
The client-side view of a component is defined by equivalent IDL. A component is translated, by an
internal stage of the IDL compiler, into an equivalent interface. In addition to the attributes and operations
defined on the component or its supported interfaces itself, this interface also contains equivalent operations
for each of the component’s ports, resulting in a plain CORBA 2 interface that can be used from clients
that need not be aware of the component’s nature. In the case of a publishes port, for example, operations
for subscribing and unsubscribing to that event are generated.
In normal operation of the IDL compiler, the equivalent IDL is not visible. However, in MicoCCM,
you can use the following command line to translate a CORBA 3 IDL file hello.idl into a file helloeq.idl that contains the equivalent IDL:
idl --codegen-idl --idl3toidl2 --name helloeq hello.idl
For example, assuming the prior definition of a Hello interface as
3
interface Hello {
void sayHello ();
};
For a component of the form
component HelloWorld supports Hello {
attribute string message;
};
the following equivalent IDL will be generated:
interface HelloWorld : Hello, Components::CCMObject {
attribute string message;
};
All equivalent interfaces inherit from Components::CCMObject. This interface provides introspection
methods, e.g. an operation that returns a list of all available facets, and generic access for for dynamic
handling of ports, e.g. an operation to connect an arbitrary receptacle rather than the specialized method in
equivalent IDL.1
With this knowledge, you can implement “component-unaware” clients that access the component
using the equivalent interface.
2.4 Homes
Components are managed by homes. A home acts as a factory for component instances: clients never create
components by themselves, but they have to contact the component’s home, and ask the home either for an
existing instance of a component, or for the creation of a new instance. As a component implementor, you
will always have to implement a home for your component. In IDL, a home is declared as
home <name>
[ : <base> ]
[ supports <iface> [, <iface>]* ]
manages <component_name>
{
<factories and finders> *
<operations and attributes> *
};
A home manages exactly one type of component2 and can optionally have factories and finders. A home
can also have operations and attributes like an interface. Factories and finders are special kinds of operations
that return a new or existing component instance, respectively. Like normal operations, factories and finders
have parameter lists, but no return type needs to be declared; an object reference to the managed component
is implicitly used as result type.
Like components, the client interface of homes can be expressed in terms of equivalent IDL, and again
you can use the command line from above to see the equivalent IDL.
For a home of the form
home HelloHome manages HelloWorld {
attribute string initial_message;
};
the following equivalent IDL will be generated:
1 See mico/include/mico/CCM.idl, or the official documents, for details about the Components::CCMObject interface.
2 A component can be managed by more than one home, though.
4
interface Hello {
void sayHello ();
};
component HelloWorld supports Hello {
attribute string message;
};
home HelloHome manages HelloWorld {
attribute string initial_message;
};
Figure 2: Consolidated Example IDL
interface HelloHomeImplicit : Components::CCMHome
{
HelloWorld create ();
};
interface HelloHomeExplicit : Components::KeylessCCMHome
{
attribute string initial_message;
};
interface HelloHome :
HelloHomeImplicit,
HelloHomeExplicit
{
};
A distinction is made between the implicit and explicit interface of a home. The implicit interface contains
a single operation to create a new component instance, while the explicit interface contains the operations
and attributes that are defined for the home, as well as equivalent operations for finders and factories. The
distinction is relevant when using inheritance; the explicit interface is inherited by the equivalent interface
for a derived home, while the implicit is not, to avoid a name clash for the create method.
The implicit interface inherits from Components::CCMHome, which provides a remove_component
method, and the explicit interface inherits from Components::KeylessCCMHome, which provides a
generic create_component method.3
2.5 A Component Client
The equivalent IDL (see section A in the Appendix) defines the interface of a component that is accessible
by component-unaware clients. Clients are not quite aware that the server is indeed a CORBA Component,
as far as they are concerned, they are just dealing with a service that offers a CORBA interface. Therefore,
writing a client for a component is straightforward.
A client to the Hello World component that was mentioned in the examples above (see figure 2) is
shown in figure 3. Accessing the home and later the component through its equivalent interface should be
no surprise. The remaining magic is the bootstrapping, to acquire a reference to the component’s home,
e.g. from the Naming Service.
3 There is also a notion of keyful homes that is not yet implemented by MicoCCM. Keyful homes manage components that have a
primary key, e.g. for components that represent database rows.
5
#include <CORBA.h>
#include <mico/CosNaming.h>
#include "hello.h"
int
main (int argc, char *argv[])
{
CORBA::ORB_var orb = CORBA::ORB_init (argc, argv);
CORBA::Object_var obj = orb->resolve_initial_references ("NameService");
CosNaming::NamingContextExt_var nc =
CosNaming::NamingContextExt::_narrow (obj);
obj = nc->resolve_str ("HelloHome");
HelloHome_var hh = HelloHome::_narrow (obj);
HelloWorld_var hw = hh->create ();
hw->message ("Hello World");
hw->configuration_complete ();
hw->sayHello ();
hw->remove ();
return 0;
}
Figure 3: A Component Client
6
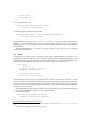
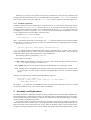
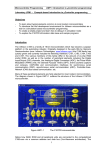
Component
Callback Interfaces
Internal Interfaces
Container
Event Service
Configuration
Management
POA API
Object Request Broker API
Figure 4: Container Programming Model
3 The Container Programming Model
Compared to implementing a CORBA 2 server, implementing a CORBA Component is much easier. Components run inside a powerful runtime environment called container. A container is a component’s only
outside contact, components do not access the ORB or the object adapter by themselves, object references
are managed automatically by the container. Containers may also, depending on their type, support various
services such as the Event service or the Persistence service.
Component and container interact via interfaces that are defined in terms of IDL. To avoid the overhead of remote calls, local interfaces are used here. Interfaces offered by the component and used by the
container are called callback interfaces, and interfaces offered by the container and used by the component
are called internal interfaces (see figure 4).
Implementing a component is reduced to the bare minimum, the developer only needs to provide the
business methods, i.e. the attributes and methods of supported interfaces, the attributes of the component
itself, and equivalent methods for ports. In particular, the developer needs not implement main, since a
component is usually not executed but deployed into an already-running component server.
The two containers currently supported by MicoCCM are the Session and Service containers, which
differ in the number of instances that are created for each component. The Session container creates one
component instance every time create is called on a home, while the Service container only creates
one component instance that is shared by all clients. Service components are usually stateless, since they
cannot store client-specific state information.
3.1 Language Mapping
The component developer must implement, in above terminology, a callback interface to receive invocations via the container. In the terminology of CORBA Components, the callback interface for a component
is named executor, which replaces the term servant in Portable Server (POA) programming.
Like the mapping for the client side of a component, the language mapping is based on the concept of
“server side” equivalent IDL. For each component and each home, equivalent local interfaces are defined,
and ports are translated to operations on these interfaces.
Two interfaces are defined for each component, one executor callback interface, and one context internal interface. The executor interface must be implemented by the user, while the context interface is
implemented by the container; it can be accessed by the component implementation and provides state
information and component-specific services, e.g. to push events.
Again, you can use the command line that was presented above to see the equivalent IDL that is generated for your components.
7
3.1.1 Equivalent Executor Interface
The executor interface has the same name as the component plus a CCM_ prefix. It inherits from the equivalent interface of the base component (if the component has a base), all supported interfaces, plus, to mark it
as a component, from the (empty) common base interface Components::EnterpriseComponent.
The executor interface contains all attributes, and equivalent operations for the component’s ports.
For the example component from figure 2, the following equivalent IDL will be generated for the server
side:
local interface CCM_HelloWorld :
Hello,
Components::EnterpriseComponent
{
attribute string message;
};
Operations are added to the executor interface for each facet and event port.
Some callback interfaces defined by the CORBA Components specification may be optionally implemented by a component implementation; one example is the Components::SessionComponent
interface that may be optionally implemented by session components. If the component implements this
interface, the container informs the component of activation and passivation, and also provides the implementation with an instance of the component’s context.
If a component shall support an optional interface, a new local interface must be declared in IDL that
inherits both the equivalent executor interface above and the optional interface, so the user would declare,
in IDL,
local interface MyHelloWorld :
CCM_HelloWorld,
Components::SessionComponent
{
};
The user would then implement the MyHelloWorld interface instead of implementing CCM_HelloWorld
directly.
3.1.2 Equivalent Context Interface for Components
The context interface has the same name as the component plus a CCM_ prefix and a postfix of _Context. It inherits from the context interface of the base component (if the component has a base), and from
Components::CCMContext. For the example HelloWorld component from figure 2, the context
interface would be empty; operations are added to it for receptacles and event sources.
3.1.3 Equivalent Executor Interfaces for Homes
For homes, the same distinction between a home’s explicit and implicit interfaces are made. Again, this is
done to avoid a name clash for an implicit create operation, and to allow implementation inheritance for a
home’s explicit interface.
For the sample home from figure 2, the following equivalent IDL will be generated:
local interface CCM_HelloHomeExplicit :
Components::HomeExecutorBase
{
attribute string initial_message;
};
local interface CCM_HelloHomeImplicit {
Components::EnterpriseComponent create ();
8
#include "hello.h"
class HelloWorld_impl : virtual public CCM_HelloWorld
{
private:
CORBA::String_var _message;
public:
HelloWorld_impl (const char * initial)
{
_message = initial;
}
void sayHello ()
{
cout << _message << endl;
}
void message (const char * val)
{
_message = val;
}
char * message ()
{
return CORBA::string_dup (_message);
}
};
Figure 5: Hello World Component Implementation
};
local interface CCM_HelloHome :
CCM_HelloHomeExplicit,
CCM_HelloHomeImplicit
{
}
3.2 Implementing Components
As the component developer, you would create an implementation class that inherits from the component’s
equivalent executor interface CCM_HelloWorld. This implementation class would provide implementations for all attributes and methods. An example implementation in C++ for our HelloWorld component is
shown in figure 5.
For the home, you would again derive an implementation class from the equivalent interface CCM_HelloHome
and implements the methods. An example implementation in C++ for the HelloHome home of our HelloWorld component is shown in figure 6.
3.3 Entry Point
One more detail that is left to the component developer is the provision of an entry point. The container
does not know how to create an instance of your home: to construct a C++ class instance, you need to know
9
#include "hello.h"
class HelloHome_impl : virtual public CCM_HelloWorld
{
private:
CORBA::String_var _initial_message;
public:
HelloHome_impl ()
{
_initial_message = CORBA::string_dup ("Hello World");
}
Components::EnterpriseComponent_ptr create ()
{
return new HelloWorld_impl (_initial_message);
}
void initial_message (const char * val)
{
_initial_message = val;
}
char * initial_message ()
{
return CORBA::string_dup (_initial_message);
}
};
Figure 6: Hello Home Implementation
10
#include "hello.h"
extern "C" {
Components::HomeExecutorBase_ptr
create_HelloHome ()
{
return new HelloHome_impl;
}
}
Figure 7: Hello Home Entry Point
the full class declaration, but this knowledge is not available to the container. Therefore, you must provide
a well-known entry point that can be called by the container in order to bootstrap an instance of your home
executor.
This well-known entry point is a function with the same name as your home - all scope delimiters are
replaced with an underscore, plus a create_ prefix. There must be one entry point for each home. To be
accessible within a shared library, the function must be declared “extern "C".” An entry point for our Hello
World example is shown in figure 7.
Optionally, you can declare the entry point to receive an ORB reference as parameter. 4 This reference
should only be used to register valuetype factories for all valuetypes and eventtypes that are used by your
component.
4 Components in MicoCCM
4.1 Code Generation
Mico’s IDL compiler and the Interface Repository have been updated to reflect the new IDL constructs for
components, so you can simply use the usual idl tool to generate stubs and skeletons for your components,
e.g.
idl hello.idl
The IDL compiler notices the new constructs and internally runs an additional IDL 3 to IDL 2 transformation that operates according to the equivalent IDL as specified by the CCM. If you are interested in seeing
the equivalent IDL, you can run
idl --codegen-idl --idl3toidl2 --name helloeq hello.idl
to generate a file helloeq.idl that contains the equivalent IDL.
The step above results in files hello.h and hello.cc with stubs and skeletons. The stubs are for
use on the client side, but on the server side, the skeletons are not for use by yourself, as you implement
the component executor, not the skeleton.
Some component and container specific “glue code” is required by the container to interact with your
implementation. This glue is generated using a separate mico-ccm tool that you can use just like the idl
compiler above, e.g.
mico-ccm hello.idl
This tool accepts some options:
--service Create code for service components.
4 This
is a MicoCCM-specific extension.
11
idl hello.idl
mico-c++ -c hello.cc
mico-c++ -c client.cc
mico-ld -o client client.o hello.o \
-lmicoccm2.3.5 -lmicocoss2.3.5 -lmico2.3.5
mico-ccm --standalone hello.idl
mico-c++ -c hello_ccm.cc
mico-c++ -c hello_impl.cc
mico-ld -o server hello_impl.o hello_ccm.o hello.o \
-lmicoccm2.3.5 -lmicocoss2.3.5 -lmico2.3.5
Figure 8: Compiling and Linking
--session Create code for session components (default).
--monolithic Create code for monolithic implementations (default).
--locator Create code for locator-based implementations.
--standalone Create code for a standalone server; this adds a main to the generated code, so that you
can wrap it up (together with your code, of course) into an executable program rather than a shared
library.
This step generates the files hello_ccm.h and hello_ccm.cc that you must link with your component implementation.
As an implementation detail, the “glue code” implements the normal Portable Server skeletons. It
passes on invocations of business methods to your implementation, and delegates invocations of nonfunctional aspects such as navigation or introspection to the container. The container registers instances of
these skeletons with the Portable Object Adapter and manages object references to them.
4.2 Compiling and Linking
Depending on the setting of the --standalone switch above, components can be compiled into a loadable component, which is then loaded into a Component Server, or into standalone server programs. 5
Loadable components are shared libraries containing all code for the component and its home; these must
be linked against the MicoCCM library -lmicoccm<version>. Standalone executables have an additional dependency on the Naming Service, so they must additionally be linked with -lmicocoss<version>.
The client does not need to be linked with hello_ccm.o.
The full process for building a standalone executable of our HelloWorld component is shown in figure
8, assuming that your implementation (composed of the code in figure 5, 6 and 7) is in hello_impl.cc
and that your client (from figure 3) is in client.cc.
4.3 Executing Components
4.3.1 Standalone Servers
Components that are linked into a standalone server (using the --standalone option of mico-ccm)
can be started from the command line. If started without any options, all homes are deployed and activated,
and are registered in the Naming Service using each home’s name.
5 A standalone executable must include all components and homes declared in a single IDL file. If you want components to be in
separate executables, put their declaration into different IDL files and compile them separately.
12
Alternatively, you can give the name of a home on the command line so that only this single home will
be deployed and activated. In that case, you can additionally give the options --ior <file> to write the
home’s object reference into a file, and/or the --ns <name> option to register it in the Naming Service.
4.3.2 Loadable Components
Loadable Components must be loaded into a Component Server. For this purpose, MicoCCM contains
a server called componentserver. However, this server is not meant to be started by hand, but it is
normally started on demand by another server, the MicoCCM Daemon mico-ccmd, which contains the
so-called Server Activator. A program, ccmload, then exists to contact the MicoCCM Daemon, to create
a new Component Server, and to load the component into it.
The usage of mico-ccmd is as follows:
mico-ccmd [-v] [--ior <file>]
With -v, the daemon prints some trace messages. The --ior option should be used to print the stringified
object reference of the Server Activator into a file (or to standard output, if a single hyphen is given as file).
The syntax of ccmload is:
ccmload [options] <Home Name> <Shared Library>
ccmload contacts the MicoCCM Daemon to first create a Component Server. It creates a new container
within the Component Server, loads a component implementation the shared library, and activates the
component’s home, whose name must be given on the command line.
The following options are accepted by ccmload:
-v Print some trace messages.
--ccmd <IOR> Object Reference to the Server Activator. This must be the object reference printed by
mico-ccmd upon its startup, or a reference to it.
--ns <name> Register the newly activated home in the Naming Service, using the given name.
--ior <file> Write a stringified object reference of the newly activated home to the given file. If file
is a single hyphen, or if this option is omitted, the stringified object reference is writted to standard
output.
Therefore, the following steps would load the HelloWorld component:
mico-ccmd --ior ccmd.ior
ccmload --ccmd file://`pwd`/ccmd.ior --ns HelloHome \
HelloHome hello.so
By using the --ns option here, the HelloHome will be registered in the Naming Service just as it would
be within a standalone server, so the client would run unchanged.
5 Assembly and Deployment
As initially mentioned, components should be far easier to handle and to reuse than classic CORBA interface implementations. Components are meant to be interconnected by assembling them into an Assembly.
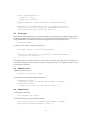
Not part of MicoCCM, but available as a separate download from the MicoCCM homepage is the MicoCCM Assembly and Deployment Toolkit.
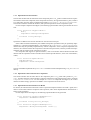
This toolkit contains the graphical Assembly Tool (see figure 9) that allows to configure and interconnect components with few mouse clicks. The components and associated configuration information can
then be saved into a self-contained Assembly Archive. Such an Assembly Archive can later be deployed in
a single step using the Deployment Tool, which installs the required component implementations, creates
13
Figure 9: The MicoCCM Assembly Tool
homes and components, optionally registers them with a Naming Service, configures attributes, and then
interconnects their ports.
So after going through the trouble of implementing a set of components, the rest is going to be very
easy, using the Assembly and Deployment Tookit.
6 About MicoCCM
MicoCCM is the result of the MICO CORBA Components Project. This project is sponsored by Alcatel
and executed by Frank Pilhofer. This section answers some of the questions that you might possibly have:
What is the relationship to the MICO project?
MICO is an open source software that welcomes all sorts of contributions. MicoCCM is such a
contribution.
What is Alcatel’s role?
Alcatel was interested in a reference implementation of the CORBA Component Model, and decided
to fund an implementation based on MICO.
What is the License of MicoCCM?
Alcatel explicitly wanted the results to be Open Source. All code is fed into the MICO code repository and released under the usual GPL and LGPL licenses.
What’s the goal of the MicoCCM project?
The goal is to evaluate the CORBA Component Model specification by implementing it, eventually
resulting in a reference implementation.
What about the OMG?
The experiences of the MicoCCM project are fed back to the OMG using their mailing lists and
discussions.
Is there a mailing list for MicoCCM?
Please use MICO’s mico-devel mailing list.
14
I have a question about CCM.
Please discriminate whether the question is about the CCM in general or MicoCCM in particular.
In the former case, please use the OMG forums or the comp.object.corba usenet newsgroup. In the
latter case, please use the mailing list.
I want to report a bug!
Send a mail to the mailing list. Better yet, send a patch.
How do I access the MICO CVS Repository?
You can find instructions on Mico’s home page.
What is the version number of MICO?
In CVS, the MICO version number is usually bumped up just before a new release. Therefore,
the CVS version uses the version number of the last MICO release while not corresponding to that
official release. Please do not confuse the both. When writing to the mailing list, please clarify that
you are using a CVS snapshot and not the release version.
A
Client Side Equivalent IDL
This section shows the full set of rules of how component ports are translated into operations on the equivalent client-side interface.
A.1 Facets
A facet of the form
provides <Interface> <name>;
is translated into the equivalent operation
<Interface> provide_<name> ();
A.2 Simplex Receptacles
A simplex receptacle of the form
uses <Interface> <name>;
is translated into the three equivalent operations
void connect_<name> (in <Interface> conxn);
<Interface> disconnect_<name> ();
<Interface> get_connection_<name> ();
A.3 Multiplex Receptacles
A multiplex receptacle of the form
uses multiple <Interface> <name>;
is translated into the following declarations
15
struct <name>Connection {
<Interface> objref;
Components::Cookie ck;
};
typedef sequence <<name>Connection> <name>Connections;
Components::Cookie connect_<name> (in <Interface> conxn);
<Interface> disconnect_<name> (in Components::Cookie ck);
<name>Connections get_connection_<name> ();
A.4 Eventtypes
Events that are transmitted between event sources and sinks of components must be declared using the new
eventtype keyword in IDL. Basically, eventtypes are valuetypes with some added features. The syntax of
eventtype declarations is exactly the same as for valuetypes. For each eventtype of the form
eventtype <name> { ... };
a valuetype and a consumer interface are generated:
valuetype <name> : Components::EventBase {
...
};
interface <name>Consumer : Components::EventConsumerBase {
void push (in <name> ev);
};
Components offer the consumer interface for each of their event sinks, and require an object reference to
the consumer interface for each of their event sources. Clients invoke the push operation in order to send
an event to the component.
A.5 Publisher Ports
A publisher port of the form
publishes <Eventtype> <name>;
is translated into the following equivalent operations
Components::Cookie
subscribe_<name> (in <Eventtype>Consumer consumer);
<Eventtype>Consumer
unsubscribe_<name> (in Components::Cookie ck);
A.6 Emitter Ports
An emitter port of the form
emits <Eventtype> <name>;
is translated into the following equivalent operations
void connect_<name> (in <Eventtype>Consumer consumer);
<Eventtype>Consumer disconnect_<name> ();
16
A.7 Consumer Ports
A consumer port of the form
consumes <Eventtype> <name>;
is translated into the following equivalent operation
<Eventtype>Consumer get_consumer_<name> ();
Clients use this operation to acquire an object reference for the consumer interface that receives events for
the desired port. Clients can invoke the push method on that object reference to send events themselves,
or they can use it to connect the event sink to another component’s event source.
A.8 Equivalent IDL for factories
If a home manages component <managed>, a factory of the form
factory <name> (<parameter list>);
is translated into the equivalent operation on the home’s equivalent explicit interface
<managed> <name> (<parameter list>);
A.9 Equivalent IDL for finders
If a home manages component <managed>, a finder of the form
finder <name> (<parameter list>);
is translated into the equivalent operation on the home’s equivalent explicit interface
<managed> <name> (<parameter list>);
References
[1] CORBA Components Specification
http://www.omg.org/cgi-bin/doc?ptc/99-10-04
The official specification. This is heavy reading. It becomes somewhat simpler if you ignore the CIDL
and CCM Implementation Framework chapters.
[2] CORBA and CCM Page
http://www.ditec.um.es/˜dsevilla/ccm/
This nice page of Diego Sevilla Ruiz tries to collect all sorts of information about the CCM, with lots
of links to interesting reading material.
[3] The OpenCCM Platform
http://corbaweb.lifl.fr/OpenCCM/index.html
This effort of implementing the CCM in Java nicely complements MicoCCM.
[4] The MICO Home Page
http://www.mico.org/
[5] The MicoCCM Home Page
http://www.fpx.de/MicoCCM/
17