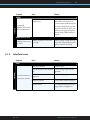
1
DXM Transport Terminal Manual Pertains to hardware models DXM3, DXMh, DXM10 Software version 2.1 Documentation version 2.1 i DXM Transport Terminal Manual Copyright © 2006-2009 XKL, LLC This document contains information that is protected by copyright. All rights are reserved. Reproduction, adaptation, or translation without prior written permission is prohibited, except as allowed under the copyright laws. All material contained herein is proprietary to XKL, LLC. Warranty The information in this publication is subject to change without notice. The information contained herein should not be construed as a commitment by XKL, LLC. XKL, LLC shall not be liable for errors contained herein or for incidental or consequential damages in connection with the furnishing, performance, or use of this material. U.S. Government Restricted Rights Notice The Computer Software is delivered as “Commercial Computer Software” as defined in DFARS 48 CFR 252.227-7014. All Computer Software and Computer Software Documentation acquired by or for the U.S. Government is provided with Restricted Rights. Use, duplication or disclosure by the U.S. Government is subject to the restrictions described in FAR 48 CFR 52.227-14 or DFARS 48 CFR 252.227-7014, as applicable. Technical Data acquired by or for the U.S. Government, if any, is provided with Limited Rights. Use, duplication or disclosure by the U.S. Government is subject to the restrictions described in FAR 48 CFR 52.227-14 or DFARS 48 CFR 252.227-7013, as applicable. Note This equipment has been tested and found to comply with the limits for a Class A digital device, pursuant to part 15 of the FCC Rules. These limits are designed to provide reasonable protection against harmful interference when the equipment is operated in a commercial environment. This equipment generates, uses, and can radiate radio frequency energy and, if not installed and used in accordance with the instruction manual, may cause harmful interference to radio communications. Operation of this equipment in a residential area may cause harmful interference, in which case the user will be required to correct the interference at his own expense. DXM and Darkstar are trademarks of XKL, LLC. XKL, LLC DXM Transport Terminal Manual ii Included Software Copyright Notices The DXM includes Secure Shell (ssh) software developed by Tatu Ylonen ([email protected]), which is Copyright © 1995 Tatu Ylonen, Espoo, Finland. All rights reserved. The software contains code implementing the packet protocol and communication with the other side. This same code is used both on client and server side. The code Tatu Ylonen has written for this software can be used freely for any purpose. Any derived versions of this software must be clearly marked as such, and if the derived work is incompatible with the protocol description in the RFC file, it must be called by a name other than “ssh” or “Secure Shell”. SSH2 packet format added by Markus Friedl. Copyright © 2000, 2001 Markus Friedl. All rights reserved. Redistribution and use in source and binary forms, with or without modification, are permitted provided that the following conditions are met: 1. Redistributions of source code must retain the above copyright notice, this list of conditions and the following disclaimer. 2. Redistributions in binary form must reproduce the above copyright notice, this list of conditions and the following disclaimer in thdocumentation and/or other materials provided with the distribution. This software is provided by the author “as is” and any express or implied warranties, including, but not limited to, the implied warranties of merchantability and fitness for a particular purpose are disclaimed. In no event shall the author be liable for any direct, indirect, incidental, special, exem plary, or consequential damages (including, but not limited to, procurement of substitute goods or services; loss of use, data, or profits; or business interruption) however caused and on any the ory of liability, whether in contract, strict liability, or tort (including negligence or otherwise) arising in any way out of the use of this software, even if advised of the possibility of such damage. The DXM includes cryptographic software written by Eric Young ([email protected]). The SSLeay library is free for commercial and non-commercial use as long as the following conditions are adhered to. The following conditions apply to all code found in this distribution, be it the RC4, RSA, lhash, DES, etc., code; not just the SSL code. Redistribution and use in source and binary forms, with or without modification, are permitted provided that the following conditions are met: 1. Redistributions of source code must retain the copyright notice, this list of conditions and the following disclaimer. 2. Redistributions in binary form must reproduce the above copyright notice, this list of conditions and the following disclaimer in the documentation and/or other materials provided with the distribution. 3. All advertising materials mentioning features or use of this software must display the following acknowledgement: “This product includes cryptographic software written by Eric Young ([email protected])” The word ‘cryptographic’ can be left out if the routines from the library being used are not cryptographic related :-). 4. If you include any Windows specific code (or a derivative thereof) from the apps directory (application code) you must include an acknowledgement: “This product includes software written by Tim Hudson ([email protected])” This software is provided by eric young “as is” and any express or implied warranties, including, but not limited to, the implied warranties of merchantability and fitness for a particular purpose are disclaimed. In no event shall the author or contributors be liable for any direct, indirect, inciden tal, special, exemplary, or consequential damages (including, but not limited to, procurement of substitute goods or services; loss of use, data, or profits; or business interruption) however caused and on any theory of liability, whether in contract, strict liability, or tort (including negligence or otherwise) arising in any way out of the use of this software, even if advised of the possibility of such damage. The licence and distribution terms for any publically available version or derivative of this code cannot be changed. i.e. this code cannot simply be copied and put under another distribution licence [including the GNU Public Licence.] The DXM includes software developed by the OpenSSL Project for use in the OpenSSL Toolkit (http://www.openssl.org/) OpenSLL is Copyright © 1998-2001 The OpenSSL Project. All rights reserved. Redistribution and use in source and binary forms, with or without modification, are permitted provided that the following conditions are met: 1. Redistributions of source code must retain the above copyright notice, this list of conditions and the following disclaimer. 2. Redistributions in binary form must reproduce the above copyright notice, this list of conditions and the following disclaimer in the documentation and/or other materials provided with the distribution. 3. All advertising materials mentioning features or use of this software must display the following acknowledgment: “This product includes software developed by the OpenSSL Project for use in the OpenSSL Toolkit. (http://www.openssl.org/)” 4. The names “OpenSSL Toolkit” and “OpenSSL Project” must not be used to endorse or promote products derived from this software without prior written permission. For written permission, please contact [email protected]. 5. Products derived from this software may not be called “OpenSSL” nor may “OpenSSL” appear in their names without prior written permission of the OpenSSL Project. 6. Redistributions of any form whatsoever must retain the following acknowledgment: “This product includes software developed by the OpenSSL Project for use in the OpenSSL Toolkit (http://www.openssl.org/)” This software is provided by the OpenSSL project “as is” and any expressed or implied warranties, in cluding, but not limited to, the implied warranties of merchantability and fitness for a particular purpose are disclaimed. In no event shall the openssl project or its contributors be liable for any direct, indirect, incidental, special, exemplary, or consequential damages (including, but not lim ited to, procurement of substitute goods or services; loss of use, data, or profits; or business inter ruption) however caused and on any theory of liability, whether in contract, strict liability, or tort (including negligence or otherwise) arising in any way out of the use of this software, even if advised of the possibility of such damage. The DXM contains code derived from software contributed to The NetBSD Foundation by Christos Zoulas. Copyright © 1998 The NetBSD Foundation, Inc. All rights reserved. Redistribution and use in source and binary forms, with or without modification, are permitted provided that the following conditions are met: 1. Redistributions of source code must retain the above copyright notice, this list of conditions and the following disclaimer. 2. Redistributions in binary form must reproduce the above copyright notice, this list of conditions and the following disclaimer in the documentation and/or other materials provided with the distribution. 3. All advertising materials mentioning features or use of this software must display the following acknowledgement: This product includes software developed by the NetBSD Foundation, Inc. and its contributors. 4. Neither the name of The NetBSD Foundation nor the names of its contributors may be used to endorse or promote prod- XKL, LLC DXM Transport Terminal Manual iii ucts derived from this software without specific prior written permission. This software is provided by the netbsd foundation, inc. And contributors “as is” and any express or implied warranties, including, but not limited to, the implied warranties of merchantability and fitness for a particular purpose are disclaimed. In no event shall the foundation or contributors be liable for any direct, indirect, incidental, special, exemplary, or consequential damages (includ ing, but not limited to, procurement of substitute goods or services; loss of use, data, or profits; or business interruption) however caused and on any theory of liability, whether in contract, strict liability, or tort (including negligence or otherwise) arising in any way out of the use of this soft ware, even if advised of the possibility of such damage. Copyright © 2003 Maxim Sobolev <[email protected]> All rights reserved. Redistribution and use in source and binary forms, with or without modification, are permitted provided that the following conditions are met: 1. Redistributions of source code must retain the above copyright notice, this list of conditions and the following disclaimer. 2. Redistributions in binary form must reproduce the above copyright notice, this list of conditions and the following disclaimer in the documentation and/or other materials provided with the distribution. This software is provided by the author and contributors “as is” and any express or implied war ranties, including, but not limited to, the implied warranties of merchantability and fitness for a particular purpose are disclaimed. In no event shall the author or contributors be liable for any direct, indirect, incidental, special, exemplary, or consequential damages (including, but not lim ited to, procurement of substitute goods or services; loss of use, data, or profits; or business inter ruption) however caused and on any theory of liability, whether in contract, strict liability, or tort (including negligence or otherwise) arising in any way out of the use of this software, even if advised of the possibility of such damage. Copyright © 1995, 1996, 1997, 1998 Lars Fenneberg <[email protected]> Permission to use, copy, modify, and distribute this software for any purpose and without fee is hereby granted, provided that this copyright and permission notice appear on all copies and supporting documentation, the name of Lars Fenneberg not be used in advertising or publicity pertaining to distribution of the program without specific prior permission, and notice be given in supporting documentation that copying and distribution is by permission of Lars Fenneberg. Lars Fenneberg makes no representations about the suitability of this software for any purpose. It is provided “as is” without express or implied warranty. Copyright © 1992 Livingston Enterprises, Inc. Livingston Enterprises, Inc. 6920 Koll Center Parkway Pleasanton, CA 94566 Permission to use, copy, modify, and distribute this software for any purpose and without fee is hereby granted, provided that this copyright and permission notice appear on all copies and supporting documentation, the name of Livingston Enterprises, Inc. not be used in advertising or publicity pertaining to distribution of the program without specific prior permission, and notice be given in supporting documentation that copying and distribution is by permission of Livingston Enterprises, Inc. Livingston Enterprises, Inc. makes no representations about the suitability of this software for any purpose. It is provided “as is” without express or implied warranty. Copyright © 1992, 1993, 1994, 1995 The Regents of the University of Michigan and Merit Network, Inc. All rights reserved. Permission to use, copy, modify, and distribute this software and its documentation for any purpose and without fee is hereby granted, provided that the above copyright notice and this permission notice appear in all copies of the software and derivative works or modified versions thereof, and that both the copyright notice and this permission and disclaimer notice appear in supporting documentation. THIS SOFTWARE IS PROVIDED “AS IS” WITHOUT WARRANTY OF ANY KIND, EITHER EXPRESS OR IMPLIED, INCLUDING WITHOUT LIMITATION WARRANTIES OF MERCHANTABILITY AND FITNESS FOR A PARTICULAR PURPOSE. THE REGENTS OF THE UNIVERSITY OF MICHIGAN AND MERIT NETWORK, INC. DO NOT WARRANT THAT THE FUNCTIONS CONTAINED IN THE SOFTWARE WILL MEET LICENSEE’S REQUIREMENTS OR THAT OPERATION WILL BE UNINTERRUPTED OR ERROR FREE. The Regents of the University of Michigan and Merit Network, Inc. shall not be liable for any special, indirect, incidental or consequential damages with respect to any claim by Licensee or any third party arising from use of the software. Copyright © 1991, 1992 RSA Data Security, Inc. Created 1991. All rights reserved. License to copy and use this software is granted provided that it is identified as the “RSA Data Security, Inc. MD5 Message-Digest Algorithm” in all material mentioning or referencing this software or this function. License is also granted to make and use derivative works provided that such works are identified as “derived from the RSA Data Security, Inc. MD5 Message-Digest Algorithm” in all material mentioning or referencing the derived work. RSA Data Security, Inc. makes no representations concerning either the merchantability of this software or the suitability of this software for any particular purpose. It is provided “as is” without express or implied warranty of any kind. These notices must be retained in any copies of any part of this documentation and/or software. XKL, LLC DXM Transport Terminal Manual iv Manual Organization Chapter 1 introduces the DXM Transport Terminal hardware and operating environment software. Chapter 2 describes the configuration tasks required to get the DXM unit up and running. Chapter 3 outlines ongoing configuration and administration operations, including system updates, monitoring, and configuration of special devices, such as Erbium-Doped Fiber Amplifiers (EDFA). Chapter 4 explains how to use the DXM Command Line Interface (CLI). Chapter 5 provides a detailed reference to all the commands in the DXMOS. Chapter 5 provides troubleshooting procedures for the DXMOS Appendix A explains the preparation needed to install the DXM. Appendix B describes how to install a DXM chassis on a rack mount system. Appendix C describes how to replace power, fan, and laser modules in the DXM. Appendix D provides a sample boot dialog for a DXM hybrid system. Appendix E describes the use of the DXM with Fibre Channel. Appendix F explains the use of DHCP configuration with the DXM. Appendix G describes the use of BERT testing with the DXM. Appendix H explains acronyms commonly used in XKL documentation and their definitions. Appendix I is a glossary of terms used in the optical networking field. XKL, LLC DXM Transport Terminal Manual v Conventions Used in This Manual This manual uses the following typographical conventions: Convention command line and syntax Description Text appearing on the command line is represented by monospace type: system> enable system# Syntax examples for commands are also monospace: show optical wavelength-map user entry Commands and keywords that are entered by the user are red: system CONF# line console system CONF-LINE-CTY# argument Arguments to a command—text that the user replaces with variable information—are written in italics: hostname name { } Required keywords and arguments in syntax examples are grouped with curly braces: ip { name-server address | route address } In the previous example, the full command typed by the user may be either of the following: ip name-server address ip route address XKL, LLC DXM Transport Terminal Manual Convention [ ] vi Description Optional keywords and arguments in syntax examples are surrounded by square brackets: show environment [ all | fans | power | temp ] In the previous example, the full command typed by the user may be any of the following: show show show show show | < > ctrl + C enter XKL, LLC environment environment environment environment environment all fans power temp A vertical bar means “or.” It delimits alternate choices of keywords and arguments in syntax examples. Red angle brackets are a placeholder for user input that is not displayed, such as password text. Hold down the Control key and press C. Press the Enter key to terminate all command lines. “Enter” is not displayed as part of command line examples in this manual. DXM Transport Terminal Manual vii Warning Warning: Do not stare into the laser; prolonged exposure may lead to severe eye damage. XKL, LLC DXM Transport Terminal Manual viii Contact XKL To obtain rapid assistance with specific technical issues, or general information about Darkstar products, use the following methods to contact XKL directly: • For general inquiries, email [email protected] or call 425-869-9050. • To access your private customer support account, log on through the Customer Support website: http://www.xkl.com/support • To contact the sales office, email [email protected] or call 1-866-802-2777. XKL, LLC DXM Transport Terminal Manual ix Table of Contents Table of Contents Manual Organization. . . . . . . . . . .iv 1 2 Updating Software and Gateware . . . . . . . . 18 Conventions Used in This Manual. . . . . v 3.1.1 Downloading Updates . . . . . . . . . . . 18 Warning. . . . . . . . . . . . . . . . . vii 3.1.2 Installing Updates. . . . . . . . . . . . . 18 Contact XKL . . . . . . . . . . . . . . 3.1.3 Rebooting the DXM. . . . . . . . . . . . 19 viii 3.2 System Overview. . . . . . . . . . . . . . . . . 1 1.1 Hardware Overview. . . . . . . . . . . . . . . . 1 1.2 Amplification Overview . . . . . . . . . . . . . . 3 1.3 Software Overview. . . . . . . . . . . . . . . . 4 2.1 Managing the Power Up and Reboot Process. . . . 6 2.2 Configuring the Management Network . . . . . . . 7 2.3 Connecting to the DXM Operating System. . . . . . 8 Monitoring the DXM . . . . . . . . . . . . . . 19 3.2.1 Monitoring Hardware . . . . . . . . . . . 19 3.2.2 Logging to Syslog . . . . . . . . . . . . . 23 3.2.3 Configuring the Circular Log Buffer. . . . . 24 3.2.4 Monitoring with SNMP. . . . . . . . . . . 24 3.2.5 Detecting Errors . . . . . . . . . . . . . .24 Getting Started . . . . . . . . . . . . . . . . . . 5 3.2.6 Forwarding Errors. . . . . . . . . . . . . 25 3.3 Setting Up the EDFA. . . . . . . . . . . . . . . 26 3.4 Setting Up the Raman. . . . . . . . . . . . . .26 3.4.1 Automatic Bring-Up. . . . . . . . . . . . 26 2.3.1 Setting up Console Access. . . . . . . . . . 8 2.3.2 Setting up Telnet Access. . . . . . . . . . . 9 2.3.3 Setting up SSH Access. . . . . . . . . . . . 9 2.3.4 Access Control Lists. . . . . . . . . . . . 10 Operating the Command Line Interface . . . . . . . . . . . 30 2.3.5 Setting up Multiple Users . . . . . . . . . 11 4.1 Getting Help . . . . . . . . . . . . . . . . . . 30 2.3.6 Setting up AAA & RADIUS. . . . . . . . . 11 4.2 Abbreviating Commands . . . . . . . . . . . . 31 Securing the DXM. . . . . . . . . . . . . . . .12 4.3 Editing the Command Line. . . . . . . . . . . .31 4.4 Command Modes . . . . . . . . . . . . . . . .32 2.4 3.4.2 Manual Bring-Up. . . . . . . . . . . . . 27 4 2.4.1 Setting an Enabled Mode Password . . . . . 12 2.4.2 Setting a Serial Console Password . . . . . .12 4.4.1 Disabled Mode Commands. . . . . . . . . 32 2.5 Setting Time and Date. . . . . . . . . . . . . .13 4.4.2 Changing Command Modes. . . . . . . . 32 2.6 Provisioning the Optical Transport. . . . . . . . 14 4.4.3 Enabled Mode Commands. . . . . . . . . 32 2.6.1 2.7 3 3.1 DHCP Configuration. . . . . . . . . . . . . . . 17 Configuring and Administering the System . . . . . . . . . . . . . . . . . . . . 18 XKL, LLC Command Line Prompts. . . . . . . . . . . . . . . Configuring Automatic Path Protection. . . 15 5 Command Line Interface Reference . . . . . . . . . . . . . . . . . . . . . 34 5.1 Format of This Reference. . . . . . . . . . . . .34 DXM Transport Terminal Release Notes Syntax Shortcuts. . . . . . . . . . . . . 35 5.5.28 router rip. . . . . . . . . . . . . . . . . 63 5.2 High-Level Command Summaries . . . . . . . . 36 5.5.29 snmp-server. . . . . . . . . . . . . . . 65 5.3 clear. . . . . . . . . . . . . . . . . . . . . .38 5.5.30 sntp. . . . . . . . . . . . . . . . . . . 66 5.1.1 5.3.1 clear app. . . . . . . . . . . . . . . . . 38 5.5.31 uart. . . . . . . . . . . . . . . . . . . 67 5.3.2 clear counters. . . . . . . . . . . . . . . 39 5.5.32 user. . . . . . . . . . . . . . . . . . . 67 5.3.3 clear interface. . . . . . . . . . . . . . .39 5.5.33 watchdog-timeout. . . . . . . . . . . . 67 5.3.4 clear line. . . . . . . . . . . . . . . . . 39 5.6 copy. . . . . . . . . . . . . . . . . . . . . .68 5.3.5 clear logging. . . . . . . . . . . . . . . 39 5.7 debug. . . . . . . . . . . . . . . . . . . . . 68 5.4 clock . . . . . . . . . . . . . . . . . . . . . 39 5.8 disable . . . . . . . . . . . . . . . . . . . . 69 5.5 configure . . . . . . . . . . . . . . . . . . . 40 5.9 enable. . . . . . . . . . . . . . . . . . . . . 69 5.5.1 aaa new-model. . . . . . . . . . . . . . 40 5.10 exit. . . . . . . . . . . . . . . . . . . . . . 69 5.5.2 aaa accounting. . . . . . . . . . . . . . 40 5.11 logout. . . . . . . . . . . . . . . . . . . . . 69 5.5.3 aaa authentication . . . . . . . . . . . . 41 5.12 ping. . . . . . . . . . . . . . . . . . . . . .69 5.5.4 access-list . . . . . . . . . . . . . . . . 41 5.13 reload. . . . . . . . . . . . . . . . . . . . . 70 5.5.5 app. . . . . . . . . . . . . . . . . . . 41 5.14 set fan-controllers . . . . . . . . . . . . . . . 70 5.5.6 boot . . . . . . . . . . . . . . . . . . . 43 5.15 set split-trunk. . . . . . . . . . . . . . . . . 71 5.5.7 boot host dhcp . . . . . . . . . . . . . . 43 5.16 show. . . . . . . . . . . . . . . . . . . . . 71 5.5.8 clock. . . . . . . . . . . . . . . . . . . 44 5.16.1 show app. . . . . . . . . . . . . . . . . 71 5.5.9 connect . . . . . . . . . . . . . . . . . 45 5.16.2 show arp. . . . . . . . . . . . . . . . . 71 5.5.10 do. . . . . . . . . . . . . . . . . . . . 45 5.16.3 show batch-queue . . . . . . . . . . . . 72 5.5.11 edfa. . . . . . . . . . . . . . . . . . . 46 5.16.4 show calendar . . . . . . . . . . . . . . 72 5.5.12 enable secret . . . . . . . . . . . . . . . 48 5.16.5 show clock. . . . . . . . . . . . . . . . 72 5.5.13 end. . . . . . . . . . . . . . . . . . . 49 5.16.6 show connections. . . . . . . . . . . . . 72 5.5.14 exit. . . . . . . . . . . . . . . . . . . 49 5.16.7 show controllers . . . . . . . . . . . . . 72 5.5.15 fan. . . . . . . . . . . . . . . . . . . .49 5.16.8 show edfa. . . . . . . . . . . . . . . . 73 5.5.16 hostname . . . . . . . . . . . . . . . . 50 5.16.9 show environment . . . . . . . . . . . . 73 5.5.17 interface . . . . . . . . . . . . . . . . . 51 5.16.10 show flash-config. . . . . . . . . . . . . 73 5.5.18 ip domain-name . . . . . . . . . . . . . 55 5.16.11 show hardware . . . . . . . . . . . . . . 74 5.5.19 ip dhcp pool . . . . . . . . . . . . . . . 55 5.16.12 show hosts . . . . . . . . . . . . . . . . 74 5.5.20 ip host . . . . . . . . . . . . . . . . . . 56 5.16.13 show interfaces. . . . . . . . . . . . . . 74 5.5.21 ip name-server. . . . . . . . . . . . . . 57 5.16.14 show ip arp . . . . . . . . . . . . . . . .74 5.5.22 ip route . . . . . . . . . . . . . . . . . 57 5.16.15 show ip routes. . . . . . . . . . . . . . 75 5.5.23 line. . . . . . . . . . . . . . . . . . . 57 5.16.16 show ip traffic. . . . . . . . . . . . . . .75 5.5.24 logging . . . . . . . . . . . . . . . . . 60 5.16.17 show lines . . . . . . . . . . . . . . . . 75 5.5.25 radius-server host. . . . . . . . . . . . . 60 5.16.18 show logging. . . . . . . . . . . . . . . 75 5.5.26 radius-server key . . . . . . . . . . . . . 61 5.16.19 show optical wavelength-map. . . . . . . 76 5.5.27 raman. . . . . . . . . . . . . . . . . . 61 5.16.20 show peers. . . . . . . . . . . . . . . . 76 5.16.21 show running-config. . . . . . . . . . . 76 5.16.22 show sntp. . . . . . . . . . . . . . . . 77 5.16.23 show startup-config. . . . . . . . . . . .77 5.16.24 show switch. . . . . . . . . . . . . . . 77 D Sample Boot-Up Type Out. . . . . . . . . . 107 E Fibre Channel & DXM . . . . . . . . . . . . . 110 F DHCP Configuration. . . . . . . . . . . . . . 111 5.16.25 show tech-support. . . . . . . . . . . . 77 5.16.26 show timer-queue . . . . . . . . . . . . 77 5.16.27 show version. . . . . . . . . . . . . . . 77 5.17 tftp. . . . . . . . . . . . . . . . . . . . . . 78 5.18 undebug. . . . . . . . . . . . . . . . . . . .79 5.19 version . . . . . . . . . . . . . . . . . . . . 79 5.20 write. . . . . . . . . . . . . . . . . . . . . 79 5.20.1 write erase . . . . . . . . . . . . . . . . 79 5.20.2 write memory . . . . . . . . . . . . . . 80 5.20.3 write network. . . . . . . . . . . . . . . 80 5.20.4 write terminal . . . . . . . . . . . . . . 80 6 Troubleshooting. . . . . . . . . . . . . . . . . 81 6.1 Troubleshooting Matrices . . . . . . . . . . . . 81 6.1.1 Hardware / Physical Issues . . . . . . . . . 82 6.1.2 Software Issues . . . . . . . . . . . . . . 83 6.1.3 Interface Issues . . . . . . . . . . . . . . 84 6.2 Troubleshooting Commands. . . . . . . . . . . 88 6.3 Front-Panel LED Codes . . . . . . . . . . . . . 88 6.4 Software. . . . . . . . . . . . . . . . . . . .89 6.4.1 DXMOS Recovery Mode . . . . . . . . . . 91 A Preparing for Hardware Installation . . . . . . . . . . . . . . . . . . . . 93 B Installing the Chassis . . . . . . . . . . . . . .94 C B.1 Introduction. . . . . . . . . . . . . . . . . . 94 B.2 Installing in a 4-Post Rack . . . . . . . . . . . . 95 B.3 Connecting to DC Power. . . . . . . . . . . . . 98 Replacing Modules. . . . . . . . . . . . . . . 100 C.1 Replacing a Power Module. . . . . . . . . . . 100 C.2 Replacing a Fan Module. . . . . . . . . . . . 102 C.3 Replacing a Wave Laser Module. . . . . . . . . 103 G BERT (Bit Error Ratio Test). . . . . . . . . . 113 H Acronyms & Abbreviations. . . . . . . . . . 116 I Glossary. . . . . . . . . . . . . . . . . . . . . . 118 1 System Overview The DXM is an integrated Dense Wavelength Division Multiplexing (DWDM) system that includes optical networking hardware along with management and monitoring software. This chapter provides a high level description of system components and operation. Subsequent chapters provide detailed procedures for DXM setup and operation. The DXM includes the DXM Operating System (DXMOS) with a standard Command Line Interface (CLI). Familiar CLI commands establish, monitor, and change flexible connections between network services and set up and select configurations and ports. 1.1 Hardware Overview The DXM contains an Optical-Electrical-Optical (OEO) switching and multiplexing facility in a small physical package. A single pair of DXM systems transport and multiplex/demultiplex 10 channels for transmission on a single fiber pair. With an optional DXM Band Combiner, multiple DXM systems can be combined to scale to larger transport capacities on a single fiber. The following table describes DXM models, supported Ethernets, fibre channels, and Optical Carrier (OC) signals. Table 1.1 DXM Supported Networking Standards DXM Model 3G (DXM3, DXMh) Ethernet 1Gbps Fibre Channel 1Gbps, 2Gbps 10G (DXM10, DXMh) 10Gbps 10Gbps OC Signal OC3, OC12, OC48 (OTU1 line rate) OC192 (OTU2 line rate) Each model can be configured to have either ten channels or five dual channels. Signals passing through the system are regenerated in the OEO process. DXM models include two non-volatile ram (NVRAM) micro SD flash memories used for storage. The startup (or customer) flash contains start-up gateware, boot image, DXMOS software, and configuration information. These start-up components are loaded during routine power-up or warm reload procedures. The factory flash contains factory gateware, and factory boot and DXMOS software images. The built-in Optical Service Channel (OSC) provides remote management and operational monitoring, multiplexed on the same fiber pair as the data signals and available at each end of every Hardware Overview 2 link. Four front panel Ethernet ports allow for the interconnection of stacked systems and for connecting the DXM to the IP management network. The Ethernet interfaces support automatic medium-dependent interface crossover (auto-MDIX), so the DXM detects whether a crossover or straight-through cable is connected to an Ethernet port and automatically configures the interface appropriately. Figure 1.1 DXM Front View 1 2 3 4 5 6 7 8 9 10 11 1. Laser maintenance panel 2. Client side optical ports 3. Side reset button access port. Reset by inserting the supplied reset tool or other nonconductive device into hole. 4. Ethernet network management ports (Ethernet 10/100 auto-negotiation) 5. Green Power indicator light 6. Amber Warning indicator light 7. Red Alarm indicator light 8. Front reset button 9. Console serial port 10. Line side signal detect lights 11. Line side optical ports (–5R models shown; other models have only one pair of line side ports) XKL, LLC DXM Transport Terminal Manual Amplification Overview 3 Figure 1.2 DXM Rear View 1 2 2 1 1. Power module 2. Fan module 1.2 Amplification Overview Darkstar systems currently support two types of amplification: EDFA DBA amplifiers use EDFA (Erbium Doped Fiber Amplification). EDFA technology dopes an optical fiber as a gain medium to amplify an optical signal. The signal and the pump laser are multiplexed into the doped fiber, where the signal is amplified through interaction with the doping ions. Raman DRA amplifiers use Raman scattering. Raman amplification uses the transmission fiber as the gain medium by multiplexing a pump wavelength with signal wavelength, thereby transferring optical energy from a pump laser to the signal beam. Amplifiers generally serve three purposes in a system: Booster: increases signal launch power into the fiber Line Amplification: increases repeater spacing Pre-Amplification: improves receiver sensitivity and signal-to-noise margin Each amplification type and its manner of deployment has unique characteristics and benefits. The amplification technology and configuration used in a DXM system will depend upon transmission distances, network topology, and fiber type, among other factors that are taken into ac- XKL, LLC DXM Transport Terminal Manual Software Overview 4 count when building a DXM system. Information related to setting up an amplifier can be found in Chapter 3 and commands are fully detailed in Chapter 5. The amplifiers share much of the same hardware and software as the DXM Transport System, thereby facilitating its management by requiring only one set of general operating instructions and commands for both products. 1.3 Software Overview The operating system environment of the DXM (DXMOS) includes a CLI that allows all users to display limited information about the system and an enabled mode that allows users with appropriate permission to reconfigure the system and display sensitive information. Chapter 3 describes the use of the CLI in both enabled and disabled modes. Chapter 4 explains common setup and administration tasks. Chapter 5 provides a command reference for all DXM commands. The DXM system includes on-line help for all commands. Enter a question mark (?) at any system prompt or command line, or press tab at the end of incomplete commands. XKL, LLC DXM Transport Terminal Manual 2 Getting Started This chapter describes initial start-up for the DXM Transport Terminal and explains the procedure for reloading software and gateware after start-up completes. Table 2.1 summarizes events that trigger boot and recovery scenarios and their effects on the system. Table 2.1 Boot and Recovery Scenarios Event Power Cycle Gateware Reload Software Reload Front button push and release Front button push and hold Side button push and release 1 Side button push and hold 1 DXMOS reload command Power cycle (disconnecting both power supplies) DXMOS software fault Watchdog timeout Recovery mode (resulting from corrupted customer flash) Failure to load customer gateware no no yes yes no yes no yes yes yes yes yes yes yes yes yes yes yes no no no yes yes yes yes yes yes no yes yes Load from Factory Settings no no no yes no no no no operator’s choice yes 1 “Push and release” means pushing the button and immediately releasing it. “Push and hold” means pushing the button and holding it in for at least 3 seconds. 1Pressing the side reset button always causes system power to cycle. Either holding or releasing the button causes the switch board to reset and all customer traffic to stop. Managing the Power Up and Reboot Process 6 There are two hardware reset buttons on the DXM, illustrated in Figure 2.1. Figure 2.1 Hardware Reset Buttons 1 2 1. The side reset button cycles system power. 2. The front reset button resets the system without cycling power. 2.1 Managing the Power Up and Reboot Process The DXM powers up as soon as either of its power supplies is plugged in. Since the DXM is designed to be powered on continuously, it does not have a power switch. The side reset button cycles the internal power and reloads software and gateware. Red, amber, and green LEDs, shown in Figure 1.1, flash to indicate system state. Table E.1 describes the LED patterns and their meanings. To cycle the power: ♦♦ Use a nonconductive reset tool to press and immediately release the side reset button. WARNING: Do not use a metal object, such as a paperclip, to press the side reset button. Doing so may expose the operator to hazardous voltages or damage the DXM. ! CAUTION: Cycling the power disrupts the transport interfaces. It should be done only in cases where the system is completely frozen, or when a physical hard reset of all hardware is desired. When powered up for the first time, or when started with an empty or nonexistent start-up configuration, the DXM performs the following steps: 1. MiniBoot, a lightweight boot loader, loads from the startup gateware and executes a larger, more functional boot loader, known as Boot, from the startup boot location in the customer flash storage. 2. Boot attempts to obtain configuration information via DHCP and TFTP. If Boot successfully obtains the configuration file, Boot passes the configuration to DXMOS. Otherwise, DXMOS is started without configuration information. 3. After a delay (10 seconds by default), Boot loads DXMOS from the image location XKL, LLC DXM Transport Terminal Manual Configuring the Management Network 7 specified in the configuration or from the startup-image by default. The following message appears: [Type Ctrl-C to abort, or any other key to boot now.] If you press ctrl + C before the automatic boot completes, the Boot> prompt appears, at which you may issue low-level configuration commands. To continue booting DXMOS from the Boot> prompt, you must manually issue the following command: Boot> boot To boot the system using the factory default image, configuration file, and gateware: ♦♦ Press and hold the side reset button for three seconds. The LEDs on the front panel flash when the DXM resets successfully. Booting from the factory default image interrupts customer traffic. To reset the software only: ♦♦ Press and immediately release the front reset button. This maintains power and the state of transport interfaces if the running-config is identical to the startup-config. To warm reboot (without a power cycle): ♦♦ Press and hold the front reset button for three seconds. This reloads the system gateware and software, and maintains power and the state of all transport interfaces if the running-config is identical to the startup-config. The green, amber, and red LEDs on the front panel flash when the warm reboot succeeds. (This is the hardware equivalent of the DXMOS reload command.). To cold reboot (with a power cycle): ♦♦ A cold reboot is performed using an internal or external power cycle. An internal power cycle is accomplished using the side reset button. An external power cycle is accomplished by removing the DXM’s power supplies or disconnecting its power cord. When you run the DXMOS’s show version command, it will indicate whether a power cycle has occurred since the last reload, and if it has, whether it was an internal or external power cycle. When managing the DXM remotely, this information may helpful to determine the cause of a power cycle. NOTE: If you make changes to running-config and you reload without saving changes to startup-config, you will lose the changes made to the running-config. As a result, when the system reboots, the previous startup-config will take effect and the loss of running-config changes may results in a loss of customer traffic. 2.2 Configuring the Management Network The DXM contains software that handles Internet Protocol (IP) connectivity between management systems and the Optical Service Channel (OSC). The OSCs communicate with each other over the main DWDM optical link: OSC 0 on non-redundant networks (DXM 10) and OSC 0 or 1 (east or west) on redundant networks (DXM 5R). DXM 5R systems use the labels “East” and “West” to describe their two five-channel trunk conXKL, LLC DXM Transport Terminal Manual Connecting to the DXM Operating System 8 nections. When viewed from the front of the DXM, the left connector is “West” and the right connector is “East”. The wave interfaces for each trunk are labeled “direction” followed by n, for interface 0-4. You can configure any unused Ethernet interface to connect to a management network. NOTE: The DXM management network behaves as a router and not as a switch. This means that to reach equipment on the remote end of an OSC link, the OSC ports must be on a subnet distinct from the Ethernet ports. In addition, all DXMs and equipment communicating to the remote DXM require valid routes that come from static or proxy ARP configurations, or from information acquired through Routing Information Protocol (RIP). The following example shows the process for configuring Ethernet interfaces. It defines an IP address and subnet mask for Ethernet interface 0. To configure an Ethernet interface, enter the following commands: localhost> enable localhost# configure localhost CONF# interface ethernet 0 localhost CONF-INT-ETH[0]# ip address 192.168.0.1/24 localhost CONF-INT-ETH[0]# end localhost# write memory Are you sure? [yes/no] yes After you complete the Ethernet configuration, you can integrate the DXM into your management network. See Section 5.5 for additional commands to configure the management network. 2.3 Connecting to the DXM Operating System You can administer the DXM directly from a console terminal connection. On a DXM with correctly-configured network connections, you can administer it from a remote computer using telnet or Secure Shell (SSH). Section 2.3.1 describes how to set up console access, Section 2.3.2 describes how to set up telnet access, and Section 2.3.3 describes how to set up ssh access. 2.3.1 Setting up Console Access The console is a minimal RS–232 Data Terminal Equipment (DTE) configuration. Wiring for the 8-pin modular jack (RJ–45) that connects the RS–232 to the console is shown in Table 2.2. XKL, LLC DXM Transport Terminal Manual Table 2.2 Connecting to the DXM Operating System 9 Console Jack Pinout Pin 1 2 3 4 5 6 7 8 Signal Comment No connection No connection TxD Gnd No connection RxD No connection No connection To establish access, connect the RS–232 port on a console terminal to the RJ–45 console port on the front of the DXM. The communication settings supported by the console line are 9600–8N1: 2.3.2 ♦♦ 9600 baud ♦♦ 8 bits per character ♦♦ no parity ♦♦ 1 stop bit Setting up Telnet Access Telnet access is disabled until you set the Virtual Terminal (VTY) password. You also need to configure the VTY line to accept connections via telnet. ♦♦ The password command sets the password for the VTY line. ♦♦ The login command enables remote login over the VTY line. ♦♦ The transport input telnet command configures the VTY line to accept login attempts via the telnet protocol. To set up remote telnet access to all configured DXM Ethernet interfaces, enter the following commands: localhost> enable localhost# configure localhost CONF# line vty localhost CONF-LINE-VTY# password new password localhost CONF-LINE-VTY# login localhost CONF-LINE-VTY# transport input telnet localhost CONF-LINE-VTY# end localhost# write memory Are you sure? [yes/no] yes localhost# You should now be able to telnet into the DXM through any cabled and configured interface. 2.3.3 Setting up SSH Access Enabling Secure Shell (SSH) access to the DXM requires setting a password for the VTY line. The XKL, LLC DXM Transport Terminal Manual Connecting to the DXM Operating System 10 VTY line must also be configured to accept connections via SSH. ♦♦ The password command sets the password for the VTY line. ♦♦ The login command enables remote login over the VTY line. ♦♦ The transport input ssh command configures the VTY line to accept login attempts via the SSH protocol. To set up remote SSH access to all configured DXM Ethernet interfaces, enter the following commands: localhost> enable localhost# configure localhost CONF# line vty localhost CONF-LINE-VTY# password new password localhost CONF-LINE-VTY# login localhost CONF-LINE-VTY# transport input ssh localhost CONF-LINE-VTY# end localhost# write memory Are you sure? [yes/no] yes localhost# NOTE: You can enable both telnet and SSH access through the VTY line by using the command transport input all or by omitting any transport input command since the default is all. The DXM comes with SSH public and private keys installed, but for extra security, you may want to generate your own keys and upload them to the DXM. The DXM has no facility for creating its own keys, so they must be generated on an external computer and copied to the DXM via TFTP. The client key must be world-readable during TFTP, which can pose a security risk on an unsecured network. To copy SSH keys to the DXM, enter the following commands: localhost> enable localhost# tftp 10.15.1.98 id_dsa hostkey-private Are you sure? [yes/no] yes Starting TFTP transfer: #################################... File transferred successfully...Completing flash write localhost# tftp 10.15.1.98 id_dsa.pub hostkey-public Are you sure? [yes/no] yes Starting TFTP transfer: #################################... File transferred successfully...Completing flash write localhost# NOTE: Only DSA keys are supported by the DXM; RSA keys will not work. 2.3.4 Access Control Lists If the DXM is not on a private management network and remote Telnet and SSH access is enabled, Access Control Lists (ACL) should be used. ACLs increase security and mitigate opportunities for denial-of-service attacks. Traffic that comes into the router is compared to ACL entries based on the order that the entries occur in the router. New statements are added to the end of the list. The router continues to look until it has a match. If no matches are found when the router reaches the end of the list, the traffic is denied. For this reason, you should have the frequently hit entries at the top of the list. There is XKL, LLC DXM Transport Terminal Manual Connecting to the DXM Operating System 11 an implied deny for traffic that is not permitted. A single-entry ACL with only one deny entry has the effect of denying all traffic. Masks are used with IP addresses in IP ACLs to specify what should be permitted and denied. Masks in order to configure IP addresses on interfaces start with 255 and have the large values on the left side, for example, IP address 209.165.202.129 with a 255.255.255.224 mask. Masks for IP ACLs are the reverse, for example, mask 0.0.0.255. This is sometimes called an inverse mask or a wildcard mask. When the value of the mask is broken down into binary (0s and 1s), the results determine which address bits are to be considered in processing the traffic. A 0 indicates that the address bits must be considered (exact match); a 1 in the mask is a “don’t care”. The following example demonstrates how this functionality may be enabled: localhost> enable localhost# configure localhost CONF# access-list 2 permit 10.0.0.0 0.255.255.255 localhost CONF# access-list 2 deny 0 255.255.255.255 localhost CONF# line vty localhost CONF-LINE-VTY# access-class 2 in localhost CONF-LINE-VTY# exit localhost CONF# exit localhost# 2.3.5 Setting up Multiple Users Instead of a single telnet or SSH password, you may also create user accounts, each with its own username and password. Multiple accounts may be used with telnet, SSH, or both, depending on what is currently enabled through the transport input command. ♦♦ Like the login command, login user accounts. local enables remote login, but only through To create user accounts, enter the following commands: localhost> enable localhost# configure localhost CONF# user username password newpassword localhost CONF# user anotheruser password anotherpassword localhost CONF# line vty localhost CONF-LINE-VTY# login local localhost CONF-LINE-VTY# end localhost# write memory Are you sure? [yes/no] yes localhost# 2.3.6 Setting up AAA & RADIUS The DXM can be configured to work with a RADIUS server to provide centralized authentication, authorization, and accounting services. Use of AAA services also allows finer-grain control when using local login methods. For more information related to AAA and RADIUS configuration, refer to their respective commands in the configuration section of the Chapter 5 Command Line Interface Reference. XKL, LLC DXM Transport Terminal Manual 2.4 Securing the DXM 12 Securing the DXM In addition to setting up passwords for telnet and SSH access, the DXM may be secured by setting passwords for enabled mode and for the serial console terminal. 2.4.1 Setting an Enabled Mode Password Setting a password for enabled mode prevents unauthorized changes from being made to DXM settings. To assign an enabled mode password, enter the following commands: localhost> enable localhost# configure localhost CONF# enable secret password localhost CONF# exit localhost# write memory Are you sure? [yes/no] yes localhost# When the enabled mode password is set, the DXM prompts for a password when you use the enable command: localhost> enable password: < > localhost# To remove enabled mode password security or change the password, enter the following commands: localhost# configure localhost CONF# no enable secret localhost CONF# end localhost CONF# write memory Are you sure? [yes/no] yes You can then set up a new password or leave the system unprotected. 2.4.2 Setting a Serial Console Password The serial console terminal (CTY) may be secured in similar fashion to the VTY line, with either a password or username and password combinations. To password-protect the serial console terminal (CTY), enter the following commands: localhost> enable localhost# configure localhost CONF# line console localhost CONF-LINE-CTY# password newpassword localhost CONF-LINE-CTY# end localhost# write memory Are you sure? [yes/no] yes localhost# logout To remove serial console password security or change the password, enter the following commands: localhost> enable localhost# configure XKL, LLC DXM Transport Terminal Manual Setting Time and Date 13 localhost CONF# line console localhost CONF-LINE-CTY# no password localhost CONF-LINE-CTY# end localhost# write memory Are you sure? [yes/no] yes You can then set up a new password or leave the system unprotected. To create user accounts for the CTY, enter the following commands: localhost> enable localhost# configure localhost CONF# user username password newpassword localhost CONF# user anotheruser password anotherpassword localhost CONF# line console localhost CONF-LINE-CTY# login local localhost CONF-LINE-CTY# end localhost# write memory Are you sure? [yes/no] yes localhost# NOTE: The same pool of accounts is used to store users for both the CTY and VTY. Keep in mind that any user created for the CTY may also be used to login over the VTY, assuming that the VTY is configured to allow remote login via telnet or SSH. To stop using user accounts and revert to a single login, enter the following commands: localhost> enable localhost# configure localhost CONF# line console localhost CONF-LINE-CTY# login localhost CONF-LINE-CTY# end localhost# write memory Are you sure? [yes/no] yes localhost# NOTE: If you set a single-login password for a line (either CTY or VTY), it remains in place, even if you switch to using user accounts with the login local command. The single-login password is not required to gain entry while the user accounts are active. However, if you later revert to the single login using the login command, gaining access to the line still requires the single-login password you originally assigned to the line. ! 2.5 CAUTION: If the customer (start-up) flash becomes unreadable for any reason, the DXM reverts to factory settings. Telnet access is disabled and only the console can be used to diagnose and repair the condition. The system enters recovery mode, in which the user may restore the system to normal operation. Recovery is described in detail in Appendix D. Setting Time and Date The DXM ships with the clock set to Universal Time, formerly known as Greenwich Mean Time (GMT). The clock command sets system date and time, and when the DXM is in configuration mode, sets the time zone and Daylight Saving Time (DST) rules that the DXM follows. To set the system clock, enter the following commands: localhost> enable XKL, LLC DXM Transport Terminal Manual Provisioning the Optical Transport 14 localhost# show clock 23:59:59 UTC Mon Mar 30 2009 localhost# configure localhost CONF# clock timezone -8 localhost CONF# clock summer-time usa localhost CONF# exit localhost# write memory Are you sure? [yes/no] yes localhost# clock set 17:01:30 30 march 2009 localhost# show clock 17:01:33 UTC-7 Mon Mar 30 2009 The series of commands listed above configure the system time to Pacific Time (UTC minus 8 hours), adhering to United States rules for determining when Daylight Saving Time begins and ends. For more information about using the clock commands, see the Command Reference section. 2.6 Provisioning the Optical Transport Provisioning the DXM establishes connections between local client interfaces and DWDM (wave) channels. Client interfaces are either Small Form Factor Pluggable (SFP) transceivers or 10Gbps Small Form Factor Pluggable (XFP) transceivers. The default DXM configuration does not include any connections between client interfaces and wave channels. To provision a transport service: 1. Enter enabled mode and type show tions. connection to display any existing connec- 2. Choose a client interface and a wave channel, for example, connect client 5 wave 5. XKL suggests using the same wave port and client, unless your network strategy requires otherwise. Please note that wave:wave east/west mapping is different on hybrids than on 3G and 10G systems. 3. Type configure to enter configuration mode. 4. Type connect client x wave y encapsulation z ♢♢ x is the client interface to be connected ♢♢ y is the wave channel to be connected ♢♢ z is the encapsulation type (see details below) 5. Connect to the remote DXM on the other end of the main trunk line and, using the same process, connect the previously specified wave channels to the client interfaces that terminate the remote network services. 6. Save the updated configuration with a write memory command on each system. Each connection between client interfaces and wave channels requires an encapsulation type. The DXM command line can display the available encapsulation values for a particular interface. If an encapsulation is not specified, the connection will use the encapsulations the interfaces already have (if they are the same) or fail to pass data (if they are different). XKL, LLC DXM Transport Terminal Manual Provisioning the Optical Transport 15 To display the encapsulations available for a client interface, enter the following commands: localhost# configure localhost CONF# interface client 0 localhost CONF-INT-CLIENT[0]# encapsulation ? one of the following: 10gigabitethernet fibrechannel sonet The following example connects client interface 0 to wave channel 0 with a SONET OC48 encapsulation: localhost> enable localhost# configure localhost CONF# connect client 0 wave 0 encapsulation sonet oc48 localhost CONF# exit localhost# write memory Are you sure? [yes/no] yes localhost# Make sure the network equipment is attached to the configured client interfaces on both sides and verify connectivity with the show connections command. Each interface can be used in only one connection. You must remove an interface from its connection before you can reconnect it to another channel. To remove a transport connection, enter the following commands: localhost> enable localhost# configure localhost CONF# no connect client x wave y localhost CONF# exit localhost# write memory Are you sure? [yes/no] yes localhost# 2.6.1 Configuring Automatic Path Protection Automatic Path Protection (APP) provides redundancy for a connection by transmitting the same signal over two different physical fiber connections. The two interfaces that make up such a redundant path are called the working and protection interfaces. Together, a working interface and protection interface form an APP group. Network traffic normally flows through the working interface, and if the working interface is interrupted, the APP group switches to the protection interface. By default, an APP group is revertive, which means that if traffic is currently using the protection interface, and the working interface comes back online, traffic is automatically switched back to the working interface. In a non-revertive configuration, switching traffic back to the working interface must be done manually. The app command sets up and configures APP groups. To create a new APP group, give the app command two arguments: ♦♦ First, the working interface ♦♦ Second, the protection interface XKL, LLC DXM Transport Terminal Manual Provisioning the Optical Transport 16 The following commands create an APP group from two wave interfaces: localhost> enable localhost# configure localhost CONF# app wave west 0 wave east 0 localhost CONF# exit localhost# write memory Are you sure? [yes/no] yes localhost# In this example, wave west 0 is the working interface and wave east 0 is the protection interface. NOTE: The app command works on all DXM systems, though it is only useful on DXM 5R redundant systems. If the working interface has intermittent connection problems, it is possible for a revertive APP group to rapidly switch back and forth between working and protection interfaces, which can cause data loss or seriously degrade network performance. In such a case, it may be useful to set a holdoff value, which is the amount of time between when the working interface comes up and the APP group reverts to using the working interface. The holdoff is specified in milliseconds. To configure a holdoff value for an APP group, enter the following commands: localhost> enable localhost# configure localhost CONF# app revertive wave west 0 holdoff 60000 localhost CONF# exit localhost# write memory Are you sure? [yes/no] yes localhost# The previous example sets a holdoff period of 1 minute (60000 milliseconds). To set an APP group to be non-revertive, enter the following commands: localhost> enable localhost# configure localhost CONF# no app revertive wave west 0 localhost CONF# exit localhost# write memory Are you sure? [yes/no] yes localhost# An APP group may be locked to prevent it from switching. Locking an APP group is a good idea during physical maintenance of one of the interfaces in the APP group; it insures that an interruption in network traffic will not switch the connection to fiber that is currently disconnected or being handled. To lock an APP group and prevent it from switching, enter the following commands: localhost> enable localhost# configure localhost CONF# app lockout wave west 0 localhost CONF# exit localhost# write memory Are you sure? [yes/no] yes localhost# XKL, LLC DXM Transport Terminal Manual DHCP Configuration 17 Because a non-revertive APP group does not automatically restore traffic flow to the working interface when it is back online, the app switch command must be used to manually switch back. NOTE: The app switch command may also be used to switch from the working interface to the protection interface, but if this is done in a revertive APP group, it will automatically switch back to the working interface again. The app switch command takes two arguments: ♦♦ First, an interface that identifies the APP group to be switched. Either interface in the APP group may be specified in the first argument. ♦♦ Second, the interface to which the APP group should be switched. This argument must be the target interface through which traffic should be directed. To manually switch from one interface to another, enter the following commands: localhost> enable localhost# configure localhost CONF# app switch wave east 0 wave west 0 localhost CONF# exit localhost# write memory Are you sure? [yes/no] yes localhost# The app switch command takes an optional third argument, force, which forces the APP group to switch interfaces, even if it is currently locked. When performing maintenance on a DXM with a revertive APP group, it is a good idea to first lock the group with app lockout to prevent automatic reversion to the working interface, then use the force version of app switch to change which interface is carrying network traffic. 2.7 DHCP Configuration Once you have followed the steps outlined in previous sections, you can use the completed configuration file to set up semi-automated configuration of your DXM system(s) using DHCP and TFTP protocols. The DXM can act as a DHCP client to acquire a configuration file from remote DHCP/TFTP server(s). This method of configuration is attempted when no startup-config file is present in the flash memory or when the boot host dhcp command is issued and saved in startup-config. For more information related to DHCP configuration, refer to command references in Chapter 5 and the DHCP Server Configuration Appendix. XKL, LLC DXM Transport Terminal Manual 3 Configuring and Administering the System This chapter describes common configuration and administration tasks for the DXM. Chapter 5 contains a comprehensive reference to all commands. The DXM is shipped without values set for IP address, hostname, or passwords. XKL strongly recommends that you set passwords, based on your site’s requirements, as soon as you install the system (see Section 2.3.3 and Section 2.4). 3.1 Updating Software and Gateware Updating DXM software and gateware involves three steps: 1. Download update files from the XKL support website to your local TFTP server. 2. Use the tftp command to install the updates on the DXM. 3. Reboot the DXM to load the new software and gateware. ! 3.1.1 CAUTION: The order in which software and gateware updates are installed is important. Always check the README that accompanies each update for specific instructions. Downloading Updates DXM software and gateware updates are available on the XKL Customer Support website (http://www.xkl.com/support). The files are available directly or in compressed tar and zip archives. To download updates from the XKL website: 1. Enter your username and password in the sidebar and click Login. 2. Click Downloads in the sidebar. 3. Locate the appropriate update. Readme files are provided that describe what each update contains, as well as any special instructions for installation. 4. Download the update files. 5. Copy the files to your TFTP server. If necessary, expand the tar or zip archives. 3.1.2 Installing Updates Once the update files are on your TFTP server, you can transfer them to the DXM with the tftp Monitoring the DXM 19 command. The tftp command takes three arguments: ♦♦ The address of the TFTP server that holds the update file ♦♦ The name of the file to copy ♦♦ The name of the storage location to which the file should be written To transfer updates to the DXM, enter the following commands: localhost> enable localhost# tftp 10.15.1.98 dxmos_2_1.exe startup-image Are you sure? [yes/no] yes Starting TFTP transfer: #################################... File transferred successfully...Completing flash write localhost# tftp 10.15.1.98 boot_2_1.exe startup-boot Are you sure? [yes/no] yes Starting TFTP transfer: #################################... File transferred successfully...Completing flash write localhost# tftp 10.15.1.98 ccc_2_1.bit startup-gateware Are you sure? [yes/no] yes Starting TFTP transfer: #################################... File transferred successfully...Completing flash write localhost# 3.1.3 Rebooting the DXM For the DXM to load the updated software and gateware, it needs to be rebooted with the reload command. To reboot the DXM, enter the following command: localhost# reload Are you sure? [yes/no] yes Initiating warm reboot... The DXM reboots and loads the updated software and gateware. The reboot will not affect customer tracffic. 3.2 Monitoring the DXM The DXM management console show commands allow you to monitor system activity from either a disabled or enabled mode login. 3.2.1 Monitoring Hardware The show Table 3.1 interface and show environment commands display hardware information. Show Interface and Show Environment Commands Command show interfaces show interface summary XKL, LLC Description Display information about the specified interface Display a short summary of the interface information DXM Transport Terminal Manual Monitoring the DXM Command show controllers show interface ethernet n show interface client n show interface wave n show environment fan show environment power show environment temp 3.2.1.1 20 Description Displays current operational warning and alarm status for client and wave interfaces Displays Ethernet interface parameters. n identifies a specific Ethernet interface. Displays local client SFP/XFP interface parameters. n identifies a specific client interface. Displays DWDM SFP/XFP interface parameters. n identifies a specific wave interface. Displays cooling fan module parameters Displays power module parameters Displays temperatures and operational temperature ranges for various DXM components Monitoring Interfaces Several of the above commands are particularly helpful in monitoring the DXM system and interface status. The “show interface” and “show interface summary” commands display what is deemed to be the most crucial state at any given time. The “show controllers” command provides a complete list of functional condition signals. Since the DXM may be used with XFP and/or SFP module types, it is important to understand how the reports issued from these commands differ for each module type. Although the general monitoring procedures are the same, the codes and nomenclature for each module type varies. At its highest level, reports issued with the “show interface” commands indicate the current state of line status in the “Line” column of the report. A line in “Up” state is functioning properly. A line in a “fault” state indicates a problem and requires further investigation. The fault state is indicated by a code that also varies with module type. Furthermore, a fault state may be accompanied by additional information in the “Alarms” column of the report. Regardless of whether this column is populated, a fault state indicates some problem(s) and the aforementioned “show controllers” command should be issued to obtain additional diagnostic information. SFP Monitoring Issue the port. If a ed, it will The code “show interface” or “show interface summary” command to obtain a refault state is indicated and the “Alarms” column of the report is populatindicate an error code that refers to the specific issue(s) causing the fault. in this column will further be categorized as a “warning” or an “alarm.” A warning indicates that although the module may be operating, it is in a state that is close to causing issues with customer data and the cause should be investigated. A warning is indicated in a “ W” appeneded to the end of the error code. XKL, LLC DXM Transport Terminal Manual Monitoring the DXM 21 An alarm indicates that customer data loss has likely already occurred and immediate action should be taken to investigate and resolve the issue as soon as possible. An alarm is indicated in the report by an “ A” appended to the end of the error code. At this point you should issue the “show controllers” command to obtain additional diagnostic information. The list below provides an overview of the most common error codes for SFP modules. However, other issues/error codes not included in this list may occur, in which case it may be helpful to refer to the governing specifications for SFP modules. The URL at the end of table refers to the web site of the industry organization that defines this information. A comprehensive list of error codes can be found there. It may also be helpful to refer to the technical information provided by the manufacturer of the module. Table 3.2.1 SFP Reporting Codes May be a single alarm or some combination from of the following: Code TEMP VCC TXBIAS TXPOW RXPOW _HI _LO W (appended to code) A (appended to code) Description Temperature Power supply voltage Transmitter laser-bias current Transmitter power Receiver power High warning Low warning Warning Alarm The latest draft of the SFP specification can be found at the following URL as specification 8472: http://www.sffcommittee.com/ XFP Monitoring Issue the “show interface” or “show interface summary” command to obtain a report. If a fault state is indicated and the “Alarms” column of the report is populated, it will refer to one of four error general error codes: Fault, Nt_Rdy, Warning, or Alarm. A fault indicates the module is in one of several fault states that is keeping either Recieve (Rx) or Transmit (Tx) from functioning properly. It also indicates that the data path is likely not fully operational. In practice, this may be the result of the low signal power on the transmitter (due to manual or automatic laser shutdown) or actual module malfunction. Nt_Rdy indicates that the module is in a “not ready” state, which implies one or more of the following issues: receiver LOL, transmitter LOL, or TX-fault. Other signals deemed valuable to detecting fault may be reflected in this alarm value. XKL, LLC DXM Transport Terminal Manual Monitoring the DXM 22 A warning indicates that although the module may be operating, it is in a state that is close to causing issues with customer data and the cause should be investigated. An alarm indicate that customer data loss has likely already occurred and immediate action should be taken to investigate and resolve the issue as soon as possible. At this point you should issue the “show controllers” command to obtain additional diagnostic information. With XFP modules, the error codes that indicate the specific issue(s) can be found in this report. The list below provides an overview of the most common error codes for XFP modules. However, other issues/error codes not included in this list may occur, in which case it may be helpful to refer to the governing specifications for XFP modules. The URL at the end of table refers to the web site of the industry organization that defines this information. A comprehensive list of error codes can be found there. It may also be helpful to refer to the technical information provided by the manufacturer of the module. XFP Reporting Codes May be a single alarm or some combination from of the following: Code Supply Voltage/Current VCC/VEE Laser Temperature Laser Wavelength TF LOS RX_LOL / TX_LOL Description Measured voltage/current of the module Power supply voltage alarm/warning A higher resolution temperature value The specific wavelength of the laser Transmitter fault Loss of signal Receiver loss of lock / Transmitter loss of lock The latest draft of the XFP specification can be found at: http://xfpmsa.org Table 3.1.2 Monitoring Temperature The show environment temp command displays a series of temperature thresholds for various components in the DXM, as well as the current temperature reported by each component. The temperature thresholds define the safe operating range of each component. Table 3.2.3 Temperature Thresholds Threshold Low Alarm Low Warning High Warning XKL, LLC Description Temperature of the component has dropped to a level that is likely to damage to component. Temperature of the component is falling toward levels that may damage the component. Temperature of the component is rising toward levels that may damage the component. DXM Transport Terminal Manual Monitoring the DXM Threshold High Alarm Critical 23 Description Temperature of the component has risen to a level that is likely to damage the component. Temperature of the component has exceeded safe levels. The DXM should be shut down immediately. The Low Warning and High Warning thresholds indicate that temperatures are moving toward levels that may cause damage to a component, but they have not yet exceeded safe levels. Warnings indicate that there might be a problem with the component and that you should monitor it closely. The Low Alarm and High Alarm thresholds indicate that temperatures have exceeded regular operational parameters for that component, and continued operation at that temperature is likely to damage the component. If the component is a replaceable part, such as a pluggable optical transceiver (SFP or XFP), fan module, or power module, turning the component off is recommended to prevent further damage. The component may need to be replaced. The Critical threshold indicates that the component is probably already damaged and will be shut off immediately to prevent possible damage to other DXM components. In addition to the temperature sensors provided by individual components of the DXM, there is a shutdown sensor embedded in the DXM circuit board. If the shutdown sensor reaches 70° C, the DXM will automatically power off, disrupting switch board traffic. The DXM will not be able to power on again until the sensor cools to less than 67° C. 3.2.2 Logging to Syslog The DXM can send logging information to a Syslog server. To log messages to a Syslog server, enter the following commands: localhost# configure localhost CONF# logging host ip.address.of.syslog.server localhost CONF# exit localhost# write memory Are you sure? [yes/no] yes localhost# To send periodic heartbeat “MARK” messages to a syslog collector, enter the following commands: localhost# configure localhost CONF# logging mark mark-interval-in-minutes localhost CONF# exit localhost# write memory Are you sure? [yes/no] yes localhost# When “MARK” is enabled, a line similar to the following appears in the syslog server logs at the specified interval: Oct 31 17:54:20 10.15.1.153 localhost (Uptime: 0:01:38:36) -- DXM MARK -- XKL, LLC DXM Transport Terminal Manual 3.2.3 Monitoring the DXM 24 Configuring the Circular Log Buffer The DXM can store log messages in a volatile circular buffer on the DXM itself. A circular buffer, when it becomes full, continues recording by overwriting the oldest messages. Once filled, it will always contain the /buffer-size-in-messages/ most recent log messages. To enable the circular log buffer, enter the following commands: localhost# configure localhost CONF# logging buffer buffer-size-in-messages localhost CONF# exit localhost# write memory Are you sure? [yes/no] yes localhost# To view the contents of the log buffer, enter the following command: localhost# show log 0:01:45:15: Authentication Success 10.15.1.98 0:01:46:17: Authentication Failure 10.15.1.98 0:01:46:22: Authentication Success 10.15.1.98 “MARK” messages do not appear in the circular log buffer. 3.2.4 Monitoring with SNMP The DXM can be monitored with Simple Network Management Protocol (SNMP). To start a read-only SNMP server on the DXM, enter the following commands: localhost> enable localhost# configure localhost CONF# snmp-server community community-string SNMP server starting localhost CONF# exit localhost# write memory Are you sure? [yes/no] yes localhost# To enable SNMP traps and send them to a monitoring system, enter the following commands: localhost> enable localhost# configure localhost CONF# snmp-server enable traps localhost CONF# snmp-server host monitoring-system-ip-address localhost CONF# exit localhost# write memory Are you sure? [yes/no] yes localhost# 3.2.5 Detecting Errors Error detection at optical frequencies on the DXM is limited to the physical layer of the network stack. The DXM relies on signal integrity indicators from the SFP/XFP modules and Clock and Data Recovery (CDR) circuitry on the switch board. The most common indicators used to monitor the integrity of incoming optical data streams, in XKL, LLC DXM Transport Terminal Manual Monitoring the DXM 25 order of precedence, are: ♦♦ Loss of Signal (LOS) – The optical power of a receive-direction optical signal is reported by the SFP/XFP module receiver. When incoming signal levels fall beneath the module’s receiver direction sensitivity threshold, the DXM reports LOS against the interface. LOS masks Loss of Lock (LOL) and Loss of Activity (LOA). ♦♦ Loss of Lock (LOL) – The CDR circuitry is normally locked on the encapsulation or clock frequency assigned to the transport interface. When the CDR circuitry fails to lock on the signal, the DXM may report LOL against the interface. LOL can occur on an interface’s receive or transmit direction. LOL masks LOA on SFPs. ♦♦ Loss-of-Activity (LOA) – (Available only on SFP modules.) A functioning optical link normally exhibits a continuous stream of bit transitions (0-1 and 1-0). The DXM expects the distribution of 1s and 0s to be roughly 50 percent each. When the distribution is skewed outside the range of 62.5 and 37.5 percent in either direction, the DXM may report LOA against the interface. XKL recommends use of LOA detection only on interfaces encapsulated with SONET protocols to generate early warnings of optical link problems. Enabling LOA may introduce end-to-end signal integrity problems. Use the show interface command to view the line status of transport interfaces and detect other fault conditions that can interfere with data integrity. 3.2.6 Forwarding Errors The DXM uses LOL forwarding to forward errors and accomplish the following: ♦♦ Protect DXM wave transmitters and receivers from variations in power levels caused by noisy signals or when end-to-end connections do not originate from valid client interface signals. ♦♦ Facilitate consistent DXM module error states when an interface detects an upstream signal integrity problem. ♦♦ Facilitate consistent signal integrity error detection by client-connected systems when upstream signal integrity problems are detected. When LOL forwarding is enabled, signal integrity errors detected by the optical receiver or receiver CDR circuitry cause one of two error forwarding mechanisms to be invoked: ♦♦ For interfaces with virtualight enabled, LOL forwarding disables the downstream switch-connected interface transmitter whenever any signal integrity error is detected upstream. ♦♦ For interfaces with virtualight disabled, LOL forwarding sends a signal to the downstream switch-connected interface when a signal integrity error is detected upstream. The error forwarding signal stabilizes transmitter power levels, avoiding damage to DWDM transmitters/receivers. The signal integrity error is detected XKL, LLC DXM Transport Terminal Manual Setting Up the EDFA 26 consistently further downstream. The error forwarding state of an interface is displayed by the show interface command. For interfaces not connected to another interface on the switch board, the show interface command may report “generating PRBS” or “transmitter disabled by virtualight.” Use the lol-forward, loa-detection, and virtualight commands, available in DXM configuration mode, to configure transport interface error forwarding and control. 3.3 Setting Up the EDFA The DXM supports an Erbium-Doped Fiber Amplifier (EDFA) as an optional part of the system configuration. This section explains how to manage and set up the EDFA. See Section 5.5.6 for complete reference to the DXMOS commands that control EDFA operation. WARNING: EDFAs can produce high-energy signals that pose a risk to human eyesight. Also, if improperly configured, an EDFA can damage optical receivers, both within the EDFA-equipped system and in remote systems connected to the EDFA-equipped system. Output power of the EDFA is turned off when the DXM is powered up. The EDFA ships with the following configuration defaults set: ♦♦ shutdown To set up the amplifier for use, enter the following commands: localhost> enable localhost# configure localhost CONF# edfa 0 localhost CONF-EDFA [0] no shutdown localhost CONF-EDFA [0] end localhost# write memory Are you sure? [yes/no] yes localhost# For more information about managing the EDFA, refer to the EDFA commands in the Chapter 5 Command Reference. 3.4 Setting Up the Raman Bring-up can be performed automatically by enabling the auto-startup feature or manually in a two-step process. 3.4.1 Automatic Bring-Up Once the installation of the system has been performed and all fibers are appropriately attatched, type the following in the Raman amplifier’s configuration mode: localhost CONF-RAMAN[0]# no shutdown localhost CONF-RAMAN[0]# auto-startup If the optical environment is within specification, then the Raman’s amplification should come up with a set point of “Maximum:” XKL, LLC DXM Transport Terminal Manual Setting Up the Raman 27 localhost CONF-RAMAN[0]# do sho raman 0 raman 0 Module is administratively up, amplification is up Module identification data: Manufacturer: RED-C Module Function Type: Raman Software Version: 201.3 (Jan 11 2009 10:49:53) Module operational data: Control mode is automatic maximum pump power Setpoint is Maximum Control optimized for SMF (G.652) fiber Status and alarms: No alarms detected Input Optical Power: -7.0 dBm Output Optical Power: 26.7 dBm OSC based APR is enabled Measured OSC Input Power: -16.5 dBm Case temperature is 20.2C Pump laser: Pump1 State: enabled Pump2 State: enabled Pump1 Current: 118.8 mA Pump2 Current: 66.7 mA Pump1 Power: 24.7 dBm Pump2 Power: 22.4 dBm Back Reflection Ratio: -33.0 dB Pump1 Temperature: 25.1 C Pump2 Temperature: 24.9 C Pin Alarms: common If amplification was not brought online, the reason should be reflected under the “status and alarms” subsection of show raman output. Do not forget to write memory once amplification is operational. WARNING: It is possible to damage connectors if the amplifier is left in auto-startup mode for prolonged periods if the connectors are not properly cleaned. 3.4.2 Manual Bring-Up Step 1 Once the installation of the system has been performed and all fibers are appropriately attatched, type the following in the Raman amplifier’s configuration mode: localhost CONF-RAMAN[0]# no shutdown localhost CONF-RAMAN[0]# control pump power 50.0 If the optical environment of the installation meets the defined specification, then the show raman command for the amplifier in question should show amplification “up” and a control set point of 50.0 mW for both pump lasers: raman 0 Module is administratively up, amplification is up Module identification data: XKL, LLC DXM Transport Terminal Manual Setting Up the Raman 28 Manufacturer: RED-C Module Function Type: Raman Software Version: 201.3 (Jan 11 2009 10:49:53) Module operational data: Control mode is manual pump power Setpoint is Pump1: 50.0 mW, Pump2: 50.0 mW Control optimized for SMF (G.652) fiber Status and alarms: No alarms detected Input Optical Power: -15.2 dBm Output Optical Power: 20.1 dBm OSC based APR is enabled Measured OSC Input Power: -21.6 dBm Case temperature is 24.2C Pump laser: Pump1 State: enabled Pump2 State: enabled Pump1 Current: 19.2 mA Pump2 Current: 20.9 mA Pump1 Power: 18.1 dBm Pump2 Power: 18.0 dBm Back Reflection Ratio: -31.1 dB Pump1 Temperature: 25.1 C Pump2 Temperature: 25.0 C Pin Alarms: common If amplification not brought online. The reason should be reflected under the “Status and alarms:”, section of the show raman output. If any errors in the optical environment exist attempt to resolve them and retype the control pump power 50.0 command. Repeat until amplification comes up at this power level, after which type the following: Step 2 localhost CONF-RAMAN[0]# control pump power maximum After issuing this command, amplification should be “up” and a set point of “Maximum” should be reflected in the show raman command. raman 0 Module is administratively up, amplification is up Module identification data: Manufacturer: RED-C Module Function Type: Raman Software Version: 201.3 (Jan 11 2009 10:49:53) Module operational data: Control mode is automatic maximum pump power Setpoint is Maximum Control optimized for SMF (G.652) fiber Status and alarms: No alarms detected Input Optical Power: -7.2 dBm Output Optical Power: 26.7 dBm OSC based APR is enabled Measured OSC Input Power: -16.5 dBm Case temperature is 22.9C Pump laser: XKL, LLC DXM Transport Terminal Manual Setting Up the Raman 29 Pump1 State: enabled Pump2 State: enabled Pump1 Current: 115.8 mA Pump2 Current: 66.7 mA Pump1 Power: 24.7 dBm Pump2 Power: 22.4 dBm Back Reflection Ratio: -33.0 dB Pump1 Temperature: 25.1 C Pump2 Temperature: 24.9 C Pin Alarms: common Any issues related to bringing the amplification “up” will be reflected in the “status and alarms” section of the output. In the event that there are issues, attempt to resolve them and then start over at step 1. XKL, LLC DXM Transport Terminal Manual 4 Operating the Command Line Interface The DXM is controlled through a command line interface (CLI) to the DXMOS operating system. This chapter explains how to use the CLI, and Chapter 5 provides a complete reference to all DXMOS commands. 4.1 Getting Help The commands that are available at the command line prompt depend on the current operating mode of the DXM. Disabled mode has fewer commands available than enabled mode, and specialized command modes, such as configure, provide access to even more commands. The DXM prompt changes to reflect the current command mode. To see a list of all commands available at each level of the CLI, enter a question mark (?) at the prompt. It is not necessary to press enter after the question mark; the DXM displays the values allowed for the currently displayed command as soon as you type the question mark. Commands are not executed until you press enter . To cancel the command and clear the command line, press ctrl + C . For example, here is the output from a disabled mode help command: localhost> show interfaces ? Interface Type, one of the following: client ethernet loopback osc wave summary <cr> localhost> show interfaces ethernet ?interface number, (decimal number) localhost> show interfaces ethernet 0 Ethernet 0 is up, line protocol is up, Internet address is 10.15.1.116/24 Hardware is 10/100 Ethernet, address is 00:A0:E3:00:01:B9 Full Duplex mode, link type is 100Mbps (Auto-Negotiated) Last State Change: 0:07:28:20 ago 9726 packets input, 1130590 bytes 0 no receive buffer, 0 CRC error, 0 overrun 0 no transmit buffer 5557 packets output, 615578 bytes 0 collisions, 0 late collisions, 0 deferred, 0 lost carrier, 0 no carrier localhost> Abbreviating Commands 31 Whenever you request help for a DXM command, the CLI remembers and redisplays the relevant part of the command line so you can add options without retyping the command. localhost# write ? one of the following: erase memory terminal localhost# write memory ? Config Name, one of the following: backup1-config backup2-config startup-config <cr> localhost# write memory ctrl + C localhost# If you enter an incorrect command, the system displays an error message: localhost# write ers Command Incomplete/Unrecognized at line 4761 localhost# write erase ? config localhost# write erase ctrl + C localhost# 4.2 Abbreviating Commands You can abbreviate everything on a command line as long as the abbreviation is unique in the current mode. For example, show connections can be shortened on to sh conn. It cannot be abbreviated to s con because there are multiple completions for both “s” and “con.” As another example, the following two command lines are equivalent and produce the same output: localhost# show interfaces ethernet 0 localhost# sh in e 0 4.3 Editing the Command Line The DXM command line recognizes the following special characters: Table 4.1 Command Line Keyboard Shortcuts Character ctrl + A ctrl + B ctrl + C ctrl + F ctrl + D ctrl + L XKL, LLC Description Go to the beginning of a line. Go back one character. Cancels input currently on the command line Go forward one character. Delete current character. Go to the end of a line. DXM Transport Terminal Manual Command Modes Character , ctrl + P , ctrl + N ctrl + R ctrl + Z tab 4.4 32 Description Scrolls forward through command history Scrolls backward through command history Redraws the current command input. This command is useful for restoring what you have already typed if the DXM writes output to the screen while you are entering a command. Discards the current command line and exits configure mode. This is equivalent to typing end at a configure mode prompt. Completes a partially-entered unique keyword. If there is more than one possible completion, tab displays a list of the possibilities. Command Modes When you first connect to the DXM Transport Terminal, the command line is in disabled mode. Some Some informational commands are available, such as show, but configuration can only take place in enabled mode. 4.4.1 Disabled Mode Commands The following commands are available in disabled mode:at the mode has changed. disable enable exit logout ping show version 4.4.2 Changing Command Modes To enter enabled mode, use the enable command. If a password is set for enabled mode, you are prompted to enter it. Type the password, which is not displayed, and press enter . If no password is set, the system immediately enters enabled mode. In either case, the end of the prompt changes from > to # to indicate that the mode has changed. localhost> enable Password: < > localhost# 4.4.3 Enabled Mode Commands The following commands are available in enabled mode: clear clock configure copy debug disable enable XKL, LLC DXM Transport Terminal Manual Command Modes 33 exit logout no ping reload set show tftp undebug version write XKL, LLC DXM Transport Terminal Manual 5 Command Line Interface Reference This chapter contains an alphabetical listing of the commands available in the DXMOS command line interface (CLI). 5.1 Format of This Reference Each command description uses the format shown below: Name of the command Summary of what the command does Context in which the command is available. This matches the prompt in the DXM command line. 5.20.4.1 laser shutdown CONF-INT-CLIENT/WAVE# Powers down a wave or client interface laser [ no ] laser shutdown Parameter laser shutdown no laser shutdown Description Shut down the laser. Bring the laser back online. Powering lasers down is appropriate to change SFPs or XFPs, to change fiber cabling, or to extend the useful lifetime of an SFP or XFP. Command syntax Detailed description of the command’s parameters Extended command description 5.1.1 Format of This Reference 35 Syntax Shortcuts To prevent syntax blocks from becoming hard to follow, this reference shortens some often-repeated syntax segments. When you use a command, expand the shortcut in its syntax reference to include the relevant options. 5.1.1.1 <edfa-identifier> Expands to: { east | west } edfa-number 5.1.1.2 <ethernet-identifier> Expands to: { ethernet | loopback | osc } interface-number 5.1.1.3 <transport-identifier> On non-redundant systems (see Section 5.15, set split-trunk no), expands to: { client | wave } interface-number On DXM 5R systems (see Section 5.15, set split-trunk yes), expands to: { client | wave { east | west} } interface-number 5.1.1.4 <interface-identifier> On non-redundant systems (see Section 5.15, set split-trunk no), expands to: { <ethernet-identifier> | <transport-identifier> } interface-number On DXM 5R systems (see Section 5.15, set split-trunk yes), expands to: { client | ethernet | loopback | osc | wave { east | west } } interface_ number 5.1.1.5 <encapsulation type> On 3G lines, expands to: { copper | fastethernet | fddi | fibrechannel { 1g | 2g } | gigabitethernet | sonet { oc12 | oc3 | oc48 | stm1 | stm16 | stm4 } } On 10G lines, expands to: { 10gigabitethernet | 10gigabitethernet fec | fibrechannel 10g | sonet oc192 XKL, LLC DXM Transport Terminal Manual High-Level Command Summaries 36 | sonet oc192 fec } 5.1.1.6 <storage-location-boot> Expands to: { startup-boot | factory-boot | backup1-boot } NOTE: The copy command may copy from any factory-* storage location. However, none of the factory-* locations are valid destinations for the copy or tftp commands. 5.1.1.7 <storage-location-config> Expands to: { backup1-config | backup2-config | factory-config | startup-config } 5.1.1.8 <storage-location-gateware> Expands to: { factory-gateware | startup-gateware } 5.1.1.9 <storage-location-image> Expands to: { backup1-image | backup2-image | factory-image | startup-image } 5.1.1.10 <storage-location> Expands to: { <storage-location-boot> | <storage-location-config> | <storage‑location‑gateware> | <storage-location-image> } This shortcut is a combination of all four storage-location shortcuts. 5.2 High-Level Command Summaries Table 5.1 summarizes the commands available in disabled mode, Table 5.2 summarizes the enabled mode commands, and Table 5.3 summarizes the configuration mode commands. All of the commands and their options are listed alphabetically in the sections following the tables. Table 5.1 Disabled Mode Command Summary Command disable XKL, LLC Description No-op when DXM is in disabled mode DXM Transport Terminal Manual High-Level Command Summaries Command Description Enters enabled mode Logs out when issued from console configured with password protection; logs out and disconnects when issued from telnet or SSH session Disconnects from the DXM Sends test packets to a specific address Displays configuration and other system information Displays version information about the DXM enable exit logout ping show version Table 5.2 Enabled Mode Command Summary Command clear clock configure copy debug disable enable exit logout no ping reload set show tftp undebug version write Table 5.3 37 Description Clears some aspect of the DXM software or a hardware component state Sets time and date of the DXM system clock Places the DXM in configuration mode Copies configuration, software images, and gateware images between storage locations Enables diagnostic debugging output Exits enabled mode No-op when DXM is in enabled mode Returns to disabled mode when issued from console configured without password protection; logs out when issued from console configured with password protection; logs out and disconnects when issued from telnet or SSH session Disconnects from the DXM Reverses the action of the specified command Sends test packets to a specified address Reloads the DXM software and gateware Sets values for DXM system functions Displays configuration and other information Updates DXM software, gateware, and configuration from an external server Stops diagnostic debugging output Displays version information about the DXM Writes configuration information to storage or an external server Configure Mode Command Summary Command access-list XKL, LLC Description Defines an IP access control list DXM Transport Terminal Manual clear Command app boot clock connect do edfa enable secret end exit fan hostname interface ip line logging no router snmp-server sntp user watchdog-timeout 5.3 38 Description Configures automatic path protection (APP) Selects a boot image from a tftp or flash memory location Configures time zone and Daylight Saving Time Connects a transport interface to a second interface Execute top level commands described in Table 5.1 and Table 5.2 without leaving configuration mode Places the DXM in EDFA configuration mode (only available on DXM models with an EDFA) Sets password for enabled mode Exits configuration mode and returns to top level Exits configuration mode and returns to top level Places the DXM in fan configuration mode Sets the hostname for the DXM Places the DXM in interface configuration mode Configures IP settings for the DXM Places the DXM in line configuration mode Configures logging of events to the local event log and the syslog service Reverses the action of the specified command Sets a router configuration Configures SNMP settings Configures an SNTP server for setting the system clock Creates a user account for logging in to the DXM Configures the length of the system watchdog timeout clear # Clears some aspect of the DXM software clear Typically, this command resets a software subsystem or counters. 5.3.1 clear app # Resets automatic path protection (APP) groups to their default state and resets all APP counters clear app NOTE: The clear app command may cause some packet loss from interrupted operation during possible resource transitions. XKL, LLC DXM Transport Terminal Manual 5.3.2 clock clear counters 39 # Clears interface counters clear counters [ interface <interface-identifier> ] Parameter Description Clear the counters for the specified interface. <interface-identifier> Without arguments, clear mand. 5.3.3 counters clears all counters displayed by the show interface com- clear interface # Clears the hardware logic on an interface clear interface <interface-identifier> Parameter <interface-identifier> The clear 5.3.4 Description Clear the hardware logic for the specified interface. interface command may temporarily interrupt interface operation. clear line # Logs out a session on any arbitrary line clear line line-number A line-number value of 0 is the console, and values 1 through 4 are the VTY lines. Use the show lines command to see which lines are currently connected (see Section 5.16.17). NOTE: The clear line n command will terminate the present session when n names the line to which this session is connected. 5.3.5 clear logging # Clears the DXM event log buffer clear logging 5.4 clock # Sets time and date of the DXM system clock clock { set hh:mm:ss day month year | XKL, LLC DXM Transport Terminal Manual configure 40 read-calendar | update-calendar } Parameter set hh:mm:ss day month year read-calendar update-calendar 5.5 Description Set the time for the system clock. Copy the time from the calendar chip to the system clock. Copy the time from the system clock to the calendar chip. configure # Places the DXM into global configuration mode configure Changes made in enabled mode affect how the DXM is operating right now. Changes made in configure mode are intended to be more permanent, and may be saved in non-volatile storage using the write memory and write network commands. 5.5.1 aaa new-model CONF# Enables or disables authentication, authorization, and accounting (AAA) feature globally [ no ] aaa new-model Parameter aaa new-model [ no ] aaa new-model 5.5.2 Description Enables AAA functionality. Disables AAA functionality. aaa accounting CONF# Enables or disables AAA accounting for session start/stops [no] aaa accounting exec default start-stop group radius Parameter aaa accounting [ no ] aaa accounting exec default start-stop group radius XKL, LLC Description Enables AAA accounting for session start/stops. Disables AAA accounting for session start/stops. Specifies accounting type. Specifies name of method list. Specifies type of record to account. Specifies group radius is used for authentication. DXM Transport Terminal Manual 5.5.3 configure aaa authentication 41 CONF# Enables or disables AAA authentication [ no ] aaa authentication { login | enable } default { enable | line | local | none | group radius } Parameter aaa authentication [ no ] aaa authentication login enable default enable line local none group radius Description Enable AAA functionality. Disable AAA functionality. Specifies rules list used for login. Specifies rules list used to enable privilege. Specifies name of the method list. Specifies use of enable password. Specifies use of line-specific password. Specifies use of local user database. Specifies no authorization is required. Specifies use of radius server group. NOTE: At least one of the parameters following default must be used. Using more than one parameter may be used as failover: { enable | line | local | none | group radius } . 5.5.4 access-list CONF# Defines an IP Access Control List (ACL) rule for filtering management network traffic [ no ] access-list list-number { deny | permit } ip mask Parameter acess-list [ no ] acess-list list-number { deny | permit } ip mask 5.5.5 Description Enable access list Disable access list Assign a number to identify the access list rule. Use permit to allow traffic that matches this rule. Use deny to prevent traffic that matches this rule. Specify IP or network address to match. Specify IP wildcard mask to match. app CONF# Configures automatic path protection (APP) [ no ] app { <transport-identifier1> <transport-identifier2> | lockout <transport-identifier> | XKL, LLC DXM Transport Terminal Manual 42 configure revertive <transport-identifier> [ holdoff reversion-holdoff ] | switch <transport-identifier1> <transport-identifier2> [ force ] } Without any options specified, the app command creates an APP group. [ no ] app <transport-identifier1> <transport-identifier2> Parameter <transport-identifier1> <transport-identifier2> no app <transport‑identifier1> <transport‑identifier2> 5.5.5.1 Description Specify the working interface. Specify the protected interface. Remove the protection group that contains <transportidentifier1>. app lockout CONF# Locks an automatic path protection (APP) group so it does not switch interfaces, effectively disabling switching but not data multicasting [ no ] app lockout <transport-identifier> Parameter lockout <transport‑identifier> no lockout <transport‑identifier> Description Specify by interface the APP group to lock. Specify by interface the APP group to release from lockout. NOTE: A locked APP group may still switch interfaces through the app switch force command. 5.5.5.2 app revertive CONF# Configures an automatic path protection (APP) group to be revertive [ no ] app revertive <transport-identifier> [ holdoff reversion-holdoff ] Parameter <transport-identifier> [ holdoff reversion‑holdoff ] no app revertive <transport‑identifier> Description Make the APP group containing the specified transport revertive. Optionally specify a time, in milliseconds, for the given interface to wait before reverting. Make the APP group containing the specified transport non-revertive. A revertive APP group uses the working interface any time that interface is functioning normally. APP groups are revertive by default. XKL, LLC DXM Transport Terminal Manual 43 configure Optionally, a hold-off time can be specified, which is the amount of time between when the working interface comes up and the APP group reverts to using the working interface. A non-revertive APP group switches interfaces only when the currently used interface goes down. It has no preference for the working interface. 5.5.5.3 app switch CONF# Switches an automatic path protection (APP) group to a particular interface within the group app switch <transport-identifier1> <transport-identifier2> [ force ] Parameter <transport-identifier1> <transport-identifier2> [ force ] 5.5.6 Description Specify by interface the APP group to switch. Specify the target interface. Optionally overrides a locked APP group. boot CONF# Selects a boot image from a flash memory or tftp location [ no ] boot { flash <storage-location-image> | tftp ip-address filename } Parameter flash <storage‑location‑image> tftp ip-address filename no boot boot-target Description Set the DXM to boot from an image in flash memory. Set the DXM to boot from filename located at ip‑address. Remove the specified boot target. Boot settings must be saved in startup-config in order to take effect during subsequent reloads. If multiple boot locations are specified, the DXM tries them in the order in which they are specified. Setting multiple boot locations provides a fallback in case the boot image in one location is missing or damaged. The DXM stores up to 5 separate boot command entries in <storagelocation-config>. 5.5.7 boot host dhcp CONF# Directs Boot to acquire a configuration file via remote DHCP/TFTP server(s) [ no ] boot host dhcp [ <client-id interface> ] where <client-id interface> expands to: { ethernet 0 | ethernet 1 | ethernet 2 | ethernet 3 | osc 0 | osc 1 } XKL, LLC DXM Transport Terminal Manual 44 configure Parameter boot host dhcp [ no ] boot host dhcp [ <client-id interface> ] Description Enable boot host dhcp Disable boot host dhcp Optionally, set an active or inactive Ethernet interface MAC address as client identifier for DHCP discovery. Boot then broadcasts discovery from each active interface. If <client-id interface> is omitted, Boot broadcasts DHCP discovery from each active interface and in each instance the client identifier will be the MAC address of the interface from which discovery is broadcast. Upon powering up or reloading the DXM, DHCP configuration is initiated when a boot host dhcp command is found or when no startup-config file is present in the flash memory. In either case, Boot persistently broadcasts DHCP discovery messages on each active Ethernet interface for 2 minutes. If Boot receives no DHCP offer after 2 minutes, Boot will time out and proceed to load DXMOS (DXM Operating Software) without a configuration. If a DHCP offer is received that includes a boot file name and TFTP server identifier, Boot requests the IP address offered and assigns it to the Ethernet interface through which the offer was received. Next, Boot acquires the configuration file from the TFTP server as indicated in the DHCP offer. Upon successfully acquiring a configuration file, Boot loads DXMOS with the configuration. Be aware that the remainder of the startup-config will not be proceessed. Please note that the discovery packet will prepend “01:” to the MAC address used as a client identifier. The same syntax must also be used in the corresponding DHCP server configuration file. The inclusion or omission of the <client-id interface> in this command should correspond to the client identifier information in the DHCP server configuration file. Refer to the DHCP Server Configuration Appendix to ensure the correct information is included in this file. 5.5.8 clock CONF# Sets timezone and Daylight Saving Time (DST) behavior of the DXM system clock clock { timezone hours-offset minutes-offset | summer-time { on | off | usa | eu } } Parameter timezone hours-offset minutes-offset XKL, LLC Description Set the timezone for the system clock to hours-offset and minutes-offset from UTC. Most timezones have a minutes-offset of 0. DXM Transport Terminal Manual 45 configure Parameter summer-time { on | off | usa | eu } Description Alter Daylight Saving Time (DST) setting. ♦♦ on displays time with a forward offset of one hour from the system clock time. ♦♦ off displays system clock time without any adjustments. ♦♦ usa applies DST rules for the United States. ♦♦ eu applies DST rules for the European Union. NOTE: Time zones west of Greenwich time have a negative offset. 5.5.9 connect CONF# Connects a transport interface to a second interface [ no ] connect <transport-identifier1> <transport-identifier2> [ clock rate | encapsulation <encapsulation-type> ] Parameter <transport-identifier1> <transport-identifier2> clock rate encapsulation <encapsulation‑type> no connect <transport‑identifier1> <transport‑identifier2> Description Specify the first interface for the connection. Specify the second interface for the connection. Optionally specify clock rate in the rate argument. Valid values are in the range 42000–3200000kHz. Clock rate may be set only on SFP client and wave interfaces, available on the DXM3 and DXMh models. Optionally specify a named encapsulation value, which sets the clock rate according to a specific network standard. Disconnect two interfaces. 3G interfaces may be connected to any other 3G interface, including themselves. 10G interfaces allow only client-to-wave connections. 3G interfaces cannot be connected to 10G interfaces. 5.5.10 do CONF# Executes top-level commands do { command } Parameter command Description Specify the command to execute. Use the do command to execute the top-level commands described in Table 5.1 and Table 5.2 XKL, LLC DXM Transport Terminal Manual configure 46 without leaving configuration mode. 5.5.11 edfa CONF# Places the DXM in Erbium-Doped Fiber Amplifier (EDFA) configuration mode edfa <edfa-identifier> edfa-number Parameter <edfa-identifier> edfa-number Description Identifies the EDFA amplifier. Specify which EDFA to configure. NOTE: The edfa command is available only on DXM systems with an EDFA installed. 5.5.11.1 control output gain CONF-EDFA# Specifies target output gain as a set point for controlling amplifier control output gain <dB (x.y)> Parameter <dB (x.y)> Description Set control point in dB NOTE: Only one EDFA control command/method (output gain, output power, or pump current) may be employed at any given time. Therefore, when you issue any EDFA control command, it becomes the de facto set point for amplifier control and invalidates previously issued control commands. 5.5.11.2 control output power CONF-EDFA# Specifies target output power as a set point for controlling amplifier control output power <dBm (x.y)> Parameter <dBm (x.y)> Description Set control point in dBm. NOTE: Only one EDFA control command/method (output gain, output power, or pump current) may be employed at any given time. Therefore, when you issue any EDFA control command, it becomes the de facto set point for amplifier control and invalidates previously issued control commands. 5.5.11.3 control pump current CONF-EDFA# Specifies target laser-bias current as a set point for controlling amplifier XKL, LLC DXM Transport Terminal Manual configure 47 control pump current <current in mA (x.y)> Parameter <current in mA (x.y)> Description Set control point in mA. NOTE: Only one EDFA control command/method (output gain, output power, or pump current) may be employed at any given time. Therefore, when you issue any EDFA control command, it becomes the de facto set point for amplifier control and invalidates previously issued control commands. 5.5.11.4 disable CONF-EDFA# Enables or disables EDFA output. [ no ] disable Parameter disable no disable ! Description Disable EDFA output. This is the default. Enable EDFA output. CAUTION: This command will be deprecated in future versions of the software. The shutdown command will replace it. 5.5.11.5 do CONF-EDFA# Executes top-level commands without leaving EDFA configuration mode do { command } Parameter command Description Specify the command to execute. Use the do command to execute the top-level commands described in Table 5.1 and Table 5.2 without leaving EDFA configuration mode. 5.5.11.6 end CONF-EDFA# Exits configuration mode and returns to the top level of the command line end Typing ctrl + Z has the same effect and discards the current command line. XKL, LLC DXM Transport Terminal Manual 48 configure 5.5.11.7 exit CONF-EDFA# Exits EDFA configuration submode and returns to configuration mode exit 5.5.11.8 send CONF-EDFA# Sends direct text commands to the EDFA as a debugging tool send <text to send to the edfa > Parameter <text to send to the edfa> Description Specify the EDFA command to send. Commands are dependent on the model of EDFA device installed in the DXM. Except in rare circumstances, there should be no need to make changes directly to EDFA settings. ! CAUTION: Be aware that it is possible to reboot the DXM with this command, which can interrupt data traffic. ! CAUTION: This feature will be available only in initial versions of this software. It will not be available in future versions. 5.5.11.9 shutdown CONF-EDFA# Enables or disables the amplifier [ no ] shutdown Parameter shutdown no shutdown Description Disables the amplifier Enables the amplifier 5.5.12 enable secret CONF# Sets password to control access to the DXM CLI enabled mode [ no ] enable secret [ 0 | 5 ] password Parameter password enable secret 5 password XKL, LLC Description Set the password for enabled mode to password. The DXM automatically encrypts a plaintext password as an MD5 hash before storing it. Specify password as an MD5 hash. DXM Transport Terminal Manual configure Parameter enable secret 0 password no enable secret ! 49 Description Specify plaintext password. This command is equivalent to enable secret password. Turns off password protection for enabled mode. CAUTION: A fiber type must be specified before osc-detection can be disabled. It’s only useful to disable APR osc-detction in the case that a Raman amplifier is sufficiently far away from a remote DXM signal it’s amplifying that it cannot detect the DXM’s OSC. This is a marginal case.and, the only way to clear the enabled mode password without entering enable mode is to reload the DXM in factory default mode by pressing and holding the side reset button. Reloading in factory default mode disrupts network traffic across all transport interfaces. 5.5.13 end CONF# Exits configuration mode and returns to the top level of the command line end Typing ctrl + Z has the same effect and discards the current command line. 5.5.14 exit CONF# Exits configuration mode and returns to the top level of the command line exit 5.5.15 fan CONF# Places the DXM in fan configuration mode fan fan-module-number Parameter fan-module-number Description Identify the fan module that is to be configured. The DXM ships with two fan modules, numbered 0 and 2. Fan module 1 is intentionally absent. 5.5.15.1 do CONF-FAN# Executes top-level commands do { command } Parameter command XKL, LLC Description Specify the command to execute. DXM Transport Terminal Manual configure 50 Use the do command to execute the top-level commands described in Table 5.1 and Table 5.2 without leaving configuration mode. 5.5.15.2 end CONF-FAN# Exits configuration mode and returns to the top level of the command line end Typing ctrl + Z has the same effect and discards the current command line. 5.5.15.3 exit CONF-FAN# Exits fan configuration submode and returns to configuration mode exit 5.5.15.4 reset CONF-FAN# Resets the fan module reset The reset command resets the logic board for the fan module without affecting its settings. Use reset on a fan that has become stuck or unresponsive. 5.5.15.5 speed CONF-FAN# Sets fan speed speed { auto | off | low | med | high | percentage } Parameter auto off low med high percentage Description Set the fans to automatically adjust their speed. This setting is the default. Turn the fans off. Set the fans to the lowest possible speed. Set the fans to medium speed. Set the fans to the highest possible speed. Set the fans to a percentage of their maximum speed, from 1 to 100, inclusive. 5.5.16 hostname CONF# Serves as the prompt string and sets the hostname for the DXM hostname name XKL, LLC DXM Transport Terminal Manual 51 configure Parameter name Description Set the DXM hostname to the string defined by name. 5.5.17 interface CONF# Places the DXM in interface configuration mode interface <interface-identifier> Parameter <interface-identifier> Description Configure the specified interface. 5.5.17.1 bert transmit CONF-INT-CLIENT/WAVE# Specifies interface for transmission of BERT/PRBS [ no ] bert transmit Parameter bert transmit [ no ] bert transmit Description Specifies for transmission of BERT/PRBS Cancels BERT/PRBS transmission on selected interface. NOTE: For more information related to the configuration of the DXM with BERT and the use of these commands, refer to the BERT Appendix. 5.5.17.2 bert receive CONF-INT-CLIENT/WAVE# Specifies interface for reception of BERT/PRBS [ no ] bert receive Parameter bert receive [ no ] bert receive Description Specifies interface for reception of BERT/PRBS. Cancels BERT/PRBS reception on selected interface and generates final test results. NOTE: For more information related to the configuration of the DXM with BERT and the use of these commands, refer to the BERT Appendix. 5.5.17.3 encapsulation CONF-INT-CLIENT/WAVE# Configures interface encapsulation type XKL, LLC DXM Transport Terminal Manual configure 52 encapsulation <encapsulation-type> Parameter <encapsulation-type> Description Set encapsulation type. The encapsulation command overwrites any previous clock or encapsulation setting for the given interface. ! CAUTION: Changing the encapsulation on an interface carrying traffic will interrupt it. 5.5.17.4 do CONF-INT-CLIENT/WAVE# Executes top-level commands do { command } Parameter command Description Specify the command to execute. Use the do command to execute the top-level commands described in Table 5.1 and Table 5.2 without leaving configuration mode. 5.5.17.5 end CONF-INT-CLIENT/WAVE# Exits configuration mode and returns to the top level of the command line end Typing ctrl + Z has the same effect and discards the current command line. 5.5.17.6 exit CONF-INT-CLIENT/WAVE# Exits interface configuration submode and returns to configuration mode exit 5.5.17.7 label CONF-INT-CLIENT/WAVE# Creates a site-configurable label used to describe the use of wave and client interfaces [ no ] label string Parameter string no label XKL, LLC Description Set the label for the interface to string. Remove the label from the interface. DXM Transport Terminal Manual configure 5.5.17.8 laser shutdown 53 CONF-INT-CLIENT/WAVE# Powers down a wave or client interface laser [ no ] laser shutdown Parameter laser shutdown no laser shutdown Description Shut down the laser. Bring the laser back online. Powering lasers down is appropriate to change SFPs or XFPs, to change fiber cabling, or to extend the useful lifetime of an SFP or XFP. NOTE: If a write memory command is issued after a laser shutdown command, the laser shutdown command is stored in startup-config and will take effect during subsequent reloads. To power up lasers following a reload, issue a no laser shutdown command. To avoid future laser shutdowns following a reload, issue a no laser shutdown command, followed by write memory. 5.5.17.9 loa-detection CONF-INT-CLIENT/WAVE# Enables and disables Loss of Activity (LOA) detection on a transport interface [ no ] loa-detection Parameter loa-detection no loa-detection Description Enable LOA detection. Disable LOA detection. By default, LOA detection is disabled. See Section 3.2.5 for additional information about LOA detection. 5.5.17.10 lol-forward CONF-INT-CLIENT/WAVE# Enables and disables Loss-of-Lock (LOL) forwarding [ no ] lol-forward Parameter lol-forward no lol-forward Description Enable LOL forwarding. Disable LOL forwarding. See Section 3.2.6 for additional information about LOL forwarding. XKL, LLC DXM Transport Terminal Manual configure 5.5.17.11 virtualight 54 CONF-INT-CLIENT/WAVE# Enables and disables Virtualight mode [ no ] virtualight Parameter virtualight no virtualight Description Enable Virtualight mode. Disable Virtualight mode. By default, Virtualight is enabled for client interfaces and disabled for DWDM “wave” interfaces. See Section 3.2.6 for information about Loss-of-Lock forwarding on interfaces with Virtualight. 5.5.17.12 ip CONF-INT-ETH/OSC# Configures IP settings for an ethernet interface ip { address ip-address/netmask | poison-reverse | proxy-arp | rip receive version rip-version | rip send version rip-version | rip v2-broadcast | split-horizon } Parameter address ip-address/netmask poison-reverse proxy-arp rip receive version rip‑version rip send version rip‑version XKL, LLC Description Set the interface IP address to ip-address with a netmask of netmask. Netmask is specified in Classless Inter-Domain Routing (CIDR) notation. Enable the poisoning (advertisement with infinite metric 16) of routes that have become unreachable. When combined with split-horizon, routes received from a given subnet are advertised with infinite metric back to the subnet to help prevent routing loops. Enabled in RIP by default. Allow the DXM to answer Address Resolution Protocol (ARP) requests for hosts other than itself, when the request originates on a subnet other than that of the ARP request. This feature is enabled by default and details of the protocol can be found in RFC1027. Configure the RIP version that the interface will receive. Valid values for rip-version are 1, 2, and 1 2 (default value is 1 2). The individual rip version specified in interface overrides global rip setting in router rip. Configure the RIP version that the interface will send. Valid values for rip-version are 1, 2, and 1 2. (default value is 1 2). The individual rip version specified in interface overrides global rip setting in router rip. DXM Transport Terminal Manual 55 configure Parameter rip v2-broadcast split-horizon Description Send v2 updates as broadcast packets. This command is enabled by default. Prevent RIP from advertising a route out of the interface on which it learned the route to help prevent routing loops. Works in conjunction with poison-reverse . Enabled by default. 5.5.17.13 shutdown CONF-INT-ETH/OSC# Shuts down an ethernet interface or brings it online [ no ] shutdown Parameter shutdown no shutdown Description Shut down the ethernet interface. Bring the ethernet interface online. 5.5.18 ip domain-name CONF# Specifies the domain name search path of the system. [ no ] ip domain-name domainname Parameter ip domain-name [ no ] ip domain-name domainname Description Enable ip domain-name Disable ip domain-name Domain name for search path. 5.5.19 ip dhcp pool CONF# Enter DHCP configuration submode for a specific pool of network addresses. [ no ] ip dhcp pool pool-id Parameter pool-id no ip dhcp pool pool-id XKL, LLC Description Enter DHCP configuration submode for a specific pool of network addresses. The pool-id argument is a convenience identifier that allows creation and management of multiple pools of networks to which DHCP should provide addresses. Remove a pool of network addresses from DHCP. DXM Transport Terminal Manual 56 configure 5.5.19.1 do CONF-DHCP# Executes top-level commands do { command } Parameter command Description Specify the command to execute. Use the do command to execute the top-level commands described in Table 5.1 and Table 5.2 without leaving configuration mode. 5.5.19.2 end CONF-DHCP# Exits configuration mode and returns to the top level of the command line end Typing ctrl + Z has the same effect and discards the current command line. 5.5.19.3 exit CONF-DHCP# Exits DHCP configuration submode and returns to configuration mode exit 5.5.19.4 network CONF-DHCP# Assigns a network for which DHCP should provide addresses network address/netmask Parameter address/netmask Description Adds address/netmask as a network for which DHCP should provide addresses. 5.5.20 ip host CONF# Sets the IP address for a particular host [ no ] ip host hostname address Parameter hostname address XKL, LLC Description Set the name of the host to which an IP address is assigned. Set the IP address for the given hostname. DXM Transport Terminal Manual configure 5.5.21 ip name-server 57 CONF# Sets the Domain Name Service (DNS) name server for the DXM [ no ] ip name-server address Parameter address Description Set the IP address of the DNS server to address. 5.5.22 ip route CONF# Adds a static route in the routing table [ no ] ip route address/netmask gateway [ metric ] Parameter ip route address/netmask gateway Description Enable static route in routing table. [ no ] ip route address/ netmask gateway Disable static route in routing table. address/netmask Set the IP address and netmask for the static route. Set the gateway IP address through which address/netmask may be accessed. Specify the metric value for the static route. Valid range is 0 to 65535. gateway metric 5.5.23 line CONF# Places the DXM in line configuration mode line { console | vty } Parameter console vty Description Configure the console line. Configure the virtual terminal (VTY) lines. The DXM has four VTY lines, all configured identically. 5.5.23.1 access-class CONF-LINE# Assigns the line to an access list [ no ] access-class list-number { in | out } XKL, LLC DXM Transport Terminal Manual configure Parameter list-number in | out 58 Description Assign the line to be accessible only to connections in the access list identified by list‑number. Specifies whether or no ACL is applied in an inbound or outbound direction for VTYs. 5.5.23.2 do CONF-LINE# Executes top-level commands do { command } Parameter command Description Specify the command to execute. Use the do command to execute the top-level commands described in Table 5.1 and Table 5.2 without leaving configuration mode. 5.5.23.3 end CONF-LINE# Exits configuration mode and returns to the top level of the command line end Typing ctrl + C has the same effect and discards the current command line. 5.5.23.4 exit CONF-LINE# Exits line configuration submode and returns to configuration mode exit 5.5.23.5 login CONF-LINE# Enables or disables remote login to VTY lines [ no ] login [ local ] Parameter login login local no login XKL, LLC Description Enable logins for VTY lines, using only a password for authentication. Enable logins for VTY lines, using stored usernames and passwords for authentication. Disable logins for VTY lines. DXM Transport Terminal Manual configure 59 VTY lines refuse telnet connectivity attempts until VTY login is enabled or AAA new model is set. Logins are always enabled for the console line. NOTE: VTY lines must have a password set before telnet or ssh access is granted (see the password command in Section 5.5.19.7). NOTE: To use stored usernames and passwords with the login local option, users must first be created with the user command (see Section 5.5.24). 5.5.23.6 monitor CONF-LINE# Enables or disables DXM message display on console or VTY lines [ no ] monitor Parameter monitor no monitor Description Enable message display. Disable message display. Message display is enabled by default for the console line and disabled by default for the VTY lines. 5.5.23.7 password CONF-LINE# Enforces password protected access to console or VTY lines [ no ] password [ 0 | 5 ] password Parameter password password 5 password password 0 password no password Description Set the password for the line to password. The DXM automatically encrypts a plaintext password as an MD5 hash before storing it. Specify password as an MD5 hash. Specify plaintext password. This syntax is equivalent to password password. Remove password protection from the line. Removing the vty password disables all vty access. 5.5.23.8 transport input CONF-LINE# Enables or disables Secure Shell (SSH) and telnet access to VTY lines [ no ] transport input [ all | ssh | telnet ] XKL, LLC DXM Transport Terminal Manual 60 configure Parameter all ssh telnet no transport input [ all | ssh | telnet ] Description Allow VTY access via both telnet and SSH. Allow VTY access only via SSH. Allow VTY access only via telnet. Allow VTY access via both telnet and SSH. The no form of the transport input command, regardless of what other parameters are used, is equivalent to entering transport input all. NOTE: To completely disable logins through VTY lines, use the no login and no aaa new-model command. 5.5.24 logging CONF# Configures logging of DXM events in both the local DXM event log and the syslog service [ no ] logging { buffer events | host address | mark mark-interval | rate-limit limit } Parameter buffer events host address mark mark-interval rate-limit limit Description Set events as the number of events to store in the local circular logging buffer. Values from 1 to 512, inclusive, turn on logging. A buffer size of 0, or the no logging buffer command, turns off event logging to the local buffer. Set address as the host to receive syslog messages. Multiple hosts may be specified; specifying at least one turns on syslog message generation. The no logging host address command stops syslog logging to the specified host. Set the mark interval to mark-interval minutes. The DXM sends a “mark” time-keeping message to syslog hosts at this interval. The commands no logging mark and logging mark 0 both turn off mark event generation. Valid range for mark-interval is 0-60. Set the message rate limit to limit messages per second. Valid range for limit is 0-10000. The rate limit applies only to syslog logging. NOTE: The contents of the local circular logging buffer are lost upon system reload. They are also cleared upon execution of the no logging buffer or logging buffer 0 commands. 5.5.25 radius-server host CONF# Sets radius host server to be used with AAA XKL, LLC DXM Transport Terminal Manual 61 configure [ no ] radius-server host host [ auth-port port host-specific-key ] Parameter host [ auth-port port ] [ acct-port port ] [ key host-specific-key ] ] [ acct-port port ] [ key Description Specify host or IP address of radius server. If multiple radius-servers are specified, the DXM will make attempts in the specified order. Optionally, specify host-specific authorization port. Optionally, specify host-specific accounting port. Optionally, specify host-specific radius-server key. Key must be configured as last item. 5.5.26 radius-server key CONF# Sets radius server key radius-server key <global-shared-key> Parameter <global-shared-key> Description Optionally, specify a global shared key for radius server. Specifying a host-specific key overrides global-shared key. 5.5.27 raman CONF# Raman amplifiers have the following configuration commands in DXMOS. 5.5.27.1 apr osc detection CONF# Enables detection of a remote optical service channel (OSC) signal as a part of the Automatic Power Reduction (APR) control system [ no ] apr osc detection Parameter apr osc detection no apr osc detection Description Enable OSC as a part of APR control system. Disable OSC as a part of APR control system. This mechanism is enabled by default. A fiber type must be specified before osc-detection can be disabled. It is only useful to disable apr osc-detction when a Raman amplifier is so far away from the remote DXM signal it is amplifying that it cannot detect the DXM’s OSC. ! CAUTION: Disabling this safety feature may cause this device to operate outside of its laser safety classification. XKL, LLC DXM Transport Terminal Manual configure 5.5.27.2 auto-startup 62 CONF# Performs Raman bring-up procedures [ no ] auto-startup Parameter auto-startup no auto-startup Description Peform bring-up procedures. Disable auto-startup procedures. When enabled, auto-startup takes precedent over manual control settings. By default, autostartup is disabled. Once a Raman amplifier is in a fully operational state, no auto-startup can be specified without interrupting amplifier operation. 5.5.27.3 control pump power CONF# Defines the set points for the Raman pump lasers control pump power { maximum | <power-level-in-mW> } Parameter maximum <power-level-in-mW> Description Define set point value in mW. Define set point as a maximum value that is automatically determined for each pump and application fiber type. 5.5.27.4 fiber-type CONF# Sets the type of fiber used by the Raman amplifier fiber-type <fiber-type> Parameter <fiber-type> Description Specify fiber type for use with Raman amplifier. Attributes of the amplifier’s control system are adjusted when fiber-type is changed because different fiber types have different physical properties with regard to Raman amplification. The default fiber type is SMF. (g.252) 5.5.27.5 label CONF# Appends a user-specified metadata label to the Raman amplifier’s UI. [ no ] label XKL, LLC DXM Transport Terminal Manual configure Parameter label no label 63 Description Append metadata label to Raman amplifier UI. Exclude metadata label from Raman amplifier UI. A metadata label allows for the inclusion of information about the link’s purpose, location, and other similar data. By default there is no label. 5.5.27.6 show raman CONF# Displays information about Raman amplifier state and function show raman <raman-identifier> Parameter <raman-identifier> Description Specify the Raman amplifier against which the command is executed. 5.5.27.7 shutdown CONF# Enables or disables amplification [ no ] shutdown Parameter shutdown no shutdown Description Enable amplification. Disable amplification. By default amplification is disabled. 5.5.28 router rip CONF# Places the DXM in Routing Information Protocol (RIP) configuration mode [ no ] router rip Parameter router rip [ no ] router rip 5.5.28.1 do Description Enable router rip Disable router rip. CONF-RIP# Executes top-level commands XKL, LLC DXM Transport Terminal Manual configure 64 do { command } Parameter command Description Specify the command to execute. Use the do command to execute the top-level commands described in Table 5.1 and Table 5.2 without leaving configuration mode. 5.5.28.2 distance CONF-RIP# Sets the RIP distance [ no ] distance rip-distance Parameter distance rip-distance no distance Description Set the RIP distance value to rip-distance. Remove RIP distance setting. 5.5.28.3 end CONF-RIP# Exits configuration mode and returns to the top level of the command line end Typing ctrl + Z has the same effect and discards the current command line. 5.5.28.4 exit CONF-RIP# Exits RIP configuration submode and returns to configuration mode exit 5.5.28.5 network CONF-RIP# Turns on RIP for a given interface [ no ] network address Parameter network address no network address XKL, LLC Description Set address of interface on which to advertise RIP. Disable RIP for the specified network. If an interface is a subnet of another interface, the [ no ] variant for the smaller subnet will also be applied to the larger subnet, even if router RIP is turned on in separate network commands. DXM Transport Terminal Manual configure 5.5.28.6 passive-interface 65 CONF-RIP# Disables sending of routing updates [ no ] passive-interface [ <ethernet-identifier> ] Parameter passive-interface <ethernet-identifier> no passive-interface <ethernet‑identifier> Description Disable sending of routing updates on the specified interface. Enable sending of routing updates on the specified interface. 5.5.28.7 redistribute CONF-RIP# Redistributes routes from other routing protocols via RIP [ no ] redistribute static [ metric value ] Parameter static [ metric value ] no redistribute static Description Specify the routing metric to use. Without the metric keyword, redistribute static defaults to a metric of 1. Disable redistribution of static routes. 5.5.28.8 version CONF-RIP# Sets which version of RIP is sent by the DXM [ no ] version version-number Parameter version-number no version Description Set the RIP version number to version-number. Valid values for version-number are 1 or 2. Return RIP version to its default value of 2/1 compatibility mode. 5.5.29 snmp-server CONF# Configures Simple Network Management Protocol (SNMP) settings [ no ] snmp-server { chassis-id string | community string | contact string | enable traps [ snmp | xkl ] | host address | location string } XKL, LLC DXM Transport Terminal Manual 66 configure Parameter chassis-id string community string contact string enable traps [ snmp | xkl ] host address location string Description The chassis-id is not currently used. Start a read-only SNMP server using the community string specified by string. The no snmp-server community command turns off the SNMP server. Set SNMP-retrievable contact information to the value of string. This value may be accessed through the SNMP variable SNMPv2-MIB::sysContact.0. The no snmp‑server contact comand sets this value to an empty string. Turn on sending of SNMP traps; a host address is also required. By itself, enable turns on all SNMP traps. Turn on only SNMP standard traps or XKL-specific traps by appending snmp or xkl, respectively. The no snmp‑server enable traps command disables sending of SNMP traps. Send SNMP traps to a specific host, specified by address. The address parameter may be either a hostname or an IP address. Only one host may be specified; a second invocation of this command overwrites the host value. The no snmp‑server host command removes an existing target host. Set SNMP-retrievable location information to the value of string. This value may be accessed through the SNMP variable SNMPv2-MIB::sysLocation.0. The no snmp‑server location command sets this value to an empty string. NOTE: DNS must be configured with the ip name-server command (see Section 5.5.15) for host address to work with a hostname instead of an IP address. 5.5.30 sntp CONF# Configures a Simple Network Time Protocol (SNTP) server for setting the system clock [ no ] sntp server address Parameter address Description IP address or hostname of the SNTP server from which the DXM should set its system clock. NOTE: DNS must be configured with the ip name-server command (see Section 5.5.15) for address to work with a hostname instead of an IP address. XKL, LLC DXM Transport Terminal Manual 67 configure 5.5.31 uart CONF# Sets the default baud rate of the system EDFA device uart speed { 9600 | 19200 } Parameter 9600 19200 Description Sets rate to 9600 baud. Sets rate to 19200 baud. NOTE: The uart speed command is useful only on DXM systems with an EDFA installed. Beyond general management of baud-rate setting, this command may be particularly useful during firmware upgrades, which may cause a DXM with an EDFA to revert to the default baud-rate setting of 19200. 5.5.32 user CONF# Creates a user account for logging in to the DXM [ no ] user username password [ 0 | 5 ] password Parameter username Description Set name for the new account to username, which may contain only letters, digits, and the following characters: - _ [ 0 | 5 ] password no user username Set password input type. If the value is 0, password is treated as a plaintext string. If the value is 5, password is treated as an MD5-hashed password. The default is 0. Set password for the account to password. Remove username and its associated password from the local user database. NOTE: To enable user accounts, use the login local command or aaa setup. 5.5.33 watchdog-timeout CONF# Configures the length of the system watchdog timeout [ no ] watchdog-timeout length XKL, LLC DXM Transport Terminal Manual copy Parameter length 68 Description Set watchdog timer to time out after length seconds. Valid values for length are from 0 to 63, inclusive. The default is 63 seconds. The commands no watchdog-timeout and watchdog-timeout 0 both disable the watchdog timeout feature. The watchdog timeout is the number of seconds for which the DXM can be non-responsive before the controlling software automatically reloads. See the reload command in Section 5.13 for the consequences of a reload. NOTE: XKL recommends leaving the watchdog timeout at its default value of 63. 5.6 copy # Copies configuration data, software images, and gateware images between storage areas copy <source-storage-location> <destination-storage-location> Parameter <source-storage-location> <destination-storagelocation> Description Copy from the specified source. Copy to the specified destination. NOTE: The copy command requires source and destination to be the same type, one of -boot, -image, -config, or -gateware. ! CAUTION: Creating image and gateware copies can take several minutes. To avoid creating a corrupted or incomplete copy, do not interrupt the copy command. Interruption of flash memory write operations with ctrl + C generates a system warning that corruption may occur. ! CAUTION: It is possible to copy a configuration whose enable password is unknown. Be sure to write down the password in a safe place. Once the password is set and you leave enabled mode, there is no way to configure the DXM without entering the password to return to enabled mode. If the password is saved to the startup configuration using the write memory command, the only way to clear the enabled mode password without entering enable mode is to reload the DXM in factory default mode by pressing and holding the side reset button. Reloading in factory default mode disrupts network traffic across all transport interfaces. 5.7 debug # Turns on verbose debugging information for a specified subsystem [ no ] debug argument XKL, LLC DXM Transport Terminal Manual disable Parameter debug [ no ] debug 69 Description Enable verbose debugging. Disable verbose debugging. This command should only be used to diagnose problems. When debug output is active, system performance may be degraded and the amount of output may make operating the DXM from the command line difficult, especially when the system is under heavy load. A heavy load may cause a watchdog timeout and subsequent reload. 5.8 disable # Exits enabled mode and returns to disabled mode disable 5.9 enable > Enters enabled mode enable NOTE: If an enabled mode password is set, the command line prompts for the password before entering enabled mode (see Section 2.4.1). 5.10 exit > Returns to the top level and disconnects from the DXM exit At the top-level command prompt, exit does the same thing as logout. 5.11 logout > Disconnects from the DXM logout The logout command disconnects any telnet or SSH session and releases the VTY line for use by others. Console logout resets the CTY line. If a console password has been set (see Section 2.4.2), you must enter a password to return to the disabled mode prompt. 5.12 ping > Sends test packets to a specific address XKL, LLC DXM Transport Terminal Manual reload 70 ping remote-host Parameter remote-host Description Set the destination hostname or IP address to which ping sends packets. The ping command sends 5 ICMP echo request packets and reports whether or not it receives responses for each. An exclamation point (!) is displayed for each successful ping, and a period (.) for each unsuccessful ping: localhost> ping 10.15.1.90 Ping 10.15.1.90 !!!!! Done pinging 10.15.1.90 - 5 of 5 packets received localhost> ping 10.15.1.110 Ping 10.15.1.110 ..... Done pinging 10.15.1.110 - 0 of 5 packets received localhost> NOTE: DNS must be configured with the ip name-server command (see Section 5.5.15) for remote-host to work with a hostname instead of an IP address. 5.13 reload # Reloads the DXM operating system software reload The reload command does not affect the transport interfaces (client and wave) unless there is a difference between the saved configuration (startup-config) and the running configuration. To ensure that the transport interfaces are unaffected by reload, use the write memory command before the reload. 5.14 set fan-controllers # Sets a hexadecimal bit-mask to select DXM fan controllers set fan-controllers hex-value Parameter hex-value Description Set which DXM fan controllers to use by specifying a hexadecimal bit-mask in hex-value. Each bit in the bitmask represents a fan controller, starting at controller 0 in the right-most bit. For example, to configure the DXM to use fan controllers 0 and 2, the binary bit-mask is 101, which is represented by a hex-value of 5. XKL, LLC DXM Transport Terminal Manual set split-trunk 71 The set fan-controllers command is useful when the default fan controller configuration has been changed by attaching additional fan modules to the DXM system. Changes made by the set fan-controllers command are persistent, and need not be saved to non-volatile storage with the write memory command. However, the changes made do not take effect immediately; the system must be reloaded. 5.15 set split-trunk # Controls how the DXM parses wave interfaces set split-trunk { yes | no } Parameter yes no Description Interpret wave interfaces as a split trunk (wave { east west }). Interpret wave interfaces as a single trunk (wave). | By default, DXM 5R systems are configured with split-trunk yes, and nonredundant systems with split-trunk no. This command is only useful for turning off split trunk support of 5R systems. Changes made by the set split-trunk command are persistent, and need not be saved to nonvolatile storage with the write memory command. However, the changes made do not take effect immediately; the system must be reloaded. ! CAUTION: Do not change the split-trunk setting while running customer traffic. Because the split-trunk setting controls how wave interfaces are parsed, changing the setting can cause the DXM to parse existing configuration files incorrectly when it reloads. 5.16 show > Displays information about how the DXM is configured 5.16.1 show app > Displays information about the settings and current status of automatic path protection (APP) groups show app See the app command in Section 5.5.2 for more information about path protection. 5.16.2 show arp > Displays the Address Resolution Protocol (ARP) cache for ethernet interfaces show arp [ <ethernet-identifier> ] XKL, LLC DXM Transport Terminal Manual show Parameter <ethernet-identifier> See also show 72 Description Display the ARP cache for the specified interface. Without an <ethernet-identifier>, show arp displays the cache for all interfaces. ip arp in Section 5.16.14. 5.16.3 show batch-queue > Displays the current batch queue show batch-queue The show batch-queue command is useful only for diagnosing DXM problems. It does not provide information that is useful during routine operation. 5.16.4 show calendar > Displays the current time and date according to the DXM calendar chip show calendar 5.16.5 show clock > Displays the current time and date according to the DXM system clock show clock 5.16.6 show connections > Displays information about the wave and client interface connections, line status, and line rates show connections [ <transport-identifier> ] Parameter <transport-identifier> Description Display connections to the specified interface. Without a <transport-identifier>, the show connections command displays information for all transport interfaces. Each line in the displayed table describes an active connection betwen If1 and If2. See connect in Section 5.5.5 for additional information. 5.16.7 show controllers # Displays current operational warning and alarm status for client and wave interfaces show controllers <interface-identifier> XKL, LLC DXM Transport Terminal Manual show Parameter <interface-identifier> The show 73 Description Display operational warning and alarm status for the specified interface. controllers command requires enabled mode. 5.16.8 show edfa > Displays status of EDFA devices, settings and alarms show edfa [ <trunk> ] <optical component id> Parameter [ trunk ] optical component id Description Optionally, specify trunk if DXM is split-trunk system. Specify the optical component id NOTE: The show edfa command is available only on DXM systems with an EDFA installed. 5.16.9 show environment > Displays operating environment information, including temperature, status of fans, and status of power units show environment [ all | fans | power | temp ] Parameter Description Display summary of fan and power unit status. Display detailed fan status and operational parameters. Display detailed power unit status and operational parameters. Display current temperature readings and temperature operating ranges for many DXM components. all fans power temp Issuing the show environment environment all. command without any arguments is equivalent to issuing show 5.16.10 show flash-config > Displays configuration information stored in flash memory show flash-config [ backup1-config | backup2-config | startup-config ] XKL, LLC DXM Transport Terminal Manual show Parameter backup1-config backup2-config startup-config 74 Description Display information stored in the backup1-config flash location. Display information stored in the backup2-config flash location. Display information stored in the startup-config flash location. Equivalent to the show startup-config command. 5.16.11 show hardware > Displays serial numbers, manufacturing dates, and hardware revision data for DXM controller and switch circuit boards. Displays the presence of certain devices in the system IDROM, such as OADM (Optical Add-Drop Multiplexer) devices, DCMs (Dispersion Compensations Modules), and other passive optical components such as attenuators. show hardware 5.16.12 show hosts > Displays the hosts table from Domain Name Service (DNS) resolution or from manual configuration by the ip host command (see Section 5.5.14). show hosts 5.16.13 show interfaces > Displays interface information show interfaces [ <interface-identifier> ] [ summary ] Parameter <interface-identifier> summary Without any arguments, the show Description Display information about the specified interface. Display a short summary of the interface information. interfaces command displays information for all interfaces. 5.16.14 show ip arp > Displays the Address Resolution Protocol (ARP) cache for an ethernet interface show ip arp [ <ethernet-identifier> ] XKL, LLC DXM Transport Terminal Manual show Parameter <ethernet-identifier> See also show 75 Description Display the ARP cache for the specified interface. Without an <ethernet-identifier>, the show ip arp command displays the cache for all ethernet interfaces. arp in Section 5.16.2. 5.16.15 show ip routes > Displays the current system routing table show ip routes [ detailed ] Parameter detailed The show Description Display more details, including link layer information. ip routes command describes route types using the following codes: Code C S R Description Connected Static RIP The show ip routes command also displays the IP/CML, metric, source, next hop address, and routing protocols to which the route is distributed. 5.16.16 show ip traffic > Displays current IP traffic statistics show ip traffic 5.16.17 show lines > Shows the status of console and VTY lines, including whether or not they are logged in or in enabled mode show lines 5.16.18 show logging # Displays the contents of the circular logging buffer show logging XKL, LLC DXM Transport Terminal Manual show The show 76 logging command requires enabled mode. 5.16.19 show optical wavelength-map > Displays a reference table of optical channels and their frequencies and wavelengths show optical wavelength-map 5.16.20 show peers > Displays peer information show peers 5.16.21 show running-config > Displays current active configuration settings show running-config [ app | boot | dhcp | fan | host | interface [ <interface-identifier> ] | line | logging | rip | snmp | static-routes | switch ] Parameter app boot dhcp fan host interface [ <interface‑identifier> ] line logging rip sntp snmp static-routes switch Description Display current automatic path protection (APP) settings. Display current boot settings. Display current Dynamic Host Control Protocol (DHCP) settings. Display current fan settings. Display current hostname. Display current settings for the specified interface. Without an <interface-identfier>, settings are displayed for all interfaces. Display current line settings. Display current logging settings. Display current Routing Information Protocol (RIP) settings. Display current Simple Network Time Protocol (SNTP) settings Display current Simple Network Management Protocol (SNMP) settings Display current static routes. Display current switch settings. Without options, the show running-config command displays full configuration information, starting with a string of eight semicolons (;;;;;;;;). This information can be captured in a text XKL, LLC DXM Transport Terminal Manual show 77 file, starting with the semicolons, and placed on a tftp server for later download via the tftp command (see Section 5.17). With an option, the show running-config command displays the relevant portion of the current active configuration. The show ! running-config command is identical to write terminal. CAUTION: The settings as displayed may not be saved to startup-, backup1-, or backup2-config. Use the write memory command (Section 5.20.2) to save the settings to nonvolatile storage. 5.16.22 show sntp > Displays current Simple Network Time Protocol (SNTP) server information show sntp 5.16.23 show startup-config > Displays DXM startup and backup configurations from customer flash memory show startup-config 5.16.24 show switch > Displays detailed crosspoint switch information show switch Information displayed by the show switch command is useful only for diagnosing software problems. It does not provide information that is useful during normal DXM operation. 5.16.25 show tech-support > Displays all system information in a format useful to customer support engineers for diagnostics show tech-support 5.16.26 show timer-queue > Displays the current timer queue show timer-queue The show timer-queue command is useful only for diagnosing DXM problems. It does not provide information that is useful during routine operation. 5.16.27 show version > Displays DXM operating system and other version information XKL, LLC DXM Transport Terminal Manual tftp 78 show version [ verbose ] Parameter verbose The show Description Display additional software version information: ♦♦ Version of DXMOS currently running ♦♦ Location from which the DXMOS image was booted (either a flash *-image location, or the TFTP address and filename) ♦♦ Flash *-gateware location of the currently running gateware ♦♦ System uptime ♦♦ A table of hardware component revision numbers version command displays the following information: ♦♦ Operating system version ♦♦ XKL software part number ♦♦ Storage (flash) location for the currently running software and gateware ♦♦ Time since the last reload or power cycle event (days:hours:minutes:seconds) ♦♦ Whether the last reload was due to power cycling or due to a watchdog timeout event. If the reload was due to power cycling, a distinction will be made to indicate whether it was an internal or external power cycle. 5.17 tftp # Updates configurations, software images, and gateware images from remote sources tftp tftp-server remote-file-name { <storage-location> | hostkey-private | hostkey-public } Parameter tftp-server remote-file-name <storage-location> hostkey-private hostkey-public Description Specify IP address or hostname of the server containing the configuration, software image, or gateware image file to copy. Specify name of file on remote TFTP server. Specify storage location to which the file is copied. Specify that the file should be stored as the DXM’s private SSH encryption key. Specify that the file should be stored as the DXM’s public SSH encryption key. The tftp command requires a configured, cabled ethernet port that provides connectivity to a functioning TFTP server that hosts relevant DXM files. See the interface command in Section 5.5.13 for information about managing the DXM system’s ethernet configuration. Configuring TFTP XKL, LLC DXM Transport Terminal Manual undebug 79 servers is beyond the scope of this manual. ! CAUTION: It is possible to corrupt valid storage locations using the tftp command. No checks are made to ensure the downloaded data files are legitimate DXM data files. Using tftp to create copies can take several minutes. To avoid creating a corrupted or incomplete copy, do not interrupt the tftp command. Interruption of flash memory write operations with ctrl + C generates a warning that corruption may occur. ! CAUTION: It is possible to use tftp to obtain a configuration whose enable password is unknown. Be sure to write down the password in a safe place. Once the password is set and you leave enabled mode, there is no way to configure the DXM without entering the password to return to enabled mode. If the password is saved to the startup configuration using the write memory command, the only way to clear the enabled mode password without entering enable mode is to reload the DXM in factory default mode by pressing and holding the side reset button. Reloading in factory default mode disrupts network traffic across all transport interfaces. NOTE: DNS must be configured with the ip name-server command for tftp-server to work with a hostname instead of an IP address. 5.18 undebug # Turns off verbose debugging information undebug argument Debugging information is useful only for diagnosing system problems. It does not provide information that is useful during normal DXM operation (see the debug command in Section 5.7). If the amount of debugging information is so extreme as to interfere with operation, undebug all is the quickest way to recover without reloading. 5.19 version > Displays the version of the software currently loaded version The version command displays slightly different information from the show version command. 5.20 write # Writes configuration information to and erases information from nonvolatile storage 5.20.1 write erase # Erases configuration information from nonvolatile storage (flash memory) write erase config [ <storage-location-config> ] XKL, LLC DXM Transport Terminal Manual write Parameter <storage-location-config> 80 Description Erase configuration from the specified storage location. Without a <storage-location-config>, write erase config erases the configuration in the startup-config location. 5.20.2 write memory # Writes current configuration information to nonvolatile storage (flash memory) write memory [ <storage-location-config> ] Parameter <storage-location-config> Description Write configuration to the specified storage location. Without a <storage-location-config>, write memory writes to the startup-config location. 5.20.3 write network Writes current configuration information to a remote server using TFTP write network tftp-server filename Parameter tftp-server filename Description Specify IP address or hostname of a TFTP server to which the write network command copies the current runningconfig. Specify name of the file to which the write network command copies the current configuration. If the file already exists at the remote location, write network overwrites it. NOTE: XKL strongly encourages you to keep a backup of your startup-config data on a remote TFTP server. In the event that flash backups of the configuration on the DXM itself become corrupted, a TFTP backup of your settings allows you to restore your DXM and customer traffic to normal conditions. NOTE: DNS must be configured with the ip name-server command for tftp-server to work with a hostname instead of an IP address. 5.20.4 write terminal Identical to the show # running-config command (see Section 5.16.21). write terminal XKL, LLC DXM Transport Terminal Manual 6 Troubleshooting This chapter provides troubleshooting information related to the operation of DXM systems. Use this chapter in conjunction with other information in the manual and command-line reports from your system to diagnose and resolve issues. The information in this chapter is intended to cover general issues, particularly those that you may experience as you initially set up and learn to operate the system. If you experience issues beyond the scope of this chapter, particularly if you experience a loss of switchboard control and customer traffic, contact your XKL representative for professional technical support. 6.1 Troubleshooting Matrices The matrices on the following pages provide a framework for operation of the DXM system and general issues you may encounter. To facilitate use of the matrices, the information has been categorized in the following manner: • Hardware / Physical • Software • Interfaces Issues that occur outside of the scope of these charts may require professional technical support. In the event that you are unable to resolve a problem using the matrices, please contact your XKL representative for additional assistance. 82 Hardware / Physical Issues Symptom Power Cause Solution DXM is not connected to external Connect DXM to external power power source source. System dead No external power Investigate external power problem. Both power supplies are missing Replace or properly seat power or not seated supplies. Temperature System overheated Hardware / Physical 6.1.1 Troubleshooting Matrices Temperature warning or alarm Correct operating environment temperature issues/reduce temperature. Run show environment temp. If logging is enabled, run show logging and you will receive a list of events that may show temperature warning events. If SNMP is configured and you have an SNMP external trap monitor, then you may see a history of traps that include temperature warning events. If fan failure, replace fans. One or more fan units are failing Run show env fans command to determine which fan(s) are failing, then replace fan module. Sensor failure XKL, LLC Identify the component causing the failure with show env temp command . If outlet 0 or 2 temperature readings are obviously wrong, investigate and possibly replace corresponding fan module 0 or 2. DXM Transport Terminal Manual 83 Software Issues Symptom Boot Cause Solution Corrupted gateware or Boot on customer flash chip Copy non-corrupted gateware or Boot to customer flash chip. You must determine whether the corrupted bits resides on the customer or the factory chip. Be aware that the customer chip also has a backup copy of boot. Refer to the software information and diagrams in the latter part of this chapter to aid in your troubleshooting. Note that if factory flash chip is damaged, this is a problem that requires XKL technical support. Miniboot (embedded in gateware) or Boot fails DXMOS Incorrect TFTP boot configura- Boot DXMOS from flash image, tion correct boot TFTP configuration entries, save corrected configurations in startup-config or remote DHCP config, then reload DXMOS. Software 6.1.2 Troubleshooting Matrices TFTP server unavailable or unDXMOS fails to load / reachable. 600-second timeout (continued on next Corrupted software page) XKL, LLC Either correct TFTP server availability or boot DXMOS from flash image. Copy non-corrupted software to customer flash chip or TFTP server. The system has a customer chip and a factory chip and you must determine on which chip the corrupted software resides. Note that if factory flash chip is damaged, this is a problem that requires factory support. DXM Transport Terminal Manual Troubleshooting Matrices Software Symptom DXMOS 84 Cause Solution DXMOS booted, but software unresponsive This likely indicates a software fault and the only recourse to avoid customer traffic disruption is a warm reload (front reset button push and release). If the condition repeats upon subsequent reloads, contact XKL technical support. (continued) DXMOS fails to load / 600-second timeout DXMOS Recovery Mode DXMOS is unable to read start- Rewrite startup-config file to cusDXMOS enters recov- up-config tomer flash chip. If unsuccessful, ery mode replace customer flash chip. Interface Issues Symptom Serial Interfaces 6.1.3 Cause Solution Cable disconnected Connect cable. Cable incorrectly wired/bad pin Correct wiring or pin-out conout figuration. Faulty remote communications No serial connection / equipment no activity at console Hardware problem Software failure XKL, LLC Replace faulty equipment. Contact XKL technical support. See troubleshooting section covering software and gateware. DXM Transport Terminal Manual Troubleshooting Matrices 85 Symptom Cause Solution 10/100 Copper Ethernet External network failure, configu- Investigate external network ration problem, and/or routing issues. issues IP address has not been assigned In CONF-ETH[#] mode, issue ip address <ip_addr>/<mask_ System unreachable via to Ethernet interface length> command followed by copper Ethernet end or exit. Interfaces Ethernet ports are administratively shutdown Bad cable Remote end of line down No link light Link light on, but no activity light when activity expected In CONF-ETH[#] mode, issue no shutdown command, followed by end or exit. Replace with good cable. Investigate and correct external network issues. Remote end incapable of Replace remote network com10/100BaseTX communication ponents with compatible equipment. No IP address assigned to ether- In CONF-ETH[#] mode, issue ip address <ip_addr>/<mask_ net interface length> command followed by end or exit. Ethernet ports are administratively shutdown In CONF-ETH[#] mode, issue no shutdown command, followed by end or exit. Remote routing or connectivity Investigate and correct external problems network issues. XKL, LLC DXM Transport Terminal Manual Troubleshooting Matrices Symptom Cause Optical Service Channel (OSC) Dirty or unplugged fiber connections OSC trunk LED dark OSC port is administratively Interfaces Insufficient OSC receive power System unreachable via OSC OSC line state flapping/bouncing shutdown Missing or defective OSC SFP Solution Clean and reconnect fiber connections In CONF-OSC[#] mode, issue no shutdown command, followed by end or exit. Attempt to diagnose using show interface osc #, install func- tioning OSC SFP. Insufficient optical signal to noise Contact XKL technical support. ratio in long-haul configuration Optical cable degradation Investigate and correct external optical cabling issues. No IP address assigned to OSC interface In CONF-OSC[#] mode, issue ip address <ip_addr>/<mask_ System unreachable via OSC length> command follwed by end or exit. Bad or missing IP routes XKL, LLC 86 Properly configure IP routing. DXM Transport Terminal Manual Troubleshooting Matrices Symptom Cause Optical Interfaces (Wave & Client) Fiber not connected Interface down Dirty fiber Failed laser or XFP/SFP module(s) Incorrect encapsulation type Incorrect switch configuration 87 Solution Connect fiber. Clean or replace fiber. Replace failed component. Verify encapsulation types at transmit and receive endpoints and ensure they are the same. Verify connection settings and ensure they are appropriately configured. Loss of Lock or Signal (LoL or LoS) Incompatible wavelengths beReplace lasers on customer tween customer equipment and equipment or DXM client interclient interfaces face to match wavelengths. Problems with remote system Interfaces Laser failure No wave laser transmission Insufficient receive power Troubleshoot and repair remote system. Run diagnostics and/or replace laser. Run show interface command on transmitting system and verify laser transmission power. Run the no laser shutdown or virtualight command. Insufficient transmission from Investigate external customer customer equipment to DXM cli- equipment issue. ent interface Laser failure Run diagnostics and/or replace laser. Laser administratively disabled Run show interface command Insufficient transmit on transmitting system and verify power laser transmission power. Run the no laser shutdown or virtualight command. Wave interface report- Insufficient power on one or both See troubleshooting procedures for insufficient transmit and ing up/down condi- directions receive power. tions Enable virtualight on the interClient interface report- Virtualight disabled face in question. ing up/down conditions XKL, LLC DXM Transport Terminal Manual 6.2 Troubleshooting Commands 88 Troubleshooting Commands Note that using the various show commands may aid in the troubleshooting procuedures outlined in this chapter. A full list of these and other commands, as well as their options, is described in full in Chapter 5. 6.3 Front-Panel LED Codes The most immediate feedback related to system status is provided via the LED lights on the front panel of the DXM. Note that meaning is derived from the combined status of all three lights. Use the information about the cause(s) of LED patterns in the table below with the other information in this chapter to better evaluate and resolve issues with your system. Table 6.1 Front Panel LED Codes PWR WRN (green) (yellow) ○ ○ ● ○ ○ ○ ALM (red) ○ ○ ● ● ◐ ○ ◐ ◐ ◐ ● ● ● Cause No power or both power supplies down System fully operational One of the following conditions exists: • Over maximum temperature (70C)(12V disabled) • FPGA load failure • System disabled due to excessively high temperature One of the following conditions exists: • One power supply is down or absent • Temperature warning • One or more fan failures • Fan controller 0 or 2 is absent One of the following conditions exists: • Initial Power up • Warm reload in progress Cold factory reload in progress Legend ○ ● ◐ XKL, LLC Steady off Steady on Flashing DXM Transport Terminal Manual 6.4 Software 89 Software Due to the complexity of software operation, it may be helpful to refer to the additional information in this section to more fully understand the symptoms, causes, and solutions outlined in the software troubleshooting matrix. The following diagrams illustrate the most important startup process flows associated with Boot and DXMOS. Figure 6.2 Executing Boot, Loading Config XKL, LLC DXM Transport Terminal Manual Software 90 . Figure 6.3 Acquiring Configuration, Loading DXMOS XKL, LLC DXM Transport Terminal Manual 6.4.1 Software 91 DXMOS Recovery Mode If at startup DXM startup-config is detected to be unreadable, DXMOS enters recovery mode. All telnet and SSH access to the DXM is disabled in recovery mode. This is a very rare occurrence. Only the console can be used to try to recover without dropping any switch board traffic. Recovery mode makes available a limited set of commands to load a remote copy of startup-config: The system entered recovery mode because it could not read from the startup flash. To prevent dropping switch board traffic, the software did not modify the switch board configuration. You can use the configure network command to recover the system configuration if you have a backup of it. Please see the DXM Transport Terminal Manual for more details. The commands available in recovery mode are: Command configure configure network continue drop-to-boot reload show 6.4.1.1 Description Enter configure mode to configure an ethernet interface in advance of issuing a configure network command. Download a remote configuration backup when a management ethernet is already configured. In cases where flash memory is unreadable and the config file is lost, continue system start-up without any configuration file, which causes the loss of switch board configuration and user data if the DXM was operating previously. In cases where only some portions of startup or flash memory are corrupted and the config file remains intact, executing this command will parse it. It is also possible to parse a DHCP config file in RAM using this command if boot is able to obtain one. Revert to the system boot loader to access Boot facilities. Reload all system software and gateware such as those that rebuild the flash partition table. Display information about recovery mode system configurations. Recover System from Remote Server You can recover the DXM from a configuration file stored on a remote server. You must already have an active network interface in order for this process to work. If the remote configuration file matches the switch board configuration, customer traffic on the DXM will not be interrupted. NOTE: The configure network command operates via TFTP, which means that the configuration file must already be saved to a remote TFTP server. XKL strongly encourages you to make a backup copy of your startup-config using the write network command. See Section 5.20.3 for more details about write network. Modify the following command examples with your own values to implement recovery at your site. XKL, LLC DXM Transport Terminal Manual Software 92 To recover the system after the recovery mode message is displayed: localhost> configure localhost CONF# interface ethernet 0 localhost CONF-INT-ETH[0]# ip address 10.15.1.116/24 localhost CONF-INT-ETH[0]# exit Interface Ethernet 0 address set to 10.15.1.116 localhost> configure network 10.15.1.99 remote-config Are you sure? [yes/no] yes Starting TFTP transfer: File transferred successfully XKL, LLC DXM Transport Terminal Manual A Preparing for Hardware Installation This appendix describes the requirements for installing the DXM hardware. ♦♦ Standard Electronic Industries Association (EIA) Rack ♦♦ Two power circuits (the DXM can use one circuit but two are recommended for redundancy): 120-240 Volt AC, 48 Volt DC, or one of each The default shipped configuration includes mounting hardware for the standard 19” four-post EIA rack. For alternate racking support, such as 19” two-post rack or 23” rack, contact your XKL sales representative. The DXM can be installed in any standard 19-inch 4–post EIA rack that has access to one or two power circuits. Two 28-inch slide rails are included for ease of access after installation. Configure cables and fiber for the DXM to allow for adequate space and cable length to slide the box from the rack for service or maintenance without physically disconnecting it. Allow a clearance of three inches behind the system box to permit sufficient air flow. XKL suggests the use of power conditioning and surge suppression on power circuits. B Installing the Chassis This appendix describes how to install the DXM as a rack mount configuration. B.1 Introduction This section describes some guidelines to consider when installing a DXM in any configuration. The example in Section B.2 describes setting up a 4-post rack mount system. Separate installation instructions are included with the optional 2-post system. ♦♦ If the DXM is installed in a closed or multi-unit rack assembly, the operating ambient temperature of the rack environment may be greater than room temperature. Therefore, install the DXM in an environment where the temperature at the front air inlet is in the range of 0° to 55° C. ♦♦ Do not obstruct the air inlets on the front panel or the air outlets on the rear panel of the DXM. ♦♦ Be sure the DXM is securely installed in the rack and not unbalanced in such a way that it may tip over and cause injury. ♦♦ AC power supplies require 100 to 240VAC, 50-60Hz, 6A maximum. DC power supplies require -48 to -60V DC, 16.5A maximum. When powering multiple DXMs from a single branch circuit, do not overload the circuit beyond its rated capacity. ♦♦ Be sure that reliable grounding is in place when installing a DXM. Use plug strips for connections to the branch circuit to make sure that proper grounding is maintained. B.2 Installing in a 4-Post Rack 95 Installing in a 4-Post Rack 1. Locate the mounting rails in the accessory box. Remove the inner rails from the outer rails. 2. Fasten the L-shaped locking brackets to the DXM with two M3 × 6mm screws on each side. 3. Attach the inner rails to the sides of the DXM by sliding the ends of the rails into the tabs near the rear of the DXM, then laying the rails alongside the DXM. Fasten the rails in three locations on each side with the M4 screws supplied (three screws for each side). XKL, LLC DXM Transport Terminal Manual Installing in a 4-Post Rack 96 4. Install the outer rails in the 4-post rack, keeping the sides level and parallel. Slide a thumb screw nut plate (see inset in illustration below) onto the front of each rail before attaching and tightening the screws to connect the rails to the rack. Leave the screws slightly loose to allow the rail to move when inserting the chassis. Use the 10-32 screws supplied with the DXM. 5. Extend the metal inserts forward from the outer rails until they lock. XKL, LLC DXM Transport Terminal Manual Installing in a 4-Post Rack 97 6. Use two people to lift the DXM and match the inner rails to the extended inserts. Slide the system into the rack until it clicks. (It will extend half way out of the 4-post rack.) 7. Press the square metal buttons on the sides of the rails, at the same time, push the DXM the rest of the way into the rack. Note the locations of the front panel and rear panel, before pushing the box in, to determine how far out to pull the box for later access. XKL, LLC DXM Transport Terminal Manual Connecting to DC Power 98 8. After the system is completely pushed into the 4-post rack, snap the black thumb screws into the L-shaped locking brackets on the sides of the DXM, and screw them tightly into the nut plates on the rails. 9. Tighten the screws that connect the rails to the rack. B.3 Connecting to DC Power To connect a properly-equipped DXM to DC power, use 12-16 American Wire Gauge (AWG) wire (stranded) to wire the -48 VDC 3-pin input connector. 14 AWG wire is recommended to optimize for size and flexibility. Note the power attachment method on the back of the power supply and follow the instructions below accordingly. WARNING: Always disconnect power before attaching wires to or detaching wires from the DXM power supply. There are two styles of power connector available on DXM power supplies: - When attaching power to this style of connector, insert a small flat blade screwdriver into a square hole of the mating connector and pry the teeth open in the adjacent round hole. Insert the uninsulated portion (about 0.25 inches) of the wire appropriately into the round hole. + INPUT CONNECTOR − + INPUT TERMINAL XKL, LLC When attaching power to this style of input terminal, loosen the terminal screw and wrap the uninsulated portion of the wire around the post of the screw. Then tighten the screw to secure the wire. DXM Transport Terminal Manual Connecting to DC Power 99 To connect a DXM to a -48V rail: 1. Connect − on the input to -48V 2. Connect on the input to Earth GND 3. Connect + on the input to -48V RTN To connect a DXM to a +48V rail: 1. Connect − on the input to +48V RTN 2. Connect on the input to Earth GND 3. Connect + on the input to +48V XKL, LLC DXM Transport Terminal Manual C Replacing Modules This Appendix describes how to replace power, fan, and laser modules in the DXM. LED displays on the front panel, SNMP traps, and the show command all provide information about when a unit needs to be replaced. See Table E.1 for a description of LED patterns and their meanings. All power, fan, and laser modules are hot swappable, which means they can be replaced while the system is running. C.1 Replacing a Power Module 1. Unplug the power cable from the power module to be removed, leaving the other power module plugged in. NOTE: The above example is for an AC power supply. Replacing a Power Module 101 2. Disengage the catch that secures the module to the chassis, and pull the module out of the chassis. 3. Slide replacement power module into the chassis. Be sure the catch clicks in place to secure the module. 4. Plug power cable into the power module. XKL, LLC DXM Transport Terminal Manual C.2 Replacing a Fan Module 102 Replacing a Fan Module 1. Locate the physical fan module that you want to replace. The show fan command describes the physical location of each fan. environment 2. Use a Phillips head screwdriver to remove the screws that hold the fan in place. Fan 2 Fan 0 3. Grasp the fan module by its handle and pull it out of the chassis. 4. Slide the replacement fan module into the chassis. Be sure to slide it all the way in so the module fits correctly. The fan unit will be energized the moment it is seated. 5. Fasten the screws to hold the fan module in place. XKL, LLC DXM Transport Terminal Manual C.3 Replacing a Wave Laser Module 103 Replacing a Wave Laser Module Client side lasers are located in the front panel of the DXM. Wave side lasers are located beneath a hatch on the top of the DXM. When replacing a wave side laser, make sure there is slack in the fiber attached to the front panel components and that the power cables have slack to the back of the unit to allow access without damaging the fiber or disconnecting the power. 1. To replace a wave side laser inside the DXM, slide the unit forward on its rails far enough to reach the top access panel. Do not strain the attached fiber connections when sliding the unit forward. Fiber bends should not be smaller than 2.5″ in diameter. 2. Unscrew the nine screws securing the access panel with a Phillips head screwdriver and open the panel. Each screw requires only a quarter turn to loosen. XKL, LLC DXM Transport Terminal Manual Replacing a Wave Laser Module 104 3. Remove the fiber pair from the laser module. Note the side each fiber pigtail is plugged into, and reconnect the same way after you replace the laser. RX TX 4. Press down on the latch to release the mechanism that holds the laser in the cage. The latch snaps and the laser slides out. (The actual release mechanism varies with the type of laser in the system.) 5. Slide the laser out of the cage. XKL, LLC DXM Transport Terminal Manual Replacing a Wave Laser Module 105 6. Insert the replacement laser module into the cage and press up on the lever to lock it in place. The latch side of the module should be facing up. Slide the laser into the cage until you hear a click. (Be sure any DWDM laser inserted is the same channel as the one removed.) 7. Clean the ends of the fiber with an approved fiber cleaner. (A fiber cleaner is included with the DXM). Clean one fiber and insert it into the laser. Then, clean the other fiber and insert it. Do not try to clean and insert both at the same time. 8. Insert the fiber into the laser module. TX RX XKL, LLC DXM Transport Terminal Manual Replacing a Wave Laser Module 106 9. Close and secure the hatch by reversing the process described in Step 2. 10. Slide the unit back into the rack. XKL, LLC DXM Transport Terminal Manual D Sample Boot-Up Type Out This appendix includes an example of the DXM boot-up dialog, described in Chapter 2. The following example shows a typical boot of an unconfigured DXM hybrid system, after powerup, without any user intervention. Chapter 2 provides a description of the system boot process. The system may generate a slightly different display, depending on the hardware and software configuration. System Processor (XKL-2) Ver - 400000000632 MiniBoot version 1.5(37)-1 Copyright (c) 1993-2009, XKL, LLC. All rights reserved. This product is protected by copyright and distributed under licenses restricting copying, distribution and decompilation. Mem Test: Wr Rd/Cmp Clr [LS0 byte reports 2] Using slot 3; card 0; sector 700000 Capacity 2045247488 bytes [Loading (flash into RAM) EXE format OK!] Loaded version 3.7(2465)-1 [Starting boot] [Processor board "0700309014G010" from ID ROM.] [System MAC addresses per ID ROM: 0x00A0E30003CE count = 8] Boot version 3.7(2465)-1 Link date 4-Aug-2009 18:43:23 UT-7:00 SVN info: Built 2009-08-05 01:37:45 UTC, SVN Id 16032, P/N 00003-00371-00 svn://source1/product_software/boot/branches/release/Boot_software_00003-00371-00/boot Copyright (c) 1993-2009, XKL, LLC. All rights reserved. This product is protected by copyright and distributed under licenses restricting copying, distribution and decompilation. Board serial number 202769418. This CPU has Microcode version 0632, options 400000 % Calendar reports Friday 14-Aug-2009 01:22:53 UT % Locally, Thursday 13-Aug-2009 18:22:53 UT-7:00 % Setting the CPU's high resolution clock from the calendar. Configuring bus: Slot Device 1. XKL-2 Processor-2 (this CPU) 2. XMH-1 XMH-1 memory control 3. XFM-1 Flash Memory Block Interface-1 4. XNC-1 Network Controller-1 108 [Optical service channel(s) present: 0, 1] 5. FPGAL-1 FPGA Loader-1 Memory configuration: Slot Device 2. XMH-1 (256MW), on line at LPN 00 [Memory has not been tested or cleared; programs may see parity errors] [Loader reports customer gateware. Cold (External power cycled) reboot.] ["Power cycled" remains on until the operating software resets it.] % Configuration file STARTUP-CONFIGURATION, slice 2, appears to be uninitialized % Unable to find a suitable configuration file [Slot 4, Ethernet 0: link is up] % There is no configuration file: network addresses are not defined. The program is seeking a network address and configuration file by means of DHCP. [The program will attempt this for two minutes until answered or interrupted. Type Ctrl-C to interrupt this.] % Timed out [Delaying AUTO-BOOT for 10. seconds.] [Type Ctrl-C to abort, or any other key to boot now.] [Autoboot candidate is Flash STARTUP-IMAGE] [AUTO-BOOT] 13-Aug-2009 18:25:08 UT-7:00 Auto booting from Flash STARTUP-IMAGE [Loading ..................................] [File entry-vector is at 7700,,1000, length is 4] [PDVA at 7707,,0] [Free pages from 10601 through 1777777.] [Enabling the watchdog timer for this program.] [Clearing flags and context] [Starting at 7700,,1000] Starting DXM Operating System (DXMOS), XKL LLC V2.1.0-16140 Aug 13 2009 12:45:05 Copyright (c) 2004-2009 XKL LLC All Rights Reserved This product is protected by copyright and distributed under licenses restricting copying, distribution and decompilation. I2C: Initializing I2C Interface... I2C Interface defined to be CCCv2. IDROM for Controller found. IDROM for Companion found. IDROM for AMP 0 found. I2C__Init: Detecting hardware with OXCSH Switch board Initializing environmental loader: Environmental loader communication is up Enviroloader: Initializing watchdog to maximum value of 0xff. Running startup-gateware Done External Power Cycled Companion Board: Detecting companion hardware with companion monitor capability. Companion Board: Power was cycled performing companion monitor reset. Companion Board: Successfully read data from companion monitor on initialization. Companion Board: Detecting companion monitor id 1, XKL Part Number: 1090020-007303. Transport Complex: Detecting OXCSH (Hybrid) Switch Board. Initializing CDR complex... CDR Complex: Detected Hybrid Switch Board. XKL, LLC DXM Transport Terminal Manual 109 Switch SFP Complex: Detecting OXCSh Hybrid Switch Board. About to init switch complex, 0 About to init switch complex, 1 Instantiating 4 AMP slots for C1UE board Not loading data from amplifier edfa west 0, because it's not present AMP 1 online Building command polling structure for REDC AMPs Not loading data from amplifier edfa east 0, because it's not present Not loading data from amplifier edfa west 1, because it's not present AMP Initialization complete localhost> User Enabling TX laser on interface: Client 0 User Enabling TX laser on interface: Client 1 User Enabling TX laser on interface: Client 2 User Enabling TX laser on interface: Client 3 User Enabling TX laser on interface: Client 4 User Enabling TX laser on interface: Client 5 User Enabling TX laser on interface: Client 6 User Enabling TX laser on interface: Client 7 User Enabling TX laser on interface: Client 8 User Enabling TX laser on interface: Client 9 User Enabling TX laser on interface: Wave 9 User Enabling TX laser on interface: Wave 8 User Enabling TX laser on interface: Wave 7 User Enabling TX laser on interface: Wave 6 User Enabling TX laser on interface: Wave 5 User Enabling TX laser on interface: Wave 4 User Enabling TX laser on interface: Wave 3 User Enabling TX laser on interface: Wave 2 User Enabling TX laser on interface: Wave 1 User Enabling TX laser on interface: Wave 0 localhost> Power Supply 0 returned to normal Power Supply 1 returned to normal Temperature Sensor: Inlet 0 online Temperature Sensor: Midboard 0 online Temperature Sensor: Outlet 2 online Fan Controller 2 online, initializing Interface Ethernet 0 line up Temperature Sensor: Outlet 0 online Fan Controller 0 online, initializing XKL, LLC DXM Transport Terminal Manual E Fibre Channel & DXM This appendix provides technical information related to the use of the DXM system with Fibre Channel technology. Before attempting to deploy DXM Fibre-Channel links, verify that the system supports the desired throughput over the additional distance. Some host controllers have limited throughput capacity over long distances because of resource constraints with the data-link protocol. Fibre-Channel hardware typically has a limited number of buffers it is willing to put into flight at any given time. Once buffer capacity is reached, a response must be received before additional buffers post. Therefore, if the round-trip length of a fiber trunk exceeds the maximum buffer capacity, fibre-channel throughput drops as the host controller pauses for a response. Calculating Supported Distances with Fibre Channel The distance at which throughput is effected is a function of: D = distance traversed by the trunk B = number of buffers R = rate S = bit size C = speed of light 2 = factor accounting for a round trip on the fiber trunk The maximum distance can be estimated using the following formula: D=B*S*C/R/2 *This formula is intended only to provide an approximate figure. Talk to your Fibre Chan nel vendor to determine compatability with your long-distance transport system. F DHCP Configuration Your DXM is capable of semi-automated configuration using DHCP and TFTP protocols. In this context, the DXM acts as the DHCP client and broadcasts discovery requests. The DHCP offer and subsequent download of the configuration file can be managed on a single DHCP/TFTP server or separate DHCP and TFTP servers. Two separate files must be properly deployed on the DHCP/TFTP server(s) in order to effectively use DHCP configuration. The first file is the DXM configuration file, which must be hosted on a TFTP server. This file can be created during manual configuration of the DXM. Once a configuration file is created, it can be modified outside of the DXM using any text editor. The second file is the DHCP server configuration file, which configures the server to provide the DHCP offer when it receives a DHCP discovery request from the DXM. It is essential that the information in the server configuration file match the client identifier or source MAC address sent by the DXM during DHCP discovery. It is important to note that “01:” will always be prepended to an interface's MAC address when it is used as the DHCP client identifier. The same syntax must be used in the DHCP server configuration file. The information included in the DHCP server configuration file must correspond to the parameters (or absence of parameters) in the boot host dhcp command stored in startup-config. If Boot finds a boot host dhcp <client-id interface> command, then Boot sends DHCP discovery using the specified client identifier. It may be useful to use the <client-id interface> parameter to specify a fixed DHCP client identifier, regardless of which Ethernet interface is used for the DHCP discovery message. The parameter may even specify an inactive Ethernet interface. If Boot finds a boot host dhcp command in startup-config without a specified <client-id interface>, then on each active interface Boot broadcasts a DHCP discovery message and in each instance the client identifier will be the MAC address of the interface from which discovery is broadcast. In this scenario, you may use any active interface's client identifier or source MAC address in the corresponding DHCP server configuration file. Be aware, however, that if the 112 Ethernet interface or MAC address that you designate in the file is unable to reach the DHCP server, no DHCP offer can be made and the configuration process will fail. Example Server Configuration: The following example demonstrates a portion of the required configuration of a Unix/dhcpdbased server. The following sample would be added to the server's /etc/dhcpd.conf file: host dxm-sea-01 { hardware ethernet 00:A0:E3:00:01:A8; next-server 10.3.0.250; filename "config-00.01.a8"; } “00:A0:E3:00:01:A8” is the MAC address of an active Ethernet interface that can reach the DCHP server. In all cases, the DXM only temporarily uses the offered IP address and then releases it after obtaining the configuration file. Static IP configuration and other configuration parameters should be included in the file config-00.01.a8 that is placed in the TFTP server's directory. The TFTP server is specified in the next-server parameter. If the DXM is multihomed and capable of reaching DCHP servers on more than one of its connected Ethernet interfaces, you can specify a configuration file bound to a particular clientidentifier as illustrated in the following example. In this case, a "boot host dhcp ethernet 0" line should be added to the startup-configuration of dxm-sea-01, where the MAC address of Ethernet 0 on dxm-sea-01 is 00:A0:E3:00:01:A6. This will allow the DHCP server to provide a single configuration regardless of which DXM management interface is used to obtain the configuration: host dxm-sea-01 { next-server 10.3.0.32; option dhcp-client-identifier 01:00:A0:E3:00:01:A6; filename "config-00.01.a6"; } NOTE: Either the DHCP server must be directly connected to the subnet that connects to a DXM management interface or a system on that subnet must act as a DHCP relay. XKL, LLC DXM Transport Terminal Manual G BERT (Bit Error Ratio Test) BERT is a testing method that uses patterns of logical ones and zeros generated by a PRBS (pseudorandom binary sequence). The DXM generates a PRBS with a bit length of 2^31 – 1. Currently, the DXM only supports BERT with XFP modules. There are multiple methods for conducting a BERT: 1. Test on a single DXM on one interface by looping together Tx and Rx sides 2. Test on paired DXMs by transmitting on an interface on the first unit and receiving on an interface on the second unit To begin BERT, ensure that LoS and LoL conditions are not present. Verify that the optical fibers between the selected interface(s) are properly secured and appropriately powered. virtualight and laser shutdown must be disabled on the selected interface(s). Each interface must be set to the same encapsulation and the encapsulation must be supported by BERT. The PRBS system uses a single clock setting and will automatically adjust to the encapsulation of the most recently selected interface. For this reason, separate interfaces used with BERT must be set to the same encapsulation. If encapsulation is different on each interface, the PRBS generator will lose lock on the data and the test will fail to initiate. The commands used to run BERT are fully detailed in the Chapter 5 Command Line Interface Reference. Only one BERT receive command can be issued at a time on a single DXM. Therefore, when performing BERT with a single or paired units, only one BERT can be performed at a time and you must cancel a current BERT before attempting to start a new test. However, it is possible to run concurrent BERTs if you transmit from different interfaces on a single DXM and receive on multiple, separate DXMs. The BERT test is accomplished by selecting the desired interface(s) and issuing a bert transmit command on the transmitting interface followed by a bert receive command on the receiving interface. The bert transmit command initiates PRBS generation. The bert receive command initiates reception of the PRBS stream and begins counting bits, errors, and the elapsed time. After you initiate PRBS generation and reception on the selected interface(s), you will need to al- 114 low the BERT to run at a time interval determined by a target confidence level. This interval can be determined using the table provided at the end of this appendix. There are two methods for obtaining BERT test results. While the BERT is running, the show interface command can be used on the receiving interface to obtain test results up to the time that the command was issued. The information can be found in the BERT results category of the command's report. This method may be useful to spot check results during an ongoing BERT. To end the BERT and obtain final test results, use the no parameter for each BERT command and issue them in reverse order: no bert receive on the receiving interface followed by no bert transmit on the transmitting interface. Final test results are automatically generated when no bert receive is issued. The BERT test-results message will contain the total number of bits received, total single-bit errors, and the total time elapsed in seconds. The maximum number of errors reported is 4.2 billion. Errors beyond the maximum limit will result in overflow. Once you have generated a report, the results can be used to manually calculate the bit-error rate using the second formula below. Confidence Level & BER Standards The tables below specify the required test period in minutes that is necessary to achieve a confidence level of 95% or 99%. The time displayed in the UI should be used to make this calculation; Do not use an external clock. This information is intended for testing with all XFP encapsulation types supported by the DXM. CL = confidence level E = maximum errors allowed for the specified duration of the test To achieve an industry-standard BER of 10 (all values specified in minutes): CL E=0 95% 51 99% 78 To achieve an industry-standard BER of 10 (all values specified in minutes): CL E=0 95% 5 99% 8 E=1 80 112 E=1 8 12 E=2 E=3 106 130 141 169 E=2 11 15 E=3 13 17 -14 , use the following confidence intervals E=4 154 195 E=5 177 220 -13 , use the following confidence intervals E=4 16 20 E=5 18 22 XKL, LLC DXM Transport Terminal Manual 115 Calculating the Bit-Error Ratio (BER) Bit-error ratio is a function of: E = number of individual bit errors (total PRBS errors received) N = number of bits received on the interface (total PRBS bits received) The bit-error rate can be calculated using the following formula: BER = E/N XKL, LLC DXM Transport Terminal Manual H Acronyms & Abbreviations This appendix defines acronyms and abbreviations used in the manual and in the optical industry. Abbreviation ADM AON ARP APP BER CIDR CTY DMUX DWDM DSF DFB FPGA GHz GBps ICMP LAN LOA LOL LOS MAN MIB MSDP MUX NAS NDSF NZ-DSF PRBS SFP Definition Add/Drop Multiplexer All Optical Network Address Resolution Protocol Automatic Path Protection Bit Error Ratio Classless Inter-Domain Routing Console Terminal Demultiplexer Dense Wavelength Division Multiplexing Dispersion-Shifted Fiber Distributed Feedback Laser Field Programmable Gate Array Gigahertz Gigabits per second Internet Control Message Protocol Local Area Network Loss of Activity Loss of Lock Loss of Signal Metropolitan Area Network Management Information Base Multicast Source Discovery Pool Multiplexer Network Attached Storage Non-Dispersion-Shifted Fiber Non-Zero Dispersion-Shifted-Fiber Pseudo-Random Binary Sequence Small Form factor Pluggable module Abbreviation VTY WAN WDM XFP XKL, LLC 117 Definition Virtual Terminal Wide Area Network Wavelength Division Multiplexing 10 gigabit small Form factor Pluggable module DXM Transport Terminal Manual I Glossary The glossary provides definitions for key terms and concepts used in the DXM Transport Terminal Manual and for some terms standard in the optical industry. Add/DropMultiplexer (ADM) A multiplexer that can add one or more lower bandwidth signals to an existing highbandwidth data stream and, simultaneously, extract other low bandwidth signals, removing them from the stream and redirecting them to another network path. Address Resolution Protocol (ARP) The method for finding a host’s hardware address when only its IP address is known. ARP is primarily used to translate IP addresses to Ethernet MAC addresses. All-Optical Network (AON) Optical network environments that exploit multiple channel wavelengths for switching, routing, or distribution, using light instead of electronics. Ambient Temperature The temperature of the medium surrounding an object. In general, room temperature and ambient temperature are the same. the same signal over two different physical fiber connections. If a fiber cut or component failure stops traffic over the primary, or working interface, APP immediately switches traffic to the secondary, or protection interface. Band Combiner A band combiner uses an optical multiplex and demultiplex to respectively combine and separate bands on a single fiber. A band consists of 10 channels of light traveling down a single fiber. With an optional DXM Band Combiner, multiple DXM systems can be combined to scale to larger transport capacities on a single fiber. Bit Error Rate Test (BERT) A testing method for digital communication circuits using stress patterns comprised of a sequence of logical ones and zeros, generated by a PRBS. Automatic Laser Shutdown (ALS) A protocol that shuts down the optical output power of remote transmitters automatically if a remote link is broken. Channel A communications path or the signal sent over that path. Multiplexing allows several channels for data communications. The channel transports information about operation, administration, maintenance, and provisioning over a SONET interface. Automatic Path Protection (APP) A DXM switching mechanism that provides redundancy for a connection by transmitting Classless Inter-Domain Routing (CIDR) A method of categorizing IP addresses for both allocation and efficient routing. CIDR notation adds a subnet mask after the standard IP address quartet (N in A.B.C.D/N) that defines how many bits of the address make up its routing prefix. Command Line Interface (CLI) A text-based interface for interacting with hardware or software. The DXM uses a CLI to present the operator with information and to receive configuration commands from the operator. The system delivers the CLI to a console through a serial connection or to a networked terminal through a Virtual Terminal (VTY). Cladding The material surrounding the core of an optical fiber. Since the cladding has a lower refraction index than the core, transmitted light is forced to travel down the core. Core The light-conducting central portion of an optical fiber, with a higher refraction index than the cladding. Crossbar Switch Switch with a matrix of connections between inputs and outputs. If the switch has M inputs and N outputs, a crossbar has a matrix with M × N crosspoints, or places where the bars cross. Demultiplexer (dmux) A module that separates two or more signals previously combined by multiplexing equipment. Dense Wavelength Division Multiplexing (DWDM) A technique where optical signals with different wavelengths are combined, transmitted together, and separated again. Dichroic Filter An optical filter that transmits light according to wavelength; light that is not transmitted is reflected. XKL, LLC 119 Dielectric A nonconducting or insulating substance that resists passage of electric current. Diffraction Grating An array of fine, parallel, equally spaced reflecting or transmitting lines that mutually enhance the effects of diffraction to concentrate the diffracted light in specific directions determined by the spacing of the lines and by the wavelength of the light. Diode An electronic device that conducts electricity in one direction only. The simplest semiconductor devices are diodes. Dispersion The spreading of a light signal caused by light signals traveling at different speeds through an optical waveguide. Dispersion can be caused by modal or chromatic effects. Erbium Doped Fiber Amplifier (EDFA) A device that strengthens optical signals by multiplexing the signal with energy from a pump laser into a fiber doped with trivalent erbium ions. The erbium ions are stimulated to emit photons at the same wavelength as the original signal. Fast Ethernet Fast Ethernet offers a speed of 100 Mbps over Cat-3 or UTP. It preserves many of the attributes of Ethernet, including frame format, MAC mechanisms, and MTU. See also Ethernet. Fibre Channel A technology for transmitting data between computer devices over optical fiber or copper. Fibre channel is optimized for connecting servers to shared storage devices and for interconnecting storage controllers and drives. Fiber Distributed Data Interface (FDDI) A LAN standard specifying a 100-Mbps tokenpassing network using fiber-optic cable, with transmission distances up to 2 km. FDDI uses DXM Transport Terminal Manual a dual-ring architecture. Filter An arrangement of components designed to pass signals in one or more frequency bands while reflecting signals in other frequency bands. Gigabit Ethernet (GigE) GigE is a backbone LAN technology offering data speeds up to 1000 Mbps. GigE can use either a shared or switched medium. 120 Internet Control Message Protocol (ICMP) A protocol used in Internet Protocol networking to send error and diagnostic messages. Internet Protocol address (IP) A unique number that devices use to identify and communicate with each other on a computer network using the Internet Protocol standard. Gigahertz (GHz) Unit of current or wave frequency that equals one thousand million hertz. Jitter Small and rapid variations in the timing of a signal or waveform due to noise, changes in component characteristics, voltages, circuit synchronization, and so on. Graded-Index Fiber An optical fiber in which the refractive index of the core decreases toward the cladding. Kbps Kilobits per second, or one thousand bits per second. Hertz (Hz) Number of cycles per second. KHz Kilohertz, or 1,000 cycles per second. Hot-Swappable The ability to add or remove a component from a system without first removing the power to that component. Lambda (λ) The Greek letter used in optics to denote wavelength. In optical communications, wavelength is measured in nanometers (nm). Hubbed Ring In a hubbed ring network topology, all channels originate and terminate from a hub node. The other nodes on the ring, sometimes called satellite nodes, add and drop one or more channels. The added and dropped channels terminate at the node, while the channels that are not being dropped, sometimes called express channels, are passed through optically, without being electrically terminated. Link Budget The accounting of all gains and losses in signal strength between transmitter and receiver. Signal loss over optical fiber is exponential with the length of the fiber, and is typically expressed as dB per unit of distance. Insertion Loss The attenuation, measured in dB, that results from inserting a component, such as a connector or splice, into a previously continuous path. Intermediate Reach A distance specification for optical systems that operate effectively from 3 to 20 km. XKL, LLC Local Area Network (LAN) A high-speed, low-error data network covering a relatively small geographic area. Ethernet, FDDI, and Token Ring are widely used LAN technologies. Loss of Activity (LOA) An event that occurs when an interface cannot detect a typical distribution of zero-one/ one-zero transitions. Some data protocols do not guarantee that all valid data is within the tolerance of activity detection. DXM Transport Terminal Manual Loss of Lock (LOL) An event that occurs when an interface cannot lock to the data rate of a signal. Loss of Signal (LOS) An event that occurs when an optical receiver is not getting enough optical power to guarantee the quality of the data that comes from the remote laser. Management Information Base (MIB) An object that can be managed by SNMP Material Dispersion The dispersion resulting from the different velocities of each wavelength in a fiber medium. Mbps Megabits per second, or one million bits per second. MBps Megabytes per second, or one million bytes per second. MD5 hash A digital “fingerprint” produced from a string of text by the Message-Digest algorithm 5 (MD5). Such hashes are commonly used for cryptographic purposes. The DXM uses MD5 to encrypt plaintext passwords before storing them. MHz Megahertz, or one million cycles per second. See also Hz. Mean Time Between Failure (MTBF) Time at which 50% of a unit fails. A measure of the time a user might reasonably expect a device or system to function correctly before a fault occurs. Metropolitan Area Network (MAN) A network that covers an area larger than a LAN, usually a metropolitan area. MANs exist between, and interconnect, the long-haul and access segments of the global network. XKL, LLC 121 Multicast Source Discovery Protocol (MSDP) A protocol that connects multicast routing domains and allows them to discover sources from other domains. Multimode Fiber An optical fiber whose core is large enough to propagate more than one mode of light. A multimode fiber core is either 50 μm or 62 μm in diameter. (See also singlemode fiber.) Multiplexer (MUX) A device that combines information from two or more data sources into a single channel. Network Attached Storage (NAS) A central data storage system attached to the network that it serves. (See also Storage Area Network) Non-Zero Dispersion-Shifted Fiber (NZ‑DSF) A dispersion-shifted single mode fiber that has the zero dispersion point near the 1550 nm window, but outside the actual window used to transmit signals. NZ-DSF is designed to maximize bandwidth while minimizing fiber nonlinearities. Optical Amplifier (OA) A device that amplifies an input optical signal without converting it to electrical form. Optical Add/Drop Multiplexer (OADM) A multiplexer used in optical networks that can add and drop wavelengths into and out of an optical signal without converting them back to electrical form. (See also ADM.) Optical Carrier (OC) A series of physical protocols, such as OC-1, OC-3, OC-12, and OC48, defined for SONET optical signal transmission. The OC-x: is the base unit found in the SONET hierarchy; the x represents increments of 51.84 Mbps (so, OC-1 is 51.84 Mbps; OC-3 is 155 Mbps, and OC-12 is 622 Mbps). (See also SONET.) DXM Transport Terminal Manual Optical Cross-Connect (OXC) An optical network element that provides for incoming optical signals to be switched to any one of a number of output ports. Some OXCs connect fibers containing multichannel optical signals to the input, demultiplex the signals, switch the signals, and recombine/remultiplex the signals to the output ports. Other OXCs connect fibers with single channel optical signals to the input and output ports and switch between the two. OXCs can have optical or electrical switch matrixes. Optical Mux/Demux (OMD) A filter that multiplexes and demultiplexes optical signals onto a fiber. Unlike an OADM, the OMD does not allow any signals to pass through. (See also OADM) Optical Link Loss Budget The total loss allowable between an optical transmitter and its corresponding receiver before the signal becomes undetectable. Optical Receiver An opto-electric circuit that detects incoming lightwave signals and converts them to the appropriate electronic signals for processing by the receiving device. Optical Service Channel (OSC) Mechanism that transports information about system parameters to the software of the management system. Optical Time Domain Reflectometer (OTDR) An instrument used in design and diagnostics that locates faults or infers attenuation in optical networks. Passive Device A component that does not require external power to manipulate or react to optical output, including optical mux/demux modules. Photodetector An opto–electronic transducer such as a photodiode. XKL, LLC 122 Photodiode A semiconductor device that converts light to electrical current. Physical Layer The first layer of the OSI reference model. Alloptical technologies such as DWDM work at the physical layer. Polarization Mode Dispersion (PMD) An inherent property of optical media, caused by the difference in the propagation velocities of light in the orthogonal principal polarization states of the transmission medium. Protection Interface The secondary interface in an Automatic Path Protection (APP) system. The protection interface takes over if the signal on the working interface is interrupted. Protocol Transparency The ability of systems to transport information without being aware of higher layer protocols. Such a system can also be described as protocol agnostic. Pseudo Random Bit Sequence (PRBS) A test pattern that provides a communication link (a sequence of ones and zeros in a pseudorandom pattern.) Since it is not a random sequence, a repeating pattern appears. The DXM uses a PRBS signal to indicate an error condition in a link. Raman Amplifier A device that uses SRS (Stimulated Raman Scattering) to produce optical gain. In contrast to EDFA and SOA devices, the amplification effect is achieved by a nonlinear interaction between the signal and a pump laser within an optical fiber. There are two types of Raman amplifiers: distributed and lumped. A distributed amplifier uses the transmission fiber as the gain medium by multiplexing a pump wavelength with signal wavelength and requires a minimum span of 100km. A lumped amplifier uses a dedicated shorter, highly DXM Transport Terminal Manual 123 nonlinear fiber with a small core to increase the interaction between signal and pump wavelengths. device mother board for a switcher or router to a fiber optic or unshielded twisted pair networking cable. Receiver A device at the destination end that includes a detector and signal processing electronics to perform optical-to-electrical conversion. A receiver has a maximum acceptable value of average received power (receiver overload) and a minimum acceptable value of received power (receiver sensitivity). Storage Area Network (SAN) A secure information infrastructure to attach remote computer storage devices to servers in such a way that the devices appear as locally attached to the operating system. The SAN enables any-to-any connection of servers and storage systems. Refraction The change of direction of a wavefront as it passes through a boundary between two dissimilar media. Refractive Index A property of optical materials that relates to the speed of light in the material. See also index of refraction. Regenerator A device that regenerates optical signals by converting incoming optical pulses to electrical pulses, cleaning up the electrical signal to eliminate noise, and reconverting them to optical pulses for output. Also called regenerative repeater. See also 2R functions; 3R functions. Revertive Switching A process that switches the signal back to an original working interface when that interface comes back online. Routing Information Protocol (RIP) The RIP is an interior gateway protocol that helps routers dynamically adapt to changes of network connections by describing which network each router can reach and how far away those networks are. Small Form-Factor Pluggable Transceiver (SFP) A compact optical transceiver used for both telecommunication and data communication applications. The SFP interfaces a network XKL, LLC Simple Network Management Protocol (SNMP) An application layer protocol to enable the exchange of management information between network devices. SNMP allows network administrators to manage performance, troubleshoot problems, and plan for growth. (SNMP is part of the Transmission Control Protocol/Internet Protocol (TCP/IP) protocol suite.) Single-Mode Fiber (SM) A small-core optical fiber through which only one mode can propagate. See also multi-mode fiber. Signal-to-Noise Ratio (SNR) A measure of signal quality as the ratio of the total signal to the total noise. This effectively shows how much higher the signal level is than the noise level. Synchronous Optical Network (SONET) A telecommunication industry standard for high-speed synchronous transport over optical fiber. Splitter A device that creates multiple optical signals from a single optical signal. Short Reach A distance specification for optical systems that operate effectively up to 3 km. Step-Index Fiber Fiber that has a uniform index of refraction DXM Transport Terminal Manual throughout the core. Survivability The ability of a network to maintain or restore an acceptable level of performance during failures by applying various restoration techniques. Topology The pattern of links connecting pairs of nodes to a network. A node has one or more links to others, and the links can appear in a variety of different shapes. The simplest topology is a one-way link between two devices. 124 Protection (APP) system. If signal on the working interface is interrupted, the protection interface takes over. XFP A hot-swappable, protocol-independent optical transceiver, typically operating at 1310nm or 1550nm. Transmission Control Protocol/Internet Protocol (TCP/IP) Protocols that create a network of networks to deliver a few basic services (file transfer, electronic mail, remote logon) across a large number of client and server systems. Virtualight A proprietary DXM feature which causes an interface to disable its transmitter whenever remote error state is detected in the associated stream, thus forcing a connected client to see the problem signal as unambiguously down. Warm Reboot Reboot where the controller gateware and software are reloaded, but the power and state of transport interfaces and switch remain on. Wavelength Division Multiplexer (WDM) A passive device that combines light signals with different wavelengths and on different fibers onto a single fiber. A Wavelength Division Demultiplexer performs the reverse function. (See also DWDM) Wide Area Network (WAN) A physical or logical network that serves users across a broad geographic area and often uses transmission devices provided by common carriers. (See also LAN and MAN.) Working Interface The primary interface in an Automatic Path XKL, LLC DXM Transport Terminal Manual Bringing fundamental change to worldwide telecommunications XKL, LLC 5020 148th Avenue NE, Suite 100 Redmond, WA 98052 425-869-9050 Fax: 425-861-7863 www.xkl.com