1
EF51
Mobile Phone
User Manual
Copyright
© 2006. BenQ Mobile GmbH & Co. OHG. All rights reserved. No part of
this publication may be reproduced, transmitted, transcribed, stored in a
retrieval system or translated into any language or computer language, in
any form or by any means, electronic, mechanical, magnetic, optical,
chemical, manual or otherwise, without the prior written permission of
BenQ Mobile GmbH & Co. OHG.
Disclaimer
BenQ Mobile GmbH & Co. OHG makes no warranty or representation,
either expressed or implied, with respect to the quality, accuracy or fitness
for any particular purpose of this document. The information in this
document is correct at the time of printing and subject to change without
notice.
Safety information
For your safety, please read the guidelines below carefully
before you use your phone:
Exposure to radio frequency signals
Max. SAR measurement
EU: GSM900: 0.778 W/Kg; DCS1800: 0.285 W/Kg.
USA: PCS1900: 0.76 W/Kg (head); 0.354 W/Kg (body).
Your handheld mobile phone is a low power transmitter and receiver.
When it is ON, it receives and also sends out radio frequency (RF) signals.
European and international agencies have set standards and
recommendations for the protection of public exposure to RF
electromagnetic energy.
• International Commission on Non-Ionising Radiation Protection
(ICNIRP) 1996
• Verband Deutscher Elektroingenieure (VDE) DIN- 0848
• Directives of the European Community, Directorate General V in
Matters of Radio Frequency Electromagnetic Energy
• National Radiological Protection Board of the United Kingdom, GS 11,
1988
• American National Standards Institute (ANSI) IEEE. C95.1- 1992
• National Council on Radiation Protection and Measurements (NCRP).
Report 86
• Department of Health and Welfare Canada. Safety Code 6
Safety information
i
These standards are based on extensive scientific review. For example,
over 120 scientists, engineers and physicians from universities,
government health agencies and industry reviewed the available body of
research to develop the updated ANSI Standard.
The design of your phone complies with these standards when used
normally.
Specific operating restrictions
No metallic component allowed in body-worn accessories.
Phone operation
• Normal Position: Hold the phone as you would with any other
telephone.
• To avoid potential RF interference, please do not wear the phone
around your neck or in front your chest for long hours.
Batteries
• For safety concerns, when the temperature of the phone goes over
45°C (113F) or below 0°C (32F), charging will halt.
• Do not expose batteries to temperatures below -10°C (14F) or above
45°C (113F). Always take your phone with you when you leave your
vehicle.
• Use only genuine batteries to ensure the phone’s normal operation.
ii
Safety information
All batteries can cause property damage, injury or burns if a conductive
material such as jewelry, keys or beaded chains touches exposed terminals.
The material may complete the electrical circuit and become quite hot. To
protect against such unwanted current drain, exercise care in handling any
charged battery, particularly when placing it inside your pocket, purse or
other container with metal objects. Your batteries are packaged with a
protective battery cover; please use this cover for storing your batteries
when not in use.
Driving
Check the laws and regulations on the use of moblie phones in the areas
where you drive. Always obey them. Also, if using your phone while
driving, please:
• Give full attention to driving--driving safety is your first responsibility.
• Use handsfree operation, if available.
• Pull off the road and park before making or answering a call if driving
conditions so require.
Electronic devices
Most modern electronic equipment is shielded from RF signals. However,
certain electronic equipment may not be shielded against the RF signals
from your wireless phone.
Pacemakers
The Health Industry Manufacturers Association recommends that a
minimum separation of six (6") inches be maintained between a handheld
wireless phone and a pacemaker to avoid potential interference with the
pacemaker. These recommendations are consistent with the independent
research by and recommendations of Wireless Technology Research.
Safety information
iii
Persons with pacemakers:
• Should ALWAYS keep the phone more than six inches from their
pacemaker when the phone is turned ON.
• Should not carry the phone in a breast pocket.
• Should use the ear opposite the pacemaker to minimise the potential
for interference.
If you have any reason to suspect that interference is taking place, turn
your phone OFF immediately.
Hearing aids
Some digital wireless phones may interfere with some hearing aids. In the
event of such interference you may want to consult your hearing aid
manufacturer to discuss alternatives.
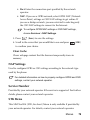
Other medical devices
If you use any other personal medical device, consult the manufacturer of
your device to determine if they are adequately shielded from external RF
energy. Your physician may be able to assist you in obtaining this
information.
Turn your phone OFF in health care facilities when any regulations posted
in these areas instruct you to do so. Hospitals or health care facilities may
be using equipment that could be sensitive to external RF energy.
Vehicles
RF signals may affect improperly installed or inadequately shielded
electronic systems in motor vehicles. Check with the manufacturer or its
representative regarding your vehicle. You should also consult the
manufacturer of any equipment that has been added to your vehicle.
iv
Safety information
Posted facilities
Turn your phone OFF in any facility where posted notice so requires.
Aircraft
FCC regulations prohibit using your phone while in the air. Switch OFF
your phone before boarding an aircraft.
Blasting areas
To avoid interfering with blasting operations, turn your phone OFF when
in a “blasting area” or in the area posted “TURN OFF TWO-WAY
RADIO.” Obey all signs and instructions.
Potentially explosive atmospheres
Turn your phone OFF and do not remove the battery when in any area
with a potentially explosive atmosphere and obey all signs and
instructions. Sparks from your battery in such areas could cause an
explosion or fire resulting in bodily injury or even death.
Areas with a potentially explosive atmosphere are often, but not always
clearly marked. They include fueling areas such as gasoline stations; below
deck on boats; fuel or chemical transfer or storage facilities; vehicles using
liquefied petroleum gas (such as propane or butane); areas where the air
contains chemicals or particles, such as grain, dust or metal powders and
any other area where you would normally be advised to turn off your
vehicle engine.
For vehicles equipped with an airbag
An airbag inflates with great force. DO NOT place objects, including both
installed or portable wireless equipment, in the area over the airbag or in
the airbag deployment area. If in-vehicle wireless equipment is improperly
installed and the airbag inflates, serious injury could result.
Safety information
v
This device complies with Part 15 of the FCC Rules.
Operation is subject to the following two conditions:
1. this device may not cause harmful interference, and
2. this device must accept any interference received, including
interference that may cause undesired operation.
Changes or modifications not expressly approved by the party
responsible for compliance could void the user's authority to operate
the equipment.
For body-worn operation, this phone has been tested and meets the FCC
RF exposure guidelines for use with an accessory that contains no metal
and that positions the handset a minimum of 1.5 cm from the body. Use
of other enhancements may not ensure compliance with FCC RF
exposure guidelines. If you do not use a body-worn accessory and are not
holding the phone at the ear, position the handset a minimum of 1.5 cm
from your body when the phone is switched on.
European Union Directives Conformance Statement
BenQ Mobile hereby declares that the phone described in this user guide
is in compliance with the essential requirements and other relevant
provisions of European Directive 1999/5/EC (R&TTE). The relevant
declaration of conformity (DoC) has been signed. Please call the company
hotline if you require a copy of the original or visit:
www.BenQMobile.com/conformity
EN 301511
TS51.010-1
EN 50360/361
EN 60950-1
EN 301489-1&-7
EN 301489-1&-17
EN55013
vi
Safety information
EN55020
EN55022
EN55024
EN300328
Permanent hearing loss may occur if you use ear- or
headphones at high volume.You can adapt over time to a
higher volume, which may sound normal but can be
damaging to your hearing. Set your volume to a safe level. If
you experience ringing in your ears, reduce the volume or
discontinue use of your system.
All electrical and electronic products should be disposed of
separately from the municipal waste stream via designated
collection facilities appointed by the government or the
local authorities.
This crossed-out wheelie bin symbol on the product
means the product is covered by the European Directive
2002/96/EC.
The correct disposal and separate collection of your old
appliance will help prevent potential negative consequences
for the environment and human health. It is a precondition
for re-use and recycling of used electrical and electronic
equipment.
For more detailed information about disposal of your old
appliance, please contact your local council, waste disposal
service or the shop where you purchased the product.
Safety information
vii
<Memo>
viii
Safety information
Table of Contents
Safety information ..............................................................i
1. Preparing your phone for use ........................................1
Removing the back cover ........................................................1
Inserting a SIM card ................................................................1
Installing a battery ...................................................................2
Installing the back cover..........................................................3
Charging the phone .................................................................3
Turning the phone on .............................................................4
The miniSD card......................................................................5
2. Getting to know your phone ..........................................6
Your phone at a glance ............................................................6
Idle screen ...............................................................................8
Icons in the status bar .................................................................9
Using the keys in idle mode ..................................................10
Menu navigation....................................................................13
3. Using your phone .........................................................14
Call functions.........................................................................14
Making a phone call ..................................................................14
Ending a phone call ...................................................................14
Answering a phone call .............................................................14
Rejecting an incoming call ........................................................15
Muting the ring tone for an incoming call...............................15
Making an international call .....................................................15
Making an emergency call.........................................................16
Table of Contents
ix
Dialing an extension number....................................................16
Speed dialing ..............................................................................16
Listening to voicemails ..............................................................16
Operations during a call ............................................................17
Using the Phone Book...........................................................21
Adding contacts to the Phone Book .........................................21
Finding contacts in the Phone Book ........................................24
Last missed, dialed, and received calls ..................................25
Using the silent profile ..........................................................25
Using the MP3 player ............................................................26
Turning the MP3 player on.......................................................26
Playing the music.......................................................................27
Using the MP3 player menu .....................................................28
Using the Camera ..................................................................33
Taking pictures ..........................................................................33
Adjusting camera mode settings...............................................34
Icons in camera mode ...............................................................35
Managing your pictures ............................................................38
Voice Commander (Speech-to-music/
Speech-to-dial) ......................................................................41
Using Voice Commander..........................................................42
Messages .................................................................................43
SMS.............................................................................................44
MMS...........................................................................................46
Voicemail ...................................................................................50
Cell Broadcast ............................................................................51
Memory Status...........................................................................51
x
Table of Contents
Input methods .......................................................................52
Changing the input method......................................................52
Shifting between upper and lower case letters .........................52
Multitap text input ....................................................................52
T9 text input ..............................................................................53
Numeric input ...........................................................................54
Entering symbols .......................................................................55
Bluetooth and USB connections...........................................55
Bluetooth....................................................................................55
USB Connection ........................................................................56
4. Menus ............................................................................59
Phone Book............................................................................59
Find.............................................................................................59
Add .............................................................................................59
Edit .............................................................................................59
Copy ...........................................................................................59
Delete..........................................................................................60
Caller Group ..............................................................................60
Privacy Manager ........................................................................60
Business Card.............................................................................60
My Number ...............................................................................61
Memory Status...........................................................................61
Messages .................................................................................61
Call Records ...........................................................................61
Missed ........................................................................................61
Received .....................................................................................61
Dialed .........................................................................................62
Table of Contents
xi
Cleanup All ................................................................................62
Duration.....................................................................................62
Cost.............................................................................................62
Games .....................................................................................63
All Games ...................................................................................63
Settings .......................................................................................64
Memory Status...........................................................................64
Entertainment ........................................................................64
Camera .......................................................................................64
MP3 Player.................................................................................64
FM Radio....................................................................................65
Recorder .....................................................................................66
Composer...................................................................................66
Media Center .........................................................................69
Images ........................................................................................70
Music ..........................................................................................70
Other ..........................................................................................71
Format miniSD ..........................................................................71
Memory Status...........................................................................71
Tools .......................................................................................72
Alarm..........................................................................................72
Connectivity...............................................................................73
World Clocks .............................................................................73
Calendar .....................................................................................73
To Do List ..................................................................................74
Note ............................................................................................74
Shortcuts ....................................................................................74
xii
Table of Contents
Setting shortcuts ........................................................................75
Using shortcuts ..........................................................................75
Calculator...................................................................................75
Currency Converter...................................................................76
Stopwatch...................................................................................76
Countdown Timer.....................................................................77
Voice Commander (Speech-to-music/Speech-to-dial)...........77
Services ...................................................................................77
WAP Service...............................................................................77
NAP Settings ..............................................................................79
Service Number .........................................................................79
STK Menu ..................................................................................79
Settings ...................................................................................80
Date & Time...............................................................................80
Auto Power On/Off ...................................................................80
Profiles........................................................................................80
Display........................................................................................82
Audio..........................................................................................82
Key Assignment .........................................................................83
Call Settings................................................................................83
Answer Mode ..................................................................................83
Connect Alert..................................................................................83
Minute Minder ...............................................................................83
Show Number .................................................................................84
Call Divert .......................................................................................84
Call Barring .....................................................................................85
Call Waiting ....................................................................................86
Auto Redial .....................................................................................86
Fixed Dialing No.............................................................................86
Table of Contents
xiii
Active Line ......................................................................................86
User Group .....................................................................................87
Network......................................................................................87
Network Mode................................................................................87
Available List...................................................................................88
Band Setting ....................................................................................88
Connection......................................................................................88
Security.......................................................................................88
PIN Code.........................................................................................88
Phone Lock .....................................................................................89
SIM Lock .........................................................................................89
Auto Keypad Lock ..........................................................................89
Power Saving Mode ...................................................................89
Language ....................................................................................90
Input...........................................................................................90
Flight Mode................................................................................90
Q-Fi Mode..................................................................................90
Restore........................................................................................90
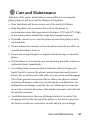
5. Care and Maintenance .................................................91
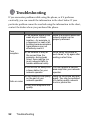
6. Troubleshooting ...........................................................92
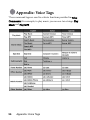
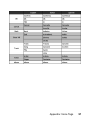
7. Appendix: Voice Tags...................................................96
8. Customer Care............................................................101
9. Guarantee certificate (UK).........................................105
10. Guarantee certificate (IRL) ......................................107
11. License Agreement ...................................................109
xiv
Table of Contents
Preparing your phone for use
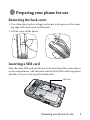
Removing the back cover
1. Use a thin object such as a finger nail to put in the groove at the center
top edge of the back cover as illustrated.
2. Lift the cover off the phone.
Inserting a SIM card
Slide the entire SIM card into the slot in the direction of the arrow shown
on the compartment, with the metal contacts of the SIM card facing down
and the cut corner at the top left as illustrated.
SIM card
Preparing your phone for use
1
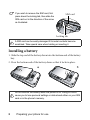
If you wish to remove the SIM card, first
press down the locking tab, then slide the
SIM card out in the direction of the arrow
as illustrated.
SIM card
Locking tab
A SIM card can be easily damaged if its metal contacts become
scratched. Take special care when holding or inserting it.
Installing a battery
1. Slide the top end of the battery down into the bottom end of the battery
bay.
2. Press the bottom end of the battery down so that it locks in place.
Do not remove the battery when the phone is on. Doing so could
cause you to lose personal settings or data stored either on your SIM
card or in the phone's memory.
2
Preparing your phone for use
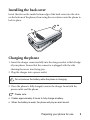
Installing the back cover
Insert the tabs on the inside bottom edge of the back cover into the slots
on the bottom of the phone, then swing the cover down onto the phone to
lock in place.
Charging the phone
1. Insert the charger connector fully into the charger socket at the left edge
of your phone. Ensure that the connector is plugged with the side
showing the arrow icon facing you.
2. Plug the charger into a power outlet.
Do not remove the battery while the phone is charging.
3. Once the phone is fully charged, remove the charger from both the
power outlet and the phone.
Please note:
• It takes approximately 4 hours to fully charge a battery.
• When the battery is weak, the phone will play an alert sound.
Preparing your phone for use
3
• When the battery is discharged, the charging may not start immediately
when you plug in the connector. Wait 10 to 15 minutes for the phone to
begin charging.
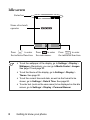
Turning the phone on
1. Open the flip.
2. Long-press
to turn the phone on. The phone will display the
welcome animation.
In this user manual, "long-press" means to press and hold down a key
for about two seconds. "Press" means to press a key and release
immediately.
To set a welcome message, go to: Settings > Display > Welcome
Message. For details, please refer to page 82.
3. Enter your PIN code and press
to confirm.
The PIN (Personal Identification Number) is the password provided by
your network operator. You need this password in order to use the
SIM card.
If you enter the PIN incorrectly three times in a row, the SIM card will
be locked. You must now enter the PUK (Personal Unblocking Key)
for that SIM card in order to unlock it. Please contact your network
operator to obtain a PUK.
To activate/disable PIN password authentication, go to Settings >
Security > PIN Code > PIN 1 Code > Set Status. See page 89.
4. When the PIN code entered has been accepted, the phone will
automatically search for the designated network. This search process
may take a few seconds.
4
Preparing your phone for use
5. The idle screen will be displayed, as well as network signal strength and
the name of the network operator. You can now use the phone.
If the phone is not able to detect the designated network, or links to a
network that you are not authorized to use, the signal strength meter
will show no bars. You will only be able to make emergency calls.
The miniSD card
Your phone features a miniSD slot designed specifically for use with the
miniSD card, a removable flash memory card intended to add greater
storage capacity to your phone.
The miniSD card enables you to store multimedia data, including images,
photos, MP3 audio files, and ring tones.
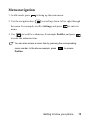
Installing the miniSD card
1. Lift the cover on the left side of the phone.
2. Insert the miniSD card fully into the slot until it clicks into place.
Ensure that the card's metal contacts face upwards.
3. Close the cover.
will display on the idle screen when the miniSD card is loaded.
Do not format the miniSD card to FAT32 or NTFS.
Removing the miniSD card
1. Lift the cover.
2. Press the miniSD card to release it.
Preparing your phone for use
5
Getting to know your phone
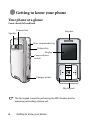
Your phone at a glance
Front closed, left and back
Camera lens
Speaker
Earpiece
Voice commander key
Volume key
Display
Camera shutter
button
Charger socket
Flip keypad
The flip keypad is used for performing the MP3 function and for
answering and ending a phone call.
6
Getting to know your phone
Front open
Earpiece
Navigation keys
Right soft key
Power on/off key
Left soft key
Dial/Answer key
OK key
Alphanumeric keys
Flip
Right and bottom
Microphone
Headset/Data cable jack
MiniSD slot
Getting to know your phone
7
Idle screen
Status bar
Name of network
operator
Press
to enter
the indicated function.
Press
to enter
the main menu.
Press
to enter
the indicated function.
• To set the wallpaper of the display, go to Settings > Display >
Wallpaper. Alternatively, you can go to Media Center > Images.
See page 70 and page 82.
• To set the theme of the display, go to Settings > Display >
Theme. See page 82.
• To set the current time and date, as well as the format to be
shown, go to Settings > Date & Time. See page 80.
• To enter text (such as the user name) to be displayed on the idle
screen, go to Settings > Display > Personal Banner.
8
Getting to know your phone
Icons in the status bar
Icon
Function
Signal strength
Signal strength of the network. The more
bars indicated, the stronger the signal.
Battery status
Current level of battery power. The more
bars indicated, the more power remains.
GPRS in use
GPRS has been activated.
Message
WAP message
Message Full
/
Description
You have new SMS/MMS messages.
You have new WAP messages.
Capacity for mesages is full.
Corrupted/
Incomplete
message
The message is corrupted/ not downloaded
completely.
Voicemail
You have new voicemail messages (this icon
will only appear if the function is supported
by your network operator).
Alarm
Alarm is turned on.
Keypad lock
Keypad is locked.
Line1 or Line2
in use
Line1 or Line2 is now in use.
Normal
The Normal profile is activated.
Meeting
The Meeting profile is activated.
Getting to know your phone
9
Icon
Function
Silent
Description
The Silent profile is activated.
Outdoors
The Outdoors profile is activated.
Personal
The Personal profile is activated.
Stereo Headset A stereo headset is connected to the phone.
Divert
/
The call divert is activated.
Roaming
Roaming is activated (not within your regular
network).
Bluetooth
Bluetooth is turned on.
miniSD Card
miniSD card is loaded.
Using the keys in idle mode
Key
Commands and functions
Power on/off key
• Long-press to turn the phone on or off.
• Press this key to end a call, reject an incoming call, or
to cancel a dialing.
Send/Answer key
• Press to send or answer a call.
• Press to access the call record list.
10
Getting to know your phone
Key
Commands and functions
Left soft key
• Press to perform the function indicated on the bottom
left of the display. To designate the function to be
accessed by the left soft key, go to Settings > Key
Assignment. See page 83.
Right soft key
• Press to perform the function indicated on the bottom
right of the display. To designate the function to be
accessed by the right soft key, go to Settings > Key
Assignment. See page 83.
• Long-press to turn the silent profile on or off.
OK key and Navigation keys
• Press
to enter the main menu or to confirm.
• Use the navigation keys
as hot keys to enter the
designated functions. To designate the functions to be
accessed by the navigation keys, go to Settings > Key
Assignment. See page 83.
Asterisk key
• Press this key to enter an asterisk " * ".
• To make an international call, long-press this key until
the display shows "+", then enter the recipient's country
code, area code and phone number.
Voicemail key
• Long-press to dial your voicemail number.
Getting to know your phone
11
Key
Commands and functions
# key
• Press to enter "#".
• For extensions: After entering a phone number, longpress to enter a "P" and then enter the extension
number.
• When playing music, press to create a 3D sound
effect.
Alphanumeric keys
• Press to enter digits.
~
• Shortcut key: Long-press a key to immediately access
the function, or dial the number, that it represents. See
page 74, "Shortcuts".
Volume key (on the left side of the phone indicated by +
and -)
• Long press the upper or lower portion of the key to
adjust ring tone volume.
Camera shutter button (on the left side of the phone
indicated by
)
• Long-press to activate the camera mode. See page
page 33, "Using the Camera"
Voice Commander key (On the left side of the phone
indicated by
)
• Long press to turn Voice Commander on. See page
page 41, "Voice Commander (Speech-to-music/
Speech-to-dial)".
12
Getting to know your phone
Menu navigation
1. In idle mode, press
2. Use the navigation keys
to bring up the main menu.
to scroll up, down, left or right through
the menu. For example, scroll to Settings, and press
menu.
to enter its
3. Use
to scroll to a submenu, for example Profiles, and press
to enter the submenu item.
You can also access a menu item by pressing the corresponding
menu number. In the above example, press
to access
Profiles.
Getting to know your phone
13
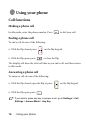
Using your phone
Call functions
Making a phone call
In idle mode, enter the phone number. Press
to dial your call.
Ending a phone call
To end a call, do one of the following:
• With the flip closed, press
on the flip keypad.
• With the flip open, press
or close the flip.
The display will show the total call time as you end a call, and then return
to idle mode.
Answering a phone call
To answer a call, do one of the following:
• With the flip closed, open the flip or press
• With the flip open, press
on the flip keypad.
.
If you wish to press any key to answer a call, go to Settings > Call
Settings > Answer Mode > Any Key.
14
Using your phone
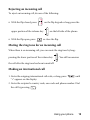
Rejecting an incoming call
To reject an incoming call, do one of the following:
• With the flip closed, press
on the flip keypad or long-press the
upper portion of the volume key
• With the flip open, press
on the left side of the phone.
or close the flip.
Muting the ring tone for an incoming call
When there is an incoming call, you can mute the ring tone by longpressing the lower portion of the volume key
. You still can answer
the call after the ring tone has been turned off.
Making an international call
1. Enter the outgoing international call code, or long-press
"+" appears on the display.
until
2. Enter the recipient's country code, area code and phone number. Dial
the call by pressing
.
Using your phone
15
Making an emergency call
To call emergency services, enter 112 (the international emergency
number) and then press
to dial the call. You can make an
emergency call even if your phone is locked or cannot access your
network, or if there is no SIM card inserted, as long as you are within
range of a network which is supported by your phone.
Dialing an extension number
1. After entering a phone number, long-press
2. Enter the desired extension number, then press
until "P" appears.
to dial it.
Speed dialing
You must assign a number key as the shortcut for a particular phone
number in order to use speed dialing for that phone number. For
information on how to set up a shortcut, see page 74, "Shortcuts".
After you have assigned a number key to serve as the shortcut key for a
particular phone number, long-press this key when the phone is in the
idle mode to dial the corresponding phone number.
Listening to voicemails
Long-press
voicemails.
to dial the voicemail phone number and listen to your
Please note:
• If the network vendor supports it, the voicemail icon
the display when you have new voicemails.
16
Using your phone
will appear on
• If the voicemail number is not stored in the memory, you will not be able to
access your voicemail by long-pressing
. In this case, you will need
to manually set the number by going to Messages > Voicemail > Set
Number.
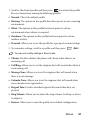
Operations during a call
The following options marked with an asterisk (*) are dependent on
network support and may require a subscription.
Using the loudspeaker
Press
(Loudsp.) to turn on the loudspeaker. To turn off the
loudspeaker, press
(Handset).
Adjusting the volume
To adjust the speech volume during a call, press the volume key on
the left side of the phone.
Adjusting speech volume only works during a call.
Putting a call on hold*
• When only one call is active:
a. Press
b. Press
(Hold) to hold this call.
to end this call.
• When only one call is on hold:
a. Press
b. Press
(Unhold) to resume the call.
to end this call.
Using your phone
17
• When there is an active call and a call on hold.
a. Press
(Swap) to resume the call that is on hold, and
put the active call on hold.
b. Press
to show a list of calls that you can end.
Making a second call*
Enter a phone number, or select one from the Phone Book or call
record, and then press
. The currently active call will
automatically be placed on hold.
Call waiting*
If there is an incoming call while you are on the phone, the phone will
notify you with a call waiting tone. If you want to
• Answer the waiting call: Press
. The currently active call will
automatically be placed on hold. However, if there is already
another call on hold, a list will appear allowing you to select a call
to end and then answer the waiting call.
• Reject the waiting call: Press
or
(End). Pressing
(End) will immediately reject the waiting call; pressing
will bring up a list allowing you to select a call to end.
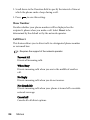
Call menu
Pressing
during a call will bring up a call menu which provides
a number of functions available during a call.
Items marked with an asterisk (*) depend on network support
and may require a subscription.
18
Using your phone
Use Headset
Allows you to use the Bluetooth headset. For more information,
see page 55, "Establishing a connection with your Bluetooth
headset".
Use Loudspeaker/Handset
Turns on/off the loud speaker function.
Phone Book
Allows you to search for a number in the Phone Book.
Call Records
Allows you to view missed, received, and dialed calls.
Conference*
Conference calls allow you to converse with more than one party
at a time.
Hold/Unhold/Swap*
Toggles the call status.
Join/Private
Adds a party that is on hold to the current conference call, or
isolates a single party in a conference call and puts all other
parties on hold.
Forward
Allows two parties to connect, while ending one's own call
(one of the two parties may be involved in an active call
while the other is either on hold or being dialed), so as to
allow the two parties to have their own call.
Using your phone
19
Send DTMF
When the phone is connected to other devices or services, you
can send DTMF (Dual Tone Multi-Frequency) strings. Your
phone will emit tones to communicate with answering machines,
pagers, computerized telephone services, and so forth.
Enter the number and then press
to send the DTMF string.
End Call
End All
Ends all calls, whether active or on hold.
End Active
Ends only the active call.
End Hold
Ends only a call or calls on hold.
End One
Ends only a single call by the number or the contact.
Anonymous
Ends a call not showing its number.
Hold/Unhold/Swap
Toggles the call status.
Mute/Unmute
Activates/cancels the silent mode.
SMS
Allows you to access the Messages menu duing a call. For details
see page 43, "Messages".
20
Using your phone
Calculator
Allows you to use the calculator. For details see page 75,
"Calculator".
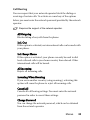
Using the Phone Book
Adding contacts to the Phone Book
The capacity of a phone book on your SIM card depends on the type
of SIM card provided by your network operator.
1. In idle mode, enter the phone number that you want to save, then press
(Save).
2. Select the memory where the contact is to be stored. Select from either
Add to SIM or Add to Phone.
3. Scroll to the data field that you want to edit, and then press
enter data.
4. Press
5. Press
to
to return to the contact data screen after filling the field.
(Option) to
• Save: Save the contact data you have entered.
• Change Type: Change the category of the phone number (for
example, from Mobile Number to Home Number). This option
can only be used in the phone number data field.
• Add New Field: Adds additional data fields for a contact.
• Delete Field: Removes the selected data field.
6. Once you have completed editing, press
Save to save contact's details.
(Option) and select
Using your phone
21
Phone book fields on SIM card memory
Name
The contact's name.
Number
The contact's phone number.
Used to select a caller group for the contact.
Caller Group
To define each caller group, go to Phone
Book > Caller Group. See page 60.
Phone book fields on phone memory
Name
The contact's name.
Mobile Number
The contact's mobile phone number.
Home Number
The contact's home phone number.
Email
The contact's email address.
Used to select a caller group for the contact.
Caller Group
22
To define each caller group, go to Phone
Book > Caller Group. See page 60.
Using your phone
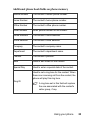
Additional phone book fields on phone memory
Mobile Number
The contact's mobile phone number.
Home Number
The contact's home phone number.
Office Number
The contact's office phone number.
Other Number
Other phone number for the contact.
Home Address
The contact's home address.
Office Address
The contact's office address.
Company
The contact's company name.
Department
The contact's department name.
Position
The contact's position.
Note
Used to edit notes for the contact.
Special Day
Used to enter a special date of the contact.
Used to set a ring tone for the contact. When
there is an incoming call from the contact, the
phone will play this ring tone.
Ring ID
A ring tone set in this field will replace
the one associated with the contact's
caller group, if any.
Using your phone
23
Used to set the image that will appear on the
display when there is an incoming call from
the contact.
Image ID
The image set in this field will replace
the image associated with the
contact's caller group, if any.
Finding contacts in the Phone Book
1. In idle mode, press
Phone Book.
(Names) to display contacts stored in the
2. Press the alphanumeric key that corresponds to the first letter of the
name you wish to locate the appropriate number of times.
3. If necessary, scroll to the entry you want.
You can access the phone book by pressing
only when
is designated as the shortcut key for the phone book. See
Settings > Key Assignment on page 83.
You can also go to Phone Book > Find, and then enter the full name
or the first letter of the name to locate a contact.
The icon
will display on the top of the screen if the contact is
stored on your SIM card;
will display if the contact is stored in
your phone memory.
4. When you have found the contact you want, you can
• Press
to view the contact's details.
• Press
to dial the number. If the entry has more than one phone
number, you will be prompted to select a number.
24
Using your phone
• Press
(Option) to Add, Edit, Copy to SIM/Copy to Phone,
Call, or Delete a contact. To send the contact's data by SMS or by
Bluetooth, select Send vCard.
For information on using Bluetooth, see page 55, "Bluetooth".
Last missed, dialed, and received calls
• If there have been any missed calls, the display will show a missed call
message along with the number of calls that were missed. Press
view the missed call number.
to
• In idle mode, press
to view the list of the most recent missed,
dialed, and received calls.
The icon
dialed calls;
will show beside missed calls;
will show beside
will show beside received calls.
If a call for the same number/contact has been missed two or more
times, a note such as “x2” will display beside the record of the call.
Scroll to the number you want and then
• Press
• Press
to call back.
(Option) and select your desired function.
Using the silent profile
In idle mode, you can long-press
to activate the silent profile.
Once it is activated, the phone will alert you to an incoming call by
vibrating without ringing.
Using your phone
25
1. When you long-press
to activate the silent profile, the phone
will vibrate for one second. The icon
will appear in the status bar.
2. To turn off the silent profile, long-press
.
To select or define a profile, go to Settings > Profiles. See page 80,
"Profiles".
Using the MP3 player
You can upload music from a computer to your phone using Bluetooth
or the supplied USB data cable. Refer to page 55, "Bluetooth and
USB connections" for details.
The MP3 Player can only play audio files saved in the following
formats: MP3 (MPEG1-LAYER3/MPEG2-LAYER3/OMA DRM v.1.0),
AAC/AAC+ (ADTS Format (LC & HE-AAC Profile)/OMA DRM v.1.0),
WMA and BP3.
Unsupported files will be skipped over during playblack.
Turning the MP3 player on
Do one of the following:
• With the flip closed, long-press
on the flip keypad.
• Choose Entertainment > MP3 Player.
You can turn on the MP3 player by pressing
only when
is set as the shortcut key for the MP3 player. See Settings
> Key Assignment on page 83.
26
Using your phone
Playing the music
Using the flip keypad (with the flip closed)
•If elapsed time is
less than or equal
to 2 seconds, press
to play the
previous song.
•If elapsed time
exceeds 2 seconds,
press to replay the
current song.
•Long press to
rewind.
View tracks/
current playlist
•Play the next song
•Long press to fastforward.
Stop
•Press to play/pause.
•Long press to keep music
playing in the background.
Using the phone keypad (with the flip open)
Use
and the navigation keys according to the on-screen keypad
shown below.
•If elapsed time is less
than or equal to
2 seconds, press to play
the previous song.
•If elapsed time exceeds
2 seconds, press to
replay the current song.
•Long press to rewind.
View tracks/current
playlist
•Play the next song
•Long press to fastforward.
Stop
Play/Pause
Using your phone
27
MP3 playback screen
Current EQ
(Equalizer) mode
The number of the
current song/total
number of songs
Name of the
current song
3D sound activated
Current repeat mode
Elapsed time/total
playback time
Sample Rate
Volume
Bit Rate (BR)
The song's audio wave spectrum
Tracks will be played in the sequence they are saved. To play tracks in
random order, press
(
) and select Settings > Use
Shuffle.
When a Bluetooth headset is connected, volume can only be adjusted
from the headset.
Using the MP3 player menu
Opening up the MP3 player menu
Do one of the following:
• With the flip closed, press
• With the flip open, press
28
Using your phone
on the flip keypad.
(
) on the phone keypad.
Navigating the MP3 player menu using the flip keypad
In addition to the handset keypad, you can also use the flip keypad as
shown below to navigate the menu.
Enter the menu
Scroll up
Back to the previous
menu or the MP3
screen
Confirm selection
Scroll down
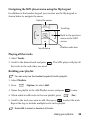
Playing all the tracks
1. Select Tracks.
2. Scroll to the desired track and press
the tracks in the order they are saved.
. The MP3 player will play all
Building your playlist
You can only use the handset keypad to build a playlist.
1. Select Playlists.
2. Press
(Option) to select Add.
3. Name the playlist in the Add Playlist screen, and press
to save.
4. When asked to add tracks to the new playlist, press
(Yes).
5. Scroll to the track you want to add, then press
to select the track.
Repeat the step to include multiple tracks in the playlist.
Select All to select or deselect all tracks.
Using your phone
29
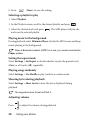
6. Press
(Done) to save the setting.
Selecting a playlist to play
1. Select Playlists.
2. In the Playlists screen, scroll to the desired playlist and press
3. Select the desired track and press
tracks on the selected playlist.
.
. The MP3 player will play the
Playing music in the background
During playback, select Minimize Player to hide the MP3 screen and keep
music playing in the background.
When a Bluetooth headset (A2DP) is in use, you cannot minimize the
Player window.
Setting the repeat mode
Select Settings > Set Repeat to decide whether to play the present track
(One) or all tracks (All) repeatedly.
Playing songs randomly
Select Settings > Use Shuffle to play tracks in a random order.
Showing lyrics during playback
Select Settings > Show Lyrics to have the lyrics displayed during
playback.
The supported lyrics format is ID3v2.3.
Adjusting volume
Press
30
to adjust the volume during playback.
Using your phone
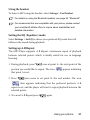
Using the headset
To listen to MP3 using the headset, select Settings > Use Headset.
For details on using the Bluetooth headset, see page 55, "Bluetooth".
For accessories that are compatible with your phone, please contact
your local BenQ Mobile office to inquire about availabilities and
detailed information.
Setting the EQ (Equalizer) mode
Select Settings > Set EQ to choose your preferred EQ mode that will
influence the sound during playback.
Setting up A-B Repeat
The MP3 Player supports A-B Repeat--continuous repeat of playback
between selected points--which is ideally suited for use in language
learning.
1. During playback, press
once at point A--the start point of the
portion you would like to repeat. The icon
that point A is set.
2. Press
appears indicating
once more to set point B--the end marker. The icon
then appears indicating that the preferred portion's A-B
repeat is set, and the player will start to repeat playback between the
selected points.
3. To cancel A-B Repeat press
again.
Using your phone
31
Producing 3D sound effects
or select Settings > Use 3D Sound to produce 3D sound
Press
effects during playback.
When a Bluetooth headset (A2DP) is in use, this feature is not
available.
Setting the display mode
Select Settings > Display Mode and set the display mode of the MP3
player.
Locking the flip keypad in MP3 mode
With the flip closed, press
and select Keypad Lock to lock the flip
keypad keys.
To unlock the keypad, press
the flip.
32
Using your phone
and then
, or simply open
Using the Camera
Your phone features a digital camera that allows you to take a picture to be
set as an image ID or wallpaper, or to be sent in a MMS.
Taking pictures
1. To activate the camera mode, on the idle screen long-press the camera
shutter button (
) or choose the menu: Entertainment > Camera.
2. The viewfinder is then displayed.
Settings bar
Exposure value
Number of
remaining
photos to take
Zoom Level
3. Press
(Option) to bring up the settings menu. For functions of
various settings, see page 34, "Adjusting camera mode settings".
The icons on the screen will be changed according to the settings you
made. For description on each icon, see page 35, "Icons in camera
mode".
4. When the viewfinder appears, press the left and right navigation keys to
adjust the exposure value; press the up and down navigation keys to
zoom in or out
The zoom function will be disabled when the image size is set as 1280
x 960).
Using your phone
33
5. Press
or the camera shutter button (
) to take a picture. The
picture will be saved to the phone memory or to the miniSD
automatically according to the setting you made. For the options of
previewing pictures, see page 38, "Managing your pictures".
To delete the newly saved photo, press
(Delete). To return to
the viewfinder without deleting the one just taken and saved, press
.
Adjusting camera mode settings
1. Press
(Option) to bring up the settings menu.
2. Scroll to the desired option and then press
Name
View Photos
Set Self-Timer
Functions
Allows you to view the saved pictures.
A picture is taken a few seconds after you press the
shutter button. Choose between 5 or 10 seconds, or
turn the option off.
Face Mask
The camera's view finder will display a mask used to
position the face of the person being photographed in
good focus, in order for you to later obtain the best
results when changing the person's facial expressions
using the Face Morph function. For details on
performing the Face Morph function, see page 40.
Hide/Show
Icons
Allows you to hide or show the icons displayed in the
view finder.
Settings
34
to save the setting.
Allows you to change the camera mode settings.
Using your phone
3. To view camera mode settings, select Settings. When the setup is done,
press
(Save) to save the settings.
Options of camera mode settings are as follows
Icon
Name
Image Size
Functions
Allows you to set the desired image size.
Effect
Enables you to apply a tone or color to your
picture to create an artistic effect.
Scene
Enables you to load preset settings that best
suit the environment you are in.
Contrast
Allows you to adjust the contrast level.
Quality
Sets the image quality (compression ratio).
Shooting Mode
Allows you to select between single shot
and multishots. The available multishot
modes vary according to the image size you
choose.
Time Stamp
Adds a time stamp to your picture.
Sound
Allows you to set the shot tone on or off.
Save to
Allows you to change the default memory to
phone memory or miniSD.
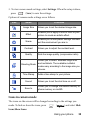
Icons in camera mode
The icons on the screen will be changed according to the settings you
made. To hide or show the icons, press
Icons/Show Icons.
(Option) and select Hide
Using your phone
35
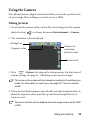
Scene
Icon
Mode
Auto
People
Landscape
Sunny
Sunset
Night
Snow
Text
Image size
Icon
Mode
1280 x 960
640 x 480
320 x 240
128 x 128 (Wallpaper)
36
Using your phone
When the image size is 1280 x 960, the feature of consecutive
shooting will be disabled. When the image size is 640 x 480, only
2 and 4 MultiShot modes will be available.
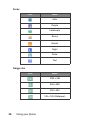
Self-Timer
Icon
Function
5 Seconds
10 Seconds
Shooting Mode
Icon
Function
Single
2 MultiShots
4 MultiShots
8 MultiShots
12 MultiShots
16 MultiShots
20 MultiShots
Save to
Icon
Function
miniSD
Using your phone
37
Icon
Function
Phone Memory
Managing your pictures
(Option) and select View Photos.
1. Press
2. Select the desired folder, if any.
3. Scroll to select a desired picture, and press
4. Press
picture.
to display it in full.
(Option) to bring up the available options for the
Name
Options
Send
Allows you to send the picture by MMS (size is
limited to 100 kilobytes) or by Bluetooth. For details
on MMS and Bluetooth, see page 46 and page 55.
Delete
Deletes the picture.
Set
Allows you to set the picture as Wallpaper for the idle
screen, or as Image ID for a new/existing contact or
caller group.
Edit
Allows you add a frame, a stamp and rotate the
picture.
Allows you to crop the picture.
1. Select the desired size of the picture to be
cropped.
Tailor
38
2. Press
(Adjust) and the navigation keys
to select the desired portion of the picture.
3. Press
to cut out the desired portion.
4. Press
again to save the cropped picture.
Using your phone
Name
Options
Face Morph
Allows you to generate various facial expressions
according to the four spots you have manually
positioned over the picture. See instructions below.
Move
Allows you to move the picture to the miniSD card or
phone memory, or to a designated folder.
Copy
Allows you to copy the picture to the miniSD card or
phone memory, or to a designated folder.
Slideshow
Allows you to view the pictures you have taken in a
slideshow.
Browsing Mode
New Folder
Protect
Allows you to view the pictures in a list or in
thumbnails.
Allows you to create a new folder to store pictures.
Protects the picture from deletion.
Unprotect
(Available when a picture is protected) Frees the
protected picture.
Rename
Allows you to rename the picture.
Delete All
Details
Deletes all the pictures.
Shows the details of the picture including its name,
resolution, and file size.
Using your phone
39
Face Morph
1. Activate the face mask and take a photo.
2. Press
and select Face Morph.
If you wish to apply an expression to a photo in the Media
Center, display the photo in full size and press
four times
consecutively to place red spots in the corners of the eyes and
the corners of the mouth, which are normally used to make facial
expressions.
To remove a red spot, press
. Press
to have the spot
reappear. Use the navigation keys to move the red spot around.
3. Press
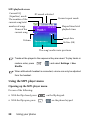
appears.
and the message "Press Number Key to Change"
4. To generate an expression, press a corresponding number key, the
meaning of the generated expression is shown at the top left of the
screen.
Press (Normal) to display the original picture with no expression
effects made.
5. Press the left and right navigation keys to reduce or intensify
expression effects.
40
Using your phone
Voice Commander (Speech-to-music/
Speech-to-dial)
With Voice Commander you can make voice digit dialings, call contacts,
and play MP3 tracks by saying corresponding voice commands to the
phone.
Please refer to page 96, "Appendix: Voice Tags" for command tags
used to activate functions provided in Voice Commander (Speech-tomusic/Speech-to-dial), in different languages.
Before you start using Voice commander
• Make sure the language set in your phone is the same language as the
one set for the voice commander tags.
To change the language setting of the phone, go to Settings >
Language.
• Make sure that all your files are named in the same language as the one
set for the voice commander tags.
Please limit the lenght of file names to 20 characters maximum.
• The phone can store up to 1000 voice tags, including contacts and
music files. When the memory is full, you will have to delete unused
contacts and music files in order to continue.
Voice Commander settings
To successfully use Voice Commander, you need to go to Tools > Voice
Commander to complete the following settings:
Information synchronization for voice commands
To ensure that the phone recognizes the voice commands containing the
names of contacts and MP3s, turn Auto-Sync on or select Sync Now.
Using your phone
41
Voice digit dialing training for the phone
You can say the phone number you want to call and the phone dials it for
you. For better accuracy and speedier dialing, you can teach the phone to
recognize the way you say numbers.
1. Select Digit Training.
2. Say the digits displayed on the screen. Once the phone recognizes the
digits you say, it will display the next string of digits. To complete the
training the phone needs to recognize 10 different strings of digits that
you say.
Using Voice Commander
Four voice commands are available: Play Music, Search Music, Call
[contact], and Digit Dial.
1. Long press the Voice Commander key
on the left of the phone to
turn Voice Commander on.
2. After hearing the prompt "Please say ..." say one of the voice commands
available.
3. Follow the instructions on the display to complete the command.
Play Music
1. Say “play music” after being prompted.
2. The MP3 player will start playing the first track in the Now playing list.
Search Music
1. Say “search music” after being prompted.
2. Say one of the following: “Track [name of the track]”/“Artist [name of
the singer]”/“Album [name of the album].”
3. When a match is found, say “confirm” after being prompted and the
track will start to play. Say “cancel” to stop.
42
Using your phone
Call [contact]
1. Say “call [name of the contact]” after being prompted.
2. When a match is found, say “confirm” after being prompted and the
phone will dial the phone number. Say “cancel” to stop or press
when the flip is closed to end the connection.
If more than one choice is available, select the desired contact and
press
to call. When the flip is closed, press
/
to scroll up/down
Digit Dial
1. Say “Digit Dial” after being prompted.
2. Say the number you wish to dial after the prompt.
3. If the phone number identified is correct, say “confirm” after being
prompted and the phone will dial the number. Say “cancel” to stop or
press
when the flip is closed to end the connection.
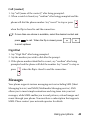
Messages
Your phone supports various messaging services including SMS (Short
Messaging Service) and MMS (Multimedia Messaging service). SMS
allows you to insert simple animations and ring tones into your text
messages, while MMS enables you to send pictures, colored images and
music through your phone. You must have a subscription that supports
MMS. Please contact your network operator for details.
Using your phone
43
To enter the Messages menu, select
in the main menu.
SMS
Receiving a new message
1. When you receive a new message, the icon
and a text message
showing the number of messages appear on the display.
2. To read the message, press
. To manage the message, press
(Option). For details about managing received messages,
see page 45, "Managing Inbox".
If you return to the idle screen without reading the new message,
will remain on the idle screen's status bar to remind you of
the unread message.
Creating a new message
1. To bring up the message editing screen, go to SMS > New. Use the
alphanumeric keys to enter text.
For information on the input method, see page 52, "Input
methods".
2. To insert a preset text, image, melody, contact data (vCard) or
Calendar memo (vCalendar) into the message, press
(Option) and select Insert.
You can also define your own preset text. See page 46, "Defining
quick message templates".
3. To align texts, press
44
Using your phone
(Option) and select Alignment.
4. When you finish editing the message, press
to Send Message,
Save to Drafts, Save to Private Folder, or Discard the message.
Managing Inbox
Your phone saves incoming messages in the Inbox. To manage Inbox
messages, go to SMS > Inbox. A list of messages received appear. To
view a message, scroll to it and press
.
Read messages saved on the phone or on the SIM will be
marked by
or
. Unread messages saved on the phone
or on the SIM will be marked by
or
.
To decide where new messages will be saved to, go to
Messages > SMS > Settings > Save Msg. To.
Managing Outbox
Go to SMS > Outbox. Outbox preserves a backup copy of messages
that you failed to send.
Managing Sent Items
Go to SMS > Sent. The Sent folder preserves messages that were
successfully delivered.
Managing Drafts
Go to SMS > Drafts. The Drafts folder contains message drafts that
you chose to save. To edit a draft, scroll to it and press
.
Using your phone
45
Managing Private Folder
Go to SMS > Private Folder. The phone code is required to enter
Private Folder.
The default phone code is 1234. To change the phone code
choose the menu Settings > Security > Phone Lock.
Defining quick message templates
Go to SMS > Templates. The Templates folder contains a list of preset
texts. To create your own text, press
Add to edit. To save it press
(Option) and select
.
Cleaning up messages
To clean up messages, go to SMS > Cleanup. You can choose to delete
messages by category.
Settings
Your phone is already set up to send or receive messages. Contact
your network operator for details.
MMS
In order to use MMS, you have to subscribe to both GPRS and MMS
services provided by your operator. Contact your operator for details on
MMS settings.
Downloading new messages
If you set MMS > Settings > Deferred Download on, the operator
will send you a notification when you receive new messages; no
messages will download to the phone before being prompted.
Press
46
if you wish to download the message.
Using your phone
Reading a message
Having successfully downloaded the MMS message, a text message
showing the sender’s name or address appears on the display.
Press
to play the MMS message page by page.
Creating a new message
1. To write and send a new MMS message, go to MMS > New. To edit
the message content, scroll to the Content: and then press
Press
.
(Option) to execute the following tasks:
• Insert: Allows you to insert photos, images, melodies, text, vCard
(contact data), vCalendar (calendar memo), or new pages.
• Preview: Plays all the pages in the message in sequence.
• Remove Image: Removes the image or photo inserted in the page.
• Remove Melody: Removes the ring tone inserted in the page.
• Remove Text: Removes entered text.
• Remove Page: Removes the current page.
• Previous/Next Page: Go to previous or next page.
• Page Duration: Sets the length of time that each page is displayed
when playing the message.
For Input options, see page 52, "Input methods".
2. After you finish creating the MMS message, press
to the main list, which includes the following items.
to return
• To: Enter the recipient's phone number or select a contact from
your phone book by pressing
(Browse). To send your
message, this field can not be left blank.
• Subject: Allows you to enter text for the subject.
• Content: Contains the message that you created.
Using your phone
47
• Cc: Allows you to send the message as a carbon copy to others.
• Bcc: Allows you to send the message as a confidential carbon copy
to others.
• Priority: Allows you to set the priority for this message.
• Receipt: Allows you to set if a confirmation is to be sent back to
you when the message has been delivered, read, or both.
3. Press
message.
(Option) and select Send Message to send the
Managing Inbox
Your phone saves incoming messages in the Inbox. To manage Inbox
messages, go to MMS > Inbox. A list of received messages appear. To
view a message, scroll to it and press
.
Managing Outbox
Go to MMS > Outbox. Outbox stores failed messages and messages
to be sent until they are successfully delivered.
Managing Sent Items
Go to MMS > Sent. The Sent folder stores messages that were
successfully delivered.
Managing Drafts
Go to MMS > Drafts. The Drafts folder contains message drafts that
you chose to save. To edit a draft, scroll to it and press
48
Using your phone
.
Managing Private Folder
Go to MMS > Private Folder. The phone code is required to enter
Private Folder.
The default phone code is 1234. To change the phone code
choose the menu Settings > Security > Phone Lock.
Templates
To use the preset MMS templates, go to MMS > Templates.
Cleaning up messages
To clean up messages, go to MMS > Cleanup. You can choose to
delete message by category.
Settings
To set up advanced settings for MMS, go to MMS > Settings.
Filter
Your phone will reject all MMS messages from the senders listed
here.
Expiry
Sets the length of time your outgoing MMS message stays on the
server before it reaches the recipient successfully.
Reply Type
You can determine here whether you want to use an SMS
message or MMS message in reply to an MMS message you have
received.
Using your phone
49
Size Limit
Sets the maximum size for a message that the phone receives. If
an incoming message exceeds this size, the phone will not be able
to download that message.
Server Info
Activates the MMS server used for sending and receiving MMS
messages.
Deferred Download
When set to On, the phone will only download the sender's
details. You can then decide whether you want to download the
whole message.
Delivery Report
Asks the recipient to return a confirmation after receiving your
MMS message.
Read Report
Asks the recipient to return a confirmation after reading your
message.
Voicemail
Get Voicemail
Dials the voicemail number provided by your network operator to
access your voicemail box.
In idle mode, long-press
to access your voicemail box.
Set Number
Allows you to save your voicemail phone number.
50
Using your phone
Cell Broadcast
Cell broadcast messages are messages that your network operator
broadcasts to all phones within a particular area. These messages are
broadcast in numbered channels. For example, channel 030 might be for
local weather, 060 for traffic reports, 080 for information about local
hospitals, taxis, pharmacies, and so forth. You can receive cell broadcast
messages that your network operator broadcasts, and select your preferred
topics and languages.
For more information about available channels and a list of the
information they provide, contact your network operator.
Receive
To activate the cell broadcast feature, set this option to On.
Topics
You can enter the desired range of topic numbers (channel
numbers) which represent the broadcast information that you
have selected to receive from your network operator.
Language
You can limit the cell broadcast information that you receive
from your network operator to a specific language.
Memory Status
Shows the amount of used and available memories on the phone.
Using your phone
51
Input methods
When an editing screen is displayed, the current text input method is
indicated in the upper right corner of the screen. The phone has the
following input methods.
Multitap text input
Numeric input
T9 text input
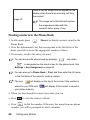
Changing the input method
When an editing screen is displayed, repeatedly press
desired input method appears.
until your
Shifting between upper and lower case letters
When an editing screen is displayed, long-press
lower case, upper case and caps lock letters.
to shift between
Multitap text input
Entering text using multitap text input
• You must press the key corresponding to the desired letter the correct
number of times in order to enter the letter you want. Display letters for
entry according to the order shown on each key. Pressing a key once
will display the first letter listed on the key, while pressing it twice will
display the second letter, and so on.
• When you have entered a letter and wish to enter the next letter, either
wait for two seconds until the cursor moves to the next text entry
position, or immediately press the key for the next letter.
52
Using your phone
• Press
to enter a space before beginning a new word. Long press
to feed a new line.
• While entering text, use the scroll key to move the cursor. Press
(Clear) once to delete one character; long-press
(Clear) to delete all entered text.
Options when using multitap text input
When entering text using multitap text input, you can access the following
options by pressing
(Option).
• Symbols: Opens the symbol table.
• Input Methods: To switch to another input method.
• Cases: To switch to lower or upper cases, or to use Caps Lock.
T9 text input
Entering text using T9 text input
• Press each key associated with the letter you want to enter only once.
The letters you have entered appear on the display. The candidate
words will change with each key you press.
• If the first highlighted word is not the word you want, scroll to
highlight the desired word.
• If you do not find the word you want in the list of candidate words, that
means the word you intend to enter is not a valid word in the
dictionary. Press
(Spell) to open the spell check box, which
allows you to create your own word into the dictionary. The next time
you enter the word, it appears as one of the candidate words.
Using your phone
53
• Once the correct word is highlighted or is entered, press
to enter
the word.
• Short press
press
to enter a space before beginning a new word. Long
to feed a new line.
• While entering text, use the navigation keys to move the cursor. Press
(Clear) once to delete a character; long-press
delete all entered text.
(Clear) to
Options when using T9 text input
When entering text using T9 text input, you can access the following
options by pressing
(Option).
• Spell: Opens the spell check box to allow you to create your own word
into the dictionary.
• Symbols: Opens the symbol table.
• Input Methods: To switch to another input method.
• Cases: To switch to lower or upper cases, or to use Caps Lock.
• T9 Settings: Enable Choice List to show the list of candidate words
when you enter letters. Enable Auto Completion to complete the
predicted word (if it was entered before), and use the navigation keys to
display alternative words.
Numeric input
The numeric input method allows you to use the alphanumeric
keys
54
to
to enter numbers.
Using your phone
Entering symbols
To open the symbol table, press
. Press
again to open the
next page. Scroll to highlight the desired symbol. Press
symbol in the text.
to place the
Bluetooth and USB connections
Bluetooth
Your phone features Bluetooth technology which allows you to have a
wireless connection between your phone and your Bluetooth devices.
Adding a Bluetooth device to your phone
1. If you go to Tools > Connection > Bluetooth > Turn On to turn on
Bluetooth, you will be asked to search and to add Bluetooth devices.
Press
(Yes) to begin searching.
2. Alternatively, you can go toTools > Connection > Bluetooth > Add
Device. The phone then begins searching.
3. When a list of available devices appear on the screen, select a device to
connect to and press
.
4. When a message appears asking for your permission to connect to this
device, press
(Yes) to connect.
5. Enter the passkey for the device, both in the phone and in the device
that you are connecting to.
6. When the passkey is accepted, the device is paired.
Establishing a connection with your Bluetooth headset
1. Go to Tools > Connection > Bluetooth > Turn On to turn on the
Bluetooth.
Using your phone
55
2. You will be asked to search and to add Bluetooth devices, press
(Yes) to begin searching. Make sure that your Bluetooth
headset is switched on and is in "pairable mode".
3. When a list of devices appear on the screen, select a device to connect to
and press
.
4. When a message pops up, press
(Yes) to connect.
5. Enter the Bluetooth headset passkey and press
.
Please check the user manual of your Bluetooth headset for this
passkey.
6. When the passkey is accepted, the headset is paired. The Bluetooth
connection is established automatically.
Sending an item using Bluetooth
You can send the items in your phone such as images, melodies, vCards
(Phone Book records), or a vCalendars (Calendar events) to another
Bluetooth device. When you select By Bluetooth as the Send method, a list
of the once connected Bluetooth devices that can transfer data appears.
Select an available device to connect to and press
.
Managing your Bluetooth devices
Go to Tools > Connection > Bluetooth > Devices. Select a device from the
list, and press
(Option) to access a list of options.
USB Connection
You can establish a USB connection to a computer using the USB data
cable.Go to Tools > Connection > USB Connection
1. Turn the phone on.
56
Using your phone
2. Connect the phone to the computer using the phone's data cable. Plug
the cable's smaller end into the data cable jack on the right side of the
phone, and the bigger end into the computer's USB port.
3. The phone will display a USB Connection menu. Select the desired task
from the following:
Mass Storage
To transfer files between the computer and the miniSD Card/phone
memory, select this option. With connection established and detected by
your computer, the miniSD card and the phone memory will function as a
removable disk.
On your computer, you can double-click on the My Computer icon to
open the My Computer panel, where the icons of two removable
disks are displayed. The first one represents the storage capacity of
the miniSD card; the second one represents the storage capacity of
the phone memory.
When copying a file from your computer to the miniSD card or phone
memory, you must place the file in the folder intended for the type of
file. For example, an MP3 file must be placed in the MP3 folder in
order to be successfully used in the phone.
Modem/PC Sync
To synchronize the phone with your computer to transfer Phone Book
data or Calendar memos, select this option. Besides, the phone can work
as a modem to let you connect your computer to the Internet.
Before activating the data synchronization or the modem function,
make sure you have installed onto your computer the software tool
designed for use with the phone.
Using your phone
57
MTP
MTP stands for Media Transfer Protocol, which standardizes the way
computers with Windows installed transfer data to portable media
devices.
To transfer files protected by Microsoft Digital Rights Management (MSDRM), you need to select MTP to activate Windows Media Player 10,
which is used for transferring MS-DRM protected files from a computer
to the phone.
System requirements:(1) Windows XP, (2) Microsoft Service pack 2
and above, (3) Windows Media Player 10 ( version 10.00.00.3990 is
recommended).
1. After you select MTP, an MTP Media Player window pop ups on
the computer. Select Synchronize Media Files To This Device to
open up Windows Media Player.
2. The synchronization screen will display for you to copy files.
On the right side of the synchronization screen, you can choose
to copy files to Flash (phone memory) or to the miniSD Card.
We strongly recommend that no more than 200 files be
transferred at the same time for better speed.
58
Using your phone
Menus
The phone features various functions and they are organized in the menus
and sub-menus. The main menu consists of nine categories. Each
category has related sub-menus.
For information about navigating menus, see page 13, "Menu navigation".
Phone Book
Find
Used to locate a contact in the Phone Book. Enter the first letter to view a
list of contacts beginning with the letter. Scroll to the contact you want to
find. See page 24, "Finding contacts in the Phone Book" for details about
what to do after locating a contact.
Add
Used to add a new contact to the Phone Book. See page 21, "Adding
contacts to the Phone Book" for details.
Edit
Used to edit a selected contact.
Copy
Used to copy contacts stored in the phone to SIM card, or copy contacts
stored in the SIM card to phone. You can also select to copy an individual
contact.
Menus
59
Delete
Deletes a contact from the phone book. You can delete one contact at a
time, or delete all contacts at once.
Caller Group
Caller groups are combinations of phone settings used to identify a
particular group of contacts.
1. Press
(Option) to select the ring tone (Ring ID) or image
(Image ID) used to identify a particular caller group, or to rename the
caller group.
2. Press
to view the contacts in the selected caller group. Press (Edit)
to add or remove contacts.
Privacy Manager
This option allows you create a list of calls that you wish to accept (Accept
List) or a list of calls that you wish to reject (Reject List). Set this function
to Off if necessary.
1. Scroll to the list you need and press
(View).
(Option) and select Add or Edit to add contacts to the
2. Press
list.
3. On the Privacy Manager menu, scroll to the list you wish to activate,
then press
.
Business Card
Allows you to enter your own business card information.
1. Scroll to the data field you wish to edit, then press
60
Menus
to enter text.
2. Press
(Option) and select Save to save all the entered data, or
select Send vCard to send this business card in a short message.
My Number
This option allows you to store your phone number and name.
Memory Status
Shows you the number of entries that have been stored and the maximum
entries that can be stored, on the SIM and on the phone.
Messages
For the description of features available in the Messages menu, see page
43, "Messages".
Call Records
This menu includes a list of your missed calls, dialed calls, and received
calls. Call costs and time are also recorded.
Missed
Shows your most recent missed calls.
See page 25, "Last missed, dialed, and received calls" for details.
Received
Shows your most recent received calls.
See page 25, "Last missed, dialed, and received calls" for details.
Menus
61
Dialed
Shows your most recent dialed calls.
See page 25, "Last missed, dialed, and received calls" for details.
Cleanup All
Deletes all of the call records.
Duration
This feature is only accessible if supported by your network operator.
Last
Shows the duration of the last call.
All
Shows the total time for all calls.
Received
Shows the total time for all received calls.
Dialed
Shows the total time for all dialed calls.
Reset
Resets all call time records.
Cost
The cost calculation requires the support of the network operator.
Last
Shows the cost of your last call.
62
Menus
All
Shows the total cost of all calls.
Reset
Resets all call cost records.
Requires entry of the PIN2 code.
Limit
Shows the current limit set for total call costs.
Settings
Allows you to set the unit price and a currency for calculating call
costs.
Requires entry of the PIN2 code.
Games
You can play the games embedded in the phone, or download Java
applications directly to your phone.
All Games
Embedded games and downloaded Java games are stored in this menu. To
find out how to play these games, please read their on-screen instructions.
Menus
63
Settings
Internet Setting
If the Java application activated requires the Internet connection, you
need to select the appropriate network access point here. To configure
network access point settings, go to Services > NAP settings. See
page 79, "NAP Settings".
Java Version
Shows the phone's Java virtual machine version.
Memory Status
Shows the amount of used and available memories on the phone and on
the miniSD card for Java applications.
Entertainment
Camera
For information on using the camera, see page 33, "Using the Camera".
MP3 Player
For information on using the MP3 Player, see page 26, "Using the MP3
player".
64
Menus
FM Radio
To listen to the FM radio on your phone, first connect your stereo
headset to the phone.
For accessories that are compatible with your phone, please contact
your local BenQ Mobile office to inquire about availabilities and
detailed information.
1. Go to Entertainment and select FM Radio.
2. Press
to turn on the radio.
3. Press the up navigation key to view a list of previously saved channels.
4. Press the left and right navigation keys to scan channels in sequential
order.
5. Press and hold the left and right navigation keys to rapidly scan for
channels with signals.
6. To adjust volume press the volume key
7. Press
.
(Option) to access a list of options.
• Save Channel: Allows you to save the current channel in the
Channels list.
• Set Frequency: Enter the frequency of a channel to access it
directly.
• Record: Allows you to record the current channel being listened to.
To listen to recordings, go to Entertainment > Recorder.
• Set as Alarm Tone: Sets the current channel as the alarm ring tone.
Menus
65
• Use Loudspeaker: Turns the loudspeaker on.
The stereo headset must remain connected to the phone even if
the loudspeaker is turned on.
Recorder
1. Press
(Option) and select Save to decide whether recordings
are to be saved on the miniSD or in the phone memory.
2. Press
to record.
3. Press
to stop recording.
4. Press the up navigation key to open up the Recordings list and select
the recording to play.
5. Press the down navigation key to pause/resume playback.
6. Press
to stop playback.
7. To adjust volume press the volume key
.
To delete recordings, go to Media Center > Music > Recordings.
Composer
You can edit your own polyphonic ring tones, and use them as alert
sounds for incoming calls.
A polyphonic ring tone consists of musical tones in multiple channels.
The Composer function allows you to create a maximum of 8 channels,
mixing them to create the final polyphonic ring tone.
66
Menus
Note format
Octave
Length
Sharp
Pitch
Entering default notes
Press key 1 to key 7 to enter quarter notes in the middle octave: 4C5,
4D5, 4E5, 4F5, 4G5, 4A5 and 4B5.
"4" on the left indicates a quarter note; "5" indicates the middle
octave.
Entering a default rest
Press
to enter a quarter rest: 40.
Adjusting the length of a note
Press key 8 to increase the note's length (the number on the screen
will increase); press key 9 to reduce the note's length (the number on
the screen will decrease). Various note lengths are represented by the
numbers shown in the chart:
On-screen
number
1
2
3
4
5
6
7
8
Note length
1/16
1/8
3/16
1/4
3/8
1/2
3/4
1
Menus
67
Adjusting a note's octave
Press key 0 to adjust a note's octave. The octave of a note is
represented by the numbers shown in the chart:
On-screen number
Represented octave
4
Lower octave
5
Middle octave
6
Higher one octave
7
Higher two octaves
Adding a sharp to a note
Press
to add a sharp '#', which raises the note a semitone. To
remove a sharp from a note, press
.
A sharp cannot be added to the E and B notes.
Steps for creating a polyphonic ring tone
1. Select to a channel to start composing music.
2. To modify a note, move the cursor to the right of the note that you
wish to change. You can then proceed with adjusting the length,
octave, sharp/unsharp, and so on. Press
note highlighted by the cursor.
3. When editing the music in a channel, press
access the following options:
(Clear) to delete a
(Option) to
• Play
Plays the notes in the channel.
• Instrument
Allows you select the instrument that will play the notes in the
channel.
68
Menus
• Time Beat
Sets the tempo.
4. After you have finished editing the notes in the channel, press
to return to the channel list. You can now repeat the above
steps to create another channel of music.
5. When you are finished with all the channels, press
(Option) in the channel list screen to access the following options:
• Play All
Plays the polyphonic ring tone that results from mixing all
channels.
• Play Channel
Plays the channel you have currently scrolled to.
• Save
Selecting the option will mix the all the channels into a
polyphonic ring tone, which will be saved to: Media Center >
Music > Composings.
Media Center
Digital Rights Management
This phone features the Digital Rights Management (DRM)
technology (OMA DRM v.1.0 and MS DRM 10). DRM allows for
copyright-protected audio/visual content transmissions for playback
in computers, portable devices and network devices, while
protecting them from unauthorized use.
Menus
69
Images
Images stores pictures and images saved in the phone or on the miniSD.
1. Select the desired folder and scroll to the desired picture.
2. Press
to display the selected picture. Scroll up or down to display
the next or previous picture.
3. Press
(Option) to perform the following:
• Send: Allows you to send the picture by SMS, MMS or Bluetooth.
For information on using Bluetooth, see page 55, "Bluetooth".
• Delete: Deletes the picture.
• Set: Allows you to set this picture as the wallpaper, an image caller
ID or a group image ID.
• Move: Allows you to move the picture to the miniSD card or
phone memory, or to a designated folder.
• Copy: Allows you to copy the picture to the miniSD card or phone
memory, or to a designated folder.
• Protect: Allows you to protect the picture from deletion.
• Rename: Allows you to rename the picture.
• Delete All: Deletes all pictures.
• Details: Shows details of the picture.
Music
Music stores audio files including MP3s, default ring tones, recordings,
and the ring tones you created using the Composer function.
1. Select the desired folder and scroll to the desired audio file.
To access the Private folder, you must enter the phone code (default:
1234).
70
Menus
2. Press
3. Press
to play the music of the file.
(Option) to perform the following:
• Send: Allows you to send the audio file by SMS, MMS or
Bluetooth.
For information on using Bluetooth, see page 55, "Bluetooth".
• Delete: Deletes the selected MP3 file.
• Set: Allows you to set the MP3 for incoming calls or as a ring ID for
a specified contact or a caller group, or as alarm tone.
• Move: Allows you to move the file to the miniSD card or phone
memory, or to a designated folder.
• Copy: Allows you to copy the file to the miniSD card or phone
memory, or to a designated folder.
• New Folder: Allows you to create a new folder.
• Protect: Allows you to protect the file from deletion.
• Rename: Allows you to rename the file.
• Delete All: Deletes all files.
• Details: Shows details of the file.
Other
Other stores files whose formats are not supported by the phone.
Format miniSD
This option will delete all the files stored on the miniSD. Phone code is
required to execute this option.
Memory Status
Shows the amount of used and available memories on the phone and on
the miniSD.
Menus
71
Tools
Alarm
1. Select the alarm to set.
2. Press the left and right navigation keys to turn the status on.
3. Scroll to an option and change the setting as needed.
Frequency
Allows you to select the days you want the alarm to sound.
Time
Allows you enter the time for the alarm to sound.
Time Duration
Allows you to set the length of the alarm.
Alarm Tone
Allows you to set the ringtone of the alarm.
4. To save all your current alarm settings, press
5. When setting is saved,
(Save).
will appear in the display's status bar.
When the alarm rings, you can:
• Press
(Snooze) to stop the alarm, the alarm will ring again five
minutes later.
• Press
(Exit) to turn off the alarm, the alarm will not ring until the
next scheduled time.
72
Menus
Connectivity
For information on Bluetooth and USB connections, see page 55,
"Bluetooth and USB connections"
World Clocks
This feature displays current local time and date for major cities around
the world.
To make use of the World Clocks feature you must set your phone's
time and date correctly. To do this, go to Settings > Date & Time.
To decide which cities’ time and date you want to display:
1. Press
(Edit) to bring up a list of cities.
2. Press
press
to mark the cities. To unselect a city, scroll to that city and
.
3. With desired cities selected, press
(Done).
Calendar
Calendar allows you keep track of upcoming events. You may set the
alarm to ring when it comes to the date.
1. When you open the Calendar, the phone will show the calendar for the
current date. Scroll to the date you want to write a memo on. You can
also press
(Option) and select the Go to Date.
2. When the desired date is highlighted, press
Add to open the memo editor.
(Option) and select
3. Edit the data fields in the memo editor as needed. Press
save the memo.
(Save) to
Menus
73
4. To send a memo by SMS or by Bluetooth, select the preferred memo,
(Option) to select Send vCal.
then press
For information on using Bluetooth, see page 55, "Bluetooth".
5. To auto delete the memos, press
(Option) and select the Auto
Delete After. Select the timeframe you want the deletion to be auto
executed.
To Do List
To do list allows you to keep track of a list of tasks.
(Option) and select Add.
1. To add a new to do item, press
2. Write your memo. Press
to save the memo.
3. On the list, if there is any to do item that has already been completed,
you can scroll to the item and press
to mark it. Then press
(Option) and activate Auto Delete, which will automatically
clear any to do items you have marked as completed.
Note
Note allows you to write down quick notes. You can set a password
protection for the notes.
Shortcuts
Allows you to assign 8 alphanumeric keys as shortcuts to commonly used
functions or frequently dialed numbers.
is assigned to voicemail dialing and you are not allowed to
change it.
74
Menus
Setting shortcuts
1. Scroll the selection box to the number key you wish to use as a shortcut
key. You can also press the actual alphanumeric key to select it.
2. To add a function, press
(Option) and select Add Function. To
add a phone number, press
(Option) to and select Add Phone.
See step 3 if Add Function is selected. See Step 4 if Add Phone is
selected.
3. From the function shortcuts list, scroll to select an item. Press
save the assigned shortcut.
4. From the contact list, scroll to select a contact. Press
assigned shortcut.
to
to save the
5. Repeat the above step to add or modify function shortcuts.
6. To cancel a shortcut key and restore the key's original function, scroll to
the shortcut key that you want to cancel, and then press
(Option). Select Delete to cancel the shortcut.
Using shortcuts
There are two ways to use shortcuts:
• In idle mode, long-press an alphanumeric key to access its assigned
shortcut.
• Select Tools > Shortcuts. You can then:
a. Scroll to move the selection box to the icon corresponding to the
desired key. Then press
to access its assigned shortcut.
b. Press the corresponding alphanumeric key to access its assigned
shortcut.
Calculator
Allows you to use the phone as a calculator.
Menus
75
1. Enter numbers using alphanumeric keys; To enter a decimal point
press
or
.
2. Perform calculations using the navigation keys and
on the Calculator screen.
3. Press
as indicated
(B.Space) to delete numbers and symbols entered.
Currency Converter
Currency converter allows you to convert currencies and set the exchange
rate.
1. To set the currencies for conversion, press
(Option) and select
either Currency 1 (to set the currency at the top of the screen) or
Currency 2 (to set the currency at the bottom of the screen).
2. To set the exchange rate, press
(Option) and select Rate Setting.
To enter a decimal point press
or
.
3. Enter the amount of currency. The result will appear in the other
currency field.
Stopwatch
Stopwatch allows you to measure time intervals.
1. Press
to start the stopwatch.
2. While the stopwatch is running, press
elapsed time.
3. Press
to halt the stopwatch.
4. Scroll to view the list of elapsed times.
5. To reset the stopwatch, press
76
Menus
(Reset).
(Split) to save each
Countdown Timer
Countdown timer allows you to specify length of time to count down.
1. Enter the length of time you want to count down.
2. Press
and the timer starts counting down to zero.
3. Press
to halt the Countdown Timer.
4. To reset the Countdown Timer, press
(Reset).
Voice Commander (Speech-to-music/Speech-to-dial)
Used for configuring the Voice Commander settings. See details on page
41, "Voice Commander settings".
Services
Your phone features a WAP browser, allowing you to use the phone for
mobile Internet connectivity. To use the phone to get online, necessary
WAP and GPRS settings must be made.
To activate the mobile Internet connectivity, consult your network
operator for WAP and GPRS services. In general, the network
operator will automatically transmit the needed settings to your phone.
If not, you will need to manually configure necessary settings. For
further details, contact your network operator.
WAP Service
Start Browser
Starts up the browser and connects to the homepage.
Menus
77
Browsing a webpage
Referring to the soft key commands appear on the screen, press
and
to perform needed tasks while browsing a
webpage. Scroll up or down until the item you want was
highlighted, and then press
to select it.
Ending the online session
While online, press
to close the browser and return to the
previous menu.
WAP Messages
When you receive a new WAP message,
will be shown on the
display. This option will start up the browser so you can read the
WAP message.
Go to URL
Allows you to link to the URL you enter.
WAP Settings
Allows you to configure settings for different network operators'
WAP servers, and then select the desired server to get online.
1. Scroll to the desired server and press
(Option).
2. Select Add Profile to establish settings for a new server, or select
Edit to configure the selected server's settings:
• Profile Name: Gives the WAP server a name.
• Homepage: Sets the homepage that the browser will link to
when it is started up.
• IP Address: Enter the IP address used for accessing the mobile
Internet.
78
Menus
• Port: Enter the connection port specified by the network
operator.
• NAP: If you use a GPRS network, select GPRS NAP (Network
Access Point) settings or CSD NAP settings to get online. If
you use a dialup network, you are restricted to selecting only
the CSD NAP settings to connect to the Internet.
To configure GPRS NAP settings or CSD NAP settings,
choose Services > NAP Settings.
3. Press
(Save) to save the settings.
4. Scroll to the server that you would like to use and press
(OK)
to confirm your choice.
Clear Cache
Clears webpage content that the browser temporarily stores in
memory.
NAP Settings
Used to configure GPRS or CSD settings according to the network type
used by the phone.
For detailed information on how to properly configure GPRS and CSD
settings, contact your network operator.
Service Number
Provided by your network operator if the service is supported. For further
details, please contact your network operator.
STK Menu
This SIM Tool Kit (STK, for short) Menu is only available if provided by
your network operator. For details, contact your network operator.
Menus
79
Settings
Date & Time
Used to set the time and date, as well as the format that will be displayed
on the idle screen.
• Date: Allows you to set today's date.
• Time: Allows you to set the current time.
• Format: Allows you set the format in which the date and the time will
be displayed.
• Time Zone: Allows you to select a time zone where you are.
• Auto Time Zone: With this feature turned on, the time displayed on
the phone will auto switch to the local time you are at.
Requires the support of the network operator.
Auto Power On/Off
Allows you to specify a time for the phone to be automatically turned on
or off.
When on an airplane, be sure that you deactivate the Auto Power
On/Off feature.
Profiles
A profile is a group of settings that determine whether the phone will alert
you to incoming calls through a ring tone or a vibrating alert, and how
ring tones in general are used on the phone. These settings allow the
phone's operations to best suit the environment you are in.
80
Menus
1. Scroll to the desired profile and then press
to activate this profile.
You can choose from among the following profiles:
• Normal: This is the default profile.
• Meeting: The options in this profile have been preset to suit a meeting
environment.
• Silent: The options in this profile have been preset to suit an
environment where silence is required.
• Outdoors: The options in this profile have been preset to suit an
outdoor activity.
• Personal: Allows you to use this profile for a group of custom settings.
2. To customize settings, scroll to a profile, and then press
(Edit).
You can not modify settings in Silent mode.
• Vibrate: Decides whether the phone will vibrate when there is an
incoming call.
• Call Ring: Allows you to set the ringtone that will sound when there is
an incoming call.
• Message Tone: Allows you to set the ringtone that will sound when
there is a new message.
• Calendar Tone: Allows you to set the ringtone that will sound when
your calendar event approaches.
• Keypad Tone: Decides whether keypad will sound when keys are
pressed.
• Ring Volume: Allows you to adjust the ring volume. Scroll up or down
to adjust it.
• Restore: Allows you to reset the profile to its default configuration.
Menus
81
Display
• Theme: You can change the appearance of the display. Select different
themes to change the display color and background.
• Wallpaper: Designates the wallpaper used for the idle screen.
• Welcome Message: Allows you create a welcome message to be
displayed when the phone is turned on.
• Personal Banner: Allows you to enter text to be displayed on the idle
screen.
• Brightness: Allows you to adjust the brightness of the display to appear
lighter or darker. Scroll up or down to adjust it.
• Backlight Duration: Allows you to specify how long the keypad
backlight remains on after the last key is pressed.
Audio
• Call Ring: Allows you to set the ring that will sound when there is an
incoming call.
• Message Tone: Allows you to set the ring that will sound when there is
a new message.
• Calendar Tone: Allows you to set the ring that will sound when your
calendar event approaches.
• Keypad Tone: Decides whether keypad will sound when keys are
pressed.
• Ring Volume: Allows you to adjust the ring volume. Scroll up or down
to adjust it.
• Speech Volume: Allows you to adjust the speech volume. Scroll up or
down to adjust it.
82
Menus
Key Assignment
Allows you to assign functions to the left and right soft keys and
navigation keys. When functions have been assigned, you can access them
by pressing their corresponding keys in idle mode.
1. Scroll to the desired key and press
.
2. Select the function to be assigned to the key and press
3. When you are ready to save the assignments, press
.
(Save).
Call Settings
Answer Mode
• Any Key: Allows any key except
to be used to answer an
incoming call.
• Send Key: Allows incoming calls to be answered only by
pressing
.
• Automatic: If the Automatic answer mode is activated, the phone
will ring for five seconds, and then the incoming call will be
automatically answered
Only the Handsfree profile allows this setting.
Connect Alert
This feature allows the phone to ring, vibrate, or flash the
backlighting when the recipient of a call has answered.
Minute Minder
You can have the phone beep at the specified interval during a call.
1. Press the navigation keys to set the status to On.
Menus
83
2. Scroll down to the Duration field to specify the interval of time at
which the phone emits a beep during a call.
3. Press
to save this setting.
Show Number
Decides whether your phone number will be displayed on the
recipient's phone when you make a call. Select Preset to be
determined by the default set by the network operator.
Call Divert
This feature allows you to divert calls to a designated phone number
or voicemail box.
Requires the support of the network operator.
Forward All
Diverts all incoming calls.
When Busy
Diverts incoming calls when you are in the middle of another
call.
No Reply
Diverts incoming calls when you do not answer.
Not Reachable
Diverts incoming calls when your phone is turned off or outside
network coverage.
Cancel All
Cancels all call divert options.
84
Menus
Call Barring
You can request that your network operator block the dialing or
receiving of certain calls. To activate or cancel any of the options
below, you must enter the network password provided by the network
operator.
Requires the support of the network operator.
All Outgoing
Blocks dialing of any calls from the phone.
Intl. Out
If this option is activated, no international calls can be made with
your phone.
Intl. Except Home
If this option is activated, your phone can only be used to dial
local calls and calls to your home country from abroad. Other
international calls will be barred.
All Incoming
Rejects all incoming calls.
Incoming When Roaming
If you are in another country (using roaming), activating this
option will cause the phone to reject all incoming calls.
Cancel All
Cancels all call barring settings. You must enter the network
password in order to cancel these settings.
Change Password
You can change the network password, which can be obtained
from the network operator.
Menus
85
Call Waiting
If there is an incoming call when you are in the middle of another call,
the screen will display the waiting call message to alert you.
Requires the support of the network operator.
Auto Redial
If there is no answer at a number you have dialed, the phone will
automatically redial.
Fixed Dialing No.
After this feature is activated, the phone will only be able to dial
numbers on the Fixed Dialing Number list. If a number is not on the
list, calls cannot be made to this number.
To activate or cancel this feature, you must enter the PIN2 code.
If the PIN2 code is entered incorrectly three consecutive times,
the PIN2 code will be locked down. You will need the PUK2 code
to unlock the PIN2 code. Contact your network operator to obtain
the PUK2 code.
To create a Fixed Dialing Number list,
1. Press
(View), then press
(Option) and select Add.
2. Enter the PIN2 code, and then add a new number to your Fixed
Dialing Number list.
Active Line
This feature allows you to use two different phone numbers on one
phone. You can designate one number for dialing calls, while
accepting incoming calls dialed to both numbers.
Requires the support of the network operator.
86
Menus
User Group
• User Group: Used to create a closed group of callers based on a
service provided by the network operator. The members of a User
Group can call each other, but cannot conduct calls with anyone
outside the group unless special provisions are made.
• Outside Access: When the User Group service is activated,
enabling Outside Access will allow users in the group to make calls
to numbers outside the group. However, incoming calls will still be
restricted to calls within the group.
Network
Generally speaking, the network that your phone uses is configured
automatically. When turned on, the phone will automatically connect to
the network provided by your network operator, or will automatically
connect to the roaming network when you are outside the coverage of
your regular network. When outside the coverage of your regular
network, you can manually select the local network system.
Your network operator must be able to support network selection in
order for you to use this feature.
Network Mode
Allows you to set the network searching automatic or manual.
• Automatic: If this option is selected, when outside the coverage of
your regular network, the phone will automatically scan for the
available network.
• Manual: If this option is selected, when outside the coverage of
your regular network, the phone will list all the networks of
telecom vendors and allow you to choose.
Menus
87
Available List
The phone will list all the available networks so that you can manually
choose the preferred one.
Not all networks listed will necessarily be available for use. If you
require further information, contact your network operator.
Band Setting
Allows you to set an appropriate band in the GSM network system.
Connection
Allows you to set whether the phone will search for a GPRS network
when it is turned on.
• GPRS & GSM: When it is turned on, the phone will search for
available GPRS and GSM networks.
• GSM Only: When it is turned on, the phone will search only for a
GSM network.
Security
You can use various codes and locks to prevent unauthorized use of the
phone.
PIN Code
The PIN (Personal Identification Number) is the password provided
by your network operator. When PIN code authentication is
activated, it will prevent unauthorized use of the SIM card. You need
this password in order to use the SIM card.
If you enter the PIN incorrectly three times in a row, the SIM card
will be locked. You must now enter the PUK (Personal
Unblocking Key) for that SIM card in order to unlock it. Please
contact your network operator to obtain a PUK.
88
Menus
• PIN1 Code: Used to activate, deactivate or change the PIN1 Code.
To change the PIN1 Code, select Set Status and set to On. Enter
PIN1.
• PIN2 Code: Used to change the PIN2 code. The procedure is the
same as for the PIN1 Code.
Phone Lock
Once the phone lock is activated, you will be required to enter the
phone code when the phone is turned on. You must enter the correct
code to unlock it (the default phone code is 1234). When the phone is
locked, you will only be able to make emergency calls.
SIM Lock
When activating the SIM Lock, you must enter the previously set SIM
Lock password (the default SIM Lock password is 1234). The
password must be between 4 and 8 digits. Once the SIM Lock is
activated, you will be required to enter the SIM Lock code to use
another SIM card on your phone.
Auto Keypad Lock
Used to create a keypad lock. When the flip is closed and you have not
used the keypad for a specified period of time, the keypad will be
locked. Scroll to set the status On, and select the time duration of
inactivity before the keypad lock to be activated.
Power Saving Mode
Activating this mode will turn off the keypad backlighting and the
brightness of the display backlighting will be reduced to conserve battery
power.
Menus
89
Language
Allows you to select the language that the phone will use.
Input
Allows you to set the default input methods that will be used in the text
input mode.
Flight Mode
When you are on a flight where the use of mobile phones is prohibited,
select this option so that the phone will not link to any network, and the
alarm, and calendar reminder will also be turned off. However, you can
still use the entertainment features such as playing MP3 music or taking
pictures in this mode.
When the Flight Mode is activated,
will display on the status
bar.
Q-Fi Mode
When the phone is in Q-Fi mode, GSM and GPRS services will not be
accessible. FM radio and Bluetooth transmission (to send/receive data or
listen to music via a Bluetooth headset (A2DP)) functions will be
available.
When the Q-Fi Mode is activated,
will display on the status bar.
Restore
Restores all the settings to their factory default.
Requires entry of the phone code, which is 1234 by the default.
90
Menus
Care and Maintenance
Take note of the points noted below to ensure that you are using the
phone properly and to extend the lifespan of the phone.
• Store the phone and its accessories out of the reach of children.
• Keep the phone and accessories dry, and use the phone in
environments where the temperature is between -10°C and 45°C. High
or low temperatures outside this range may damage the phone.
• If possible, do not use or store the phone in excessively dusty or dirty
environments.
• Do not remove the warranty seal on the phone yourself, nor allow an
unauthorized dealer to do so.
• Do not use strong detergents or organic solvents to wipe or clean the
phone.
• If your phone or its accessories are not operating normally, contact an
authorized dealer immediately.
• Use only genuine accessories such as batteries, battery charger and
hands-free kit to ensure the phone's normal operation and preserve
battery life, as well as protect the safety of your person and belongings.
Use of non-genuine accessories will not allow your phone to achieve
optimal performance, and may cause the phone to malfunction. Any
malfunctions or damage caused by the use of third-party accessories
are not be covered by the terms of the product warranty, and will void
the product warranty.
• Avoid allowing objects that may discharge electricity to contact the
charging socket on the bottom of the phone or the metal contacts on
the battery, as this may cause short circuits and put you in danger.
Care and Maintenance
91
Troubleshooting
If you encounter problems while using the phone, or if it performs
erratically, you can consult the information in the chart below. If your
particular problem cannot be resolved using the information in the chart,
contact the dealer where you purchased the phone.
Problem
Possible cause
Solution
• The network signal is too
Move to a location where the
network signal can be
properly received.
• The network is busy at
Avoid using the phone at
such times, or try again after
waiting a short time.
weak at your current
location—for example, in
a basement or near a tall
building-because wireless
transmissions can not
effectively reach it.
Poor
reception
the current time (for
example, during peak
times, there may be too
much network traffic to
handle additional calls).
• You are too far away from You can request a service
a base station for your
network operator.
area map from your network
operator.
• Poor network trunk quality Hang up the phone and dial
Echo or noise
on the part of your
network operator.
• Poor local telephone line
quality.
92
Troubleshooting
again. You may be switched
to a better-quality network
trunk or phone line.
Problem
Possible cause
• The standby time is
related to your network
operator's system
configuration. The same
phone used with different
network operators'
systems will not provide
exactly the same length
of standby time.
Shortened
standby time
• The battery is depleted. In Use a new battery.
high-temperature
environments, battery life
will be shortened.
• If you are not able to
Change your location to one
where the network is
accessible, or temporarily
turn off your phone.
• Battery power has been
Recharge the phone's
battery.
• SIM card malfunction or
Take the SIM card to your
network operator for testing.
• SIM card inserted
Insert the SIM card properly.
• Debris on the SIM card
Use a soft, dry cloth to clean
the SIM card contacts.
connect to the network,
the phone will continue to
send out signals as it
attempts to locate a base
station. Doing so
consumes battery power
and will consequently
shorten standby time.
You cannot
switch your
phone on.
depleted.
damage.
SIM card
error
Solution
If you are located in an area
where signaling is weak,
temporarily shut off the
phone.
improperly.
contacts.
Troubleshooting
93
Problem
Unable to
connect to the
network.
You cannot
answer
incoming
calls.
You cannot
make
outgoing
calls.
PIN Code is
blocked.
Possible cause
Solution
• SIM card invalid.
Contact your network
operator.
• You are not within the
Check the service area with
your network operator.
• Poor signal.
Move to an open space, or if
you are inside a building,
move closer to a window.
• You have activated
Go to Phone Book >
Privacy Manager and
select Off in order to
deactivate this option.
• You have activated the
Go to Settings > Call
Settings > Call Barring,
and then select Cancel All.
• You have activated the
Go to Settings > Call
Settings > Call Barring,
and then select Cancel All.
• You have activated the
Go to Settings > Call
Settings > Fixed Dialing
No. and select Off to turn
this feature off.
• You have entered an
Contact your network
operator. If the network
operator provides the SIM
card's PUK code, use the
PUK code to unlock the SIM
card.
• The battery or battery
Contact the dealer.
• The phone's temperature
Adjust the battery charging
environment to avoid
extremes of temperature.
network's service area.
Accept List or Reject
List in the Privacy
Manager option.
Call Barring feature.
Call Barring feature.
Fixed Dialing No.
feature.
incorrect PIN code three
consecutive times.
charger is damaged.
Battery will
not charge.
is below 0°C or higher
than 45°C.
• Poor contact between the Check all connectors to
battery and charger.
94
Troubleshooting
make sure all connections
have been properly made.
Problem
Unable to
enter
information
into the
Phone Book.
Unable to
select certain
features.
Possible cause
Solution
• The Phone Book's
Delete unnecessary data
from the Phone Book.
• Your network operator
Contact your network
operator.
memory is already full.
does not support these
features, or you have not
applied for services that
provide these features.
Troubleshooting
95
Appendix: Voice Tags
These command tags are used to activate functions provided in Voice
Commander. For example, to play music, you can use two strings: Play
Music and Play MP3.
96
Appendix: Voice Tags
Appendix: Voice Tags
97
98
Appendix: Voice Tags
Appendix: Voice Tags
99
100
Appendix: Voice Tags
Customer Care
We offer fast, individual advice! You have several options:
Our online support on the Internet:
www.BenQMobile.com/customercare
We can be reached any time, any place. You are given 24 hour
support on all aspects of our products. Here you will find an
interactive fault-finding system, a compilation of the most
frequently asked questions and answers, plus user guides and
current software updates to download.
You will also find the most frequently asked questions and answers
in the section entitled "Troubleshooting" in this user guide on s. 92.
You can also get personal advice about our range of products on our
Premium Hotline:
United Kingdom ................. 0906 9597500
(0.75 £ per minute)
Qualified employees are waiting to offer you expert information about
our products and installation.
In some countries repair and replace services are impossible where the
products are not sold through our authorised dealers.
If repair work is necessary, please contact one of our service centres:
Abu Dhabi.............................. 0 26 42 38 00
Argentina .......................... 0 81 02 22 66 24
Australia ............................... 13 00 55 76 68
Austria....................................... 05 17 05 17
Customer Care
101
Bahrain........................................... 40 42 34
Bangladesh ............................. 0 17 52 74 47
Belgium .................................. 0 78 15 22 21
Bolivia .................................... 0 21 21 41 14
Bosnia Herzegovina............... 0 33 27 66 49
Brunei........................................ 02 43 08 01
Bulgaria ..................................... 02 73 94 88
Cambodia.................................. 12 80 05 00
Canada .............................. 1 88 87 77 02 11
Chile ....................................... 8 00 53 06 62
China.................................... 40 08 88 56 56
Colombia ........................ 01 80 07 00 66 24
Croatia.................................... 0 16 10 53 81
Czech Republic ...................... 2 33 03 27 27
Denmark ................................... 35 25 65 29
Dubai...................................... 0 43 96 64 33
Ecuador ................................ 18 00 10 10 00
Egypt ...................................... 0 23 33 41 11
Estonia....................................... 56 64 54 00
Finland ................................. 09 22 94 37 00
France................................... 01 56 38 42 00
Germany ........................... 0 18 05 33 32 26
Greece................................... 80 11 11 11 16
Hong Kong................................ 28 61 11 18
Hungary ............................... 06 14 71 24 44
Iceland......................................... 5 20 30 00
India ................. 22 24 98 70 00 Extn: 70 40
Indonesia........................... 0 21 46 82 60 81
102
Customer Care
Ireland .................................. 18 50 77 72 77
Italy....................................... 02 45 27 90 36
Ivory Coast................................ 05 02 02 59
Jordan..................................... 0 64 39 86 42
Kenya........................................... 2 72 37 17
Kuwait ......................................... 2 45 41 78
Latvia........................................... 7 50 11 18
Lebanon .................................... 01 44 30 43
Libya..................................... 02 13 50 28 82
Lithuania................................ 8 70 07 07 00
Luxembourg......................... 40 66 61 56 40
Macedonia.............................. 0 23 13 18 48
Malaysia .........................+ 6 03 77 12 43 04
Malta ............................+ 35 32 14 94 06 32
Mauritius .................................... 2 11 62 13
Mexico............................. 01 80 07 11 00 03
Morocco .................................... 22 66 92 09
Netherlands....................... 0 90 03 33 31 00
New Zealand ........................ 08 00 27 43 63
Nigeria.................................... 0 14 50 05 00
Norway...................................... 22 57 77 46
Oman ............................................. 79 10 12
Pakistan ................................ 02 15 66 22 00
Paraguay................................. 8 00 10 20 04
Peru ........................................ 0 80 05 24 00
Philippines ............................. 0 27 57 11 18
Poland .................................. 08 01 30 00 30
Portugal.................................. 8 08 20 15 21
Customer Care
103
Qatar ......................................... 04 32 20 10
Romania............................... 02 12 09 99 66
Russia ................................ 8 80 02 00 10 10
Saudi Arabia........................... 0 22 26 00 43
Serbia.................................... 01 13 07 00 80
Singapore .................................. 62 27 11 18
Slovak Republic ................... 02 59 68 22 66
Slovenia .................................. 0 14 74 63 36
South Africa ......................... 08 60 10 11 57
Spain....................................... 9 02 11 50 61
Sweden ................................. 08 57 92 90 49
Switzerland .......................... 08 48 84 08 45
Taiwan .................................. 02 23 96 10 06
Thailand ................................. 0 29 53 50 00
Tunisia....................................... 71 86 19 02
Turkey ............................... 0 21 64 59 98 98
Ukraine ............................. 8 80 05 01 00 00
United Arab Emirates............ 0 43 66 03 86
United Kingdom............... 0 87 05 33 44 11
Uruguay................................ 00 04 05 46 62
USA ................................... 1 88 87 77 02 11
Venezuela .......................... 0 80 01 00 56 66
Vietnam................................ 84 89 20 24 64
Zimbabwe ................................. 04 36 94 24
104
Customer Care
Guarantee certificate (UK)
Without prejudice to any claim the user (customer) may have in relation
to the dealer or retailer, the customer shall be granted a manufacturer's
Guarantee under the conditions set out below:
• In the case of new devices and their components exhibiting defects
resulting from manufacturing and/or material faults within 24 months
of purchase, BenQ Mobile shall, at its own option and free of charge,
either replace the device with another device reflecting the current state
of the art, or repair the said device. In respect of parts subject to wear
and tear (including, but not limited to, batteries, keypads, casings,
small parts on casings, protective coverings where included in the scope
of delivery), this warranty shall be valid for six months from the date of
purchase.
• This Guarantee shall be invalid if the device defect is attributable to
improper treatment and/or failure to comply with information
contained in the user manuals.
• This Guarantee shall not apply to or extend to services performed by
the authorised dealer or the customer themselves (e.g. installation,
configuration, software downloads). User manuals and any software
supplied on a separate data medium shall be excluded from the
Guarantee.
• The purchase receipt, together with the date of purchase, shall be
required as evidence for invoking the Guarantee. Claims under the
Guarantee must be submitted within two months of the Guarantee
default becoming evident.
• Ownership of devices or components replaced by and returned to
BenQ Mobile shall vest in BenQ Mobile.
Guarantee certificate (UK)
105
• This Guarantee shall apply to new devices purchased in the European
Union. For Products sold in the United Kingdom the Guarantee is
issued by BenQ Mobile UK Ltd., 1 Arlington Square, Downshire Way,
Bracknell, Berkshire, RG12 1WA, United Kingdom.
• Any other claims resulting out of or in connection with the device shall
be excluded from this Guarantee. Nothing in this Guarantee shall
attempt to limit or exclude a Customer’s Statutory Rights, nor the
manufacturer's liability for death or personal injury resulting from its
negligence.
• The duration of the Guarantee shall not be extended by services
rendered under the terms of the Guarantee.
• Insofar as no Guarantee default exists, BenQ Mobile reserves the right
to charge the customer for replacement or repair.
• The above provisions do not imply a change in the burden of proof to
the detriment of the customer.
To invoke this Guarantee, please contact our online support on the
Internet www.BenQMobile.com/customercare or the telephone service.
The relevant number is to be found in the accompanying user guide.
106
Guarantee certificate (UK)
Guarantee certificate (IRL)
Without prejudice to any claim the user (customer) may have in relation
to the dealer or retailer, the customer shall be granted a manufacturer’s
Guarantee under the conditions set out below:
• In the case of new devices and their components exhibiting defects
resulting from manufacturing and/or material faults within 24 months
of purchase, BenQ Mobile shall, at its own option and free of charge,
either replace the device with another device reflecting the current state
of the art, or repair the said device. In respect of parts subject to wear
and tear (including, but not limited to, batteries, keypads, casings,
small parts on casings, protective coverings where included in the scope
of delivery), this warranty shall be valid for six months from the date of
purchase.
• This Guarantee shall be invalid if the device defect is attributable to
improper care or use and/or failure to comply with information
contained in the user manuals.
• In particular claims under the Guarantee cannot be made if:
• The device is opened (this is classed as third party intervention)
• Repairs or other work done by persons not authorised by
BenQ Mobile.
• Components on the printed circuit board are manipulated
• The software is manipulated
• Defects or damage caused by dropping, breaking, lightning or
ingress of moisture. This also applies if defects or damage was
caused by mechanical, chemical, radio interference or thermal
factors (e.g.: microwave, sauna etc.)
• Devices fitted with accessories not authorised by BenQ Mobile
Guarantee certificate (IRL)
107
• This Guarantee shall not apply to or extend to services performed by
the authorised dealer or the customer themselves (e.g. installation,
configuration, software downloads). User manuals and any software
supplied on a separate data medium shall be excluded from the
Guarantee.
• The purchase receipt, together with the date of purchase, shall be
required as evidence for invoking the Guarantee. Claims under the
Guarantee must be submitted within two months of the Guarantee
default becoming evident.
• Ownership of devices or components replaced by and returned to
BenQ Mobile shall vest in BenQ Mobile.
• This Guarantee shall apply to new devices purchased in the European
Union. For Products sold in the Republic of Ireland the Guarantee is
issued by BenQ Mobile UK, Branch Ireland, 1st Floor, Riverview
House, 21–23 City Quay, Dublin– The Republic of Ireland.
• Any other claims resulting out of or in connection with the device shall
be excluded from this Guarantee. Nothing in this Guarantee shall
attempt to limit or exclude a Customer’s Statutory Rights, nor the
manufacturer’s liability for death or personal injury resulting from its
negligence.
• The duration of the Guarantee shall not be extended by services
rendered under the terms of the Guarantee.
• Insofar as no Guarantee default exists, BenQ Mobile reserves the right
to charge the customer for replacement or repair.
• The above provisions do not imply a change in the burden of proof to
the detriment of the customer.
To invoke this Guarantee, please contact our online support on the
Internet www.BenQMobile.com/customercare or the telephone service.
The relevant number is to be found in the accompanying user guide.
108
Guarantee certificate (IRL)
License Agreement
This License Agreement ("Agreement") is between You and BenQ Mobile
GmbH & Co. OHG ("BenQ"). The Agreement authorizes You to use the
Licensed Software, specified in Clause 1 below, which may be included in
your phone, stored on a CD-ROM, sent to You by electronic mail or over
the air, downloaded from BenQ Web pages or servers or from other
sources under the terms and conditions set forth below.
Read this Agreement carefully before using your phone. By using your
phone or installing, copying, and/or using the Licensed Software, You
acknowledge that You have read and understood the Agreement and agree
to be bound by all of the terms and conditions stated below. You further
agree that if BenQ or any licensor of BenQ ("Licensor") is required to
engage in any proceeding, legal or otherwise, to enforce their rights under
this Agreement, BenQ and/or its Licensor shall be entitled to recover from
You, in addition to any other sums due, reasonable attorney's fees, costs
and disbursements. If You do not agree to all of the terms and conditions
of this Agreement, do not install or use the Licensed Software. This
Agreement governs any Updates, releases, revisions, or enhancements to
the Licensed Software.
1. LICENSED SOFTWARE. As used in this Agreement, the term "Licensed
Software" means collectively: all the software in Your phone, all of the
contents of the disk(s), CD-ROM(s), electronic mail and its file
attachments, or other media with which this Agreement is provided and
includes any related BenQ or third party software and upgrades, modified
versions, updates, additions and copies of the Licensed Software, if any,
distributed over the air, downloaded from BenQ web pages or servers or
from other sources.
License Agreement
109
2. COPYRIGHT. The Licensed Software and all related rights, without
limitation including proprietary rights therein, are owned by BenQ, its
Licensors or affiliates and are protected by international treaty provisions
and all applicable national laws. This Agreement does not convey to You
nor allow You to acquire any title or ownership interest in the Licensed
Software or rights therein. The structure, organization, data and code of
the Licensed Software are the valuable trade secrets and confidential
information of BenQ, its Licensors or affiliates. You must reproduce and
include the copyright notices with any permitted copies You make of the
Licensed Software.
3. LICENCE AND USE. BenQ grants to You a non-exclusive, nontransferrable end user right to install the Licensed Software or use the
Licensed Software installed on the phone. The Licensed Software is
licensed with the phone as a single integrated product and may be used
with the phone only as set forth in these licensing terms.
4. LIMITATIONS ON LICENCE. You may not copy, distribute, or make
derivative works of the Licensed Software except as follows:
(a) You may make one copy of the Licensed Software, excluding the
documentation, as an archival backup copy of the original. Any other
copies You make of the Licensed Software are in violation of this
Agreement.
(b) You may not use, modify or transfer the right to use the Licensed
Software other than together with the accompanying hardware or copy
the Licensed Software except as expressly provided in this Agreement.
(c) You may not sublicense, rent or lease the Licensed Software.
(d) You may not reverse engineer, decompile, modify, or disassemble
those Licensed Software programs except and only to the extent that such
activity is expressly permitted by applicable law notwithstanding this
limitation.
110
License Agreement
Parts of the Licensed Software may be supplied by third parties and may
be subject to separate licence terms. Such terms are set out within the
documentation.
5. MISUSE OF THE LICENSED SOFTWARE OR DATA GENERATED BY
THE LICENSED SOFTWARE IS STRICTLY PROHIBITED BY BENQ,
MAY VIOLATE GERMAN, U.S. AND OTHER LAWS AND MAY
SUBJECT YOU TO SUBSTANTIAL LIABILITY. You are solely responsible
for any misuse of the Licensed Software under this Agreement and for any
liability or damage related in any way to your use of the Licensed Software
in violation of this Agreement. You are also responsible for using the
Licensed Software in accordance with the limitations of this Agreement.
6. TERMINATION. This Agreement is effective from the first date You
install, copy or otherwise use the Licensed Software. You may terminate
this licence at any time by deleting or destroying the Licensed Software, all
backup copies and all related materials provided to You by BenQ. Your
licence rights terminate automatically and immediately without notice if
You fail to comply with any provision of this Agreement. The rights and
obligations under sections 2, 5, 6, 7, 9, 12 and 13 of this Agreement shall
survive the termination of this Agreement.
7. YOU ACKNOWLEDGE THE LICENSED SOFTWARE IS PROVIDED
"AS IS" AND NEITHER BENQ NOR ANY OF ITS LICENSORS MAKE
ANY REPRESENTATIONS OR WARRANTIES, EXPRESS OR IMPLIED,
INCLUDING BUT NOT LIMITED TO THE WARRANTIES OF
MERCHANTABILITY OR FITNESS FOR A PARTICULAR PURPOSE
OR THAT THE LICENSED SOFTWARE WILL NOT INFRINGE ANY
THIRD PARTY PATENTS, COPYRIGHTS, TRADEMARKS OR OTHER
RIGHTS. THERE IS NO WARRANTY BY BENQ OR ITS LICENSORS
OR BY ANY OTHER PARTY THAT THE FUNCTIONS CONTAINED IN
THE LICENSED SOFTWARE WILL MEET YOUR REQUIREMENTS OR
THAT THE OPERATION OF THE LICENSED SOFTWARE WILL BE
License Agreement
111
UNINTERRUPTED OR ERROR-FREE AND BENQ AND ITS
LICENSORS HEREBY DISCLAIM ANY AND ALL LIABILITY ON
ACCOUNT THEREOF. NO ORAL OR WRITTEN INFORMATION OR
ADVICE GIVEN BY A BENQ REPRESENTATIVE SHALL CREATE A
WARRANTY OR IN ANY WAY AFFECT THIS DISCLAIMER. YOU
ASSUME ALL RESPONSIBILITY TO ACHIEVE YOUR INTENDED
RESULTS AND FOR THE INSTALLATION, USE, AND RESULTS
OBTAINED FROM IT.
8. NO OTHER OBLIGATIONS. This Agreement creates no obligations on
the part of BenQ other than as specifically set forth herein.
9. LIMITATION OF LIABILITY. IN NO EVENT SHALL BENQ, ITS
EMPLOYEES, LICENSORS, AFFILIATES OR AGENTS BE LIABLE FOR
ANY DIRECT DAMAGES, LOST PROFITS, DATA OR BUSINESS, OR
COSTS OF PROCUREMENT OF SUBSTITUTE GOODS OR SERVICES,
PROPERTY DAMAGE, INTERRUPTION OF BUSINESS OR FOR ANY
SPECIAL, INDIRECT, INCIDENTAL, EXEMPLARY, ECONOMIC,
PUNITIVE OR CONSEQUENTIAL DAMAGES, HOWEVER CAUSED,
AND WHETHER ARISING UNDER CONTRACT, TORT,
NEGLIGENCE, OR OTHER THEORY OF LIABILITY, OR ARISING
OUT OF THE USE OF OR INABILITY TO USE THE LICENSED
SOFTWARE, EVEN IF BENQ IS ADVISED OF THE POSSIBILITY OF
SUCH DAMAGES. THE LIMITATION OF LIABILITY SHALL NOT
APPLY IF AND TO THE EXTENT BENQ´s LIABILITY IS MANDATORY
UNDER THE APPLICABLE LAW E.G. ACCORDING TO PRODUCT
LIABILITY LAW OR IN THE EVENT OF INTENTIONAL
MISCONDUCT, PERSONAL INJURY OR DEATH.
112
License Agreement
10. TECHNICAL SUPPORT. BenQ and its Licensors have no obligation
to furnish You with technical support unless separately agreed in writing
between You and BenQ or the applicable Licensor.
BenQ and where applicable its Licensors in the Licensed Software shall be
free to use any feedback received from You resulting from your access to
and use of the Licensed Software for any purpose including (without
limitation) the manufacture, marketing and maintenance or support of
products and services.
11. EXPORT CONTROL. The Licensed Software may include technical
data and cryptographic software and is subject to German, European
Union and U.S. export controls and may be subject to import or export
controls in other countries. You agree to strictly comply with all applicable
import and export laws and regulations. Specifically, You agree, to the
extent required by U.S. Export Administration Regulations, that You shall
not disclose or otherwise export or re-export the Licensed Software or any
part thereof delivered under this Agreement to (a) Cuba, Iran, Iraq, Libya,
North Korea, Sudan, Syria or any other country (including a national or
resident of such country) to which the U.S. has restricted or prohibited
the export of goods or services.
12. APPLICABLE LAW AND FORUM. The laws of Germany govern this
Agreement. No choice of law rules of any jurisdiction will apply. The
courts in Munich shall settle any disputes arising out of or relating to this
Agreement provided you are a merchant.
13. MISCELLANEOUS. This Agreement represents the entire agreement
between You and BenQ relating to the Licensed Software and (i)
supersedes all prior or contemporaneous oral or written communications,
proposals and representations with respect to its subject matter; and (ii)
prevails over any conflicting or additional terms of any acknowledgement
or similar communication between the parties during the term of this
Licence. Notwithstanding the foregoing, some products of BenQ may
License Agreement
113
require You to agree to additional terms through an on-line "click-wrap"
licence, and such terms shall supplement this Agreement. If any provision
of this Agreement is held invalid, all other provisions shall remain valid
unless such validity would frustrate the purpose of this Agreement, and
this Agreement shall be enforced to the full extent allowable under
applicable law. No modification to this Agreement is binding, unless in
writing and signed by a duly authorised representative of each party. This
Agreement shall be binding on and shall inure to the benefit of the heirs,
successors and assigns of the parties hereto. The failure of either party to
enforce any right resulting from the breach of any provision of this
Agreement by the other party will not be deemed a waiver of any right
related to a subsequent breach of such provision or any other right
hereunder. Notwithstanding anything to the contrary in this Agreement,
BenQ and/or its licensors may enforce its rights, including but not limited
to copyright, trademark or trade names, in accordance with the rules of
law in each country.
114
License Agreement