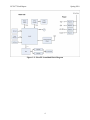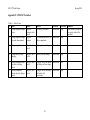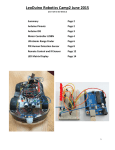
1
ECE 477 Final Report Spring 2010
Team 5 GloveFx
Team Members:
#1: Andrew Gregor
Signature: ____________________Date: _________
#2: Fred Grandlienard
Signature: ____________________ Date: _________
#3: Kevin Mohr
Signature: ____________________ Date: _________
#4: Ryan DeFord
Signature: ____________________ Date: _________
CRITERION
Technical content
Design documentation
Technical writing style
Contributions
Editing
Comments:
0
0
0
0
0
1
1
1
1
1
2
2
2
2
2
3
3
3
3
3
SCORE
4 5 6 7
4 5 6 7
4 5 6 7
4 5 6 7
4 5 6 7
8
8
8
8
8
9
9
9
9
9
10
10
10
10
10
MPY
3
3
2
1
1
TOTAL
PTS
ECE 477 Final Report
Spring 2010
TABLE OF CONTENTS
Abstract
1
1.0 Project Overview and Block Diagram
2
2.0 Team Success Criteria and Fulfillment
6
3.0 Constraint Analysis and Component Selection
7
4.0 Patent Liability Analysis
12
5.0 Reliability and Safety Analysis
16
6.0 Ethical and Environmental Impact Analysis
21
7.0 Packaging Design Considerations
24
8.0 Schematic Design Considerations
27
9.0 PCB Layout Design Considerations
31
10.0 Software Design Considerations
34
11.0 Version 2 Changes
40
12.0 Summary and Conclusions
41
13.0 References
42
Appendix A: Individual Contributions
49
Appendix B: Packaging
B-1
Appendix C: Schematic
C-1
Appendix D: PCB Layout Top and Bottom Copper
D-1
Appendix E: Parts List Spreadsheet
E-1
Appendix F: FMECA Worksheet
F-1
Appendix G: Software Diagrams
F-4
-ii-
ECE 477 Final Report
Spring 2010
Abstract
GloveFX is a device capable of monitoring the user's hand and finger motions in order
to play and modulate a variety of audio signals. The design consists of two separate gloves
equipped with an array of sensors that can wirelessly communicate with a sound hub. The right
glove allows the user to create sounds by tapping the fingers while the left glove allows the user
to select different modulations and alter the modulations by tilting the hand. The station is
responsible for monitoring each glove's sensor data, which it then uses to load, manipulate, and
output audio samples in real-time. The keypad allows the user to select audio samples from an
SD card and program a sample to an individual finger by selecting it using the rotary switch.
1
ECE 477 Final Report
Spring 2010
1.0 Project Overview and Block Diagram
GloveFX consists of two gloves that interact wirelessly with a main base station in order
to produce an array of musical sounds. Each finger on the right glove is equipped with a forcesensing resistor that is able to tell us the force applied to the sensor. This data is sent to the sound hub
via an RF transmitter. If the sensor is pressed, the corresponding LED will light up. The left hand has
four pushbuttons on four fingers, and each one is used to select between three different modulations
and default mode. The accelerometer on the left hand is used to calculate the angle that the hand is
compared to ground. As the user rolls their hand to the left or right, the currently playing sample
increases or decreases in frequency based on the amount of tilt. Again, this data s sent to the sound
hub via an RF transmitter.
This information is used to play and modulate various audio samples in real time. The
samples are mapped to each finger from an external SD card and played through a stereo 3.5mm
headphone jack. Data from the gloves is received wirelessly through the XBee unit, which is used to
play and modulate audio samples. Different waveforms allow for unique sounds to be mapped to
each finger, and audio effects such as delay, phaser, and distortion can be applied using switches on
the left glove. An accelerometer in the left glove detects the angle of the user’s hand and uses this
data to change the frequency of the waveforms so different pitches can be achieved.
2
ECE 477 Final Report
Spring 2010
Figure 1-1: GloveFX Glove Block Diagram
3
ECE 477 Final Report
Spring 2010
Figure 1-2: GloveFX Sound hub Block Diagram
4
ECE 477 Final Report
Spring 2010
Figure 2.2: GloveFX Final Product
5
ECE 477 Final Report
Spring 2010
2.0 Team Success Criteria and Fulfillment
2.1 Project-Specific Success Criteria
1. An ability to correctly transmit and receive data wirelessly between gloves and base
station.
2. An ability to determine the absolute orientation of a user's hand using an accelerometer.
3. An ability to load sound files from an SD card and convert them into an analog output
signal.
4. An ability to use DSP to apply effects such as phaser, delay, and distortion to an audio
signal.
5. An ability to combine multiple digital audio samples into a single output signal.
2.2 Assessment of PSSC Fulfillment
We were able to satisfy three out of our five PSSC’s with our design.
1. The gloves successfully transmit sensor data back to the sound hub and the sound hub is
able to interpret the incoming data and either play an audio sample, change the effect, or
alter the modulation frequency of the audio sample.
2. With the accelerometer we are able to measure the tilt of the users hand and use that
value to increase or decrease frequency of the audio sample being played.
3. We were unable to interact with an SD card on the SHARC and therefore were unable to
satisfy this PSSC.
4. We successfully we able to use the gloves to change between three different modulations
by pushing the pushbuttons on the left hand. The SHARC will then switch between
theses modulations and output a modulated audio sample.
5. We were not able to satisfy this outcome successfully due to aliasing problems inherent
in the waveforms we generated. The sound generated when we ran our wave-adding
algorithms had a multitude of higher harmonics, which yielded an unpleasant bell sound
instead of clean harmonies.
6
ECE 477 Final Report
Spring 2010
3.0 Constraint Analysis and Component Selection
GloveFX is a device capable of monitoring the user’s hand and finger motions in order
to play and modulate a variety of audio signals. The design consists of two separate gloves
equipped with an array of sensors that can wirelessly communicate with a sound hub. The
station is responsible for monitoring each glove's sensor data, which it then uses to load,
manipulate, and output audio samples in real-time. Design constraints for this project include
minimizing power, reducing package size, and decreasing total cost; however, the main design
considerations need to be focused around memory accessibility and processing speed. These
factors are crucial due to the computationally intensive digital signal processing (DSP)
algorithms needed to alter the sample waveform characteristics, particularly since the audio
output signals need to have a minimum response delay time and maximum audio quality. The
following document outlines how these design constraints affected the overall part selection and
interfacing mechanisms for GloveFX.
3.1
Design Constraint Analysis
The GloveFX system is broken up into three main functional units, and each unit
contains its own unique set of design constraints. The main functionality and design
considerations for both of the gloves and the sound hub are defined below.
Right Glove
The right glove is used to detect finger taps and then communicate this data to the
sound hub. Pressure sensors are located at the end of each finger and thumb, as well as small
LEDs to help inform the user that a finger tap was detected. Data from the pressure sensors
needs to be fed into an A/D converter and translated into impact readings so that the base station
can adjust audio signal amplitudes. Communication with the base station is performed through
wireless RF transmission, and a portable battery supply gives the user the ability to send data to
the base station without the need to be near an AC wall outlet. The major design constraints for
the right glove include keeping power dissipation low in order to maximize battery life,
7
ECE 477 Final Report
Spring 2010
incorporating sensors and processing components that provide a reasonable level of dynamic
range and sampling speed, and choosing components that are appropriately sized to ensure
comfortable operation and package reliability.
Left Glove
The left glove is used to calculate the tilt of the user's hand with respect to the ground.
Tilt orientation is determined by a triple-axis accelerometer located directly in the middle of the
palm. Output data is fed into an A/D converter and translated into control information for the
base station's DSP effect algorithms. Switches are also located at the end of each finger in order
to give the user a convenient way to switch between certain effects or bypass the effects
processing altogether. Just like the right glove, a portable battery supply will be used for power,
and RF transmission will be used to communicate with the base station. The major design
constraints for the left glove include all of the same constraints from the right glove, including a
new issue regarding accelerometer noise. Capacitors will need to be chosen carefully in order to
anti-alias the unwanted frequency bands and achieve a tolerance of approximately 10º or less [9].
Sound Hub
The sound hub is used to monitor the incoming RF streams from each glove unit and
generate audio signals that correspond to the sensor readings. A multi-switch control box is used
to select between multiple preset mappings that tell the device which raw (non-modulated) audio
samples to play when finger taps on the right glove are detected. A maximum of five audio
samples (1 sample for each pressure sensor on the right glove) are loaded into RAM from an
external SD card so they can be accessed quickly and easily. Upon detecting a finger tap, the
base station will feed the corresponding audio sample into a DSP and apply the necessary
amplitude and waveform processing, which will depend on the current value for the right glove's
finger pressure, the current values for the left glove's effect settings and tilt orientation, as well as
the nature of the raw audio sample. The sound hub is the most critical part of the entire design
because it must process large amounts of data and I/O requests in a relatively short amount of
time. Major design constraints for the base station include choosing a DSP with an adequate
clock speed, providing enough RAM for buffering sampled data, and making sure that devices
can talk to each other fast enough to meet nearly real-time response time. Since the human ear
8
ECE 477 Final Report
Spring 2010
can start detecting audio delays of approximately 10-20 ms [1], parts will need to be chosen such
that the delay does not exceed this margin.
3.2 Computational Requirements
In order to achieve the fastest response time possible, the entire device must be able to
fetch, process, and output data as efficiently as possible. The bulk of computation will be in the
base station's DSP algorithms, which require multiple point Fast Fourier Transform functions
and signal manipulation routines that tend to use an enormous amount of division and
multiplication operations. The recursive and convoluted nature of effects processing algorithms
can quickly inflate the cycle count on normal processors, but a digital signal processor is
typically optimized for handling this kind of complex mathematics [1]. In fact, one digital signal
processor from Analog Devices (ADSP-21262) can execute a 1024-point FFT in just under 70 μs
[2].
Another factor to consider includes the I/O routines necessary for pulling audio
samples from external memory into RAM. Every time the user changes a preset mapping, the
device will need to fetch and buffer the five new audio samples. If an SD card is used,
connection speeds will be around 10-20 MB/s [10], meaning that samples less than 1 second
could be loaded within a few milliseconds.
As far as the glove devices, they are relatively simple to implement, and they don't
require a tremendous deal of processing power. The left hand, however, has some extra
calculations to do in order to filter and quantify a specific tilt orientation, but these calculations
are negligible compared to the computations carried out by the base station's DSP algorithms
[4][1]. The wireless RF speeds must not absorb too much of the timing margin, but at
approximately 30 KB/s, the RF transmitters have more than enough speed to transmit sensor data
to the sound hub in a time-effective manner [3]. A typical data packet from either hand will be at
most 6 Bytes, which means this data will be received by the sound hub in approximately 0.2 ms.
(6 Bytes) * (1 KB / 1024 Bytes) * (1 / 30 KB) = 0.2 ms << 10-20 ms
3.3 Interface Requirements
9
ECE 477 Final Report
Spring 2010
The right glove interfaces with 5 LEDs, 5 pressure sensitive resistors, and a single RF
transmitter through UART communication [8][5][3]. All devices operate at 3.3 VDC, which will
be stepped up from a single AA battery using a power-efficient voltage converter [7]. The LEDs
connect directly to the Arduino LilyPad's digital outputs, and the pressure sensors are connected
through anti-aliasing filters to the A/D input ports [6]. An anti-aliasing filter must be applied in
order to reduce noise and increase the reliability of the pressure readings. The left glove
interfaces with 5 input switches, 1 3-axis accelerometer, and a single UART RF transmitter. Its
power system is designed in the same fashion as the right glove, and basic filtering must be
present on the x,y,z-axis A/D inputs in order to reduce noise and smooth outputs [4]. The sound
hub interfaces to an external SD Card in order to fetch sample data, as well as a 3.5 mm analog
audio output. The initial design is geared towards single channel 16-bit PCM data sampled at
44.1 kHz; however, an additional CODEC could be purchased in order to manipulate standard
PCM, WAV, MP3, as well as other standard audio encodings [2].
3.4 On-Chip Peripheral Requirements
The Arduino LilyPads will be used to monitor and control the left and right gloves.
The right glove requires 5 channels of 8-bit A/D to in order to capture pressure sensor data, as
well as 5 digital outputs for controlling the LEDs. The left glove requires 3 channels of 8-bit
A/D for monitoring each accelerometer axis, as well as 5 digital inputs for switch controls [6]. A
UART interface is used in both glove designs in order to send RF data to the sound hub. The
base station interfaces with another UART RF receiver, along with an SPI SD Card reader for
reading in external sound files [10]. Digital inputs and basic switch logic from the control box
will also be used for altering the preset finger-to-sound configurations. If DSP algorithms come
together well, and the need arises for more memory buffers, the ADSP-21262 is capable of
external RAM support.
3.5 Power Constraints
The sound hub is powered by a 3.2 VDC wall wart and requires no battery backup.
Power dissipation in the base station should be tolerable, especially since the design is not
driving any motors or mechanical systems. The gloves, however, need to meet power constraints
10
ECE 477 Final Report
Spring 2010
in order to maximize battery life. Both gloves operate on 3.3 VDC, which is equivalent to about
3 rechargeable AA batteries. The MAX756 from Maxim is a power-efficient voltage converter
that can step a single AA battery up to 3.3 VDC, resulting in each glove operating on only 1 AA
[7].
3.6
Package Constraints
Packaging constraints are most relevant in the left and right glove designs. The gloves
need to be comfortable enough for the user to wear during long time periods, the components
need to be small enough to fit on the glove, and the glove needs to be strong enough to withstand
minor impacts from finger impulses. The force sensitive resistors, accelerometer, LEDs,
switches, Arduinos, and XBee RF modules are all within size constraints for a normal sized
hand.
3.7
Cost Constraints
The motivation behind GloveFX is to provide a fast, easy-to-use, and customizable
embedded design project that gives the user the power to store, play, and modulate multiple
sound files in real time. Although many effects processing units give users the ability to
modulate digital audio signals, none of the designs allow the effect parameters to be controlled
through the sensing of human motion. This makes GloveFX unique, which may justify slightly
increasing design costs in order to focus on the other design constraint issues. As a comparison,
the Line 6 POD 2.0 effects processing unit has a market price of around $200.00 [11]. GloveFX
is an interactive effects processing unit that can be played like an instrument capable of
customizable sounds. Because of these distinct features, GloveFX’s overall design cost will try
to hover below $300.00.
3.8
Component Selection Rationale
DSP
Selection
dsPIC
dsPIC30F4013
Blackfin
ADSP-BF512F
Sharc
ADSP-21262 [2]
Voltage
3.0 - 3.6 V
3.2 V
1.2 V
Clock Speed
40 MHz
400 MHz
200 MHz
11
ECE 477 Final Report
Spring 2010
Ram
2 KB
116 KB
2 Mb
Fixed/Floating
Fixed
Fixed
Floating
Packaging
18/SOIC
176 ld LQFP
144 ld LQFP
Cost
$6.12
$25.49
$20.46
The above table summarizes the major characteristics for three different types of DSP
processors. After looking into the fundamentals of DSP applications, it became obvious that a
traditional microcontroller might not meet design constraints. Frequency domain conversions
require an enormous amount of time-domain convolutions and integrations, which can eat up a
lot of memory quickly. Also, some DSP algorithms can literally take days to execute on a light
weight processor [1], which means that GloveFX must invest into a DSP specifically tailored for
audio applications. As seen above, tradeoffs occur between each processor in terms of operating
conditions, execution time, accessible memory, precision, packaging, and overall cost. Because
audio quality and system performance is paramount to a good design, the Sharc ADSP-21262
was chosen as the main DSP controller. It offers the high precision (floating-point), reasonable
cost, and a large amount of available RAM [2]. The Arduino LilyPad processor was chosen for
both of the glove designs because it was cheap, able to be sewn in place, and boasted a pretty
simple design with easy-to-learn API [6].
3.9
Summary
Design constraints such as speed, memory management, power dissipation, and
packaging considerations were analyzed thoroughly in order to make intelligent component
selections. The bulk of the design is housed in the sound hub, which explains why processing
speed and memory management were the main focus of this design.
4.0 Patent Liability Analysis
The goal of the GloveFX project is to develop a device capable of monitoring the
user’s hand and finger motions in order to play and modulate a variety of audio signals. The
design consists of two separate gloves equipped with an array of sensors whose data will be sent
12
ECE 477 Final Report
Spring 2010
wirelessly to a sound hub. Upon examining similar products and patents, there seem to be two
main areas of potential infringement. The first system in question is our method of measuring
hand orientation. The second system is the use of force sensors. The following document
discusses any patent liability issues that our GloveFx design may violate and how the
infringements may be resolved.
4.1 Results of Patent and Product Search
After searching for existing products that our design might have infringed upon, none
were found to be literal infringements. The lack of patents on gloves that modulate audio
samples led to searching more in-depth to systems used in our design.
One patent that was easy to find was US patent number 5615132 titled, “Method and
apparatus for determining position and orientation of a moveable object using accelerometers
”. It was filed on October 6, 1998 and outlines the method to collect impact data via
accelerometers [1]. A summary of the patent’s abstract is as follows:
“A three-dimensional position and orientation tracking system uses accelerometers to
measure acceleration of a moveable object (e.g. a head-mounted display unit or a data
glove). A tracking processor generates both position and orientation information on
the object relative to a simulation environment as a function of the acceleration data.”
[1]
The claims of this patent outline the functionality of the device. One that was of importance was
the one stating that at least 3 accelerometers would need to be mounted on the moveable object
in order to generate linear acceleration signals that could then be used to generate calculated
orientation signals. This feature is of interest because it is what the left glove does in our design.
The second patent in question was US patent number 5581484 titled, “Finger mounted
computer input device”. This patent was filed on June 27th, 1996 and outlines the glove that is
used to manually enter information into a computer via a glove [2]. A summary of the patents
abstract is as follows:
“A pressure sensor is attached proximate to the tip of at least one, but preferably all, of
the fingers of a hand for generating a pressure signal that corresponds to the pressure
of the finger tip against a surface, such as a desktop or tabletop.” [2]
13
ECE 477 Final Report
Spring 2010
There are two relevant claims that this patent states. First, pressure sensors placed near the tip of
the finger correspond to the pressure of the fingertip against a surface. Second, data is
transmittable using radio waves.
Although there may be several other patents that may be related to sub systems in our
overall design, there are two products that perform the same functions as GloveFX that are worth
mentioning.
The first product is called Piano Hands
and it consists of a pair of gloves and a control hub.
There are sensors in each fingertip that detect a tap,
and a corresponding sound is played through a
speaker in the hub [3]. There are eight instruments to
choose from, and the user can set the volume and
choose a background accompaniment. This device is
wired and does not transmit data wirelessly [4].
Similar to Piano Hands, Hand Band also detects
finger taps and also plays the corresponding note of a
particular instrument. Sounds are played through the hub’s
built-in speaker or its headphone jack. Different instruments
and accompaniment can be chosen here, as well. This device
transmits its data wirelessly [5].
4.2 Analysis of Patent Liability
With regards to patent 5615132 titled “Method and apparatus for determining position
and orientation of a moveable object using accelerometers”, GloveFX uses accelerometers to
determine the pitch and roll of the left glove in order to modulate the audio samples being
played. Our design uses a single 3-axis accelerometer to give us the necessary orientation data to
calculate pitch and roll, while the patent uses at least 3 single-axis accelerometers to determine
the same calculations.
14
ECE 477 Final Report
Spring 2010
With regards to patent 5581484 under the title “Finger mounted computer input
device,” GloveFX uses sensors mounted near the tip of a finger to detect pressure of the finger
on another surface, which is also what is stated in the patent. GloveFX uses RF to transmit data,
which is what is stated in the patent’s claim. There might be the potential for infringement on
this patent.
Since the two products, Piano Hands and Hand Band, do not have patents, there are no
legal infringements on these products. If the manufactures were to patent these products before
we did, we would very likely have to get a license or come up with a new product, as they are
almost identical.
4.3 Action Recommended
With the accelerometer patent, there seems to be no literal infringement because
GloveFX has a 3-axis accelerometer instead of three single-axis accelerometers. This small
difference is enough to invalidate any infringement. The concept of using this data to determine
different calculations may bring up a possible doctrine of equivalents infringement that could be
settled with a license.
With the finger mounted computer patent, while the overall concept of using sensors
on the tips of glove to get user inputs is the same, the type of sensor used to determine the
pressure is different. The patent uses bending sensor resistors, while our design uses force
pressure sensor resistors, so there should be no literal infringement there. The only question
would be if the concept of having sensors on the tips of your fingers infringes, which in that case
would fall under the doctrine of equivalents infringement that could be settled with a license.
There might be an infringement with their method of transiting data thought. We might have to
pay for a license or royalty fees for this method of transmitting sensor data.
The two products described above are literally the same concept as our design but
since there are no patents out for their design, there is no infringement. Therefore, there is no
action needed on their behalf.
4.4 Summary
15
ECE 477 Final Report
Spring 2010
This report presented two patents and two products whose functions were similar to those
of GloveFX. For all of them, there were similarities and differences, but overall we should not be
literally infringing on any patents. The only one in question would be the finger mounted
computer input device patent. This patent might need to be licensed due to the fact that our
design uses force sensors and transmits that data, unless it could be challenged although unlikely.
5.0 Reliability and Safety Analysis
GloveFX will consist of a pair of gloves that will enable its wearer to play and
manipulate audio samples. With the current design, there are a number of safety and reliability
points of concern. The most important of these concerns is the safety of the components in the
gloves. Because the user will be wearing part of our product, the chances of an overheating
condition or battery malfunction must be minimized. A battery explosion in particular carries a
high risk of injury in the form of burns or cuts. The proper functioning of the battery charging
and discharging system is critical to safety. In addition, none of the parts should be allowed to
become hot enough to cause pain or discomfort to the user. The hand module should be suitably
insulated from the user, and it should be kept cool and ventilated. Another safety concern is the
audio output. Its amplitude should be easily adjustable to prevent discomfort or pain in the user’s
ear.
In terms of reliability, the gloves again are the main point of interest. All of the
sensors within the glove must be able to tolerate extremes of movement. The human hand has
many points of articulation, so the connections must be extremely strong to ensure a reliable
system. The wires must also be easily bendable and not brittle. Braided strands will be the
preferred connection method here. The glove enclosures will need to be firmly attached to the
gloves, as well. In the hub, the major reliability concerns are for the components with moving
parts. The SD card slot and headphone jack in particular must have firm connections that will not
weaken with use. The keypad buttons should also have a high press count rating.
5.1 Reliability Analysis
16
ECE 477 Final Report
Spring 2010
In performing a reliability analysis for our design, four of its components have been
chosen as follows:
1. SHARC: This is easily the most complex component of the system, and it will be hard at
work with audio sampling and processing duties. It also controls all of the hub’s
functions, and its failure would likely have severe consequences for the overall proper
functioning of the system.
2. ATmega: Though not as powerful as the SHARC, it will still be handling a great deal of
data from the glove sensors, and its failure would also have system-fatal consequences.
3. Regulator: The system will utilize six voltage regulators in all, but the one that will be
discussed here is the hub regulator that bucks 9 V down to 1.2 V. This is because it has
the most power dissipation and will therefore be the hottest and least reliable.
4. Charger: Though not as complex or prone to malfunction as the other components, the
charge controller’s failure could have user-injurious results. This criticality makes the
charger another important focal point of this analysis.
The SHARC is modeled as the microprocessor in section 5.1 of the MIL-HDBK-217F
reliability prediction handbook [1]. Its failure rate is given as λp = (C1πT + C2πE)πQπL. Except for
πT (which requires some extra calculation using a secondary set of parameters), all values are
found in tables. Assuming TC to be 45° C (using the MIL-HDBK-217F default case temperature
for GF), θJC to be 22° C/W (using the MIL-HDBK-217F equivalent for a small, flat package die),
and P to be 1.08 W (using estimates done earlier); TJ is found to be 68.76° C. Further
calculations using an Ea value of 0.35 eV yield the final πT value.
Table 2.1 – SHARC reliability
Parameter Description
Value Comments
C1
Die complexity
0.56
πT
Temperature factor
0.57
C2
Package failure rate
0.25
144-pin flatpack
πE
Environmental factor
2.0
Ground, fixed
πQ
Quality factors
10
Commercial screening level
17
32-bit microprocessor
ECE 477 Final Report
Spring 2010
πL
Learning factor
1.0
λp
Failures/106 hours
8.19
MTTF
Mean time to failure (years) 14
≥ 2.0 years in production [2]
The ATmega328, like the SHARC, is modeled in section 5.1 of MIL-HDBK-217F [1].
The tables and calculations used are the same. TC and θJC are also the same values, but P is now
10.5 mW (based on datasheet values [3]). This makes TJ 45.23° C.
Table 2.2 – ATmega328 reliability
Parameter Description
Value Comments
C1
Die complexity
0.14
πT
Temperature factor
0.24
C2
Package failure rate
0.016
32-pin flatpack
πE
Environmental factor
2.0
Ground, fixed
πQ
Quality factors
10
Commercial screening level
πL
Learning factor
1.0
≥ 2.0 years in production [4]
λp
Failures/106 hours
0.656
MTTF
Mean time to failure (years) 174
8-bit microprocessor
The L6932H1.2 voltage regulator has the same reliability model as the SHARC and
the ATmega328. With the same TC and θJC and 1.56 W for P (estimated), TJ is found to be
79.32° C.
Table 2.3 – L6932H1.2 reliability
Parameter Description
Value
Comments
C1
Die complexity
0.01
Linear, < 100 transistors [5]
πT
Temperature factor
5.2
18
ECE 477 Final Report
Spring 2010
C2
Package failure rate
0.0026 SMT
πE
Environmental factor
2.0
Ground, fixed
πQ
Quality factors
10
Commercial screening level
πL
Learning factor
1.0
≥ 2.0 years in production [5]
λp
Failures/106 hours
0.572
MTTF
Mean time to failure (years) 200
Like all of the previous components, the MCP73838 charge controller will use the
same reliability model. TC and θJC again use the same values, and P is 10 mW. TJ is 45.22° C.
Table 2.4 – MCP73838 reliability
Parameter Description
Value
Comments
C1
Die complexity
0.01
Linear, < 100 transistors [6]
πT
Temperature factor
0.49
C2
Package failure rate
0.0034 SMT
πE
Environmental factor
2.0
Ground, fixed
πQ
Quality factors
10
Commercial screening level
πL
Learning factor
1.0
≥ 2.0 years in production [6]
λp
Failures/106 hours
0.117
MTTF
Mean time to failure (years) 976
The reliability of these components is not bad, but it could be improved; there are
several ways in which this could be achieved. The simplest and most effective reliability
improvement would be the attachment of heat sinks to all of the voltage regulators. This would
keep heat from building up within the components and would increase their life. The addition of
hub ventilation is another improvement that would help to protect the system components. This
ventilation could be as simple as passive venting through slots in the enclosures to active cooling
with powered fans or some similar means.
19
ECE 477 Final Report
Spring 2010
Specifically for the glove components, padding could be added to diminish shock
stresses. This would be applied on or around the enclosures. Additionally, the same heatreducing methods mentioned above could be applied to the glove systems.
5.2 Failure Mode, Effects, and Criticality Analysis (FMECA)
For the safety and reliability analysis, the GloveFX system has been split into five
separate subsections. These sections are the gloves (not including power), glove power, hub
DSP, hub audio, and hub power. Appendix A illustrates these subsections, and Appendix B
presents a FMECA analysis table corresponding to each. These tables list likely failure events,
their causes and effects, and their criticality.
The criticality is determined by assessing the risk to a user or other persons. The low
criticality label corresponds to events that are highly unlikely to cause harm while the high
criticality label is reserved for events that might do otherwise. If an event is fairly benign but still
has even some chance of causing harm, it will still be labeled as a high criticality event. The
acceptable failure rate for a high criticality event is λ < 10-9. This value was chosen because it is
the standard rate for high criticality events. The acceptable rate for a low criticality event is λ <
10-5.
5.3 Summary
Safety and reliability are extremely important factors to consider in a system’s design.
This is true of almost any design process, but it becomes even more important in high-risk, highresponsibility situations (e.g., power tools or medical equipment). GloveFX, though a relatively
simple and safe product, still poses risks that could cause serious harm to itself, its users, and its
surroundings.
The components used are reliable and safe enough for their intended purpose, but
there is certainly room for improvement. Dealing with heat is a major issue to consider. Having a
safe packaging design for a wearable electronic product is also paramount. Redundant backup
and shutdown systems could also be added if necessary, and watchdogs could be built into the
20
ECE 477 Final Report
Spring 2010
system to maintain stable operation. These are all viable solutions to improving the safety and
reliability
6.0 Ethical and Environmental Impact Analysis
Ethical and environmental issues can arise from many different areas of our design
and can be dealt with in an array of ways. Ethically, the well-being of the users and the legality
of the usage of our product are the main concerns. Along the same lines, the product needs to be
reliable and must be rigorously tested to ensure safety. From the environmental aspect, the
impact of our product during its lifecycle is taken under consideration. Manufacturing, pollution
and waste, electrical consumption, disposal, and recycling are all areas that are of concern.
6.1
Ethical Impact Analysis
The ethical challenges needed to be resolved to bring the design to market would
mostly deal with user misuse. GloveFX must be able to offer a safe and reliable way to make
audio output without harming the user by ensuring the volume is at an acceptable level.
Legality, another ethical concern, is always an issue when allowing the user to import his or her
own files to a music device. Also, the design must protect against any abuse by the user and
include if the user tries to improperly use the device.
One ethical concern for GloveFX is that a user may use audio samples that are illegal.
Many clips of audio can be found online and saved to an SD card for use with our product.
These samples may not necessarily be open for use by the general public. Since the user has not
obtained permission from the maker or owner of the clip to use it with our product, he or she
could possibly be promoting illegal activity. The concern here is that if the user produces a new
audio sample using the clip found online, he could be violating copyright laws. Protecting our
design from this kind of abuse may be hard to manage, but there are a few ways to curb this
behavior and make sure the product does not become involved in a lawsuit.
Protecting the design from illegal audio samples could involve a few different
solutions that can be written in software or in the user manual. First, the software could encrypt
21
ECE 477 Final Report
Spring 2010
audio samples found on the SD card and make sure the user can not reuse the samples for
monetary gain. Although this would stifle some creativity, encryption could prevent misuse of
the files. Another software approach would be to check samples for validity when the SD card is
inserting and used on the device. This would be tough to do, but software could possible look
for digital markers set by copyrighted materials. A final solution to protect the project from
potential lawsuits is to list a statement in the user manual that the user assumes all responsibility
for the samples used on the device.
Another concern for GloveFX is the volume of audio output from the sound hub.
Since a user will be determining the intensity of the output with the gloves, the volume will be
of variable degree. Since it will be hard to predict whether or not a user will be ready for the
output of the sound hub, the design will need to protect a user from the outputting audio that is
too loud and may damage their ears. Testing a variety of audio samples on the device will help
determine where the software will need to be set to output a decent level of volume. In addition
to testing, a warning may be placed on the sound hub to advise the user to check the volume
before use. This would be a visual to attract the user’s attention when they plug in the speakers
or headphones for use with GloveFX. Another method of prevention for inadequate volume
would be software to limit the intensity of output from the device. This would help measure the
output and clip the audio level and could be done on start up.
An issue that may arise from the use of GloveFx is the effects of prolonged use of the
gloves. A user may suffer injury from overusing the gloves. From an ethical standpoint, the user
manual must inform the user that using the product may require awkward positions and repetitive
motions to play successful. Once known, the user is aware that the use of GloveFx may be
uncomfortable, they can continue to use the product. Stipulating the conditions upfront, the
product can avoid legal injunctions and not be subject to personal injury lawsuits. Also as a
precaution, the user documentation can list a suggestion to the user to limit the amount of time
spent using the gloves.
6.2
Environmental Impact Analysis
22
ECE 477 Final Report
Spring 2010
Over the life cycle of our design, GloveFX has a few different impacts on the
environment. Some of the concerns include the manufacturing of the printed circuit boards and
many of the electronic components included in our design. The PCBs contain lead and several
other harmful materials. All steps in the process of manufacturing the PCB must be carefully
monitored to ensure safety and that none of these harmful materials come in contact with the
users. Also, the lithium ion battery is full of hazardous chemicals that have an environmental
impact.
During the normal use of our product, only a few devices may have environmental
impact. First, the wireless units use RF to transmit the data from the gloves to the sound hub. As
with any type of wireless communications, there is always a chance of emissions from the
transmission. Although the effects of this radiation are minimal, the consideration is needed to
let users know that this is a concern. Secondly, GloveFX needs to maximize the amount of
battery life with the gloves. To reduce energy output, the microcontroller and wireless units on
the glove are run as slowly as possible. The lithium-ion batteries are energy efficient as well.
The disposal phase of the lifecycle needs to minimize the amount of environmental
impact for our device. Many of the metals used in the lithium-ion battery can be recycled.
Advising the user to dispose of this battery properly should be included in the user manual. The
rest of the device can be disposed of in an environmentally safe fashion through e-waste
recycling programs available in most cities. Encouragement can be given to our users to take
advantage of these friendly disposal programs and can minimize the impact GloveFX has on the
environment.
6.3
Summary
As a marketable product, GloveFX will face many ethical and environmental issues.
Many of these issues will need to be resolved before the product is made available to the general
public. By ensuring that the device goes through rigorous testing and trusting the user to only
use our product legally, many of the ethical issues presented here can be resolved. Also, any
possible hazards must be brought to the attention of the user before they begin using the device.
The environmental concerns can be curbed by being knowledgeable about the materials used in
23
ECE 477 Final Report
Spring 2010
the production of our product and encouraging users to dispose of GloveFX in an
environmentally friendly way.
7.0 Packaging Design Considerations
GloveFX is a product that will allow audio sample playback to be controlled by a
user’s fingers. The user will wear gloves that are connected wirelessly to a control box. Wireless
communication was chosen for the convenience of not having wires connecting the components
to each other. This decision does complicate the design. Battery packs will need to be attached to
the gloves in an unobtrusive location, and wireless modules will also need to be included.
The user will be able to play a sample by tapping a finger against another surface. The
tap will be sensed with a pressure sensor in the fingertip. All fingers on the right hand will serve
this purpose, and different samples will be mapped to different fingers. LEDs will be attached to
the tops of these fingertips to provide visual feedback when the glove senses a tap. On the left
hand, there will be pushbuttons in the four fingertips. Depending upon which fingertip is pushed
against the thumb tip; different audio effects will be applied to the samples being played by the
right hand. The pushbuttons will provide tactile feedback with a noticeable click so that the user
knows when a button has been activated.
Because of the frequent and varied nature of human hand movement, durability is the
principal priority in regard to packaging. All components must have a tolerance to flex and
impact stress, and all connections must be solid. All solder joints will be encased within epoxy or
resin to both reduces the risk of breakage and to improve the user’s comfort while wearing the
gloves. Additionally, the controls must be reliable and easy to use.
The hub that receives the gloves’ signals will have less stringent requirements. It will
house a wireless receiver for communication with the gloves, an SD card slot, a DSP for control
and audio processing, a keypad, and an LCD display. All of these components can be easily
mounted within a simple project box.
7.1 Commercial Product Packaging
24
ECE 477 Final Report
Spring 2010
Below are two similar products already in production: Piano Hands and Hand Band.
Product #1: Piano Hands
Piano Hands consists of a pair of gloves and a control hub. There are sensors in each
fingertip that detect a tap, and a corresponding sound is played through a speaker in the hub [1].
There are eight instruments to choose from, and the user can set the volume and choose a
background accompaniment [2].
Because Piano Hands does not support wireless communication, the gloves only need
to contain the tap sensors. This allows for a simple, lightweight glove, but being wired is also the
product’s greatest drawback. GloveFX will provide this convenience. Additionally, GloveFX
will give the user a more immersive playing experience by allowing one hand to control effects
while the other is playing. Piano Hands only has tap sensors in all of the fingertips, and all audio
changes are done at the control hub [1]. Piano Hands also has very limited audio sample
selection. GloveFX will allow for any sample to be mapped to any finger of the hand, and there
will be a much greater range of samples to choose from. A disadvantage of the GloveFX design
however is that it does not have a built-in speaker like Piano Hands.
Product #2: Hand Band
25
ECE 477 Final Report
Spring 2010
Similar to Piano Hands, Hand Band also detects finger taps and also plays the
corresponding note of a particular instrument. Sounds are played through the hub’s built-in
speaker or its headphone jack. Different instruments and accompaniment can be chosen here, as
well [3].
Unlike Piano Hands, Hand Band does use a wireless interface. This is in line with
GloveFX’s design; however, Hand Band is even more limited than Piano Hands in terms of the
number of instruments that can be played. A user can only choose from keyboard, guitar, or
drum sounds. The hub of Hand Band is battery operated. GloveFX’s hub will be powered from a
wall outlet and so will be less portable. Another notable difference from Piano Hands is that
Hand Band can detect not only a tap but also a flick [4]. A user can play against a surface or in
the air. GloveFX will only be able to detect taps like Piano Hands.
7.2 Project Packaging Specifications
GloveFX will consist of a pair of gloves and a hub box. The gloves will be fitted with
a variety of components. There will be pressure sensors and pushbuttons in the fingertips, an
accelerometer in the left palm, wireless modules and Arduino controllers on the backs of the
hands, and batteries near the wrists. All of these components (with the exception of the batteries)
will be hidden within the fabric of the gloves.
The hub will contain another wireless module along with several other components for
receiving and responding to the gloves’ signals. A keypad on the front of the hub will enable the
26
ECE 477 Final Report
Spring 2010
user to map audio samples. An SD card slot will be on the right-hand side as well as a line out
jack and a DC power jack. The hub components will be contained in a plastic project box.
The estimated cost of the packaging components is very low. The box and gloves
combined should cost under $20. All other packaging costs are negligible. The estimated weight
of a single glove with batteries is 50 g. The estimated weight of the hub is 100g.
7.3 PCB Footprint Layout
For GloveFX, mostly surface mount components were chosen for the hub. Limiting
the PCB footprint size is not a high priority for this project since the hub does not have to be
portable. For this reason, PCB component placement was fairly straightforward. The only major
consideration was to keep the wireless module as far from power as possible. Giving ample
space for the components, the final board footprint size is 110 mm by 110 mm.
7.4 Summary
The GloveFX project requires a thoughtful packaging design in order to function
properly and comfortably. The gloves must be lightweight and durable which means that the
components and their interconnections must also be lightweight and durable. Feedback is
important, as well. This will be implemented with the LEDs and pushbuttons.
The controlling hub is not as difficult to package. Most of the components do not
require any special considerations, and the box itself is not constrained to a particular size or
weight. The parts can be easily placed, and a project box is easy to work with.
8.0 Schematic Design Considerations
GloveFX is a device capable of monitoring the user’s hand and finger motions in order
to play and modulate a variety of audio signals. The design consists of two separate gloves
equipped with an array of sensors that will wirelessly communicate with a sound hub. The
station is responsible for monitoring each glove's sensor data, which it then uses to load,
manipulate, and output audio samples in real-time. The following document describes the
27
ECE 477 Final Report
Spring 2010
function and operating mode of each major subsection of the circuit, as well as how the
subsections relate to each other.
8.1.1
Power Supply
Each glove will be powered by a single cell lithium-ion polymer battery. This battery
will output 3.7V and will have enough charge capacity to run the gloves for at least 3 hours of
constant use [1]. The lithium-ion battery will be recharged by a Microchip MCP73838 via a wall
wart [2]. To regulate the battery output to the desired 3.3V, the LTC3440 Synchronous BuckBoost DC/DC Converter will be used. This 3.3V power line will power all of the devices in the
glove, and so has a high current requirement. The LTC3440 is rated to supply up to 600 mA of
current [3].
The sound hub will be powered with a 5V wall wart and be regulated down to 5V and
-5V, which is what the D/A converter requires. This will also have to be regulated down to 1.2 V
for the Sharc’s core, and 3.3V for the Sharc’s I/O pins, as well as all the other devices in the
sound hub.
8.1.2 SHARC DSP
The Sharc ADSP-21262 digital signal processor (DSP) will act as the main control
unit for the sound hub. Its core components require an internal supply voltage of 1.2V, and its
onboard I/O peripherals require a supply voltage of 3.3V [5]. The SHARC needs an external
12.5 MHz oscillator because the chip lacks an internal oscillator. An onboard phase-locked loop
generates the 200MHz core clock, as well as peripheral clock signals needed to supply I/O
capabilities. In order to communicate with other circuit components, the DSP will be utilizing its
built-in serial peripheral interface (SPI) and integrated interchip sound (I2S) modules. External
serial flash is used to feed program data to the chip because its onboard ROM is only maskprogrammable.
8.1.3
DAC
The AD1854 DAC is a high performance, single-chip stereo, audio DAC with a 48
kHz sample rate [9]. The DAC will get digital pulse-code modulation (PCM) data from the DSP
28
ECE 477 Final Report
Spring 2010
through an I2S connection. To operate in I2S mode, the chip’s IDPM0 (pin 21) port must be tied
high and IDPM1 (pin 20) port must be tied low. The digital circuitry requires 5.0V to operate
correctly, while the analog circuitry requires a reference HI voltage of 3.3V and a reference LO
voltage of 0V. The final major unit consists of the amplification and output of the generated
analog signals. This will require an amplifier on the left and right channels that can drive a stereo
3.5mm headphone jack. The amplifier that we used in our design is manufactured by Analog
Devices and its part number is SSM2135SZ.
8.1.4
XBee RF Modules
The XBee RF modules communicate over the 802.15.4 protocol and operate within
the ISM 2.4 GHz frequency band. The modules require minimal power and provide reliable
delivery of data between devices. They operate at 3.3 V and have a rated current of 45-50 mA
[8]. The module has 5 modes that it can operate in. The idle mode, transmit mode, receive mode,
sleep mode, and command mode. The Xbee modules will be responsible for sending both of the
glove’s data back to the sound hub. Through its serial port, the module can communicate with
any logic and voltage compatible UART. The Arduino Lilypad sends out data from the sensors
through a standard RS-232 UART straight to the XBees. The sound hub will have a coordinator
Xbee that will receive data from both gloves and do the process of determining what samples
need to be played with modulations or not. In order to avoid RF packet collisions, a random
delay is inserted before each glove relays their data packet.
8.1.5
Force Sensing Resistors
The Flexiforce sensor acts as a force sensing resistor in an electrical circuit. When the
force sensor is unloaded, its resistance is around 1Mohm. The sensor exhibits a decrease in
resistance when increased pressure is applied to the surface of the sensor. When a force is
applied to the sensor, this resistance decreases. The voltage is proportional to the inverse of the
force sensor’s resistance, Vo = Vcc ( R / (R + FSR) ) [4].
For this application, we need a voltage measurement corresponding to the resistance to gauge the
force applied. The output of the force resistors is not only used to determine the amplitude of the
29
ECE 477 Final Report
Spring 2010
audio sample but also to drive the corresponding LEDs on each finger. If the force resistors are
not pressed, the LEDs will be off, otherwise they will be on.
8.1.6
SD Card
A single SD card will be used to store the multiple audio samples. We will have to
create FAT16 drivers for the SHARC to be able to read in the audio samples. Because the SD
card can operate in a fully SPI compatible mode, this card will be connected to the Sharc DSP
through the processor’s built-in SPI module and is will be powered at 3.3 volts. The SPI mode is
slower but fast enough for our requirements to load the audio samples real time.
8.2
Hardware Design Narrative
The SHARC ADSP-21262’s most important (and computationally intensive) task is to
process large amounts of data and I/O requests in a relatively short amount of time. This
microcontroller also is tasked with fetching, processing, and outputting data as efficiently as
possible.
8.2.1
SPI
The Sharc’s SPI port can operate in a multimaster environment by interfacing with up
to four other SPI-compatible devices, either acting as a master or slave device. Its port uses open
drain drivers to support a multimaster configuration and to avoid data contention.
The Sharc’s SPI peripheral will be used exclusively to interface with the SD card and the
external serial 2Mbit Flash. To connect the SD card and the Flash to the Sharc, we will use the
Sharc’s SPICLK, MOSI, and MISO pins for both devices and a separate pin for both that serves
as the device select pin.
8.2.2
Serial (USART)
The Arduino Lilypad’s serial interface will be used to send incoming sensor data out
to the Xbee via the Tx pin. A baud rate of 9600 will be used. We believe this will be fast enough
for what we are doing because we are only sending one byte from each sensor when they are
push or the accelerometer sends data.
30
ECE 477 Final Report
Spring 2010
8.2.3 Analog to Digital Converters
Analog to digital converters will be used in both of the Arduinos. In the right glove,
five of these pins will be used to sample the incoming data from the five force sensors. In the left
glove, three of these pins will be used to sample the three outputs of the accelerometer.
8.3
Summary
Using the components and microcontrollers listed above, the GloveFX will be able to
allow the user to play audio sample and modulate them at the same time. The gloves will be
entirely self-contained and wireless. Powered by lithium-ion polymer rechargeable battery packs,
they will sense fingertip pressure as well as hand orientation to affect the output of the audio.
The Arduino controllers in the gloves will receive all the signals from the sensors and send them
to their corresponding XBee module where that data will be transmitted wirelessly to the hub.
In the hub, another XBee module will receive this data and send it to the Sharc for
processing. The Sharc will control the hub and process all of the audio signals which will be
retrieved from the SD card. The audio will be digitally modified before being converted into an
analog signal, amplified, and sent to the line out jack.
9.0 PCB Layout Design Considerations
GloveFX consists of two gloves that interact wirelessly with a main base station in order
to produce an array of musical sounds. Sensors are used to gather hand and finger data which is
sent to the sound hub via an RF transmitter. This information is used to play and modulate
various audio samples in real time. The samples are mapped to each finger from an external SD
card and played through a stereo 3.5mm headphone jack. This design will require three separate
PCB layouts to accommodate the left and right gloves as well as the sound hub.
Each board needs to be laid out such that it adheres to its own unique design
constraints. The important considerations for designing the glove PCBs include properly placing
the components in order to meet size and power requirements. The important considerations for
31
ECE 477 Final Report
Spring 2010
the sound hub PCB include separating the circuitry in order to minimize noise and ensure high
quality audio output.
9.1 PCB Layout Design Considerations - Overall
Both the left and right gloves need to house a circuit board that is small enough to fit
comfortably on the back of the user's hand. The largest components include a 3.7V lithium ion
battery and an XBee RF transmitter. To help minimize total area of the board, components are
placed on both the top and bottom side of the PCB. Power and ground traces are kept to a
minimum of 100 mils while the signal traces are kept to at least 15 mils. This will help protect
against unwanted power dissipation across the traces as well as EMI from internal circuit noise
[1]. Trace angle are kept above 90 degrees to avoid acid traps during the fabrication process.
Any chips that are sensitive to RF interference are positioned further away from the XBee
wireless unit and external resonators [3]. Headers are placed near the outside of the PCB so
external devices can access them easily.
The sound hub does not share the same size constraints as the gloves, but it does need
to reliably receive RF signals and output low-noise audio signals. Trace sizes are kept between
15 and 100 mils just like the glove PCBs and routed in a way that avoids acute angles. The
analog and digital components are physically separated as much as possible to avoid crosscoupling effects and digital noise [1]. The back side of the chip is dedicated to analog circuitry
while the front side is used to split up the RF transmitter and other devices. Digital and analog
ground traces are separated to further reduce any effects of coupling. Headers are placed near
the edge of the chips so they are easily accessible by external devices.
9.2
PCB Layout Design Considerations – Microcontroller
Both of the gloves contain an ATmega328 8-bit microcontroller for interfacing
between external sensors and the RF transmitter. A 16 MHz oscillator is positioned right beside
each controller such that the clocking signal is not affected by RF interference. The noise
generated by the XBee wireless unit and power circuitry is avoided by keeping a safe distance
32
ECE 477 Final Report
Spring 2010
between the controller and these devices [3]. A regulated 3.3V trace from the LTC3440 is used
to power the ATmega's internal circuitry. Decoupling capacitors with values ranging up to 47 μF
are placed between the power and ground pins to help shield against EMI noise on the power
rails [1].
The sound hub uses a SHARC ADSP-21262 digital signal processor to interface
between the SD card reader, RF transmitter, and audio circuitry. The DSP is located in the
center of the sound hub PCB so it can easily interface with other circuit components. It uses an
external 12.5 MHz oscillator placed directly beside the SHARC's clocking pins in order to
reduce its susceptibility to RF emissions [1]. The device requires an internal core voltage of
1.2V and a peripheral I/O voltage of 3.3V to function properly. Decoupling capacitors are placed
between each of the power and ground pins to protect against VDD glitches caused by digital
switching noise [2]. The external SD card reader and flash memory are positioned close to the
SPI bus so traces don't need to be routed across other signals.
9.3
PCB Layout Design Considerations - Power Supply
The gloves operate on a rechargeable 3.7V lithium-ion battery source located on the
bottom left portion of the PCB. Traces run through the buck-booster and are regulated down to
3.3V for use by the all of the components. A 4.7 μF bulk capacitor is placed between power and
ground terminals of the battery to protect against RF interference. The coulomb counter and
recharging circuit are located close to battery, while the regulator is located closer to the circuit
components that need 3.3V. The XBee wireless unit is kept as far from the power rail and other
components as possible to avoid unwanted noise [3].
The sound hub’s power supply comes from a 9V DC wall wart connector located in
the top right-hand corner of the chip. Main power supply rails run along the right-hand side and
bottom side of the board parallel with the ground traces [1]. Voltage regulators divide the power
supply into the necessary 5V, 3.3V, and 1.2V DC lines. The regulators are positioned next to the
main power supply rails which minimizes the voltage fluctuations from trace resistances and
external circuit noise. Further protection is added by inserted bulk capacitors between each
33
ECE 477 Final Report
Spring 2010
power and ground rail. Since the D/A components require both a digital and an analog 5V line, a
trace split occurs directly after the 5V regulator helping reduce excess coupling noise. The
analog and digital grounds are also kept separate from each other and tied together at only a
single point in the main ground rails, further protecting against the noisy effects of coupling [1].
Again, the Xbee wireless unit is kept as far from power and other components as possible,
especially the analog audio components which tend to be more susceptible to circuit noise [3][1].
9.4
Summary
Each PCB has its own design constraints associated with it. The gloves focus more on
minimizing size and reducing power dissipation while the sound hub focuses more on
minimizing the effects of RF interference. Special care is taken to separate noisy components
from sensitive components. Digital and analog circuitry is also laid out separately to avoid any
unnecessary cross coupling. The use of bypass capacitors helps decrease interference on the
VDD lines for each PCB.
10 Software Design Considerations
GloveFX consists of two gloves that interact wirelessly with a main base station in
order to produce an array of musical sounds. Sensors are used to gather hand and finger data
which is sent to the main hub via an RF transmitter. This information is used to play and
modulate various audio samples in real time. The samples are mapped to each finger from an
external SD card and played through a stereo 3.5mm headphone jack.
This design requires three separate pieces of code. Each glove requires code be written
on an ATmega328 which is based on C and has included libraries from the open source Arduino
project [1]. The right glove contains code for gathering data from the force sensor resistors and
outputting pulses to LEDs. The left glove consists of code for accumulating information from the
accelerometer, calculating deterministic formulas, and listening for interrupts of pushbutton
events. Both of the gloves contain polling loops for operation.
The main hub requires code be written on the SHARC DSP which is based on
VisualDSP++ and also has some libraries included from Analog Devices. The majority of the
34
ECE 477 Final Report
Spring 2010
software for the hub consists of interfacing to all of the peripherals. The main hub’s software
contains a polling loop which looks for information sent from the gloves or events initiated from
the hub itself. The keypad input will take precedence over the data sent from the XBee wireless
unit.
10.1 Software Design Considerations
The main software design constraints of the gloves revolve around the speed of the
information being gathered and sent to the main hub. The project, in its entirety, must operate in
a near real time fashion. Thus, the information sent from the gloves is vital and any disruption in
communication must be negligible to the user in the output of audio through the headphone jack.
A simple polling loop can be used to easily and quickly collate and communicate the information
over the wireless unit. Appendix A (Figure 1) illustrates the basic flow of the main function of
the right glove.
The right glove uses twelve of the available external ports on the package of the
ATmega328 [2]. Table 2.1 lists the ports used by each device. Ports PC0-4 are used to monitor
the force sensor resistors. These are simple analog input pins. Ports PB0-4 are used for PWM
output. These drive the LEDs on the glove. Ports PD0-1 are used for XBee configuration and
transmission.
Table 2.1 – External Device Map for Right Glove
Device
Force Sensor Resistor 0
Force Sensor Resistor 1
Force Sensor Resistor 2
Force Sensor Resistor 3
Force Sensor Resistor 4
LED 0
LED 1
LED 2
LED 3
LED 4
XBee Configuration
XBee Transmission
Port
PC0
PC1
PC2
PC3
PC4
PB0
PB1
PB2
PB3
PB4
PD0
PD1
35
ECE 477 Final Report
Spring 2010
The left glove also uses a polling loop for the accelerometer readings. Interrupts are
needed to service the pushbutton events. When a pushbutton is pressed, the calculations need to
be interrupted and the accelerometer needs to be re-calibrated to allow for the newly selected
effect to be properly determined and output to the user. Appendix A (Figure 2) illustrates the
basic flow of the main function of the left glove.
The left glove uses nine of the available external ports on the package of the
ATmega328. Table 2.2 lists the ports used by each device. Ports PC0-2 are used to monitor the
accelerometer. These are simple analog input pins. Ports PB1-4 are used for to determine if a
pushbutton is pressed. Ports PD0-1 are used for XBee configuration and transmission.
Table 2.2 – External Device Map for Left Glove
Device
Accelerometer X-Axis
Accelerometer Y-Axis
Accelerometer Z-Axis
Pushbutton 1
Pushbutton 2
Pushbutton 3
Pushbutton 4
XBee Configuration
XBee Transmission
Port
PC0
PC1
PC2
PB1
PB2
PB3
PB4
PD0
PD1
The main hub is responsible for monitoring user input from the keypad and the
wireless gloves. It performs a basic polling loop on the DAI registers in order to detect key
presses and wireless data packets. The signal routing unit (SRU) allows the physical DAI
connections to be multiplexed to practically any internal flag register, making it straightforward
to check each pin's status bits. If the hub detects a special sequence of keypad presses, it decodes
the data and performs the requested action. This action could include bringing new audio
samples into the global heap buffers from the SD card, reassigning finger mappings for the right
glove, or flushing out the current audio buffers. Wireless data events are used to start I2S
communication with the DAC so the samples can be played. The data events from the gloves
36
ECE 477 Final Report
Spring 2010
constantly feed the effects processing and audio output algorithms, giving the user a musicallyinteractive experience.
The SHARC directly interfaces with 6 external components [3]. Each pin
configuration is listed in Table 2.3 below. Of these 6 components, only the external keypad and
the XBee are responsible for triggering user input events on the hub. However, readings from
the glove sensors need to be analyzed and fed into audio algorithms at regular intervals in order
to maintain a fluid response to the user's hand gestures. Since power consumption is not a major
concern on the hub, a simple polling loop is used to monitor the connection registers. The SPI
port, I2S connections, and the parallel port (AD pins) are all used to interface with devices that
do not need to sample real-time inputs. For example, software routines fired by a right glove tap
will internally connect buffer streams to the external DAC with a fairly large window of cushion.
In addition, the SRU along with the on-chip DMA controller help make core-to-external memory
transfers fast and nearly overhead-free [6].
Table 2.3 – External Device Map for Main Hub
Device
Audio
Flash
LCD
Keypad
SD Card
XBee
Port
DAI1-4
AD8, SPI
AD0-7, 12,13 DAI16
DAI5-9
AD9, SPI
AD10-11
The SHARC exhibits a Harvard Architecture that divides up the program and data
memories into separate banks [10]. All of the banks are accessible via inline assembly
commands, plus the VisualDSP++ compiler allows the programmer to explicitly choose where
certain variables are stored in memory in order to optimize memory mapping. Control registers,
such as the SPICTL, SPISTAT, SPCTL, are accessed by simple library macros provided by
Analog Devices. This makes it very simple to set up baud and frame rates for peripheral
communications.
Table 2.4 – Memory Map (Normal Word, 32 bits)
37
ECE 477 Final Report
Block 0 SRAM
Reserved
Block 0 ROM
Reserved
Block 1 SRAM
Reserved
Block 1 ROM
Reserved
10.2
Spring 2010
0x0008 0000 - 0x0008 3FFF
0x0008 4000 - 0x000A FFFF
0x000B 0000 - 0x000B BFFF
0x000B C000 - 0x000B FFFF
0x000C 0000 - 0x000C 3FFF
0x000C 4000 - 0x000E FFFF
0x000F 0000 - 0x000F BFFF
0x000F C000 - 0x000F FFFF
Software Design Narrative
Right Glove
Status: Written and tested on Arduino Lilypad, but not yet ported to ATmega328
The right glove reads the analog input from each of the force sensor resistors and adjusts the
PWM output to each of the LEDs. This is done in a polling fashion with an interval less than 10
ms. The force sensor resistor data is sent out serially through the XBee transmission port.
Left Glove
Status: Partially written and tested on Arduino Lilypad, but not yet ported to ATmega328
The left glove reads the values from the axes of the accelerometer and calculates the necessary
values for use in the main hub. This is done in a polling fashion with an interval less than 10 ms.
The pushbuttons will be interrupt driven and trigger the accelerometer to be re-initialized and recalibrated. The pushbutton signals are debounced in software. The accelerometer data and
pushbutton triggers are sent out serially through the XBee transmission port.
Main Hub
Main:
Status: Completed
This is the main software routine that initializes all components and waits for external interrupts
from the XBee wireless module. It starts by setting up the LCD, audio drivers, keypad, and
XBee module. A short introduction song is played using sine waves, and a polling loop begins
monitoring the status of XBee data. Based on the input’s value, either internal parameters are
changed or music is driven through the headphone jack.
38
ECE 477 Final Report
Spring 2010
Audio:
Status: Completed
This software is meant to interface with the AD1854 DAC. It sets up the I2S interface port by
using the SHARC’s precision clock generators and SPORTS. The chip is configured to operate
with 16-bit stereo audio using a sampling rate of 48 kHz. An internal buffer of 15,000 integer
samples is used to store waveforms, and a core-driven software approach is used to push the data
into our DAC. Sine, triangle, square, and sawtooth waves can be generated at various
frequencies and pushed into the sample output buffer. Harmony can also be added to the stored
waveform.
Effects:
Status: Completed
This code modulates audio signals by manipulating an audio buffer stored in memory. It utilizes
time-domain algorithms for producing delay lines, frequency phasing, and basic distortion. Each
effect has its own unique parameters that can be used to achieve different sounds.
LCD:
Status: Completed
This code gives us the ability to send control commands and data packets to the LCD screen. The
LCD screen is mapped to the SHARC’s AD pins and communicates with an 8-bit standard
parallel interface. The PPCTL along with the SYSCTL registers control how the parallel port
operates [5].
SD Card:
Status: Partially Completed
This code is currently ported from Analog Device’s website [8]. It demonstrates how to connect
an SD card to the SPI interface of the SHARC.
SPI:
Status: Completed
39
ECE 477 Final Report
Spring 2010
This code gives us an abstraction for accessing the TXSPI/RXSPI registers. The TXSPI register
is a buffer used for sending data out to external slaves, and the RXSPI register is an input buffer
for incoming data. Information is sent and received by monitoring the SPI status registers and
letting the core’s DMA handle data transfers transparently.
XBee:
Status: Completed
This code maintains data transmissions from the XBee wireless unit. The UART driver is
written from scratch using internal interrupts from the SHARC. The UART signal is 3x
oversampled to ensure more reliable data capture, and decoded data bytes are passed on to the
main software routine.
Keypad:
Status: Completed
This software routine basically decodes key presses sent from the keypad encoder. There is a
row-column matrix scheme used to decode the data.
10.3 Summary
The software development for GloveFX consists of two distinct parts: the gloves and
the main hub. The overall organization of the code in the gloves consists of polling loops plus
one instance of the use of interrupts. The organization of the code for the main hub is a polling
loop which looks for data sent through the XBee or a user event initiated on the hub. The state of
the software of the gloves is quite far along. The code for the XBee communication is the only
area that lacks so far. The state of the software for the main hub is still in development. The
major tasks for us to complete will be uniting the gloves and the main hub through the XBee
interface.
11 Version 2 Changes
There are several aspects to our design that should be modified in the second iteration of
our design. Firstly, we might have chosen a different microcontroller for the sound hub.
Although we were able to get things working correctly, the learning curve for the SHARC is
40
ECE 477 Final Report
Spring 2010
very steep. There was not a lot of online documentation and the SHARC was more complex then
was needed for this project. We could have selected a microcontroller with more internal
memory or with flash so that we could have burned our program onto the chip instead of an
external memory. We might have gone with a DSPic33 instead if we would have known how
hard the SHARC is to interact with.
Secondly, there are several errors in the hardware that should be changed. For instance,
we had several programming headers that were incorrect. This was frustrating because we had to
fly-wire all of these wires to our in-system-programmer for the gloves and jtag for the sound
hub. Additionally, there were a few more traces that we would have liked to pull out onto
headers to make probing certain pins easier. Also, a header for the lcd screen would have been
helpful. We also could have implemented a “sleep” mode on the gloves. In normal operation we
had to provide about 300 mA to power the gloves, but the XBee and ATmega328 both have
“sleep” modes that would greatly reduce the battery drain.
12 Summary and Conclusions
Although GloveFX did not accomplish all the PSCC’s, we were able to complete a
majority of the project. Both gloves successfully transmit sensor data to the sound hub which is
able to take the inputs and play and modulate the samples accordingly. The overall goal of the
project was to make a fun, interactive way to create music and we believe we were successful in
accomplishing just that.
The team learned how to design a schematic for a complicated electrical system and
how to map that schematic to a printed circuit board. We became more comfortable working
with a microcontroller and other circuit peripherals. It was a valuable learning experience for
everyone on the team. We have substantially increased our knowledge and honed our skills at
developing solutions for real-world applications. Through the ups and downs of our project, we
believe that we learned several lessons and skills that will be beneficial in the future.
41
ECE 477 Final Report
Spring 2010
13 References
13.1 Section 3 References - Constraint Analysis and Component Selection
[1]
S. Smith, "The Scientist and Engineer's Guide to Digital Signal Processing," [Online].
Available: http://www.dspguide.com/pdfbook.htm. [Accessed: Jan 22, 2010]
[2]
Analog Devices, "ADSP-21261/ADSP-21262/ADSP-21266 Datasheet," Analog
Devices. [Online]. Available: http://www.analog.com/en/embedded-processing-dsp/sharc/adsp21262/processors/product.html. [Accessed: Jan 25, 2010]
[3]
MaxStream, "XBee™/XBee-PRO™ OEM RF Module Datasheet," MaxStream.
[Online]. Available: http://www.sparkfun.com/commerce/product_info.php?products_id=8664.
[Accessed: Jan 29, 2010]
[4]
Analog Devices, "ADXL335 3-Axis +/-3g Accelerometer Datasheet," Analog
Devices. [Online]. Available:
http://www.analog.com/en/sensors/inertialsensors/adxl335/products/
product.html. [Accessed: Jan 23, 2010]
[5]
Interlink Electronics, "402 Force Sensitive Resistor Tutorial & Datasheet," Interlink
Electronics. [Online]. Available: http://www.instructables.com/id/FSRTutorial/?ALLSTEPS. [Accessed: Jan 30, 2010]
[6]
Arduino. "LilyPad Arduino Datasheet," Arduino. [Online]. Available:
http://www.arduino.cc/en/Main/ArduinoBoardLilyPad. [Accessed: Feb 1, 2010]
[7]
Maxim. "MAX756 Adjustable-Output Step-Up DC-DC Converter Datasheet," Maxim.
[Online]. Available: http://www.maxim-ic.com/quick_view2.cfm/qv_pk/1167/t/al.
[Accessed: Feb 4, 2010]
[8]
Kingbright. "SMD Chip LED Lamp Datasheet," Kingbright. [Online]. Available:
http://parts.digikey.com/1/parts/1315287-led-3-2x1-6mm-470nm-blue-clr-smdaptr3216pbc-a.html. [Accessed: Feb 2, 2010]
[9]
Freescale. "Measuring Tilt with Low-g Accelerometers Manual," Freescale. [Online].
Available: http://www.freescale.com/files/sensors/doc/app_note/AN3107.pdf.
[Accessed:
Feb 2, 2010]
[10]
Wikipedia. "Secure Digital (SD card)," Wikipedia. [Online]. Available:
http://en.wikipedia.org/wiki/Secure_Digital. [Accessed: Feb 4, 2010]
[11]
Musician's Friend. "Line 6 Description," Musician's Friend. [Online]. Available:
http://guitars.musiciansfriend.com/product/Line-6-Pod-2.0-Guitar-Multi-EffectsProcessor?sku=150448&ZYXSEM=0&src=3AGGWXX2. [Accessed: Feb 5, 2010]
42
ECE 477 Final Report
Spring 2010
13.2 Section 4 References - Patent Liability Analysis
[1] Horton, M, Newton, R, “Method and apparatus for determining position and orientation of a
moveable object using accelerometers”, U.S. Patent 5819206, Mar. 20, 1997.
http://www.freepatentsonline.com/5819206.html [Accessed: Mar. 31st, 2010].
[2] Prince, Kevin, “Finger mounted computer input device”. U.S. Patent 5581484. June 27th,
1994. http://www.freepatentsonline.com/5581484.html [Accessed: Mar. 31st, 2010].
[3] “YouTube – Musical Fingers Piano Gloves – Findmeagift.com,” Nov. 17, 2008. [Online].
Available: http://www.youtube.com/watch?v=KUgkZ0D61vY. [Accessed: Mar 31st, 2010].
[4] “Piano Hands, Musical Gloves for the Little Mozart in You”, Oct. 24th, 2008. [Online].
Available: http://news.softpedia.com/news/Piano-Hands-Musical-Gloves-for-the-Little-Mozartin-You-96404.shtml [Accessed: Mar. 31st, 2010].
[5] “Hand Band - - Gizmodo,” Jan. 26, 2005. [Online]. Available:
http://gizmodo.com/031178/hand-band. [Accessed: Mar. 31st, 2010].
13.3 Section 5 References - Reliability and Safety Analysis
[1] Department of Defense, “Military Handbook – Reliability Prediction of Electronic
Equipment,” MIL-HDBK-217F, Dec. 1991. [Online]. Available:
https://engineering.purdue.edu/ece477/Homework/CommonRefs/Mil-Hdbk-217F.pdf
[2] “Super Harvard Architecture Single-Chip Computer,” Oct. 2004. [Online]. Available:
http://en.wikipedia.org/wiki/Super_Harvard_Architecture_Single-Chip_Computer. [Accessed:
Apr. 6, 2010].
43
ECE 477 Final Report
Spring 2010
[3] Atmel, “8-bit AVR Microcontroller,” Dec. 2009. [Online]. Available:
http://www.atmel.com/dyn/resources/prod_documents/8271.pdf. [Accessed: Apr. 6, 2010].
[4] “Atmel AVR,” Oct. 2002. [Online]. Available: http://en.wikipedia.org/wiki/Atmel_AVR.
[Accessed: Apr. 6, 2010].
[5] STMicroelectronics, “High performance 2A ULDO linear regulator,” May 2007. [Online].
Available: http://www.st.com/stonline/products/literature/ds/12424/l6932h1.2.pdf. [Accessed:
Apr. 6, 2010].
[6] Microchip, “Advanced Stand-Alone Li-Ion / Li-Polymer Battery Charge Management
Controller with Autonomous AC-Adapter or USB-Port Source Selection,” Nov. 2007. [Online].
Available: http://ww1.microchip.com/downloads/en/DeviceDoc/22071a.pdf. [Accessed: Apr. 6,
2010].
13.4 Section 6 References - Ethical and Environmental Impact Analysis
[1] IEEE, “IEEE Code of Ethics,” [Online Document], 2006, [accessed April 11, 2008],
http://www.ieee.org/portal/pages/iportals/aboutus/ethics/code.html
[2] Panasonic, “Environmental Disposal of Batteries,” [Online document], 2009, [accessed April
15, 2010],
http://www2.panasonic.com/webapp/wcs/stores/servlet/vEnvironmental?storeId=15001
[3] Federal Communications Commission, “Radio Frequency Safety,” [Online document], Sep
2009, [accessed April 15, 2010], http://www.fcc.gov/oet/rfsafety/rf-faqs.html
13.5 Section 7 References - Packaging Design Considerations
[1] “YouTube – Musical Fingers Piano Gloves – Findmeagift.com,” Nov. 17, 2008. [Online].
Available: http://www.youtube.com/watch?v=KUgkZ0D61vY. [Accessed: Feb. 6, 2010].
44
ECE 477 Final Report
Spring 2010
[2] “Piano Hands – IWOOT,” Dec. 10, 2009. [Online]. Available:
http://www.iwantoneofthose.com/piano-hands/index.html. [Accessed: Feb. 6, 2010].
[3] “Hand Band - - Gizmodo,” Jan. 26, 2005. [Online]. Available:
http://gizmodo.com/031178/hand-band. [Accessed: Feb. 6, 2010].
[4] “The Hand Band. – The Red Ferret,” Jan. 26, 2005. [Online]. Available:
http://www.redferret.net/?p=4593. [Accessed: Feb. 6, 2010].
13.6 Section 8 References - Schematic Design Considerations
[1] Batteryspace, “Polymer Lithium-ion Battery Product Specification”, [Online Document],
2008, [accessed February 17, 2010], http://www.batteryspace.com/prod-specs/4542.pdf
[2] Microchip, “MCP73837/8 Data Sheet”, [Online Document], 2007, [accessed February 17,
2010], http://ww1.microchip.com/downloads/en/DeviceDoc/22071a.pdf.
[3] Linear Technology, “LTC3440 Data Sheet”, [Online Document], 2001, [accessed February
17, 2010],
http://www.linear.com/pc/downloadDocument.do?navId=H0,C1,C1003,C1042,C1116,P2123,D3
314.
[4] Interlink Electronics, “Force Sensing Resistor Integration Guide and Evaluation Parts
Catalog”, [Online Document], Unknown, [accessed February 17, 2010],
http://www.imagesco.com/sensors/fsr/fsrguide.pdf
[5] Analog Devices, “SHARC Embedded Processor”, [Online Document], 2009, [accessed
February 17, 2010], http://www.analog.com/static/imported-files/data_sheets/ADSP21261_21262_21266.pdf
[6] Analog Devices, “Small, Low Power, 3-Axis ±3 g Accelerometer”, [Online Document],
2009, [accessed February 17, 2010],
http://www.sparkfun.com/datasheets/Components/SMD/adxl335.pdf
45
ECE 477 Final Report
Spring 2010
[7] Atmel, “8-bit Microcontroller with 4/8/16K Bytes In-System Programmable Flash”, [Online
Document], Unknown, [accessed February 17, 2010],
http://www.atmel.com/dyn/resources/prod_documents/doc8025.pdf
[8] MaxStream, “XBee™/XBee-PRO™ OEM RF Modules”, [Online Document], 2007,
[accessed February 17, 2010], http://www.sparkfun.com/datasheets/Wireless/Zigbee/XBeeManual.pdf
[9] Analog Devices, “Stereo, 96 kHz, Multibit DAC”, [Online Document], 2000, [accessed
February 17, 2010], http://pdfdata.datasheetsite.com/pdf1/Analog/AD1854JRSZ.pdf
[10] Analog Devices, “Implementing a Glueless UART Using The SHARC® DSP SPORTs”,
[Online Document], 2003, [accessed February 18, 2010],
http://www.analog.com/static/imported-files/application_notes/EE191.pdf
13.7 Section 9 References - PCB Layout Design Considerations
[1] M. Glenewinkel, “System Design and Layout Techniques for Noise Reduction in MCUBased Systems,” CSIC Applications, Austin, TX. [Online]. Available:
http://www.freescale.com/files/microcontrollers/doc/app_note/AN1259.pdf. [Accessed: February
23, 2010]
[2] Analog Devices, "ADSP-21261/ADSP-21262/ADSP-21266 Datasheet," Analog Devices.
[Online]. Available: http://www.analog.com/en/embeddedprocessingdsp/sharc/adsp21262/processors/product.html [Accessed: February 24, 2010]
[3] MaxStream, "XBee™/XBee-PRO™ OEM RF Module Datasheet," MaxStream. [Online].
Available: http://www.sparkfun.com/commerce/product_info.php?products_id=8664 [Accessed:
February 24, 2010]
46
ECE 477 Final Report
Spring 2010
13.8 Section 10 References - Software Design Considerations
[1] Arduino, “Language Reference,” Apr. 2009. [Online]. Available:
http://arduino.cc/en/Reference/HomePage [Accessed: Feb. 26, 2010].
[2] Atmel, “8-bit Microcontroller with 4/8/16K Bytes In-System Programmable Flash,” 2009.
[Online]. Available: http://www.atmel.com/dyn/resources/prod_documents/doc8025.pdf
[Accessed: Feb. 26, 2010].
[3] Analog Devices, “SHARC Processor Programming Reference,” June 2009. [Online].
Available: http://www.atmel.com/dyn/resources/prod_documents/doc8025.pdf [Accessed: Mar.
25, 2010].
[4] Analog Devices, “Implementing a Glueless UART Using The SHARC DSP SPORTs,” May
2003. [Online]. Available: http://www.atmel.com/dyn/resources/prod_documents/doc8025.pdf
[Accessed: Mar. 25, 2010].
[5] Analog Devices, “Connecting Character LCD Panels to ADSP-21262 SHARC DSPs,” Dec.
2003. [Online]. Available: http://www.atmel.com/dyn/resources/prod_documents/doc8025.pdf
[Accessed: Mar. 25, 2010].
[6] Analog Devices, “Configuring the Signal Routing Unit of ADSP-2126x SHARC DSPs” Feb.
2004. [Online]. Available: http://www.atmel.com/dyn/resources/prod_documents/doc8025.pdf
[Accessed: Mar. 25, 2010].
[7] Analog Devices, “Using the Expert DAI for SHARC Processors” Dec. 2009. [Online].
Available: http://www.atmel.com/dyn/resources/prod_documents/doc8025.pdf [Accessed: Mar.
25, 2010].
[8] Analog Devices, “Interfacing MultiMediaCard with ADSP-2126x SHARC Processors” Mar.
2005. [Online]. Available: http://www.atmel.com/dyn/resources/prod_documents/doc8025.pdf
[Accessed: Mar. 25, 2010].
47
ECE 477 Final Report
Spring 2010
[9] Analog Devices, “ADSP-21262 EZ-KIT Lite Evaluation System Manual” Aug. 2006.
[Online]. Available: http://www.atmel.com/dyn/resources/prod_documents/doc8025.pdf
[Accessed: Mar. 25, 2010].
[10] Analog Devices, “C/C++ Compiler and Library Manual for SHARC Processors” Apr. 2006.
[Online]. Available: http://www.atmel.com/dyn/resources/prod_documents/doc8025.pdf
[Accessed: Mar. 25, 2010].
48
ECE 477 Final Report
Spring 2010
Appendix A: Individual Contributions
A.1 Contributions of Andrew Gregor:
Having had more hands-on and construction and fabrication experience, Andrew was
tasked with the construction and packaging of GloveFX. He did most of the principal component
soldering and did any other soldering jobs needed for development and testing. Fly-wiring was
also his responsibility. Several components malfunctioned and needed to be either repaired or
replaced (e.g., the SHARC DSP, an ATmega328 microcontroller, the flash chip, and several
regulators). Near the end of the project, the XBee headers on the gloves failed to make contact
and had to be bypassed with fly-wiring. Some mistakes were also made during design that had to
be accounted for. A power rail in the hub was not connected to all of the necessary points and
had to be routed by wire, and a bad component decal required an off-PCB connection for a DIP
inverter.
Andrew attached all of the headers and interfacing components to the PCBs. Many of the
IO pins for the microcontrollers were pulled to headers that needed to be attached, and external
components had to be connected. The batteries and sensors were wired to their individual
headers; and power jacks, switches, and user interface components (keypad, rotary switch, LCD)
were attached. Heat shrink tubing proved invaluable in these endeavors as electrical tape could
never have been applied with as much grace – especially in tight header areas.
For the packaging, Andrew had to make sure that everything would fit properly. The
glove boxes were quite small, but everything managed to fit. The hub had quite a bit of room to
work with, and it didn’t get too cramped in there. Sensors and pushbuttons had to be sewn into
the gloves. This involved separating the glove lining from its shell and adding these components
in between. Once these were in place, the lining had to be carefully replaced, and the gloves were
sewn back together. Velcro was added to the top of the gloves and the bottom of their boxes to
allow for the attachment of the two, and they were connected together with a bundle of wires.
The hub required drilling and cutting to affix the external components. Andrew passed the
keypad ribbon cable through a slot in the shell and firmly attached the rotary switch with a nut
and locking washer. He cut a notch for the power jack and a slot for the SD card. A hole was also
necessary for the headphone jack.
49
ECE 477 Final Report
Spring 2010
In addition to construction, Andrew also helped quite a bit with problem troubleshooting.
The team encountered many problems, and it was necessary to take a systematic approach to
each of them. Andrew came up with different possible causes for particular issues, and these
possibilities sometimes proved to be the answer. For example, in some cases, a pin may not have
been connected properly, or there might have been a problem in software. Andrew helped quite a
bit with these sorts of problems.
A.2 Contributions of Fred Grandlienard:
I started the semester researching the wireless that we would use to send the glove data to
the sound hub. I found a variety of projects online that all used a device called XBee that
appeared perfect for our project because it was low power, easy to implement, and very small. I
ordered two XBees and a Lilypad that has an ATmega328 on it, right away to start testing the
wireless communication. The next task I took on was to start the schematic for the gloves. I did
the research for the recharging unit and analog comparator. I had to figure out how all of this
would tie together with the ATmega328 and XBee. Since I had to do the Theory of Operation
and Hardware Design Narrative plus Preliminary Schematic Drawing homework, I played a
large role in the schematic creating process for both of the gloves.
I created the initial schematic for the gloves and made a rough PCB layout before we had
the actual size of the PCB needed to fit in our enclosure. We had to estimate the size of the PCB
that we would be working with on the glove because we did not decide on a final enclosure until
last second. After we decided on the enclosure, I was able to start laying out the components on
the correct size PCB. Placing the components took some time because the PCBs for the gloves
were size constrained. I also did the routing one the glove PCBs. This was rather straight
forward, as the ATmega328 only had a handful of traces for power, ground, clock, and sensors.
Everything else was just required that I place the resistors and capacitors close to the
corresponding IC.
Once our PCBs arrived, I help Andrew populate the glove PCBs. After our boards were
up and running, a few errors were found in the layout that I had made. One was the programming
header that was flat out wrong. I did not know about the in-system-programmer until after we
had the PCBs made. I only knew of the header that the Lilypad ATmega328 used, so that was the
header that I made on the PCB. Although I did help Kevin code the ATmega328s to get them
50
ECE 477 Final Report
Spring 2010
functioning correctly, I focused my efforts more so on the getting the hardware together and
functioning since I designed the PCB layout. The code that I did write was very early on when
were originally testing XBee and the force sensors with the ATmega328s. I also wrote some
code to interface with an SD card on the ATmega328 because Ryan was having trouble getting
the SD card to work on the SHARC. We never did use this because making the ATmega328 talk
to the SHARC might be worse than just getting the SD card to talk directly to the SHARC.
The last 2 to 3 weeks of class were really just debugging our code on the glove and making them
more efficient. I came up with a really easy protocol that we used to send the data that each
sensor would send out to the SHARC. Anytime a sensor was pressed we would send out one data
byte that the SHARC would be able to decode and know what hand and finger it came from and
also the data associated with that sensor. I also took the time to compile all of our homework’s
for the final report.
A.3 Contributions of Kevin Mohr:
As one of the only team members who have had experience working with web content, I
was tasked with setting up the website for our team. This included finding a template design and
modifying it to meet our needs. I also created the content for much of the website. This included
adding an audio player, adding pictures, and embedding our video. The documentation for
GloveFX was also placed online for future reference.
One of the first tasks I tackled was writing code for both the left and right gloves. This
was an easy choice for me to make because the code was in C and I have had a multitude of
experience developing in the language. Much of our development began on the Arduino Lilypad
because we were looking for a microcontroller that would be easy to attach to our gloves and
would be lightweight so that the user could still move his or her hands. After I helped build a
prototype circuit for the right hand, I developed code in a polling loop that read from the force
sensor resistors, lit up LEDs, and sent data serially to the XBee unit. For the left hand, we only
needed a few buttons and an accelerometer, but the code needed a little more depth to use the
acceleration data correctly. I adapted an accelerometer class from online to meet the needs of our
left glove. This glove also ran in a polling loop that sent data serially to the XBee unit.
After we learned that we may need a more complicated circuit for the charging and
regulating of our gloves, we decided to move to the ATmega328 chip. This was the same chip
51
ECE 477 Final Report
Spring 2010
used on the Lilypad, but would need to be programmed differently. I took the task of learning
how to program the new chip with the AVR in-system programmer. I learned that we would
need to fly wire pins from the ATmega328 and burn a bootloader before could program the chip
with our code. After finding the right settings and drivers, I was able to successfully write
programs to the ATmega328 and test out the peripherals for both right and left gloves.
While Ryan handled most of the programming for the SHARC, I decided to try my hand
at programming the LCD so that we could have a visual representation of our data on the sound
hub side of the project. This would prove to be much faster than printing to the terminal for
debugging. Adapting code from an application note on the Analog Devices website, I wrote code
to use the LCD for our device. This including changing numerous timing requirements for
writing to the LCD and rewriting the initialization routine to account for the height, width, and
needs of our selected LCD. I also reconstructed the printing routine for the LCD to include a way
to print to both lines of the screen from within the parameters of the function. This made it much
simpler to pick a line for which to print. I also wrote a function to clear the screen and reset the
pointer back to the starting position.
Another one of my tasks was to debug wireless communications from the glove side.
Sending data to the sound hub proved to be more difficult than we originally thought it would be.
I discovered that we needed to send the data as byte format for the SHARC to recognize the data
and a specific baud rate would also be needed to time the data correctly. When I started with
wireless communications, two bytes was thought to be small enough to contain all the data we
would need. This turned out to be too timely so we converted to one byte that contained header
information and data. Once we converted to a one byte system, we found that we could run both
the gloves and the SHARC with very little delay in transmission.
As far as documentation goes, I was responsible for submitting the Software Design
Contributions homework and the Ethical and Environmental Impact Analysis homework. I
organized the website and added all of our final information so that it would be ready for the
archive CD.
A.4 Contributions of Ryan DeFord:
My responsibilities included designing the hardware and software for the main sound
hub. In the first few weeks of the semester, I researched the basic fundamentals of audio signal
52
ECE 477 Final Report
Spring 2010
processing in both the digital and analog domain. I used this information to start choosing
components that would fulfill the minimum project requirements while still adhering to the
team's budget. In order to get a feel for the software routines necessary for effects processing, I
used MATLAB to simulate time-domain algorithms for emulating delay, reverb, and phaser on
raw PCM data. I was able to develop some unique sounds that were easily modified through the
altering of various function parameters. This helped give us some flexibility in terms of how the
left and right gloves would work together to modulate waveforms.
As the semester progressed, I started constructing the schematic and PCB layout for the sound
hub. Interfacing the components required some decision making in terms of communication
protocols, sampling rates, bit resolutions, as well as the I/O capabilities of our SHARC 21262.
Through my research, I decided that 16-bit stereo audio at 48kHz would be more than enough to
reliably reconstruct our audio signals. I used standard protocols such as I2S and SPI, which
meant that I had to arrange each component's configuration pins in order to ensure proper chipto-chip communication. After the schematic was successfully completed, I made the footprints
for each component and generated a PCB layout. I carefully placed components to avoid
unwanted EMI, and I chose properly sized trace widths to avoid excessive resistance and heat
dissipation.
Once the PCB came in, I was responsible for designing and implementing the software routines
for the SHARC. This proved to be very challenging, especially since the SHARC's
documentation was sometimes misleading and contained cyclical references that neglected to
convey the subtle, yet important, details. However, I was able to start writing basic software
routines and build upon each idea one step at a time. Some of my major accomplishments
include writing a UART driver from scratch using an interrupt-based approach, setting up an I2S
bus on the SHARC's DAI pins for interfacing with the DAC, and figuring out creative ways to
generate audio waveforms "on the fly" in order to make up for the lack of on-chip internal
memory. I was able to successfully generate sine waves, square waves, triangle waves, and
sawtooth waves at any given frequency. My code allowed each finger to be mapped to the
desired waveform, which could then be modulated using effects such as single-tap delay, phaser,
and distortion.
53
ECE 477 Final Report
Spring 2010
54
ECE 477 Final Report
Spring 2010
Appendix B: Packaging
Figure B-1. Final Product
B-1
ECE 477 Final Report
Spring 2010
Figure B-2. Glove Internals
Figure B-3. Sound Hub Internals
B-2
ECE 477 Final Report
Spring 2010
Figure B-4. Glove Operations
LCD
Power Jack
Keypad
Finger Selection Knob
Headphone Jack
SD Card Slot
Figure B-5. Sound Hub Controls
B-3
ECE 477 Final Report
Spring 2010
Buttons
Force Sensors
LEDs
Left Glove Box
Right Glove Box
Connector
Connector
Figure B-6. Glove Controls
Gloves
Weight:
25 g (single glove, 50 g with batteries)
Hub
Weight:
100 g
Length:
Width:
Depth:
130 mm
130 mm
50 mm
B-4
ECE 477 Final Report
Spring 2010
Appendix C: Schematic
Figure C-1. SHARC Schematic
C-1
ECE 477 Final Report
Spring 2010
Figure C-2. SHARC Power Schematic
C-2
ECE 477 Final Report
Spring 2010
Figure C-3. SHARC Audio Schematic
C-3
ECE 477 Final Report
Spring 2010
Figure C-4. SHARC Memory Schematic
C-4
ECE 477 Final Report
Spring 2010
Figure C-5. SHARC Peripheral Schematic
C-5
ECE 477 Final Report
Spring 2010
Figure C-6. Right Glove Schematic
C-6
ECE 477 Final Report
Spring 2010
Figure C-7. Left Glove Schematic
C-7
ECE 477 Final Report
Spring 2010
Appendix D: PCB Layout Top and Bottom Copper
Figure D-1. Left Glove Top Copper and Silkscreen
Figure D-2. Left Glove Bottom Copper and Silkscreen
D-1
ECE 477 Final Report
Spring 2010
Figure D-3. Right Glove Top Copper and Silkscreen
Figure D-4. Right Glove Bottom Copper and Silkscreen
D-2
ECE 477 Final Report
Spring 2010
Figure D-5. Sound Hub Top Copper and Silkscreen
Figure D-6. Sound Hub Bottom Copper and Silkscreen
D-3
ECE 477 Final Report
Spring 2010
Appendix E: Parts List Spreadsheet
Item
LilyPad
Arduino 328
Main Board
Manufacturer
Part #
Price
Sparkfun
Sparkfun
DEV-09266
$21.95
2
$43.90
Sparkfun
Digi
XB24-ACI-001
$22.95
3
$68.85
Sparkfun
Sparkfun
WRL-08687
$24.95
1
$24.95
Sparkfun
Sparkfun
PRT-09140
$3.95
1
$3.95
Sparkfun
Interlink
Electronics
402
$6.95
5
$34.75
Sparkfun
Sparkfun
DEV-08772
$13.95
1
$13.95
Triple Axis
Accelerometer
Sparkfun
Analog Devices
ADXL335
$9.95
1
$9.95
Dual Axis
Gyro
Sparkfun
ST
LPR530AL
$7.95
1
$7.95
SHARC DSP
Digi-Key
Analog Devices
ADSP21262SKSTZ200
$27.02
1
$27.02
DAC
Test
Pushbuttons
and LEDs
Tactile SPST
Pushbutton
Switch
Digi-Key
Analog Devices
AD1854JRSZ
$8.80
1
$8.80
Digi-Key
[multiple]
[multiple]
$5.21
1
$5.21
Digi-Key
C&K Components
PTS635SL25SMTR
LFS
$0.53
6
$3.18
Blue LED
Digi-Key
Kingbright Corp.
APT3216PBC/A
$0.52
7
$3.64
Sparkfun
Atmel
ATmega328
$4.25
2
$8.50
Digi-Key
CUI Inc.
SJ-3523-SMT
$0.87
2
$1.74
2 Mb Flash
Digi-Key
Numonyx / ST
Micro
M25PE20-VMN6P
$1.19
2
$2.38
Audio
Amplifier
Digi-Key
Analog Devices
SSM2135SZ
$5.65
2
$11.30
SPST Slide
Switch
Digi-Key
CW Industries
G-107-SI-0005
$1.57
2
$3.14
XBee 1mW
Chip Antenna
XBee Explorer
USB
Jumper Wires
Premium 6"
M/F
Force
Sensitive
Resistor 0.5"
FTDI Basic
Breakout 3.3V
ATMega328 TQFP
3.5 mm
Stereo Audio
Jack
E-1
Qty
Total
Cost
Vendor
ECE 477 Final Report
Spring 2010
Battery
Charger
Microchip
Microchip
MCP73838
$1.12
4
$4.48
3.7 V Polymer
Li-Ion Battery
BatterySpace.com
BatterySpace.com
PL-603048-10C
$7.95
2
$15.90
IC Encoder
Digi-Key
Fairchild
Semiconductor
MM74C922WM
$8.95
1
$8.95
Black Plastic
Knob
Digi-Key
Grayhill
11K5017-JCNB
$1.43
1
$1.43
Keypad
Digi-Key
NKK Switches of
America Inc
FMBN16BD
$25.00
1
$25.00
Rotary Switch
Digi-Key
Grayhill
56D36-01-1-AJN
$11.00
1
$11.00
Stop Pins
Digi-Key
Grayhill
557002-001
$0.19
3
$0.57
-5 V Inverting
Regulator
Digi-Key
Maxim Integrated
Products
MAX774CSA+
$5.64
1
$5.64
XBee
Headers
Digi-Key
Sullins Connector
Solutions
NPPN101BFLC-RC
$1.67
6
$10.02
5.6 V Zener
Diodes
Digi-Key
Fairchild
Semiconductor
1N5232BTR
$0.24
6
$1.44
12.5 MHz
Crystal
Digi-Key
CTS-Frequency
Controls
407F35E012M5000
$1.58
2
$3.16
Linear Voltage
Regulator
Digi-Key
STMicroelectronics
L6932H1.2TR
$3.43
3
$10.29
16 MHz
Oscillator
Digi-Key
CTS-Frequency
Controls
636L3C016M00000
$3.92
2
$7.84
Panel Mount
Power Jack
Digi-Key
CUI Inc
PJ-009A
$0.44
1
$0.44
PCB Mount
Power Jack
Digi-Key
CUI Inc
PJ-002A-SMT
$0.88
1
$0.88
-5 V Inverting
Regulator
Digi-Key
Maxim Integrated
Products
MAX764CSA+
$6.10
1
$6.10
Digi-Key
Serpac
17-S BLACK
$10.65
1
$10.65
Linear Technology
LTC3440
$0.00
4
$0.00
Hub
Enclosure
Buck-Boost
DC/DC
Converter
Power Jack
Digi-Key
CUI Inc
PJ-033A
$0.68
3
$2.04
16 Mhz
Resonator
Digi-Key
TDK Corporation
FCR16.0M6T
$0.34
4
$1.36
10 uH
Inductors
Digi-Key
JW Miller A Bourns
Company
9230-44-RC
$1.30
3
$3.90
E-2
ECE 477 Final Report
Spring 2010
Rubber Cover
for Switch
Digi-Key
E-Switch
KOC1
$0.97
1
$0.97
Bottom
Contacts
Digi-Key
FCI
HFW8R-1STE1LF
$0.78
1
$0.78
Top Contacts
Digi-Key
FCI
HFW8R-2STE1LF
$0.99
1
$0.99
LCD
Digi-Key
Newhaven Display
Intl
NHD-0220FZFSW-GBW-P-3V3
$10.90
1
$10.90
-5 V Inverting
Regulator
Digi-Key
Maxim Integrated
Products
MAX764CSA
$6.10
1
$6.10
Linear Voltage
Regulator
Digi-Key
STMicroelectronics
L6932H1
$3.43
E-3
1
$3.43
Total
$437.42
ECE 477 Final Report
Spring 2010
Appendix F: FMECA Worksheet
Table 1 – Glove Power
No. Mode
A1 Voltage regulator output
is zero
Causes
Chip fail,
overheat, short
circuit
Chip fail,
overheat
Effects
No activity in system
Detection
Criticality Remarks
Observation High
Low criticality except in
the case of a short (fire
possible)
Overheating and failure of Observation High
other components
A2
Voltage regulator output
is greater than nominal
A3
Charger output is zero
Chip fail, short
circuit
Battery cannot recharge
Observation Low
A4
Charger does not stop
charging
Chip fail, short
circuit
Battery will overcharge
Observation High
A5
Analog comparator does
not detect a voltage
match
Analog comparator
always detects a voltage
match
Chip fail, short
circuit
Charger will not be turned Observation Low
on, battery will not charge
Chip fail, short
circuit
Charger will be constantly Observation High
on, battery will
overcharge
A6
F-1
ECE 477 Final Report
Spring 2010
Table 2 – Glove
No. Mode
B1 No data is output from the
ATmega
Causes
Chip fail, software issue
Effects
No data sent to hub, no
audio output
Detection
Criticality Remarks
Observation Low
B2
Invalid data is output from the
ATmega
Chip fail, software issue
Wrong or missing sensor
data samples
Observation Low
B3
Sensor does not respond to
user
Sensor fail
Missing sensor data
Observation Low
B4
No data is output from the
wireless module
Wireless module fail,
software issue
No data sent to hub, no
audio output
Observation Low
Table 3 – Hub DSP
No. Mode
C1 No audio is output from the
SHARC
C2
Distorted audio is output
from the SHARC
Causes
Buffer fail, chip fail, short circuit,
software issue
Effects
No audio
Detection
Criticality Remarks
Observation Low
Power irregularity, RF interference, chip
fail, software issue
Distorted
audio
Observation Low
F-2
ECE 477 Final Report
Spring 2010
Table 4 – Hub Audio
No. Mode
D1 No audio is output from the amplifier
D2
Distorted audio is output from the
amplifier
Table 5 – Hub Power
No. Mode
E1 Voltage regulator
output is zero
E2
Voltage regulator
output is greater than
nominal
Causes
Chip fail,
overheat, short
circuit
Chip fail,
overheat
Causes
Chip fail, overheat, short
circuit
Effects
No audio
Detection
Criticality Remarks
Observation Low
Chip fail, overheat
Distorted
audio
Observation Low
Effects
No activity in part or all
of system
Overheating and failure
of other components
F-3
Detection
Criticality Remarks
Observation High
Low criticality except in
the case of a short (fire
possible)
Observation High
ECE 477 Final Report
Spring 2010
Appendix G: Software Diagrams
Figure G-1. Flowchart for Right Glove
F-4
ECE 477 Final Report
Spring 2010
Figure G-2. Flowchart for Left Glove
F-5
ECE 477 Final Report
Spring 2010
Figure G-3. Flowchart for Sound Hub
F-6
ECE 477 Final Report
Spring 2010
Figure G-4. Right and Left Glove Hierarchy
F-7
ECE 477 Final Report
Spring 2010
Figure G-5. Sound Hub Hierarchy
F-8