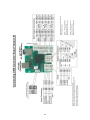
1
Link
Motion™
by Solustan, Inc.
Tel: 781-449-7666
support @solustan.com
User’s Manual
November 16, 2011
©Copyrights Reserved 2003-2011
1
SOFTWARE LICENSE AGREEMENT
YOU SHOULD CAREFULLY READ THE FOLLOWING TERMS. YOUR INSTALLATION OF THE PROGRAM
INDICATES YOUR ACCEPTANCE OF THESE LICENSE TERMS.
PLEASE READ THIS AGREEMENT CAREFULLY BEFORE INSTALLING THE PROGRAM. SOLUSTAN, INC.
WILL ONLY LICENSE THE PROGRAM TO YOU IF YOU FIRST ACCEPT THE TERMS OF THIS AGREEMENT
BY INSTALLING THE PROGRAM. SOLUSTAN, INC. PROVIDES THE SOFTWARE FOR TRIAL FOR 15 DAYS
OR 15 LAUNCHES OF THE DRIVER TO PROVE THE FUNCTIONING OF THE DRIVER ON YOUR PC BEFORE
PURCHASING THE LICENSE. ONCE THE LICENSE IS PURCHASED, IT IS NON-REFUNDABLE AND NONRETURNABLE.
These license terms apply to Your installation and use of the program, which program includes copyrighted materials
and programs (collectively referred to as "Program"). This license is granted to You by Solustan, Inc. You may not use
the Program contained in this Package to upgrade any existing Programs that You may have. The Programs contained in
this package are intended only for New Users of LinkMotion Lite and not for any other use.
1. License. This Program is licensed and not sold. Title to the Program does not pass to You. Solustan owns
copyrights in the Program. You obtain no rights other than those granted You under this Program License Agreement.
The term "Program" means the original (including any revisions, enhancements, updates, or the like) and all whole or
partial copies of it, including modified copies or portions merged into other programs. You are responsible for the use
of, and results obtained from the Program. This Program may be used only on one machine at any one time. You may
not reverse assemble or reverse compile the Program, except as specifically provided by law, without the possibility of a
contractual waiver. You may not sublicense, rent, lease, or assign the Program.
2. Disclaimer of Warranty and Limitation of Liability. THE PROGRAM AND ANY OTHER PRODUCT WHICH
WE PROVIDE TO YOU AS PART OF OUR SERVICE ARE PROVIDED "AS IS." EXCEPT AS SPECIFICALLY
SET FORTH HEREIN, NEITHER WE NOR OUR LICENSORS MAKE ANY WARRANTIES, REPRESENTATIONS
OR CONDITIONS OF MERCHANTABILITY, QUALITY, AND FITNESS FOR A PARTICULAR PURPOSE
RELATING TO OUR PROGRAM, SERVICES, AND/OR RELATED PRODUCTS THAT WE OR OUR LICENSORS
PROVIDE.
3. IN NO EVENT SHALL SOLUSTAN BE LIABLE FOR ANY DAMAGES RESULTING FROM THE USE OR
MISUSE OF THE SOFTWARE OR THE ACCOMPANYING MANUAL INCLUDING BUT NOT LIMITED TO
DAMAGES FOR INJURY TO ANY PERSON OR PROPERTY. THE PROGRAM IS DESIGNED TO WORK WITH
MACHINES AND AS SUCH, ANY PART OF THE SYSTEM MAY MISBEHAVE. IT IS IMPORTANT TO TAKE
ALL THE NECESSARY PRECAUTIONS IN OREDR TO AVOID EQUIPMENT DAMAGE AND/OR INJURY.
4. WE DISCLAIM ANY WARRANTY OF TITLE OR OTHER WARRANTIES FOR ANY THIRD PARTY'S
OFFERING(S) OR PRODUCT(S). ALL SUCH WARRANTIES AND REPRESENTATIONS ARE HEREBY
EXCLUDED. WITHOUT LIMITATION, NO WARRANTY IS GIVEN THAT THE PROGRAM OR PRODUCTS
ARE ERROR-FREE.
WE, INCLUDING OUR LICENSORS, DISCLAIM ANY LIABILITY OR RESPONSIBILITY ARISING FROM ANY
CLAIM THAT YOUR ACCESS OR USE OF THE PROGRAM, SERVICE, AND/OR RELATED PRODUCTS WE
PROVIDE INFRINGE ANY THIRD PARTY'S INTELLECTUAL PROPERTY RIGHTS.
IN NO EVENT ARE WE OR OUR LICENSORS ARE LIABLE FOR: A) DIRECT, SPECIAL, INDIRECT,
CONSEQUENTIAL OR INCIDENTAL DAMAGES EVEN IF WE HAVE BEEN ADVISED OF THE POSSIBILITY
THEREOF INCLUDING, BUT NOT LIMITED TO, LOST PROFITS, LOST BUSINESS REVENUE, OR FAILURE
TO REALIZE EXPECTED SAVINGS; OR, B) ANY CLAIMS AGAINST YOU BY ANY OTHER PARTY. This
Section applies to all claims by You irrespective of the cause of action underlying Your claim, including, but not limited
to: a) breach of contract, even if in the nature of a breach of condition or a fundamental term or a fundamental breach, or
b) tort including but not limited to negligence or misrepresentation.
2
In no event are We or Our dealers liable for any damages arising from Your failure to perform Your responsibility in
connection with this Program License Agreement, or arising from any cause beyond Our control, including but not
limited to delay in the performance of Our obligations or misuse of Your User IDs. All limitations and disclaimers stated
in this Section also apply to Our Product Licensors as intended beneficiaries of this Program License Agreement. Any
rights or limits stated herein are the maximum for which we are collectively responsible.
5. Termination. This license is effective until terminated. This license will terminate immediately without notice from
Solustan, Inc. if fail to comply with any of its provisions. Upon termination you must destroy the Software and all copies
thereof, and you may terminate this license anytime by doing so.
6. General. You are responsible for payment of any taxes, including Your personal property taxes, resulting from this
Program License Agreement or Your use of the Program. You agree to comply with all export laws and regulations.
Neither party may bring an action under this Program License Agreement more than ONE years after the cause of
actions arose. This Program License Agreement and all Your rights and obligations are governed by the laws of the
State of Massachusetts.
7. LinkMotion Lite software is protected with a software protection key. The protection key is tied to your specific PC
computer using appropriate Microsoft Operating System. If the technology was not available to transfer the license to
another PC, you will be required to buy another license at a full price of the software in case of a PC failure beyond
normal repair. It is very important to safeguard the PC with the license.
8. Support is available free of charge for 30 days from purchase date. Normal support charges will apply after 30 days of
purchase date.
Solustan, Inc. 165 Chestnut St., #200, Needham, MA 02492
Tel: 781-449-7666 EMail: [email protected]
3
LinkMotion Detail Installation and Setup Instructions
Computer Requirements:
LinkMotion CD is available for 32 Bit and 64 bit operating systems of Windows.
Windows 7 32 or 64 bit operating system or
Windows XP operating system with Service Pak 2 or 3 and Microsoft .NET 2.0 Framework installed
Processor speed of at least 800 Mhz, Minimum RAM memory 512 MB, 1 GB preferred,
40 MB of Hard drive free space, Screen resolution of at least 800 x 600,
CD-ROM drive is not required, if the driver software was received by internet.
CD-ROM drive is necessary, if the software was received on a CD.
Microsoft .NET 2.0 Framework is available for a free download from the following site:
Microsoft.com>Downloads & Trials>Download Center>.NET Framework Version 2.0 or higher.
If you have purchased USB controller without wiring you need to follow the instruction from the
document Connect USB controller first before you install any software. If Solustan has prepared with
pre wiring you do not need to worry about Connect USB controller document for hardware wiring.
Installation required for LinkMotion Lite and USB controller:
Part 1 - First part is installation of LinkMotion USB software.
Part 2 - Second part is to Install USB controller driver.
Do not plug the USB cable into your computer until the instruction guides you to do it.
Part 3 - Software License Code procedure is necessary for full working license.
When you install the LinkMotion software on your computer it is good for 30 days or 30 executions.
Within this period you need to get a license code from Solustan to make it a permanent license for the
computer of your choice. Please make sure and install on the computer that you are planning to use
for long term. All LinkMotion product Licenses are non-transferrable. Price is subject to change
any time. Additional software licenses can be made available for an extra charge.
4
Part 1 - Installation Procedure for LinkMotion Lite:
Note that you must have administrative privileges on the computer in order to install LinkMotion.
Most of the installation process is self-explanatory by following the instructions from the screen. You
can stop the installation at any time by clicking "Cancel".
If you selected to receive the driver software on a CD, Go to the step (1A) and skip (1B).
If you selected to receive the driver software by internet, Go directly to the step (1B) and skip
(1A).
(1A) Insert the LinkMotion installation CD into your CD-ROM drive. If the Auto-run feature is
enabled, Windows will start the Installation automatically. If the Auto-run feature is not enabled, browse
the CD drive in Windows explorer and double-click on the "Launcher.exe" and installation will begin.
(1B) After downloading the driver software, unzip the files and save by creating a folder name
LinkMotion. Now double click on the file name Launcher.exe and installation will begin.
(2) Click on the Next Button.
(3) Click on the Next Button.
(4) When you get to the License Agreement dialog (see above), you must read the agreement. If you
agree, go ahead and click the radio button "I Agree" for the installation process to continue and
Click on the Next Button.
5
(5) After you have read and agreed to the License Agreement, you will be asked to specify the
installation folder. In most cases you can leave this as the default setting. You will also be asked to
specify who will be able to run LinkMotion on this computer. In most cases you should specify
"Everyone" and then Click on Next button.
IMPORTANT: If you do not specify everyone, the software will be installed only for the user that
is active at the time of installation.
(6) Click on the Next button once again.
6
(7) Later during the installation you will see Choose your machine for installation. Machine is My
Machine as default. Scrolling arrow on the right will allow you to choose your machine name.
(9) Click on "Close" when the installation is complete.
Icon shown below should show up in system tray at the bottom right.
If LinkMotion icon does not show up in the systems stray in case of Win 7 follow directions from below
and setup to view that icon all the time.
Go to Control Panel of windows from the Start button. Click on the Apperance and Personalization.
Click on the Taskbar and Start Menu. Click on the Customize icons on the taskbar. Here make the
selection for Always show all icons and notifications on the taskbar. Click on the OK button.
To view all different files and folders that is installed for LinkMotion one more setup is necessary
using following directions in Win 7:
7
Go to Control Panel and click on the Appearance and Personalization.
Under folder Options Click on the Show Hidden files and folders.
In the View section, look for Hidden files and folders.
If not checked already, check the button for Show hidden files, folders and drives.
Click on the Apply button. Click on the OK button.
(10) This setup is necessary for only Win 7 users. Windows 7 operating system disables USB port
connections when it is in power save or screen saver mode. Following settings will keep USB port
always active. Please make sure to set this up properly. Power save mode can be turned off.
Go to Control Panel > Click on Hardware and Sound > Under Power Options Click on Change
Power-Saving Settings > Balanced is selected by default. On the right Click on Change Plan Settings
> Select Never for put the Computer to sleep. Click on the Change advanced power settings from
below > Double click on the USB Settings > Double click on the USB Selective Suspend Setting >
Click on the Settings and Select Disable (for Desktop computers) or Select Disable for On battery as
well as Plugged in (for Laptops) > Click on the Apply button and Click OK.
(11) International Customers need to check following:
If you are using Windows operating system for other languages please make sure that following settings
are selected for LinkMotion to work properly.
Win XP: Go to the Start button > Control Panel > Regional and Language Options > Click on the
Customize button. Here Decimal Symbol should be .(Full stop or Period) selected. Do not select
,(Comma). If you had to change click on the Apply button and Click OK.
Win 7 32/64: Go to the Start button > Control Panel > Clock, Language, and Region > Change
keyboards or other input methods > Select Format tab(menu) > Click on the Additional settings
button. Here Decimal Symbol should be .(Full stop or Period) selected. Do not select ,(Comma). If you
had to change click on the Apply button and Click OK.
You are done with all settings for windows. LinkMotion installation procedure is complete. Now follow
the USB controller driver installation procedure. Refer to the LinkMotion Lite manual for additional
information on the operation and setup of the LinkMotion Lite software.
Re-Launch LinkMotion:
It is extremely important to Re-Launch LinkMotion if you replace or change LinkMotion.INI file
for it to be effective.
Exit the LinkMotion (icon) applet by right mouse click from the systems tray at the bottom right.
LinkMotion icon should go away from the systems tray.
Now launch it back again by following and selecting the path Windows Start button>Program
Files or All Programs >Solustan>LinkMotion by the arrow of your mouse.
LinkMotion icon should appear again in the systems tray at the bottom right.
8
Uninstalling LinkMotion:
Please make sure of the following before you uninstall:
Your specific machine related settings are saved as LinkMotion.ini file. This file can be saved from
General Options Menu and simply click on the Save button and give whatever name you prefer. You
can also navigate where in your hard drive you want to save it. Different users can save under different
names. Similarly you can Load that file back after another installation of LinkMotion by going to the
General Options menu and clicking on the Load button. Navigate to the file from your computer where
you saved it earlier. Restore Default button allows you to load default installed INI file that is supplied
with LinkMotion. It is very important to exit LinkMotion applet and Re-launch the applet when
you make any changes for it to be effective. Understand the definition of Re-Launch from below.
Uninstall LinkMotion Procedure:
Make sure the LinkMotion applet is closed. Open the Start menu and select the Control Panel.
Double-click on Add or Remove Programs. Look for LinkMotion entry in the list and click on that.
Select "Remove" and answer "Yes" when it asks you if you really want to remove LinkMotion.
LinkMotion.INI file (configuration file) does not get deleted with uninstall
procedure.
If you want to delete your existing INI file following is the procedure for win XP:
In the C:\ hard drive Find folder name Document and Settings> Folder with users (your own name)
name> Folder name Application Data> Folder name Solustan> Folder name LinkMotion>
LinkMotion.INI. Delete this file.
If you want to delete your existing INI file following is the procedure for win 7:
In the C:\ hard drive Find folder name Users> Folder with users (your own name) name> Folder
name ApplData> Folder name Roaming>Folder name Solustan> Folder name LinkMotion>
LinkMotion.INI. Delete this file.
9
Part 2 - Install USB Controller Driver:
Do not plug the USB controller using the USB cable until it is asked for in the instructions. Always plug
the controller directly into your computer’s USB 2.0 connection when instructed.
If the controller is plugged into the PC via USB hub or other extension devices, it is important to note
that the third party devices should meet USB 2.0 specifications. If the hubs or other extension devices
cause problems, connect the controller directly to the PC to isolate USB related problems.
Installing USB Controller driver for Win 7 32, 64 and Win XP operating System:
Make sure your LinkMotion CD is in the computer. If you receive the software by internet you should
unzip and find a folder name USB Controller Driver and follow the instructions from step (3).
(1) Go to the start button of Windows at the bottom left and Click with the right mouse button and
select Explore.
(2) Navigate and select LinkMotion CD on the left side. Select and open a USB Cont Driver folder
from the right side.
(3) You will see a file name OEMTech 11391 USB Driver 0.9.9.2.exe as shown in the picture above.
Double click on this file and it will start installing the driver. Your computer setup may ask for special
permission to install unknown vendor and you can click on the Yes button to start.
(4) When you see the dialog box for Device Driver Installation Wizard, click on the Next button. It just
takes a few seconds to install the USB driver.
10
(5) You should see the above shown dialog box and click on the Finish button.
(6) Now plug in the USB cable. When you plug the USB cable in the computer you will see a message
for found new hardware ncPOD at the bottom right in the systems tray or the screen.
Dialog box shown in Windows 7:
Dialog box shown in Windows XP:
(7) Found new hardware wizard dialog box shows up and make sure to check the button for Install
software automatically (Recommended). Click on the Next button.
(8) You may see the above shown dialog box before this installation starts and select Install this driver
software anyway.
11
(9) You will see the installation procedure with above picture and collecting and installing the necessary
files in proper locations.
(10) When it finishes automatic installation you will have the selection available for Finish button. Click
on the Finish button.
(11) Remember to plug in the compatible SD memory card into the USB Controller card.
Approximately 1minute of machine work uses 1MB of memory. This controller supports up to 2GB
Memory. We have provided the list of SD memory we have done testing with.
If you are installing for the first time you do not need to worry about next step 12 for updating the
firmware. We ship all USB controller boards with latest firmware.
(12) Firmware update for USB controller board:
This procedure may be necessary only when we send you an updated firmware or updated
LinkMotion driver software to work with latest firmware properly.
You need to disconnect USB cable from the computer end, wait for a minute and re-connect back
one time. Firmware update requires USB controller board connected to the computer.
Double click on the file name FirmUpdater 2070.exe or with the latest number that we have provided.
Click on the big button Firmware Updater 2070. This will take a few seconds and when it is done
updating it will give you a message Update Successful. Click on the OK button and you are done with
the firmware update.
If you are simply updating the USB controller board firmware or updating the LinkMotion driver
version then you will simply need to exit the LinkMotion applet by right mouse click and Re-Launch it
from the Start menu and start working with it again.
Congratulations!You were successful in installing the USB controller driver. You should be able to start
using LinkMotion. Please understand all of the tab functions in LinkMotion, setup proper parameters for
your machine and then start using it.
12
13
Warning for USB Controller board:
1. It is always possible to plug the controller directly into your computer’s USB 2.0
connection.
2. It is important to experiment and determine that the USB controller works with the USB
hub or extension device, if the user plan to use such a device.
3. This USB controller does not work with USB1.1 connections. If you connect other USB
devices that require 1.1 connections, it will cause problems. All the USB devices including
keyboard and mouse in the system shall comply with 2.0 specification. Always check
compatibility for wireless USB devices, if you are using one.
4. Power saver and Screen Saver modes on your computer should be turned off. If these modes are
activated, it can cause problems in recognizing the USB connection on a continuous basis.
5. The USB controller can be configured to power either from the USB connection of the PC
or from an external 5 VDC power supply.
6. In case of Laptop computers AC power unit shall be connected to an AC outlet while
operating external USB devices. Sometimes, aggressive power save mode under battery
operations could activate the disconnection of USB devices. Re-Launching LinkMotion will
activate the communication.
7. Approximately 1 minute of machine operation uses 1MB of memory. This controller supports up
to 4GB Micro Memory. If you are using LinkMotion version 3.1 or higher, you could use either
SD or SDHC memory cards.
8. It is impossible to test all the available SD Memory cards in the market but we have listed in the
following lists ones that work and ones that do not work with this USB controller.
Memory chips tested and working with this controller: Sandisk 1 gb, 512 mb, 256 mb, Topram
1gb, PNY 1gb, PNY 4gb SDHC, Samsung 1gb, Transcend 1gb and 'Made in China Generic' 1gb.
Memory chips not working with this controller: Kingston 2gb (non SDHC) and Kingston 4gb
SDHC
USB Controller Board Lights:
There are three LED lights on the USB Controller board Blue and Amber. These lights behave in the
following manner:
Blue LED Flashing Slowly – No USB Connection
Blue LED Steady – USB powered up and ready
Amber LED Flashing Slowly – Waiting for firmware update
Amber LED Flashing Fast – No SD (Memory) card
Amber LED Steady – USB ready with SD card
Red LED Steady – Turns on when board is powered. It turns off when it makes proper connection with
LinkMotion. It should turn on every time when any machine motion is detected.
Red LED Flashing – If hardware switch for Repeat is installed on the USB controller and
LinkMotion.INI file is setup properly then Red LED starts flashing after a job is processed one time.
Pressing the Repeat switch will send the job again to the machine. After a job is processed one time it is
ready to repeat the last job using either of the Enter key on the PC keyboard as many times as user
wishes.
14
It is always a good idea and a good practice to turn on the PC first and your driver module after
the Windows is loaded. In the same manner, it is always a good Idea to turn off the PC last when
you switch off the system.
It is advisable to turn the spindle motor off and keep if off during the installation of the
LinkMotion and during the process of turning the PC ON and OFF. This should be true whether
the decision was made to power the USB controller from the USB port of the PC or from external
5 VDC power supply.
Warning for LinkMotion Control Pad:
1. Use the ‘Space Bar’ of the keyboard or ‘Zero (Ins)’ key on your Numeric Key Pad to
Pause. Pause works from these keys when LinkMotion is in the foreground and active
mode. You will see a message box asking you if you want to Continue or Quit the job.
(Sometimes this message box is in the back of your Control pad and you can bring it to the
front simply by clicking on the system tray’s active LinkMotion application.) At this point,
make the necessary selection. Click YES to continue the job or No to stop the job
completely. After you select NO you will see another dialog box asking you if wish to stay in
the position you are at or you wish to go to X, Y (0, 0) position. Make your selection and
park your tool properly.
2. Control Pad for USB allows only one direction movement at a time.
3. Once a job is sent or you have activated the LinkMotion applet, it shows up in the bottom bar
where active applications are displayed.
4. Repeat Key from Control Pad (Enter key from computer keyboard) will process immediately the
last job sent to the controller without sending the job again from the PC to the controller.
5. Wireless keyboard and mouse should be checked fully before using them. One of the
possible problems with the wireless keyboards is that Control pad keys may not send out
information fast enough for machine to move properly.
6. We have done preliminary testing with wireless control pad and most keys function well when
an individual key is pressed. When two keys are pressed together, it may not work properly. An
example is pressing one directional key 6 to move the X axis going to the right and then try
pressing key 5 while holding down the key 6 to make it go faster may not work well.
Design using plate size feature under Material properties is fully tested only with Corel Draw. If
you are using any other design application you need to test before you start using that feature.
15
Part 3 – Software License Key Procedure:
We welcome you for trying out our LinkMotion driver software. You will see the following message on
the screen when LinkMotion is launched from the systems tray every time when you are using the
program as demo.
Click on the Enter key button, whenever you decide to purchase or you have purchased it and you are
ready for full license key. Enter Key will open following dialog box and show the Hardware
fingerprint of your computer.
You need to provide us the proper information for Hardware fingerprint, Business Name, valid email
for Business along with the LinkMotion version and operating system you are using. Fill out this
information in each respective boxes, save the file and email it to us at [email protected]. Solustan
is not responsible for any incorrect Hardware fingerprint code you provide. Please double check
this information before you send it to us. Software license working with Hardware fingerprint and
matching code provided by Solustan, Inc. is intended to work only on the computer with the proper
hardware fingerprint. Key Code will not be generated for any incomplete information.
All LinkMotion product licenses are non-transferrable. User will need to buy another license for
another computer. Additional license can be made available for an extra charge.
Hardware fingerprint:
Name: (Business name or Computer user’s name)
Valid email for Business or User:
16
Your Operating System:
Win 7 64
Win 7 32
Win XP
Your LinkMotion Application:
LinkMotion USB
LinkMotion Lite
LinkCAM M&G
LinkMotion Galvo
LinkMotion VC-Laser
LinkMotion VC
LinkMotion HPGLEng.
LinkMotion HPGLVinyl
LinkMotionLeetro
LinkMotion USB and LinkMotion Lite users need to verify Serial number of the USB controller
card. Launch your LinkMotion application and select the Help tab(menu). Last thing at the bottom right
it displays the serial number for the USB Controller. Please write this serial number in the box below.
USB Controller Serial Number:
After you send us all of the information in above boxes, we will send you the customized Key Code.
This key code is long text containing numeric numbers as well as alphabet letters.
Key: (Key Code for LinkMotion License)
We highly recommend that you simply copy and paste this in the Key section by bringing back the
same Enter Key screen. Click OK and you are ready to use your LinkMotion driver software license.
If you did not purchase within 30 days or 30 launchings you will see a last reminder as seen in the
following picture. It will be best to purchase at this point.
Once the trial period of LinkMotion expires, you will see the following message.
Click on the Enter key will always give you the Hardware Fingerprint and you can purchase the
software any time if you were using the trial version.
17
LinkMotion Lite with USB Controller for processing
M&G Codes:
LinkMotion Lite works with Windows XP and Windows 7 32/64. It allows the user to control and setup
a machine and process the M & G Codes to send it to the machine.
Warning for USB Controller board:
1. It is always possible to plug the controller directly into your computer’s USB 2.0 connection.
2. It is important to experiment and determine that the USB controller works with the USB hub or
extension device, if the user plan to use such a device.
3. This USB controller does not work with USB1.1 connections. If you connect other USB devices
that require 1.1 connections, it will cause problems. All the USB devices including keyboard
and mouse in the system shall comply with 2.0 specification. Always check compatibility for
wireless USB devices, if you are using one.
4. Power saver and Screen Saver modes on your computer should be turned off. If these
modes are activated, it can cause problems in recognizing the USB connection on a continuous
basis.
5. The USB controller can be configured to power either from the USB connection of the PC or
from an external 5 VDC power supply.
6. In case of Laptop computers AC power unit shall be connected to an AC outlet while operating
external USB devices. Sometimes, aggressive power save mode under battery operations could
activate the disconnection of USB devices. Re-Launching LinkMotion will activate the
communication.
7. Approximately 1 minute of machine operation uses 1MB of memory. This controller
supports up to 4GB Micro Memory. If you are using LinkMotion version 3.1 or higher, you
could use either SD or SDHC memory cards.
8. It is impossible to test all the available SD Memory cards in the market but we have listed
in the following lists ones that work and ones that do not work with this USB controller.
Memory chips tested and working with this controller: Sandisk 1 gb, 512 mb, 256 mb, Topram 1gb,
PNY 1gb, PNY 4gb SDHC, Samsung 1gb, Transcend 1gb and 'Made in China Generic' 1gb.
Memory chips not working with this controller: Kingston 2gb (non SDHC) and Kingston 4gb SDHC
USB Controller Board Lights:
There are three LED lights on the USB Controller board Blue and Amber. These lights behave in the
following manner:
Blue LED Flashing Slowly – No USB Connection
Blue LED Steady – USB powered up and ready
Amber LED Flashing Slowly – Waiting for firmware update
Amber LED Flashing Fast – No SD (Memory) card
Amber LED Steady – USB ready with SD card
18
Red LED Steady – Turns on when board is powered. It turns off when it makes proper connection with
LinkMotion. It should turn on every time when any machine motion is detected.
Red LED Flashing – If hardware switch for Repeat is installed on the USB controller and
LinkMotion.INI file is setup properly then Red LED starts flashing after a job is processed one time.
Pressing the Repeat switch will send the job again to the machine. After a job is processed one time it is
ready to repeat the last job using either of the Enter key on the PC keyboard as many times as user
wishes.
It is always a good idea and a good practice to turn on the PC first and your driver module after
the Windows is loaded. In the same manner, it is always a good Idea to turn off the PC last when
you switch off the system.
It is advisable to turn the spindle motor off and keep if off during the installation of the
LinkMotion and during the process of turning the PC ON and OFF. This should be true whether
the decision was made to power the USB controller from the USB port of the PC or from external
5 VDC power supply.
Warning for LinkMotion Control Pad:
1. Use the ‘Space Bar’ of the keyboard or ‘Zero (Ins)’ key on your Numeric Key Pad to
Pause. Pause works from these keys when LinkMotion is in the foreground and active
mode. You will see a message box asking you if you want to Continue or Quit the job.
(Sometimes this message box is in the back of your Control pad and you can bring it to the
front simply by clicking on the system tray’s active LinkMotion application.) At this point,
make the necessary selection. Click YES to continue the job or No to stop the job
completely. After you select NO you will see another dialog box asking you if wish to stay in
the position you are at or you wish to go to X, Y (0, 0) position. Make your selection and
park your tool properly.
2. Control Pad for USB allows only one direction movement at a time.
3. Once a job is sent or you have activated the LinkMotion applet, it shows up in the bottom bar
where active applications are displayed.
4. Repeat Key from Control Pad (Enter key from computer keyboard) will process immediately the
last job sent to the controller without sending the job again from the PC to the controller.
5. Wireless keyboard and mouse should be checked fully before using them. One of the possible
problems with the wireless keyboards is that Control pad keys may not send out information fast
enough for machine to move properly.
6. We have done preliminary testing with wireless control pad and most keys function well when
an individual key is pressed. When two keys are pressed together, it may not work properly. An
example is pressing one directional key 6 to move the X axis going to the right and then try
pressing key 5 while holding down the key 6 to make it go faster may not work well.
Design using plate size feature under Material properties is fully tested only with Corel Draw. If
you are using any other design application you need to test before you start using that feature.
19
LinkMotion Lite Control Pad Explanation:
Users can setup this Control Pad to view in English, Spanish or Symbol. This setup is available in
General Options tab. Following explanation will explain the function of each keys.
Control Pad in the English language:
The Control Pad is operated using the numeric keypad, the right side of the extended PC keyboard.
Click on the Apply button after any changes you make on any of the Tabs (Menus). Changes are
effective only when you click on one of these buttons.
Home (Limit) switches (Green or red lights) show up at the top of the Control Pad for each axis. If
switches are present and properly configured, it will show green color when not tripped. We protect you
from driving into the end of an axis where you may have tripped the Home switch already. Move the
table in any one of the axis until the switch is tripped, the green color will change to red. Once the
20
switch has Settings for the switches are in the Origin Setup menu. Sometime Z axis is either Solenoid or
there may not be a home switch in Z axis and in that case you need to go to the Origin menu and under
Home switches uncheck Z axis Enabled.
Reset Counter – Basic function of this is to Reset Counter to 0 value for each X and Y axis positions.
If you move the tool any where on the table, the X, Y and Z axis counters will display the actual
positions of the tool. If you then click on the Reset Counter it will make all the display values to 0, 0.
Machines without the Home switches or selecting a new staring position on any machines are some of
the useful functions of Reset Counter button.
Move To 0,0 – Clicking on this button will make your machine move your X and Y position to 0, 0
location if the counters show values other than 0, 0. This is a useful function for resetting back to the
start position for the machines without the Home switches.
Clicking on the Solustan logo will take you to Solustan web site, if the computer is online and connected
to Internet.
All the blue colored keys are designed to move X, Y, and Z axis with respective direction. Following
are the keys for each axis X left (4), X Right (6), Y Up (8), Y Down (2), Z Up (-), Z Down (+) and
Move Fast (5).
Driving X or Y axis with two motors:
LinkMotion driver software has been designed to drive the X or Y axis with two motors. X axis can
work with A axis and Y axis can work with B axis. Your hardware should be wired properly to use this
feature as explained in Connecting USB Controller part of the document. Software support is available
in the LinkMotion.INI file by changing the value from zero to one. Your LinkMotion.INI file is in
following location:
Windows 7 32/64:
In the C:\ Users > Folder with user’s (your own or business name) name > ApplData > Roaming >
Solustan > LinkMotion > LinkMotion.INI.
Windows XP:
In the C:\ Document and Settings > Folder with user’s (your own or business name) name >
Application Data > Solustan > LinkMotion > LinkMotion.INI
Double click on this file and windows Note Pad should open it. This is a configuration file and it has the
number of machines listed at the beginning and go down until you find more information for your
selected machine name (example) "My Machine-USB". Please find following lines within your
machine's data information by scrolling down:
XDuplicateA=0
YDuplicateB=0
You can activate by changing XDuplicateA=1 or YDuplicateB=1 depending on how your machine is
designed.
21
Save this file from the File menu after you made the change and close everything. Launch Linkmotion
and Highlight one of the values in Linear travel per revolution under Machine setup tab and retype
the same number again and click on the Apply button. Now remember to Re-Launch LinkMotion by
exiting from the system's tray at the bottom right and then Re-launch it from the Start button of windows
on the bottom left for this to be effective.
Following G-Code example files of a simple rectangle will give you an idea of files generated with X
DuplicateA and YduplicateB being active as well as not active.
G-code generated where XDuplicateA=0 and YDuplicateB=0
G94
G90
G20
G64 P0.004
G01 Z0.000 F60.000
G00 X1.000 Y-1.000 F60.000
G01 Z-0.153
G04 P0.100
G01 X4.000 Y-1.000 F120.000
X4.000 Y-3.000
X1.000 Y-3.000
X1.000 Y-1.000
G01 Z0.000 F60.000
G00 X0.000 Y0.000 F60.000
M02
G-code generated where XDuplicateA=1 and YDuplicateB=1
G94
G90
G20
G64 P0.004
G01 Z0.000 F60.000
G00 X1.000 Y-1.000 A1.000 B-1.000 F60.000
G01 Z-0.153
G04 P0.100
G01 X4.000 Y-1.000 A4.000 B-1.000 F120.000
X4.000 Y-3.000 A4.000 B-3.000
X1.000 Y-3.000 A1.000 B-3.000
X1.000 Y-1.000 A1.000 B-1.000
G01 Z0.000 F60.000
G00 X0.000 Y0.000 A0.000 B0.000 F60.000
M02
22
Fast Key (5) is pressed after pressing any one directional key for X, Y or Z axis to make it move faster.
It is designed to give you double the speed of declared Jog speed under Material properties.
Z Ref key (*) is clicked when the tool is just touching the top of the material. LinkMotion will
remember the reference surface for the job. It will use the Z reference to calculate the moves in the Z
axis for the depth and lift as it processes the job. If your machine has the home switch for Z axis and if
it is activated in LinkMotion, Z Reference value is automatically calculated. If your machine does
not have the home switch then you can declare the Z Reference value in the Origin setup in the Z
offset for Start Position and it will go up by that distance with the Z Reference Key. If you traveled
in X and Y direction to do the Z Reference you should go back to home position only by clicking
on the button on the Control Pad ‘Move To 0, 0”. Do not use Home key after you do the Z
reference if your machine has all the three home switches activated instead do your Z reference
with the following explanation for the Home key command.
If your Z stroke is 3 inches or more and you do not care to travel the full stroke while seeking the
home switch during homing operation, you could declare Z home switch not enabled and declare
your own Z-up stroke in the Z-offset in start position of Origin setup menu.
HOME key (7) will move the machine to its Home position, if the machine is equipped with Home
switches and will reset the counter to 0, 0. Machines may have Home switches in X and Y axis or all the
three axis. Home key now also has Z Reference function included for the machine built with home
switches for all the three axis and activated in LinkMotion. User can bring the Z down to touch the
material and instead of Z Reference key if you click on the Home Key it will do the calculation for the
Z Reference as well as it will sense all the three home switches and park the tool in home position.
I/O Keys (1), (3), (Del) and (9) are available for I/O 1, I/O 2, I/O 3 and I/O4 controls. These could be
used to control Z axis movement in case Z axis is not motorized but it is solenoid and is controlled by air
valve, for example. Can also be used for lubrication of tools, vacuum control, laser control, red diode,
air, water etc. All four I/O keys can behave as momentary contacts (Click and hold down to change the
status. Let go of the key and the status is back to original) or toggle contacts (Click once to change the
state. Click again to change it back to original state). The settings are done in the INI file as explained
below:
I/O 1 is connected to Output D on the USB controller and it is for Solenoid or Laser Power.
It turns on and off while cutting/engraving the job using tool up and down or G00 and G01
commands.
I/O 2 is connected to Output F on the USB controller and it is for Solenoid or Red Pointer(Diode).
It turns on and off while cutting/engraving the job using tool up and down or G00 and G01
commands.
I/O 3 is connected to Output E on the USB controller and it is for cooling water control.
It turns on and off with the job.
I/O 4 is connected to Output B on the USB controller and it is for Spindle motor or positive air
pressure. It turns on and off with the job and programmable delay is available.
23
Output settings on LinkMotion USB controller
The LinkMotion USB controller has six output lines. Each output is a 2 pin connector, a signal line and
a ground line. They are defined as outputs A, B, C, D, E, and F. Here is how to control them from
your G code job files. I/O’s for output can be controlled in two different ways as explained below.
OUTPUT
I/O No.
A
Control logic High
Control logic Low
PWM output straight or inverted
B
I/O 4
Spindle M3 or M4
M64 P1
M5
M65 P1 (alternate control)
C
I/O 5
M64 P5
M65 P5
(Cylindrical switch within LinkMotion USB or Lite)
D
I/O 1
M7
M64 P2
M9
M65 P2 (Alternate control)
E
I/O 3
M8
M64 P3
M9
M65 P3 (alternate control)
F
I/O 2
M64 P4
M65 P4
LinkMotion.INI file can be found in following location:
Windows 7 32/64:
In the C:\ Users > Folder with user’s (your own or business name) name > ApplData > Roaming >
Solustan > LinkMotion > LinkMotion.INI.
Windows XP:
In the C:\ Document and Settings > Folder with user’s (your own or business name) name >
Application Data > Solustan > LinkMotion > LinkMotion.INI
Open LinkMotion.INI file by double clicking on the file. It is a text file. You will see all the
different machine names at the beginning. Specific machine related controls are further down in
the file. Find the specific settings for your machine and you can make changes there. Remember to
save the file after you make changes. Also, remember to ReLaunch LinkMotion for your changes
to take effect.
(1) I/O keys to be either momentary or toggle keys find the following lines:
Key1Toggle=0
Key3Toggle=0
Key9Toggle=0
KeyDeleteToggle=0
24
These lines control the toggle or no toggle nature of the four I/O keys on the Control Pad. The four
keys correspond to keys 1, 3, 9, and Del. Any key with a declared value of zero is a momentary key
while a declared value of 1 becomes a toggle key.
LinkMotion Lite product also has the capability to invert the I/O’s. Values can bee 0 or 1. Zero
value does not invert and one value inverts the I/O. If I/O’s turn on and off in reverse order then
what you want you need to change the values from 0 to 1 or 1 to 0 in the LinkMotion.INI file.
Save the file and Re-Launch the LinkMotion.
InvertOutput1=0
InvertOutput2=0
InvertOutput3=0
InvertOutput4=0
InvertOutput5=1
(For Output D on USB Controller and I/O 1 in LinkMotion)
(For Output F on USB Controller and I/O 2 in LinkMotion)
(For Output E on USB Controller and I/O 3 in LinkMotion)
(For Output B on USB Controller and I/O 4 in LinkMotion)
(For Output C on USB Controller and used for Cylindrical axis in
LinkMotion)
The big Space Bar or INS (0) key on the numeric keypad is available to Pause
processing of the job anytime.
Num Lock and \ keys are not available for LinkMotion Lite.
Repeat Key will process immediately the last job sent to the controller without sending the job
again from the PC to the controller. LinkMotion control pad should be active in the foreground on your
computer screen. Red LED should be flashing on the USB controller when it is ready to repeat the job.
This function can be activated in four ways.
(1) Press the Enter key of your computer keyboard,
(2) Pressing the Enter key from the accounting keys of your keyboard,
(3) Click on the Repeat key (on your computer screen) with the left mouse button.
(4) Pressing the hardware switch for Repeat, if you have connected a switch on the USB
controller. Read and follow the detail explanation for hardware switch connection and how user
can use it with LinkMotion.INI file settings.
CycleStart and HardwarePause functions using hardware switches are used by changing the numbers
in the Linkmotion.INI file. Following explanation with guide you to use it properly. Saving the INI file,
close it and Re-launch LinkMotion application for any change to be effective.
CycleStart= -1, 2 or 3
If the INI value is -1, the feature is disabled.
Set the INI value to 2, if the input polarity is normally closed and multiple Repeat option will be active.
Set the INI value to 3, if the input polarity is normally open and multiple Repeat option will be active.
HardwarePause= -1, 2 or 3
If the INI value is -1, the feature is disabled.
Set the INI value to 2, if the input polarity is normally closed and pause with toggle will be active.
Set the INI value to 3, if the input polarity is normally open and pause with toggle will be active.
25
USB connection, SD memory, Emergency stop and Job Time are four items under the Solustan
Logo. There are three lights in front of first three items showing green or red. These lights show up if
following lines are there in LinkMotion.INI file. This file is located in your hard drive in following
location:
Windows 7 32/64:
In the C:\ Users > Folder with user’s (your own or business name) name > ApplData > Roaming >
Solustan > LinkMotion > LinkMotion.INI.
Windows XP:
In the C:\ Document and Settings > Folder with user’s (your own or business name) name >
Application Data > Solustan > LinkMotion > LinkMotion.INI
You need to check and re-launch LinkMotion in order for these to work properly if for any reason it was
disconnected.
status1=USB connection
Check your USB (cable) connection if this First light is Red. Some times simply disconnecting and
connecting the cable back along with exiting LinkMotion and Launching it back will bring back the
Green light.
status2=Memory card
Check your (SD) Memory card in the USB Board if the Second light is Red. SD card is properly
plugged and working well then it should show you the green light. Approximately 1minute of work uses
1MB of memory. This controller supports up to 2GB Memory. Do not use SDHC memory.
status3=Emergency stop
Emergency stop is activated by emergency switch that you might have connected to your machine then
this Third light is Red. LinkMotion will recognize this and should pause the job and delete the remaining
file. You will have to exit and re-launch the LinkMotion application to start again. This is activated in
the LinkMotion.INI file.
Estop=-1
1. Normally, the LinkMotion software is shipped with E-Stop sensing disabled via the INI file.
Search for the line EStop=-1 in the section of the INI file for your machine (Name of the machine you
selected when installing).
EStop=-1 disables the function.
EStop=0 enables emergency stop function for normally open E-Stop switch.
EStop=1 enables emergency stop function for normally close E-Stop switch.
2. Additionally, you will note an indication on the PC screen and to the right of the Control Pad, when
the LinkMotion Control Pad is displayed, a green or e red light for the E-Stop configuration.
3. We do not bring out the connections for E-Stop in our current controller enclosure (Upgrade
engraving machine kit or USB controller with enclosure option is purchased). There is a slot for a spare
26
DB-25 connector in the back of the controller. It should be simple to bring the E-Stop sensing and
ground wire out through the connector.
4. The sensing voltage shall be limited to +5 VDC (TTL logic) when connecting lines to the E-Stop
sensing on our controller. Applying higher voltage may damage the controller.
5. On sensing the fault on the E-Stop line, the controller will halt any motion in progress, display a
message on the PC screen, terminate any profile that is running in the controller, and will force the user
to reset and restart LinkMotion and prepare and send the job again. There is no internal circuit designed
to take the power off of the AC to DC power supply. The step motor will still be powered. However,
there will be no movement.
status4=Job Time
This function will display the time actively when a job is prepared by LinkMotion driver as shown in the
picture below. It will display the time in minutes and seconds.
USB Controller Board Lights:
There are three LED lights on the USB Controller board Blue and Amber. These lights behave in the
following manner:
Blue LED Flashing Slowly – No USB Connection
Blue LED Steady – USB powered up and ready
Amber LED Flashing Slowly – Waiting for firmware update
Amber LED Flashing Fast – No SD (Memory) card
Amber LED Steady – USB ready with SD card
Red LED Steady – Turns on when board is powered. It turns off when it makes proper connection with
LinkMotion. It should turn on every time when any machine motion is detected.
Red LED Flashing – If hardware switch for Repeat is installed on the USB controller and
LinkMotion.INI file is setup properly then Red LED starts flashing after a job is processed one time.
Pressing the Repeat switch will send the job again to the machine. After a job is processed one time it is
ready to repeat the last job using either of the Enter key on the PC keyboard as many times as user
wishes.
27
Control Pad in the Spanish language:
Go into General Options menu. Look at Control Pad Labels. Arrow to the right will show you the
choices you have. Here select the Spanish Control pad and click on Apply button. Now you will see the
Spanish control pad.
28
Control Pad with Symbols:
Go into General Options menu. Look at Control Pad Labels. Arrow to the right will show you the
choices you have. Here select the Symbol Control pad and click on Apply button. Now you will see
the Symbol control pad.
29
G Code Files:
This tab allows the selection of a previously generated G-Code and 3D G-Code files that may be present
in your PC and sending it to the machine from LinkMotion lite. If you send 3D G-Code files make sure
that your machine is capable of handling 3D files. User needs to make sure that you have setup all
the parameters for your machine properly by going to the Machine Properties, Material
Properties, Motor Parameters and Origin setup before sending the file from here.
User simply can click on the G Code Files menu and it will show you the dialog box to select your file.
You simply navigate to the G code file of choice and click on the Open button. The file will be sent to
the machine and the job will be processed.
Output settings on LinkMotion USB controller
The LinkMotion USB controller has six output lines. Each output is a 2 pin connector, a signal line and
a ground line. They are defined as outputs A, B, C, D, E, and F. Here is how to control them from
your G code job files. I/O’s for output can be controlled in two different ways as explained below.
OUTPUT
A
I/O No.
Control logic High
Control logic Low
PWM output straight or inverted
30
B
I/O 4
Spindle M3 or M4
M64 P1
M5
M65 P1 (alternate control)
C
I/O 5
M64 P5
M65 P5
(Cylindrical switch within LinkMotion USB or Lite)
D
I/O 1
M7
M64 P2
M9
M65 P2 (Alternate control)
E
I/O 3
M8
M64 P3
M9
M65 P3 (alternate control)
F
I/O 2
M64 P4
M65 P4
LinkMotion USB uses EMC2 interpreter with following Supported M and G codes:
User can download the manual from www.linuxcnc.org/docs/EMC2_User_Manual.pdf. This has
complete explanation for M and G-Codes.
G0 Rapid linear motion – program X-Y-Z-A-B-C- all 6axis motion commands
G1 Linear motion at feed rate
G2 Arc at feed rate clockwise
G3 Arc at feed rate counterclockwise
G4 Dwell
G10 Select Coordinate Offset System
G17, G18, G19 Select Plane
G20 for inch, G21 for mm works with LinkMotion. Some G-Code generating programs use G70, G71
and user should replace these with G20 for inches and G21 for mm.
G40, G41, G42 Cutter Compensation (requires pre-defined tool table file)
G43, G49 Tool Length Offsets (requires pre-defined tool table file)
G53 Position Move without regard to current Coordinate Offset
G54, G55, G56, G57, G58, G59, G59.1, G59.2, G59.3 Set Coordinate Offset (requires coordinate
parameter file)
G61, G61.1, G64 Set Path Control Mode (Control radius at corners like P0.004) It is important to have
P in front of the value.
G80 Cancel Modal Motion
G81-Drilling, G82-Drilling with Dwell, G83-Peck Drilling / Canned Cycles
G90-Absolute mode, G91-Increemental mode
G92, G92.1, G92.3 Coordinate System Offsets
G93, G94 Set Feed Rate Mode – G94 to start units per minute mode. G93 to start inverse time mode.
G98, G99 Canned Cycle Return Level
M1 – Stop running program temporarily (not sure) M2 or M30 to end the Program.
M3-Spindle start Clockwise, M4-Spindle start Anticlockwise,
M5-Stop Spindle / Spindle Control (Do not include S commands for spindle speed)
31
M7 and M8-Coolant on, M9-Coolant Off / Coolant Control
M6 – Tool Change command – T(X)
M62 Turn on digital Output synched with motion, M63 Turn off digital output synched with motion
M64 Turn on digital output immediately, M65 Turn off digital output immediately.
If your software generates F commands for feed rate it should always have proper number values
like F2.0 for job feed rate. If you have 0.00 value or no value after F it will not process your file.
You also need to have end of the file command with either M02 or M30. Files will not be processed
if end of the file command is missing.
The process requirement using M & G codes will be as follows:
1. User will set the tool at X=0, Y=0, and Z=0. Typically, the user may bring the tool to lower left
of the machine and bring the tool down to where it touches the top of the surface. Also, the
material may also be set to the lower left of the machine.
2. If there is a jig set up, the user may bring the tool to one of the corners of the material and bring
the tool to the top surface of the material. This will be 0, 0, 0.
3. The CAM program shall have the facility to declare a very first move command to be a tool lift
distance defined by the user.
4. The processing will start at this point. Including spindle on, turning on of the I/O’s, G rapids, and
the rest of the job.
5. If the CAM program does not have the facility to lift the Z axis at the beginning of the job, the
user will be required to edit the file and insert appropriate tool lift command.
6. Assuming X axis to be the axis from left to right as the user faces the machine, X axis moving
right is a positive number and X axis moving left is a negative number.
7. Assuming Y axis to be the axis from front to back as the user faces the machine, Y axis moving
away from the user is a positive number and Y axis moving toward the user is a negative
number.
8. For the Z axis, Z axis moving up is a positive number and Z axis moving down is a negative
number.
How to use G54 to G59.3 commands for Set coordinate offset:
A. If working with inches and if you use G10 L2 command, you need to program the offset values in
user units. If your user units are in mm, you need to declare offsets in mm. Similarly, if your user units
are in inches, you need to declare the offsets here in inches.
B. However, if you are working with 52XX parameter commands to set your offsets, these parameters
shall always be declared in mm, no matter what the user units are.
C. It is always a good idea to set G54 to coincide with machine home in order to bring it back to
machine home at the end of a job. At this point, we restart G-code compiler at the end of every job.
Whatever the offset settings were, were reset. We may choose to change that in future. It will be a good
practice to set G54 for machine home and bring it back. This will allow you to operate your saved jobs
32
in future, even if we make changes to the compiler in future. Please, note the additional command G00
X0 Y0 Z0 after issuing G54 to bring the machine back. See following examples.
Example 1 - Using G10 L2 P1 command:
G94
G90
G20
G10 L2 P1 X0.0 Y0.0 Z0.0
G10 L2 P2 X2.0 Y-2.0 Z0.0
G10 L2 P3 X4 Y-4 Z0
G64 P0.004
G55
G00 X0.005 Y-0.011 F60.000
G01 Z-1.272
G04 P0.100
G01 X1.186 Y-0.011
X1.186 Y-0.601
X0.005 Y-0.601
X0.005 Y-0.011
G01 Z-1.119
G00 X0.202 Y-0.798 F60.000
G01 Z-1.272
G04 P0.100
G01 X1.383 Y-0.798
X1.383 Y-1.389
X0.202 Y-1.389
X0.202 Y-0.798
G01 Z0.000
G00 X0.000 Y0.000 F60.000
G56
G00 X0.005 Y-0.011 F60.000
G01 Z-1.272
G04 P0.100
G01 X1.186 Y-0.011
X1.186 Y-0.601
X0.005 Y-0.601
X0.005 Y-0.011
G01 Z-1.119
G00 X0.202 Y-0.798 F60.000
G01 Z-1.272
G04 P0.100
G01 X1.383 Y-0.798
X1.383 Y-1.389
X0.202 Y-1.389
X0.202 Y-0.798
33
G01 Z0.000
G00 X0.000 Y0.000 F60.000
G54
G00 X0 Y0
M02
Example 2 - Using G54 to G59.3:
G94
G90
G20
#5221=0
#5222=0
#5241=50
#5242=-50
#5261=100
#5262=-100
G64 P0.004
G55
G00 X0.005 Y-0.011 F60.000
G01 Z-1.272
G04 P0.100
G01 X1.186 Y-0.011
X1.186 Y-0.601
X0.005 Y-0.601
X0.005 Y-0.011
G01 Z-1.119
G00 X0.202 Y-0.798 F60.000
G01 Z-1.272
G04 P0.100
G01 X1.383 Y-0.798
X1.383 Y-1.389
X0.202 Y-1.389
X0.202 Y-0.798
G01 Z0.000
G00 X0.000 Y0.000 F60.000
G56
G00 X0.005 Y-0.011 F60.000
G01 Z-1.272
G04 P0.100
G01 X1.186 Y-0.011
X1.186 Y-0.601
X0.005 Y-0.601
X0.005 Y-0.011
G01 Z-1.119
G00 X0.202 Y-0.798 F60.000
34
G01 Z-1.272
G04 P0.100
G01 X1.383 Y-0.798
X1.383 Y-1.389
X0.202 Y-1.389
X0.202 Y-0.798
G01 Z0.000
G00 X0.000 Y0.000 F60.000
G54
G00 X0 Y0
M02
G-Code File Processing:
When processing G-Code files user needs to follow proper procedure for setting up Z axis. It can be
done in two ways.
(1) Automatic Safe Z process - Machine that have the home (limit) switches and are active and
enabled.
(2) Manual Z setup process - Machines that do not have home (limit) switches or home
switches are disabled.
(1) Automatic Safe Z process - Machine that have the home (limit) switches and are active and
enabled.
1. Prepare your G-Code file. (We have done testing with the file names with .txt, .cnc.tap and .ncd)
2. Open and edit the G code file and insert Z up command (positive value) at the beginning of the
file to move the tool to a Safe Z value and similar Z up command (positive value) at the end of
the file to move the tool up after it finishes the job and save it. Some CadCAM softwares allow
you declare this Z up move in their software and generate this automatically. In that case you do
not need to edit the file.
3. Surfacing procedure -
35
(2) Manual Z setup process - Machines that do not have home (limit) switches or home switches
are disabled.
1. Prepare your G-Code file. (We have done testing with the file names with .txt, .cnc.tap
and .ncd)
2. Open and edit the G code file and insert Z up command (positive value) at the beginning
of the file to move the tool to a Safe Z value and similar Z up command (positive value)
at the end of the file to move the tool up after it finishes the job and save it. Some
CadCAM softwares allow you declare this Z up move in their software and generate this
automatically. In that case you do not need to edit the file.
3. Now, go to the Origin setup of LinkMotion and check the button for disable home
switches. Declare the same positive value (same as in no 2. above ) in start offset of Z
axis in start position.
4. Now, go to General Options tab of LinkMotion and declare the same positive value
(same as in no 2. above ) in Nudge. Click on the Apply button and click OK.
5. Park the tool at X0, Y0 position (start position). For example, if you have selected
Bottom Left Start position in LinkMotion’s Origin setup, Start position selection then
tool should be parked at the bottom left of the table.
6. Click on the Reset counter button on the control pad and X and Y axis counter should set
to 0, 0.
7. Bring the Z axis down until it touches the material. Now press Z-Ref (*) key on the key
board and Z axis should travel up by declared value in Z offset of start position.
8. Now last thing you need to do is to bring the arrow of your mouse on the screen where it
shows Z down key. Click on this with the left mouse button and Z should travel down to
the surface of the material and you should see X0, Y0 and Z0 value on the counter of
each axis on the screen of LinkMotion Control pad.
9. Now you are ready to process your G-Code file. Open the G-Code file tab and select your
file and click on the open button. This should process the G-Code.
36
Materials Properties:
LinkMotion can be employed to work with many different types of machines. Hence, there is no single
value appropriate for all different machines. User’s experience will dictate the values for his/her
machines.
The values can be inches per second or millimeters per second or centimeters per second. General
Options menu allows you to make your selection for this measure of units.
Tool Speed:
Jog speed is when the user is jogging the machine with the help of Control Pad. Jogging can be done
faster by pressing 5(Fast) key along with any directional keys. It doubles the speed of declared value of
Jog speed in Materials menu.
User can set up separate speeds for Z feed (up) and Z feed down.
37
Machine Properties:
Enable output 1, 2, 3 and Spindle/Air:
If Enable I/O control 1 is checked, it will turn the I/O ON while cutting/engraving a shape during a job
and turn itself OFF at the end of completing the shape. The I/O will stay OFF during the traverse/Move
motion to the beginning of the next shape. You can test the operation of the I/O by either clicking on the
Key 1 button with a mouse or depressing the key on the Control Pad.
If Enable I/O control 2 is checked, it will turn the I/O ON while cutting/engraving a shape during a job
and turn itself OFF at the end of completing the shape. The I/O will stay OFF during the traverse/Move
motion to the beginning of the next shape. You can test the operation of the I/O by either clicking on the
Key 3 button with a mouse or depressing the key on the Control Pad.
38
If Enable I/O control 3 is checked, it will turn on and off with the job execution. You can check by
clicking Key Del (.) on the Control Pad.
If Enable I/O control 4 (Spindle/Air) is checked, it will turn on and off with the job execution. You
can check by clicking Key 9 on the Control Pad. The value of delay can be entered in seconds and
fraction of seconds in the Spindle Delay area. This delay value will allow the spindle motor to reach
its speed before the tool plunges into the material.
Output settings on LinkMotion USB controller
The LinkMotion USB controller has six output lines. Each output is a 2 pin connector, a signal line and
a ground line. They are defined as outputs A, B, C, D, E, and F. Here is how to control them from
your G code job files. I/O’s for output can be controlled in two different ways as explained below.
OUTPUT
I/O No.
A
Control logic High
Control logic Low
PWM output straight or inverted
B
I/O 4
Spindle M3 or M4
M64 P1
M5
M65 P1 (alternate control)
C
I/O 5
M64 P5
M65 P5
(Cylindrical switch within LinkMotion USB or Lite)
D
I/O 1
M7
M64 P2
M9
M65 P2 (Alternate control)
E
I/O 3
M8
M64 P3
M9
M65 P3 (alternate control)
F
I/O 2
M64 P4
M65 P4
LinkMotion Lite product also has the capability to invert the I/O’s. Values can bee 0 or 1. Zero
value does not invert and one value inverts the I/O. If I/O’s turn on and off in reverse order then
what you want you need to change the values from 0 to 1 or 1 to 0 in the LinkMotion.INI file.
Save the file and Re-Launch the LinkMotion.
InvertOutput1=0
InvertOutput2=0
InvertOutput3=0
InvertOutput4=0
(For Output D on USB Controller and I/O 1 in LinkMotion)
(For Output F on USB Controller and I/O 2 in LinkMotion)
(For Output E on USB Controller and I/O 3 in LinkMotion)
(For Output B on USB Controller and I/O 4 in LinkMotion)
These I/O’s also can be toggled by setting up proper information in LinkMotion.INI file as explained
earlier in the control pad functions.
Reverse X, Y, or Z direction:
39
Directions for X, Y and Z can be set properly here by checking or un-checking the direction button.
If the axis movements are opposite to the intended directions, the direction or directions can be reversed
without changing the wiring.
Linear travel per revolution for X, Y, and Z:
Linear travel per revolution (lead screw pitch) is shown here and you can change this if necessary.
There are unknowns in a system from time to time. These are the pitch of the screw (2 turns per inch, 5
turns per inch, etc.), full step angle of a step motor (200 full steps for 360 degree turn, etc.), and micro
stepping of the driver. If you know any two of the three, the third one can be determined using nudging
feature of the Control Pad. Typically, most of the Control Pad is activated using physical keys of the
keyboard and using them with fingers. The nudge feature is activated using a single click of the mouse
on the appropriate key on the screen. Nudge a distance by declaring the distance in the General Options.
Next, measure the actual distance moved by the machine. Make the necessary correction of the value for
the unknown parameter until you get the desired distance by nudging.
Machine setup Test:
There is one simple test you can do using the nudge value in the General Options tab. Default nudge
value is 1inch when you install LinkMotion. User can change this nudge value (0.25 or 0.5 inches) for Z
axis if your machine is designed to travel very small distance overall.
Now when you bring up the control pad and bring the arrow of your mouse on the x axis right
movement arrow and click with the left mouse button and X Axis of your machine should move 1inch to
the right. If it does not move 1 inch then your values declared as explained above is not correct and you
need to get the proper values.
Using that nudge value you can do this test for all of the three axis to determine if your settings are
proper in Linear Travel per revolution of Machine Properties as well as Microstep per full step in
Motor parameters.
Following two values are important for getting proper size output.
(1) Linear Travel per revolution in Machine Properties
The pitch of the screw in all three axis determines the linear movement of the axis per single rotation of
the step motor.
(2) Microstep per full step in Motor Parameters
Amplifier Drivers used for the motors of your machine determine this value.
40
Motor Parameters:
Full steps per revolution:
Above values are determined by the motor manufacturer. Enter Full steps per revolution values for
each axis depending upon the motor and the lead screw size specifications.
Toolhead Maximum Acceleration:
Declare Toolhead Maximum Acceleration values for the motors in each of the axis in in/seec^2. You
may need to adjust this numbers to get proper acceleration constants for smooth motion. Check with
your machine manufacturer for the correct numbers required for the machine. In absence of that, you
should start with a number between 25 and 100 as a safe starting point.
Microsteps per every full Step:
41
Set the Microsteps per every full Step for your system for each of the axis. This is necessary only if
you are using step motors in your system. This number is derived from the Amplifier driver used for
your motors. In case of servo motors, you need to make sure that the multiplication of numbers in this
area as well as in the number of full steps per revolution of the motor in the Motor parameters match
your encoder number for the feedback. Generally, it would be a good idea to declare number 1 as the
number in microsteps per every full step and the encoder resolution number in the number of full steps
per revolution in the motor parameters location.
Maximum Motor RPM:
Maximum Motor RPM number should be selected by the specifications given by your motor
manufacturer.
Machine setup Test:
There is one simple test you can do using the nudge value in the General Options tab. Default nudge
value is 1inch when you install LinkMotion. User can change this nudge value (0.25 or 0.5 inches) for Z
axis if your machine is designed to travel very small distance overall.
Now when you bring up the control pad and bring the arrow of your mouse on the x axis right
movement arrow and click with the left mouse button and X Axis of your machine should move 1inch to
the right. If it does not move 1 inch then your values declared as explained above is not correct and you
need to get the proper values.
Using that nudge value you can do this test for all of the three axis to determine if your settings are
proper in Linear Travel per revolution of Machine Properties as well as Microstep per full step in
Motor parameters.
Following two values are important for getting proper size output.
(1) Linear Travel per revolution in Machine Properties
The pitch of the screw in all three axis determines the linear movement of the axis per single rotation of
the step motor.
(2) Microstep per full step in Motor Parameters
Amplifier Drivers used for the motors of your machine determine this value.
42
Origin Setup:
Go Home After Job:
If you have not checked this box then after finishing the job the tool will travel up on Z axis and stop at
the position where it finished the last shape. It does not move the X and Y position. It does not go to the
start position. Checking this box makes your tool go back to the starting position (parking position)
for X, Y and Z axis. Most of the time parking positions are 0, 0 for X and Y. If you have the need to
sense the Home switches again then you need to make sure your surfacing value in the Z axis (Origin
Setup and Z offset value in Start Position) is proper and then click on the Home key on the control pad
and that will place you tool in the Home position. If you need to change the surfacing value then you
need to surface the tool again and then go home.
Disable Home (Limit) Switch:
43
Checking this box disables the limit switches. Un-checking the box activates the limit switches. If
limit switches are present Home switch polarity Normally open or closed need to be selected.
Home Switches Position:
This is the parking position of the tool of your machine. Bottom Left, Bottom Right, Top Left and
Top Right are the choices. It is important to understand the setting of the origin for the machine. If the
machine has home switches, it will have a defined Home position. It should be selected. The offsets
from the home switch sensing serve two purposes:
A. It is advisable to get off the switch once sensed. The offset value will allow the machine to move
back by the declared distance after reaching the switch.
B. The offset values can be adjusted to get to a specific position such as the very corner of the table
where the user may want to start every job.
C. This position shall be recalibrated every six months or anytime the sensor is replaced, or as often
as necessary to maintain the integrity of home position.
Homing Speed:
The Homing speed for finding and going Home is different than the jogging or move speed.
LinkMotion forces the machine to go Home twice when asked to go Home. The Home key is key 7 on
the Control Pad. The first time the machine travels at a higher speed. Once reaching Home the first
time, the machine travels back into the working area of the table and hunts for Home again at a slower
speed. This will allow the table to get to the exact Home position every time.
Start Position:
Bottom Center, Bottom Left, Bottom Right, Center, Top Center, Top Left and Top Right are the
choices. If your Home Position and Start Positions are the same following are the necessary selection:
Home Position Selection
Start Position Selection
Bottom Left
Bottom Left
Bottom Right
Bottom Right
Top Left
Top Left
Top Right
Top Right
Job start position can be different than the Home position. Job start position may be,
- Where the jig is positioned (Home Position)
- Center of a machine in case of a vise type machine with offset values in X and Y where both
jaws move
- Top center of a machine with offset value in X only in case of a machine where only bottom
jaw moves
In above situations and others, it is necessary to select Start Position and declare offset values for X and
Y appropriately. Also see the diagram on the next page.
Home Switches:
44
Home Switches for each axis can be selected individually by checking X, Y or Z axis enabled. This
depends on how your machine is built. Some machines have home switches for all three axis and some
have for X and Y but not for Z axis. Make proper selection for your machine.
Home Switch Polarity selection is available for Normally Open as well as Normally Closed and it
depends on how the wiring is done for your home switches. LinkMotion will sense those switches and
show you green lights on the control pad (next to X, Y and Z movement boxes) when we sense proper
switches. If you do not know how your machine is wired then try selecting one after another and when
the lights are green you have made the proper selection.
45
46
47
General Options:
Units:
Once your settings are created, they can be saved and loaded again in case of an upgrade of a version of
the software. There will be no need to set them up again. Of course, the units of operation can be
selected to be inches or mm.
If you use older saved files from any graphic design applications then remember to change your
drawing to thinnest line thickness and no fill. In case of CAD applications make line width to
0(Zero).
Nudge:
48
The Nudge will allow the axis to move a fix distance when any axis is moved with a single mouse click
on the keys that move the X, Y and Z axis when Control Pad tab is open or selected.
Control Pad Labels:
Arrow to the right will show you the choices you have. Here select the English, or Spanish or Symbol
and click on the Apply button. Now you should see the control pad you have selected.
Enable Drill support:
Enable Drill support is designed to drill holes. This can be used for creating Braille signs. Selecting
this option makes your tool travel to the begin point of each shape and go down to create a mark or a
hole and go back up and go to the begin point of the next shape.
For typical CAD programs capable of rendering point entity on the design screen, there is no need to
enable drill support.
For typical graphic programs not capable of rendering point entity, a shape such as a small rectangle can
be designed for each of the point entity. When drill support is enabled, the begin point of each shape is
be retained for generating G codes and used as the drilling point.
Save Settings:
Save:
Once the machine is properly configured and is working well, it is advisable to Save the settings on
the hard disk drive. This is saved as LinkMotion.INI file. This file is found in following location
for different operatin system.
Windows 7 32/64:
Select Computer from the Start button. Select the C: hard drive from the left side. Double click on the
folder name Users. Double click on the folder that has computer user’s name or your business name.
Double click on the folder name AppData. Double click on the folder name Roaming. Double click on
the folder name Solustan. Double click on the folder name LinkMotion. You should see a file name
LinkMotion.INI here.
Windows XP:
In the hard drive Find folder name Document and Settings> Folder with user’s(your own or business
name) name> Folder name - Application Data> Folder name - Solustan> Folder name - LinkMotion>
File name - LinkMotion.INI
Click on the Save button and it will ask you to give a file name. Make sure to remember the file name,
and where you are saving it. You can navigate on your hard drive where you want to save. You can also
rename the file with what ever is easy for you to remember. Mostly our customers rename the file with
their machine name.
Load:
49
In case the LinkMotion needs to be loaded again from the CD supplied by Solustan, or you need to
load upgraded version the user will be able to reload all the settings with your .INI file without
wasting any time. For loading the settings back select Load button and navigate to the saved .INI file
and click on Apply and OK. Now click on the right mouse button when you are on the LinkMotion
appellate and exit the program. Go to the start button and launch back LinkMotion. You should see all
your saved settings here now.
Restore Defaults:
Clicking on this button will load default LinkMotion.INI file that we supply with the LinkMotion
driver.
It is very important to exit Link applet and Re-launch the applet when you change
and select another INI file for it to be effective.
50
Connecting and Wiring the USB Controller Board:
LinkMotion USB controller is easy to connect. It offers lots of flexibilities.
Advantages of our USB controller board:
(1) LinkMotionUSB is the latest addition in the LinkMotion product. Major function of this product
is to drive your machines with USB connection of your computer without locking up any
computer functions. Your computer and the design programs are free and available to you while
the previous job is being processed.
(2) The controller is compatible with USB 2.0 specification. It allows transfer of job at a very high
speed. It is not compatible with USB 1.1.
(3) It has a slot for SD card memory. It is used as a job buffer and a spooler. The processing of a job
on a machine can go on while the PC can be used for other purposes simultaneously.
Approximately 1 minute of machine operation for a job uses 1MB of memory and this controller
supports up to 4GB of micro memory. New version of LinkMotion 3.0 and higher now
supports SDHC memory and we have done testing with following ones.
Memory chips tested and working with this controller: Sandisk 1 gb, 512 mb, 256 mb,
Topram 1gb, PNY 1gb, PNY 4gb SDHC, Samsung 1gb, Transcend 1gb and 'Made in China
Generic' 1gb.
Memory chips not working with this controller: Kingston 2gb (non SDHC) and Kingston 4gb
SDHC
(4) The USB controller solution is equipped with EMC2 (The Enhanced Machine Control 2)
compatible M&G code capability. EMC (the Enhanced Machine Control) is a software system
for computer control of machine tools such as milling machines, lathes, engraving machines,
torch cutting machines, water jet cutting machines, laser machines, and other multi-axis
machines. EMC has been available under Linux and has a very large user base. Now, it is
available under Microsoft Windows environment with the same capabilities, precision, and
flexibility. Please, visit http://www.linuxcnc.org/ for additional information.
(5) The LinkMotion can accept the jobs in the following manner:
2D jobs, 2 1/2D, 3D, 4D, 5D, or 6D jobs created elsewhere using M&G format can be sent to
the USB controller using LinkMotion. In other words, the USB controller is totally
compatible with M&G codes, one of the most popular command structure for machine
control. A list of implemented M&G codes from the complete list of EMC commands is
available elsewhere in this document.
(6) The board requires 5 VDC with a maximum current requirement of 200 ma. The controller can
be configured to receive power from either the USB port of the PC it is connected to or from an
51
independent +5 VDC power supply. Default configuration of the USB controller is to be
powered from the USB port of the PC.
(7) The board will generate step and direction commands for up to 6 drivers for controlling 6
motors. Standard explanation is for 3 axis and refer to Additional axis control information if
your machine has more then 3 motors.
(8) The USB controller is capable of sensing Home switches, E-Stop, and other inputs.
(9) The USB controller has 6 output connectors. The functions are described later in this document.
(10) The physical size of the controller is about 2.5 in X 2.37 in (64 mm X 60 mm)
(11) It is advisable to mount the controller board in your enclosure such that the USB connector
residing on the controller board and the SD memory card slots are accessible without opening
the enclosure.
(12) Optionally, Solustan provides small, standalone enclosure with or without the wiring for the
output connector (DB-25 female) for the convenience of initial testing and/or for an on-going
configuration. An optional, external 5 VDC power supply is also available along with the
enclosure, if required.
(13) 75,000 steps per second is the maximum specified limit of the controller.
Pictures of the controller board and the enclosure
The USB controller board without any connectors showing dimensions
52
The USB controller board with necessary connectors, USB cable, and SD memory card
The USB controller board in an enclosure (optional item)
The USB controller board +5VDC requirement:
Version II USB controller shipped from 2008. Positions for Motor Output connections for A, X, and Y
has been changed compared to version I. Similarly positions for Output connectors B, D, and F also has
changed.
53
54
55
Following parts are needed to wire up USB Controller card:
Part No. 1 – Piston Grip Handle
Tyco Part No: 58074-1
Digi-Key Part No: A2031-ND
Part No. 2 - Head for MTA100
Tyco Part No: 58246-1
Digi-Key Part No: A1998-ND
LinkMotion USB controller with 6 axis controls can be configured in the following different ways:
1. X and Y axis with non-motorized control in the Z axis.
2. X, Y, and Z axis motorized controls.
3. X, Y, Z, A, B, and C all 6 axis motorized controls. (A and B axis are not available for LinkMotion
USB Laser product)
4. There may be 2 motors in X axis. In this case, X and A are mirrored axis while Y and Z are
configured normally. (not available for LinkMotion USB Laser product)
5. There may be 2 motors in Y axis. In this case, Y and B are mirrored axis while X and Z are
configured normally. (not available for LinkMotion USB Laser product)
6. Some CNC and laser machines have cylindrical axis including engraving machines. C axis can be
configured for the cylindrical axis.
Standard 3 Axis machines supported by LinkMotion:
Position on the
USB Controller
Connecting to
Your Machine and using LinkMotion
Motor Output Connection X
Motor Output Connection X
Motor Output Connection Y
Motor Output Connection Y
Motor Output Connection Z
Motor Output Connection Z
Connects to X Axis Driver for Step
Connects to X Axis Driver for Direction
Connects to Y Axis Driver for Step
Connects to Y Axis Driver for Direction
Connects to Z Axis Driver for Step
Connects to Z Axis Driver for Direction
Output B
Output D
Output E
Output F
Connects to I/O (4) (I/O signal, turns on and off with the job, Used for Spindle
motor and programmable delay available for LMUSB, Used for Air control for
LM USB Laser)
Connects to I/O (1) (I/O signal, turns on and off while cutting or engraving a
shape using tool up and tool down or G00 and G01 commands for LMUSB
and Laser is controlled in case of LMUSB Laser)
Connects to I/O (3) (I/O signal, turns on and off with the job)
Connects to I/O (2) (I/O signal, turns on and off while cutting or engraving a
shape using tool up and tool down or G00 and G01 commands for LMUSB
And Laser Red diode is controlled in case of LMUSB Laser)
56
All the five outputs can be inverted to work properly by changing the value from 0 to 1 or 1 to 0
in the LinkMotion.INI file as explained in the document.
(LinkMotion version 2.8 and higher supports home switches of any kind used for different axis.
LinkMotion version 2.7 and earlier required using all home switches to be the same type either
normally open or normally closed and did not support if you use normally open for one axis and
normally closed for other axis.)
Home Z
Home X
Home Y
Connects to Z Axis home switch
Connects to X Axis home switch
Connects to Y Axis home switch
All Ground lines
Ground lines
Input 6
Input 5
Input 4
Input 3
Input 2
Connects to Torch Cutting (Lower)
Connects to Torch Cutting (Raise)
Connects to Repeat/CycleStart
Connects to Probe
Connects to E-Stop (Declared value 0 (zero) enables normally open switch and
value 1 (one) enables normally closed switch from the Linkmotion.INI file. Read
the document for more details.)
Connects to Physical Pause
Input 1
All the outputs including the output lines to the motor drivers are capable of driving the opto-isolators, if
present.
In the earlier version of the controller board, the C output was set up to output maximum of 3.3 VDC.
All the other outputs are capable of driving 5 VDC. The C output is changed to generate 5 VDC in the
newer versions of the controller board.
Earlier version of Linkmotion was designed for the logic for the Home switches such that all of the axis
needed to have either normally open or normally closed switches. The Home logic did not function
properly if some of the switches are normally open and the other switches are normally closed.
Linkmotion Version 2.8 onwards supports different type of switches. Refer to Origin setup of
Linkmotion for more detail explanations.
The ground wire of the external 5 VDC power supply should be connected to the signal ground of the
PC connected to the controller via USB cable.
USB Controller (with enclosure) to parallel port configuration for machine control:
LinkMotion USB comes with our USB controller board. Optionally, USB controller board is housed
inside a metal enclosure with USB connector on one side and a DB-25 connector on the other side.
The standard configured is shipped as follows:
57
The enclosure has openings for the USB cable connection, a slot to plug in a SD memory card, opening
in-between the USB connector and the SD card slot for various LED Indicators for the operation of the
USB controller.
On the opposite side of the enclosure are two connectors - one for the external power unit and the other
is a DB-25 connector to connect the USB controller to the rest of the motion control system.
Users may have Solustan's amplifier module connected to a machine using our Virtual Controller
solution. It is possible to simply disconnect the printer port cable from your PC computer and connect
unit to the USB controller enclosure. Please look at the illustration on the following page. Connect the
USB cable to your properly configured PC, Install the SD memory card, load the newer version of the
LinkMotion USB driver software and you are ready to take advantage of the USB Interface.
Please, do refer to additional documents that we have included on the CD under Manual-PDF folder or
you can download from our web site www.solustan.com/support for better understanding of the
operation of USB controller and it’s advantages. Creating jobs and compatibility with M&G codes
including the compatibility with EMC2 (More Information on our Implementation of M&G codes Is
available at http://www.linuxcnc.org/).
It is always a good idea and a good practice to turn on the PC first and your driver module after
the Windows is loaded. In the same manner, it is always a good Idea to turn off the PC last when
you switch off the system.
Additional Axis Control available with LinkMotion:
(A and B Axis not available for LinkMotion USB Laser)
Position on the
USB Controller
Connecting to
Your Machine Using LinkMotion
Motor Output Connection A
Motor Output Connection A
Motor Output Connection B
Motor Output Connection B
Connects to A Axis Driver for Step
Connects to A Axis Driver for Direction
Connects to B Axis Driver for Step
Connects to B Axis Driver for Direction
Normally, we duplicate the same step and direction signals for X and A or Y and B. If the machine is
designed with both the motors in the same axis facing the same way (shafts going out in the same
direction), you will wire the motors the same way.
However, if both the motors in the same axis (both the shafts either facing in or out going in opposite
direction), you will reverse only one of the windings (A or B) of any one of the motors to create
synchronous movement. Please check with motor and the driver manufacturer for more detail
information on changing the windings for directional change.
LinkMotion driver software has been designed to drive the X or Y axis with two motors. This support
is available in the LinkMotion.INI file by changing the value from zero to one. Your LinkMotion.INI
file is in following location:
58
C:\Documents and Settings\Folder with Computer user's name\ Application Data\Solustan\LinkMotion\
LinkMotion.INI
Double click on this file and windows Note Pad should open it. This is a configuration file and it has the
number of machines listed at the beginning and go down until you find more information for your
selected machine name (example) "My Machine-USB". Please find following lines within your
machine's data information by scrolling down:
XDuplicateA=0
YDuplicateB=0
You can activate by changing XDuplicateA=1 or YDuplicateB=1 depending on how your machine is
designed.
Save this file from the File menu after you made the change and close everything. Launch Linkmotion
and Highlight one of the values in Linear travel per revolution under Machine setup tab and retype
the same number again and click on the Apply button. Now remember to Re-Launch LinkMotion by
exiting from the system's tray at the bottom right and then Re-launch it from the Start button of windows
on the bottom left for this to be effective.
Motor Output Connection C
Motor Output Connection C
Connects to C Axis Driver for Step (Cylindrical axis when separate
amplifier driver is used)
Connects to C Axis Driver for Direction (Cylindrical axis when
separate amplifier driver is used)
Cylindrical axis support for C axis on the USB controller card requires separate amplifier driver in your
hardware. LinkMotion software supports this by changing the value from zero to one in the
LinkMotion.INI file as following:
UseCAxis=0 (Zero value is declared when X or Y axis becomes cylindrical per your hardware design)
UseCAxis=1 (One value is declared when C axis is cylindrical axis per your hardware design)
Remember to save this change and Re-Launch LinkMotion for this to be effective as explained earlier.
Standard configuration of DB-25 pin settings:
The DB-25 connector on the enclosure is a female connector. You may request male connector.
DB-25 pins
Signals
1
2
3
4
5
I/O 2 output switch (I/O turns on and off with the job and Output F on USB controller)
X - Step
X - Direction
Y - Step
Y - Direction
59
6
7
8
9
10
11
12
13
14
15
16
17
25
Z - Step
Z - Direction
Switching between cylindrical and flat axis (Output C on USB controller)
Home switch Input to parallel port- Z axis
Future use
Home switch Input to parallel port - X axis
Home switch Input to parallel port - Y axis
I/O 1 output switch (I/O turns on and off with the job and Output D on USB controller)
Emergency switch Input to parallel port (configurable)
I/O 4, Spindle motor or Air enable (Output B on USB controller)
I/O 3 output switch (Output E on USB controller)
Ground line
This is a standard configuration. Custom configurations are available. The USB outputs B, C, D, E, and
F can individually configured to be default On or Off to suit the needs of your machine. Please, consult
Solustan or read LMUSB-Laser.PDF document for proper settings.
E-Stop Switch settings:
1. Normally, the LinkMotion software is shipped with E-Stop sensing disabled via the INI file.
Search for the line EStop=-1 in the section of the INI file for your machine (Name of the machine you
selected when installing).
EStop=-1 disables the function.
EStop=0 enables emergency stop function for normally open E-Stop switch.
EStop=1 enables emergency stop function for normally close E-Stop switch.
2. Additionally, you will note an indication on the PC screen and to the right of the Control Pad, when
the LinkMotion Control Pad is displayed, a green or e red light for the E-Stop configuration.
3. We do not bring out the connections for E-Stop in our current controller enclosure (Upgrade
engraving machine kit or USB controller with enclosure option is purchased). There is a slot for a spare
DB-25 connector in the back of the controller. It should be simple to bring the E-Stop sensing and
ground wire out through the connector.
4. The sensing voltage shall be limited to +5 VDC (TTL logic) when connecting lines to the E-Stop
sensing on our controller. Applying higher voltage may damage the controller.
5. On sensing the fault on the E-Stop line, the controller will halt any motion in progress, display a
message on the PC screen, terminate any profile that is running in the controller, and will force the user
to reset and restart LinkMotion and prepare and send the job again. There is no internal circuit designed
to take the power off of the AC to DC power supply. The step motor will still be powered. However,
there will be no movement.
60
LinkMotion USB uses EMC2 interpreter with following Supported M and G codes:
G0 Rapid linear motion – program X-Y-Z-A-B-C- all 6axis motion commands
G1 Linear motion at feed rate
G2 Arc at feed rate clockwise
G3 Arc at feed rate counterclockwise
G4 Dwell
G10 Select Coordinate Offset System
G17, G18, G19 Select Plane
G20 for inch, G21 for mm works with LinkMotion. Some G-Code generating programs use G70, G71
and user should replace these with G20 for inches and G21 for mm.
G40, G41, G42 Cutter Compensation (requires pre-defined tool table file)
G43, G49 Tool Length Offsets (requires pre-defined tool table file)
G53 Position Move without regard to current Coordinate Offset
G54, G55, G56, G57, G58, G59, G59.1, G59.2, G59.3 Set Coordinate Offset (requires coordinate
parameter file)
G61, G61.1, G64 Set Path Control Mode (Control radius at corners like P0.004) It is important to have
P in front of the value.
G80 Cancel Modal Motion
G81-Drilling, G82-Drilling with Dwell, G83-Peck Drilling / Canned Cycles
G90-Absolute mode, G91-Increemental mode
G92, G92.1, G92.3 Coordinate System Offsets
G93, G94 Set Feed Rate Mode – G94 to start units per minute mode. G93 to start inverse time mode.
G98, G99 Canned Cycle Return Level
M1 – Stop running program temporarily (not sure) M2 or M30 to end the Program.
M3-Spindle start Clockwise, M4-Spindle start Anticlockwise,
M5-Stop Spindle / Spindle Control (Do not include S commands for spindle speed)
M7 and M8-Coolant on, M9-Coolant Off / Coolant Control
M6 – Tool Change command – T(X)
M62 Turn on digital Output synched with motion, M63 Turn off digital output synched with motion
M64 Turn on digital output immediately, M65 Turn off digital output immediately.
If your software generates F commands for feed rate it should always have proper number values
like F2.0 for job feed rate. If you have 0.00 value or no value after F it will not process your file.
You also need to have end of the file command with either M02 or M30. Files will not be processed
if end of the file command is missing.
The process requirement for beginning will be as follows:
1. User will set the tool at X=0, Y=0, and Z=0. Typically, the user may bring the tool to lower left
of the machine and bring the tool down to where it touches the top of the surface. Also, the
material may also be set to the lower left of the machine.
2. If there is a jig set up, the user may bring the tool to one of the corners of the material and bring
the tool to the top surface of the material. This will be 0, 0, 0.
3. The CAM program shall have the facility to declare a very first move command to be a tool lift
distance defined by the user.
61
4. The processing will start at this point. Including spindle on, turning on of the I/O’s, G rapids, and
the rest of the job.
5. If the CAM program does not have the facility to lift the Z axis at the beginning of the job, the
user will be required to edit the file and insert appropriate tool lift command.
6. Assuming X axis to be the axis from left to right as the user faces the machine, X axis moving
right is a positive number and X axis moving left is a negative number.
7. Assuming Y axis to be the axis from front to back as the user faces the machine, Y axis moving
away from the user is a positive number and Y axis moving toward the user is a negative
number.
8. For the Z axis, Z axis moving up is a positive number and Y axis moving down is a negative
number.
62
Frequently Asked Questions:
Section I - Microsoft Windows configuration and computer related
questions:
1. What is the minimum configuration required for the PC?
Windows 7 with 32 or 64 bit operating system or
Windows XP operating system with Service Pak 2 or higher and Microsoft .NET 2.0 or higher
Framework installed and USB 2.0 port,
Processor speed of at least 800 Mhz, minimum RAM memory 512 MB, 1 GB preferred.
40 MB of Hard drive free space, Screen resolution of at least 800 x 600.
Service Pak and .NET 2.0 Framework are (free) downloadable from Microsoft’s website.
CD-ROM drive is not required, if the driver software was down loaded from the internet.
CD-ROM drive is necessary, if the software was received on a CD.
2. How to check in Win XP if I have installed Service Pak2 or higher on my
computer?
Go to the Start button. Select Control Panel. Select System. Now in General menu it should show if
Service Pak 2 is installed. Also you can install and uninstall by windows standard Add/Remove
program procedure. Make sure you install LinkMotion after you install windows operating system
related update first.
3. How to check in Win XP if I have installed .NET Framework 2.0 or higher on my
computer?
Go to the Start button. Select Control Panel. Select Add/Remove programs. Here you should see if
you have installed the .NET Framework 2.0 of Microsoft. This is required to work with our new
version of LinkMotion.
4. How can I check the processor speed and RAM memory on my PC?
Go to the Start button on the System Tray on the bottom left and select Control Panel. Select System
from the Control panel. Here you should see information for the version of your operating system and
under Computer you should see the processor speed and the RAM memory installed on your
computer.
5. How to see hidden folders in Windows 7?
63
Go to the Start button. Select Control Panel. Click on the Appearance and Personalization. Under
folder Options Click on the Show Hidden files and folders. Here check the button for Show hidden
files, folders and drives in the middle section under Hidden files and folders. Click on the Apply
button. Click on the OK button. Now you should be able to see all files and folders.
6. How to see hidden folders in Windows XP?
Go to the Start button. Select Control Panel. Select Tools Menu and select Folder option. Click on
the View menu. You should see a folder called Hidden files and folders. Here select the button for
Show hidden files and folders. Click on the Apply button. Now you will see all the folders. This is
useful to see the configuration file name LinkMotion.INI for LinkMotion driver application.
7. How to setup in Windows 7 for display of the Linkmotion Icon in Systems Tray
at the bottom right? It is necessary to see this all the time to make your machine
move.
Go to Control Panel of windows from the Start button. Click on the Apperance and Personalization.
Click on the Taskbar and Start Menu. Click on the Customize icons on the taskbar. Here make the
selection for Always show all icons and notifications on the taskbar. Click on the OK button. Now
LinkMotion Icon should be displayed all the time in the Systems Tray.
8. How can I tell in Win XP if my computer has USB 2.0 or 1.1? What is the
difference?
USB 1.1 transfers data around at 12mbps, with each new device added to your system taking up
progressively more of the available transfer pipe until you hit a point where your USB gets overloaded.
USB 2.0 is a massive speed increase to 480mbps, which leaves plenty of room for most device
operations.
Finding out if you have USB 1.1 or 2.0 is complicated because some motherboards don't accurately
identify your device as USB 2.0. To find out which version you have, open the Device Manager by
right-clicking My Computer and choosing Properties (or with Windows key + Pause/Break on the
keyboard). Click the Hardware tab and then click on the Device Manager. Scroll down until you locate
the Universal Serial Bus controllers and expand the list of controllers. If you have a USB 2.0 controller
in your computer, the word Enhanced will be listed somewhere in one of those names. In some case it
might say USB2 and some other case it might say Enhanced as well. The word Enhanced may appear
without any reference to USB2 or USB 2.0. If it says Enhanced, it doesn't matter what additional details
are included along with it. It's also important to make sure you know which USB ports on your computer
is connected to the USB 2.0 transfer bus. You may have a computer with USB ports on the front which
interface with USB 1.1 and transfer data slowly compared to the USB ports on the back of the computer,
which are USB 2.0.
64
Section II - LinkMotion Driver:
1. Do I need to access LinkMotion driver software once loaded?
Generally, you simply deal with your job design software and your machine. We do provide an
accompanied settings application. This application can be invoked from its icon in the System Tray area.
This application will allow you to choose a few settings by going to different tabs (menu) like Material
Properties, Machine parameters, Origin setup and Motion Control Boards. Make proper selection, click
on the apply button and then start the design application.
2. How do I know if my LinkMotion is installed properly?
When you launch LinkMotion applet does it show the title “LinkMotion for My Machine-USB –
Version Lite X.XX 32/64” (version that you have).
If you had a trial version you need to purchase the full working version.
3. How to see the file for my LinkMotion related configuration settings?
This file is named LinkMotion.INI. This file has all your machine related settings. You can save this
file under different name as well as reload this file from where you might have saved this file.
In Windows 7 32/64:
Go to Control Panel of windows from the Start button. Click on the Apperance and Personalization.
Click on the Taskbar and Start Menu. Click on the Customize icons on the taskbar. Here make the
selection for Always show all icons and notifications on the taskbar. Click on the OK button.
In Windows XP:
Go to your C:\ > Documents and Settings > Folder with computer User’s name (how ever you
have set up your computer) > Application Data > Total Graphics Network > LinkMotion >
LinkMotion.INI.
4. LinkMotion is installed but the lights on Control Pad are red, Why?
There are three lights on the Control Pad of LinkMotion under Solustan logo.
USB connection, SD memory card and Emergency stop.
USB Connection light remains red until the USB controller and LinkMotion will establish proper
connection by loading the driver for USB Controller. User needs to follow instructions from the
document name Install USB Controller driver.
SD Memory card needs to be plugged in and the light should be green.
Emergency stop light should be green if proper wiring is done for emergency switch and it should be
red only when you press the emergency switch.
Please refer to the help section or LM&USB.PDF for more detail explanation.
65
There are also three more lights on the Control Pad of LinkMotion next to the X, Y and Z axis counter
on top area. These lights are for home(limit) switches of your machine. Check if you see all three lights
to be green. Home switches are available by using normally open or normally close mode. Origin setup
of LinkMotion has the selection available for both the modes. You can try reversing this mode click on
the Apply button and see if home switches lights changed from red to green. You can temporarily
disable them by checking the check mark for disable home switches under Origin Setup of LinkMotion.
Please refer to the help section or LM&USB.PDF for more detail explanation.
5. When I connect the cable from USB Controller card to my computer’s USB
connection it gives me a message that I have USB 1.1 and it will not work. I know
that I have USB 2.0 connection on my computer. Why?
Even though you have USB 2.0 connection on your computer but if you are using any hub or extension
devices to have more USB ports they can bring you USB connection down to 1.1level. It is extremely
important to plug this cable directly into your computer’s USB 2.0 connection. Some wireless devices
like wireless mouse or keyboard may have this kind of effect also so you need to check and make sure
that you have proper devices.
6. LinkMotion for USB working with USB Controller is not moving any of the axis.
Why?
First important thing to check is all of your cable connections. Make sure nothing is loose. Second
thing is to check if SD card is plugged in the USB controller board properly.
Third problem can be Emergency Stop may be activated. Control Pad of LinkMotion also shows you
three green lights if all three are properly recognized. These lights may be red if any one of those has
problem and you need to correct this to make it work properly. Activate Disable home switches check
button in Origin setup and click on the apply button. Now see if your axis moves.
Please read and understand UsingLM on help section or LM&USB.PDF file.
7. When I launch LinkMotion it is telling me that I do not have proper firmware.
What should I do?
Manufacturer of USB controller board will keep improving features available from their board. We also
improve LinkMotion capability to take advantage of those features. This is why you may be required to
update the firmware. This is generally available with us and we can send you the firmware updater by
email. Instruction on how to update the firmware is at the end of the documents of Install ncPOD.pdf.
8. What G-Codes are supported with LinkMotion Lite?
Please refer to help section or LM&USB.PDF document where we have listed all the G-Codes
compatible by this USB Controller board and LinkMotion working together.
9. Can I output 3D G-Codes?
66
Yes you can output 3D G-Codes as long as your machine is capable of handling 3D work and you have
G Code Files handling option with LinkMotion.
10. LinkMotion Lite behaves in a strange way if I have not used it for a while and
come back to my computer. Why?
Power saver and Screen Saver mode on your computer should be turned off. This can cause
problems in recognizing the USB connection on a continuous basis. If the USB controller board is
powered by the PC’s USB port power supply it may be necessary to unplug and plug it back again the
USB cable every time you turn on the computer and re-launch LinkMotion.
11. I want to design in millimeters and not inches. How do I change?
Simply go to the General Options tab and change from inches to mm by clicking on the scroll down
arrow and then click on the Apply button. Similarly you can change to cm also. It is that easy.
12. I am sending file for printing and nothing is happening. What am I doing
wrong?
This situation may occur due to any of the following:
(A) There are three lights on the Control Pad of LinkMotion under Solustan logo. USB connection,
SD memory card and Emergency stop. Check if you see all three lights to be green on the Control Pad
screen of LinkMotion. If any of the lights are red the job will not go out. Please refer to the help section
or LM&USB.PDF for more detail explanation.
(B) There are also three more lights on the Control Pad of LinkMotion next to the X, Y and Z axis
counter on top area. These lights are for home(limit) switches of your machine. Check if you see all
three lights to be green. You can temporarily disable them by checking the check mark for disable home
switches under Origin Setup of LinkMotion. If any of the lights are red the job will not go out. Please
refer to the help section or LM&USB.PDF for more detail explanation.
(C) Check if you have given the Print command from your design application.
(D) Check the print queue for any extraneous documents and remove them.
(D) If Service Pak 2 was not installed on your Windows XP operating system you may see the
problem of LinkMotion not sending anything to the machine. You need to uninstall the LinkMotion
and then install the Service Pak 2 and re-install the LinkMotion driver.
(E) Make sure to design the job within the size of plotting area available with your machine table size.
67
13. I have setup and customized LinkMotion for my needs. Now, you sent me
information for new version of LinkMotion. How can I preserve my settings while
upgrading to a new version?
It is very easy. Remember to first save your older configuration file and then uninstall. Follow the
uninstall instruction (from the end of the document) from installation instructions. Now install the new
version and bring back you older configuration file from General Options tab by Load button. ReLaunch LinkMotion driver one time and then work with your new version.
68