1
User’s Manual for OSA System Management Bridge
OSA System
Management Bridge
User’s Guide
Revision History
Date
Version
Description
July 10, 2004
1.0
First draft.
September 27, 2004
2.0
Second draft
Copyright (c) 2004 - OSA Technologies, an Avocent Company. All Rights Reserved.
1
User’s Manual for OSA System Management Bridge
TABLE OF CONTENTS
INTRODUCTION ..................................................................................................................................3
TARGET AUDIENCES .............................................................................................................................3
GLOSSARY ............................................................................................................................................4
SUPPORTED PLATFORMS .......................................................................................................................4
END USER LICENSE AGREEMENT ................................................................................................5
INSTALLATION STEPS ......................................................................................................................9
INSTALLATION ON WINDOWS SYSTEM ..................................................................................................9
INSTALLATION ON LINUX SYSTEM ......................................................................................................14
POST INSTALLATION ...........................................................................................................................14
UNINSTALLING OSA SMBRIDGE ........................................................................................................15
Uninstalling OSA SMBridge from Windows System.......................................................................15
Uninstalling OSA SMBridge from Linux System ............................................................................15
COMMAND LINE INTERFACE MODE .........................................................................................16
WORKING IN CLI MODE ......................................................................................................................16
SYNTACTIC RULES ..............................................................................................................................17
GLOBAL OPTIONS................................................................................................................................18
Help Option -help ...........................................................................................................................18
IPMI Session Option -ip .................................................................................................................19
IPMI Session Option -com..............................................................................................................19
COMMANDS.........................................................................................................................................20
identify ............................................................................................................................................21
sysinfo.............................................................................................................................................22
power ..............................................................................................................................................23
sel ...................................................................................................................................................24
INTERACTIVE SERVER MODE .....................................................................................................27
STARTING THE OSA SMBRIDGE DAEMON ..........................................................................................27
TELNET CLIENTS .................................................................................................................................29
WORKING IN SERVER MODE ...............................................................................................................29
Via Windows Command Prompt.....................................................................................................29
Via Windows HyperTerminal Console ...........................................................................................29
Via Linux Shell ...............................................................................................................................29
USER LOGIN ........................................................................................................................................30
GETTING HELP ....................................................................................................................................31
COMMANDS.........................................................................................................................................32
Commands inherited from the CLI mode........................................................................................32
connect............................................................................................................................................33
sol ...................................................................................................................................................34
console............................................................................................................................................36
reboot..............................................................................................................................................37
TROUBLE SHOOTING......................................................................................................................38
APPENDIX A.
A.1
A.2
CONFIGURING A REMOTE SERVER FOR OOB ACCESS........................39
BMC CONFIGURATION ............................................................................................................39
BIOS CONFIGURATION ............................................................................................................39
APPENDIX B.
TELNET CLIENTS USE AND CONFIGURATION........................................40
APPENDIX C.
CONFIGURE OSA SMBRIDGE ........................................................................41
APPENDIX D.
ERROR MESSAGES ...........................................................................................43
D.1
OSA DEFINED COMPLETION CODES.................................................................................43
INDEX ...................................................................................................................................................45
Copyright (c) 2004 - OSA Technologies, an Avocent Company. All Rights Reserved.
2
User’s Manual for OSA System Management Bridge
Introduction
The OSA System Management Bridge (SMBridge) is a console application for remote server
management. It allows cost effective administration of servers using IPMI 1.5 protocol and the
Serial Over LAN (SOL) protocol.
SMBridge provides server control and management ability via two distinct modes of operation,
a “Command Line Interface” mode (CLI) and an “Interactive Server” mode (Server).
CLI Mode
In CLI mode, OSA SMBridge supports out-of-band (OOB) access (through LAN or serial
port) to a remote server. It enables OSA SMBridge users to execute IPMI control
commands in a native command line to manage the remote server.
OSA SMBridge allows an administrator with user-level privilege to a remote BMC to:
• Display the current power status
• Display the 16-byte system GUID of the managed server
• Display all field replaceable units (FRU) present in the system
• Display the BMC firmware information
• Display summary information about the event log
• Display the logged events, one event per line
An administrator, with operator-level privilege to a remote BMC, can additionally:
• Power on/off, or cycle a server
• Initiate a hard power off or graceful shutdown of the system1.
• Delete the system event log
• Turn on/off the blinking system identifier
• Set a timestamp for the event log
Server Mode
In Server Mode, OSA SMBridge allows a local or remote telnet client to connect with a
Remote BMC to realize power and system management, or communicate with the
hardware designated serial port. Server mode is available when SMBridge is started as a
background service or daemon. Then administrator can access SMBridge remotely via a
telnet client. Any standard telnet client application, such as HyperTerminal on Microsoft
Windows or telnet on Linux, can be used to access the server’s features. The SOL
protocol coupled with the remote system’s BIOS console redirection allows administrators
to view and change the BIOS settings over LAN. Linux serial console and Microsoft’s
EMS/SAC interfaces can also be accessed over LAN using SOL.
Target Audiences
The target audiences for this manual are Linux or MS windows system administrators who
need access to the system console in early stages of the boot cycle or for pre-boot
configuration. Administrators can also use these tools to monitor the proper operation of the
system hardware and operating system.
1
Graceful shutdown is an optional IPMI command and may or may not be implemented by the target BMC. Initiating
a graceful shutdown for a platform that does not support the feature should return an error code.
Copyright (c) 2004 - OSA Technologies, an Avocent Company. All Rights Reserved.
3
User’s Manual for OSA System Management Bridge
Glossary
This Manual uses the following glossary and abbreviations:
Term
SMBridge
OOB
IPMI
SOL
BMC
LAN
GUID
FRU
Definition
System Management Bridge
Out Of Band. Pre-OS or OS-absent management scheme. The BMC allows
the retrieval of firmware information, and performs shutdown and reboot
functions in the absence of an OS.
Intelligent Platform Management Interface is an industry standard for
management of peripherals used in enterprise computers based on Intel®
architecture. The key characteristic of IPMI is that inventory, monitoring,
logging, and recovery control functions are available independent of the main
processors, BIOS, and OS.
Serial Over LAN enables suitably designed servers to transparently redirect
the serial character stream of a baseboard UART (Universal Asynchronous
Receiver Transmitter) to/from a remote client via the LAN. The architecture
requires software running on the BMC and client software running on a
management workstation and/or a central network proxy.
Baseboard Management Controller is a micro-controller that provides the
intelligence in the IPMI structure.
Local Area Network is a shared medium peer-to-peer communication network
that broadcasts information for all station to receive in a moderate size
geographic area.
Globally Unique Identifier is a random number used in software applications.
Each generated GUID is supposed to be unique.
Field Replaceable Unit identifies a module or component that will typically be
replaced in its entirety as part of a field service repair operation.
Supported Platforms
SMBridge supports the following platforms:
• Redhat Linux 7.2
• Redhat Linux 8.0
• Redhat Linux 9.0
• Redhat Linux Enterprise Server 3.0
• Microsoft Windows XP
• Microsoft Windows 2000 Professional
• Microsoft Windows 2000 Server
• Microsoft Windows Server 2003
Copyright (c) 2004 - OSA Technologies, an Avocent Company. All Rights Reserved.
4
User’s Manual for OSA System Management Bridge
END USER LICENSE AGREEMENT
PLEASE READ THIS END USER LICENSE AGREEMENT ("EULA") BETWEEN YOU AND
OSA TECHNOLOGIES, INC., CAREFULLY BEFORE USING THE SOFTWARE (DEFINED
BELOW) AND DOCUMENTATION (DEFINED BELOW) THAT IS PROVIDED WITH THIS
EULA.
BY USING THE SOFTWARE OR DOCUMENTATION, YOU ACKNOWLEDGE THAT YOU
HAVE READ AND UNDERSTOOD ALL THE TERMS AND CONDITIONS OF THIS
AGREEMENT AND YOU WILL BE CONSENTING TO BE BOUND BY THEM. IF YOU DO
NOT ACCEPT THESE TERMS AND CONDITIONS, THEN: (1) DO NOT INSTALL THE
SOFTWARE OR IF INSTALLED ALREADY, YOU MUST UNINSTALL THE SOFTWARE;
AND (2) DO NOT USE THE SOFTWARE OR DOCUMENTATION.
The license grant hereunder is conditioned upon the terms of this EULA, and OSA is not
willing to enter into this EULA if you are not willing to accept these terms.
DEFINITIONS
"Documentation" means electronic or printed materials that accompany the Software to
provide instructions for installation, operation, and use.
"OSA" means OSA Technologies, Inc. and its successors and assigns.
"OSA Distributor" means any distributor that OSA authorizes to distribute the Product.
"Platform" means those supported products as specified in writing by OSA or an OSA
Distributor (as applicable).
"Product" means the Software and Documentation.
"Software" means the OSA software, in object code format, which accompanies this EULA.
"you" means the company you represent.
INTELLECTUAL PROPERTY PROTECTION
The Product is owned by OSA, or its licensors, and is protected by United States and
international copyright and other intellectual property laws and international trade provisions.
You acknowledge that the Software and Documentation contain unpublished information and
embody valuable trade secrets proprietary to OSA and its licensors. You agree to hold all
such information and trade secrets in confidence. OSA and its licensors reserve all rights in
the Product not expressly granted in this EULA. This license and your right to use the
Product terminate automatically if you violate any part of this EULA. In the event of
termination, you must destroy the original and all copies of the Product or return them to OSA.
GRANT OF LICENSE
Upon your acceptance of this EULA and provided you observe the terms of this EULA, OSA
grants you a nontransferable, nonsublicensable, nonexclusive license to either: (a) use the
Software on the Platform to the extent specified in use rights provided to you in writing by
OSA or an OSA Distributor (as applicable), OR (b) if there are no use rights specified in
writing to you by OSA or an OSA Distributor (as applicable), you may use the Software on the
Platform. Customer may use the Product solely on its own private network. No copies of the
Software shall be made without OSA's written consent.
TITLE TO SOFTWARE AND RESTRICTIONS
Title to the Software (including any online user documentation, and software contained
therein and all translations thereof) shall remain with OSA. You shall not remove, alter, cover
or obfuscate any copyright notices or other proprietary rights notices placed or embedded by
OSA on or in any Software or Documentation. You shall not (a) disclose the results of any
benchmark tests relating to the Software or (b) announce, promote, present, display,, criticize
or advertise the Software or Documentation to anyone. You may not sublicense or otherwise
distribute the Software or Documentation to any third party. You will not sell, resell for a profit,
rent, lease or lend the Software or Documentation or use it for commercial time sharing, rental
or service bureau use. You shall not, and shall not authorize any third party to, modify, alter,
adapt, reverse engineer, disassemble, create derivative works of, or decompile the Software
and you agree that you do not have the right to obtain or use any source code for the
Copyright (c) 2004 - OSA Technologies, an Avocent Company. All Rights Reserved.
5
User’s Manual for OSA System Management Bridge
Software or any part of it. The preceding sentence is limited by the following: The parties
acknowledge that, in the European Union countries, a software directive by the European
Union Commission mandates that a licensee of software shall be lawfully entitled to
decompile such software for the purpose of obtaining the information necessary to achieve
the interoperability of an independently created computer program with other programs,
provided, among other things, that such information has not previously been readily available,
and such decompilation is confined to the parts of the licensed program which are necessary
to achieve interoperability. You acknowledge that OSA makes such information available to
you, and that, accordingly, you shall not claim or exercise any such right of decompilation.
You agree that you will not provide access to the Software to any person for any purpose
other than processing your internal data for the intended use of the Software.
UPDATES AND UPGRADES
OSA may, from time to time in its sole discretion and without any obligation to do so, make
updates and/or upgrades to the Software available via the Internet or other sources. All such
updates and upgrades shall be deemed to be included within the definition of Software and
shall be subject to the terms and conditions of this EULA. This EULA does not entitle you to
any support, maintenance, assistance or the like, with respect to the Software or the
Documentation.
WARRANTY
OSA warrants that on the date of delivery of the Software, the Software will substantially
conform to the specifications set forth in the Documentation. Your sole and exclusive remedy
under the foregoing warranty shall be for OSA to use commercially reasonable efforts to
correct any substantial non-conformity of the Software reported to OSA in writing within the
warranty period. All errors shall be reported to OSA support at the following email address:
[email protected]. The foregoing warranty shall not apply to any error in the
Software that is caused by the use or operation of the Software other than on the Platform.
DISCLAIMER OF OTHER WARRANTIES
OSA DISCLAIMS ALL OTHER WARRANTIES, WHETHER EXPRESS, IMPLIED,
STATUTORY OR OTHERWISE, INCLUDING BUT NOT LIMITED TO IMPLIED
WARRANTIES OF MERCHANTABILITY, NONINFRINGEMENT, FITNESS FOR A
PARTICULAR PURPOSE AND ANY WARRANTY OTHERWISE ARISING OUT OF ANY
SAMPLE, SPECIFICATION OR PROPOSAL. OSA DOES NOT GUARANTEE THAT THE
SOFTWARE IS FREE OF DEFECTS, WILL RUN ERROR-FREE OR UNINTERRUPTED OR
WILL MEET YOUR REQUIREMENTS OR THAT OSA WILL CORRECT ALL PROGRAM
ERRORS. SOME LAWS DO NOT ALLOW THE EXCLUSION OF IMPLIED WARRANTIES
SO TO THAT EXTENT THIS LIMITATION MAY NOT APPLY TO YOU. OSA FURTHER
DISCLAIMS ANY EXPRESS OR IMPLIED WARRANTIES REGARDING LACK OF VIRUSES,
ACCURACY OR COMPLETENESS OF RESPONSES, RESULTS, SATISFACTORY
QUALITY, LACK OF NEGLIGENCE AND LACK OF WORKMANLIKE EFFORT.
NO LIABILITY FOR CONSEQUENTIAL DAMAGES
IN NO EVENT WILL OSA OR ITS LICENSORS BE LIABLE FOR ANY SPECIAL,
INCIDENTAL, CONSEQUENTIAL, PUNITIVE OR INDIRECT DAMAGES WHATSOEVER
(INCLUDING, WITHOUT LIMITATION, DAMAGES FOR LOSS OF PROFITS, BUSINESS
INTERRUPTION, LOSS OF INFORMATION, OR OTHER PECUNIARY LOSS) ARISING
OUT OF THE USE OR INABILITY TO USE THE PRODUCT OR THE PERFORMANCE,
INTERRUPTION OR FAILURE OF THE PRODUCT, IRRESPECTIVE OF THE CAUSE OF
ACTION, EVEN IF OSA HAS BEEN ADVISED OF THE POSSIBILITY OF SUCH DAMAGES.
SOME JURISDICTIONS DO NOT ALLOW THE EXCLUSION OR LIMITATION OF
INCIDENTAL OR CONSEQUENTIAL DAMAGES, SO TO THAT EXTENT THE ABOVE
LIMITATIONS OR EXCLUSIONS MAY NOT APPLY TO YOU. You acknowledge and agree
that it is the intention of OSA to give its third party licensors and suppliers the benefit of the
covenants made by you in this EULA, and you agree that the limitations of liability and
disclaimers stated in this EULA also apply to OSA's licensors and suppliers as intended
beneficiaries hereof.
Copyright (c) 2004 - OSA Technologies, an Avocent Company. All Rights Reserved.
6
User’s Manual for OSA System Management Bridge
YOU AGREE THAT IN ANY EVENT, OSA'S CUMULATIVE LIABILITY FOR ALL CLAIMS
ARISING OUT OF OR IN CONNECTION WITH THIS EULA, INCLUDING, WITHOUT
LIMITATION, FROM OR IN CONNECTION WITH THE LICENSE OR THE USE OR
IMPROPER FUNCTIONING OF THE SOFTWARE (EACH, A "CLAIM"), WILL NOT EXCEED
THE AMOUNT PAID BY YOU TO PURCHASE THE SOFTWARE. OSA'S THIRD PARTY
SUPPLIERS AND LICENSORS WILL HAVE NO LIABILITY FOR ANY CLAIMS.
YOU AGREE THAT THE ABOVE LIMITATIONS OF LIABILITY APPLY REGARDLESS OF
THE BASIS ON WHICH YOU ARE ENTITLED TO CLAIM, INCLUDING BUT NOT LIMITED
TO BREACH OF CONTRACT (INCLUDING, WITHOUT LIMITATION, FUNDAMENTAL
BREACH) OR TORT (INCLUDING, WITHOUT LIMITATION, NEGLIGENCE, GROSS
NEGLIGENCE, NEGLIGENT MISREPRESENTATION, PRODUCT LIABILITY OR OTHER
FAULT OF OSA OR ITS THIRD PARTY SUPPLIERS AND LICENSORS), EVEN IF OSA OR
ITS THIRD PARTY SUPPLIERS AND LICENSORS HAVE BEEN ADVISED OF THE
POSSIBILITY OF SUCH DAMAGES AND NOTWITHSTANDING THE FAILURE OF
ESSENTIAL PURPOSE OF ANY REMEDY. YOU AGREE THAT THESE LIMITATIONS ON
POTENTIAL LIABILITIES WERE AN ESSENTIAL ELEMENT IN SETTING
CONSIDERATION UNDER THIS EULA.
GENERAL
This EULA constitutes the entire agreement between you and OSA and supersedes any prior
agreement concerning the Product. OSA is not bound by any provision of any purchase order,
receipt, acceptance, confirmation, correspondence, or otherwise, unless OSA specifically
agrees to the provision in a written, executed document. If any provision of this EULA shall
be held to be invalid, illegal or unenforceable, such provision shall be enforced to the
maximum extent permitted by law and the remaining provisions shall not be affected. This
EULA is governed by the laws of the State of California without reference to conflicts of laws
provisions. You agree that all disputes arising out of or in connection with this EULA shall be
subject to the exclusive jurisdiction of and venue in the federal and state courts within Santa
Clara County, California, U.S.A., and you irrevocably consent to the personal and exclusive
jurisdiction and venue of these courts. You may not assign or transfer this EULA or any rights
or obligations under this EULA. Any assignment or transfer of this EULA made in
contravention of the terms hereof shall be null and void. Subject to the foregoing, this EULA
shall be binding on and inure to the benefit of the parties' respective successors and
permitted assigns. OSA may assign its rights under this EULA to its affiliates and to any
successor by way of merger, acquisition, consolidation, reorganization or sale or all or
substantially all of its assets which relate to this EULA, without action on your part, in which
case references to OSA herein shall be deemed to refer to the assignee. You are responsible
for the payment of any taxes, including your personal property taxes, arising from this EULA
or your use of the Product.
LIFE SUPPORT AND OTHER CRITICAL SYSTEMS
The Software shall not be used in connection with any system where malfunction can
reasonably be expected to result in personal injury, death or damage to property, environment
or business. Without limiting the foregoing, the Software shall not be used in connection with
any life support system. You agree to hold OSA and its officers, directors, employees,
affiliates and licensors harmless from any claims or losses resulting from any of the foregoing
uses of the Software.
EXPORT CONTROLS
The Software and the underlying information and technology may not be downloaded or
otherwise exported or reexported (i) into (or to a national or resident of) Cuba, Iraq, Libya,
Sudan, North Korea, Iran, Syria or any other country to which the U.S. has embargoed goods;
or (ii) to anyone on the U.S. Treasury Department's list of Specially Designated Nationals,
Specially Designated Terrorists, Specially Designated Narcotic Traffickers or the U.S.
Commerce Department's Table of Deny Orders. By downloading or using the Software, you
are agreeing to the foregoing and you represent and warrant that you are not located in,
under the control of, or a national or resident of any such country or on any such list. Without
limiting the generality of the foregoing, you agree that you will not export or re-export, directly
Copyright (c) 2004 - OSA Technologies, an Avocent Company. All Rights Reserved.
7
User’s Manual for OSA System Management Bridge
or indirectly, the Software or Documentation (or any copies thereof) or any products utilizing
the Software or such documentation in violation of any applicable laws or regulations.
U.S. GOVERNMENT RESTRICTED RIGHTS
The Software and Documentation are considered to be "commercial computer software" and
"commercial computer software documentation," respectively, pursuant to DFAR Section
227.7202 and FAR Section 12.212, as applicable. Use, duplication, or disclosure of the
Software and/or Documentation by the U.S. Government is subject to the restrictions set forth
in DFAR Section 227.7202 for military agencies, and FAR Section 12.212 for civilian agencies.
OSA reserves all rights not expressly granted herein.
Copyright (c) 2004 - OSA Technologies, an Avocent Company. All Rights Reserved.
8
User’s Manual for OSA System Management Bridge
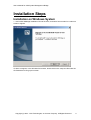
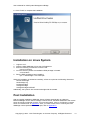
Installation Steps
Installation on Windows System
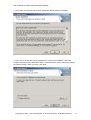
1. Insert OSA SMBridge Installation CD into the drive, and wait a few seconds for a welcome
screen to appear:
If it does not appear, in the Windows file browser, double click on the setup.exe file under the
CD-ROM drive to bring up this screen.
Copyright (c) 2004 - OSA Technologies, an Avocent Company. All Rights Reserved.
9
User’s Manual for OSA System Management Bridge
2. Click “Next” and the End User License Agreement (EULA) window will appear.
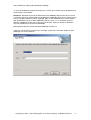
3. Click “Yes” to accept the License Agreement to continue the installation. The install
program will prompt for the destination folder. The default folder can be changed by clicking
the “Browse” button. When you finish, click “Next”.
Copyright (c) 2004 - OSA Technologies, an Avocent Company. All Rights Reserved.
10
User’s Manual for OSA System Management Bridge
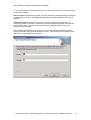
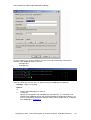
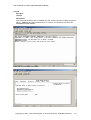
4. Then the installation program will prompt for a TCP/IP port number and an IP address that
will be used in Server Mode.
IP address: Specifies the server IP address that OSA SMBridge will bind and service. Since
a computer may have multiple valid NIC IP addresses, SMBridge allows you to restrict access
to it via a single IP address. Specify “INADDR_ANY” as the IP address if any of the multiple
NIC IP addresses can be bound to SMBridge. Specify “127.0.0.1” or “localhost” as the IP
address if SMBridge should only accept local connections. Specify a specific IP address if
only this IP address can be bound to SMBridge.
Port: Specifies the port number that OSA SMBridge will listen on.
These two values will be recorded in the smbridge.cfg file for the automatic startup of OSA
SMBridge as a service daemon.
Copyright (c) 2004 - OSA Technologies, an Avocent Company. All Rights Reserved.
11
User’s Manual for OSA System Management Bridge
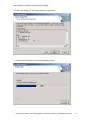
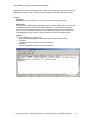
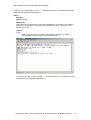
5. User could specify the Telnet Session Timeout value and “Power Off” Command Timeout
value for Server Mode.
Session timeout: Specifies the number of minutes without any keyboard activity that signals
a “session timeout” event. An established telnet session will be closed when this event is
triggered.
“Power Off” timeout: Specifies the number of seconds to wait for an IPMI power off
command (graceful or forced) to complete. If time has exceeded the timeout value and the
power status is still on, an error code will be returned to indicate that the “Power Off”
command may have failed.
The necessary time duration for a system to power off is platform and operating system
specific, particularly when graceful shutdown is used. User should choose a timeout value
that works for most platforms and systems.
Copyright (c) 2004 - OSA Technologies, an Avocent Company. All Rights Reserved.
12
User’s Manual for OSA System Management Bridge
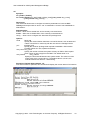
6. Review the settings you have selected before copying files.
7. A progress bar will appear to show the installation process.
Copyright (c) 2004 - OSA Technologies, an Avocent Company. All Rights Reserved.
13
User’s Manual for OSA System Management Bridge
8. Click “Finish” to complete the installation.
Installation on Linux System
1. Login as “root”.
2. Insert the OSA SMBridge CD into the CD-ROM drive.
3. Enter the following command to mount the CD:
mount /mnt/cdrom
4. Go to the directory where the installation RPM package is located:
cd /mnt/cdrom
5. Run the RMP package to begin installing:
rpm –i osasmbridge-1.0.2-0.i386.rpm
When the installation is finished successfully, 5 files are copied to the following directories:
/etc/init.d/smbridge
/etc/smbridge.cfg
/usr/bin/smbridge
/var/log/smbridge
/var/log/smbridge/LICENSE
Additionally, the symbolic link /usr/sbin/smbridge shall be created.
Post Installation
After successful installation, SMBridge Server will start automatically as a daemon.
Before SMBridge can be used to manage a remote server, the BMC and BIOS of the remote
server should be configured correctly. For more information, refer to “Configuring a remote
server for OOB Access” in Appendix A. Also, you need to know how to correctly set OSA
SMBridge runtime parameters. For this part, refer to Appendix C.
Copyright (c) 2004 - OSA Technologies, an Avocent Company. All Rights Reserved.
14
User’s Manual for OSA System Management Bridge
Uninstalling OSA SMBridge
Uninstalling OSA SMBridge from Windows System
To uninstall OSA SMBridge, use the Add/Remove Programs Utility in the Control Panel.
Uninstalling OSA SMBridge from Linux System
1. Login as “root”;
2. Enter the following command to remove all the installed packages.
rpm –e osasmbridge
3. A success message should be returned to show that OSA SMBridge is uninstalled
successfully.
Copyright (c) 2004 - OSA Technologies, an Avocent Company. All Rights Reserved.
15
User’s Manual for OSA System Management Bridge
Command Line Interface Mode
OSA SMBridge
Remote Managed
Server
IPMI Session
In CLI mode, OSA SMBridge supports out-of-band (OOB) access (through LAN or serial port)
to a single server at a time. By connecting to the BMC of the remote server, SMBridge can
realize cost effective remote management. However, multiple IPMI sessions can run
simultaneously on the same node.
To facilitate command scripting, upon successful execution, SMBridge commands return with
an exit code of zero, and will output the execution results in a parsable format. If an error is
encountered, the program exits with a non-zero error code and output the error in a parsable
format.
Working in CLI mode
On Windows System:
1. Start a Command Prompt window.
2. Go to the directory where the file smbridge.exe is located. By default, smbridge.exe is
located at the OSA SMBridge installation directory.
3. Enter the commands available in CLI mode to manage the remote server.
On Linux System:
1. Start an OS shell.
2. Go to the directory where the file smbridge is located. By default, smbridge is located at
the directory: /usr/sbin
3. Enter the commands available in CLI mode to manage the remote server.
Copyright (c) 2004 - OSA Technologies, an Avocent Company. All Rights Reserved.
16
User’s Manual for OSA System Management Bridge
Syntactic Rules
To ensure that readers understand more clearly the commands appearing in OSA SMBridge,
the following conventions are presented. These conventions also apply to the syntax of
commands in Server Mode.
Expression
Explanation
bold text
type exactly as shown.
italic text
replace with appropriate argument.
[-abc]
any or all arguments within [ ] are optional.
-a|-b
options delimited by | cannot be used together.
argument ...
argument is repeatable.
argument,argument,argument
Underlined argument is default value if no argument is
present.
[expression] ...
entire expression within [ ] is repeatable.
The general syntax of SMBridge commands in this mode is as follows:
smbridge global-option … command [; command] …
Where a command is:
cmd [sub-cmd] [cmd option & argument] …
Both global options and command specific options are always in the form of:
-option [argument]
i.e. -help, -max 20, -u John, etc
Arguments with embedded tabs or spaces must be enclosed in matching “ or ‘ quotes, for
example:
-user ‘John Smith’
-time ‘’2003/03/03 14:35:34”
Every command has one Default Subcommand. The Default Subcommand is typically, but
not always, the equivalent of reading and displaying of the current setting or status for the
command.
Copyright (c) 2004 - OSA Technologies, an Avocent Company. All Rights Reserved.
17
User’s Manual for OSA System Management Bridge
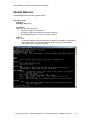
Global Options
OSA SMBridge has the following global options:
Help Option -help
Synopsis:
smbridge -help [cmd]
Description:
This option is used to get help for:
• A summary page for all commands
• A summary of all subcommands for a single command
• A detailed description of a cmd, sub-cmd combination
Options:
-help cmd
A command list and a capsule description of options are printed if no argument is
given. When there is an argument specifying which command, the detailed
description of this command will display.
Copyright (c) 2004 - OSA Technologies, an Avocent Company. All Rights Reserved.
18
User’s Manual for OSA System Management Bridge
IPMI Session Option -ip
Synopsis:
smbridge -ip bmc-ip-address | bmc-host-name [-u username] [-p password]
Description:
This option is used to establish a connection to a remote server via LAN channel, while
the IP port specified in installation (default value is 623) is used implicitly.
Options:
-ip bmc-ip-address | bmc-host-name
Specify the OOB IP address or hostname of the remote managed server.
-u username
Specify the username used to connect to the server. It can be omitted if the
argument value is null.
-p password
Specify the password used to connect to the server. It can be omitted if the
argument value is null.
Note:
Session option -ip cannot be used independently and one or more SMBridge commands
must follow it.
IPMI Session Option -com
Synopsis:
smbridge -com serial_port [-baud baud_rate] [-flow flow_control] [-u username] [-p
password]
Description:
This option is used to establish a connection to a remote server via Serial channel.
Options:
-com serial_port
Specify the serial port when establish an IPMI session to the managed server. In
windows system, it can be 1, 2, 3 and so on. In Linux system, it can be ttyS0,
ttyS1, ttyS2, and so on.
-baud baud_rate
Specify the communication baud rate over serial channel, such as 9600 and
19200. It should be in conformity with the one set in the managed server.
-flow
flow_control
Specify the controlling manner of the flow data. There are 3 ways to handle flow
control: CTS, XON and NONE. CTS means Hardware Flow Control since the
control is handled by hardware. XON means Software Flow Control because the
flow control manner is via software. NONE means no flow control.
-u
username
Specify the username used to connect to the server. It can be omitted if the
argument value is null.
-p
password
Specify the password used to connect to the server. It can be omitted if the
argument value is null.
Copyright (c) 2004 - OSA Technologies, an Avocent Company. All Rights Reserved.
19
User’s Manual for OSA System Management Bridge
Note:
Session option -com cannot be used independently and one or more SMBridge
commands must follow it.
Commands
The table below lists the OSA SMBridge commands available in the CLI mode with a brief
description.
Command
identify
sysinfo
power
sel
Description
Controls the identification LED on the front panel
Retrieves and displays the system information
Controls power state of the managed server
Performs some operations on the system event log
Copyright (c) 2004 - OSA Technologies, an Avocent Company. All Rights Reserved.
20
User’s Manual for OSA System Management Bridge
identify
Synopsis:
identify [on [-t seconds] | off]
Description:
This command is used to control identification LED on the front panel.
Subcommands:
on - Turn on the LED.
If the BMC supports IPMI extension “Chassis Identify On” command, then “identify
on” turns the LED on indefinitely until “identify off” is used to turn the LED off.
Otherwise, the LED will be turned on for the maximum allowed time of 255 seconds.
off - Turn off the LED.
Options:
-t
seconds
Specify how long the LED will be turned on. It should be no longer than 255
seconds.
Synopsis of Default Subcommand: identify
If no subcommand is specified, this command will act the same as “identify on”.
Copyright (c) 2004 - OSA Technologies, an Avocent Company. All Rights Reserved.
21
User’s Manual for OSA System Management Bridge
sysinfo
Synopsis:
sysinfo [fru | id]
Description:
This command retrieves and displays the system information, including information about
FRU and BMC.
Subcommands:
fru - Return FRU related information
id - Return BMC related information
Synopsis of Default Subcommand: sysinfo
If no subcommand is specified, this command will act the same as “sysinfo id”.
Copyright (c) 2004 - OSA Technologies, an Avocent Company. All Rights Reserved.
22
User’s Manual for OSA System Management Bridge
power
Synopsis:
power status
power off [-force] | on | cycle | reset
Description:
This command is used to display the current power status of the managed server, turn
on/off or reset the server.
Subcommands:
status -- Display the current power status of the server, the returned value is “on” or “off”.
on
-- Turn on the server.
off
-- Issue a “graceful shutdown” IPMI command.
cycle -- Turn off the server first, after a period of time, turn it on.
reset -- Pulse the system reset signal regardless of the power state.
Options:
-force
This option will simulate pressing the power button and will force the system off.
Synopsis of Default Subcommand: power
If no subcommand is specified, this command will act the same as “power status”.
Copyright (c) 2004 - OSA Technologies, an Avocent Company. All Rights Reserved.
23
User’s Manual for OSA System Management Bridge
sel
Synopsis:
sel status
sel get [ [-begin index1 ] [-end index2 | -max count] ] | [-last n]
sel clear
sel set –time yyyy/mm/dd hh:mm:ss
Description:
This command allows user to perform some operations on the system event log, such as
displaying the total number of records in the event log, deleting all the records, displaying
contents of the event log, or setting timestamp.
Subcommands:
status -- Display the total number of system event log records
get
-- Print all or part of the event logs
clear -- Remove all the records in the event log
set
-- Set timestamp for the event log
Options:
-begin index1
Specify the record from which to begin displaying.
-end
index2
Specify the record to which to end displaying.
-max count
Specify the maximum of the records to be displayed.
If the value of argument count is bigger than the total number of the records, this
option will lapse. The last record to be displayed will be the last one in the event
log.
-last
n
Specify the number of records to be printed, starting from the last record then
counting backwards.
-time yyyy/mm/dd hh:mm:ss
Specify a point in time as the value of timestamp. It should be in the format of
"yyyy/mm/dd hh:mm:ss".
yyyy: Year. It should be a valid calendar year number and include 4 digits, such
as 1999.
mm: Month. It should be a valid calendar month number from 01 to 12, such as
06 (June), 11(November).
dd: Day. It should be a valid calendar day number from 01 to 31.
hh: Hour. It should be a valid hour number from 00 to 23.
mm: Minute. It should be a valid minute number from 00 to 59.
ss: Second. It should be a valid second number from 00 to 59.
Synopsis of Default Subcommand: sel
If no subcommand is specified, this command will act the same as “sel status”.
Copyright (c) 2004 - OSA Technologies, an Avocent Company. All Rights Reserved.
24
User’s Manual for OSA System Management Bridge
When executing “sel get” command, the system event log records are displayed using a
tabular format. The column headers are: Ordinal Number, Message Timestamp, Sensor
Number, Sensor Type and Brief Description.
Copyright (c) 2004 - OSA Technologies, an Avocent Company. All Rights Reserved.
25
User’s Manual for OSA System Management Bridge
Copyright (c) 2004 - OSA Technologies, an Avocent Company. All Rights Reserved.
26
User’s Manual for OSA System Management Bridge
Interactive Server Mode
OSA SMBridge
BMC
Serial Port
SOL
Telnet
IPMI
Remote Server
BIOS
Telnet Client
In Server Mode, OSA SMBridge runs as a background service or daemon and automatically
starts each time the system boots. It allows a telnet client (both local and remote) to interact
with a Remote BMC through IPMI session to realize power and system management, or
communicate with a hardware designated serial port of a remote server using the LAN
channel.
Using SOL access, administrators can view and change the BIOS settings over LAN, Linux
serial console and Microsoft’s EMS/SAC interfaces can also be accessed.
When BIOS Console Redirection to serial port is enabled at the remote server, any
application that uses the BIOS to read from or write to the system console will have its IO
redirected to the designated serial IO port. When SOL is activated, the BMC firmware reads
any data written to the serial port and transmits it to the OSA SMBridge as LAN packets. OSA
SMBridge then forwards the data to the telnet client as TCP/IP packets.
Conversely, any keyboard activity at the telnet client is sent to the BMC via OSA SMBridge.
BMC then writes the packets to the system serial IO port.
This communication scheme enables the viewing and configuration of the BIOS settings of a
managed node, as well as resetting the node remotely, via a telnet client. One SMBridge
session supports one SOL session with one BMC at a time.
Starting the OSA SMBridge daemon
To support telnet connections OSA SMBridge must be started as a background service or
daemon.
On MS Windows System start the daemon by clicking:
Start ---- Settings --- Control Panel ----- Administrative Tools ----- Services -----OSA SMBridge
Copyright (c) 2004 - OSA Technologies, an Avocent Company. All Rights Reserved.
27
User’s Manual for OSA System Management Bridge
On Linux system, you can go to directory /etc/init.d and use the following commands to
start/stop OSA SMBridge daemon service:
smbridge start
smbridge stop
In the CLI Mode, you can also use “-d” option to start OSA SMBridge as a daemon:
smbridge –d [-c <config file>]
Options:
-d
Used to start SMBridge as a daemon
-c
<config file>
Specify the configuration file that SMBridge may start with. If a config file is not
specified then SMBridge Server will operate with default configuration settings. For
a list of configuration parameters and their default values please refer to “Configure
OSA SMBridge” in Appendix C.
Copyright (c) 2004 - OSA Technologies, an Avocent Company. All Rights Reserved.
28
User’s Manual for OSA System Management Bridge
Telnet Clients
A variety of telnet clients can be used:
• In a MS Windows environment, you can use a Command Prompt window as your
console.
• In a MS Windows environment, you can also use any telnet application supporting
VT100 emulation mode (such as HyperTerminal bundled by MS Windows platforms) as
your console.
• In a Linux environment, you can use a shell such as csh or ksh as your console.
To find out more about how to use and configure different telnet clients, refer to Appendix B.
Depending on the console you use, there are different steps for accessing OSA SOL
Manager. For ease of description, we call the computer where OSA SMBridge is installed
OSA SMBridge Server.
Working in Server Mode
Important note: Before working in the Server mode, you should ensure that OSA SMBridge
has been successfully started as a background service or daemon.
Via Windows Command Prompt
1. Open a Command Prompt window.
2. Enter the “telnet” command in the command-line and provide the IP address of OSA
SMBridge Server and the port number you have specified in OSA SMBridge
installation process (the default value is 623). For example:
telnet 192.168.1.24 623
Note: The IP address and port number you provide should conform to the ones
defined in OSA SMBridge configuration file smbridge.cfg. For more details, refer to
“Configure OSA SMBridge” in Appendix C.
3. Upon successful execution, you are ready to login SMBridge.
Via Windows HyperTerminal Console
1. Open a HyperTerminal session.
2. Create a new TCP/IP connection, providing the IP address of OSA SMBridge Server
and the port number you have specified in OSA SMBridge installation process (the
default value is 623). The Emulation mode is VT100.
Note: The IP address and port number you provide should conform to the ones
defined in OSA SMBridge configuration file smbridge.cfg. For more details, refer to
“Configure OSA SMBridge” in Appendix C.
3. Upon successful execution, you are ready to login SMBridge.
Via Linux Shell
1. Open a Linux shell.
2. Enter the “telnet” command and provide the IP address of OSA SMBridge Server and
the port number you have specified in OSA SMBridge installation process (the default
value is 623). For example:
telnet 192.168.1.24 623
Note: The IP address and port number you provide should conform to the ones
defined in OSA SMBridge configuration file smbridge.cfg. For more details, refer to
“Configure OSA SMBridge” in Appendix C.
3. Upon successful execution, you are ready to login SMBridge.
Copyright (c) 2004 - OSA Technologies, an Avocent Company. All Rights Reserved.
29
User’s Manual for OSA System Management Bridge
User Login
When a user attempts to establish a telnet session, SMBridge will authenticate the connection
request leveraging the host system’s authentication mechanism.
If the telnet connection request is from the local host, SMBridge will not authenticate the user,
since he has already been authenticated by the local host OS system by virtue of being
logged on to the system. Otherwise, the user will be prompted to input valid a user name and
password.
After a successful login, a telnet session is established and a command prompt is displayed
for the user to interactively execute SMBridge commands.
Copyright (c) 2004 - OSA Technologies, an Avocent Company. All Rights Reserved.
30
User’s Manual for OSA System Management Bridge
Getting Help
When user has entered SMBridge Server Mode, he can key in “help” command in the
command line to know what commands he can use to accomplish management tasks.
Synopsis:
help [cmd]
Description:
A command list and a capsule description of options are printed if no argument is given.
When there is an argument specifying which command, the detailed description of this
command will display.
Argument:
cmd ---- Specify the command that will be printed with detailed description
Copyright (c) 2004 - OSA Technologies, an Avocent Company. All Rights Reserved.
31
User’s Manual for OSA System Management Bridge
Commands
After the telnet connection with OSA SMBridge is successfully established, a “SMBridge”
prompt is displayed for further user commands.
The table below lists the OSA SMBridge commands available in Server mode with a brief
description.
Command
connect
identify
sysinfo
power
sel
sol
console
reboot
Description
Connects to remote managed server
Controls the identification LED on the front panel of the
currently connected server
Retrieves and displays the system information of the
currently connected server
Controls power state of the managed server of the
currently connected server
Performs vital operations related to the system event log
of the currently connected server
Configures SOL BMC parameters of the currently
connected server
Establishes the SOL session with the currently connected
server
Combines power control with establishing a SOL session
in one atomic operation.
Commands inherited from the CLI mode
The identify, sysinfo, power and sel commands are exactly the same as the corresponding
commands in the CLI mode. In CLI mode, these commands operate on the remote server
specified with the IPMI session global option –ip. In the Server mode the commands operate
on the remote server specified with the “connect” command. For example, the proper use of
the command “power” is depicted in the following image:
Copyright (c) 2004 - OSA Technologies, an Avocent Company. All Rights Reserved.
32
User’s Manual for OSA System Management Bridge
Additionally, four new commands (connect, reboot, sol, console) are introduced that are only
available in the Server mode. Each new command will be described in the section below.
connect
Synopsis:
connect -ip bmc-ip-address | bmc-host-name [-u username] [-p password]
Description:
This command is approximately equivalent to the CLI Mode “global options” and is used
to establish an IPMI connection with the remote server. A connection to the remote
server is necessary before using any other commands to perform server management.
Once “connect” command is executed, the connection will remain active until the user
quits SMBridge or uses “connect” command again to connect to a different server.
Options:
-ip bmc-ip-address | bmc-host-name
Specify the OOB IP address or hostname of the remote managed server
-u username
Specify the username used to connect to the server
-p password
Specify the password used to connect to the server
Copyright (c) 2004 - OSA Technologies, an Avocent Company. All Rights Reserved.
33
User’s Manual for OSA System Management Bridge
sol
Synopsis:
sol [enable | disable]
sol config [-baud baud_rate ] [-priv privilege_level] [-retry count retry_count]
[-retry interval retry_interval]
Description:
This command allows user to configure sol session parameters of a remote BMC.
SMBridge will respond with an error if “sol” is used before “connect” has established an
IPMI session.
Subcommands:
enable – Allow user to enable SOL of the currently connected server
disable – Allow user to disable SOL of the currently connected server
config – Allow user to configure SOL baud rate and privilege level
Options:
-baud
baud_rate
Specify the communication baud rate over serial channel, such as 9600 and
19200. It should be in conformity with the one set in the managed server.
-priv
privilege_level
Specify the minimum privilege level required to establish a SOL session.
Possible values are: user, operator and admin.
-retry count retry_count
Specify the number of times the system will retry an IPMI or SOL request
when it does not get a reply from the BMC. The default value is 10.
-retry interval
retry_interval
Specify the time interval between two system retries. The value is in ticks
where each tick is 0.5 second long. The default value is 2, that is, the
interval between two retries is 1 second long.
Synopsis of Default Subcommand: sol
If no subcommand is specified, this command will display the current status of sol session.
Copyright (c) 2004 - OSA Technologies, an Avocent Company. All Rights Reserved.
34
User’s Manual for OSA System Management Bridge
Copyright (c) 2004 - OSA Technologies, an Avocent Company. All Rights Reserved.
35
User’s Manual for OSA System Management Bridge
console
Synopsis:
console
Description:
This command allows the user to establish the SOL session with the currently connected
server. SMBridge will respond with an error if “console” is used before “connect” has
established an IPMI session.
Press “F2” to enter BIOS Setup Utility.
Copyright (c) 2004 - OSA Technologies, an Avocent Company. All Rights Reserved.
36
User’s Manual for OSA System Management Bridge
To exit an active SOL session, use the “~.” character sequence. The characters should be
typed without a long delay between them.
reboot
Synopsis:
reboot [-force]
Description:
This command combines power control with establishing a SOL session in one atomic
operation. It is equivalent to executing the commands “power off”, “power on”, and
activate “sol” in turn.
Options:
-force
Used to force a power off condition. If this option is omitted, the “reboot”
command will be executed using a graceful shutdown.
To exit an active SOL session, use the “~.” character sequence. The characters should
be typed without a long delay between them.
Copyright (c) 2004 - OSA Technologies, an Avocent Company. All Rights Reserved.
37
User’s Manual for OSA System Management Bridge
Trouble Shooting
Q: Do OSA SMBridge commands correspond one-to-one to IPMI commands?
A: OSA SMBridge is only concerned with the most useful IPMI commands. It aims to provide
a set of powerful commands to empower the system administrator to accomplish his most
common management tasks effortlessly while shielding him from common human errors.
Therefore, OSA SMBridge commands may not correspond one-to-one to IPMI commands.
Q: Can a server be managed by multiple IPMI connections simultaneously?
A: Yes, a server can be managed by multiple IPMI connections at the same time as long as
the BMC supports more than one concurrent connection.
Q: When the BIOS Console of a remotely managed node is redirected, I tried to press
F1 button to enter BIOS setup interface, but it does not work, why?
A: Some telnet clients may not support <F1> and <F2> function keys. When using telnet in
an ASCII command prompt interfaces on MS Windows platforms, you can use <Esc> plus
numeric 1 to replace <F1>, and <Esc> plus numeric 2 to replace <F2>. For additional
information and guidance please refer to Appendix B.
Q: When I use HyperTerminal as a SMBridge telnet client on Windows Server 2003
platform, errors occurred, why?
A: On Windows Server 2003 platform, you should upgrade HyperTerminal to the private
edition. Also, you should turn off automatic wrap function by clearing the checkbox “Wrap
lines that exceed terminal width” in HyperTerminal ASCⅡ Setup (HyperTerminal Properties --- Setting ----- ASCⅡ Setup) to get a clean and clear display.
Copyright (c) 2004 - OSA Technologies, an Avocent Company. All Rights Reserved.
38
User’s Manual for OSA System Management Bridge
Appendix A. Configuring a Remote Server for OOB Access
Before SMBridge can be used to manage a remote server, the BMC and BIOS of the remote
server must have correct settings. OSA SMBridge does not configure any of the network
settings for the target BMC or the management host.
A.1 BMC configuration
If OOB LAN is to be used, the following settings of remote BMC should be configured in
advance so that the BMC has a working LAN connection to the management host:
¾ OOB IP address
¾ Subnet mask
¾ Default gateway address
Some older platforms require that network MAC addresses be configured manually:
¾ MAC address
¾ Default gateway MAC address
In newer platforms BIOS or the NIC enable the setting of these MAC addresses automatically.
Also, for OOB Serial, OSA SMBridge assumes a working connection between the
management node and the correct serial I/O port of the target BMC, using a Null Modem
Cable.
For both OOB LAN and OOB Serial, BMC login authentication information should be specified,
including:
¾ User name
¾ User password
¾ User Privilege
A.2 BIOS configuration
OSA SMBridge does not configure any BIOS settings and assumes that BIOS Console
Redirection is enabled and redirects console I/O to the correct serial I/O port for the target
BMC to intercept.
Copyright (c) 2004 - OSA Technologies, an Avocent Company. All Rights Reserved.
39
User’s Manual for OSA System Management Bridge
Appendix B. Telnet Clients Use And Configuration
Before establishing a telnet session with SMBridge, administrator should configure the telnet
clients to get correct and clear displaying.
Any telnet client application supporting VT100 emulation mode can work as a SMBridge telnet
client. SMBridge has been tested on three telnet clients:
¾ Microsoft Telnet
You can use the MS Microsoft Telnet from a Windows Command Prompt as your telnet client,
without any additional configuration. However, this client may not support <F1> and <F2>
function keys that are needed to enter BIOS settings Interface of a remotely managed node
after BIOS Console is redirected to the client side. Instead, you can use <Esc> plus numeric 1
to replace <F1>, and <Esc> plus numeric 2 to replace <F2>.
¾ Microsoft HyperTerminal
MS HyperTerminal bundled with MS Windows platform has been tested as a SMBridge telnet
client and should satisfy most users’ needs.
To ensure a clear and correct displaying, user should turn off automatic wrap function by
clearing the checkbox “Wrap lines that exceed terminal width” in HyperTerminal ASCⅡ Setup
(HyperTerminal Properties ---- Setting ----- ASCⅡ Setup).
If HyperTerminal is used to connect to a Windows Console, user should select VT100 as the
emulation mode. <F1> and <F2> function keys are supported in this case. Additionally, for
Windows Server 2003 Enterprise edition, HyperTerminal may not work correctly as a
SMBridge telnet client until you upgrade it to the private edition.
If HyperTerminal is used to connect to a Linux Console (redirected by SOL), the function and
arrow keys may not work, based on the “tty” settings of the remote application.
¾ Linux Telnet
In a Linux environment, you can use the standard Linux telnet executed from any Linux shell,
such as csh or ksh, as the telnet client. However, pressing <F1> and <F2> function keys may
not generate the required vt100 key codes. If the Linux shell is running outside of an XWindows environment the generated key codes will most likely be wrong. If however, the
shell is running as a window in an X-Windows environment it is possible to configure XWindows to generate vt100 key codes for function keys. In some windowing environments,
such as KDE, this can be simply done by using the “Settings” menu to configure the keyboard
behavior.
Copyright (c) 2004 - OSA Technologies, an Avocent Company. All Rights Reserved.
40
User’s Manual for OSA System Management Bridge
Appendix C. Configure OSA SMBridge
OSA SMBridge must be correctly configured and running before an incoming telnet
connection can be accepted.
The configuration file is a text file where the value of some runtime parameters is defined. For
MS Windows operating systems the default configuration file is located in the Windows
installation directory. For the Linux operating systems the default configuration file is installed
in the /etc directory.
The default SMBridge configuration file typically includes four key configuration parameters as
depicted in the example configuration file below:
# SMBridge Configuration File
ip=INADDR_ANY
port=623
session_timeout=30
power_off_timeout=60
Any line starting with “#” is treated as a comment. Possible configuration parameters are:
¾
ip
This item defines what kind of connection can be accepted to establish an OSA SMBridge
telnet session. There are three candidate values: “INADDR_ANY”, “127.0.0.1” and a valid
IP address, which respectively means that OSA SMBridge accepts the telnet request to
any server, the localhost and the machine occupying the IP address specified. If this
parameter is absent, system will use “127.0.0.1” (or localhost) as the default value of this
parameter.
¾
port
This item defines the port number when you telnet OSA SMBridge. If it is absent, system
will use “623” as the default port.
¾
session_timeout
If there is no keyboard activity for this timeout period, the telnet session will be closed.
This timeout value is specified in minutes. If it is absent, system will use the value of 30
minutes as the default value.
¾
power_off_timeout
“Power Off” timeout is only used during the reboot command, in order to abort waiting for
the “Power Off” command to complete. If wait time exceeds the timeout value and the
power status is still on, an error code will be returned to indicate the “Power Off”
command has failed. This timeout value is specified in seconds. If it is absent, system will
use the value of 45 seconds as the default value.
¾
sol_loss_silent
This parameter specifies how the system behaves when one or more SOL packets are
lost. Possible values are: 0 and 1. If it is set to be 0 or it is absent, system will print error
message on the screen each time a SOL packet is lost. Otherwise, when the value is 1,
system will silently ignore the error. The default value is 0.
¾
sol_loss_threshold
This parameter specifies how many SOL packets can be lost before SOL is deactivated.
The default value is 0, that is, system will deactivate sol and end the sol session when any
SOL packet is lost.
¾
set_boot_option
Copyright (c) 2004 - OSA Technologies, an Avocent Company. All Rights Reserved.
41
User’s Manual for OSA System Management Bridge
This parameter controls whether the “reboot” command sets the BIOS boot option to
enable console redirection. Possible values are: on, off and auto. The default value is
“auto” when the parameter is absent.
If the value is “on”, the reboot command will always set the BIOS flag to enable BIOS
console redirection after reboot. If the value is “off”, then the reboot command will not
change BIOS settings. If the value is “auto”, the reboot command will check whether
BIOS supports this flag. If it is supported, then the system behaves as if the value is "on",
otherwise behaves as if the value is "off".
¾
retry_count
This parameter defines the number of times the system will retry an IPMI or SOL request
when it does not get a reply from the BMC. The default value is 10.
¾
retry_interval
This parameter defines the time interval between two system retries. The value is in ticks
where each tick is 0.5 second long. The default value is 2, that is, the interval between
two retries is 1 second long.
Copyright (c) 2004 - OSA Technologies, an Avocent Company. All Rights Reserved.
42
User’s Manual for OSA System Management Bridge
Appendix D. Error Messages
In case of a functional failure a non-zero error code is returned as the exit status of the
executable. Additionally an error message will be printed to stderr. The text of the error
message is what appears in the Message column in the table below. Error messages will
always be printed in a parsable format as follows:
Error (<cmd>,<hex-code>):<message>.
Example: Error (Activate,0xA1): Connection timeout.
D.1 OSA Defined COMPLETION CODES
Code
A1h
Classification
Connection
errors.
A2h
Communication
errors.
A3h
A5h
Authorization
errors.
Initialization
errors.
Message
Connection timeout.
Invalid authentication type.
Communication Error.
Data Error.
Description
BMC not responding.
Auth-Type Error
Network stack or serial communication error.
Data packet format error.
Not connected.
Insufficient privilege for
command.
Login not authorized.
Insufficient privilege for
command.
Not connected to a remote server yet.
Insufficient privilege level to execute
command
Invalid BMC username/password.
Valid username/password has insufficient
privilege to login using the current
communication channel.
Request for a session from the local or remote
proxy was rejected. Currently this is either
due to providing invalid OS credentials. In
the future Active Directory integration can
also cause this.
Trying to access the proxy from a forbidden
IP address.
Unknown Language code
Ip resolving error
Length exceeds the limit of telnet input
Authentication failure.
Access denied.
A6h
Syntax errors.
A7h
Parameter value
errors.
Unknown language.
Invalid IP address.
Session buffer limit
exceeded.
Command syntax Error.
Unrecognized command.
Time format is incorrect.
Conflicting option.
Invalid parameter.
Parameter out of range.
Parameter out of range (1255)
Parameter out of range(165535).
Invalid data field.
Invalid index value.
First index larger than the
last.
First index larger than total
sel records.
Unable to parse command.
Unrecognized Command
Time is not correct
Conflicting option (-last & -max).
Invalid Parameter.
Parameter out of range
The value is out of range (1-255).
IPMI Error
0xC6, 0xC7,
0xC8, 0xCA
0xD4
0x86
0xC9
The value is out of range (1-65535).
Invalid data field
Index cannot be zero or negative.
The first index is larger than the last
0xCC
The first index is larger than the total sel
records.
Copyright (c) 2004 - OSA Technologies, an Avocent Company. All Rights Reserved.
43
User’s Manual for OSA System Management Bridge
A8h
A9h
H/W or F/W
errors.
Processing errors
(transient errors
that may
disappear upon
retry of
command).
Unsupported command.
Sensor not present.
Sensor command error.
Firmware error.
Destination error.
Device error.
Unsupported command for
current BMC state
BMC busy.
Destination timeout Error.
BMC out of storage space.
Invalid reservation id.
Duplicate command.
SDR busy.
Device busy.
BMC unavailable.
BMC out of sessions.
AEh
Unexpected
IPMI errors.
AFh
Unknown error
Invalid LUN.
Unspecified error.
Unknown error.
Unsupported Operation .
Request sensor, data, or record not present .
Command illegal for specified sensor or
record type
Command response could not be provided
Cannot deliver request to destination
Device specific (OEM) errors
Request not supported in present BMC state
BMC out of processing resources .
BMC timeout while processing command
BMC out of storage space required to process
command .
Invalid reservation id
Cannot execute duplicated request
Sensor Data Record Repository in update
mode
Device in firmware update mode
BMC initialization in progress
No session slots are available for connection
request.
Invalid Logical Unit Number in request .
Unspecified error .
OSA unknown error
Copyright (c) 2004 - OSA Technologies, an Avocent Company. All Rights Reserved.
0xC1
0xCB
0xCD
0xCE
0xD3
0x01 – 0x7E
0xD5
0xC0
0xC3
0xC4
0xC5
0xCF
0xD0
0xD1
0xD2
0x81, 0x82,
0x83
0xC2
0xFF
44
User’s Manual for OSA System Management Bridge
Index
B
L
BIOS configuration ...................................... 39
BMC ............................................................... 4
BMC configuration....................................... 39
LAN ................................................................4
C
port................................................................41
power ............................................................23
power_off_timeout........................................41
CLI Mode ....................................................... 3
Configure OSA SMBridge ........................... 41
connect ......................................................... 33
console.......................................................... 36
E
Error Messages ............................................. 43
F
FRU ................................................................ 4
G
GUID.............................................................. 4
H
Help Option .................................................. 18
I
identify ......................................................... 21
ip …………………………………………...41
IPMI ............................................................... 4
IPMI Session Option -com ........................... 19
IPMI Session Option -ip............................... 19
P
R
reboot ............................................................37
retry_count ....................................................42
retry_interval.................................................42
S
sel..................................................................24
Server Mode....................................................3
session_timeout.............................................41
set_boot_option.............................................41
SMBridge........................................................4
SOL...........................................................4, 34
sol_loss_silent...............................................41
sol_loss_threshold.........................................41
sysinfo...........................................................22
T
Telnet Clients................................................29
Trouble Shooting ..........................................38
U
User Login ....................................................30
Copyright (c) 2004 - OSA Technologies, an Avocent Company. All Rights Reserved.
45