1
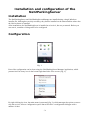
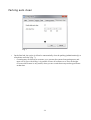
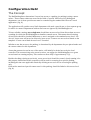
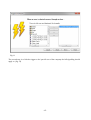
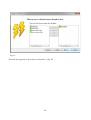
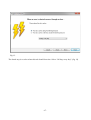
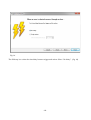
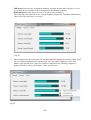
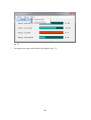
Net2ParkingServer and
Net2ParkingClient
Manual
Version:
Date:
Copyright:
2.11
2015-11-24
CRC Value B.V. 2014
-1-
Table of contents
Installation and configuration of the Net2ParkingServer.....................................................................3
Installation.......................................................................................................................................3
Configuration...................................................................................................................................3
Net2.............................................................................................................................................4
Logging.......................................................................................................................................5
Mail.............................................................................................................................................6
Parking options...........................................................................................................................7
Parking auto clean.......................................................................................................................8
Configuration Net2..........................................................................................................................9
The Concept................................................................................................................................9
Defining companies / groups.....................................................................................................11
Net2Entry..................................................................................................................................12
Switching full lamps......................................................................................................................13
Configuring full lamps..............................................................................................................13
Temporarily lighting a full lamp...........................................................................................14
Permanently lighting a full lamp..........................................................................................26
Reader Configuration.....................................................................................................................30
Installation and usage of the Net2ParkingClient................................................................................31
Installation.....................................................................................................................................31
Usage.............................................................................................................................................31
Command line parameters.............................................................................................................35
Other configuration options...........................................................................................................35
Selective counter display (V2.4 and higher).............................................................................35
Limitations..........................................................................................................................................36
-2-
Installation and configuration of the
Net2ParkingServer
Installation
The Net2ParkingServer and Net2ParkingServerManager are installed using a single Windows
installer file. Although not strictly necessary, they best be installed on the same machine where also
the Net2 software is installed.
After installation, the Net2ParkingServer is installed as a 'service', but not yet started. Before you
can start it, a number of things need to be configured.
Configuration
Fig. 1
Part of the configuration can be done using the 'Net2ParkingServer Manager' application, which
presents itself as a tray icon in the bottom right hand side of the screen. (fig. 1)
Fig. 2
By right clicking the icon, the main menu is presented (fig. 2), which amongst the option to start or
stop the service, offers a configuration option that will lead to a configuration dialogue with a
number of tabs:
-3-
Net2
Fig. 3
•
On the Net2 tab, the connection parameters of the Net2 server can be supplied (fig. 3).
◦ Initially all fields contain a default value. In most cases they will work, but if for
example Net2 was installed on another computer, the 'Host' field should hold the IPaddress (or resolvable network name) of that computer.
◦ The port number rarely needs adjustment. Only if the Net2 server is deliberately
configured to use another port, you are required to change it..
◦ The UserId should reference a Net2 operator with sufficient rights. Typically it is set to
0, which is the 'System Engineer'. You can use our Net2Query tool to query the UsersEx
table of the Net2 database, to obtain the id of a different user/operator.
◦ The password is the password of the selected user/operator. For the 'System Engineer'
this is typically set to 'net2'.
-4-
Logging
Fig. 4
•
The Logging tab, offers the possibility to change the verbosity level of the application log
(fig. 4). For normal usage this is not relevant, but in case of problems, a detailed log is very
important to determine the cause.
◦ Typically, both options can be set to 'ERROR', which will only log normal and fatal
errors.
◦ When taking the application into service however, it is best to set the 'Root level' to
'DEBUG' at first, since that will produce the most detailed log. This log can be displayed
using the 'show log' option in the menu. (see also fig. 2)
◦ The 'Net2 level' log, is only important when you experience communication issues.
Leave this set to 'ERROR' otherwise.
-5-
Mail
Fig. 5
•
The Mail tab offers configuration for emailing (error) reports (fig. 5).
Since a windows service has no user interface, important messages can not be easily
presented to a user. Therefore the emailing feature offers a way to email important messages
to a specific email address.
◦ Check 'use mail' to activate the emailing function.
◦ The fields 'smtp host' and 'smtp port' should reference the smtp-server through which
emails can be sent.
◦ The field 'mail from' should hold the email address of the sender of the emails. You
could use this address, for example, to setup an email 'filter' for these messages and
direct them to a separate folder.
◦ The field 'mail to' should hold the recipient for the email messages. Only one address is
allowed here.
-6-
Parking options
Fig. 6
•
At the Parking options tab, a number of global settings can be configured, which influence
the behaviour of the parking specific part of the application.
◦ The 'Holdoff time' is the time period that should pass, before the same card will be
accepted again. This should prevent counting the same card multiple times at one
passing.
◦ The 'Unregulated users warning' determines if a warning will be given, if there are Net2
users defined, that have an access level that allows them access outside the control of the
parking application (which should not be the case, if you want the counters to be
accurate).
◦ 'The Check interval time' determines how often the application will test the existence of
'Unregulated users'. The value zero means that the test is only done at application startup.
◦ The 'Enable relay 2' option determines if relays 2 of the controller is powered when a
user is not granted access. Typical use for this, is to connect the reader(s) red LED to it.
(also see chapter: 'Reader configuration')
◦ The 'Report possible card abuse' option ensures the sending of a notification email when
someone enters- of leaves- the parking lot multiple times consecutive.
◦ The 'Block entrance on card abuse' option determines the behaviour on consecutive
entrance requests. When selected any consecutive entrance request will be denied.
-7-
Parking auto clean
Fig. 7
•
On the final tab, the option is offered to automatically clear the parking (administratively) at
a fixed time each day. (fig. 7)
◦ Counting may not always be accurate, so to prevent the system from getting more and
more out of sync with reality, it is possible to have all counters set to zero each night.
Of course this feature is only useful, when you are certain that everyone has gone home
at that time.
-8-
Configuration Net2
The Concept
The Net2ParkingServer determines if a user has access to a parking (or parkings), using counter
values. These counter values are stored in the fields of 'special' Net2 users. Per parking and
department, one of those special users must be created using the standard Net2 Access Control
application. (fig. 9)
The application will consider every Net2 department with such a special user, to be a separate group
for which is counted. Departments without such user are ignored by Net2ParkingServer.
To have reliable counting, not a single user should have an access level that allows them access to
a parking for which the Net2ParkingServer handles counted access. This means that all existing
access levels should be checked. Make sure no user is assigned to the standard access level: “No
Access”, these users will never be allowed to have access. Create a new access level based on the
template: “Create a new blank Access Level” if needed.
Whether a user has access to the parking, is determined by the department they are placed under and
the counter values for this department.
A user that presents its card at one of the entries, will initially be denied access by the local
controller. This event arriving at the server however, can trigger the Net2ParkingServer to grant
access based on counting anyway. This can have a short delay of approximately 2 [s].
Besides checking existing access levels, a new access level should be created, clearly naming it for
this purpose, that defines which controllers will be used for counting for a specific parking,
including the time zone applicable. Basically defining an access level for accessing the parking
only.
Each earlier mentioned special counter user for this parking, should be linked to this access level.
(fig. 8)
-9-
Fig. 8
Defining companies / groups
-10-
Fig. 9
Lets take an imaginary situation, in which the companies 'Apple', 'Microsoft', 'Google' and 'IBM'
share a common parking. Apple has 10 parking slots, Microsoft 8, Google 20 and IBM 7.
In Net2, four 'Departments' should be created, one for each company. (fig. 9)
The users for each company, must be placed under their correct 'department'
Per department (company), a special user should be created of which the Surname is a mandatory
field with the contents '_counter'. The first name should contain a description that makes it clear for
which department (company) and parking it is used. This description is used to present the current
occupancy by the Net2ParkingClient application. (fig. 23)
Now connect these (four) special users, to an access level that only has access (in/out) to the
parking, within the proper time zone.
Of the special users, the 'Fax' (4) field defines the total number of slots available to that company.
The 'phone' (3) field defines the number of slots currently occupied. These values can always be
changed manually, but mind that an invalid integer will be interpreted as '0'.
After all steps are taken, the Net2ParkingServer can be started using the Net2ParkingServer
Manager application. (fig. 2)
-11-
Net2Entry
Net2Entry (intercom) is supported up till a certain point (V2.7 and up; only for Net2 V5.x).
Since an intercom panel will send an open command directly to a Net2 controller, it is not possible
to intervene using the SDK, without doing something extra at the hardware level.
The following solutions are possible:
1. Only monitor that access is being provided by the intercom, without controlling it. Counter
values will be adjusted, but it is possible to grant more people access than the maximum
counter value allows.
Access using cards, presented to the Net2Entry panel, function the same way as with card
readers connected to a controller directly. Denying access is still possible when the
maximum count value is reached. It must be noted that, contrary to the LEDS on normal pas
readers, messages shown in the display of the Net2 Entry module, can't be suppressed!
2. Link a 'dummy' Net2Plus controller to a Net2Entry panel and configure Net2 to activate
another controller instead. At an intercom event, the dummy controller will activated
(without effect) by the Net2Entry panel, after which Net2Parking picks up on this event and
activates the right controller when the counter values allow this.
To make this work, the 'dummy' controller needs to get a name in which the ACU address of
the real controller needs to be defined between '#' characters.
For example “Dummy Roldeur #1156774#”.
Also in this case, messages shown in the display of the Net2 Entry module, can't be
suppressed!
Fig. 9a
Common for both solutions, Net2 needs to be configured to hold the relation between the
company/department intercom device and the counter value to increase/decrease.
For this the field “Personnel number” of the special _counter users should hold the Net2Entry
intercom address of the proper company/department.
-12-
Switching full lamps
The Net2ParkingServer offers the possibility to control external devices when reaching the full
state. A typical application for this, is a full lamp at the entrance of a parking.
This functionality requires, depending on the number of lamps, the presence of one or more Paxton
Net2 I/O modules. Per I/O module, a maximum of 4 lamps can be controlled.
A full lamp can signal in several ways. The simplest way is lighting it up for 'x' seconds when
someone tries to gain access to an area that is full.
Another option is to switch a full lamp on and keep it lit until space becomes available again.
The application is designed as such, that it will also signal full lamps when counter values are
manually changed. (e.g. by changing the 'Phone' field value of a particular '_counter' user)
For such manual changes, keep in mind that there is a maximum delay of 10 [s] before seeing the
light state change, after changing a counter value.
Configuring full lamps
The full signal configuration, is done using the Net2 'Triggers and Actions' feature. For each
department/company a separate trigger must be defined.
Below you will find the required steps, to create triggers that activate a full lamp during 'x' seconds
when full.
-13-
Temporarily lighting a full lamp
Fig. 10
A trigger must be defined, that is activated when “When a user is denied access through a door...”
(fig. 10)
-14-
Fig. 11
The second step, is to link the trigger to the 'special' user of the company the full signalling should
apply to. (fig. 11)
-15-
Fig. 12
The third step typically is the selection “Anywhere“. (fig. 12)
-16-
Fig. 13
The fourth step is to select when this rule should be active. Select “All day, every day”. (fig. 13)
-17-
Fig. 14
The fifth step is to select the time delay between trigger and action. Select “No delay”. (fig. 14)
-18-
Fig. 15
The sixth step, is to select the action to perform. Select “Affect relay”. (fig. 15)
-19-
Fig. 16
The seventh step is to define the right module relay and the time to turn it on. (fig. 16)
Note:
If the lamp should stay on while there is no space left, make sure that the option “Turn on for” is
unchecked.
-20-
Fig. 17
The final step is to clearly name the trigger. (fig. 17)
-21-
Permanently lighting a full lamp
If the full lamp should stay on while there is no space for the given company, a set of two 'Triggers
and Actions' must be defined.
The first trigger is identical to temporarily lighting a full lamp, only unchecking the “Turn on for”
option.
The second trigger must take care of switching off the full lamp, when space becomes available
again.
Fig. 18
The first step is to create a trigger that is activated “When a user is granted access through a
door...”. (fig.18)
De second up to the sixth step are identical to the earlier defined trigger;
1. 'Link to special user'. (fig. 11);
2. 'Anywhere'. (fig. 12);
3. 'All day, every day'. (fig. 13);
4. 'No delay'. (fig. 14)
5. 'Affect relay'. (fig. 15).
-22-
Fig 19
In the seventh step, the correct module relay must be set to turn off. (fig. 19)
And the final step is giving it a proper name again..
-23-
Reader Configuration
In a normal configuration, the reader LED's are controlled by the controller. This has the
disadvantage (when using the Net2ParkingServer), that the red LED is always powered after a card
is presented. The decision to grant access is taken by the Net2ParkingServer, of which the controller
is unaware.
Fig. 20
A relatively simple solution for this issue, is to have the Net2ParkingServer take care of controlling
the red LED. In this case, the red LED will only light up, when a user is really denied access
(whatever the reason).
At the controller, the brown (red LED) reader wire should be connected to the 'normally open'
contact of Relays 2 (fig. 20-I and II) and the 'common' of Relay 2 connected to the 0V. (fig. 20-III)
Using the Net2ParkingServer manager application, the option 'Enable Relay 2' should be enabled.
(fig. 6)
Unfortunately the controller has only one extra relay, which means that when an entrance and exit
are combined on one controller, the red LED's of both readers must be switched on at the same
time. (parallel)
-24-
Installation and usage of the
Net2ParkingClient
Installation
The Net2ParkingClient has its own installer program and can be installed on multiple PC's. It's
correct functioning however, depends on the configuration of the Net2ParkingServer.
Usage
Fig. 21
1. At start-up the Net2ParkingClient request the name or IP address of the PC where the Net2
software was installed. (fig. 21)
Fig. 22
2. If connecting is successful, the user is prompted to select an operator and enter a valid
password. In many cases this could be the System Engineer, but that is not required.
The Net2 application allows you to define additional operators and assign them a role. The
role that is assigned, determines part of the Net2ParkingClient functionality that is available
to a user. (fig. 22)
-25-
Full access allows the user to adjust the numbers currently present and let people in or out
by clicking on the occupation bar of the applicable department/company.
Read only access, only allows the user to see the current occupancy.
The following roles have full access: System Engineer, Supervisor, Timesheet administrator.
Other roles have read only or no access.
Fig. 23
3. After authentication has succeeded, the Net2ParkingClient displays the actual counter values
for all configured departments/companies (fig. 23). The names displayed, are the First
names of the 'special' users. (Also see chapters 'Conceptual' and 'Defining companies /
groups) The list is order by 'First name' of the 'special' users.
Fig. 24
-26-
4. Depending on the role of the logged on user, the application offers the possibility to
(fig. 24):
◦ Adjust the number present;
◦ Let someone in. This option is disabled when full;
◦ Let someone out; This option is always available, even after reaching count 0;
Fig. 25
5. If the option to let someone in or out is selected, the application will prompt the user to
select the entrance or exit to use. (fig. 25)
Fig. 26
6. The manual adjustment of the counter values, prompts the user for a new value. The number
allowed, lies between 0 and the maximum value allowed for this company. (fig. 26)
-27-
Fig. 27
7. The application supports both Dutch and English. (fig. 27)
-28-
Command line parameters
Using command line parameters, it is possible to logon and switch to full screen, without user
interaction (V2.2 and higher).
The following options are supported:
/h = net2 server ip or network name,e.g. “localhost”
/u = net2 operator name, e.g. “System engineer” (use quotes if containing whitespace!)
/p = net2 password, e.g. “net2”
/f = full screen
Full call sample:
Net2ParkingClient.exe /h 172.28.240.159 /u "System engineer" /p net2 /f
Other configuration options
Selective counter display (V2.4 and higher)
It is possible to display only some of the counters, by registering the relevant counter id's in the
config file 'Net2ParkingClient.exe.config' using a CSV format. (the default empty value leads to
displaying all counters)
In the sample below, you can see what syntax is required.
<Net2ParkingClient.Properties.Settings>
<setting name="CounterIds" serializeAs="String">
<value>20,21</value>
</setting>
</Net2ParkingClient.Properties.Settings>
To find out the id's of the counters, look in the log file produced by the application. Upon succesful
connection to Net2, the following log lines will be present (this is only a sample):
2014-07-04 13:02:46,382 [Net2ParkingClient.View.MainForm,1] INFO Counter #20: 'Dep1' (Department1)
2014-07-04 13:02:46,382 [Net2ParkingClient.View.MainForm,1] INFO Counter #21: 'Dep2' (Department2)
2014-07-04 13:02:46,382 [Net2ParkingClient.View.MainForm,1] INFO Counter #22: 'Dep3' (Department3)
The number after the # sign is the counter id.
In more recent versions the log is changed and will have to be set to DEBUG in order to obtain the
info. Look for the line with “ DEBUG Counter Lookup Dump” in the section “Full markings:”.
id#'1001': counter=AMC, full=False, inaddr=[2430949], outaddr=[2430891]
The number after the # sign is again the counter id, with the counter name behind 'counter='.
-29-
Limitations
The Net2ParkingServer solution has a few limitations, which are listed below:
•
Since it is a server based solution, the server is required to be operational for anyone to gain
access to a counted area. This opposed to 'normal' access, which is handled completely by a
controller.
•
Since entered pin codes are not relayed to the server as an event, access using pin codes is
not supported.
-30-