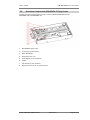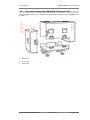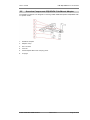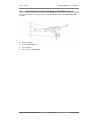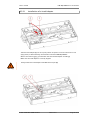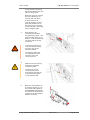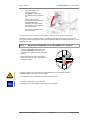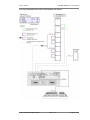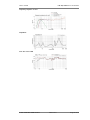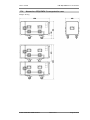
1
K&F SEQUENZA 5 incl. accessories
User's Manual
Important Information,
Please Read Before Use!
KLING & FREITAG GmbH
Junkersstraße 14
D-30179 Hannover
TEL +49 (0) 511 96 99 70
FAX +49 (0) 511 67 37 94
www.kling-freitag.de
Version 4.0
Released: 26.03.2014
User's manual
K&F SEQUENZA 5 incl. accessories
Table of contents
Introduction
1
6
1.1
Symbols in User's Manual
6
1.2
Information about this User's Manual
6
Scope of Delivery
2
7
2.1
Scope of Delivery SEQUENZA 5 W
7
2.2
Scope of Delivery SEQUENZA 5 B
7
2.3
Scope of Delivery SEQUENZA 5 Flying Frame
7
2.4
Scope of Delivery SEQUENZA 5 VariMount Adapter
7
2.5
Scope of Delivery SEQUENZA 5 Downfill Adapter
7
2.6
Scope of Delivery SEQUENZA 5 Transport Case
7
Product Description
3
8
3.1
Overview SEQUENZA 5 W Parts
8
3.2
Overview SEQUENZA 5 B Parts
9
3.3
Overview Components SEQUENZA 5 Flying Frame
10
3.4
Overview Components SEQUENZA 5 Transport Case
11
3.5
Overview Components SEQUENZA 5 VariMount Adapter
12
3.6
Übersicht Bauteile Downfill Adapter SEQUENZA 10 to 5
13
System Requirements for Use
4
4.1
5
14
System Requirements
14
Safety Instructions
14
5.1
Safety Instructions for Flown Setup
15
5.2
Safety Instructions for Stacked Setups
16
5.3
Wind Loading
17
5.4
Preventing hearing damage
19
5.5
Protecting the Speakers / Operating Safety
19
6
Opening the Transport Case
20
7
Using the Spring Bolt
20
8
Safe Connecting and Disconnecting of the Products
21
9
SEQUENZA 5 setup
24
9.1
Setup Variations
24
9.1.1
Setup variations, flown
24
9.1.2
Mounting Variations, Stacked
27
9.1.3
Mounting Variation: Stand
28
9.2
General Preparation
30
9.3
Flown Setup
30
9.3.1
Prerequisites, Flown Setup
30
9.3.2
SEQUENZA 5 Flying Frame Preparation, Flown Setup
30
KLING & FREITAG GMBH © 2014
Version 4.0
Page 3 of 87
User's manual
K&F SEQUENZA 5 incl. accessories
9.3.2.1
Installation of a Load Adapter
31
9.3.2.2
Installing the TV Spigot
33
9.3.3
Mounting SEQUENZA 5 B to SEQUENZA 5 Flying Frame, Flown
35
9.3.4
Mounting SEQUENZA 5 B to SEQUENZA 5 B
35
9.3.5
Mounting SEQUENZA 5 W to SEQUENZA 5 Flying Frame, Flown
36
9.3.6
Mounting SEQUENZA 5 W to SEQUENZA 5 B, Flown
38
9.3.7
Mounting SEQUENZA 5 W to SEQUENZA 5 W, Flown
40
9.3.8
Mounting SEQUENZA 5 W and SEQUENZA 10 with Downfill Adapter
46
9.4
Lifting the Array
48
9.5
Stacked Setup
50
9.5.1
Preparing the Flying Frame
50
9.5.2
Mounting SEQUENZA 5 B to SEQUENZA 5 Flying Frame, Stacked
51
9.5.3
Mounting SEQUENZA 5 W to SEQUENZA 5 Flying Frame, Stacked
53
9.5.4
Mounting SEQUENZA 5 B to SEQUENZA 5 B, Stacked
55
9.5.5
Mounting SEQUENZA 5 W to SEQUENZA 5 B, Stacked
56
9.5.6
Mounting SEQUENZA 5 W to SEQUENZA 5 W, Stacked
57
9.5.7
Mounting SEQUENZA 5 W to SEQUENZA 5 Varimount Adapter
59
Disassembly
10
10.1
10.1.1
10.2
11
62
Flown Disassembly
63
Disassembling an Array
63
Disassambling the Stacked Array
65
Wiring
65
11.1
Cabling a K&F System Rack
65
11.2
Connecting the SEQUENZA 5 Speakers
66
12
Transport and Storage
68
13
Maintenance and Care
68
13.1
Inspection Intervals and Items
68
14
Optional BGV C1 Certification
69
15
Technical Specifications of Loudspeakers
70
15.1
Technical Specifications SEQUENZA 5 W
70
15.2
Technical Specifications SEQUENZA 5 B
71
16
16.1
17
Measuring Diagrams
72
SEQUENZA 5 W diagrams
72
Dimensions speaker
76
17.1
Dimensions SEQUENZA 5 W
76
17.2
Dimensions SEQUENZA 5 B
77
17.3
Dimensions SEQUENZA 5 flying frame
78
17.4
dimensions SEQUENZA 5 transportation case
79
17.5
dimensions SEQUENZA 5 VariMount adapter
80
KLING & FREITAG GMBH © 2014
Version 4.0
Page 4 of 87
User's manual
17.6
K&F SEQUENZA 5 incl. accessories
Dimensions SEQUENZA 5 downfill adapter
Accessories
18
81
82
18.1
General Accessories for SEQUENZA 5
82
18.2
Accessories for SEQUENZA 5 W
83
18.3
Accessories for SEQUENZA 5 B
84
18.4
Acccessories for SEQUENZA 5 Flying Frame
85
Disposal
19
19.1
86
Regulations for Disposal
86
19.1.1
Germany
86
19.1.2
EU, Norway, Iceland, and Liechtenstein
86
19.1.3
All other Countries
86
KLING & FREITAG GMBH © 2014
Version 4.0
Page 5 of 87
User's manual
1.
K&F SEQUENZA 5 incl. accessories
Introduction
Thank you for your decision to buy a KLING & FREITAG product. To guarantee a trouble-free
operating of the equipment and to allow your device to achieve its full potential please read
the operating instructions carefully before use. With the purchase of a SEQUENZA 5, you
have acquired a sound system with the highest possible quality and performance capabilities.
As the owner of a SEQUENZA 5 system, you now have a versatile and highly professional tool
that will satisfy the full range of highest demands on sound quality.
1.1
Symbols in User's Manual
This symbol indicates the possibility of life-threatening danger and a health risk for persons.
Not following these instructions may result in serious health problems including potentially
fatal injuries.
Warning
This symbol indicates a possibly dangerous situation. Not following these instructions may
cause minor injuries or cause property damage.
Caution
This symbol gives instructions for the proper use of the described products. Not following
these instructions may cause malfunctions or property damage.
This symbol indicates notes that help you to handle the described products easier.
Tip
1.2
Information about this User's Manual
User's manual SEQUENZA 5 W and SEQUENZA 5 B in combination with the SEQUENZA 5
flying frame and accessories.
© KLING & FREITAG GMBH, all rights reserved.
All specifications in this manual are based on information available at the time of publishing
for the features and safety guidelines of the described products.
Technical specifications, measurements, weights and properties are not guaranteed.
The manufacturer reserves the right to make product alterations within legal provisions as
well as changes to improve product quality.
All persons who use the speaker system must have this guide and all further information for
safe operations available to them during assembly, disassembly, and use. The speaker system
may neither be set up nor used until this manual has been read, understood and kept readily
available on site.
When re-selling the SEQUENZA 5 system, the seller must hand this manual over to the buyer.
The buyer must consult the Kling & Freitag website to find out if an updated version of this
manual is available. He is obligated to use the most current version of the manual in the
future.
We appreciate any input with suggestions and improvements for this manual. Please send this
to us at the following address:
[email protected] or to:
KLING & FREITAG GMBH Junkersstr.14 D-30179 Hannover.
Phone +49 (0) 511 - 96 99 70, Fax +49 (0) 511 - 67 37 94
KLING & FREITAG GMBH © 2014
Version 4.0
Page 6 of 87
User's manual
2.
2.1
K&F SEQUENZA 5 incl. accessories
Scope of Delivery
Scope of Delivery SEQUENZA 5 W
•
Full-range speaker system with integrated 'Snap&Fly+' rigging system incl. ball lock pin
(usable with SEQUENZA 5 flying frame only)
•
User's Manual (1x)
The calculation software CON:SEQUENZA+ is necessary to operate the system. Please
download the most current version from our website http://www.kling-freitag.biz/.
2.2
Scope of Delivery SEQUENZA 5 B
•
Subwoofer with integrated 'Snap&Fly+' rigging system incl. ball lock pin (usable with
SEQUENZA 5 flying frame only)
•
User's Manual (1x)
The calculation software CON:SEQUENZA+ is necessary to operate the system. Please
download the most current version from our website http://www.kling-freitag.biz/.
2.3
Scope of Delivery SEQUENZA 5 Flying Frame
•
Flying frame for flying and stacking speakers SEQUENZA 5 W and SEQUENZA 5 B, incl.
ball lock pin.
•
1 x 3.25t shackle (for optional safety chain)
•
2 x load adapter
•
1 x TV spigot
•
1 x flying frame connector
2.4
Scope of Delivery SEQUENZA 5 VariMount Adapter
•
VariMount adapter for using max. three SEQUENZA 5 W speakers on a speaker stand
and for flying with a TV spigot.
•
TV spigot
•
Pole mount socket
2.5
•
2.6
•
Scope of Delivery SEQUENZA 5 Downfill Adapter
Downfill adapter for mounting up to three SEQUENZA 5 W speakers under flown
SEQUENZA 10 speakers.
Scope of Delivery SEQUENZA 5 Transport Case
Transport case for three SEQUENZA 5 W speakers
KLING & FREITAG GMBH © 2014
Version 4.0
Page 7 of 87
User's manual
3.
K&F SEQUENZA 5 incl. accessories
Product Description
3.1
Overview SEQUENZA 5 W Parts
1.
speaker enclosure
2.
handle
3.
Rear connecting plates (with park position connector)
4.
Quick Release Pin
5.
spring bolt
6.
Joint bar (with bolt)
7.
Safety latch 'Safelock'
8.
Joint bar
9.
Connector
KLING & FREITAG GMBH © 2014
Version 4.0
Page 8 of 87
User's manual
3.2
K&F SEQUENZA 5 incl. accessories
Overview SEQUENZA 5 B Parts
1.
Housing
2.
connector brackets
3.
Quick Release Pin
4.
Joint bar (with bolt)
5.
L connector
6.
Safety latch 'Safelock'
7.
Joint bar
8.
Transport cover
KLING & FREITAG GMBH © 2014
Version 4.0
Page 9 of 87
User's manual
3.3
K&F SEQUENZA 5 incl. accessories
Overview Components SEQUENZA 5 Flying Frame
This flying frame was designed for flying or stacking KLING & FREITAG speakers
SEQUENZA 5 W and SEQUENZA 5 B.
1.
SEQUENZA 5 flying frame
2.
TV spigot (in park position)
3.
Quick Release Pin
4.
Heavy duty foot, rear
5.
Load adapter (in park position)
6.
handle
7.
3.5t shackle (in park position)
8.
Flying frame connector (in park position)
KLING & FREITAG GMBH © 2014
Version 4.0
Page 10 of 87
User's manual
3.4
K&F SEQUENZA 5 incl. accessories
Overview Components SEQUENZA 5 Transport Case
The SEQUENZA 5 transport case was specially designed for transporting three SEQUENZA 5 W
speakers.
1.
Case cover
2.
Front cover
3.
Castor base
KLING & FREITAG GMBH © 2014
Version 4.0
Page 11 of 87
User's manual
3.5
K&F SEQUENZA 5 incl. accessories
Overview Components SEQUENZA 5 VariMount Adapter
The VariMount adapter was designed for stacking KLING & FREITAG speakers SEQUENZA 5 W
on speaker stands.
1.
VariMount adapter
2.
Adapter clamp
3.
Vari connector
4.
Joint bar
5.
'Stand adapter M10' with clamping screw
6.
TV spigot
KLING & FREITAG GMBH © 2014
Version 4.0
Page 12 of 87
User's manual
3.6
K&F SEQUENZA 5 incl. accessories
Übersicht Bauteile Downfill Adapter SEQUENZA 10 to 5
This downfill adapter was designed for combining SEQUENZA 5 W with SEQUENZA 10 N/W
speakers.
1.
Downfill adapter
2.
Joint bar SEQUENZA 10
3.
Joint bar SEQ 5
4.
Rear connector SEQUENZA 5
KLING & FREITAG GMBH © 2014
Version 4.0
Page 13 of 87
User's manual
4.
4.1
K&F SEQUENZA 5 incl. accessories
System Requirements for Use
System Requirements
K&F TOPAS system amplifier:
or
K&F CD 44 Digital System Controller:
LAB.GRUPPEN FP 10000Q:
These components are referred to as 'K&F SystemRack'.
Optional:
Connector Panel CP 4:
5.
Safety Instructions
The information described here does not relieve the user of the duty to follow the given
safety requirements and legal regulations.
Warning
The technicians responsible for assembling the flying frame on site are responsible for the
safe setup and use and guarantee this.
To prevent damage to persons and property, you must set up or suspend the array in
compliance with the specifications of the German safety regulation BGV C1 or comparable
applicable national standards.
Der Flugrahmen darf ausschließlich für den professionellen Einsatz und nur zum Aufhängen,
bzw. Aufstellen von KLING & FREITAG Lautsprechern der Typen SEQUENZA 5 W und
SEQUENZA 5 B sowie in der hier beschriebenen Art und Weise verwendet werden.
It is only permissible to set up a configuration after the simulation software CON:SEQUENZA+
has indicated in the window 'Object properties' that this configuration is approved for use in
the desired application.
KLING & FREITAG GMBH © 2014
Version 4.0
Page 14 of 87
User's manual
K&F SEQUENZA 5 incl. accessories
You must observe and comply with the simulation software's safety instructions.
When laying out the connecting cables, make sure that nobody can trip.
If not otherwise stated in this manual, only original KLING & FREITAG parts may be used for
mounting the speakers. The use of other parts - in particular parts by other manufacturers - is
not permitted.
For mobile and fixed installations, use only assembly equipment from KLING & FREITAG.
As a basic principle, you must visually inspect all components of the array before every use.
For fixed installations, you must inspect all components of the flying system for signs of wear
at regular intervals. The visual inspection includes checking the components of the speakers,
the flying frame, the load-bearing parts (cross beams, ceiling constructions, etc.) and their
bolted connections. Bei den Prüfungen an den Komponenten des Flugsystems ist besonders
auf Verformungen, Risse, Beschädigungen an Bolzen und Korrosion an allen Produkten
zu achten sowie die Funktionsfähigkeit der Kugelsperrbolzen und die Funktionsfähigkeit
der Federbolzen zu überprüfen. Mounting devices such as shackles, chains and wire ropes
also have to be checked for signs of wear or deformation carefully. If there are signs of
wear, cracks, or deformation, etc. then you must replace the parts immediately. For further
instructions, refer to chapter 'Maintenance and Care' on page 68.
5.1
Safety Instructions for Flown Setup
Falling speakers pose the threat of fatal injuries to people near them!
If you have even the slightest reason to doubt the safety of the flying system, then you may
not use it under any circumstance.
Warning
Only trained event technicians may suspend the SEQUENZA 5 system.
Never suspend the speakers without the appropriate flying frame.
The maximum working load limit (WLL) of the flying frame depends on the selected setup.
This specification includes cabling and additional fittings. The provided simulation software
'CON:SEQUENZA+' must be used to determine if the frame is loaded permissibly. The
simulation software CON:SEQUENZA+ does not take the weight of cabling and additional
fittings into consideration! When following the specifications of the CON:SEQUENZA+
simulation software, consider this additional weight and reduce the number of speakers
accordingly.
If the simulation software CON:SEQUENZA+ does not confirm the compliance with DIN 18
800, the array may not be assembled in the simulated setup.
If the simulation software CON:SEQUENZA+ does not confirm the compliance with BGV C1,
no one may be situated in this area between the assembly and disassembly – not even those
involved in assembly and disassembly. You must effectively block off this area and secure it
from trespassing.
Ensure that all connections are secured against coming loose and that only authorized,
statically tested and correctly sized supports, mounting equipment, wire ropes and chains
are used. Follow the relevant specified safety factors. Be sure to follow the relevant national
specifications, norms, and safety regulations.
Note that every suspension point as well as the supporting structure of the building (i.e.
ceiling points, cross beams and stage or PA tower, etc.) must be capable of carrying the total
load of the system (including cabling and additional fittings).
Note that the suspension points on the hall ceiling (i.e. shackles, suspension points, or chain
points) must comply with the accident prevention regulation BGV C1 (Event and Production
Sites for Stage Presentations) or comparable applicable national standards, and the total load
must be approved by an authorised expert. If in doubt, have it checked by local authorities.
Also, follow the operating and safety instructions for the product from which you will
suspend the flying frame (i.e. truss). If there is no information regarding the safe use and the
working load limit, you may not fly the flying frame from it.
KLING & FREITAG GMBH © 2014
Version 4.0
Page 15 of 87
User's manual
K&F SEQUENZA 5 incl. accessories
Every chain and every motor must be capable of carrying the total load of the array on its
own, even with two-strand rigging. Check to make sure that the chains of the hoist motors
are hanging straight down and are not twisted and that the hoist motors are in the intended
positions.
When operating with chain hoists that do not comply with the BGV C1 or the D8+, no one
may be present in the danger zone underneath or near the speaker array.
If a BGV (government safety organisation) C1 or a D8+ motor is used, the SEQUENZA 5 system
is intrinsically safe and does not require any secondary securing. If the SEQUENZA 5 system
is, however, to be hung on another motor, then secondary securing is necessary. This can be
attached to the 3.5t shackles and must be implemented with zero drop height. Instructions
for the correct use of secondary securing with zero drop height are in the standard VPLT
(Assoc. of Media and Event Technology) SR 2.0 "Preparation & use of electric chain hoists".
Never use signal cables or power cords for suspending, aligning or securing the systems.
When laying out the connecting cables, make sure that nobody can trip.
Make sure you have enough free working space on site to assemble and suspend the array.
The array can swing out while being lifted!
Only personnel directly involved with assembly or disassembly may be in the working area.
Every time before the responsible technician raises or lowers the flying frame, he must
unmistakably signal this to all people. All persons must then move outside of the pivoting
and lifting range.
The flying frame may not be used to lift and secure people or objects other than the abovementioned speaker systems.
The array may not be used as a climbing aid.
The safe use of the flying frame and the speakers also depends on the various factors present
at the area of use. Weather conditions such as wind or rain, for example, can compromise
the safety of the flying frame and speakers. Always consider and evaluate these factors. (See
chapter 'Wind Loading' on page 17.)
5.2
Safety Instructions for Stacked Setups
Falling speakers pose the threat of injuries to people near them!
Be sure to follow the relevant national specifications, norms, and safety regulations.
Warning
Always make sure that a sufficient safety level is still given, even when outside forces have
an additional impact on the stacked speakers. Before setup, carefully ascertain if there are
any possible outside forces that could result in the array falling over. (Slant of the ground /
the bearing capacity of the ground / wind / person or vehicle impact, etc.). A technical expert
who is responsible for the setup must evaluate and determine necessary measures (including
calculating the statics). If necessary, obtain expert proof of stability.
For the stability inspection, you must always factor in an imperfection (tilt) of +/-15° and
destabilising loads. A planned tilt of the flying frame ist not permissible. In calculations, the
tilted setup serves the purpose of levelling out unevenness.
With the set-up systems for which you cannot verify the structural safety without safeguards,
you must secure them to prevent sliding or tipping in order to provide proof of this safety. To
secure the system from tipping over, use water tanks or floor bolts. Other possible measures
include strapping it to a suitable substructure or tying it using safety straps. The simulation in
the CON:SEQUENZA+ software is not valid as a verification of structural safety. This software
always states that you must secure stacked speakers to prevent their falling over.
For outdoor and trade fair venues in which wind loads must be considered, additional proof
of stability is necessary.
Maximum number of stacked speakers
KLING & FREITAG GMBH © 2014
Version 4.0
Page 16 of 87
User's manual
K&F SEQUENZA 5 incl. accessories
The number of speakers (max. 7) depends on the tilting angle and must be verified by
the simulation software CON:SEQUENZA+. This shows if the structural stability is attained
with the optional outriggers or if the system has to be separately secured (i.e. with straps,
weights, etc.) The simulation software CON:SEQUENZA+ shows if safe operation with the
outriggers is guaranteed. The setup configuration with the outriggers must be secured. But
even with additional securing, no more than seven speakers may be stacked.
5.3
Wind Loading
For open air events, obtain current local wind and weather data. The following chart
provides a preliminary indication
Bft
m/s
Windspeed
Description
0
0-0.2
Calm
Smoke rises
vertically
1
0.3-1.5
Light air
Smoke drift
indicates wind
direction, vanes
do not move
2
1.6-3.3
Light
Wind felt on face,
vanes begin to
move
3
3.4-5.4
Gentle
Leaves, small
twigs in constant
motion, light flags
extended
4
5.5-7.9
Moderate
Dust, leaves, and
loose paper raised
up, small branches
move
5
8.0-10.7
Fresh
Small trees in leaf
begin to sway,
whitecaps on lakes
visible
6
10.8-13.8
Strong
Larger branches
of trees in motion;
whistling heard in
wires
7
13.9-17.1
Near gale
Whole trees in
motion; resistance
felt in walking
against wind
8
17.2-20.7
Gale
Twigs and small
branches broken
off trees
For outdoor uses, we recommend using at least a BGV D8+ hoisting device to avoid wind
causing the release of the secondary safety device.
Warning
If wind speeds higher than Beaufort 5 are expected, you must constantly consider the wind
speed and its possible influence on the array as well as the fact that the wind speed increases
the higher the array is.
KLING & FREITAG GMBH © 2014
Version 4.0
Page 17 of 87
User's manual
K&F SEQUENZA 5 incl. accessories
With expected wind speeds exceeding Beaufort 5, construct the rigging and safety points so
that they can carry at least twice the static load.
With wind speeds exceeding Beaufort 6 (14 m/sec.), arrays are not recommended.
As of a wind speed of Beaufort 6, you must clear the area under the speakers. Effectively
prevent the arrays from swaying in the wind by tying them off or using a lateral fixation.
If the suspended load sways, it can create significant inertial force that can result in the PA
tower structurally collapsing or tipping.
With wind speeds of Beaufort 8 or more, you must lower and disassemble the array.
KLING & FREITAG GMBH © 2014
Version 4.0
Page 18 of 87
User's manual
5.4
K&F SEQUENZA 5 incl. accessories
Preventing hearing damage
Avoid beeing too close to operating speakers. This equipment is capable of delivering sound
pressure levels in excess of 90 dB SPL, which may cause permanent hearing damage.
Caution
5.5
Protecting the Speakers / Operating Safety
SEQUENZA 5 speakers may only be used in combination with a K&F SystemRack.
In general, audio signals must not be overdriven. This may be caused by mixing consoles,
equalizers, effect equipment, etc. and should be indicated on this equipment. When a power
amplifier is overloaded at the output (clipping), then the amplifier activates a clipping
warning signal. In any case, the signal must be reduced as soon as it sounds unnaturally
distorted.
For damage caused by
•
overloading the speakers
•
using the speakers without K&F SystemRack
we do not assume warranty and excludes liability for possible consequential damage.
The following signals may damage the speakers:
•
permanent high-level signals with high frequency and continuous noise from feedback.
•
permanently distorted high-level signals.
•
noises, which occur when the amplifier is on while equipment is being connected,
disconnected or switched on.
Do not install devices in any of the following places:
•
where the devices are permanently exposed to direct sunlight.
•
where the devices are exposed to high moisture or rain.
•
where the devices are exposed to strong vibrations and dust.
Damage caused by the speakers' magnetic fields
Speakers are permanently surrounded by a magnetic field, even when they are not
connected. Therefore, during transport and placement of the speakers, it is important to
ensure that there is always approx. 1 m between the speakers and magnetic data media and
computer/video monitors.
KLING & FREITAG GMBH © 2014
Version 4.0
Page 19 of 87
User's manual
6.
K&F SEQUENZA 5 incl. accessories
Opening the Transport Case
In the SEQUENZA 5 transport case three SEQUENZA 5 W speakers are safely packed. When
dismantling the speakers, you can leave them connected in any given tilt angle. You need
not remove or loosen the rear connectors. This makes them easier to dismount and faster to
disassemble.
To remove the transport lid, turn the
appropriate catches 180° to completely
release the latch.
Once you have released catches, you can
lift off the lid.
To remove the front lid, you must open
two catches.
To remove the main lid, you must also
open the four bottom catches.
You close the case by following these steps in reverse order.
7.
Using the Spring Bolt
The spring bolt is the central bolt of the 'Snap&Fly+' rigging system.
It can be set to four positions that you have either set manually or that have come about
because of the handling of the speakers.
Initial position:
The spring bolt is under tension. You can
mount a standard connector.
KLING & FREITAG GMBH © 2014
Version 4.0
Page 20 of 87
User's manual
K&F SEQUENZA 5 incl. accessories
Waiting position:
In this position, the spring bolt is
connected to a standard connector (not
shown) and is 'waiting' for the speaker to
move, snapping into its locking position.
Locking position:
In this safe position, the spring bolt is
holding a connector.
On the opposite side, the spring bolt
protrudes.
Release position:
The spring bolt can only be manually
moved to this position.
To release a connector from the spring
bolt, the user must pull the spring bolt as
far as it will go and hold onto it.
8.
Safe Connecting and Disconnecting of the Products
To safely connect or disconnect the products, you always need the same hand grips. In
general, the joints must always be connected and the appropriate speaker connector must
be used and attached to the other speaker, flying frame, or adapter. To prevent inadvertent
loosening, you must always ensure that the safety latch snaps over each joint. When you have
mounted everything correctly, a red dot is visible on the safety latch.
For disassembly, release the connector first and then fasten it in its parking position. After
doing so, you must then push the safety latch into the enclosure using one hand, then release
the product to be dismantled to the side and then completely release it.
The safety latch is always on the speaker.
Tip
In general, all SEQUENZA 5 speakers can be safely connected to one another and with the
SEQUENZA 5 adapters this way.
KLING & FREITAG GMBH © 2014
Version 4.0
Page 21 of 87
User's manual
1.
Place the speaker, flying
frame or adapter onto a
standing speaker so that the
joint bars are next to one
another.
2.
Ensure that the safety latch
of the standing speaker is
pushed into the enclosure
by the joint bars of the
adjoining device.
3.
Push the speaker to the side
to allow the joint bars to
connect properly and ensure
that the safety latch of the
joint snaps into place.
4.
The safety latch makes a
clearly audible clicking noise
when snapping into place.
K&F SEQUENZA 5 incl. accessories
Make sure that the joint
bolts in both joints are
properly connected in the
joint bar.
Warning
Make sure the red dot is
visible on the safety latch,
indicating a properly
locked joint.
KLING & FREITAG GMBH © 2014
Version 4.0
Page 22 of 87
User's manual
K&F SEQUENZA 5 incl. accessories
In general, all SEQUENZA 5 speakers and SEQUENZA 5 adapters can be safely disconnected
this way.
To avoid injury, it is forbidden to separate speakers from one another while they are still
suspended or strapped.
Take the load off the speakers' connecting points by laying the array onto the castor base of
the transport case or by vertically lowering three speakers at a time into transport cases, thus
lessening the load.
Warning
1.
Loosen the connector on the
spring bolt.
Do this by pulling the spring
bolt out and holding it
in this retracted position
(release position, compare
to 'Handling the spring bolt',
page 20).
Pull the connector out
and fold it between the
connecting plates.
When all connections have
been released, fasten the
connecter with the speaker's
own spring bolt.
You should completely
disassemble the flying
frame connector and
fasten it in its parking
position on the rigging
frame.
Tip
You should now mount
the SEQUENZA 5 W
connectors that you
parked on the rigging
frame during setup back
onto the speaker.
2.
Using both hands, grasp
to the right and left of the
connecting joints and push
the safety latch into the
speaker using one finger.
KLING & FREITAG GMBH © 2014
Version 4.0
Page 23 of 87
User's manual
3.
To separate the joints, push
the speaker to the side.
4.
Slide the speakers apart.
9.
K&F SEQUENZA 5 incl. accessories
SEQUENZA 5 setup
9.1
Setup Variations
You can choose between the setup variations
•
flown setup, SEQUENZA 5 W only
•
stacked setup, SEQUENZA 5 W only SEQUENZA 5 B
•
flown setup, SEQUENZA 5 W under SEQUENZA 10 N/W
•
flown setup, SEQUENZA 5 B only
•
stacked setup, SEQUENZA 5 W with SEQUENZA 5 B
•
stacked setup, SEQUENZA 5 W with SEQUENZA 5 B, without flying frame
•
Setup on a stand, SEQUENZA 5 W only
9.1.1
Warning
Setup variations, flown
If a BGV (government safety organisation) C1 or a D8+ motor is used, the SEQUENZA 5 system
is intrinsically safe and does not require any secondary securing. If the SEQUENZA 5 system
is, however, to be hung on another motor, then secondary securing is necessary. This can be
attached to the 3.5t shackles and must be implemented with zero drop height. Instructions
for the correct use of secondary securing with zero drop height are in the standard VPLT
(Assoc. of Media and Event Technology) SR 2.0 "Preparation & use of electric chain hoists".
Ensure that nobody can step below the suspended systems.
To remove a SEQUENZA 5 B lid, the array must be standing on the ground.
KLING & FREITAG GMBH © 2014
Version 4.0
Page 24 of 87
User's manual
K&F SEQUENZA 5 incl. accessories
The simulation software CON:SEQUENZA+ must always verify the number of speakers.
It is generally prohibited to exceed the maximum number of 15 speakers.
Caution
To prevent damage to persons and property, you must set up or suspend the array in
compliance with the specifications of the German safety regulation BGV C1 or comparable
applicable national standards.
Always assemble the complete rigging frame first before connecting the rigging frame to the
speakers.
During setup, always make sure to use the correct connectors. When connecting the
SEQUENZA 5 flying frame with a SEQUENZA 5 W speaker, you must always use the flying
frame connector.
Using a wrong connector or incorrectly installing a connector can result in certain tilt angles
being impossible or the array tipping because of a shifted centre of gravity. This would
lead to unfavourable acoustic results. For this reason, always follow the depictions and
descriptions mentioned in this manual.
The following illustrations show you the possible setup variations with the corresponding
chapters in which the working steps for the setup are explained.
see following chapter:
•
General Preparation
KLING & FREITAG GMBH © 2014
•
SEQUENZA 5 Flying Frame
Preparation, Flown Setup
•
Mounting SEQUENZA 5 W to
SEQUENZA 5 Flying Frame, page
36
•
Mounting SEQUENZA 5 W to
SEQUENZA 5 W, Flown, page 40
Version 4.0
Page 25 of 87
User's manual
K&F SEQUENZA 5 incl. accessories
see following chapter:
•
General Preparation
•
Preparing SEQUENZA 5 Flying
Frame, Flown, page 30
•
Mounting SEQUENZA 5 B to Flying
Frame, page 35
•
Mounting SEQUENZA 5 W to
SEQUENZA 5 B, Flown, page 38
•
Mounting SEQUENZA 5 W to
SEQUENZA 5 W, Flown, page 40
see following chapter:
•
When setting up Sequenza 10
speakers, please consult the
appropriate manual.
KLING & FREITAG GMBH © 2014
•
Mounting the downfill adapter
under the Sequenza 10, page 46
•
Hanging the SEQUENZA 5 W under
the downfill adapter
•
Mounting SEQUENZA 5 W to
SEQUENZA 5 W, Flown, page 40
Version 4.0
Page 26 of 87
User's manual
9.1.2
K&F SEQUENZA 5 incl. accessories
Mounting Variations, Stacked
No matter which setup you use, you must always secure the array to prevent tipping and
falling. To ensure safety, you can either use the lying flying frame with the optional accessory
'outrigger' or secure the array – with or without the flying frame – with suitable anchoring
such as lashing straps.
Warning
We recommend using the optional accessory 'outrigger' that you can purchase from your
K&F dealer. They are easy to mount and reliably secure the standing array to prevent falling.
The simulation software CON:SEQUENZA+ must always verify the number of stacked speakers
(max. 7). It is generally prohibited to exceed the maximum number of 7 stacked speakers.
Before setup, make sure there is a stable and even surface.
The following illustrations show you the possible setup variations with the corresponding
chapters in which the working steps for the setup are explained.
see following chapter:
•
General Preparation
•
Preparing SEQUENZA 5 Flying
Frame, Flown, page 36
•
Mounting SEQUENZA 5 W to
SEQUENZA 5 Flying Frame, Stacked,
page 53
•
Mounting SEQUENZA 5 W to
SEQUENZA 5 W, Flown, page 36
see following chapter:
•
General Preparation
KLING & FREITAG GMBH © 2014
•
Preparing SEQUENZA 5 Flying
Frame, Flown, page 36
•
Mounting SEQUENZA 5 B to Flying
Frame, page 30
•
Mounting SEQUENZA 5 W to
SEQUENZA 5 B, Flown
•
Mounting SEQUENZA 5 W to
SEQUENZA 5 W, Page 57
Version 4.0
Page 27 of 87
User's manual
K&F SEQUENZA 5 incl. accessories
see following chapter:
•
General Preparation
•
Mounting SEQUENZA 5 W to
SEQUENZA 5 B, Flown
•
Mounting SEQUENZA 5 W to
SEQUENZA 5 W, Flown
A flying frame under a SEQUENZA 5 B
speaker is not absolutely necessary. It is,
however, very helpful when aligning the
speakers on an uneven surface.
The structural stability must always be
ensured!
9.1.3
Mounting Variation: Stand
You may only mount a maximum of three speakers on a stand.
It is forbidden to mount a SEQUENZA 5 B speaker on a stand.
Warning
Before setup, make sure that there is a stable and even surface and the stand has a sufficient
load capacity.
The following illustrations show you the possible setup variations with the corresponding
chapters in which the working steps for the setup are explained.
Because the centre of gravity must always be directly above the stand, you must always check
the speaker configuration with the simulation software CON:SEQUENZA+.
KLING & FREITAG GMBH © 2014
Version 4.0
Page 28 of 87
User's manual
K&F SEQUENZA 5 incl. accessories
see following chapter:
•
General Preparation
•
Preparing the SEQUENZA 5
VariMount adapter and the speaker
stand, page 59
•
Mounting SEQUENZA 5 W to
SEQUENZA 5 Flying Frame, Stacked,
page 53
•
Mounting SEQUENZA 5 W to
SEQUENZA 5 W, Stacked, page
57
S
KLING & FREITAG GMBH © 2014
Version 4.0
Page 29 of 87
User's manual
9.2
K&F SEQUENZA 5 incl. accessories
General Preparation
See the instructions in chapter 'Safety Instructions' from page 14 and in the corresponding
sub-section 'Safety Instructions for Flown Setup' from page 15.
Control the secure fit of every ball lock pin during setup.
Warning
Simulate the desired configuration with the simulation software CON:SEQUENZA+ and
determine the necessary tilt angle of every speaker. On the rear joint plate of the speakers,
there are drill holes with the corresponding angles marked.
Print out the results of the simulation so that you can check the settings at any given time
and so you have a documentation of the settings.
Tip
Before setup, adjust the tilt angle of every speaker.
9.3
9.3.1
Flown Setup
Prerequisites, Flown Setup
See the instructions in chapter 'Safety Instructions' from page 14 and in the corresponding
sub-section 'Safety Instructions for Flown Setup' from page 15.
Control the secure fit of every ball lock pin during setup.
Warning
Preparation: You should have simulated the desired speaker configuration with the provided
software CON:SEQUENZA+ and printed out the results. You can only be certain that the
configuration is not overloaded if you have done the simulation. Aside from this, the
software provides information about the tilt angles of the individual speakers.
You should have set the necessary tilt angle on every speaker.
9.3.2
Warning
SEQUENZA 5 Flying Frame Preparation, Flown Setup
If a BGV (government safety organisation) C1 or a D8+ motor is used, the SEQUENZA 5 system
is intrinsically safe and does not require any secondary securing. If the SEQUENZA 5 system
is, however, to be hung on another motor, then secondary securing is necessary. This can be
attached to the 3.5t shackles and must be implemented with zero drop height. Instructions
for the correct use of secondary securing with zero drop height are in the standard VPLT
(Assoc. of Media and Event Technology) SR 2.0 "Preparation & use of electric chain hoists".
Before speaker setup, you must prepare the SEQUENZA 5 flying frame completely.
You can calculate one- and two-strand riggings with the simulation software CON:SEQUENZA
+. For one-strand rigging, use one load adapter; for two-strand rigging, use two load
adapters.
The drill holes on the flying frame where the load adapters are to be attached are
determined by the simulation software CON:SEQUENZA. CON:SEQUENZA+You will find the
specifications on the relevant calculation printouts. The specification of the drill hole in the
simulation software refers to the drill hole in the load adapter that is facing the front side of
the frame. The front side of the frame is marked with a sticker (Front).
With the required second ball lock pin, the connection in the next drill hole is secured.
The drill holes in the flying frame are numbered consecutively from 1 to 22, beginning on the
front end of the frame (Front). For your orientation, the drill holes 1 to 5 and 11 to 15 are
labelled.
KLING & FREITAG GMBH © 2014
Version 4.0
Page 30 of 87
User's manual
K&F SEQUENZA 5 incl. accessories
You can set the position of the load adapters in 1/2-steps because they are usable on both
sides. In doing so, the number of drill holes in the flying frame and, thus, the adjustment
possibilities, is doubled. The load adapters are labelled with '1/1 Grid' on the one side and
'1/2 Grid' on the other. The simulation software CON:SEQUENZA+ gives you the information
whether a load adapter should be mounted in the 1/1 or the 1/2 position. In the 1/1 position
(A), the arrow on the 1/1 side of the load adapter must point toward the front side of the
flying frame (Front). In the 1/2 position (B), the arrow on the 1/2 side of the load adapter
must point toward the front side of the flying frame (Front).
A = Load adapter 1/1 grid position
B = Load adapter 1/2 grid position
Tip for unused equipment
Tip
There is a parking position provided for every piece of equipment, such as a connector or a
ball lock pin. Always leave the equipment in the provided park position or fasten unneeded
equipment back into the provided park position. This ensures that all pieces are always
available.
Instructions about using the load adapter or the TV spigot
Always use the simulation software CON:SEQUENZA+ to calculate the correct position of
load adapters or TV spigots. In this calculated position, the array is guaranteed to fly at the
desired angle later, and the sound will be emitted correctly.
KLING & FREITAG GMBH © 2014
Version 4.0
Page 31 of 87
User's manual
9.3.2.1
K&F SEQUENZA 5 incl. accessories
Installation of a Load Adapter
Take the load adapter (1) out of its park position and place it onto the drill hole on the
flying frame, as determined by the simulation software CON:SEQUENZA+.
With a two-strand rigging, proceed with the second load adapter accordingly.
Make sure the load adapter is correctly aligned.
Always fasten the load adapter with two ball lock pins (2).
Warning
KLING & FREITAG GMBH © 2014
Version 4.0
Page 32 of 87
User's manual
K&F SEQUENZA 5 incl. accessories
Make sure the load adapters (1) and the two ball lock pins (2) are secured in place.
9.3.2.2
Installing the TV Spigot
Remove the TV spigot (1) from its park position and place it on the drill hole on the
flying frame, as determined by the simulation software CON:SEQUENZA+.
To do so, select a one-stranded suspension in the software.
Always fasten the TV spigot with two ball lock pins.
Keep in mind the safe maximum load for the TV spigot is limited to 116 kg (BGV C1 /
Factor of Safety 10:1). (e.g. 6 SEQUENZA 5-tops)
Warning
KLING & FREITAG GMBH © 2014
Version 4.0
Page 33 of 87
User's manual
K&F SEQUENZA 5 incl. accessories
Check the TV spigot (1) and the two ball lock pins (2) to make sure they are secured in
place.
KLING & FREITAG GMBH © 2014
Version 4.0
Page 34 of 87
User's manual
9.3.3
K&F SEQUENZA 5 incl. accessories
Mounting SEQUENZA 5 B to SEQUENZA 5 Flying Frame,
Flown
1.
Prepare the flying frame for flying mode. (see chap. 'Preparing the Sequenza 5
Flying Frame' on page 30)
2.
Connect the SEQUENZA 5
flying frame with the
SEQUENZA 5 B speaker
as explained in chapter
'Safe Connecting and
Disconnecting of the
Products' on page 21.
Make sure you can see the
red dot on the safety latch.
3.
To connect a SEQUENZA 5 B
speaker with a SEQUENZA 5
flying frame, you must use
the provided L-bracket of
the speaker.
To connect the L-bracket
to the rigging frame, reach
into the side opening of the
speaker and swivel the Lbracket down by nearly 180
degrees.
Align the drill holes of
the L-bracket with the
corresponding drill holes of
the flying frame.
Secure the connection with
the removed ball lock pins.
Make sure that the Lbracket is in a sloped
position after you have
completed the setup.
Tip
Make sure the ball lock pin is
secured in place.
The speaker is now completely assembled and secured.
If you don't want to mount any more speakers, then you can now wire the speakers.
Further information in chapter 'Wiring' on page 65.
Detailed information for connecting the speakers and configuring the K&F system amplifier
TOPAS or the K&F SystemRack is in the hardware manuals.
KLING & FREITAG GMBH © 2014
Version 4.0
Page 35 of 87
User's manual
9.3.4
K&F SEQUENZA 5 incl. accessories
Mounting SEQUENZA 5 B to SEQUENZA 5 B
To setup a SEQUENZA 5 B speaker with
a further SEQUENZA 5 B speaker, you
must use the L-bracket provided with the
speaker.
Please note that the outer drill hole of
the L-bracket's long side is connected to
the next speaker.
1.
Connect the SEQUENZA 5 B
speaker with further
SEQUENZA 5 B speakers,
as described in Chapter
'Safe Connecting and
Disconnecting of the
Products' on page 21.
Make sure you can see the
red dot on the safety latch.
Swivel the L-bracket of the
already setup SEQUENZA 5 B
speaker downwards so that
the long leg is facing up.
Secure the L-bracket with
the ball lock pin.
2.
The speaker is now completely assembled and secured.
If necessary, repeat the procedure for the next SEQUENZA 5 B speaker.
If you don't want to mount any more speakers, then you can now wire the speakers.
Further information in chapter 'Wiring' on page 65.
Detailed information for connecting the speakers and configuring the K&F system amplifier
TOPAS or the K&F SystemRack is in the hardware manuals.
KLING & FREITAG GMBH © 2014
Version 4.0
Page 36 of 87
User's manual
9.3.5
K&F SEQUENZA 5 incl. accessories
Mounting SEQUENZA 5 W to SEQUENZA 5 Flying Frame,
Flown
When mounting a SEQUENZA 5 W
speaker with a SEQUENZA 5 flying frame,
you must use the flying frame connector
that is provided with the flying frame.
Upon delivery of the flying frame, the
flying frame connector is secured in its
park position with a ball lock pin.
Tip
To ensure that the flying frame
connector is available at all times
and cannot get lost, we recommend
fastening it back into its park position
on the flying frame when not in use.
For the flying mode, you can mount a complete triple from a transport case in one step.
You can also mount the triples directly from vertically standing transport cases. This
procedure is especially recommendable when you have little room for assembly.
Tip
If you also disassemble the speakers using a vertically standing transport case, you can be
certain that the speakers are in the transport case the right way for the next assembly.
1.
Prepare the flying frame for flying mode. (see chap. 'Preparing the SEQUENZA 5
Flying Frame, Flown' on page 30)
2.
Open the transport case of the SEQUENZA 5 W triple by turning the catches 180°
and removing the lid.
3.
Connect the SEQUENZA 5
flying frame with the
SEQUENZA 5 W speaker as
explained in chapter '[...]' on
page 21.
KLING & FREITAG GMBH © 2014
Version 4.0
Page 37 of 87
User's manual
4.
Make sure you can see the
red dot on the safety latch.
5.
Fasten the flying frame
connector onto the flying
frame with a ball lock pin.
K&F SEQUENZA 5 incl. accessories
Fold the flying frame's
connector (that was
mounted to the speaker
during preparations)
upwards between the
connecting plates of the
flying frame.
To prevent losing the
SEQUENZA 5 W connector,
it should be mounted in the
intended parking position of
the rigging frame.
6.
The simulation software
CON:SEQUENZA+ specifies
real angles.
With the help of the chart
on the rigging frame, you
can determine the required
hole position.
Using a further ball lock pin,
secure the connector to the
speaker using the tilt angle
drill hole calculated by the
software CON:SEQUENZA+.
7.
The speaker is now completely assembled and secured.
If you don't want to mount any more speakers, then you can now wire the speakers.
Further information in chapter 'Wiring' on page 65.
Detailed information for connecting the speakers and configuring the K&F system amplifier
TOPAS or the K&F SystemRack is in the hardware manuals.
KLING & FREITAG GMBH © 2014
Version 4.0
Page 38 of 87
User's manual
9.3.6
K&F SEQUENZA 5 incl. accessories
Mounting SEQUENZA 5 W to SEQUENZA 5 B, Flown
When mounting a SEQUENZA 5 W
speaker with a SEQUENZA 5 B speaker,
you must use the provided connector on
the SEQUENZA 5 W speaker.
We recommend setting up a triple directly from a vertically standing transport case, as
described in Chapter 'Mounting SEQUENZA 5 W to SEQUENZA 5 W, Flown' on page 40.
Tip
If you also disassemble the speakers using a vertically standing transport case, you can be
certain that the speakers are in the transport case the right way for the next assembly.
1.
Connect the SEQUENZA 5 W
speaker with a previously
mounted SEQUENZA 5 B
speaker as described in
Chapter 'Safe Connecting
and Disconnecting of the
Products' on page 21.
If you want to setup
complete triples, remove all
lids from the transport cases.
2.
Make sure you can see the
red dot on the safety latch.
Remove the ball lock pin
from the SEQUENZA 5 W
speaker and fasten it with
the standard SEQUENZA 5 W
connector.
KLING & FREITAG GMBH © 2014
Version 4.0
Page 39 of 87
User's manual
3.
K&F SEQUENZA 5 incl. accessories
Fold the connector between
the connecting plates of the
adjacent speaker.
Secure the connection with
the ball lock pin.
4.
The speaker is now completely assembled and secured.
If you don't want to mount any more speakers, then you can now wire the speakers.
Further information in chapter 'Wiring' on page 65.
Detailed information for connecting the speakers and configuring the K&F system amplifier
TOPAS or the K&F SystemRack is in the hardware manuals.
9.3.7
Mounting SEQUENZA 5 W to SEQUENZA 5 W, Flown
When mounting a SEQUENZA 5 W
speaker with another SEQUENZA 5 W
speaker, you must use the provided
connector on the speaker.
If you also disassemble the speakers using a vertically standing transport case, you can be
certain that the speakers are in the transport case the right way for the next assembly.
Tip
KLING & FREITAG GMBH © 2014
Version 4.0
Page 40 of 87
User's manual
K&F SEQUENZA 5 incl. accessories
Vertical setup:
1.
Stand the transport case
vertically and remove the lid.
2.
Insert the flying frame
connector into the
SEQUENZA 5 flying frame
and secure it with a ball lock
pin.
The magnet fitted on the
flying frame prevents the
connector from hindering
the subsequent steps of
setup.
3.
Lift the prepared flying
frame onto the topmost
speaker.
Connect the flying frame
with the speaker as
explained in chapter
'Safe Connecting and
Disconnecting of the
Products' on page 21
Make sure you can see the
red dot on the safety latch.
KLING & FREITAG GMBH © 2014
Version 4.0
Page 41 of 87
User's manual
4.
K&F SEQUENZA 5 incl. accessories
Release the flying frame
connector from the magnet
and fold it downwards
between the connecting
plates of the SEQUENZA 5 W
speaker.
Align the drill hole of the
connector with the drill hole
that has been determined
for the calculated tilt angle.
Secure the connection with
the ball joint pin.
5.
Connect the flying frame
with the hoist.
Completely lift the triple out
of the transport case.
6.
To allow the speakers
to securely and reliably
connect, pull the lower
speaker upwards until all
spring bolts click into place.
Check the SEQUENZA 5 W
connector and push it into
the previously drawn back
spring bolt, if necessary.
KLING & FREITAG GMBH © 2014
Version 4.0
Page 42 of 87
User's manual
7.
K&F SEQUENZA 5 incl. accessories
Compare the drill hole
to which the connector is
attached with the print-out
of the simulation.
Correct the position if
necessary:
Pull the spring bolt outwards
as far as it will go (release
position), hold onto it, and
fold the connector out. (see
chapter 'Using the Spring
Bolt' on page 20)
Position the connector in
the calculated tilt angle drill
hole.
Attach the connector with
the removed ball lock pin.
8.
The speakers are now completely assembled and secured.
If you don't want to mount any more speakers, then you can now wire the speakers.
Further information in chapter 'Wiring' on page 65.
KLING & FREITAG GMBH © 2014
Version 4.0
Page 43 of 87
User's manual
K&F SEQUENZA 5 incl. accessories
Horizontal setup:
Line up all required transport cases next to one another. You can completely set up all three
speakers from one transport case without having to separate the speakers from one another.
1.
When setting up the
speakers, make sure you
can add another speaker
without obstacles.
If you want to set up a
complete triple, remove
the entire lid from the first
transport case and the lid of
the next transport case.
Position the transport cases
of all triples behind one
another so that the side of
the first speaker's safety
catch is in front.
2.
Connect the SEQUENZA 5
flying frame with the top
SEQUENZA 5 W speaker,
as described in chapter
'Safe Connecting and
Disconnecting of the
Products' on page 21.
If you cannot connect the
speakers straightaway, it
is most likely because of
uneven ground. In this case,
slightly lift both speakers
under the connecting
point while sliding them
sideways so that the bolts
are inserted.
3.
Set the spring bolts of all
speakers by turning each
one 90° to the right into the
start position. 20Using the
Spring Bolt
KLING & FREITAG GMBH © 2014
Version 4.0
Page 44 of 87
User's manual
4.
K&F SEQUENZA 5 incl. accessories
Adjust every speaker to the
tilt angle calculated by the
simulation software:
Align the drill hole of the
connector with the drill
hole that is marked with the
desired angular degree.
Fasten the connector with
the ball lock pin.
Make sure the ball lock pin
is secured and clicked into
place.
5.
Fold out the connector
and push it between the
connecting plates and into
the drawn back spring bolts
of the next speaker.
In doing so, the spring bolt
clicks into the track of the
standard connector into its
locking position.
6.
It is absolutely necessary
that you lock the rear
bolts into place.
Caution
When lifting the array, the
connector is secured by the
spring bolt, indicated by a
loud clicking noise.
KLING & FREITAG GMBH © 2014
Version 4.0
Page 45 of 87
User's manual
7.
K&F SEQUENZA 5 incl. accessories
The speaker is now
completely assembled and
secured.
Connect the SEQUENZA 5
flying frame with the
SEQUENZA 5 W speaker
as explained in chapter
'Safe Connecting and
Disconnecting of the
Products' on page 21.
If you don't want to mount any more speakers, then you can now wire the speakers.
Further information in chapter 'Wiring' on page 65.
Detailed information for connecting the speakers and configuring the K&F system amplifier
TOPAS or the K&F SystemRack is in the hardware manuals.
Read more in chapter 'Lifting the Array' on page 48.
9.3.8
Mounting SEQUENZA 5 W and SEQUENZA 10 with Downfill
Adapter
Using the downfill adapter, you may hang a maximum of three speakers under a SEQUENZA
10 N/W speaker. You must always check the structural calculations with the simulation
software CON:SEQUENZA+.
With the downfill adapter, you create a stable and safe connection between a SEQUENZA 10
N/W speaker and a SEQUENZA 5 W speaker.
1.
Connect the SEQUENZA 5
downfill adapter with the
SEQUENZA 5 W speaker,
as described in chapter
'Safe Connecting and
Disconnecting of the
Products' on page 21.
KLING & FREITAG GMBH © 2014
Version 4.0
Page 46 of 87
User's manual
2.
K&F SEQUENZA 5 incl. accessories
Make sure you can see the
red dot on the safety latch.
Use a ball lock pin to fasten
the connector of the adapter
in the desired drill hole on
the speaker.
3.
Lower the SEQUENZA 10 N/
W array until you can insert
the downfill adapter into
the lower speaker.
Secure the connection with
one ball lock pin on each
side.
4.
Lift the speaker and connect
the upper connector bracket
in the 1° angle drill hole
with the SEUQNZA 10
speaker.
Secure the connection with
the ball joint pin.
5.
If further speakers are to
be flown, connect them as
described on page 21.
If you don't want to mount any more speakers, then you can now wire the speakers.
Further information in chapter 'Wiring' on page 65.
KLING & FREITAG GMBH © 2014
Version 4.0
Page 47 of 87
User's manual
K&F SEQUENZA 5 incl. accessories
Detailed information for connecting the speakers and configuring the K&F system amplifier
TOPAS or the K&F SystemRack is in the hardware manuals.
9.4
Warning
Lifting the Array
If a BGV (government safety organisation) C1 or a D8+ motor is used, the SEQUENZA 5 system
is intrinsically safe and does not require any secondary securing. If the SEQUENZA 5 system
is, however, to be hung on another motor, then secondary securing is necessary. This can be
attached to the 3.5t shackles and must be implemented with zero drop height. Instructions
for the correct use of secondary securing with zero drop height are in the standard VPLT
(Assoc. of Media and Event Technology) SR 2.0 "Preparation & use of electric chain hoists".
See the instructions in chapter 'Safety Instructions' from page 14 and in the corresponding
sub-section 'Safety Instructions for Flown Setup' from page 15.
Risk of crushing hands!
Caution
The speakers move towards each
other during lifting.
During hoisting - as long as the motor
is running - the specifications of the
BGV (government safety organisation)
C1 are not fulfilled.
Ensure that nobody can step below
the suspended systems.
These instructions are valid for arrays consisting of up 15 SEQUENZA 5 W speakers or 10
SEQUENZA 5 B speakers and also for mixed arrays with SEQUENZA 5 W and SEQUENZA 5 B.
The simulation software SEQUENZA 5 must always verify the number of speakers.
1.
To prevent the castor base
from being pushed up if a
load is outside of the castors,
pull the rear-most castor
base out from underneath
the lying speakers until the
red marking is completely
visible.
2.
Hook the load hook of
the hoist chain (i.e. of the
hoist motor) into the load
adapter's shackle and begin
to lift the array carefully.
Make sure that the
speaker array does not
pull the castor bases up
with them.
Caution
During lifting, the spring
bolts snap into their predetermined position with a
clearly audible clicking noise.
KLING & FREITAG GMBH © 2014
Version 4.0
Page 48 of 87
User's manual
K&F SEQUENZA 5 incl. accessories
At a 0° position, the spring
bolt should already click into
place on the ground.
When the ground is uneven,
the spring bolts may not
correctly click into place.
To ensure that it has
correctly locked into place
while the speakers are on
the ground, you may need
to manually assist, especially
with a 0 degree angle.
3.
During lifting, the
connectors should slide
along the spring bolts – one
after the other from top to
bottom – until the bolts snap
into place and secure the
connection.
If the spring bolts do not
snap into place properly,
the array may not be
lifted any further.
Warning
If the spring bolts have
not snapped into place,
lower the array and
correct the error.
4.
Make sure that the spring
bolts have completely
locked into place.
The bolts are in the
correct position when
they slightly protrude out
of the connecting plate
on the opposite side.
Caution
5.
When the first speakers are
at working height, you can
remove the castor bases of
the SEQUENZA 5 B speakers
and mount the optional rain
protections for this speaker
model if necessary.
KLING & FREITAG GMBH © 2014
Version 4.0
Page 49 of 87
User's manual
K&F SEQUENZA 5 incl. accessories
For outdoor use, there
are optional rain covers
for the flying frame, the
bass speakers and the tops.
These covers serve as rain
protection for the rear flying
mechanics as well as for the
cables and plugs.
The array can potentially
swing out. For this reason,
only the setup crew may
be in front of or behind
the array during lifting.
Warning
Lift the array evenly and slowly into its operating position so that it cannot swing out during
lifting, then secure it. In doing this, make sure that chain hoists and lifting accessories do not
get caught. Make sure that the speaker cables do not get crimped or get caught.
9.5
Stacked Setup
SEQUENZA 5 W speakers may only be stacked on a flying frame, on a SEQUENZA 5 B speaker,
or with a SEQUENZA 5 VariMount adapter on a stand. If a SEQUENZA 5 W speaker is to
be mounted on a SEQUENZA 5 B speaker, a SEQUENZA 5 flying frame does not have to be
mounted as a support.
Please note that the speakers must be turned upside down for a stacked setup. In order to
avoid detracting from the speakers' appearance, the logos should be turned by 180° after
setup.
No matter which setup you use, you must always secure the array to prevent tipping and
falling. To ensure safety, you can either use the lying flying frame with the optional accessory
'outrigger' or secure the array – with or without the flying frame – with suitable anchoring
such as lashing straps.
Warning
We recommend using the optional accessory 'outrigger' that you can purchase from your
K&F dealer. They are easy to mount and reliably secure the standing array to prevent falling.
Before setup, ensure that the ground is firm and cannot give in under the load of the stacked
speakers.
Ensure that all accessories of the flying frame are fastened in their provided parking
positions.
KLING & FREITAG GMBH © 2014
Version 4.0
Page 50 of 87
User's manual
9.5.1
K&F SEQUENZA 5 incl. accessories
Preparing the Flying Frame
1.
To compensate for minimal
ground unevenness, you
can adjust the integrated
rubber padded feet by a few
centimetres. This prevents
the mounted flying frame
from sliding and/or causing
damaging scratches to the
floor.
2.
Lay the flying frame on
the floor and align it
horizontally using the builtin spirit level.
3.
Optional:
Place one outrigger on each
corner of the flying frame.
You must adjust all feet
on the flying frame and
outrigger so that they are all
on the ground.
Caution
To avoid damaging the
material, the adjustable
feet of the flying
frame must always
be completely on the
ground. They must bear
the entire load of the
array.
KLING & FREITAG GMBH © 2014
Version 4.0
Page 51 of 87
User's manual
9.5.2
K&F SEQUENZA 5 incl. accessories
Mounting SEQUENZA 5 B to SEQUENZA 5 Flying Frame,
Stacked
1.
Connect the speaker with
the flying frame as described
in chapter 'Safe Connecting
and Disconnecting of the
Products' on page 21.
2.
If the array is set up on a stage edge and tilted downwards, then the
SEQUENZA 5 B speakers must also be tilted accordingly.
Tilt angle (downtilt):
Depending on the configuration, you can set three different tilt angles.
2a:
•
If the speakers are standing at foot level, they don’t require any tilt angle.
Read step 2a for more.
•
If the speakers are standing slightly higher, you can use a 5° downtilt. Read
step 2b for more.
•
If the speakers are standing higher, you can use a 10° downtilt. Read step 2c
for more.
During setup, be sure to
use the short side of the Lbracket on the speaker for a
0° angle.
Align the L-bracket so that
you can insert the ball lock
pin.
Attach and secure the Lbracket with a ball lock pin.
Make sure that the Lbracket has a slightly
sloped position.
KLING & FREITAG GMBH © 2014
Version 4.0
Page 52 of 87
User's manual
2b:
K&F SEQUENZA 5 incl. accessories
During setup, be sure to
use the long side of the Lbracket and the inner drill
hole on the leg for a 5°
downtilt.
Align the L-bracket so that
you can insert the ball lock
pin.
Attach and secure the Lbracket with a ball lock pin.
Make sure that the Lbracket has a slightly
sloped position.
2c:
During setup, be sure to
use the long side of the Lbracket and the outer drill
hole on the leg for a 10°
downtilt.
Align the L-bracket so that
you can insert the ball lock
pin.
Attach and secure the Lbracket with a ball lock pin.
Make sure that the Lbracket has a slightly
sloped position.
KLING & FREITAG GMBH © 2014
Version 4.0
Page 53 of 87
User's manual
9.5.3
K&F SEQUENZA 5 incl. accessories
Mounting SEQUENZA 5 W to SEQUENZA 5 Flying Frame,
Stacked
When mounting a SEQUENZA 5 W
speaker with a SEQUENZA 5 flying frame,
you must use the flying frame connector
that is provided with the flying frame.
Upon delivery of the flying frame, the
flying frame connector is secured in its
park position with a ball lock pin.
Tip
To ensure that the flying frame
connector is available at all times
and cannot get lost, we recommend
fastening it back into its park position
on the flying frame when not in use.
You will get the specifications for the setting angle of the bottom speaker on the frame from
the simulation software CON:SEQUENZA. CON:SEQUENZA+
To determine the correct drill hole for the desired tilt angle of the first speaker, look at
the table on the flying frame for the angle indication and number of the corresponding
drill hole. See following illustration. In the left column, positive angles are denoted and
in the right are negative angles. In the middle column, you will find the numbers of the
corresponding drill hole in the speaker enclosure.
1.
Connect the SEQUENZA 5 W
speaker with the rigging
frame, as described in
chapter 'Safe Connecting
and Disconnecting of the
Products' on page 21.
Make sure you can see the
red dot on the safety latch.
KLING & FREITAG GMBH © 2014
Version 4.0
Page 54 of 87
User's manual
2.
K&F SEQUENZA 5 incl. accessories
Insert the flying frame
connector into the
SEQUENZA 5 flying frame
and secure it with a ball lock
pin.
Fold the flying frame
connector upwards between
the SEQUENZA 5 W
speaker's connecting plates
and position it in the desired
tilt angle drill hole.
Secure the connection with
the ball lock pin.
If you don't want to mount any more speakers, then you can now wire the speakers.
Further information in chapter 'Wiring' on page 65. Detailed information for connecting
the speakers and configuring the K&F system amplifier TOPAS or the K&F SystemRack is in the
hardware manuals.
9.5.4
Mounting SEQUENZA 5 B to SEQUENZA 5 B, Stacked
To setup a SEQUENZA 5 B speaker with
a further SEQUENZA 5 B speaker, you
must use the L-bracket provided with the
speaker.
Please note that the outer drill hole of
the L-bracket's long side is connected to
the next speaker.
In general, make sure to just set up as many speakers as the simulation software
CON:SEQUENZA+ calculates to be acceptable.
It is forbidden to mount additional speakers onto the array!
Caution
A cardioid configuration is not intended.
A tilt between two bass speakers (downtilt) is not intended.
KLING & FREITAG GMBH © 2014
Version 4.0
Page 55 of 87
User's manual
1.
K&F SEQUENZA 5 incl. accessories
Connect a further
SEQUENZA 5 B speaker
with the present speaker
as described in chapter
'Safe Connecting and
Disconnecting of the
Products' on page 21.
The gliding feet and
guide grooves help to
position the speaker.
Tip
2.
Please note that you must
use the long leg of the
L-bracket and the outer
drill hole to safely mount
a further SEQUENZA 5 B
speaker.
Make sure you can see the
red dot on the safety latch.
9.5.5
Mounting SEQUENZA 5 W to SEQUENZA 5 B, Stacked
The setup for stacked use only differs from flown use in the alignment of the speakers. Please
note that the speakers must be turned upside down for a stacked setup. In order to avoid
detracting from the speakers' appearance, the logos should be turned by 180° after setup.
1.
Connect a SEQUENZA 5 W
speaker with the present
speaker as described in
chapter 'Safe Connecting
and Disconnecting of the
Products' on page 21.
SEQUENZA 5 B
KLING & FREITAG GMBH © 2014
Version 4.0
Page 56 of 87
User's manual
2.
K&F SEQUENZA 5 incl. accessories
Make sure you can see the
red dot on the safety latch.
Place the speaker's
connector into the lower
speaker in the mounting
position shown here.
3.
9.5.6
Using a further ball lock pin,
secure the connector to the
speaker using the tilt angle
drill hole calculated by the
software CON:SEQUENZA+.
Mounting SEQUENZA 5 W to SEQUENZA 5 W, Stacked
For weight reasons, you may only lift, set up and mount max. one speaker.
Caution
1.
Connect the SEQUENZA 5 W
speaker with the lower
SEQUENZA 5 W as described
in chapter 'Safe Connecting
and Disconnecting of the
Products' on page 21.
The gliding feet and
guide grooves help to
position the speaker.
KLING & FREITAG GMBH © 2014
Version 4.0
Page 57 of 87
User's manual
2.
K&F SEQUENZA 5 incl. accessories
Make sure you can see the
red dot on the safety latch.
Position the lower speaker's
spring bolt into its original
starting position. (See
chapter 'Using the Spring
Bolt' on page 20)
Using a further ball lock pin,
secure the connector to the
speaker using the tilt angle
drill hole calculated by the
software CON:SEQUENZA+.
Push the connector between
the lower speaker's
connecting plates until it
clicks into place and the
spring bolt catches in its
waiting position.
3.
When the connector is
guided by the spring
bolt, lower the upper
speaker until the spring
bolt completely catches
and snaps into is locking
position.
4.
Check that the spring bolts
protrude at least 0.5 mm
out of the drill holes at the
entire circumference.
The speaker is now
completely mounted and
secured.
If your configuration
provides for it, you
can connect a further
SEQUENZA 5 W speaker
onto the present speaker,
as described in chapter
'Safe Connecting and
Disconnecting of the
Products' on page 21.
KLING & FREITAG GMBH © 2014
Version 4.0
Page 58 of 87
User's manual
5.
K&F SEQUENZA 5 incl. accessories
The complete standing
SEQUENZA 5 speaker array is
now set up and the speakers
are secured among each
other.
Please note that without
outriggers on the rigging
frame, the array must be
secured from tripping
and falling with suitable
lashing straps.
Warning
With outriggers on the
rigging frame, you must
ensure that no one can
trip over the outriggers. If
the array cannot stand in
a secured area, block the
area around the array.
9.5.7
Mounting SEQUENZA 5 W to SEQUENZA 5 Varimount
Adapter
In the following steps, the handling of the VariMount adapter will be shown.
The VariMount adapter can be used for stand mounting as well as flown mounting. Flown
mounting requires the TV spigot and the appropriate accessories.
Please note that the SEQUENZA 5 VariMount adapter is designed for a maximum of three
SEQUENZA 5 W speakers. Make sure that the stand is designed for the total weight.
You can find out about further setup alternatives in chapter 'Setup Variations' from page 24.
Warning
In the following description, only a stand adapter is shown. All work on the speakers up to
the final mounting or flying is identical.
1.
If you wish to mount
a maximum of three
SEQUENZA 5 W speakers,
you can decide between
the alternatives of a stand
positioned on the ground or
a hanging TV spigot.
Either screw in the stand
adapter or the TV spigot.
2.
Ensure that the adapter is always positioned precisely horizontal.
To ensure safe use, the array's centre of gravity must always be vertically
in line with the TV spigot.
Caution
KLING & FREITAG GMBH © 2014
Version 4.0
Page 59 of 87
User's manual
K&F SEQUENZA 5 incl. accessories
Consult the print-out from the simulation software CON:SEQUENZA+ to find
out which position on the VariMount scale the stand adapter must have.
3.
Slide the stand adapter to
the determined value on the
scale.
Tighten the stand adapter or
the TV spigot.
4.
Connect the SEQUENZA 5
VariMount adapter with
a SEQUENZA 5 W speaker,
as described in chapter
'Safe Connecting and
Disconnecting of the
Products' on page 21.
Make sure that the joint bar
of the VariMount adapter
pushes the speaker's safety
latch into the enclosure.
5.
Make sure you can see the
red dot on the safety latch.
Fold the VariMountConnector between the joint
bars of the speaker.
Secure the VariMount
connector with a ball lock
pin.
•
If you have mounted the SEQUENZA 5 VariMount adapter with the stand adapter
because you want to place the array on a stand, please read sections 6a to 8a.
•
If you have mounted the SEQUENZA 5 VariMount adapter with the TV spigot because
you want to hang the array with a pipe clamp, please read sections 6b bis 8b.
Stand alternative:
KLING & FREITAG GMBH © 2014
Version 4.0
Page 60 of 87
User's manual
6a:
Tip
K&F SEQUENZA 5 incl. accessories
We recommend first
assembling all elements
on the floor and
subsequently raising the
complete array with two
people.
If your configuration
provides for it, you can
mount up to two further
SEQUENZA 5 W speakers,
as described in chapter
'Safe Connecting and
Disconnecting of the
Products' on page 21.
Place the speaker stand on
an even and stable surface.
With two people, raise the
stand to the desired height,
tighten and secure it.
Tighten the clamping screw.
7a:
Place the speaker with the VariMount adapter onto the speaker stand and
tighten the clamping screw.
8a:
You may only stack a
maximum of three speakers
on a stand using the
VariMount adapter.
The speakers are now
completely assembled and
secured.
You can now wire the speakers.
Detailed information for connecting the speakers and configuring the K&F system amplifier
TOPAS or the K&F SystemRack is in the hardware manuals.
Pipe clamp alternative:
6b:
If your configuration provides for it, you can mount up to two further
SEQUENZA 5 W speakers, as described in chapter 'Safe Connecting and
Disconnecting of the Products' on page 21.
KLING & FREITAG GMBH © 2014
Version 4.0
Page 61 of 87
User's manual
7b:
Place a pipe clamp onto the
TV spigot.
8b:
Lift the triple with an
approved hoist and hang it
from a suitable support.
K&F SEQUENZA 5 incl. accessories
The speakers are now
completely assembled and
secured.
You can now wire the speakers.
Detailed information for connecting the speakers and configuring the K&F system amplifier
TOPAS or the K&F SystemRack is in the hardware manuals.
10. Disassembly
Basically, you disassemble the array in the reverse order of assembly.
If you want to disassemble complete flown triples, you must proceed as follows:
1.
Place a transport case
vertically – with its front lid
facing upward – under the
speaker array.
Open the front lid of the
transport case.
Slowly lower the bottom
three speakers of the array
into the transport case.
KLING & FREITAG GMBH © 2014
Version 4.0
Page 62 of 87
User's manual
2.
K&F SEQUENZA 5 incl. accessories
Completely remove the
SEQUENZA 5 speaker cable
split adapter out of the
wiring.
When the connection is
relieved, loosen the spring
bolt on the fourth speaker.
3.
Grasp to the right and left
on the speaker's connecting
joints and push the safety
catch into the enclosure.
While doing so, push the
top speaker to the side so
that the speakers disconnect
from one another.
4.
Slightly lift the still flown
speakers.
Close the transport case, tip
it onto the castors and slide
it to the side.
The triple is now completely
disassembled and packed
into the transport cases.
Proceed in the same manner
with the remaining speakers.
5.
Loosen the flying frame
from the topmost
SEQUENZA 5 W speaker
as described in chapter
'Safe Connecting and
Disconnecting of the
Products' on page 21.
Fold the flying frame
connector against the builtin magnet.
Lower the flying frame to
the ground and separate it
from the hoist.
10.1
Flown Disassembly
KLING & FREITAG GMBH © 2014
Version 4.0
Page 63 of 87
User's manual
10.1.1
K&F SEQUENZA 5 incl. accessories
Disassembling an Array
1.
Disassemble the array as described in the previous chapters.
2.
Prepare the SEQUENZA 5 system for transport:
•
Fold the connectors back into their parking position.
•
Dismantle all used components so that they do not protrude and cannot be damaged
during transport.
•
Close the transport cases with the lids. Note that each of the lid pieces only fits onto
one side of the castor base.
KLING & FREITAG GMBH © 2014
Version 4.0
Page 64 of 87
User's manual
10.2
K&F SEQUENZA 5 incl. accessories
Disassambling the Stacked Array
Basically, you disassemble the array in the reverse order of assembly.
11. Wiring
The operating safety and the highest-possible performance is only guaranteed in conjunction
with the K&F Topas or K&F SystemRack.
Caution
11.1
Cabling a K&F System Rack
KLING & FREITAG GMBH © 2014
Version 4.0
Page 65 of 87
User's manual
11.2
K&F SEQUENZA 5 incl. accessories
Connecting the SEQUENZA 5 Speakers
Connecting arrays that only consist of SEQUENZA 5 W speakers:
KLING & FREITAG GMBH © 2014
Version 4.0
Page 66 of 87
User's manual
K&F SEQUENZA 5 incl. accessories
Connecting SEQUENZA 5 W speakers with SEQUENZA 5 B speakers:
KLING & FREITAG GMBH © 2014
Version 4.0
Page 67 of 87
User's manual
K&F SEQUENZA 5 incl. accessories
12. Transport and Storage
All metal components are protected against short-term moisture with a coating.
SEQUENZA 5The accessories has to be stored, transported and used in a dry enviroment. The
SEQUENZA 5 System is not designed for long-term use in a corrosive environment.
Make sure that the system is adequately ventilated during longer storage periods so that
possible residual moisture can escape from the equipment.
Furthermore, you should ensure that all components of the SEQUENZA 5 System are
protected from mechanical strain to prevent possible damage.
We recommend using the SEQUENZA 5 W transport cases and the optional transport covers for
the SEQUENZA 5 B speakers that protect the components from the above-mentioned influences.
13. Maintenance and Care
For the owner and user, it is mandatory to be aware of the fact that rigging systems are
highly safety critical.
The inspection requirements vary depending on application and country of use. Observe the
requirements that are relevant for you. If in doubt, contact local authorities.
In many countries, regular inspection of mounting components and accessories is required. It
is thus recommendable to carry through such an inspection for your own safety, too. In most
cases (e.g. german BGV C1), an additional annual inspection is required that must be done by
a technical expert. Additionally, a detailed inspection carried through by a legally certified or
official authority is required every four years.
In this context, it is very important to keep an inspection log book. In this inspection log
book, the data for every used accessory is entered at the periodic inspections, making the
data available at all times for possible inspections.
In addition an inspection book for the rigging components of the SEQUENZA 10 system
should be kept and maintained carefully. SEQUENZA 5This book should document
maintenance measures and inspection intervals and contain parts lists.
If as a result of these checks any uncertainty should arise with regard to safety or if specific
faults are found, the product may no longer be used. You should send in the product to a
KLING & FREITAG specialist dealer for inspection and repairs, if necessary.
If defects are ascertained, then you must send in the product to KLING & FREITAG GmbH for
inspection and repairs, if necessary.
You may not repair or straighten the components of the SEQUENZA 10 System (speakers and
flying frame) yourself! SEQUENZA 5If parts of the rigging system are damaged, send in the
speakers or the flying frame to KLING & FREITAG GmbH or recycle it at a professional scrap
processing plant. It must by all means be guaranteed that the parts can no longer be used in
any way after their disposal.
13.1
Inspection Intervals and Items
The SEQUENZA 5 system can exhibit signs of wear over the years, i.e. from mechanical strain,
transport damage, corrosion, or improper handling. In general, this always indicates an
increased accident risk.
As a basic principle, you must visually inspect the SEQUENZA 10 System every time you get
it out or box it up. SEQUENZA 5For fixed installations, you must inspect the SEQUENZA 10
System at regular intervals for signs of wear. SEQUENZA 5
During these inspections, you must especially look out for deformations, cracks, dents,
damage to threads, and corrosion. Mounting devices such as shackles, chains and wire ropes
also have to be checked for signs of wear or deformation carefully.
Use the visual inspection as an opportunity to rub all metal parts, especially the connectors,
ball lock pins and spring bolts with a suitable corrosion preventive oil.
KLING & FREITAG GMBH © 2014
Version 4.0
Page 68 of 87
User's manual
K&F SEQUENZA 5 incl. accessories
Tip
During the inspection, you must pay special attention to the following points:
•
Mobility of the spring bolts. The bolts must move easily and snap securely into place.
They must protrude at least 0.5 mm out of the joining plate on the opposite side.
•
Impact and corrosion damage on the flying frame and on the speaker enclosure.
•
Joint connectors and bolts
•
Adhesion
•
Tight fit of the front bolts
14. Optional BGV C1 Certification
In Germany, you have the possibility to have your system individually certified. If required,
you can request the necessary basis of calculation from KLING & FREITAG. On the speakers as
well as on the flying frame, there is a field where an inspection label can be affixed.
Seal of approval box on the
SEQUENZA 5 W speaker
Seal of approval box on the
SEQUENZA 5 B speaker
TO BE INSTALLED BY QUALIFIED
RIGGERS ONLY!
READ MANUAL AND SAFETY
INSTRUCTIONS BEFORE USE!
LOAD LIMIT:
IT'S MANDATORY TO CALCULATE
ANGLE SETTINGS AND LOAD
LIMIT WITH THE ARRAY SOFTWARE
'CON:SEQUENZA+' . ITS SAFETY
DIRECTIONS HAVE TO BE
FOLLOWED STRICTLY!
+
1+
2- IN 1-
-
2+
PWR:
IMP:
SER.-NO.:
all pins parallel to out
WT: 23,5 kg
'CON:SEQUENZA+' . ITS
SAFETY DIRECTIONS HAVE TO
BE FOLLOWEDE STRICTLY!
+
1+
2- IN 1-
-
2+
PWR:
IMP:
350 W
16 W
SER.-NO.:
Seal of approval box on the SEQUENZA 5
flying frame
ANGLE BETWEEN FRAME
AND 1st SEQUENZA 5
HOLE IN
CABINET
all pins parallel to out
1st SEQUENZA 5
WT: 16,3 kg
KLING & FREITAG GMBH © 2014
Version 4.0
Page 69 of 87
User's manual
K&F SEQUENZA 5 incl. accessories
15. Technical Specifications of Loudspeakers
15.1
Technical Specifications SEQUENZA 5 W
Design
2-way passive system, bass reflex tuning
(operation with K&F SystemRack or K&F TOPAS)
Frequency range -10 dB
59 Hz - 22 kHz in 'FR mode'
74 Hz - 22 kHz in 'LCut mode'
Frequency range ±3 dB
70 Hz - 22 kHz in 'FR mode'
110 Hz - 22 kHz in 'LCut mode'
Horizontal coverage angle
100°
Vertical coverage angle
depending on the configuration (15° for one
speaker)
Power handling
350 W nominal power handling
700 W program
1400 W peak
Max. SPL
130 dB (SPL peak / 1m / 185 ms burst) (1 x
SEQUENZA 5 W)
137 dB (SPL peak / 1m / 185 ms burst) (3 x
SEQUENZA 5 W)
Components
4 x 5" neodymium woofer
3 x 1" neodymium tweeter
Speakers / channel
3 (recommended / up to 5 possible)
Nominal impedance
16 ohms, Zmin 11.75 ohms @ 195 Hz
Connections
2 x Speakon 4-NLT4MP
Housing
Multiplex plywood with highly resilient Polyurea
synthetic black coating, integrated steel
rigging system with CTP and powder coating,
wear resistant connectors, 1 ball lock pin
(undetachable), 2 rear mounted handles, 2 nonabrasive plastic feet each on top and bottom for
fast installation, ball proof steel grille with black
acoustic foam on the inside.
Rigging system
integrated 3 point rigging system
Dimensions (W x H x D)
368 x 349 x 394 mm
Weight
16.3 kg
Farbe
RAL 9005 (black)
KLING & FREITAG GMBH © 2014
Version 4.0
Page 70 of 87
User's manual
15.2
K&F SEQUENZA 5 incl. accessories
Technical Specifications SEQUENZA 5 B
Design
bass reflex tuning (operation via K&F SystemRack
or K&F TOPAS)
Frequency range -10 dB
36 Hz - 147 Hz
Frequency range ±3 dB
40 Hz - 100 Hz
Coverage
Omnidirectional
Power handling
400 W nominal power handling
1)
2)
800 W program
1600 W peak
Max. SPL
123 dB (SPL peak, 1 m, 185 ms burst)
SEQUENZA 5 B
Components
1 x 12" neodymium woofer
Speakers / channel
3
Nominal impedance
8 Ohm
Connections
2 x Speakon 4-pin NLT4MP
Housing
Frame reinforced enclosure, 15 mm multiplex
with highly resilient Polyurea synthetic black
coating, integrated 3 point steel rigging
system with CTP and powder coating with
wear resistant connectors, 1 Qball lock pin
(undetachable), 8 non-abrasive plastic feet on
top and bottom for fast installation and high
stability, 2 locking profiles for optional transport
cover, ball proof steel grille with black acoustic
foam on the inside.
Rigging system
integrated 3 point rigging system
Dimensions (W x H x D)
368 x 349 x 394 mm
Weight
23.6 kg
Farbe
RAL 9005 (black)
1)
pink noise, depending on the signal's crest factor and the amplifier's ouput power
same as pink noise but with 50% duty cycle
2)
KLING & FREITAG GMBH © 2014
Version 4.0
Page 71 of 87
User's manual
K&F SEQUENZA 5 incl. accessories
16. Measuring Diagrams
16.1
SEQUENZA 5 W diagrams
Horizontal coverage pattern
Vertical coverage pattern
KLING & FREITAG GMBH © 2014
Version 4.0
Page 72 of 87
User's manual
K&F SEQUENZA 5 incl. accessories
vertical coverage, 0 deg. tilt
vertical coverage, 3 deg. tilt
vertical coverage, 6 deg. tilt
KLING & FREITAG GMBH © 2014
Version 4.0
Page 73 of 87
User's manual
K&F SEQUENZA 5 incl. accessories
vertical coverage, 9 deg. tilt
vertical coverage, 12 deg. tilt
vertical coverage, 15 deg. tilt
KLING & FREITAG GMBH © 2014
Version 4.0
Page 74 of 87
User's manual
K&F SEQUENZA 5 incl. accessories
Frequency response 'on axis'
Impedance
max. SPL at 10% THD
KLING & FREITAG GMBH © 2014
Version 4.0
Page 75 of 87
User's manual
K&F SEQUENZA 5 incl. accessories
17. Dimensions speaker
17.1
Dimensions SEQUENZA 5 W
Weight: 16.3 kg
332
355
368
KLING & FREITAG GMBH © 2014
308
15°
348
306
R1130
394
Version 4.0
Page 76 of 87
User's manual
17.2
K&F SEQUENZA 5 incl. accessories
Dimensions SEQUENZA 5 B
Weight: 23.6 kg
469
472
516
368
332
237
614
KLING & FREITAG GMBH © 2014
Version 4.0
Page 77 of 87
User's manual
17.3
K&F SEQUENZA 5 incl. accessories
Dimensions SEQUENZA 5 flying frame
Weight: 17.4 kg
KLING & FREITAG GMBH © 2014
Version 4.0
Page 78 of 87
User's manual
17.4
K&F SEQUENZA 5 incl. accessories
dimensions SEQUENZA 5 transportation case
Weight: 36.5 kg
KLING & FREITAG GMBH © 2014
Version 4.0
Page 79 of 87
User's manual
17.5
K&F SEQUENZA 5 incl. accessories
dimensions SEQUENZA 5 VariMount adapter
336
52
336
Weight: 2.8 kg
327
KLING & FREITAG GMBH © 2014
Version 4.0
Page 80 of 87
User's manual
17.6
K&F SEQUENZA 5 incl. accessories
Dimensions SEQUENZA 5 downfill adapter
Weight: 3.0 kg
KLING & FREITAG GMBH © 2014
Version 4.0
Page 81 of 87
User's manual
K&F SEQUENZA 5 incl. accessories
18. Accessories
18.1
General Accessories for SEQUENZA 5
K&F BOB:
Speaker signal distributor, 2x 8-pin into 4x
4-pin, optionally with 3 x eyebolt M8 for
vertical or horizontal suspension.
ProRental NL8 Prof. Speaker Cable
NLT-840:
high grade halogen-free speaker cable, 8
2
conductors with 4 mm cross section each,
water proof metal connectors Neutrik®
NLT8FX
ProRental NL4 Prof. Speaker Cable
NLT-425:
High-grade halogen-free speaker cable, 4
2
conductors with 4 mm cross section each,
water proof metal connectors Neutrik®
NLT4FX
SEQUENZA 5 Speaker Split Adapter
Split adapter, weather proof, 1 x Neutrik®
NLT4MP metal connector, 4 contacts, to
2 x Neutrik® NLT4FX metal connector, 2
contacts, high-grade halogen-free cable
2
with 2.5 mm cross section
Speaker Patch Cable NLT-425, 0.5 m
50 cm patch cable for connections
between SEQUENZA 5/10 (N/W) elements,
high-grade halogen-free cable, 4
2
conductors with 2.5 mm cross section
each, water proof metal connectors
Neutrik® NLT4FX
Speaker Patch Cable NLT-425, 1 m
100 cm patch cable for connections
between SEQUENZA 5 B elements, highgrade halogen-free cable, 4 conductors
2
with 2.5 mm cross section each, water
proof metal connectors Neutrik® NLT4FX
KLING & FREITAG GMBH © 2014
Version 4.0
Page 82 of 87
User's manual
18.2
K&F SEQUENZA 5 incl. accessories
Accessories for SEQUENZA 5 W
Downfill adapter SEQUENZA 10 to 5,
downfill adapter for flown configurations
of max. 3 SEQUENZA 5 W elements under
SEQUENZA 10 N/W
VariMount adapter SEQUENZA 5 W for
stacking or suspending of 3 elements
SEQUENZA 5 W, black colour
Transport case SEQUENZA 5 W (3)
Transport case for 3 SEQUENZA 5 W
elements for optimal handling during
setup (horizontal or vertical). The tilt
angles of the single elements can be
maintained. Colour: RAL 9005 (black)
Rain Protection SEQUENZA 5
Rain protection for the rear flying
mechanics and the cable connections
while the speakers are in use. Colour:
black
KLING & FREITAG GMBH © 2014
Version 4.0
Page 83 of 87
User's manual
18.3
K&F SEQUENZA 5 incl. accessories
Accessories for SEQUENZA 5 B
Transport cover SEQUENZA 5 B
Transport Cover SEQUENZA 5 B
KLING & FREITAG GMBH © 2014
Version 4.0
Page 84 of 87
User's manual
18.4
K&F SEQUENZA 5 incl. accessories
Acccessories for SEQUENZA 5 Flying Frame
SEQUENZA 5 Flying frame outrigger
for increased stability
Rain protection SEQUENZA 5 rigging
frame
Rain protection while the speakers are in
use
Colour: blac
KLING & FREITAG GMBH © 2014
Version 4.0
Page 85 of 87
User's manual
K&F SEQUENZA 5 incl. accessories
19. Disposal
19.1
19.1.1
Regulations for Disposal
Germany
It is not allowed to dispose of used electrical equipment as domestic waste.
But please do not dispose of them at official collecting points for recycling either!
All KLING & FREITAG products are plain business-to-business (B2B) products. KLING & FREITAG
products labelled with a waste bin sign have thus to be disposed of by KLING & FREITAG
GmbH alone. Please call KLING & FREITAG at the number stated below if you have a KLING
& FREITAG product to be disposed of. We will offer you a straightforward and professional
disposal with no costs involved.
If there is no waste bin sign on one of your KLING & FREITAG products, because it has been
sold before 24 March 2006, then by law the owner is in charge of the disposal. In this case we
will be happy to assist and offer you proper ways of disposal.
Telephone number to call about the disposal of used KLING & FREITAG products: +49 (0)
511-96 99 7-0
Explanation: With the ElektroG (law relating to electrical and electronic equipment and
appliances) we have complied with the EU-directive on waste electrical and electronic
equipment (WEEE, 2002/96/EC).
From 03/24/2006 onwards KLING & FREITAG GMBH has thus labelled all products mentioned
in the WEEE with a sign with a crossed out waste bin and a white bar below. This sign
indicates that the disposal as domestic waste is prohibited and that the product has been put
into circulation on 03/24/2006 at the earliest.
KLING & FREITAG GMBH has been legally registered as a manufacturer with the German
registration office EAR. Our WEEE registration number is: DE64110372.
For the German Registration office EAR we have accredited that our products are soleB2B
products.
19.1.2
EU, Norway, Iceland, and Liechtenstein
It is not allowed to dispose of used electrical equipment as domestic waste.
From 08/13/2005 onwards KLING & FREITAG GMBH has thus labelled all products for EUMember countries as well as Norway, Iceland and Liechtenstein (except Germany) mentioned
in the WEEE with a sign with a crossed out waste bin and a white bar below. This sign
indicates that the disposal on domestic waste is prohibited and that the product has been put
into circulation on 08/13/2005 at the earliest.
Unfortunately the European directive WEEE has been complied with implementing different
national provisions of law throughout all member countries, which makes it impossible for us
to offer consistent solutions for the disposal throughout Europe.
Responsible for complying with these provisions of law is the local distributor (importer) of
each country.
For proper disposal of used products in accordance with these local provisions in the
mentioned countries of the European Union (except Germany) please ask your local dealer or
the local authorities.
19.1.3
All other Countries
For proper disposal of used products in accordance with local provisions in other than the
above mentioned countries please ask your local dealer or the local authorities.
KLING & FREITAG GMBH © 2014
Version 4.0
Page 86 of 87
User's manual
KLING & FREITAG GMBH © 2014
K&F SEQUENZA 5 incl. accessories
Version 4.0
Page 87 of 87