1
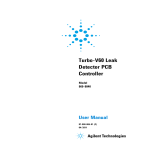
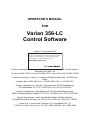
OPERATOR’S MANUAL FOR Varian 356-LC Control Software Version 1.0 November 2007 NOTICE: This document contains references to Varian. Please note that Varian, Inc. is now part of Agilent Technologies. For more information, go to www.agilent.com/chem. Polymer Laboratories Ltd, Now a part of Varian, Inc., Essex Road, Church Stretton, Shropshire SY6 6AX, UK Tel +44 (0)1694 723581, Fax +44 (0)1694 722171, Service Tel +44 (0)1694 724333 Polymer Laboratories, Varian, Inc., Amherst Fields Research Park, 160 Old Farm Road, Amherst, MA 01002, USA Tel +1 413 253 9554, Fax +1 413 253 2476 Polymer Laboratories, Varian B.V., Herculesweg 8, 4339 PL Middelburg, The Netherlands Tel +31 (0) 118 671500, Fax +31 (0)118 671502 Polymer Laboratories, Varian Belgium NV SA, Mechelsesteenweg 362, 2860 St.-Katelijne-Waver, Belgium Tel +32 (0) 15 556460, Fax +32 (0) 15 556186 Polymer Laboratories, Varian Deutschland GmbH, Alsfelder Stra€e 6, D-64289 Darmstadt, Germany Tel: +49 (0) 6151 7030 Fax: +49 (0)6151 703237 Varian S.A.,7 Avenue des Tropiques, Z.A. Courtaboeuf, B.P. 12 F-91941 Les Ulis Cedex, France Tel +33 1.6986.3838 Fax: +33 1.6928.2308 CONTENTS 1 GENERAL INFORMATION 3 1.1 INTRODUCTION ............................................................................................... 3 1.2 SPECIFICATIONS ............................................................................................. 4 1.3 CONNECTING THE VARIAN 356-LC TO A PC...................................................... 5 1.3.1 Use a Universal Serial Bus Interface (USB) 5 1.3.2 Adding an Extra Serial Card to your PC - Using Multiple Serial Ports 5 1.4 USING STAR W ORKSTATION WITH INSTRUMENT CONTROL SOFTWARE. ............... 5 1.5 INSTALLATION PROCEDURES- SOFTWARE ......................................................... 7 1.5.1 Installation of the PL Instrument Control Software from CD 7 1.5.2 Installation of the PL Instrument Control On-line Help from CD 7 1.5.3 Configuring the PL Instrument Control Software 8 2 THE GRAPHICAL USER INTERFACE 10 2.1 OVERVIEW ................................................................................................... 10 2.2 SUMMARY VIEW............................................................................................ 11 2.3 COMPONENT VIEW........................................................................................ 11 2.4 AUTOMATING THE VARIAN 356-LC ................................................................. 12 3 TROUBLESHOOTING 14 3.1 ERRORS....................................................................................................... 14 3.2 VARIAN 356-LC ERRORS .............................................................................. 15 Chapter 1 –General Information 1 General Information 1.1 Introduction The Varian 356-LC differential refractometer is a universal detector designed for high-performance analyses where the refractive index of a flowing liquid with respect to a reference is required. Its small cell volume, high sensitivity, and accurate temperature control make it well-suited for use as a detector in automated and manual high performance liquid chromatography. The Varian 356-LC RI detector can be operated as an integrated module within a Liquid Chromatography System using Galaxie™ Chromatography software. Alternatively, the detector can be used as a stand-alone HPLC detector through serial communications. This manual instructs the user how to install the PL Instrument Control software for operation of the Varian 356-LC RI as a stand-alone detector. For information on operating the detector please refer to the Operation manual. 3 Document # 6/27416 Varian 356-LC Software Control Manual Chapter 1 –General Information 1.2 Specifications RI range Range Linearity Sensitivity Short-term noise 1 Drift Response time Temperature control Cell volume Light source Analogue output Digital output Polarity External communication Autozero Purge Flow rate range Pressure rating Internal volume- inlet Internal volume- outlet Total internal volume Wetted material Power requirements Power consumption Dimensions (wxdxh) (unpacked) Dimensions (packed) Weight (unpacked) Weight (packed) PC Requirements Remote operation Safety features 1.0~1.75 RIU 150-600x10-6 /FS RIU 600 ‚RIU LOW (2), MED (4), HIGH (8) mV/‚RIU <5.0x10⁻⁹RIU <2.5x10⁻⁷ RIU/hour 0.1-5.0 sec OFF, 30-50 ƒC (1 ƒC increments) 6 ‚L LED 880 nm 1 V FSD 24 bit (10 Hz) via serial port Positive/Negative RS232 YES YES 0.1-10 mL/min 100 kPa (15 psi) 15 ‚L 459 ‚L Normal operation 474 ‚L Purge mode 491 ‚L 316 SST, Quartz Glass, PTFE, Perfluoroelastomer AC 100~240 V 50/60 Hz 150 W (max) 296 x 475 x 212 mm 460 x 775 x 385 mm 11 kg 13.5 kg Windows„ 2000 & XPpro Remote purge & autozero Error and leak detection Table 1. Performance Specification of the Varian 356-LC RI Detector 1 According to ASTM method E-1303-95 “Practice for Refractive Index Detectors used in Liquid Chromatography”. Detector conditions; temperature 35 ƒ C, response time 4 sec. 4 Document # 6/27416 Varian 356-LC Software Control Manual Chapter 1 –General Information 1.3 Connecting the Varian 356-LC to a PC 1.3.1 PC Requirements To operate the Varian 356-LC detector using the Instrument Control Software, a free Serial (RS-232) communications port (1 to 255) is required on your PC. Most computers are supplied with at least one serial port as standard, but if your PC does not provide a serial port, please see section 1.3.1.1 & 1.3.1.2 The Varian 356-LC Instrument Control Software is only compatible with Windows„ 2000 & XP Pro. 1.3.1.1 Use a Universal Serial Bus (USB) to Serial Interface If your PC has one or more Universal Serial Bus (USB) connectors then you can use a “USB – Serial Port Adaptor” (part # 0860-0620), which provides a Serial Port connection to your PC. The Universal Serial Bus interface is supported on: Windows 98 Windows ME Windows 2000 Windows XP ! USB is NOT Supported on NT 4.0. You may require extra software to use USB on Windows NOTE 1.3.1.2 Adding an Extra Serial Card to your PC - Using Multiple Serial Ports Multiple Port Serial cards are available, which allow 4, 8 and 16 extra serial ports to be added to your PC using a single PCI card. 1.3.2 Serial Connection Ensure that the Varian 356-LC detector is switched on and operating normally. Make sure you have one free and valid RS-232 communications port (1 to 255). Connect the serial port on your PC to the port labelled "RS232" on the rear of the detector, using the serial cable provided. Ensure that the flash upgrade switch, (see figure 1) is located in the RUN position (i.e. downwards). 1.4 Instrument Control for non-Galaxie Users The Varian 356-LC was designed to integrate fully into Galaxie Chromatography software, allowing the user to control the instrument, remotely for unattended operation. However, for non-Galaxie users (e.g. Star or MS workstation) the Varian 356-LC Control software (v2.2), provides a standalone control of the Varian 356-LC 5 Document # 6/27416 Varian 356-LC Software Control Manual Chapter 1 –General Information The 356-LC Instrument Control software provides direct control of the Varian 356-LC, via the RS232 port, in much the same way as front panel control. It does not provide data acquisition. For data acquisition and control, the Control software must be used in conjunction with a chromatographic data acquisition package, such as Star or MS Workstation. The Varian 356-LC’s analogue data can be collected by connecting the supplied analogue output cable (Part No. PL0880-0310) from the rear of the detector (see figure 1) to an A/D interface (e.g. Star MIB 800 module). Please refer to the Star or MS workstation user manual for more information on how to configure the Star 800 modules. 4 1 5 2 3 6 Figure 1. Rear view of the Varian 356-LC RI Detector 1. Serial RS232 connector – 24 bit digital output 2. Control firmware flash upgrade switch 3. Connector control I/O –15 pin D type female 4. Analogue output - ‰1 V 5. Mains switch 6. Mains input 6 Document # 6/27416 Varian 356-LC Software Control Manual Chapter 1 –General Information 1.5 Installation Procedures- Software 1.5.1 Installation of the PL Instrument Control Software from CD Place the CD-ROM containing the Varian 356-LC Control software into the CD drive. In most cases the CD browser window will automatically open. However if the window does not appear then select the Run option in the Start menu, and type in D:\launch.exe (where D: denotes the CD drive). From the CD browser window select the Install the Software option and follow the onscreen instructions, it is recommended that the default settings are selected. Ensure that when you log on to the PC you have full administration rights. You may need to restart your computer at the end of installation; if this is required you will be prompted to do so. After successful installation of the Control software, the program is simply run by clicking on the application named PL Instrument Control (PLInstControl.exe) installed in the PL Instrument Control group of the Programs option in the Start menu. The default location for the program files will be C:\Program Files\Polymer Laboratories\PL Instrument Control, which contains the following files:- Before running the program the software must be first configured, see section 1.5.3. 1.5.2 Installation of the Instrument Control On-line Help from CD From the CD browser window select the Install Online Help option and follow the onscreen instructions, it is recommended that the default settings are selected. The two help files (one for the PL Instrument Control software and the other for the PL Instrument Configuration Editor program) will be installed and the default location will be C:\Program Files\Polymer Laboratories\PL Instrument Control\Docs. 7 Document # 6/27416 Varian 356-LC Software Control Manual Chapter 1 –General Information 1.5.3 Configuring the Instrument Control Software The Control Software needs to be closed down before starting this program. The configuration of the Varian 356-LC should normally be done by a qualified Varian representative. To configure the Control software for the Varian 356-LC, you need to run the PL Instrument Configuration Editor to define the components that make up the instrument. The PL Instrument Configuration Editor is simply run by clicking on the application named PL Instrument Configuration Editor (PLInstConfigEd.exe) installed in the Service group of the PL Instrument Control group of the Programs option in the Start menu. The first time the PL Configuration Editor program is run, the program displays all the components that are available for control. For the initial configuration of the system select the Varian 356-LC from the list by left clicking on the name of the component so that the configuration matches the instrument. Once the Varian 356-LC configuration has been completed the correct Com port needs to be assigned. To set the Com port, double click on the component name. The Configure Component dialog will open, where the correct Com port can be entered. 8 Document # 6/27416 Varian 356-LC Software Control Manual Chapter 1 –General Information Once the Com ports is set correctly, close the configuration editor and wait while the new configuration is saved. While the new configuration is being saved the following message will be displayed: - Updating the instrument configuration can take up to a minute so please be patience. For further information on configuring a system then please see the on-line help within the PL Configuration Editor program. 9 Document # 6/27416 Varian 356-LC Software Control Manual Chapter 2-The Graphical User Interface 2 The Graphical User Interface Total instrument control of the Varian 356-LC is provided by a Windows-based Graphical User Interface (GUI). This intuitive interface provides simplistic control as well as a comprehensive monitoring system. For further information on the PL Instrument Control software please see the on-line help within the program. To start the 356-LC Control software, select the PL Instrument Control item in the PL Instrument Control program group of the Programs option in the Start menu. 2.1 Overview The Control screen is effectively divided into two main Views, these are: 1. The Summary View 2. The Component View 10 Document # 6/27416 Varian 356-LC Software Control Manual Chapter 2-The Graphical User Interface 2.2 Summary View The summary view displays the status of the Varian 356-LC and a quick way of accessing the various parameters and options available within the PL Instrument Control software. A green LED next to the Varian 356-LC name indicates the module is being controlled and running whereas a red LED would indicate the module is either not running or not controlled. For further information on the Summary View please see the on-line help within the PL Instrument Control software. 2.3 Component View The component view provides direct access to the Varian 356-LC control parameters. In general each component view contains a number of common items and options. The actual items available in a view are dependent on the component selected. The general component view for all components except for autosamplers/carousels is shown below. Status Bar – This displays Varian 356-LC description and current status. On-line Help Button – This is a direct link to the on-line help for that component view. Parameter Grid – This displays the current set parameter(s) for the 356-LC. To set and update the parameter(s) enter the required value(s) in the Set Value column and press the UPDATE button. 11 Document # 6/27416 Varian 356-LC Software Control Manual Chapter 2-The Graphical User Interface To undo any parameter(s) prior to pressing the Update button press the Undo button, . To reset the parameter(s) back to the default value(s) press the Factory Reset button, . Help Output Window – This displays a simple summary help for each parameter and action. To view this information, select the parameter or action. The information displayed in the Help Window will be a short description about the action or parameter, the Factory Default Value and the Minimum and Maximum Values for the parameter. Action Button(s) – The Varian 356-LC can be Purged or Autozeroed using the Action Buttons, as well as from the Action List. To run an action, press the required Action button. Press the STOP button, to stop all the procedures currently running on the selected component. For information on the Toolbar menus please see the on-line help within the PL Instrument Control software. 2.4 Automating the Varian 356-LC The Instrument Control software provides the ability to automate the control of the Varian 356-LC using the Events Schedule Editor. To open the Events Schedule Editor and create a schedule, select the Edit Schedule option from the Automation menu on the toolbar. The editor will initially display a default Events Schedule consisting of a single Process and Sequence entry. This ensures you only have to add a Procedure entry for the schedule to be valid. 12 Document # 6/27416 Varian 356-LC Software Control Manual Chapter 2-The Graphical User Interface To add a Procedure right click on the Sequence entry in the schedule, the Procedure Details window will open where the required action can be selected. Once the Events Schedule is completed press the Start button, schedule. to start the The schedule can be used to equilibrate the detector by automatically purging a autozeroing the detector. Message boxes can be displayed at key stages during an Event Schedule. These message boxes require user input before the rest of the schedule can be run. The text displayed in the message box is customisable allowing simple status information or more detailed instructions to be displayed to the operator. Two examples of this are: Providing a simple guide path to an operator for the manual operation of the system. Providing feedback / key information to an operator at key stages of a more automated system. For further information on the Event Schedule Editor please see the on-line help within the Instrument Control software. 13 Document # 6/27416 Varian 356-LC Software Control Manual Chapter 3 - Troubleshooting 3 Troubleshooting 3.1 Errors Any error(s) that occur with communications or operations (running component actions, updating parameters etc.) with the instrument, the Diagnostic Output Window will automatically open with the error(s) displayed in the Component Error Status Tab of the Diagnostic Output Window as shown below. Each error is uniquely identified with a number that can be referenced back to the control code. Figure 2. Diagnostic Output Window Note: The information displayed in last two Tabs is primarily for service diagnostics and the Window does not need to be open for normal operation of the instrument. If an error is displayed it needs to be cleared in order for the diagnostic window to be closed, allowing access back to the PL Instrument Control software. To clear an error press the Select button to highlight the row and press the Clear button. Multiple errors can be selected at a time. Once all errors have been cleared the diagnostic window can be closed. Clearing an error will stop all procedures that are running and attempting to communicate with the component. To re-establish communications with the component either select the Reconnect option from the Instrument menu or return to the component view and resend the parameters or repeat the required action. The errors that can be displayed from the software are listed on the following pages. 14 Document # 6/27416 Varian 356-LC Software Control Manual Chapter 3 - Troubleshooting 3.2 Varian 356-LC Errors Error Could not initialise specified comms port No response received from the device General System Errors Cause(s) Action Incorrect Com port Ensure the correct Com port has been assigned to the assigned within the PL Instrument component, the PL-GPC Configuration Editor program. Ensure 50 Plus is not powered the PL-GPC 50 Plus is powered on and on or the USB cable is the USB cable is connected. not connected. Incorrect Com assigned to component communications lost the component, power failure. port the or with e.g. Ensure the correct Com port has been assigned within the PL Instrument Configuration Editor program. Ensure the PL-GPC 50 Plus and/or component is powered on. If assigned Com port is correct and the system is powered on then contact Polymer Laboratories or your local agent. Unrecognised response from the device Turn the PL-GPC 50 Plus off and then on again (ensure the control software has been closed before turning the instrument off). If this error persists then contact Polymer Laboratories or your local agent. The device rejected the last command Ensure the correct component has Incorrect component been assigned to the correct Com port assigned to the Com within the PL Instrument Configuration port. Editor program. The device returned an error Reinitialise the component from the PL Instrument Control software and ensure the initialisation is completed successfully. Otherwise turn the PLGPC 50 Plus off and then on again The component failed to (ensure the control software has been complete an action. closed before turning the instrument off). If unsuccessful and no obvious cause for the error then contact Polymer Laboratories or your local agent. 15 Document # 6/27416 Varian 356-LC Software Control Manual Chapter 3 - Troubleshooting Error 01 Instrument Errors Cause(s) Action Fan stopped/failed Fault with the circuitry/wires/fan. Call your Varian customer support representative if this happens regularly. 02 Upper leak detector thermistor failure. Liquid sensor needs replacing. Call your Varian customer support representative. 03 Lower leak detector thermistor failure. Liquid sensor needs replacing. Call your Varian customer support representative. 04 Internal vapour sensor failure. Vapour sensor needs replacing. Call your Varian customer support representative. 05 External vapour sensor failure. Vapour sensor needs replacing. Call your Varian customer support representative. 06 Liquid leak sensor has detected liquid in drip tray. Liquid in the base of the unit - Stop pump and investigate. 07 High concentration of vapour detected outside of unit. Ensure sufficient ventilation around the module. Check for a solvent leak. 08 Heated block thermistor below minimum threshold. Call your Varian customer support representative. 09 Heated block thermistor above maximum threshold. Call your Varian customer support representative. 0A Light source error Replace the light source assembly. Call your Varian customer support representative. Auto-Zero (01) Autozero timeout Re-autozero the detector. 16 Document # 6/27416 Varian 356-LC Software Control Manual