1
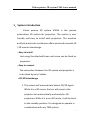
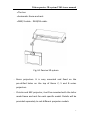
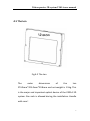
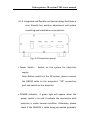
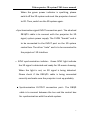
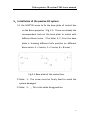
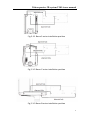
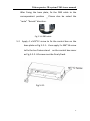
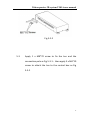
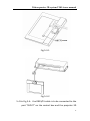
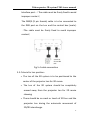
iVision passive polarization 3D system V901A
User Manual
For All Barco models
iVision Global Ltd
Flat 337, 3/F, South China C.S. Bldg, 13-17 Wah Sing Street, Kwai Chung, Kowloon, Hong Kong.
Malaysia:
RT I Vision Sdn Bhd.
324, Jalan Nilam 12, Taman Jayamas, 70200 Seremban, Negeri Sembilan, Malaysia
Thailand:
GT Vision (Thailand) Co., Ltd
234/47 Moo 6, Suksawad Rd., Naiklongbangplakod, Prasamutjadee, Samutprakarn 10290 Thailand
iVision passive 3D system V901A user manual
Content
1. System Introduction —————
3
2. System feature————————
4
3. Projector & 3D glasses—————
4
4. System structure————————
4-9
5. Installation ——————————
10 - 15
6. Dark Time Adjustment and
Output Reference Delay setting —
16
7. Optical Alignment ———————
16
8. Others—————————————
17 - 18
2
iVision passive 3D system V901A user manual
1.System introduction
iVision passive 3D system V901A is the passive
polarization 3D system for projectors. The system is user
friendly and easy to install with projectors. The sensitive
and fully automatic mechanism offers quick and accurate 2D
/ 3D movies interchange.
●
Easy to install
Just using the attached frame and screw can be fixed on
projectors.
● Easy
to connect
The connection between the 3D system and projector is
to be done by only 2 cables.
● 2D-3D
interchange
1. The system will automatically detect 2D/3D signal.
While it is a 3D movie, the Len will move to the
projector Len automatically and ready for 3D
projection. While it is a non 3D movie, it will be back
to the standby position. It is designed to operate in
coordination with any TMS system.
3
iVision passive 3D system V901A user manual
● Easy
to maintain
The Len is easy to clean and maintain.
2.System feature
● Electrical
data
Power source: Nil
Synchronized signal input: 3D interface (15 pin)
Wattage: less than 12w
● Optical
feature
Light efficiency: 16% ± 1%
Contrast: 100:1
Ghost shadow: Less than 2%
Response time: Less than 150us
Frame rate: Support 60frames/second
3.Projectors and 3D glasses
● Polarization
3D glasses
iVision approved 3D glasses
●
Projectors:
The iVision 3D system is applicable to all Barco, Christie
and NEC DCI projectors including 4K projectors.
4.System Structure
The 3D system will include the following compartments.
4
iVision passive 3D system V901A user manual
● The
Len
● Automatic
● DB9/
frame and rack
9 cable,DB15/15 cable.
Fig.4-1 Passive 3D system
- Barco projectors: It is easy mounted and fixed on the
pre-drilled holes on the top of Barco C, S and B series
projectors.
- Christie and NEC projector, it will be mounted with the tailor
made frame and rack for each specific model. Details will be
provided separately to suit different projector models
5
iVision passive 3D system V901A user manual
4.1 The Len
Fig 4-2 The Len
The
outer
dimensions
of
the
Len
274.0mm*225.0mm*29.8mm and net weight is 1.5kg. This
is the major and important optical device of the V901A 3D
system. No crash is allowed during the installation. Handle
with care !
6
iVision passive 3D system V901A user manual
4.2 Automatic rack and system control box
Fig 4-3 Automatic and system control box.
4.1.1
The automatic and system control box is the device
for 2D/3D interchange and control module for
synchronization of 3D signal.
4.1.2
The DB9/9 cable will be connected between the
3D system Len and the system control box. While
3D
signal
being
detected,
the
Len
will
automatically move in front of the pre-set position
of the projector. While 2D movie is detected, the
Len will move out to the standby position.
4.1.3 During installation, please handle with care to
prevent the mechanical parts being crashed to the
projector and projector Len.
7
iVision passive 3D system V901A user manual
4.1.4 Integrated and flexible mechanical design facilitates a
user friendly Len position adjustment and system
mounting and installation on projectors.
Fig. 4-4 Connection panel
●
Power Switch: Switch on the system for electricity
supply.
Note: Before switch on the 3D system, please connect
the DB15/5 cable to the projectors’ “3D” connection
port and switch on the projector.
●
POWER indicator:A green light will appear when the
power switch is on and it indicate the connection with
projector is under normal condition. Otherwise, please
check if the DB15/15 is cable being connected probably.
8
iVision passive 3D system V901A user manual
When the green power indicator is sparkling, please
switch off the 3D system and reset the projector channel
to 2D. Then, switch on the 3D system again.
● Synchronization
signal INPUT connection port:The attached
DB15/15 cable is to connect with the projector for 3D
signal, system power supply. The 15PIN “female” end is
to be connected to the INPUT port on the 3D system
control box. The other “male” end is to be connected to
the projectors’ 3D Interface.
●
SYNC synchronization indictor:Green SYNC light indicate
the 3D signal is detected and ready for 3D movie showing.
When the light is out, no 3D signal is being detected.
Please check if the DB15/15 cable is being connected
correctly and make sure the projector is set up probably.
●
Synchronization OUTPUT connection port:The DB9/9
cable is to connect between the Len and the control box
for synchronization with the whole system.
9
iVision passive 3D system V901A user manual
5.Installation of the passive 3D system
5.1 Use M10*50 screw to fix the base plate of control box
on the Barco projector(Fig 5-1)There are already the
correspondent hole on the base plate to match with
different Barco series.(The letter S, C, B on the base
plate is showing different hole position on different
Barco series- S = S series, C = C series, B = B series)
Fig 5-1 Base plate of the control box.
※ Note:1、The screw must be firmly fixed to avoid the
system damaged.
※ Note:2、
This is the cable fixing position.
10
iVision passive 3D system V901A user manual
Fig 5-1-1 Barco S series installation position
Fig 5-1-2 Barco C series installation position
Fig 5-1-3 Barco B series installation position
11
iVision passive 3D system V901A user manual
After fixing the base plate, fix the DB9 cable to the
correspondent position
Please also be noted the
“male” “female” direction.
Fig 5-1-4 DB9 cable
5.2
Apply 4 x M5*12 screw to fix the control box on the
base plate as Fig 5-2-1,then apply 2 x M6*16 screw
to fix the Len fixture stand
on the control box cover
as Fig 5-2-2. All screw must be firmly fixed.
Fig 5-2-1
12
iVision passive 3D system V901A user manual
Fig 5-2-2
5.3
Apply 1 x M8*70 screw to fix the Len and the
connection pole as Fig 5-3-1,then apply 3 x M6*10
screw to attach the Len to the control box as Fig
5-3-2
13
iVision passive 3D system V901A user manual
Fig 5-3-1
Fig 5-3-2
5.4 As Fig 5-4,the DB15/15 cable is to be connected to the
port “INPUT” on the control box and the projector 3D
14
iVision passive 3D system V901A user manual
Interface port.。
(The cable must be firmly fixed to avoid
improper contact)
The DB9/9 (9 pin female) cable is to be connected to
the DB9 port on the Len and the control box (male).
(The cable must be firmly fixed to avoid improper
contact)
Fig 5-4 cable connection
5.5 Criteria for Len position:
●
The Len of the 3D system is to be positioned to the
center of the projector Len for 3D movie.
●
The Len of the 3D system should be completely
moved away from the projector Len for 2D movie
showing
●
There should be no crash or touch of 3D Len and the
projector Len during the automatic movement of
2D/3D interchange.
15
iVision passive 3D system V901A user manual
6.
Dark Time Adjustment and Output Reference
Delay setting
In the projector,
The Dark Time Adjustment
= 1500
Output Reference Delay
= -220
7.Optical alignment
●
Switch on the projector and let the 3D Len move toward
the center of projector Len.
●
Upload and apply the projector alignment program, and
slightly adjust the 3D Len position to align the “+” sign
perfectly overlap, coincide and match together.
● Screw
A – For “+” sign alignment.
● Screw
B – For adjustment of the 3D Len to make the beam
perpendicular to the silver screen.。
Fig 6-1 Optical alignment
16
iVision passive 3D system V901A user manual
8.Others
8.1 Installation reminder
●
The distance between the 3D Len and the Projector Len
should not be less than 10cm.
●
●
The 3D Len logo should be facing the projector Len.
The projection light beam should be control on the
center of the 3D Len. The projection beam should not be
projected on the Len metal frame with at least 5mm –
10mm as non-projection area from each side of the 3D
Len’s metal frame.
●
The Len projection film must be taken out during moving
showing.
●
Silver screen with 2.4 gain or above will offer the best 3D
imagine.
8.2
Daily maintenance
●
The 3D Len should be cleaned with alcoholic cloth.
(Note:Alcoholic (in liquid form) MUST not be applied )
●
Operation environment:Temperature 10℃-50℃ Relative
Humidity <60%
●
Please don’t apply sharp and hard object on the Len
surface.
●
All 3D glasses should be cleaned by alcoholic cloth. It
17
iVision passive 3D system V901A user manual
should not use water to clean.
8.3
Transportation note:
●
The passive 3D system must not be throw and cast
during transportation.
●
The Len is a fragile part. It must be stored separately
during transportation.
8.4
Safety reminder
●
Please don’t apply sharp and hard object on the Len
surface to avoid damage of the Len.
●
●
Don’t place the Len near the steam and mist area.
Don’t bend the cable and plug in abnormal way and don’t
put heavy object on the 3D control box.
●
Please switch off the 3D system before removing any
cable.
●
Please switch off the 3D system and remove all the cable
before transportation or cleaning the 3D system.
●
Please dry your hand before touching the 3D system.
- End 18


![Multi Input Module for OverView D user`s manual [v07]](http://vs1.manualzilla.com/store/data/005713215_1-e2d53d24a0a93d32e9e353f3f6c133cd-150x150.png)