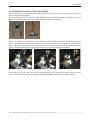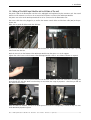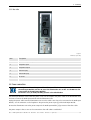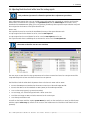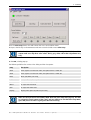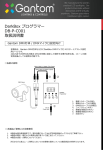
1
User’s manual
MULTI INPUT MODULE FOR
OVERVIEW D
Title:
ID-no.:
Revision:
Date:
MULTI INPUT MODULE FOR OVERVIEW D SERIES – User’s Manual
R5976778
07
April-2006
main issue
chapter 1
chapter 2
chapter 3
chapter 4
chapter 5
chapter 7
chapter 8
chapter 9
chapter 10
update
Rev 02: incl. 67"
Rev 06: chapter 3.8 new
Rev 02: new
Rev 05: new
new: The corresponding chapters are new or completely revised.
corr.: Passages of the corresponding chapter were corrected; see modification bars.
add.: Passages of the corresponding chapter were added; see modification bars.
Document History
Modifications, which result in a new version, are indicated by a vertical bar.
Trademarks
Brand and product names mentioned in this manual may be trademarks, registered trademarks or copyrights of
their respective holders. All brand and product names mentioned in this manual serve as comments or examples
and are not to be understood as advertising for the products or their manufacturers.
Copyright © 2004-2005 by BARCO
Die Weitergabe sowie die Vervielfältigung aller Unterlagen, die von uns überlassen werden, deren Verwertung
und Mitteilung ihres Inhaltes an Dritte ist nicht gestattet, soweit dies nicht ausdrücklich zugestanden ist. Urheberrechte, insbesondere auch solche an Software, werden nur insoweit übertragen, als es für die Erreichung des
speziellen Vertragszwecks erforderlich ist. Zuwiderhandlungen können zu Schadensersatz verpflichten. Alle Rechte aus der Erteilung eines Patents oder der Eintragung eines Gebrauchsmusters verbleiben bei uns.
Copyright © 2004-2005 by BARCO
All rights reserved. No part of this document may be copied, reproduced or translated. It shall not otherwise be
recorded, transmitted or stored in a retrieval system without the prior written consent of BARCO.
Guarantee and Compensation
BARCO provides a guarantee relating to perfect manufacturing as part of the legally stipulated terms of guarantee. On receipt, the purchaser must immediately inspect all delivered goods for damage incurred during transport, as well as for material and manufacturing faults. BARCO must be informed immediately in writing of any
complaints.
The period of guarantee begins on the date of transfer of risks, in the case of special systems and software on
the date of commissioning, at the latest 30 days after the transfer of risks. In the event of justified notice of
complaint, BARCO can repair the fault or provide a replacement at its own discretion within an appropriate period. If this measure proves to be impossible or unsuccessful, the purchaser can demand a reduction in the purchase price or cancellation of the contract (redhibition). All other claims, in particular those relating to compensation for direct or indirect damage, and also damage attributed to the operation of software as well as to other
services provided by BARCO, being a component of the system or independent services, will be deemed invalid
provided the damage is not proven to be attributed to the absence of properties guaranteed in writing or due to
the intent or gross negligence on the part of BARCO.
If the purchaser or a third party carries out modifications or repairs on good delivered by BARCO, or if the goods
are handled incorrectly, in particular if the systems are commissioned or operated incorrectly or if, after the
transfer of risks, the goods are subject to influences not agreed upon in the contract, all guarantee claims of the
purchaser will be rendered invalid. Not included in the guarantee coverage are system failures which are attributed to programs or special electronic circuitry provided by the purchaser, e. g. interfaces. Normal wear as well
as normal maintenance are not subject to the guarantee provided by BARCO either.
The environmental conditions as well as the servicing and maintenance regulations specified in this manual must
be complied with by the customer.
Revision sheet
To:
•
BARCO Control Rooms GmbH
An der Rossweid 5, D-76229 Karlsruhe
Phone: +49-721-6201-0, Fax: +49-721-6201-298
E-mail: [email protected], Web: www.barcocontrolrooms.com
From:
Date:
Please correct the following items in this documentation:
page
wrong
correct
Contents
1 Introduction........................................................................................................................................ 1-1
1.1 How this manual is organized ....................................................................................................................1-2
1.2 Styles and Symbols .....................................................................................................................................1-3
1.3 Safety Instructions .......................................................................................................................................1-4
1.3.1 Standards ............................................................................................................................................1-4
1.3.2 General safety instructions.................................................................................................................1-4
1.3.3 Installation ..........................................................................................................................................1-4
1.3.4 Placement ...........................................................................................................................................1-5
1.3.5 Operation ............................................................................................................................................1-6
1.3.6 Maintenance .......................................................................................................................................1-6
1.3.7 Servicing..............................................................................................................................................1-7
1.3.8 Unpacking of Devices .........................................................................................................................1-7
1.3.9 Modification of Devices ......................................................................................................................1-7
2 Installation ......................................................................................................................................... 2-1
2.1 Installing the support of the Multi Input Module (50") .............................................................................2-2
2.2 Installing the support of the Multi Input Module (67") .............................................................................2-3
2.3 Installing the sensor of the Multi Input Module ........................................................................................2-4
2.4 Cabling of the Multi Input Module and installation of the unit.................................................................2-5
3 Summary ............................................................................................................................................ 3-1
3.1 Features .......................................................................................................................................................3-2
3.2 Applications .................................................................................................................................................3-2
3.2.1 Display of Video/RGB sources............................................................................................................3-2
3.2.2 Redundancy option.............................................................................................................................3-2
3.3 Interfaces .....................................................................................................................................................3-3
3.3.1 Front side ............................................................................................................................................3-3
3.3.2 Rear side .............................................................................................................................................3-4
3.4 Power connection........................................................................................................................................3-4
3.4.1 Switching On .......................................................................................................................................3-5
3.4.2 Fuses....................................................................................................................................................3-5
3.5 Input Connections........................................................................................................................................3-5
3.5.1 Video Input..........................................................................................................................................3-5
3.5.2 S-Video Input ......................................................................................................................................3-5
3.5.3 DVI-I input ...........................................................................................................................................3-6
3.5.4 Serial Digital Input / Serial Digital Output (optional) .......................................................................3-6
3.6 Communication Connections.......................................................................................................................3-6
3.6.1 RS232 in / RS232 out .........................................................................................................................3-6
3.6.2 IR .........................................................................................................................................................3-6
3.7 IR Remote Control .......................................................................................................................................3-7
3.8 Adjusting black level and white level for analog signals..........................................................................3-8
4 Operating the Multi Input Module .................................................................................................... 4-1
4.1 General.........................................................................................................................................................4-2
4.2 Menu layout.................................................................................................................................................4-2
4.3 Addressing a Multi Input Module ...............................................................................................................4-2
4.4 Navigating ...................................................................................................................................................4-3
4.4.1 OSD closed...........................................................................................................................................4-3
4.4.2 OSD activated......................................................................................................................................4-3
4.5 Activating the OSD.......................................................................................................................................4-3
4.6 Input Signal..................................................................................................................................................4-4
4.6.1 VGA1....................................................................................................................................................4-4
4.6.2 VGA2....................................................................................................................................................4-4
4.6.3 DVI .......................................................................................................................................................4-4
4.6.4 Video ...................................................................................................................................................4-5
4.6.5 SDI .......................................................................................................................................................4-5
4.6.6 Options ................................................................................................................................................4-5
4.6.7 Signal...................................................................................................................................................4-7
4.7 Frame Geometry..........................................................................................................................................4-7
4.7.1 Input ....................................................................................................................................................4-7
4.7.2 Display.................................................................................................................................................4-9
4.7.3 Advanced ............................................................................................................................................4-9
4.7.4 Wall .................................................................................................................................................. 4-10
4.8 Geometry (Video)..................................................................................................................................... 4-11
4.8.1 Settings ............................................................................................................................................ 4-11
4.9 Picture ....................................................................................................................................................... 4-13
4.9.1 Colors................................................................................................................................................ 4-13
4.10 Other ....................................................................................................................................................... 4-14
4.10.1 Language........................................................................................................................................ 4-14
4.10.2 OSD setup....................................................................................................................................... 4-14
4.10.3 Freeze mode .................................................................................................................................. 4-14
4.10.4 Runtime.......................................................................................................................................... 4-14
4.10.5 Keyboard options........................................................................................................................... 4-15
4.10.6 Input Selection ............................................................................................................................... 4-16
5 RS 232 Remote Control...................................................................................................................... 5-1
5.1 Cabling and setting......................................................................................................................................5-2
5.2 Structure of Messages .................................................................................................................................5-3
5.2.1 Checksum Byte ...................................................................................................................................5-3
5.2.2 General commands.............................................................................................................................5-4
5.2.3 Key Codes............................................................................................................................................5-4
5.2.4 Monitor wall........................................................................................................................................5-5
5.2.5 Commands corresponding to the OSD menu Input Signal................................................................5-6
5.2.6 Commands corresponding to the OSD menu Geometry (VGA) ........................................................5-7
5.2.7 Commands corresponding to the OSD menu Geometry (Video)......................................................5-8
5.2.8 Commands corresponding to the OSD menu Picture........................................................................5-9
5.2.9 Commands corresponding to the OSD menu Other ....................................................................... 5-10
5.2.10 Protocol examples ......................................................................................................................... 5-11
6 Input Selection tool............................................................................................................................ 6-1
6.1 Requirements ..............................................................................................................................................6-2
6.2 Setup ............................................................................................................................................................6-2
6.3 Launching the Input Selection Tool ............................................................................................................6-3
6.4 Menu bar of the Input Selection Tool .........................................................................................................6-4
6.4.1 File menu ............................................................................................................................................6-4
6.4.2 Options menu .....................................................................................................................................6-5
6.4.3 Help .....................................................................................................................................................6-6
6.5 Establishing a connection............................................................................................................................6-7
6.6 Operating the Multi Input Module by means of the Input Selection Tool ................................................6-7
6.6.1 Script section.......................................................................................................................................6-7
6.6.2 Source Selection section.....................................................................................................................6-7
6.6.3 Customization .....................................................................................................................................6-9
6.6.4 Un-installation of the Input Selection Tool ..................................................................................... 6-11
7 Technical Data .................................................................................................................................... 7-1
7.1 General data ................................................................................................................................................7-2
7.2 Interfaces .....................................................................................................................................................7-2
7.2.1 Video1, Video 2...................................................................................................................................7-2
7.2.2 S-Video ................................................................................................................................................7-2
7.2.3 RGB ......................................................................................................................................................7-2
7.2.4 DVI .......................................................................................................................................................7-3
7.2.5 RS232 Remote Control........................................................................................................................7-3
7.3 Part numbers ...............................................................................................................................................7-4
8 Troubleshooting ................................................................................................................................. 8-1
8.1 IR Remote Control .......................................................................................................................................8-2
8.2 Hot Line........................................................................................................................................................8-3
9 Tips and Tricks .................................................................................................................................... 9-1
9.1 Upscaling a source.......................................................................................................................................9-2
10 Appendix ........................................................................................................................................ 10-1
10.1 Supported input sources ........................................................................................................................ 10-1
10.1.1 DVI Input ........................................................................................................................................ 10-1
10.1.2 RGB Input ....................................................................................................................................... 10-2
10.1.3 Video Input..................................................................................................................................... 10-3
10.2 All types of RCU ...................................................................................................................................... 10-4
10.2.1 IR Remote Control Type 1 ............................................................................................................. 10-4
10.2.2 IR Remote Control Type 2 ............................................................................................................. 10-1
10.2.3 IR Remote Control Type 3 ............................................................................................................. 10-2
1. Introduction
1 Introduction
This chapter explains the structure of the manual itself and the used typographic styles and symbols. Safety information is provided concerning the operation of computer systems from Barco.
Barco – Multi Input Module for OverView D – R5976778 – user's manual – Revision 07 – April 2006 _______________________________________________________ 1-1
1. Introduction
1.1 How this manual is organized
This section explains the structure of the manual itself and the used typographic styles and symbols. Safety information is provided concerning the operation of computer systems from Barco.
•
Introduction
explains styles and symbols of this manual
•
Installation
explains how the Multi Input Module is installed (in a 50"system).
•
Summary
gives an overview about the features of Multi Input Module
•
Operating
describes operating the Multi Input Module an explains the OSD
•
RS232 Remote Control
explains cabling and settings of the RS232 Remote-Control, introduces the syntax and lists the available
commands
•
Input Selection Tool
introduces and explains the graphical user inter face Input Selection Tool for switching the inputs
•
Technical Data
gives tabular overviews about the technical details the Multi Input Module
•
Troubleshooting
give advice in case of mal function and lists the hotline address
•
Tips and tricks
give some useful hints about spanning up sources
•
Appendix
lists the tested input sources and shows all types of RCU
Chapters, pages, figures and tables are numbered separately. Chapters are indicated by a »point syntax«, e. g.
4.2.3, pages by a »dash syntax«, e. g. 2-1, as figures and tables are, e. g. figure 5-4.
Barco – Multi Input Module for OverView D – R5976778 – user's manual – Revision 07 – April 2006 _______________________________________________________ 1-2
1. Introduction
1.2 Styles and Symbols
The typographic styles and the symbols used in this document have the following meaning:
Bold
Labels, menus and buttons are printed in Bold font.
Condensed
Links to both other chapters of this manual and to sites in the Internet are printed
condensed. In the on-line version of this manual all hyperlinks appear teal.
Courier
Names of files and parts from programs are printed in the Courier font.
Courier bold
Inputs you are supposed to do from the keyboard are printed in Courier bold font.
If you do not heed instructions indicated by this symbol there is a risk of damage to the
equipment!
If you do not heed instructions indicated by this symbol there is a risk of electrical shock
and danger to personal health!
If you do not heed instructions indicated by this symbol there is a risk of damage to parts,
which are sensitive towared electrostatic charge!
If you do not heed instructions indicated by this symbol there is a risk to get harmed by
sharp objects!
If you do not heed instructions indicated by this symbol there is a risk that parts may
explode!
If you do not heed instructions indicated by this symbol there is a risk that hot parts impact
persons or objects!
The sheet icon indicates additional notes.
Next to this icon you find further information.
This arrow marks tips.
Next to this icon you find important notes.
Barco – Multi Input Module for OverView D – R5976778 – user's manual – Revision 07 – April 2006 _______________________________________________________ 1-3
1. Introduction
1.3 Safety Instructions
This section describes safety precautions, which must be observed when installing and operating a product from
Barco.
1.3.1 Standards
Safety Regulations
The equipment is built in accordance with the requirements of the international safety standard IEC 60950-1, UL
60950-1 and CSA 22.2 No 60950-1-03, which are the safety standards of information technology equipment
including electrical business equipment.
The safety standards of information technology equipment impose important requirements on the use of safety
critical components, materials and isolation, in order to protect the user or operator against the risk of electric
shock and energy hazard, and having access to live parts.
Safety standards also impose limits to the internal and external temperature rises, radiation levels, mechanical
stability and strength, enclosure construction and protection against risk of fire.
Simulated single fault condition testing ensures the safety of the equipment to the use even when the equipment’s normal operation fails.
1.3.2 General safety instructions
•
All the safety and operating instructions should be read before using this unit.
•
The operating instructions manual should be retained for future reference.
•
All warnings on the device and in the documentation manuals should be adhered to.
•
All instructions for operating and use of this equipment must be followed precisely.
1.3.3 Installation
Installation and preliminary adjustments should be performed by qualified Barco personnel or authorized Barco
service dealers.
1.3.3.1 Power Connection
This product should be operated from an AC power source. Power input is auto-ranging from 100V to 240V.
Check the power rating on your outlet before connecting the devices to the wall outlet or to
a power strip. Contact your facilities manager or a qualified electrician if you are not sure
what type of power is supplied to your building.
All equipment in the system is equipped with a 3-wire grounding plug, a plug having a third (grounding) pin.
This plug will only fit into a grounding-type power outlet. This is a safety feature. If you are unable to insert the
plug into the outlet, contact your electrician to replace your obsolete outlet. Do not defeat the purpose of the
grounding-type plug.
The devices are designed to operate with single-phase power systems having a grounded
neutral conductor. To reduce the risk of electrical shock, do not plug into any other type of
power system.
Use only the power cord supplied with your device. While appearing to be similar, other power cords have not
been safety tested at the factory and may not be used to power the projector. For a replacement power cord,
contact your dealer.
Barco – Multi Input Module for OverView D – R5976778 – user's manual – Revision 07 – April 2006 _______________________________________________________ 1-4
1. Introduction
If an extension cord is used with this product, make sure that the total of the ampere ratings on the products
plugged into the extension cord does not exceed the extension cord ampere rating.
Also make sure that the total of all products plugged into the wall outlet does not exceed 15 amperes.
A. Mains lead (AC Power cord) with CEE 7 plug:
The colors of the mains lead are colored in accordance with the following code:
Green-and-yellow:
Earth (Ground)
Blue:
Neutral
Brown:
Line (live)
B. Power cord with NEMA 5-15 plug:
The wires of the power cord are colored in accordance with the following code:
Green or Green/yellow:
Earth (Ground)
White or blue:
Neutral
Black or brown:
Line (live)
1.3.4 Placement
Place the device in a well ventilated area away from sources of ignition and out of direct sun light. Never expose
this product to rain or excessive moisture
Slots and openings in the cabinet and the back or bottom are provided for ventilation; to ensure reliable operation of the product and to protect it from overheating, these openings must not be blocked or covered.
Exposing flammable or combustible materials into close proximity of this device could result in the spontaneous
ignition of that material, resulting in a fire. For this reason, it is absolutely necessary to leave an "exclusion zone"
around all external surfaces of the device whereby no flammable or combustible materials are present. The exclusion zone must be not less than 10 cm (4").
•
Do not allow anything to rest on the power cord. Do not locate this product where persons will walk on the
cord.
Barco – Multi Input Module for OverView D – R5976778 – user's manual – Revision 07 – April 2006 _______________________________________________________ 1-5
1. Introduction
1.3.5 Operation
Barco products are designed and manufactured to meet the most stringent safety regulations.
During operation, the equipment radiates heat on its external surfaces and from ventilation ducts, which is
both normal and safe.
•
Do not cover the equipment with any material while the equipment is in operation.
•
Do not block the cooling fans or free air movement under and around the device.
•
Keep flammable and combustible materials away from the device at all times.
In the event of fire, use sand, CO2, or dry powder fire extinguishers; never use water on an
electrical fire.
Do not allow anything to rest on the power cord. Do not locate this product where people will walk on the cord.
To disconnect the cord, pull it out by the plug. Never pull the cord itself.
•
Never push objects of any kind into this product through cabinet slots as they may touch dangerous voltage
points or short cut parts that could result in a risk of fire or electrical shock.
•
Never spill liquid of any kind on the product. Should any liquid or solid object fall into the cabinet, unplug the
set and have it checked by qualified service personnel before resuming operations.
Adjust only those controls that are covered by the operating instructions since improper adjustment of the other
controls may result in damage and will often require extensive work by a qualified technician to restore the
product to normal operation
Lightning - For extra protection for this video product during a lightning storm or when it is lift unattended and
unused for a long period of time, unplug it from the wall outlet. This will prevent damage to the unit due to
lightning and AC power-line surges.
1.3.6 Maintenance
Please refer to the maintenance instructions in the user's manual! Do not perform other maintenance work than
explained in the user's manual!
Barco – Multi Input Module for OverView D – R5976778 – user's manual – Revision 07 – April 2006 _______________________________________________________ 1-6
1. Introduction
1.3.7 Servicing
Never open the case of a device without first disconnecting the power supply cord!
Measurements and tests with an opened device may be carried out only in the factory or by
specially trained personnel, due to the dangers of electrical shock.
Do not attempt to service this device yourself, as opening or removing covers may expose you to dangerous
voltage potential and risk of electric shock! Refer all service to a qualified Barco service center.
Always have service performed on this product by authorized Barco service personnel. Always insist on genuine
Barco replacement parts. Never use non-Barco replacement parts as they may degrade the safety of this device.
Call for service in the following conditions :
•
When the power cord or plug is damaged or frayed.
•
If liquid has been spilled into the device.
•
If the product has been exposed to rain or water.
•
If the product does not operate normally when the operating instructions are followed.
•
If the product has been dropped or the cabinet has been damaged;
•
If the product exhibits a distinct change in performance, indicating a need for service.
When replacement parts are required, be sure the service technician has used original Barco replacement parts
or authorized replacement parts which have the same characteristics as the Barco original part. Unauthorized
substitutions may result in degraded performance and reliability, fire, electric shock or other hazards. Unauthorized substitutions may void warranty.
Upon completion of any service or repairs to this unit, ask the service technician to perform safety checks to determine that the unit is in proper operating condition.
1.3.8 Unpacking of Devices
Note advises on the packaging for unpacking!
1.3.9 Modification of Devices
Mechanical or electrical modifications must not be made to the devices. Barco is not liable for damages resulting
from modified devices.
Barco – Multi Input Module for OverView D – R5976778 – user's manual – Revision 07 – April 2006 _______________________________________________________ 1-7
2. Installation
2 Installation
The Multi Input Module will be installed into the dark box, all cables guided inside the system. This chapter describes how an OverView D systems without Multi Input Module is upgraded with this unit.
Barco – Multi Input Module for OverView D – R5976778 – user's manual – Revision 07 – April 2006 _______________________________________________________ 2-1
2. Installation
2.1 Installing the support of the Multi Input Module (50")
To install the Multi Input Module, the top rear cover [1] of the system has to be removed. Use a torx key size 10
to remove the sheet metal.
When the sheet metal is removed, on the left side of the darkbox you see the enforcement metal. The support
for the Multi Input Module will be fixed to this enforcement. Unscrew the screw shown in the picture.
Into the vertical profile, a movable nut has to be inserted.
Look at the support of the Multi Input Module. It has a "nose" which will have to be fit into the hole of the enforcement metal indicated by the arrow. In addition, it has 4 spares, labeled 1-1', 2-2'. For internal installation of
the Multi Input Module, the unit will be hooked into the spares 1-1'. The lateral front edge of the Multi Input Unit
will fit into the slot of the support.
Insert the support. Fit the nose into the enforcement metal. The support of the Multi Input Module will be fixed
on the bottom by means of the screw you previously loosend, and on the top by an additional screw which will
be tightened using the nut inserted into the profile.
After the support has been attached, the IR sensor for operating the Multi Input Module via IR remote control has
to be installed.
Barco – Multi Input Module for OverView D – R5976778 – user's manual – Revision 07 – April 2006 _______________________________________________________ 2-2
2. Installation
2.2 Installing the support of the Multi Input Module (67")
Installation of the support of the Multi Input Module in a 67" structure is about the same as for the 50" systems.
The main difference is that there is no need to fit the "nose".
Remove the rear cover of the structure.
The fixation material for 67" are the two short hammerbolts included in the installation kit. Insert the two hammerbolts:
Subsequently the hammerbolts are inserted into the left vertical profile (seen from behind). Fix the support
about 50mm above the bottom connection bracket:
After the support has been attached, the IR sensor for operating the Multi Input Module via IR remote control has
to be installed.
The steps described in the following chapters are the same for 50" and 67" inch systems and therefore only explained once (50" system.)
Barco – Multi Input Module for OverView D – R5976778 – user's manual – Revision 07 – April 2006 _______________________________________________________ 2-3
2. Installation
2.3 Installing the sensor of the Multi Input Module
The IR sensor of the Multi Input Module will be placed upon the IR sensor of the projection unit. Therefore it
comes with two fixation facilities.
Before installing the sensor, plug in the cable! Mind the correct orientation! For better recognition, the socket
NOT to be connected to the sensor (but to the Multi Input Module) is painted black:
One by one, replace the fixation screws of the IR sensor of the projection unit by the fixation facilities of the
sensor of the Multi Input Module. In the picture, you can see the required steps: replace one screw, then the
other, finally attach the second sensor on top of the IR sensor of the projection unit. Make sure not to block the
sensor of the projection unit by a wrong attachment of the IR sensor of the Multi Input Module!
Since the back side of the unit is no longer accessible when the unit is installed, the power cables to and the
sensor cable have to be connected to the Multi Input Module BEFORE inserting the unit into the darkbox.
Barco – Multi Input Module for OverView D – R5976778 – user's manual – Revision 07 – April 2006 _______________________________________________________ 2-4
2. Installation
2.4 Cabling of the Multi Input Module and installation of the unit
The power cable of the illumination unit has to be unplugged and lenghtened by the extension cord. The second
interface of the extension cord has to be connected to the power in socket of the Multi Input Module.
The power out socket of the Multi Input Module has to be connected to the illumination unit.
The sensor cable has to be plugged in, as well as the remote control cables and the data cable (DVI) to the projection unit.
Make sure to guide all cables inside the dark box!
Now you can insert the Multi Input Module into the dark box. Tilt it to enable the insertion and put it up only
when inside the dark box.
Hook the two rods on the bottom of the Multi Input Module into the spares 1-1' of the support.
Tighten the curled screw on the bottom of the Multi Input Module. That's it. No additional fixation is required.
Now the cabling of the sources (front interfaces can be done. When all cables are connected, carefully guide
them through the dark box. Make sure that they are not within the range of projection – otherwise you will see
the cables on the screen!
When all cables are attached, switch on the Multi Input Unit and test it. Subsequently re-attach the top rear cover
of the OverView projection system.
Barco – Multi Input Module for OverView D – R5976778 – user's manual – Revision 07 – April 2006 _______________________________________________________ 2-5
3. Summary
3 Summary
This chapter gives an overview about the features of the MULTI INPUT MODULE.
Barco – Multi Input Module for OverView D – R5976778 – user's manual – Revision 07 – April 2006 _______________________________________________________ 3-1
3. Summary
3.1 Features
The MULTI INPUT MODULE for OverView D series provides a set of interfaces to connect all common RGB, Video, DVI,
and SDI signals and to display them at the respective OverView D projection module.
The source will be displayed full screen on the respective projection module. It is not possible
to have it displayed in a window and/or to move it on the Display Wall.
The MULTI INPUT MODULE features an OnScreen Display to select the source and to adjust the parameters. The OnScreen Display is operated via an IR Remote Control.
Superior composite video performance, the capability to process all known (and unknown) VGA timings and formats, with every possible sync type, guarantees perfect satisfaction in most applications.
3.2 Applications
3.2.1 Display of Video/RGB sources
Select the MULTI INPUT MODULE to display a RGB/Video source full screen on a projection module.
Please mind: For OverView DR+ (SXGA+ resolution), the possible input resolution of signals
to be scaled is restricted to SXGA and lower. Sources with resolutions SXGA+ can be
displayed 1:1, sources with resolution higher than SXGA cannot be displayed on an SXGA+
projection module.
3.2.2 Redundancy option
Select the MULTI INPUT MODULE for a redundant configuration: The display wall controller is attached to the standard DVI-I input and the sources to be displayed directly on analog inputs (RGB inputs, video inputs). Upon controller failure, the sources are still displayed on the display modules, scaled up to each cube size: no loss of information.
Barco – Multi Input Module for OverView D – R5976778 – user's manual – Revision 07 – April 2006 _______________________________________________________ 3-2
3. Summary
3.3 Interfaces
3.3.1 Front side
Figure 1
interfaces of the Multi Input Module (front side)
Input
interface
Video 1
Cinch (FBAS)
Video 2
Cinch (FBAS)
S Video
Mini DIN 4pol (S-Video, Y/C)
RGB
15pol HD SubD receptacle (R/G/B/Hsync/Vsync)
DVI IN
DVI-I input
SDI IN/OUT
SDI input (optional)
Barco – Multi Input Module for OverView D – R5976778 – user's manual – Revision 07 – April 2006 _______________________________________________________ 3-3
3. Summary
3.3.2 Rear side
Figure 2
interfaces (rear side)
Item
description
1
power switch, 1= On, 0=Off
2
AC power input
3
AC power output
4
RS232 IN (D9)
5
RS232 OUT (D9)
6
IR sensor
7
DVI D OUT
3.4 Power connection
In case you use the Multi Input Module with a 200W illumination unit, connect the AC In of
the Multi Input Module with the AC out of the illumination unit. In this case do NOT use the
power outlet of the Multi Input Module!
In all other cases (IU 100W, IU120W) proceed as described below!
The Multi Input Modules comes with two power cords: one to lengthen the power cable of the illumination unit,
and one to connect the Multi Input module with the illumination unit.
Unplug the power cable from the illumination unit. Since this cable is too short to be connected to the Multi Input
Module, use the extension cord to lengthen it. Plug it into the power input [2] of the Multi Input Module.
Connect the illumination unit to the power output of the Multi Input Module [3] by means of the other cable.
The power output is live as soon as the connection to the wall outlet is established.
Barco – Multi Input Module for OverView D – R5976778 – user's manual – Revision 07 – April 2006 _______________________________________________________ 3-4
3. Summary
3.4.1 Switching On
The power switch of the Multi Input Module only switches the functionality of this module. It has no impact on
the power supply of the illumination unit: the power output of the Multi Input Module where the illumination
unit is connected is live as soon as the Multi Input Module is connected to the wall outlet.
Use the power switch[1] to switch on the Multi Input Module.
The sequence of switching on the system (projector, Multi Input Module, sources connected to the Multi Input
Module) does not matter.
3.4.2 Fuses
The fuse is located beneath the AC power input and is of Type T 4 AH / 250V
Always replace with the same type of fuse!
3.5 Input Connections
The Multi Input Module has multiple input connections for all common RGB and video sources. The active input
can be selected using the cursor key on the IR Remote Control and the OSD or Input Selection Tool.
3.5.1 Video Input
There are two cinch connectors to connect a composite video, labeled Video1 and Video2.
The following signals can be connected to these connectors:
•
Composite video signals from a VCR, etc.
Composite Video is a single video signal that contains luminance, color and synchronization
information.
3.5.2 S-Video Input
Connect an S-Video source to the 4 sub Mini-Din interface labeled S-Video.
The following signals can be connected:
•
Separate Y-luma/C-chroma signals for higher quality playback of Super VHS-signals.
Pin configuration mini DIN plug:
1
ground luminance
2
ground chrominance
3
luminance 1.0Vpp ± 3 dB
4
chrominance 282 mVpp ± 3 dB
Barco – Multi Input Module for OverView D – R5976778 – user's manual – Revision 07 – April 2006 _______________________________________________________ 3-5
3. Summary
3.5.3 DVI-I input
Slot 5 provides a single link DVI I input.
•
Connect one channel of the dual channel UGX graphics card to this input
3.5.4 Serial Digital Input / Serial Digital Output (optional)
If required, the Multi Input Module can be extended by a SDI interface.
The input is always 75 Ω terminated. The output impedance of the SDO is 75 Ω.
This avoids the need for analog processing anywhere in the video production chain and guarantees the ultimate
image quality.
3.6 Communication Connections
The following communication connections are available:
•
RS232 in / RS232 out.
•
IR to plug in the IR sensor to
3.6.1 RS232 in / RS232 out
To connect a computer, e.g. IBM PC (or compatible), Apple Macintosh to the RS 232 input of the Multi Input Module to allow communication between the computer and the Multi Input Module. Via this connection the Multi
Input Module can be RS232 remote-controlled.
Connect the shorting plug to shorten the RS232 output.
3.6.2 IR
The IR sensor to enable the communication with the IR Remote Control unit is plugged to this input. Please mind
the correct orientation of the cable!
Barco – Multi Input Module for OverView D – R5976778 – user's manual – Revision 07 – April 2006 _______________________________________________________ 3-6
3. Summary
3.7 IR Remote Control
The Multi Input Module is operated by means of an IR Remote Control.
Figure 3
IR Remote Control
Item
description
1
On/off button, also used for re-programming
2
OK button to enter the OSD, to exit a sub menu and/or to close the OSD
3
Up key
4
Right key
5
Down key
6
Left key
All other keys
No function (except the numeric keys when programming the IR, see below)
To program the IR remote control, press the following keys in the described sequence:
•
simultaneously press the On/Off + OK key for 3 seconds
•
Use the numeric keys, and enter the code 2 7 0
•
Press On/Off again.
For confirmation, the On/Off key will blink 3 times
This instruction can also be found on a label on the back of the IR remote control unit.
Barco – Multi Input Module for OverView D – R5976778 – user's manual – Revision 07 – April 2006 _______________________________________________________ 3-7
3. Summary
3.8 Adjusting black level and white level for analog signals
Only authorized personnel is allowed to perform these adjustment procedures.
These adjustments require the access to a hidden menu of the OSD. The commands to switch to and from the
hidden menu are listed in two script files, the Systemmenu.txt and the ColorSetup.txt. These files can be
downloaded from KARINtranet (http://karsrv11/products/download/data.asp?search=Input Selection Tool) and
then assigned to the buttons of the Input Selection Tool.
Please note:
The script files have to be stored in the installation directory of the Input Selection Tool!
A script assigned to the first button has to be saved as ISTScript1.txt.
A script assigned to the second button has to be saved as ISTScript2.txt, and so on.
The script executed when establishing the connection has to be saved as ISTScriptInit.txt.
The names of the files are not case sensitive!
The next steps assume that the script Systemmenu.txt has been renamed and saved as ISTScript1.txt and the
script ColorSetup.txt has been renamed and saved as ISTScript2.txt.
The black level and the white level adjustment have to be done for VGA1 and for VGA2!
•
Connect the COM-port of Notebook to the RS232 In interface of the Multi Input Module.
•
Connect the VGA out of the Notebook to VGA1 (VGA2) of the Multi Input Module.
•
Start a color test program (e.g. Ntest from Nokia).
•
As test image, use a black background with a white center box.
•
Feed the test image to VGA1 and select VGA1 to be the active input.
•
Start the Input Selection Tool.
You will see the button with the caption System Menu (to switch on the standard user menu) and the button
with the caption Color Setup (to switch on the access to the hidden menu for black level and white level adjustment).
Barco – Multi Input Module for OverView D – R5976778 – user's manual – Revision 07 – April 2006 _______________________________________________________ 3-8
3. Summary
Press the Color Setup button. This will activate the access to the hidden menu.
Now press the left key on the Remote-Control Unit to start the hidden menu Color Setup.
With the Color Setup menu active, the gamma table of the signal is disabled, and the
output mode uses only three color values: black, gray, white. This makes adjustment very
easy.
On the OSD, a dialog pops up.
The following table lists the entries of the dialog and their description:
Entry
description
VGA1
If the signal is connected to VGA1, this option shows a white dot
VGA2
If the signal is connected to VGA2, this option shows a white dot
B&W
Black and White (not used)
Brightness
Actual brightness (not used)
Contrast
Actual contrast (not used)
Offset
To adjust the black level
Gain
To adjust the white level
Display
Display white point adjustment (not used)
Make sure that you do not select VGA1/VGA2 when the color setup menu pops up. This will
re-activate the actual gamma of the signal, and you will have to exit the Color Setup Menu
(press OK) and to re-enter it again (press the left cursor key)
Barco – Multi Input Module for OverView D – R5976778 – user's manual – Revision 07 – April 2006 _______________________________________________________ 3-9
3. Summary
•
Use the up/down cursor key to select Offset (to adjust the black level).
•
Press the right cursor key to activate it.
•
A submenu pops up with the entries Auto, R, G, B.
•
Select Auto, and wait until the adjustment is finished.
•
Exit the Offset menu by pressing OK.
•
Use the up/down cursor key to select Gain (to adjust the white level).
•
Press the right cursor key to activate it.
•
A submenu pops up with the entries Auto, R, G, B.
•
Select Auto, and wait until the adjustment is finished. This takes a bit longer than with Offset!
•
Subsequently the R, G, B parameters have to be adjusted.
Probably the values for red and blue are smaller than for green. Let's assume to start with
red, than proceed with blue, and finally adjust green.
Anyway, the sequence does not really matter!
•
Carefully watch the left side of the white test box.
•
Select R (red).
•
Increase the value of red by pressing the right key until red is extended up to the left edge of the white test
box!
•
Select B (blue), and increase the value of blue by pressing the right key until the blue spreads up to the left
edge (which means that the most left column of pixels of the "white" box no longer is red, but magenta).
•
Select G (green), and increase the value of green by pressing the right key until the most left column of
pixels of the test box is white.
•
Exit the submenu by pressing OK.
•
To apply the adjusted black level and the adjusted white level,
•
Navigate with the cursor key to the active input (VGA1 or VGA2, respectively) und press OK.
•
Apply the NOKIA test pattern. The display should show "nice" colors.
•
Finally switch back to the System Menu by pressing the button System Menu on the Input Selection Tool!
Repeat all steps for VGA2.
Barco – Multi Input Module for OverView D – R5976778 – user's manual – Revision 07 – April 2006 _____________________________________________________ 3-10
4. Operating the Multi Input Module
4 Operating the Multi Input Module
All the functions of the Multi Input Module are selected and adjusted using an advanced on screen display (OSD)
by means of an IR-remote control. The OSD includes an online help window to explain the functionality of the
menu items. Direct control via the IR Remote Control is not supported.
Barco – Multi Input Module for OverView D – R5976778 – user's manual – Revision 07 – April 2006 _______________________________________________________ 4-1
4. Operating the Multi Input Module
4.1 General
The OSD allows easy access to commands for selecting a source and setting its parameters.
The OSD is activated by pressing M on the IR Remote Control.
Menu items which are not applicable are grayed out.
There are also menu items which are not grayed out but don’t effect anything due to a
missing functionality of this version of the Multi Input Module. Please refer to the menu
description to learn more about the available menus and commands.
Adjusted menu items will be saved if
•
The sub menu is closed
The selection of an input will be saved whether the sub menu has been closed or not.
4.2 Menu layout
The existence of a submenu is indicated by an arrow:
A selected item is indicated by a dot:
When selecting a menu item a dialog box is displayed with explanations.
4.3 Addressing a Multi Input Module
A Multi Input Module is addressed by means of its address. To assign an address, proceed as follows:
•
While the OSD is closed, press the Left key. The System menu is displayed.
•
In the System menu, select MTBF | IR Accesscode
•
Direct the IR Remote Control unit to the Multi Input Module.
•
With the numeric keys on the IR Remote Control Unit (RCU), enter the specific address. This has to be a twodigit value.
Example: to assign the address "3" to a Multi Input Module, enter 03 on the RCU.
To find out the address of a Multi Input Module, enter 00 with the numeric keys on the RCU. Keep in mind that
the answer of the Multi Input Module will be only e.g. 3, and not 03.
After assigning an address to a Multi Input Module, you can send commands to only this Multi Input Module by
first entering the address and then pressing the respective command key and operating the device via the OSD.
All commands and settings will be applied to the Multi Input Module with this specific address.
If you want to address a different Multi Input Module, start your command with the address of this Multi Input
Module. Make sure that the previously addressed device realizes this new address. In case it does not realize the
new address, e.g. the IR Remote Control access to this Multi Input Module is blocked during entering the new
address, it will listen to the commands although it is not intended to do.
The address of the Multi Input Module operated via the IR Remote Control and the Remote
Control adress of the same device operated via RS232 Remote Control may differ.
Barco – Multi Input Module for OverView D – R5976778 – user's manual – Revision 07 – April 2006 _______________________________________________________ 4-2
4. Operating the Multi Input Module
4.4 Navigating
4.4.1 OSD closed
In case the OSD is closed, the keys of the IR Remote Control are assigned to the following actions:
key
Action
UP
Opens the SOURCE menu.
LEFT
Opens the INFO menu
RIGHT
Opens the INPUT GEOMETRY menu
DOWN
Toggles through the inputs: Video1, Video2, S-Video, RGB, DVI
M
Activates the OSD and opens the MAIN menu
4.4.2 OSD activated
In case the OSD is activated, the keys of the IR Remote Control are assigned to the following actions:
key
Action
UP
Select the previous menu item. Wrap around is provided at the first item of a menu.
LEFT
Decrease the actual selected value.
Toggle ON/OFF buttons.
Select an OPTION button.
RIGHT
Increase the actual selected value.
Toggle ON/OFF buttons.
Select an OPTION button.
DOWN
Select the next menu item. Wrap around is provided at the last item of a menu.
M
Close the active menu and return to the previous, Exit the OSD
4.5 Activating the OSD
Press the OK key on the IR Remote Control to activate the OSD. The main menu will be displayed.
The main menu includes the following menu items:
•
Input Signal
•
Geometry (VGA)
•
Geometry (Video)
•
Picture
•
Other
Use the up and down keys to select a menu item.
Press the right key to activate it.
Barco – Multi Input Module for OverView D – R5976778 – user's manual – Revision 07 – April 2006 _______________________________________________________ 4-3
4. Operating the Multi Input Module
4.6 Input Signal
This menu items gives access to select the desired input source.
No information is given if the input source is actually connected!
Use the M key to activate the OSD.
Use the up/down key to select Input Selection.
Press the right key to select.
A submenu is displayed which lists the available inputs. The currently active input is indicated by a dot.
Use the up/down key to select the desired source and subsequently press the right key to activate it.
4.6.1 VGA1
This item refers to the source connected to the RGB interface. If this menu item is selected and active, timing
information detected on the input is shown:
Item
description
Resolution
Resolution in pixels and in lines
H
Horizontal frequency
V
Vertical frequency
S
Type of synchronization signal:
HV:
Separate H-Sync and V-Sync
H-Comp:
Composite video
on green:
Sync signal is embedded on the green signal
H+(V+):
active High Sync
H- (V-):
active Low Sync
This information is also taken to save user adjustments for this timing.
A timing is recognized as “known” according to following rules:
Total vertical lines range: +/- 2
Horizontal frequency range: ~ 1%
Same sync type.
If a source provides more than one sync types the used sync is selected in following order
1st : Separate H Sync and V Sync.
2nd: Composite Sync.
3rd : Sync on Green
4.6.2 VGA2
This "interface" refers to an analog signal connected to the DVI-I interface.
4.6.3 DVI
Select DVI if the source connected to the interface labeled DVI should be displayed (in Control Room applications,
usually this interface is connected to the graphical card of the wall controller and therefore the active input)
Barco – Multi Input Module for OverView D – R5976778 – user's manual – Revision 07 – April 2006 _______________________________________________________ 4-4
4. Operating the Multi Input Module
4.6.4 Video
This menu item gives access to a submenu to select the respective video source out of Video1, Video2, S-Video.
Press the left key to open the submenu. A list with video sources pops up:
Item
description
Comp1
Select Comp1 if the video source to be shown is connected to the input labeled Video1
Comp2
Select Comp2 if the video source to be shown is connected to the input labeled Video2
Y/C
Select Y/C if the video source to be shown is connected to the input labeled S-Video
AV
Not available
4.6.5 SDI
Select SDI if the source connected to the interface labeled SDI should be displayed
SDI is only available on request!
4.6.6 Options
This menu item gives access to a submenu to specify the parameters of the active source.
Press the left key to open the submenu.
•
VGA Options
Only shows up if the source connected to the interface labeled RGB is active.
The following options are available:
Item
description
Auto Sync Detect:
Enables or disables the auto detection of the supplied synchronized signal. Supported sync types are Separete Hsync and Vsync, Composite Sync at H input, Sync
on Green.
Besides Auto Sync Detection, also manual detection of the sync signal can be
selected. Please note: In manual sync type mode no other sync type is detected
as the chosen one. If for example composite sync is selected and a sync on green
signal is applied, this signal is processed as “no signal”! It might therefore be
recommended to select Auto Sync Detect. However, in power saving mode
(DPMS) the desired sync type should be selected manually since in some cases, if
the source stops, only Hsync and Vsync can be taken as synchronization signal
HV Sync:
manual selection of separate Hsync and Vsync,
Composite Sync:
manual selection of composite sync
Sync on Green:
manual selection of sync on green
Barco – Multi Input Module for OverView D – R5976778 – user's manual – Revision 07 – April 2006 _______________________________________________________ 4-5
4. Operating the Multi Input Module
Details:
H-Clamp:
Horizontal Clamp Place (only for special purposes).
Default value is 8. Wrong settings may cause artifacts!
SoG Level
Voltage level for the sync on green comperator
(only for special purposes). Wrong settings may result in “no signal”.
Coast Lines:
Number of serration pulses.
If the setting is below the number of serration pulses , the picture
may be right shifted at the top. Default value is 7.
Edge:
H-Sync edge (leading or trailing) for sample rate recovery.
If this item is changed, in case of SoG sync, H-Clamp has also to
be adjusted.
C-Sync Filter: Only for SoG or composite sync.
C-Sync Filter specifies a delay time within the C-Sync must be at
his active level before V-Sync is detected. The following delay
times are related to the settings:
off: 3.2 µs
HF: 6.4 µs
LF: 20.0 µs
Default value is HF. In some case there are unusual long pulses
during the vertical sync time, which leads to erroneous sync separation. In this cases the setting LF may be helpful. If the pulses
are really short, the C-Sync filter can be disabled.
Multisync:
•
•
this setting allows to display very unstable signals. Default value is ON.
Video Options
This menu is only accessible if a video input (Video1, Video2, S-Video) is active.
Item
description
Source:
Optimize color recovery for VCR, satellite or terrestrial video sources
Every video source has a delay between the luminance and the chrominance information.
Auto:
Detection of the video norm PAL, NTSC; SECAM with also their sub standards.
Following video norms are supported: PAL, NTSC M, SECAM, NTSC 44, P AL M, PAL N,
PAL 60, NTSC Mono 50Hz Mono 60Hz.
Norm:
Shows the norm of the incoming video signal. If Auto is disabled, the desired norm can
be selected manually.
Auto Format:
Allows the detection of several 16:9 and so-called “letter boxes” formats. For this
formats the top and bottom blacklines are suppressed via vertical expansion.
AV:
Operation modes of the AV plug (not available)
SDI Options
This menu is only accessible if a SDI input source is active.
Item
description
Format:
Shows the SDI formats: 625-50Hz, 525-60Hz
SMTP
SMTP, NRZI and DESC(rambing) are options for non-standard applications. Wrong settings may result in corrupt picture or loss of signal
NRZI
DESC
Barco – Multi Input Module for OverView D – R5976778 – user's manual – Revision 07 – April 2006 _______________________________________________________ 4-6
4. Operating the Multi Input Module
•
AV
Not available
4.6.7 Signal
This menu item allows to control the signal management. The following functions can be enabled or disabled:
Item
description
Power On
Use this selection to specify the input which is selected at power on. If the last active
input should be selected again, enable LAST
Search
Enables the search of active inputs if no signal is supplied at the current input. This
function provides the redundancy option.
Supervision
Enables auto selection of other inputs if new signals are detected. Supervision of inactive inputs is only possible for inputs which are not in the same group as the active
input, e.g. if the active input is Video1, no supervision is possible for Video2 or SVideo.
4.7 Frame Geometry
Frame geometry is only available if the active source is connected to the input labeled RGB or DVI. This menu
item allows to set all parameters which are related to the size and position of the displayed picture.
4.7.1 Input
This menu items refers to all parameters which describe the incoming picture. This menu can be selected directly
by pressing the right key on the IR Remote Control while the OSD is off.
•
Pixel rate
Adjust pixel rate until the whole frame appears the same
•
Phase shift
Adjust phase shift to get the best picture quality
•
X-Position
Adjust horizontal frame position
•
Y-Position
Adjust vertical frame position
•
Pixel
Number of active pixels of the incoming PC signal, e.g. SXGA 1280
•
Lines
number of active lines of the incoming PC signal, e.g. SXGA 1024.
“I” indicates interlaced signals
Barco – Multi Input Module for OverView D – R5976778 – user's manual – Revision 07 – April 2006 _______________________________________________________ 4-7
4. Operating the Multi Input Module
•
Interlaced
Item
description
Interlaced
Selection of interlaced or none-interlaced input formats.
PC
Optimized de-interlacing for PC-Signals (static mesh).
Sport
Optimized de-interlacing for fast moving RGB video signals (temporal de-interlacing).
Movie
Optimized de-interlacing for less moving RGB video signals (spatial de-interlacing).
Auto Phase
Enabling and time period of automatic phase sensing. This function detects phase
distortion +/- 2 steps around the actual phase setting.
Note: Correct operation depends on various parameters. Due to this correct functionality could not be guaranteed. Correct operation has to be ensured by testing this function with the target application.
•
Auto
Self adjustment of the following parameters
Item
Item
description
All
geometry
parameters
Phase shift
Contrast
The intention is to adjust signals within an input range between 0.5 to 1V (full scale).
You get best results with images of large, full scale, homogeneous areas.
Blackk&white
Not available
4.7.1.1 Recommended procedure to adjust unknown input formats
For pixel rate adjustment a support mode is available. To benefit from this support mode, select “original mode”,
cf. Advanced. Subsequently go back to item pixel rate. Now the phase shift is continuously increased from 0 to 31
(with wrap around). One cycle time is around one second.
A detailed look on the display shows following behavior:
The pixel is sampled more than one time if the pixel rate is much too high. In this case decreasing of the pixel
rate is recommended.
Attention: while the phase shift is increased form 0 to 31 the x-position changes smooth by one. The overflows
from 31 to 0 the results in an abrupt step back to the former x-position. Do not misjudge this behavior with oversampling.
•
The pixel disappears if the pixel rate is much too low. In this case increasing of the pixel rate is recommended.
•
If the pixel rate is nearly correct, a distortion moves like a “wave” over the picture.
If the direction of the wave goes from left to right, decrease the pixel rate.
If the direction goes form right to left, increase the pixel rate.
In any case if the direction of the “wave” changes you have passed the correct setting.
Hint: Evaluation is easy with one single pixel in horizontal direction (e.g. vertical line).
•
After the pixel rate is correct adjusted change back to original mode and adjust number of pixels, lines and
x/y position to get a full screen displayed image.
Barco – Multi Input Module for OverView D – R5976778 – user's manual – Revision 07 – April 2006 _______________________________________________________ 4-8
4. Operating the Multi Input Module
If there is a unstable picture for nearly every phase setting the quality can be improved by:
•
Selecting the other H-Sync edge as reference edge for pixel clock recovery. (cf. Options, VGA Options, Details).
•
Adjust SoG Level for Sync on Green signals (cf. Options, VGA Options, Details).
After adjusting SoG level, phaseshift has also to be adjusted
4.7.2 Display
This menu items gives access to adjust all parameters of the monitor geometry.
•
Pixel
Number of active display pixel per line. Maximum possible value is the true display resolution.
•
Lines
Number of active display lines. Maximum possible value is the true display resolution.
•
X-Position
If the active display area is chosen smaller than its real resolution, the horizontal position can be adjusted.
•
y-Position
If the active display area is chosen smaller than its real resolution, the vertical position can be adjusted.
•
Mirror
Enables a mirrored display (H reverse). Due to some scaler restrictions this function is not possible if the vertical downscaler is running, i.e. if there are more input lines than output lines.
4.7.3 Advanced
This menu items allows to select the display modes standard, original, and zoom.
•
Standard
The input signal will be displayed on the entire display
•
Original
The input frame will be displayed in a 1:1 ratio.
If the input resolution is larger than the display resolution, only a part of the picture is displayed.
If the input resolutin is smaller than the display resolution, a window is placed in the display.
•
Item
description
X-Position
Adjust horizontal position of the displayed window
Y-Position
Adjust vertical position of the displayed window
Zoom
Magnification of the input frame.
Item
description
X-Factor
Magnifying factor in horizontal direction
Y-Factor
Magnifying factor in vertical direction
X-Position
Adjust horizontal position of the displayed window
Y-Position
Adjust vertical position of the displayed window
Barco – Multi Input Module for OverView D – R5976778 – user's manual – Revision 07 – April 2006 _______________________________________________________ 4-9
4. Operating the Multi Input Module
4.7.4 Wall
This menu items allows to span a source over multiple projection modules
Item
description
display wall
If this item is not checked, the following settings are NOT applied
Display no.
Number of this projection module *)
Display horizontal
Number of horizontal cubes of the display wall *)
Display vertical
Number of vertical cubes of the display wall *)
Border horizontal
Border of one display in percent of the active width
Border vertical
Border of one display in percent of the active height
*)
The modules are counted from left to right and from top to bottom, seen from front. "Display wall" means
the area to be covered by one signal.
The following picture shows two different numbering depending on the "display wall" (display size). For the
2x2 the numbering in brackets applies.
1
2
4(3) 5(4)
7
8
3
6
9
Barco – Multi Input Module for OverView D – R5976778 – user's manual – Revision 07 – April 2006 _____________________________________________________ 4-10
4. Operating the Multi Input Module
4.8 Geometry (Video)
This menu is only available in Video and SDI mode.
It can be selected directly by pressing the right key on the IR Remote-Control while the OSD is off.
Item
description
Default
Normal display of video input
Zoom 1
Slightly zoomed picture to reduce black lines at the borders
Zoom 2
As Zoom 1, but more zoomed
Settings
Manual adjustments for the picture geometry, cf. Settings. All parameters of the input
and output frame can be adjusted. The adjustments are saved according to the actual
selected mode Default, Zoom 1, Zoom 2.
Mirror
Enables mirrored display (H reverse). Due to some scaler restrictions, this function is
not available if the vertical downscaler is running, i.e. if there are more input lines
than output lines.
Sports
Selects de-interlacing with no moving but few flicker artifacts. Best setting for pictures
with fast moving contents (like News tickers or some sports games). Technical term:
“spatial de-interlacing”.
Movie
Selects de-interlacing with some moving but no flicker artifacts. Also some noise reduction is done in this mode. Best for normal movies. Technical term: “motion adaptive de-interlacing”.
4.8.1 Settings
This menu items opens a submenu to adjust the geometry of the video signal.
•
•
Input
This menu items refers to all parameters which describe the incoming picture and allows to adjust active
pixels, lines, and position.
Item
description
Pixel
Number of pixel of the incoming video signal
Lines
Number of lines of the incoming video signal
X-Position
Adjust horizontal frame position
Y-Position
Adjust vertical frame position
Display
This menu items refers to all parameters which describe the monitor geometry.
Item
description
Pixel
Number of active display pixel per line. Maximum possible value is the true display
resolution
Lines
Number of active display lines. Maximum possible value is the true display resolution
X-Position
If the active display area is chosen smaller than its real resolution, the horizontal position can be adjusted
Y-Position
If the active display area is chosen smaller than its real resolution, the vertical position
can be adjusted
Barco – Multi Input Module for OverView D – R5976778 – user's manual – Revision 07 – April 2006 _____________________________________________________ 4-11
4. Operating the Multi Input Module
•
•
•
Zoom
This menu items allows to adjust magnification factors and picture positions.
Item
description
X-Factor
Magnifying factor in X direction
Y-Factor
Magnifying factor in Y direction
X-Position
Adjust horizontal position of the displayed window
Y-Position
Adjust vertical position of the displayed window
Format
This menu items allows to set special parameters for format conversion
Item
description
Parameter 1
Format correction achieved by adding black lines or columns
Parameter 2
Format correction achieved by cropping lines or columns
Parameter 3
Format correction achieved by panorama or waterglass view. Technical term: “anamorphic scaling”
Wall
This menu items allows span a source over multiple projection modules.
Item
description
display wall
If this item is not checked, the following settings are NOT applied
Display no.
Number of this projection module *)
Display horizontal
Number of horizontal cubes of the display wall *)
Display vertical
Number of vertical cubes of the display wall *)
Border horizontal
Border of one display in percent of the active width
Border vertical
Border of one display in percent of the active height
*)
The modules are counted from left to right and from top to bottom, seen from front. "Display wall" means
the area to be covered by one signal, cf. Wall.
•
Default
This menu items resets all geometry adjustments to their factory defaults.
Barco – Multi Input Module for OverView D – R5976778 – user's manual – Revision 07 – April 2006 _____________________________________________________ 4-12
4. Operating the Multi Input Module
4.9 Picture
This menu item gives access to adjust the following picture settings:
Item
description
Brightness
Brightness of the displayed picture, default value is 32
Contrast
Contrast of the displayed picture, default value is 32
Gamma
Gamma correction factor. Possible values are off, 1.8, 2.2
Color Temperature
Depending on the application, the color temperature can be adjusted to the following
values:
3200K (Broadcast)
5600K (Film)
6500K (Video)
7100K (medical applications)
9300K (Computer)
User (to adjust the color temperature by means of the R, G, B values, cf. Colors
Sharpness
Adjust scaling algorithm for up-scaling
0: smooth scaling
8: scaling done by pixel doubling
Colors
Gives access to a submenu to select color temperature by means of the R, G, B values,
cf. Colors
Backlight
Adjust backlight brightness
4.9.1 Colors
This submenu gives access to adjust the color temperatures by means of the R, G, B values and to e.g. modify
saturation.
Sometimes no item of this submenu can be adjusted, and therefore this submenu cannot be
accessed.
Item
description
Saturation
Only available for video
Black&White
Only available for video
create a monochrome picture (set saturation to zero)
Edges
Only available for video
Edge enhancement
Contrast R
Can only be adjusted if color temperature is set to “User”
Color offset for red channel
Contrast G
Can only be adjusted if color temperature is set to “User”
Color offset for green channel
Contrast
Can only be adjusted if color temperature is set to “User”
Color offset for blue channel
Barco – Multi Input Module for OverView D – R5976778 – user's manual – Revision 07 – April 2006 _____________________________________________________ 4-13
4. Operating the Multi Input Module
4.10 Other
This menu items gives access to the submenu of Language, OSD setup, freeze mode, runtime, keyboard options
and input selections.
4.10.1 Language
Use this submenu to set the OSD language.
Item
description
German
OSD will be in German
English
OSD will be in English
4.10.2 OSD setup
Use this submenu to select the OSD settings.
Item
description
Cascade menus
Select cascaded menus
Transparency
Select transparent OSD
Default colors
Select the desired OSD color
X-Position
Horizontal placement of the OSD
Y-Position
Vertical placement of the OSD
OSD timeout
Define the time the OSD closes automatically if no key is pressed
Help
For most menu items a short explanation is available
4.10.3 Freeze mode
This menu item is a command to freeze the picture.
4.10.4 Runtime
This menu item opens a submenu where some system information is displayed. In this menu, information can
only be read, not set!
Item
description
Runtime
Actual runtime of the Multi Input Module
Backlight
n.a.
Temperature
Actual system temperature
Barco – Multi Input Module for OverView D – R5976778 – user's manual – Revision 07 – April 2006 _____________________________________________________ 4-14
4. Operating the Multi Input Module
4.10.5 Keyboard options
If desired, the function of the keys on the IR Remote Control when the OSD is off can be adjusted.
Item
description
Up
Options for the up key.-
Default:
gives access to the menu Input source
Disabled: no function if the OSD is closed.
Left Right
Options for the left/ right key.-
Default left:
gives access to the menu Info
Default right:
gives access to the menu Geometry
Disabled: no function if the OSD is closed.
Input:
toggling through the inputs
Contrast: adjust contrast
Brightness:
Down
adjust brightness
Options for the down key.-
Default:
toggling through the inputs
Disabled: no function if the OSD is closed.
Contrast: Down and M keys are used to adjust contrast value
Brightness:
Down and M keys are used to adjust brightness value
Inverse:
Change of increase and decrease function of Down and M when contrast or brightness adjust is selected.
Barco – Multi Input Module for OverView D – R5976778 – user's manual – Revision 07 – April 2006 _____________________________________________________ 4-15
4. Operating the Multi Input Module
4.10.6 Input Selection
This menu allows to activate or deactivate specific actions for the inputs
Item
description
Function
The functions provided by the keys of the IR Remote Control and the Search and Supervision activation should be applicable (or not applicable) for the inputs listed below
VGA 1
Include VGA1: Functions are applicable for the source connected to RGB
VGA 2
Refers to the analog pins of the DVI interface
DVI
Include DVI: Functions are applicable for the source connected to DVI
Video
Include Comp1: functions are applicable for the source connected to Video 1
Include Comp 2: functions are applicable for the source connected to Video 2
Include Y/C: functions are applicable for the source connected to S-Video
AV: (input not available)
SDI
Include SDI: Functions are applicable for the source connected to SDI (option on request)
Barco – Multi Input Module for OverView D – R5976778 – user's manual – Revision 07 – April 2006 _____________________________________________________ 4-16
5. RS 232 Remote Control
5 RS 232 Remote Control
The Multi Input Module can also be operated via RS232 Remote Control. The following chapter describes cabling, settings and protocol.
Barco – Multi Input Module for OverView D – R5976778 – user's manual – Revision 07 – April 2006 _______________________________________________________ 5-1
5. RS 232 Remote Control
5.1 Cabling and setting
The RS232 communication offers an additional way to adjust and control the OSD settings. Therefore a simple
RS232 protocol is used. Each data stream has a fixed length of 10 bytes.
The remote control master (RCM) sends the command to a respective remote control slave (RCS).
To allow to connect more than one Multi Input Modules to the RS232 port of a master (e.g. personal computer)
an RS232 „ring“ technique is to use. Since RS232 is not recommended for more than two terminals each slave
must repeat the incoming messages for the next client. The last slave is terminated by means of a shorting plug.
Figure 4
RS 232 cabling
The following table list the recommended setting of the communication parameters:
Parameter
value
Baud-rate
9600
Parity
Even
Data-bits
8
Stop-bits
1
If you build up a session in a ring you should perform a “PING” command at first, to ensure
that all Multi Input Modules have a unique number.
Barco – Multi Input Module for OverView D – R5976778 – user's manual – Revision 07 – April 2006 _______________________________________________________ 5-2
5. RS 232 Remote Control
5.2 Structure of Messages
A standard read/write message has the following structure:
<Start Bytes> <Multi Input Module Address> <Command Bytes> <Value> <Checksum
Byte> <Stop Bytes>
Communication lost or timeout has the following structure:
<Start Bytes> <Multi Input Module Address> <0xAAAA> <0x5555> <0xAA> <0x0055>
These are the elements of a message in detail:
<Start Bytes>
The "start bytes" 0x55AA informs the RCS (in case of transmission) or
the RCM (in case of reception) that a new data transfer will take place.
<Multi Input Module
Address>
The "address" defines the address of the Multi Input Module
(0x01…0xFF) the computer wants to talk to (in case of (transmission) or
the address of the Multi Input Module that answers (in case of
reception). The maximum number of Multi Input Modules that
can be addressed by one computer is 256.
<Command Bytes>
The two command bytes comprises the command itself (cf. General
commands) (bit15…12) and the item to read or to write or the keycode,
respectively (cf. Key Codes)
<Value Bytes>
The range comprises 0x0000 to 0xFFFF. This byte defines the value to be
read/set.
In case a feature will be enabled/disabled, 0x0000 represents disabled,
0x0001….0xFFFF
0x0001….0xFFFF represents enabled.
<Checksum Byte>
The checksum is evaluated by the recipient and used to detect errors
during transmissin or reception. See the section below for a detailed
explanation on calculating the checksum.
<Stop Bytes>
The "stop bytes" 0x00FF informs the RCS (in case of transmission) that
the data transfer is complete and that the interpretation of the command and data bytes can start.
The "stop bytes" 0x00FE is the ACK stop condition from the RCS to the
RCM (ACK).
In case communication was lost or a timeout has occurred, NACK stop
condition from client is sent: 0x0055
If the recipient does not exist, the command comes back to the RCM
with the unchanged "stop bytse" 0x00FF.
5.2.1 Checksum Byte
The checksum byte is the generated by adding the following bytes:
<Multi Input Module Address> + LoByte(<Command Bytes>) +
Bytes>)+LoByte(<Value Bytes>) + HiByte(<Value Bytes>) AND 0xFF
HiByte(<Command
(AND 0xFF: After summing up, MOD 256 has to be applied to the sum)
Barco – Multi Input Module for OverView D – R5976778 – user's manual – Revision 07 – April 2006 _______________________________________________________ 5-3
5. RS 232 Remote Control
5.2.2 General commands
code
description
descripti on
0x0
Read menu item, from RCS (see also CMD 0x4)
0x1
Write menu item, to RCS (see also CMD 0x4)
0x2
key, simulate keystroke on RCS
0x3
repeated key, simulate repeated keystroke on RCS (steps will be greater)
0x4
Save, necessary if items adjusted over CMD 0x0 and 0x1
0x5
ping, automatically numbering all RCS in the RS232 ring (in physical order)
0x6
File system Command
0x7
Firmware Update
0x8
RAM Read (simplified Read Current 0x6007 command)
0x9
RAM Write (simplified Write Current 0x6008 command).
0xA
NACK (read only)
5.2.3 Key Codes
code
description
0x0B6
Left key
0x08B
Up key
0x0B7
Right key
0x08D
Down key
0x08C
OK key
Barco – Multi Input Module for OverView D – R5976778 – user's manual – Revision 07 – April 2006 _______________________________________________________ 5-4
5. RS 232 Remote Control
5.2.4 Monitor wall
Code
Item
value
0x3xxx
0: monitor number is not changed
Bit(5..0): number of monitors in X direction
1…1024: Monitor is the # within the monitor wall
Bit(7..6): not used
1025 (0x401): Numbering is done automatically
within the wall
Bit(13..8): numbers of monitors in Y direction
Bit 14: force black (0: normal, 1: black)
Bit 15: monitor wall on/off (1: on, 0: off)
Automatic numbering is done in the sequence of the remote control cabling. In order to
avoid confusion and to make use of the automatic numbering, cabling has to be done
always from left to right, starting with the top most row (seen from front). This implies
that the cable connecting the last Multi Input Module of the previous row to the first Multi
Input Module of the following row runs diagonally.
start
1
2
3
4
5
6
7
8
9
stop
Barco – Multi Input Module for OverView D – R5976778 – user's manual – Revision 07 – April 2006 _______________________________________________________ 5-5
5. RS 232 Remote Control
5.2.5 Commands corresponding to the OSD menu Input Signal
itemno
menu
item
description
38Dh
Input Signal
VGA 1
Show {1st PC} input signal.
49Ah
Input Signal
VGA 2
Show {2nd PC} input signal.
4B9h
Input Signal | Video
COMP 1
Show {1st composite} input signal.
4BAh
COMP 2
Show {2nd composite} input signal.
4BBh
Y/C
Show {Y/C} input signal.
4BCh
AV
Show {AV} input signal.
73Ah
Input Signal
DVI
Show {DVI} input signal.
4A0h
Input Signal
SDI
4B0h
Input Signal | Video options Source
Show {SDI} input signal.
Optimize color recovery for {VCR}, {satellite}- or {terrestrial}
television.
4A7h
Auto Norm
Detection of the Videostandards {PAL}, {NTSC} and {SECAM}.
3CDh
Norm
Selection of the desired videostandards.
5D7h
Auto Format Detection of {16:9} or {Letterbox formats}.
{Standard} shows the {composite} signal of the {AV} input.
AV
{RGB & YUV} shows the {component} signals of the {AV}
input.
4A8h
4AAh
Input Signal | VGA options
4ABh
Auto Sync Enables auto detection of the supplied synchronization
Detect
signal. Supported: {Separate HV-Sync}, {C-Sync} or {Sync on
Green}.
4ACh
HV Sync
Composite
Sync
4ADh
Sync
Green
4AEh
Auto
Detection of monochrome pictures supplied on the {green}
Black&White channel.
Horizontal Clamp Place. Only for special purposes. Default
H-Clamp
value is 8. {Attention: Wrong settings may cause color artifacts}
5B7h
4B4h
Input Signal | SDI options
Format
4B5h
SMPTE
4B6h
NRZI
4B7h
DESC
4BEh
4BFh
4C0h
Input
Signal
Signal management
on
| Power On
Which input will be select at power on. {Last} means the
last active input will be select again.
Search
Allow search of active inputs at {No signal}.
Supervision Enables auto selection of other inputs if new signals are
detected. {Remark:} Supervision of inactive inputs is only
possible for inputs which are not in the same group as the
active input.
Barco – Multi Input Module for OverView D – R5976778 – user's manual – Revision 07 – April 2006 _______________________________________________________ 5-6
5. RS 232 Remote Control
5.2.6 Commands corresponding to the OSD menu Geometry (VGA)
itemno menu
399h
Geometry | Input
item
Pixel rate
39Eh
Phase shift (for Adjust phase shift to get best picture quality.
VGA 1)
Phase shift (for Adjust phase shift to get best picture quality.
VGA 2)
5B6h
description
Adjust pixel rate until the whole frame appears the same.
{Hint}: Use Windows Shut Down Picture for adjustment.
39Ch
X-Position
Horizontal frame offset.
39Dh
Y-Position
39Ah
Pixel
Vertical frame offset
Number of pixel of the incoming PC signal. For e.g. SXGA:
1280.
39Bh
Lines
Number of lines of the incoming PC signal. For e.g. SXGA:
1024. {I} or {i} indicates {interlaced} signals.
433h
437h
.Geometry
|Interlaced
|
Input Non-Interlaced
PC
Optimized picture for {PC} signals.
438h
Sport
Optimized picture for fast moving {video} frames.
439h
Movie
Optimized picture for less moving {video} frames.
4B1h
SoG Level
39Fh
Geometry | Input
Auto
Comparator voltage for the sync on green slicer.
Selfadjustment of the {geometry parameter}, {phaseshift}
and {contrast}. Color values will be set to their default values.
3A1h
Geometry | Display
Pixel
Number of active display pixel per line.
3A2h
Lines
3A3h
X-Offset
3A4h
Y-Offset
Number of active display lines.
Output: if active display area is chosen smaller than its real
resolution, the horizontal position can be adjusted.
Output: if active display area is chosen smaller than its real
resolution, the vertical position can be adjusted.
3A5h
Mirror
Enable mirrored display. {Note:} Not available for all input
resolutions.
Standard
In every case the input signal will be displayed on the
whole display.
3A6h
Geometry | Advanced |
3A7h
Original
Geometry | Advanced X-Position
|Original
Y-Position
3BCh
3BDh
3A8h
3C0h
3C1h
The Input Frame will be displayed 1:1.
Horizontal position for scanning the input frame.
Vertical position for scanning the input frame.
Zoom
Magnification of the input frame.
Geometry | Advanced X-Factor
|Zoom
Y-Factor
Horizontal magnification factor.
Vertical magnification factor.
3BEh
X-Position
Horizontal position for the magnified input frame.
3BFh
Y-Position
Vertical position for the magnified input frame.
Display wall
Enable or disable the display wall function
Position of the current display within the display wall.
Counts up from left to right, from top to bottom.
ACCh
Geometry | Wall
AC7h
Display no
AC8h
Displays
zontal
AC9h
Displays verti- Numbe of displays in vertical direction
cal
Border horizon- Border of one display in percent of the active width
tal
ACAh
ACBh
hori- Number of displays in horizontal direction
Border vertical
Border of one display in percent of the active height
Barco – Multi Input Module for OverView D – R5976778 – user's manual – Revision 07 – April 2006 _______________________________________________________ 5-7
5. RS 232 Remote Control
5.2.7 Commands corresponding to the OSD menu Geometry (Video)
itemno
menu
item
3D6h
Geometry
Default
3D7h
Zoom 1
3D8h
Zoom 2
3DBh
Settings
3E1h
Geometry | Input
Lines
3E3h
X-Position
3E4h
Y-Position
Geometry | Display
Pixel
3E6h
Lines
3E7h
X-Position
3E8h
Y-Position
3EAh
Parameter 1
Format correction achieved by adding black lines or columns.
3EBh
Parameter 2
Format correction achieved by cropping lines or columns.
3ECh
Parameter 3
Format correction achieved by panorama or waterglass view.
3F5h
.Geometry | Format
define your own frame format. {Only for special purposes.}
Pixel
3E2h
3E5h
description
Geometry | Zoom
Zoom
3F1h
X-Position
3F2h
Y-Position
3F3h
X-Factor
3F4h
Y-Factor
ACCh
Geometry | Wall
Display wall
Enable or disable the display wall function
Position of the current display within the display wall. Counts
up from left to right, from top to bottom.
AC7h
Display no
AC8h
Displays
horizontal
Displays
vertical
Number of displays in horizontal direction
ACAh
Border
horizontal
Border of one display in percent of the active width
ACBh
Border
vertical
Border of one display in percent of the active height
Mirror
Enable mirrored display. {Note:} Not available for all input
resolutions.
3D9h
Sports
Optimized picture for fast moving frames.
3DAh
Movie
Optimized picture for less moving frames.
AC9h
3DCh
Geometry
Numbe of displays in vertical direction
Barco – Multi Input Module for OverView D – R5976778 – user's manual – Revision 07 – April 2006 _______________________________________________________ 5-8
5. RS 232 Remote Control
5.2.8 Commands corresponding to the OSD menu Picture
itemno
Menu
Item
3A9h
Picture
Brightness
description
3AAh
Contrast
3ABh
Gamma
5A0h
Color
tem- 0->User 1->3200 2->5500 3->6500 4->9300 5->7100
perature
3ACh
4C3h
Sharpness
...->Colors
Saturation
5F0h
Red
5F1h
Green
5F2h
Blue
4AFh
Black&White
4C4h
Edges
3B4h
Compensation of the color difference from TFT to CRT displays.
{Remark:} the default value is about 8.
Picture
Backlight
Generates monochrome Pictures. If {VGA} is active only the
{green} color signal is processed.
Adjust backlight brightness
Barco – Multi Input Module for OverView D – R5976778 – user's manual – Revision 07 – April 2006 _______________________________________________________ 5-9
5. RS 232 Remote Control
5.2.9 Commands corresponding to the OSD menu Other
itemno
menu
item
3C8h
Other | Language
Deutsch
3C9h
3FBh
English
Other | OSD Setup
Cascade Menus
3FEh
Transparency
3FFh
Default-colors
3FCh
X-Position
3FDh
3C4h
Y-Position
Other
3C5h
3C7h
Other
461h
Other |
Keyboard
Left Right
462h
description
options
Freeze mode
{Remark:} Adjustments in geometry or picture parameter
will clear freeze mode.
Help
Use{ up}, {down} to select a menu item. Use {left}, {right}
to change the value or to reach the next submenu. Use {ok}
to go back to the previous menu or to close the OSD.
Default
| Functionlist I
Opens the {INFO} or {GEOMETRY} OSD-menus.
Select 1st function list. {Attention:} Be sure that there is
always one key left which can open the OSD-menu.
463h
Disabled
The {Left} and {Right} keys are only available while OSDmenu is open. {Attention:} Be sure that there is always one
key left which can open the OSD-menu.
464h
Inputs
Toggles between the inputs.
47Dh
47Ch
47Eh
Other |
Keyboard options
Left Right | Inputs
VGA 1
| VGA 2
COMP1
47Fh
COMP2
480h
Y/C
5AFh
AV
5B0h
SDI
465h
466h
467h
468h
Other |
Keyboard
Left Right
options
Contrast
| Brightness
Other |
Default
Keyboard options | Up Functionlist II
469h
46Ah
...->Functionlist I
46Bh
46Ch
..->Functionlist II
46Dh
476h
Other |
Keyboard
Down
options
Opens the {INPUT} OSD-menus.
Select 2nd function list. {Attention:} Be sure that there is
always one key left which can open the OSD-menu.
Disabled
The {Up} key is only available while OSD-menu is open.
{Attention:} Be sure that there is always one key left which
can open the OSD-menu.
Create
After activating this item the menu can used as usual. With
the {left} key the actual selected item is added to the function list. Closing the OSD-menu will stop this function.
Delete
Create
Deletes all items in the function list.
After activating this item the menu can used as usual. With
the {left} key the actual selected item is added to the function list. Closing the OSD-menu will stop this function.
Delete
Deletes all items in the function list.
Default
Toggles between the inputs.
|
Barco – Multi Input Module for OverView D – R5976778 – user's manual – Revision 07 – April 2006 _____________________________________________________ 5-10
5. RS 232 Remote Control
470h
471h
Other |
VGA 1
Input Selection| Con- VGA 2
figuration | Function
COMP 1
472h
COMP2
Include COMP 1
473h
Y/C
Include Y/C
5ADh
AV
Include AV
5AEh
SDI
Include SDI
Select 1st function list. {Attention:} Be sure that there is
always one key left which can open the OSD-menu.
The {Down} key is only available while OSD-menu is open.
{Attention:} Be sure that there is always one key left which
can open the OSD-menu.
474h
477h
478h
Other |
Keyboard
Down
Functionlist I
options
|
Disabled
Include VGA 1
Include VGA 2
Include COMP 1
479h
Contrast
{Down} and {Ok} keys are used to adjust contrast value.
47Ah
Brightness
{Down} and {Ok} keys are used to adjust brightness value.
47Bh
Inverse
Direction of {Down} and {Ok} is inverted.
5.2.10 Protocol examples
Low Bytes (LSB) must be transmitted / received first!
5.2.10.1 Example: Set Item 3 of Multi Input Module 1 to a value of 0xFF.
<Start Bytes>
<Address>
<Command Bytes>
<Value Bytes>
<Checksum Byte>
<Stop Bytes>
0x55AA
0x01
0x1003
0xFF
0x13
0x00FF
This command is sent by the Host to the Multi Input Module with the Address 1. Written in a command
line (and taking into consideration that the low bytes have to be sent first), this reads:
0xAA 0x55 0x01 0x03 0x10 0xff 0x00 0x13 0xFF 0x00
The Multi Input Module with the address 1 returns
<Start Bytes>
<Address>
<Command Bytes>
<Value Bytes>
<Checksum Byte>
<Stop Bytes>
0x55AA
0x01
0x1003
0xFF
0x13
0x00FE
Command line:
0xAA 0x55 0x01 0x03 0x10 0xff 0x00 0x13 0xFE 0x00
Barco – Multi Input Module for OverView D – R5976778 – user's manual – Revision 07 – April 2006 _____________________________________________________ 5-11
5. RS 232 Remote Control
5.2.10.2 Example: Read value of Item 4 of Multi Input Module 2.
<Start Bytes>
<Address>
<Command Bytes>
<Value Bytes>
<Checksum Byte>
<Stop Bytes>
0x55AA
0x02
0x0004
0x00
0x06
0x00FF
At read commands value should always be zero. (0x0000)
The Multi Input Module with the address 2 returns
<Start Bytes>
<Address>
<Command Bytes>
<Value Bytes>
<Checksum Byte>
<Stop Bytes>
0x55AA
0x02
0x0004
0x0500
0x0B
0x00FE
5.2.10.3 Example: Simulate pressing the M key on the IR Remote Control at the Multi Input Module with
the address 1
<Start Bytes>
<Address>
<Command Bytes>
<Value Bytes>
<Checksum Byte>
<Stop Bytes>
0x55AA
0x01
0x208C
0x0000
0xAD
0x00FF
The Multi Input Module with the address 1 returns (if the key has no effect to any value):
<Start Bytes>
<Address>
<Command Bytes>
<Value Bytes>
<Checksum Byte>
0x55AA
0x01
0x208C
0x0000
0xAD
<Stop Bytes>
0x00FE
The Multi Input Module with the address 1 returns the new value (if the key has effected a value):
<Start Bytes>
<Address>
<Command Bytes>
<Value Bytes>
<Checksum Byte>
0x55AA
0x01
0x208C
0x0500
0xB2
<Stop Bytes>
0x00FE
5.2.10.4 Example: Ping
Pinging allows numbering and counting of all Multi Input Modules available in the RS232 Ring. Since pinging is a broadcast command sent to all RCS, the address is 0x00
<Start Byte>
<Address>
<Command Bytes>
<Value Bytes>
<Checksum Byte>
0x55AA
0x00
0x5000
0x5500
0xA5
<Stop Byte>
0x00FF
Note: At pinging <Address> has no affect, <Data Bytes> must be set to 0x5500.
Broadcast functionality is only available for the pinging command!
Barco – Multi Input Module for OverView D – R5976778 – user's manual – Revision 07 – April 2006 _____________________________________________________ 5-12
5. RS 232 Remote Control
The Multi Input Module with the address 1 returns
<Start Bytes>
<Address>
<Command Bytes>
<Value Bytes>
<Checksum Byte>
0x55AA
0x00
0x5000
0x5501
0xA6
<Stop Bytes>
0x00FE
Low byte of value returns the (new) number of the Multi Input Modules in the RS232 Ring
The Multi Input Module with the address 2 returns
<Start Bytes>
<Address>
<Command Bytes>
<Value Bytes>
<Checksum Byte>
0x55AA
0x00
0x5000
0x5502
0xA7
<Stop Bytes>
0x00FE
Barco – Multi Input Module for OverView D – R5976778 – user's manual – Revision 07 – April 2006 _____________________________________________________ 5-13
6. Input Selection tool
6 Input Selection tool
The Multi Input Module comes with the Input Selection Tool to enable switching of the inputs via a graphical
user interface.
Barco – Multi Input Module for OverView D – R5976778 – user's manual – Revision 07 – April 2006 _______________________________________________________ 6-1
6. Input Selection tool
6.1 Requirements
•
Windows 2000 Service Pack 4 or later
or
•
Windows XP Professional Service Pack 1 or later
These requirements are checked before installation A prompt is displayed to install any additionally required
software, if necessary. The installation then has to be restarted.
You need administrative privileges to install the software. If the computer reboots during installation, users have
to log in with administrative privileges after the reboot as well.
6.2 Setup
You need administrative privileges to install the software.
Place the CD into the CD drive and run setup.exe. The wizard will guide you through the installation process.
Follow the displayed instructions.
Figure 5
Input Selection Tool Setup
Figure 6
Input Selection Tool Setup
The wizard copies all required files into the indicated directory.
There is no need to re-boot the system after the successful installation.
Barco – Multi Input Module for OverView D – R5976778 – user's manual – Revision 07 – April 2006 _______________________________________________________ 6-2
6. Input Selection tool
6.3 Launching the Input Selection Tool
To launch the Input Selection Tool, select
Start | Programs | Barco Input Selection Tool for OverView D Multi Input Module | Input Selection Tool.
Figure 7
Launching the application
The application window of the Input Selection Tool is displayed.
Figure 8
Input Selection Tool: application window
Barco – Multi Input Module for OverView D – R5976778 – user's manual – Revision 07 – April 2006 _______________________________________________________ 6-3
6. Input Selection tool
6.4 Menu bar of the Input Selection Tool
The Input Selection Tool has a menu bar with the menus File, Options, and Help.
6.4.1 File menu
Figure 9
Input Selection Tool: File menu
The File menu includes the command Exit to shut down the application. The Input Selection Tool can also be
closed by clicking on the Close icon on the window caption.
If the application is closed while a connection is established, the connection will be closed
first!
Barco – Multi Input Module for OverView D – R5976778 – user's manual – Revision 07 – April 2006 _______________________________________________________ 6-4
6. Input Selection tool
6.4.2 Options menu
Figure 10
Input Selection Tool: Options menu
The Options menu allows to select the respective COM port. As default COM1 is selected. In case the remote
control cable is connected to a different COM port, please adjust the selection!
All other setting of the remote control communication are fixed according the parameter values mentioned in
Cabling and setting.
On special request, the Multi Input Module can also be equipped with an SDI input. In case an SDI input is available, it has to be enabled by selecting Enable SDI input. This command then will activate the SDI button in the
Source Selection section below.
Barco – Multi Input Module for OverView D – R5976778 – user's manual – Revision 07 – April 2006 _______________________________________________________ 6-5
6. Input Selection tool
6.4.3 Help
Figure 11
Input Selection Tool: Help menu
The Help menu has the menu entry About which informs about the software version:
Figure 12
Input Selection Tool: Help menu, About
Barco – Multi Input Module for OverView D – R5976778 – user's manual – Revision 07 – April 2006 _______________________________________________________ 6-6
6. Input Selection tool
6.5 Establishing a connection
Beneath the menu bar, a connection icon indiciates whether the remote control connection has been established
(green icon) or not (red icon). This icon is also a toggle button: clicking on the red icon will establish the remote
control connection (the icon will turn green) and vice versa.
Clicking on the red icon will establish the connection.
As soon as the connection is established, the selection of the COM port in the Options menu is disabled: With an
existing connection, changing the COM port is not allowed.
6.6 Operating the Multi Input Module by means of the Input Selection Tool
Establish the connection for operating the Multi Input Module.
The command buttons of the Input Selection Tools window get enabled. There are two kind of command buttons:
command buttons which trigger a fixed action are placed in the section Source Selection. Command buttons
which can be customized are placed in the Script section.
6.6.1 Script section
The Script Section provides the convenient possibility to start 4 different scripts assigned to the buttons. The
actions launched by these scripts as well as the caption of the button can be individually programmed according
the actual requirements.
By means of a script, e.g. all inputs can be switched at once.
Customization of the buttons and the sample scripts are explained later, cf. Customization
6.6.2 Source Selection section
The Source Selection section allows to switch one Multi Input Module to one of the inputs DVI, RGB, Video1,
Video2, S-Video, (and SDI, SDI is only available on special request only, therefore the button is grayed out).
To address a specific device, you have to select the respective Device Index. The Device Index is the Remote
Control address as assigned according the cabling: the first device in the remote control chain has the address 1,
the second device has the address 2 and so on, cf. Cabling and setting
Select the desired device by means of the Device Index listbox.
Barco – Multi Input Module for OverView D – R5976778 – user's manual – Revision 07 – April 2006 _______________________________________________________ 6-7
6. Input Selection tool
Figure 13
Input Selection Tool: Selecting a device
When the device is selected, you can switch its input by means of the respective button. Click on DVI to select
the DVI input.
Besides the buttons to switch the inputs, an additional button with the caption Check active is placed on this
section. Click this button to get the information of the actual active input of the selected device.
In case the signal of the selected input is lost, the Multi Input Module automatically switches
to another input which provides a signal. To check if the system still works with the original
set input, click on the Check active button.
Beneath each button, there is a "check mark" which indicates the result of clicking the Check active button. Usually the buttons are grayed out. When activating the Check active button, they show the status of the inputs: a
red icon stands for inactive, and the green icon represents the active input. This indication is visible for a some
seconds.
Barco – Multi Input Module for OverView D – R5976778 – user's manual – Revision 07 – April 2006 _______________________________________________________ 6-8
6. Input Selection tool
Figure 14
Input Selection Tool: Check active button has been pressed, DVI input is active
6.6.3 Customization
As mentioned above, the buttons on the script sections can be assigned to individually programmed actions.
Basically all commands listed in the chapter Remote Control commands (cf. Structure of Messages can be included
in a script.
6.6.3.1 Location and naming of the script files
The script files have to be stored in the installation directory of the Input Selection Tool.
A script assigned to the first button has to be saved as ISTScript1.txt.
A script assigned to the second button has to be saved as ISTScript2.txt, and so on.
The sript executed when establishing the connection has to be saved as ISTScriptInit.txt.
The names of the files are not case sensitive!
Figure 15
Location of script files
Barco – Multi Input Module for OverView D – R5976778 – user's manual – Revision 07 – April 2006 _______________________________________________________ 6-9
6. Input Selection tool
6.6.3.2 Syntax of the script files
The following lines are an extract of a script file:
ISTscript1.txt
Filename, script is assigned to the first button
<Switch all to DVI>
The caption of the button is written in angular brackets
// All numbers including target device address must be given in hex
Comments start with two slashes:
// Read register:
ister: 0x1???
0x0???, write reg-
//
Boolean
values:
0x0000
means
FALSE, any other value means TRUE.
:01 0x173A 0x0001
The command line has to start with a colon
:02 0x173A 0x0001
The device to which the command is sent is addressed
by means of its (hexadecimal) address.
:03 0x173A 0x0001
:04 0x173A 0x0001
To send a command, it has to be written in the respective register as true
:05 0x173A 0x0001
:06 0x173A 0x0001
:07 0x173A 0x0001
:08 0x173A 0x0001
:09 0x173A 0x0001
:0A 0x173A 0x0001
:0B 0x173A 0x0001
:0C 0x173A 0x0001
:0D 0x173A 0x0001
:0E 0x173A 0x0001
:0F 0x173A 0x0001
:10 0x173A 0x0001
:01 0x173A 0x001 therefore means:
device number 0 (01) switched (write register: 0x1) to DVI (73A) is true (0x001)
Please keep in mind to write the device address in hexadecimal.
To learn about the available commands, cf. Structure of Messages
Keep in mind that scripts are only read when the application is launched! When changing
skripts, exit and restart the program!
Barco – Multi Input Module for OverView D – R5976778 – user's manual – Revision 07 – April 2006 _____________________________________________________ 6-10
6. Input Selection tool
6.6.4 Un-installation of the Input Selection Tool
To un-install, select Start | Settings | Control Panel | Add or Remove Programs | Barco Input Selection Tool
Click on the Remove button to remove the software and all of its components.
Modified scripts have to be manually deleted and – in consequence, since these files are
located in this folder – also the installation directory.
Barco – Multi Input Module for OverView D – R5976778 – user's manual – Revision 07 – April 2006 _____________________________________________________ 6-11
7. Technical Data
7 Technical Data
This chapter provides technical data of the Multi Input Module
Barco – Multi Input Module for OverView D – R5976778 – user's manual – Revision 07 – April 2006 _______________________________________________________ 7-1
7. Technical Data
7.1 General data
B×T×H 205mm × 225mm × 85mm
weight 2kg
Power consumption 20W
7.2 Interfaces
7.2.1 Video1, Video 2
Type cinch 1.0Vpp ± 3 dB
Pin 1 Comp: Composite video input
Pin 2 GND: Ground
7.2.2 S-Video
Type 4 pin S-Video, mini Din
Pin 1 GND: Ground
Pin 2 GND: Ground
Pin 3 Y: Luminance
Pin 4 C Chrominance
7.2.3 RGB
1
2
3
4
5
Red
Green
Blue
5
1
10
6
15
11
6
7
8
9
10
GND red
GND green
GND blue
GND sync
11
12
13
14
15
HSYNC
VSYNC
Barco – Multi Input Module for OverView D – R5976778 – user's manual – Revision 07 – April 2006 _______________________________________________________ 7-2
7. Technical Data
7.2.4 DVI
Pin
Signal Assignment
Pin
Signal Assignment
1
2
3
4
5
6
7
8
9
10
11
12
TMDS Data 2TMDS Data 2+
TMDS Data 2 Shield
DDC Clock
DDC Data
TMDS Data 1TMDS Data 1+
TMDS Data 1 Shield
-
13
14
15
16
17
18
19
20
21
22
23
24
Ground (+5, Analog /V Sync)
TMDS Data 0TMDS Data 0+
TMDS Data 0 Shield
TMDS Clock Shield
TMDS Clock +
TMDS Clock -
7.2.5 RS232 Remote Control
5
1
9
6
Description
Pin
Symbol
D-Sub 9 (female)
1
Loop1
1, DCD
2
Loop1
6, DTR
3
TXD
2, transmit line
4
Loop2
7, CTS
5
RXD
3, receive line
6
Loop2
8, RTS
7
Loop1
4, DSR
8
GND
9, ground
9
GND
5, ground
10
Boot
open
The pin out of the SV6 is prepared for operation as DCE (Data Carrier Equipment). Connect D-Sub 9 (female, crimpable) with a ribbon cable to SV. Leave pin 10 open.
All necessary Null-modem loops (loop1 and loop2) are provided.
Connect the RS232 interface with a standard 1:1 cable to the PC interface.
Barco – Multi Input Module for OverView D – R5976778 – user's manual – Revision 07 – April 2006 _______________________________________________________ 7-3
7. Technical Data
7.3 Part numbers
Article number
Description
R9852430
Option: Multi Input Module OV-D, XGA
R9852431
Multi Input Module OV-D, XGA, incl. cabling, CD-ROM, manual etc.
R9852440
Option: Multi Input Module OV-D, SXGA
R9852441
Multi Input Module OV-D, SXGA, incl. cabling, CD-ROM, manual etc.
R9842610
Option: Multi Input Module OV-D, SXGA+
R9842620
Multi Input Module OV-D, SXGA+, incl. cabling, CD-ROM, manual etc.
R9852450
Option: Multi Input Module OV-D, XGA, SDI option
R9852451
Multi Input Module OV-D, XGA, SDI option, incl. cabling, CD-ROM, manual etc.
R9852460
Option: Multi Input Module OV-D, SXGA, SDI option
R9852461
Multi Input Module OV-D, SXGA, SDI option, incl. cabling, CD-ROM, manual etc.
R9842630
Option: Multi Input Module OV-D, SXGA+, SDI option
R9842640
Multi Input Module OV-D, SXGA+, SDI option, incl. cabling, CD-ROM, manual etc.
R32914000
Input Selection Tool, CD-ROM
Barco – Multi Input Module for OverView D – R5976778 – user's manual – Revision 07 – April 2006 _______________________________________________________ 7-4
8. Troubleshooting
8 Troubleshooting
This chapter gives some hint in case the Multi Input Module is no longer operable and gives information how to
contact the technical support of BARCO.
Barco – Multi Input Module for OverView D – R5976778 – user's manual – Revision 07 – April 2006 _______________________________________________________ 8-1
8. Troubleshooting
8.1 IR Remote Control
In case the Multi Input Module can no longer be operated,
•
Check the distance: IR Remote Control works within 5 meters.
•
Check if there are obstacles which block the IR communication.
•
Exchange the batteries: Use 2x1.5 micro AA cells.
After exchanging the cells it might happen that IR Remote Control needs to be re-programmed
To program the IR remote control, press the following keys in the described sequence:
• simultaneously press the On/Off + OK key for 3 seconds
• Use the numeric keys, and enter the code 2 7 0
• Press On/Off again.
For confirmation, the On/Off key will blink 3 times
The “Power” key has no function in normal operation.
Barco – Multi Input Module for OverView D – R5976778 – user's manual – Revision 07 – April 2006 _______________________________________________________ 8-2
8. Troubleshooting
8.2 Hot Line
Feel free to contact us if you have any further questions!
•
BARCO N.V. Projection Systems - Europe
Noordlaan 5, B-8520 Kuurne
Phone: +32-56-368-211, Fax: +32-56-368-251
E-mail: [email protected], Web: www.barcocontrolrooms.com
Barco – Multi Input Module for OverView D – R5976778 – user's manual – Revision 07 – April 2006 _______________________________________________________ 8-3
9. Tips and Tricks
9 Tips and Tricks
This chapter gives some hints how the functions of the Multi Input Module can be used for specific scenarios
Barco – Multi Input Module for OverView D – R5976778 – user's manual – Revision 07 – April 2006 _______________________________________________________ 9-1
9. Tips and Tricks
9.1 Upscaling a source
One source can be displayed on up to 8x8 projection modules.
System requirements: The projection modules where (a part of) the source is to be displayed has to be equipped
with a Multi Input Module.
Upscaling a source can easily be done via the OSD. Depending on the source, select
Geometrie|Frame Geometry|Wall (VGA)
Or
Geometrie|Settings|Wall (Video)
These menu entries open a sub menu with the following items:
Item
description
display wall
If this item is not checked, the following settings are NOT applied
Display no.
Number of this projection module
Display horizontal
Number of horizontal cubes of the display wall
Display vertical
Number of vertical cubes of the display wall
Border horizontal
Border of one display in percent of the active width
Border vertical
Border of one display in percent of the active height
To make use of the display wall functionality, the checkbox display wall has to be ticked!
Depending on the display size, the number of horizontal and vertical cubes has to be specified and the number
of the projection module in the actual configuration.
Example: Span a video e.g. on a 2x2 sub area of a display wall
1
2
3
4
For the red-bordered projection module the following settings apply:
Item
description
display wall
checked
Display no.
4
Display horizontal
2
Display vertical
2
Barco – Multi Input Module for OverView D – R5976778 – user's manual – Revision 07 – April 2006 _______________________________________________________ 9-2
9. Tips and Tricks
By means of a script activated via the script buttons of the InputSelectionTool, the signal can be upscaled by a
simple mouse click. The following example lists the command lines:
Address
Command
Description
:01
0xAC7h 0x0001
Display no. (=1)
:01
0xAC8h 0x0002
Display horizontal (=2)
:01
0xAC9h 0x0002
Display vertical (=2)
:02
0xAC7h 0x0002
Display no. (=2)
:02
0xAC8h 0x0002
Display horizontal (=2)
:02
0xAC9h 0x0002
Display vertical (=2)
:03
0xAC7h 0x0003
Display no. (=3)
:03
0xAC8h 0x0002
Display horizontal (=2)
:03
0xAC9h 0x0002
Display vertical (=2)
:04
0xAC7h 0x0004
Display no. (=4)
:04
0xAC8h 0x0002
Display horizontal (=2)
:04
0xAC9h 0x0002
Display vertical (=2)
:01
0xACCh 0x0001
activate display wall functionality
:02
0xACCh 0x0001
activate display wall functionality
:03
0xACCh 0x0001
activate display wall functionality
:04
0xACCh 0x0001
activate display wall functionality
Barco – Multi Input Module for OverView D – R5976778 – user's manual – Revision 07 – April 2006 _______________________________________________________ 9-3
9. Tips and Tricks
To switch back to the standard display mode, simply deactivate the display functionality
(in the OSD, remove the tick in the "display wall" checkbox
Address
Command
Description
:01
0xACCh 0x0000
deactivate display wall functionality
:02
0xACCh 0x0000
deactivate display wall functionality
:03
0xACCh 0x0000
deactivate display wall functionality
:04
0xACCh 0x0000
deactivate display wall functionality
Barco – Multi Input Module for OverView D – R5976778 – user's manual – Revision 07 – April 2006 _______________________________________________________ 9-4
9. Tips and Tricks
In case the remote control cabling of the display wall is according the rule given in Monitor wall, the scenario described above can be achieved by a single command using the monitor wall functionality:
Address
Command
Description
:01
0x3401 0x8202
Assigns a remote control address according the cabling (0x3401) and informs about the number of horizontal and vertical cubes, and switches on
the wall functionality (0x8202), cf. Monitor wall.
8
2
0
2
1
0
0
0
0
0
1
0
0
0
0
0
0
0
1
0
Bit 15
Bit 14
Bit
Bit 12
Bit 11
Bit 10
Bit 9
Bit 8
Bit 7
Bit 6
Bit 5
Bit 4
Bit 3
Bit 2
Bit 1
Bit
0
13
Monitor
wall
on/off
== on
Force
Black
Number of monitors in Y direction
(==2)
Not
used
Not
used
Number of monitors in X direction
== 2
To switch back to the standard display mode, simply deactivate the display functionality
Address
Command
Description
:01
0x3401 0x0202
Assigns a remote control address according the cabling (0x3401) and informs about the number of horizontal and vertical cubes, and switches off
the wall functionality, (0x0202) cf. Monitor wall.
0
2
0
2
0
0
0
0
0
0
1
0
0
0
0
0
0
0
1
0
Bit 15
Bit 14
Bit
Bit 12
Bit 11
Bit 10
Bit 9
Bit 8
Bit 7
Bit 6
Bit 5
Bit 4
Bit 3
Bit 2
Bit 1
Bit
0
13
Monitor
wall
on/off
== off
Force
Black
Number of monitors in Y direction
(==2)
Not
used
Not
used
Number of monitors in X direction
== 2
Barco – Multi Input Module for OverView D – R5976778 – user's manual – Revision 07 – April 2006 _______________________________________________________ 9-5
9. Tips and Tricks
Barco – Multi Input Module for OverView D – R5976778 – user's manual – Revision 07 – April 2006 _______________________________________________________ 9-1
10. Appendix
10 Appendix
10.1 Supported input sources
The following table lists the sources which have been tested.
10.1.1 DVI Input
The adjustments are done automatically
Source
XGA
SXGA
SXGA+
640x350 / 85Hz
OK
OK
OK
640x400 / 85Hz
NOK
NOK
OK
720x350 / 85Hz
OK
OK
n.a
640x480 / 60Hz
OK
OK
OK
640x480 / 72Hz
OK
OK
OK
640x480 / 75Hz
OK
OK
OK
640x480 / 85Hz
OK
OK
OK
800x600 / 56Hz
OK
OK
OK
800x600 / 60Hz
OK
OK
OK
800x600 / 72Hz
OK
OK
OK
800x600 / 85Hz
OK
OK
OK
1024x768 / 60Hz
OK
OK
OK
1024x768 / 70Hz
OK
OK
OK
1024x768 / 75Hz
OK
OK
OK
1024x768 / 85Hz
OK
OK
OK
1152x864 / 75Hz
OK
OK
OK
1280x960 / 60Hz
OK
OK
OK
1280x960 / 85Hz
OK
OK
OK
1280x1024 / 60Hz
OK
OK
OK
1280x1024 / 75Hz
OK
OK
OK
1280x1024 / 85Hz
OK
OK
OK
1600x1200 / 60Hz
OK
OK
NOK
Barco – Multi Input Module for OverView D – R5976778 – user's manual – Revision 07 – April 2006 _____________________________________________________ 10-1
10. Appendix
10.1.2 RGB Input
The adjustments are done automatically
Source
XGA
SXGA
SXGA+
640x350 / 85Hz
OK*)
OK*)
OK
640x400 / 85Hz
OK*)
OK*)
OK
720x350 / 85Hz
OK
OK
n.a
640x480 / 60Hz
OK
OK
OK
640x480 / 72Hz
OK
OK
OK
640x480 / 75Hz
OK
OK
OK
640x480 / 85Hz
OK
OK
OK
800x600 / 56Hz
OK
OK
OK
800x600 / 60Hz
OK
OK
OK
800x600 / 72Hz
OK
OK
OK
800x600 / 85Hz
OK
OK
OK
1024x768 / 60Hz
OK
OK
OK
1024x768 / 70Hz
OK
OK
OK
1024x768 / 75Hz
OK
OK
OK
1024x768 / 85Hz
OK
OK
OK
1152x864 / 75Hz
OK
OK
OK
1280x960 / 60Hz
OK
OK
OK
1280x960 / 85Hz
OK*)
OK*)
OK
1280x1024 / 60Hz
OK
OK
OK
1280x1024 / 75Hz
OK
OK
n.a.
1280x1024 / 85Hz
OK*)
OK*)
n.a.
1600x1200 / 60Hz
OK
OK
NOK
*) manual adjustment only
Barco – Multi Input Module for OverView D – R5976778 – user's manual – Revision 07 – April 2006 _____________________________________________________ 10-2
10. Appendix
10.1.3 Video Input
The timing is found automatically
XGA
SXGA
SXGA+
PAL B/ G
OK
OK
OK
PAL D/ K
OK
OK
OK
PAL I
OK
OK
OK
PAL M
OK
OK
OK
PAL N
OK
OK
OK
NTSC 4 B/ G
OK
OK
OK
NTSC 4 D/ K
OK
OK
OK
NTSC 4 I
OK
OK
OK
NTSC M
OK
OK
OK
SECAM B/ G
OK
OK
OK
SECAM D/ K/ K1
OK
OK
OK
SECAM
OK
OK
OK
Barco – Multi Input Module for OverView D – R5976778 – user's manual – Revision 07 – April 2006 _____________________________________________________ 10-3
10. Appendix
10.2 All types of RCU
Up to now, three different kind of RCU's have been used for controlling the MultiInput Module. The following
chapter shows a picture of each type and explains how it is programmed.
10.2.1 IR Remote Control Type 1
Item
description
1
No function in standard operation; used for re-programming
2
Menu key to enter the OSD, to exit a sub menu and/or to close the OSD
3
Up key
4
Right key
5
Down key
6
Left key
All other keys
No function
fter exchanging the cells it might happen that IR Remote Control needs to be re-programmed
Therefore on the IR Remote Control, press the “Standby” button and the M key together until the red LED on the
IR Remote Control is permanent on. Then press in following order:
1
6
6
To quit the programming mode, press the M key on the IR Remote Control.
Barco – Multi Input Module for OverView D – R5976778 – user's manual – Revision 07 – April 2006 _____________________________________________________ 10-4
10. Appendix
10.2.2 IR Remote Control Type 2
Item
description
1
On/off button, also used for re-programming
2
OK button to enter the OSD, to exit a sub menu and/or to close the OSD
3
Up key
4
Right key
5
Down key
6
Left key
All other keys
No function
After exchanging the cells it might happen that IR Remote Control needs to be re-programmed
Make sure that the device is switched on (power switch on the rear side of the device!)
On the IR Remote Control, press the TV button
Press the MAGIC button until the red LED on the IR Remote Control blinks once and then twice.
Then press in following order:
0
6
2
5
The red LED blinks twice.
Subsequently direct the IR Remote Control to the device and press Power key. The programming has been successfull if the device switches on.
Barco – Multi Input Module for OverView D – R5976778 – user's manual – Revision 07 – April 2006 _____________________________________________________ 10-1
10. Appendix
10.2.3 IR Remote Control Type 3
Item
description
1
On/off button, also used for re-programming
2
OK button to enter the OSD, to exit a sub menu and/or to close the OSD
3
Up key
4
Right key
5
Down key
6
Left key
All other keys
No function (except the numeric keys when programming the IR, see below)
To program the IR remote control, press the following keys in the described sequence:
•
simultaneously press the On/Off + OK key for 3 seconds
•
Use the numeric keys, and enter the code 2 7 0
•
Press On/Off again.
For confirmation, the on/off key will blink three times.
Barco – Multi Input Module for OverView D – R5976778 – user's manual – Revision 07 – April 2006 _____________________________________________________ 10-2