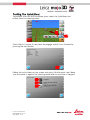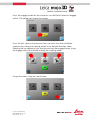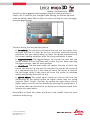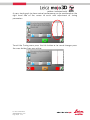
1
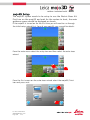
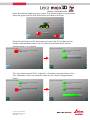
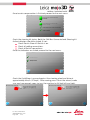
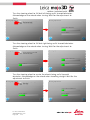
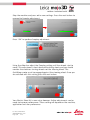
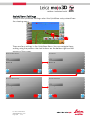
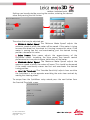
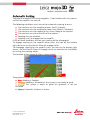
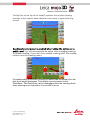
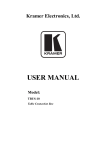
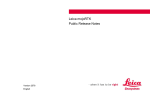
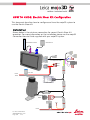
HOW TO GUIDE: Electric Steer Kit Configuration This document describes how to configure and tune the mojo3D system to use the Electric Steer Kit. Installation Shown below is the minimum connection for correct Electric Steer Kit operation. For more information on the installation please see the mojo3D Connection How to Guide supplied with your mojo3D system. Cell Modem Antenna GPS Antenna Port Expansion Cable Ignition Master Fuse 15A Power 12Vdc Leica QuickSteer Leica Twist QuickSteer Switch Fuse Ignition Power For more information: www.AgGuidance.com Page 1/18 v1.3 mojo3D Setup The mojo3D system needs to be setup to use the Electric Steer Kit. First turn on the mojo3D and wait for the system to boot, the main guidance screen should be displayed as shown. If the mojo3D is turned on for the first time you will need to run through the initial setup wizard first. Consult you mojo3D user manual for details. From the main menu select the setup icon and then select the auto-steer wizard. From the first screen on the auto-steer wizard select the mojo3D/ Twist icon and press next. For more information: www.AgGuidance.com Page 2/18 v1.3 Enter the vehicle height and press next. The vehicle height is the distance from the ground to the GPS antenna on the roof of the cab. Drive the machine to a flat level area and press the first button on the Terrain Compensation menu. Do not move the machine while terrain compensation is in progress. Turn the vehicle around 180° and park in the exact same position as the first calibration. Press the second button on the Terrain Compensation menu. For more information: www.AgGuidance.com Page 3/18 v1.3 Once terrain compensation is finished proceed to the next menu. Check the steering kit status. Both the CAN Bus Connected and Steering kit Active indicators should be ticked. If not: Check Electric Steer Kit Switch is on. Check all cabling connections. Check all Switch connections. Once the indicators are ticked proceed to the next menu. Check the QuickSteer is pressed against the steering wheel and drive at approximately 4km/h (2.5mph). Once moving press OK on the wizard, make sure you have enough room to turn the machine to full lock left and right. For more information: www.AgGuidance.com Page 4/18 v1.3 Turn the steering wheel to full lock left being carful to avoid obstacles. Acknowledge on the wizard when turning. Wait for the adjustment to finish. Turn the steering wheel to full lock right being carful to avoid obstacles. Acknowledge on the wizard when turning. Wait for the adjustment to finish. Turn the steering wheel to centre the wheels being carful to avoid obstacles. Acknowledge on the wizard when travelling straight. Wait for the adjustment to finish. For more information: www.AgGuidance.com Page 5/18 v1.3 Stop the machine and press ok to save settings. Press the next button to proceed to freeplay adjustment. Press “OK” to perform freeplay adjustment. Using the slider bar adjust the Freeplay setting until the wheels start to move. This adjustment is best done while driving slowly and you should monitor the machines turning wheels not the steering wheel. The QuickSteer motor must be engaged against the steering wheel. Once you are satisfied with this setting press the next button. Your Electric Steer Kit is now setup however further adjustments can be made to improve performance. These setting will depend on the machine, application and user preferences. For more information: www.AgGuidance.com Page 6/18 v1.3 Note: Terrain compensation should be repeated if any of the following conditions occur: The mojo3D requests a terrain compensation update. The cabin temperature is significantly different from temperatures at which the terrain compensation has been previously performed. The machine when controlling is sitting left or right of the desired wayline. (also see nudging at the end of this document) Steering Adjustment and Freeplay should not require re-adjusting and may be skipped if re-performing terrain compensation. For more information: www.AgGuidance.com Page 7/18 v1.3 QuickSteer Settings To adjust the QuickSteer Settings select the QuickSteer setup wizard from the steering menu. There are four settings in the QuickSteer Menu. You can navigate these setting using the previous the next buttons on the bottom right and left corners of the screen. For more information: www.AgGuidance.com Page 8/18 v1.3 Settings can be adjusted be pressing the number, entering the desired value and pressing the tick button. 1 3 2 The values that may be adjusted are: Minimum Motor Speed: The ‘Minimum Motor Speed’ adjusts the minimum speed at which the motor will be moved. If the motor is trying to move the wheel, but the wheel isn’t turning increase this value. If the motor is moving too fast and overshooting past the desired turning position, decrease this value. Drive Power: Drive power adjusts the aggressiveness of the QuickSteer motor. Increasing the drive power may benefit control performance but may also increase twitchiness of the motor. Maximum Motor Speed: The ‘Maximum Motor Speed’ adjusts the maximum speed at which the motor will move. This should be decreased if the motor consistently moves too fast and overshoots the desired tuning position. Override Threshold: The ‘Override Sensitivity’ adjusts how sensitive the QuickSteer is to the operator overriding the auto steer controls by moving the steering wheel. To escape from the QuickSteer setup wizard press the next button from the Override Threshold screen. For more information: www.AgGuidance.com Page 9/18 v1.3 Testing the QuickSteer To perform a test on the QuickSteer press select the QuickSteer test button from the steering menu. Check the kit is active, if not check the engage switch is on. Proceed by pressing the next button. Follow the instructions on the screen and press OK after each step. Make sure the motor is against the steering wheel and the machine is stopped. For more information: www.AgGuidance.com Page 10/18 v1.3 Press the engage button on the screen or use the Electric Steer Kit engage switch. The yellow icon should turn green. Press the left, right and centre turn icons to check that the QuickSteer response by turning the steering wheel in the desired direction. Note: Steering can be stopped at any time by pressing the engage button, using the engage switch or manually moving the steering wheel. Escape the menu using the next button. For more information: www.AgGuidance.com Page 11/18 v1.3 Tuning To tune the mojo3D system, press the Tuning button from the steering menu. From the tuning menu four settings can be adjusted. These setting are available on the left of the screen. Once settings are selected adjustments can be made using the slider. For more information: www.AgGuidance.com Page 12/18 v1.3 Control can be engaged and disengaged using the steering button as shown, this is useful to test changes made. Setting can also be adjusted while controlling. Note: Electric Steer Kit switch can also be used to engage and disengage control. The four setting that may be adjusted are: Sensitivity: The sensitivity will control the rate that the tractor turns and how sensitive it is when on the line. Sensitivity should be the only parameter that you need to adjust to adapt the control performance to the current working conditions after the tuning refinement is done. Aggressiveness: The aggressiveness will control the rate that the tractor attacks the line and how well it holds the line. When adjusting the aggressiveness, look for these qualities. Overshoot: The overshoot value will control the rate at which the tractor will drive at the line and the rate that the tractor will round off as it approaches the line. A low value will cause the tractor to hold off the line longer while a high value will cause the tractor to converge quickly and possibly drive past the line. Speed Adjust: The speed adjust should be used to fine tune the performance of the control system for higher speeds than the tuning speed of 5km/h (3mph). Typically, the vehicle can steer side to side at higher speeds, and this can be resolved by reducing the speed adjust. If the vehicle does not hold the line as desired at the desired speed, then increase the speed adjust. Descriptions of these four values are found in the mojo3D menu for quick reference while tuning. For more information: www.AgGuidance.com Page 13/18 v1.3 A cross-track graph to show control performance can be monitored on the right hand side of the screen to assist with adjustment of tuning parameters. To exit the Tuning menu press the tick button or to cancel changes press the cross button from any setting. For more information: www.AgGuidance.com Page 14/18 v1.3 Automatic Guiding To guide to a wayline first setup waypoints, if not familiar with this process consult the mojo3D user manual. The following conditions must be met for automatic steering to occur: The machine must be travelling at over 1km/h (0.6mph). The machine must be travelling at lower than 30km/h (18.6mph). The machine must be heading at less than 45deg to the wayline. The machine must be within 6m of the wayline. Roading must be disabled. Steering must be engaged on the mojo3D. If any of these conditions are not met steering will be disengaged. To engage steering on the mojo3D either press the icon on the bottom right corner or use the Electric Steer Kit engage switch. To disengage steering on the mojo3D press the icon on the bottom right corner, use the Electric Steer Kit engage switch or override the QuickSteer by turning the steering wheel. The location of the engage button is shown below. The guidance button has four states: Red: Roading is Enabled Orange: Roading is disabled but the system is not ready to guide. Yellow: The system is ready to guide but guidance is not yet activated. Green: Automatic Guidance is active. For more information: www.AgGuidance.com Page 15/18 v1.3 The light-bar at the top of the mojo3D indicates the required steering direction to the wayline. Some deviation from center is expected during control. Roading should always be enabled when taking the vehicle on a public road. You will automatically be asked when engaging steering to disable roading. If you wish to re-enable roading press the roading button from the steering menu. For added safety the Electric Steering Kit switch can be turned off so the light is no longer illuminated. This directly removes power to the QuickSteer. The QuickSteer can be disengaged from the steering wheel when steering is not required or it is not safe to do so. For more information: www.AgGuidance.com Page 16/18 v1.3 Nudging The GPS system in the mojo3D is subject to drift over time. If using the mojo3D for extended periods of time nudging may be required to adjust the wayline to the desired position. To nudge the wayline press the light-bar at the top of the screen. From the nudging menu either move the wayline left or right by tapping the left and right buttons or adjust the wayline to the machines current position by pressing the centre of the screen. If tapping left or right exit the nudging menu by pressing the cross button or waiting for the menu to disappear. For more information: www.AgGuidance.com Page 17/18 v1.3 Note: The Field Offset function can also be used to adjust the wayline position however this should not be used to correct position drift. The field offset should only be used to adjust wayline positions between differing fields or treatment areas. For more information: www.AgGuidance.com Page 18/18 v1.3