1
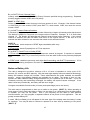
Excerpts from:
OPERATING INSTRUCTIONS
(USER MANUAL)
KG209 Portable Transceiver
6KEN SOFTWARE
Edited for Web Site
INDEX
Subject
Page
Radio Features
Battery Installation
Basic Operation / Controls
Using Scan
Priority Channel Instant Select
2
2
3
4
5
Advanced Features
Channel Name
Low Battery Indicator
Transmit Time Limiter
Alert Tones
Power-off Timer
Transmit Inhibit
Voice Scrambler
ANI
Emergency Alarm
5
5
6
6
6
6
6
6
6
7
Kill Mode
User Password
7
7
Selective Call Operation
Placing a Call
Receiving a Call
7
7
8
Special Keypad Functions
8
Notes on Battery Life
10
KG209 Operating Instructions
KG209 radios employ sophisticated technology and microprocessor control to make changing the
radio’s characteristics fast and easy. Any computer-equipped dealer or service shop with the
necessary Software and Programming Manual can easily program your radio to your specific
operating requirements.
Radio Features
•
•
•
•
•
•
•
•
•
•
•
•
•
•
•
•
•
•
•
•
•
•
•
•
•
•
Simplex or semi-duplex operation
High performance specifications
Wide non-tuning bandwidth
Wide-band/Narrow band by channel
PC field-programmable features
Emergency alert (man-down)
Keypad selection of channel
Up to 200 channel frequencies, or
Up to 100 channel frequencies with 8-digit alphanumeric “Channel Name” feature
Kill Feature (disable from another radio)
ANI, Unit ID in either 5-Tone and DTMF formats
CTCSS, DCS by channel
DTMF and 5-Tone select-call encoder / decoder, user selectable
Caller ID
Call forwarding
Voice Scrambling
Single-tone encoder
Transmit high / low power, keypad selectable or assigned by channel
Display of programmed frequencies and tones for each channel
Transmit time limiter (TTL)
Multiple scanning modes
Large alphanumeric LCD display with back-light
User friendly
Self diagnostics
Small, rugged die-cast construction
State of the art technology
Battery Installation
1.
2.
3.
4.
5.
Switch off the radio.
Hold radio with speaker facing you.
Position battery to left of the radio.
Place battery into the groove at the bottom
of the radio.
Slide the battery to the right until it “clicks” into
place.
Battery Removal
1.
2.
Switch off the radio.
Push the battery latch upward and slide the
battery to the left.
2
Basic Operation
OFF / VOLUME
Switch the radio on by rotating the VOLUME knob clockwise ½ turn. The volume may be adjusted
later when you receive a message.
Depending on program, the display may momentarily show all characters and icons, then show the
normal channel display. The function of each display icon will be discussed as we cover the operation
and features. You may refer to this drawing as you read the text.
Selecting the Channel
Select the desired channel by rotating the CHANNEL SELECTOR knob. The channel number will
appear in the display. Either 1 or CH-1 may appear depending on other program features used. If
using CHANNEL NAME, the name will appear after a short time.
The channel may also be selected by pressing C on the keypad and entering the channel number.
Example: C 1 2 C will select channel 12. If the final C is not entered, the radio will wait for two
seconds for the next digit, then switch to the selected channel.
Squelch
Locate the SHIFT (FUNCTION) button on the left side of the radio. This is the round button just below
the accessory connector. When the SHIFT button is pressed, the CHANNEL SELECT knob becomes
3
the SQUELCH control. Press and hold the SHIFT button while turning the CHANNEL SELECT knob.
The display will show SQ-0 through SQ-7.
At SQ–0, the squelch will be open and the BUSY icon will be displayed. If the radio is not equipped
with a decoder, noise will be heard in the speaker. Rotate the CHANNEL knob until the BUSY icon
goes away (usually at SQ-3 or SQ-4). This is the most sensitive setting for the squelch. If the
squelch is set to a higher number, you may miss weaker transmissions. If you hear occasional noise
bursts in the speaker, set the squelch to a higher number.
Monitoring the Channel
If the channel is in use, the BUSY icon will be displayed. You should not transmit until the channel is
clear. The exception to this is when you are communicating through a repeater. In this case, the
repeater will remain on the air for several seconds after the other party has finished speaking. You
should begin speaking immediately even though the BUSY icon is still displayed.
If you are not using any type of decoder, you will be able to hear the all signals on the channel.
If a decode function is in use such as CTCSS, DCS or Selective Call, a small MUTE icon
will
appear in the lower right of the display next to the LB indicator, and the audio will be muted when
another user (outside of your system) is on the channel. If you wish to listen to this transmission, you
may disable your decoder by pressing ∗ . This will toggle the decoder ON/OFF causing the MUTE
icon and the speaker to switch on and off.
Transmitting
To transmit, press the lower button on the left side of the radio. This is the PTT (Push To Talk)
button. The TX icon will appear in the display. TX alone indicates low power; TX> indicates high
power. Press the button in while holding the speaker grille 5 to 8 cm from you lips and speak in a
normal voice. When finished speaking, release the button. Keep your messages short and to the
point. This will assure the maximum battery life.
A common mistake is to begin speaking before pressing the PTT button. This may cause the first
word of you message to be deleted. It is recommended that you press the button, then wait one
second before speaking. This is especially important when using a repeater or ANI tone signaling.
Please review the safety information at the beginning of this manual to avoid endangering yourself
and others.
Using SCAN
The radio has two types of scanning, “All Scan” and “Program Scan”. Each of these has a “Busy”
mode and a “Priority” mode of operation.
In all of the scan modes, when a call is received, the radio will pause on the active channel for a few
seconds after the end of the message. This feature allows the listener to hear any reply to the
message before the radio begins to scan again. During this pause, you may transmit to answer a call
without leaving the scan mode. If you wait until the radio again begins to scan, you cannot transmit
without first exiting the scan mode and selecting the proper channel.
To delete a channel from the scan list, press SHIFT * for two seconds when the radio stops on that
channel. To restore all deleted channels, press SHIFT A for two seconds or exit the scan mode.
During programming, a HIGH and LOW priority channel is entered for both the All Scan and Program
Scan modes. These may be a different pair of channels for each mode.
4
All Scan: This mode is selected by pressing SHIFT #. The display will show BY--AL--SC. This
means Busy All Scan. The SCAN icon will be displayed. The radio will now scan all channels and
stop on any that are busy. To exit this mode, press #.
Priority All Scan: This mode is selected by pressing the SHIFT #, then pressing SHIFT 9. The display
will show PR--AL--SC. This means Priority All Scan. The PRIO and the SCAN icons will be
displayed. The radio will now scan all channels and stop on any that are busy. While listening to this
channel, it will also monitor HIGH and LOW priority channels selected during programming. If a signal
appears on the LOW priority channel, the radio will immediately switch to that channel. Also, while
listening to the LOW priority channel, the radio will continue to monitor the HIGH priority channel. If a
signal appears there, it will immediately switch to that channel. To exit this mode, press #.
When the radio is in either All Scan mode, pressing the PTT will automatically switch the radio to the
All Scan HIGH priority channel and remain there during the transmission and for several seconds
after. This allows the operator to send a message without exiting the scan mode.
Program Scan: This mode is selected by pressing the # (no SHIFT). The display will show BY--PR-SC. This means Busy Program Scan. The SCAN icon will be displayed. The radio will now scan all
channels that were selected for scanning during programming and stop on any that are busy. To exit
this mode, press #.
Priority Program Scan: This mode is selected by pressing the # (no SHIFT), then pressing SHIFT 9.
The display will show PR--PG--SC. This means Priority Program Scan. The PRIO and the SCAN
icons will be displayed. The radio will now scan all channels that were selected for scanning during
programming and stop on any that are busy. While listening to this channel, it will also monitor HIGH
and LOW priority channels selected during programming. If a signal appears on the LOW priority
channel, the radio will immediately switch to that channel. Also, while listening to the LOW priority
channel, the radio will continue to monitor the HIGH priority channel. If a signal appears there, it will
immediately switch to that channel. To exit this mode, press #.
When the radio is in either Program Scan mode, pressing the PTT will automatically switch the radio
to the Program Scan HIGH priority channel and remain there during the transmission and for several
seconds after. This permits the operator to send a message on the priority channel without exiting the
scan mode.
Priority Channel Instant Select
When in normal non-scan operation, the user may immediately switch to the All Scan HIGH Priority
channel by pressing SHIFT B. Pressing SHIFT B again will select the All Scan LOW Priority channel.
Repeated pressing will toggle between the two channels.
To switch to the Program Scan HIGH Priority channel by press B. Pressing B again will select the
Program Scan LOW Priority channel. Repeated pressing will toggle between the two channels.
Advanced Features
Your new Model KG209 contains many advanced features that may be used to suit your individual
system needs. Some are available at all times while others are programmable as needed. The more
commonly used features will be discussed here. All features are discussed in detail in the
Programming Manual.
Channel Name
During programming, each channel may be assigned a name to assist the operator in channel
selection. For example, channel 1 may be REPEAT, channel 2 may be POLICE, channel 3 may be
5
PRIVATE, etc. When the channel is selected, the actual channel number will appear in the display.
After a short time, the channel name will appear. Up to 8 alphanumeric characters may be used.
Note that the radio normally is capable of up to 200 channels. If the Channel Name feature is used,
only 100 channels may be programmed due to the additional memory requirements.
Low-Battery Indicator
An LB icon in the lower right of the display will appear when the battery is nearing the end of charge.
If another battery is not available, the radio should be switched to LO power (SHIFT 2) and
transmissions limited. The battery must be recharged as soon as possible. Refer to the section on
Notes on Battery Life for more information.
Transmit Time Limiter (TTL)
This feature limits the length of each transmission to a pre-programmed time (5 to 255 sec.). This
prevents long transmissions, either accidental or intentional. If the time limit is exceeded, the radio
will return to the receive mode and stop transmitting. The operator must release the PTT button for
five seconds before he can resume transmitting.
Alert Tones
The radio may be programmed to emit a beep at the beginning of each transmission, the end, or both.
This will alert the operator that he has begun and/or ended his transmission. Tones may also be
programmed to signal when numbers are entered on the keypad. For covert operation, this feature
should not be used.
Power-off Timer
If this program feature is used, the radio will automatically turn off after a programmed length of time
(1 to 15 hours). This will prevent he battery from going dead when the radio is not in use. When the
radio turns off, the display will show PW OFF. To return to normal operation, turn the radio OFF, then
ON.
Transmit Inhibit
During programming, different conditions may be selected to prevent transmitting, such as: channel is
busy, improper CTCSS tone, etc. If the selected condition exists, the radio will not transmit and you
may hear a beep when you press the PTT button.
Voice Scrambler
This feature may be programmed for any channel or channels. It scrambles the voice so that it
cannot be understood by another radio unless it also has the scramble feature. If added to just a few
radios in the group, it will permit private communications between those few. Others in the group will
not understand the messages. This feature is useful for police and military operations.
ANI (Automatic Number Identification)
If this feature is programmed, the radio will transmit a unique ANI number each time the PTT button is
pressed. This number may be sent at the beginning of the transmission, at the end or the
transmission, or both. When the number is being sent, a small music note icon
will appear in the
lower right of the display. If this appears at the beginning of the transmission, your voice will be
covered by the tones and will not be heard by others. You should practice pressing the PTT and
waiting for one second before beginning to speak.
With proper display equipment, the operator at the control point will know which radio is transmitting.
6
Emergency Alarm
If this feature is programmed, the radio will be capable of sending an alarm when the user is in danger
or injured. For this function, the radio may be equipped with a small momentary push-button on the
top panel. When activated, the radio will transmit the radio Emergency ANI, then remain in the
transmit mode for a period of time. This is followed by a period on silence (no transmit). During the
time the transmitter is activated, the microphone is active so that other users may monitor. For
example, if the user is captured, he may activate the alarm and give the listeners a clue to his
location. If programmed to do so, the radio will send a beep—beep—beep sound as an audible alert
during the transmit period.
With proper display equipment, the operator at the control point will know which radio is transmitting
and that an emergency exists.
Kill Mode
If this feature is programmed, the radio may be disabled or “killed” by another operator in the system
that knows the proper “kill code”. This feature may be used if the radio is stolen or lost. The radio
must be turned on and the kill code must be sent on the selected channel. When the kill code is
properly received, the radio will answer back (transpond) with its ANI number, then become disabled.
The display will show F.
After entering the KILL MODE, the radio is totally disabled and must be returned to a service center
for reprogramming.
User Password (ID Number)
If this feature is programmed, the user must enter the proper ID number (up to 6 digits) before the
radio will operate. Upon switching on the radio, the display will show PLS ID (please identify). The
operator must press * to clear the display, then enter his password. If the correct number is not
entered in a certain number of attempts, the radio will enter a disabled, KILL MODE and must be
returned to a service center for reprogramming.
Selective Call Operation (selcall)
Selective call may used to call individual or groups of users within the system. Each radio is assigned
a specific “phone number”. The radios are normally muted until their specific number is called. Using
letters (A, B, C, D) as the first digit is not recommended as it complicates digit entry.
The radio supports DTMF and 5-Tone, encode and decode formats. Before using selective call, it
may be necessary to first select the proper tone format by pressing SHIFT 0 for 2 seconds.
Placing a call
In DTMF mode, digits are transmitted as they are entered. Only digits 1 through 9, 0 and A may be
used as the first digit. Other keys have specific functions when entered alone. After the first digit, any
of the 16 digits may be used. If the digits are entered quickly with equal timing, the called radio may
respond (send an acknowledge tone) after the number is entered. However, if there are pauses or
long tones in the manual entry, press SHIFT D to send the number again. A music note will appear
in the display indicating that the tones are being sent. To redial, press D. If the call is received, the
called radio will answer back (transpond) with a short tone, then “ring” several times to signal the
operator. That operator may then answer the call.
In 5-Tone mode, enter the digits in the field indicated in the display. A pointer at the top of the display
will indicate the active digit field. To clear the display, hold the SHIFT key and press the PTT.
However, It is not necessary to clear the display. New numbers entered will replace existing digits.
Only digits 1 through 9, 0 and A may be used as the first digit. Other keys have specific functions
7
when entered alone. When entering digits, the pointer will advance automatically as numbers are
entered or it may be advanced during entry using the CHANNEL SELECT knob. To include B, C, D in
the sequence, hold SHIFT, then press the desired digit.
Note that the character D may be entered as part of the sequence but not as a first digit because this
is used as the redial function.
After number is entered, press D (no SHIFT) to send the number. A music note
will appear in the
display indicating that the tones are being sent. If the call is received, the called radio will answer back
(transpond) with a short tone, then “ring” several times to signal the operator. That operator may then
answer the call. If the operator receives the call but does not answer, you may redial by again
pressing D.
Receiving a Call
If another party calls you, your decoder will unmute the speaker and the radio will “ring” several times.
To answer, press the PTT button and speak. The decoder will automatically reset after a short time.
In 5Tone systems, the radio may be programmed to display the identity of the caller. Refer to the
Programming Instruc tions for more detailed information.
Special Keypad Functions
The main function of the keypad is to enter numbers for selective calling. This feature was discussed
previously. Pressing keypad buttons while holding the SHIFT key may perform various other
operations. For some functions, the SHIFT is not required.
Firmware Identification
If the SHIFT is held when the radio is turned on, the display will indicate the firmware used in the
radio. This information is necessary for the programmer to select the correct programming software.
SHIFT 1 Display Back-Light
Turns on display back-light for 10 sec.
If pressed again before time-out, light will go off.
SHIFT 2 High/Low Power Selection
If enabled during programming, selects HIGH or LOW power, usually 5 W or 1 W, unless radio has
been readjusted from factory settings. When on HIGH power, a > icon will appear in the lower edge of
the display to the right of the TX indicator.
SHIFT 3 Select Call Number Memory
Selects the Encode Memory Register which is used for selective calling. Frequently called numbers
may be stored here during programming. To recall a number, press SHIFT 3, then rotate the
CHANNEL knob. Each number will be displayed in sequence. To send the displayed number, press
D. A music note will appear in the lower edge of the display to the right of the TX icon while the tones
are being transmitted.
SHIFT 4 Single Tone Function
Turns the SINGLE TONE function ON or OFF.
SHIFT 5 Transfer Mode (Call Forwarding)
Toggles the Transfer Mode ON or OFF. Upon receipt and decoding of a valid number, this feature
allows the radio to transmit a calling number on the same or different channel (see programming
manual).
8
SHIFT 6 Kill Password
Permits entry of a password to use the KILL function. This function allows the user to disable (kill)
another radio by sending that radio its proper kill code.
SHIFT 7 Information Display
If enabled during programming, displays program data such as channel frequency and tones.
SHIFT 8 Keypad Lock
Turns the KEY LOCK feature ON or OFF. When ON, certain keypad and control functions are locked
out. This may be used to prevent inadvertently sending tones or switching channels. Variations of
operation may be selected during programming.
SHIFT 9 Scan Mode Select
Selects either the BUSY scan or the PRIORITY scan modes. If PRIORITY is selected, PRIO will
appear in the upper left of the display and the radio will monitor the HIGH and LOW priority channels
selected during programming (see “Using Scan”).
Note: Radio must first be placed into one of the scan mode (see below).
SHIFT * Digital Encryption
Turns the Digital Encryption feature (if so equipped) ON or OFF
SHIFT * Delete Channel from Scan List
When operating in the scan mode, pressing SHIFT * for two seconds will delete the channel currently
being received from the scan list. Pressing SHIFT A for two seconds will restore all deleted
channels.
* (no SHIFT)
PIN entry or MUTE
If the radio has been programmed to require a Personal Identification Number (PIN) for operation, the
* must be entered before entering the PIN. This will be requested upon turning on the radio. This
display will show PLS ID.
In normal operation, the * is used as a MUTE key in selcall systems to switch the speaker ON or
OFF.
SHIFT 0 DTMF / 5Tone select
When pressed and held for 2 seconds, toggles tone format from DTMF to 5-Tone.
SHIFT # ALL SCAN Select
Turns the ALL SCAN mode ON or OFF. This mode scans all channels in the radio. The display will
show BY--AL--SC indicating that the radio is scanning all channels (see “Using Scan”)..
# (no SHIFT) PROGRAM SCAN Select
Turns the PROGRAM SCAN mode ON or OFF. The display will show BY--PG--SC indicating that the
radio is scanning all channels that were selected for scan during programming (see “Using Scan”).
SHIFT, A Restore Channels Deleted from Scan List
See SHIFT * above, restores all channels deleted from the scan list.
SHIFT B Priority Channel Select
Instantly selects one of the ALL SCAN Priority Channels specified during programming. Repeated
pressing toggles between HIGH and LOW priority.
9
B (no SHIFT) Priority Channel Select
Instantly selects one of the PGM SCAN Priority Channels specified during programming. Repeated
pressing toggles between HIGH and LOW priority.
SHIFT C DTMF Clear
Clears any new DTMF number that may have been entered in error. Example, if the desired number
is 12345 and you have entered 13345, press SHIFT C, which erases 13345, then enter the correct
number 12345.
C (no SHIFT) Instant Channel Selection
C followed by keypad entry of a channel number followed by C again will instantly select that channel.
This feature is helpful for users who use a large number of channels. Example: C 1 2 C will select
channel 12. The display will flash the new channel several times before switching. If an unused
channel is selected, the radio will BEEP and return to the original channel. If the final C is not
entered, the radio will wait for two seconds, then switch to the selected channel.
SHIFT D
In DTMF Mode, sends sequence of DTMF digits immediately after entry.
In 5Tone mode, sends R (repeat) tone in 5Tone sequence.
D (no SHIFT) Send 5Tone) or Redial (DTMF)
In 5Tone mode, sends or redials displayed sequence entered by keypad. If sequence is selected
from memory (see SHIFT 3), it is sent only one time, then the radio reverts to the previously displayed
digits.
In DTMF mode, redials the previously sent digits after first sending with SHIFT D (see above). If D is
pressed while entering a sequence, the radio accepts is as part of the sequence.
Notes on Battery Life
The radio is designed to provide a minimum of 8 to 10 hours of operation at a duty cycle of 5%
transmit, 5% receive and 90% stand-by. With the latest high capacity cells and advanced technology,
battery life between charges will increase. These advancements are made available as standard
product. Larger, high-capacity batteries are available as an option. The length of time you can
operate the radio between battery charges depends on your individual use of the radio. If you are
constantly receiving and transmitting messages, the battery will require frequent recharges. If the
radio is used only occasionally, the battery will last much longer.
Chargers are available for both trickle (16 hours) and rapid charge (one to two hours).
The radio may be programmed to allow you to switch to low power (SHIFT 2). When operating at
close range to other hand-held radios or when you are within 2 to 4 kilometers from the base station
or repeater, you may use low power. Also, if you frequently use the radio for short distance
communications, you may program a separate channel at low power for this application. This will
greatly increase battery life.
A small LB (Low Battery) icon will appear in the lower right of the display when the battery is ready
for recharge. You may be able to continue to operate for a short time by switching to low power
(SHIFT 2).
10
During the first few weeks of normal operation, you should note the length of time the radio operates
without a recharge. Based on this experience, you should plan to recharge the radio as necessary to
provide the required service. It may be necessary to carry a spare, fully charged battery with you.
Another option is to use an optional accessory vehicle adapter that permits operation and recharging
of the battery while in a vehicle. Do not allow the spare battery to come into contact with keys, coins,
etc. This may short it out causing it to discharge or overheat.
The battery should not be recharged until it is fully discharged (the radio no longer operates). Do not
attempt to recharge the battery if it is very cold or very hot. This may cause damage.
Do not keep the battery in the charger continuous ly. When fully charged, remove the battery from the
charger and put it into service.
You may notice slightly reduced battery life when operating at low temperatures (below 0 C). This is
normal as battery efficiency is reduced at low temperatures..
The radio has a “battery saver” feature that turns off unnecessary circuits when the radio is not busy.
This extends the life of the battery.
Use of the SCAN feature keeps the radio in a “ready” status at all times and results in shorter battery
life. You should use SCAN only when necessary.
As the battery ages (one year of more) you may experience shorter life between charges. The actual
life will depend on the total number of charge/recharge cycles and the care given to the battery.
11