1
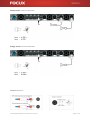
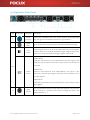
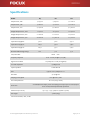
 D Series Digital Amplifier User Manual 2013 Version 6.2 D Series Digital Amplifier User Manual 2013 Version 6.2 Page 1 of 18 Contents Chapter 1: Warnings 3 Important Safety Instructions 5 Precautions Regarding Installation Chapter 2: Welcome 7 Basic functions descriptions and How to use this manual Chapter 3: Installation 8 Structure diagram 9 Cooling description 9 Connection mode illustration (Stereo mode) 10 Connection mode illustration (Mono mode and Bridge mode) Chapter 4: Operation 11 Speaker protection 11 Start‐up procedure 13 Operation Front Panel 14 Operation Rear Panel 15 Specifications 16 Cleaning, Service and Dust Removal 17 Product Warranty, Return of Goods and Repair or replacement D Series Digital Amplifier User Manual 2013 Version 6.2 Page 2 of 18 Chapter 1: WARNINGS 1.1 IMPORTANT SAFETY INSTRUCTIONS CAUTION: IN ORDER TO REDUCE THE RISK OF ELECTRIC SHOCK, DO NOT ATTEMPT TO OPEN ANY PART OF THE UNIT. NO USER‐SERVICEABLE PARTS INSIDE. REFER SERVICING TO QUALIFIED SERVICE PERSONNEL. “WARNING: TO REDUCE THE RISK OF FIRE OR ELECTRIC SHOCK, DO NOT EXPOSE THIS APPARATUS TO RAIN OR MOISTURE. OBJECTS FILLED WITH LIQUIDS, SUCH AS VASES, SHOULD NOT BE PLACED ON THIS APPARATUS” “TO COMPLETELY DISCONNECT THIS APPARATUS FROM THE AC MAINS, DISCONNECT THE POWER SUPPLY CORD PLUG FROM THE AC RECEPTACLE” “THE MAINS PLUG OF THE POWER SUPPLY CORD MUST REMAIN READILY ACCESSIBLE” SAFEGUARDS: Electrical energy can perform many useful functions. This unit has been engineered and manufactured to assure your personal safety. Improper use can result in potential electrical shock or fire hazards. In order not to defeat the safeguards, observe the following instructions for its installation, use and servicing. Read these instructions. Keep these instructions. Heed all warnings. Follow all instructions. Do not use this amplifier near water. Clean only with a dry cloth. Do not block any ventilation openings. Install in accordance with the manufacturer’s instructions. Do not install near any heat sources such as radiators, heat registers, stoves, or other apparatus (including amplifiers) that produce heat. Do not defeat the safety purpose of the polarized or grounding‐type plug. A polarized plug has two blades with one wider than the other. A grounding type plug has two blades and a third grounding prong. The wide blade or the third prong is provided for your safety. If the provided plug does not fit into your outlet, consult an electrician for replacement of the obsolete outlet. D Series Digital Amplifier User Manual 2013 Version 6.2 Page 3 of 18 Protect the power cord from being walked on or pinched particularly at plugs, convenience receptacles, and the point where they exit from the apparatus. Only use attachments/accessories specified by the manufacturer. Unplug this amplifier during lightning storms or when unused for long periods of time. Refer all servicing to qualified service personnel. Servicing is required when the amplifier has been damaged in any way. For example if the power‐supply cord or plug have been damaged, if liquid has been spilled or objects have fallen into the amplifier, if the amplifier has been exposed to rain or moisture, if it has been dropped or if it does not operate normally. CAUTION: To prevent fire hazard, when connect the speakers to the amplifier's output jacks, only can use dedicated speaker cable. Using other cables may cause fire. Cabling should be routed away from potential hazards to avoid damage to the insulation of the cable itself. EXPLANATIONS OF GRAPHICAL SYMBOLS: “The exclamation point within an equilateral triangle is intended to alert the user to the presence of important operating and maintenance (servicing) instructions in the literature accompanying the product”. “The Lightning Flash with arrowhead symbol within an equilateral triangle is intended to alert the user to the presence of uninsulated “dangerous voltage” within the product enclosure that may be of sufficient magnitude to constitute a risk of shock to persons”. The lightning symbol within the triangle symbol is used to prompt the user pay attention to the risk of electric shock. D Series Digital Amplifier User Manual 2013 Version 6.2 Page 4 of 18 1.2 PRECAUTIONS REGARDING INSTALLATION Placing and using the amplifier for long periods of time on heat generating sources will affect its performance. Avoid placing the amplifier on heat generating sources. Install this amplifier as far as possible from tuners and TV sets. An amplifier installed in close proximity of such equipment may experience noise or generic performance degradation. WARNING: To prevent fire or electric shock: The ventilation openings must not be impeded by any item such as newspapers, tablecloths, curtains etc; keep a distance of at least 20‐inch from the front and rear ventilation openings of the amplifier. Do not expose this amplifier to rain or moisture. This equipment must not be exposed to dripping or splashing liquids: objects filled with liquids, such as vases, must not be placed on the amplifier. 1.2.1 Safety Rules This device must be powered exclusively by earth connected mains sockets in electrical networks compliant to the IEC 364 or similar rules. It is absolutely necessary to verify this fundamental requirement of safety and, in case of doubt, require an accurate check by qualified personnel. The manufacturer cannot be held responsible for damages caused to persons, things or data due to an improper or missing ground connection. Before powering this amplifier, verify that the correct voltage rating is being used. Verify that your mains connection is capable of satisfying the power ratings of the device. Do not spill water or other liquids into or on the amplifier. Do not use this amplifier if the electrical power cord is frayed or broken. Do not remove the cover. Failing to do so will expose you to potentially dangerous voltage. No naked flame sources such as lighted candles should be placed on the amplifier. Provide a sectioning breaker between the mains connections and the amplifier. Suggested device is 16A/250VAC, C or D curve, 10KA. Contact the authorized service center for ordinary and extraordinary maintenance. D Series Digital Amplifier User Manual 2013 Version 6.2 Page 5 of 18 1.2.2 Speaker Damage Focux Class D amplifiers are among the most powerful professional amplifiers available and are capable of producing much more power than many loudspeakers can handle. It is the user’s responsibility to use speakers suitable to the amplifier and to use them in a sensible way that will not cause damage. Focux will not be held responsible for damaged speakers. Consult the speaker manufacturer for power handling recommendations. Even if you reduce the gain using the amplifier’s front panel attenuation controls, it is still possible to reach full output power if the input signal level is high enough. A single high‐power tone can damage high frequency drivers almost instantaneously, while low frequency drivers can usually withstand very high, continuous power levels for a few seconds before they fail. Reduce power immediately if you hear any speaker “bottoming out” ‐ harsh pops or cracking distortion that indicate that the speaker voice coil or diaphragm is striking the magnet assembly. Focux recommends that you use amplifiers of this power range for more headroom (cleaner sound) rather than for increased volume. 1.2.3 Speaker Output Shock Hazard A Class D amplifier is capable of producing hazardous output voltages. To avoid electrical shock, do not touch any exposed speaker wiring while the amplifier is operating. This manual contains important information on operating your Focux amplifier correctly and safely. Please read it carefully before operating your amplifier. If you have any questions, contact your Focux dealer. D Series Digital Amplifier User Manual 2013 Version 6.2 Page 6 of 18 Chapter 2: Welcome Thank you for your purchase and use! The cabinet of the D Series is designed with the international 1U standard, as well as small size and powerful. In order to ensure the user to use the product stably and effectively, please carefully read this manual and follow the guidance manual to install and operate this unit carefully. 2.1 Basic functions descriptions Universal PFC (Power Factor Correction) power supply, which can be used all over the world. The front panel has a large number of LEDs to provide you accurate working status information of the product. Adopt the modular circuit design to facilitate cooling and maintenance. Adopt the smart variable speed fan to force the air cooling. Efficient circuit protection design can avoid output short circuit, DC, load, over‐temperature, over / under‐voltage, high frequency overload protection and so on. 2.2 How to use this manual This manual provides you the information of the safe and proper setting and operation for this unit. But it does not cover the use instructions of every occasion and all the situations that may arise. For more information, please visit: www.focux.us or contact our technical support, system installer or dealer. Strongly recommend that you read this manual including all the instructions, warnings and precautions. In addition, in order to protect your interests, please keep sales slip or invoice well, which is your credentials of purchasing our products. D Series Digital Amplifier User Manual 2013 Version 6.2 Page 7 of 18 Chapter 3: Installation Warning: Before you beginning to install the unit, please make sure to carefully read and follow the "important safety instructions" at the beginning of the manual. Open the packaging and check whether the unit is damage or not during the transportation. If the unit is found damaged, please immediately notify the transportation company. Only you have the right to ask for the transport damages compensation. Please keep the box well as the damage evidence and provide it for the side delivery checking. Our company will provide you with necessary assistance. In addition, we also recommend you saving all packaging materials for the need of the transportation. Do not transport the unit without package to avoid damaging the unit. To make the unit work normally, you also need to prepare the following parts (our company does not provide): Input wiring cable. Output wiring cable. Rack or unit mounting bracket (provide a stable table for the unit stacked). Warning: The third pin (grounding) of the AC power cord connector which this unit uses is the necessary security components. Do not use adapters or other methods to make the ground connection failure. 3.1 Structure diagram Rear Panel Top Front Panel D Series Digital Amplifier User Manual 2013 Version 6.2 Page 8 of 18 3.2 Cooling description This digital amplifier series is designed according to international 1 U size standards. The cooling method is: pumping the outside air into the unit through the vents of the front panel, and then bring out the heat through the aluminum radiator in the unit and then out from the rear panel vents. The "smart" variable speed DC fan is equipped in the unit, and then it can adjust the wind speed through the temperature detection and circuit detection for the heat sink module. When the unit inside overheats, it will adjust the fan speed to increase cooling efficiency immediately. If any heat‐sink overheats, the detection circuit will reduce output power. If the amplifier overheats, the temperature protection detection circuit and its circuit will shut down and power off until it cools to a safe temperature. D Series amplifiers can be stacked one on top of the other due to the efficient cooling system they are equipped with. There is however a safety limits to be observed: in case a rack with closed back panels is used, leave one rack unit empty every four D Series amplifiers installed to guarantee adequate air flow. 3.3 Connection mode illustration Stereo mode connection illustration D Series Digital Amplifier User Manual 2013 Version 6.2 Page 9 of 18 Mono mode connection illustration Bridge mode connection illustration Interface illustration D Series Digital Amplifier User Manual 2013 Version 6.2 Page 10 of 18 Chapter 4: Operation Warning: Before turning on the unit, please make sure the unit is power off, the power switch is in the "OFF" position, and all the volume knob has been set to the lowest position. 4.1 Speaker protection Clipping not only make the sound worse, but also will damage the high frequency drive unit. It is recommended you that don't do the clipping to the unit's signal to protect the speaker. In addition, to avoid the speaker drive circuit burned which is caused by the strong infrasound signal transmission of the unit, breathing or the high level which is caused by the dropping of the microphone and the low frequency signals. It should take one of the following ways: Install the high‐pass filter between the mixer output and unit input. Install a high‐pass filter at the sides of the mixer. At the premise of without affecting the use, set the filter frequency as high as possible. For example, for music is set to 35Hz, for the microphone is set to 75Hz. In each mixer's input channel, set the frequency of the filter with the relevant channel below the lowest fundamental frequency. Warning: Do not put the sensitive high‐gain devices (such as tape deck) above or below the unit directly. This will form a strong magnetic field to cause a "buzzing" sound near the unshielded device. If you use a cabinet, we recommend you to place the sensitive devices at least 10‐inch to the units. 4.2 Start‐up procedure According to the users' needs, please follow the connection illustration section of the stereo, bridge or mono mode of the manual to install, if it is necessary to change the mode, please disconnect the power supply. Precautions Although the unit is protected when happens the internal and external fault, but you should take the following measures to let the unit's operation to reach the optimum performance and the maximum safety: Before using the unit, please configure the unit first to make it work normally. Include the connections of the input wiring and output wiring. The improper wiring connection will cause the serious D Series Digital Amplifier User Manual 2013 Version 6.2 Page 11 of 18 operational difficulties. The relevant configuration of the unit, please refer to the "Installation" section of the manual. Please be careful when connect, select the signal source and control the output level. This can save you a lot of troubles. Do not short connect the ground wire and the input signal ground wire of the cable. This will form a ground loop and cause the oscillations. Tampering or modifying the circuit without authorization will be dangerous and will make all services provided by agents lose efficacy. Do not use the unit when the yellow clip LED is continued flashing. Do not make the mixer overload, otherwise it will send a clipping signal to the unit. The unit will accurately reproduce such signals, which may cause speaker damage. Do not use the unit when the load impedance is lower than the nominal. Because of the output protection of the unit, this configuration will result to the premature clipping and speaker damage. Warning: Do not connect the output end to the power supply, the battery or the primary power. This may cause electrical shock. Note: There is signal passing after turning on the unit, the output interface may exist the fatal voltage. D Series Digital Amplifier User Manual 2013 Version 6.2 Page 12 of 18 4.3 Operation Front Panel Item Illustratio
n Functions Clip LED Description The LED lights up orange when the output signal distortion on the corresponding channel rises above 1%, which indicate that the “clipping” has occurred because the signal level is too high. The corresponding LED will light up when the input signal exceeds ‐35dB, ‐20dB and 10dB. If the signal LED does not light up, please check 1 the gain setting, the input connections, the signal audio source and Signal LED whether the output line is short circuit. If the Signal 20dB or ‐10dB LED illuminates with no signal input, there may be system oscillations or some other malfunction. Disconnect the load and fully reduce the gain. If the LED remains on, shows that the amplifier needs servicing. The maximum voltage gain of the amplifier varies depending on the model is shown of the designation. The Gain controls are marked in dB Gain 2 Control of attenuation. There are 21 detents for repeatable adjustments. The upper 14 steps are about 1 dB each, and settings should not be used for normal program levels, as the input headroom could be exceeded, but can be used for testing at reduced levels. At the minimum setting, the signal is completely cut off. Power LED Thermal LED 3 Bridge Mono Power on, LED will illuminate green. If no indication, please check whether the AC power cord or AC outlet is unusual or not. It will light up when the amplifier overheats. Bridge mode; Mono mode. It will light up red to indicate that protection is in effect. To provide protection, the unit will not output any sound from the speakers while Protect this indicator is lit up. It will light up if the heat sink overheats, or if a DC LED voltage is detected at the amplifier outputs. Also it will light up for about a few seconds at time of power‐on, as the amplifier gets ready to operate. 4 Power Switch on and off the power supply. It will light up green when switch Switch on. D Series Digital Amplifier User Manual 2013 Version 6.2 Page 13 of 18 4.4 Operation Rear Panel Item Illustration Power 1 2 Functions Interface Signal Input Gain Switch Description Power cord: Standard power cord. Power outlet is the 16A polarized plug with ground which meets the GB 1002‐1996 standard. Input female XLR: The input plug uses the balanced female XLR plug. When the gain switch is on 1Vrms, the input sensitivity of the amplifier is 1Vrms. When it is on 32dB, the amplification gain range is within 32dB. When it is on 26dB, the amplification gain range is within 26dB. STEREO Mode Channel A and Channel B work independently. The input signal of the Channel A outputs from the Channel A output socket, and the same as Channel B. 3& 4 MONO Mode Mode Channel A and channel B work independently. The output of the Switch channel A is from the input signal A. The input of the channel B is from the input signal A. BRIDGE Mode Channel A and channel B work at the same time, and the output is from input signal A. 5 Signal Output Four core SPEAKON speaker socket: When the amplifier is in the Stereo mode, Channel A \ Channel B will connect through this socket, the method is below: 1+, 1‐. D Series Digital Amplifier User Manual 2013 Version 6.2 Page 14 of 18 Specifications Model D4 D6 D12 Output Power, 8 Ω* 4 x 450 W 4 x 650 W 4 x 1200 W Output Power, 4 Ω* 4 x 800 W 4 x 1100 W 4 x 2100 W Output Power, 2 Ω* 4 x 1400 W 4 x 1800 W 4 x 3600 W Bridged Output Power, 16 Ω* 2 x 900 W 2 x 1300 W 2 x 2400 W Bridged Output Power, 8 Ω* 2 x 1600 W 2 x 2200 W 2 x 4200 W Bridged Output Power, 4 Ω* 2 x 2800 W 2 x 3600 W 2 x 7200 W Input Sensitivity @ 8 Ω 3.00 V 3.61 V 4.90 V Input Sensitivity @ 4 Ω 2.83 V 3.40 V 4.58 V Input Sensitivity @ 2 Ω 2.65 V 3.17 V 4.24 V 60 V 72 V 97 V Maximum RMS Voltage Swing* +26 dB (20X) Gain, selectable Frequency Response 20 Hz ‐ 20 kHz (1W @ 8 Ω, ±0.5dB) Signal to Noise Ratio ≥105 dB (20 Hz ‐ 20 kHz, A weighted) Crosstalk separation >70dB @ 1 kHz Input Impedance 20 kΩ balanced THD typical < 0.02 %, full power ≤ 1 % Slew Rate 50 V/us @ 8 Ω Damping Factor @ 8Ω ≥200 @100 Hz / 1 KHz Power Requirements AC~100‐240V (50‐60Hz) Protection Dimensions (W x D x H) overheat/thermal output power control/long term output power control/output short‐circuit/overload protection/dc protection 19" x 14.3" x 1.75" (483mm x 364mm x 44 mm) Net weight *EIAJ Test Standard, 1 kHz, 1% THD 17.6 lbs (8 kg) D Series Digital Amplifier User Manual 2013 Version 6.2 Page 15 of 18 Maintenance Cleaning Before attempting to clean any part of the amplifier, first disconnect the AC main source. Use a soft cloth and mild nonabrasive solution to clean the faceplate and chassis. WARNING! Never let any liquid reach the internal parts of the amplifier. Service There are no user‐serviceable parts in your amplifier. Refer servicing to qualified technical personnel. In addition to having an in‐house service department, Focux supports a network of authorized service centers. If your amplifier needs repair contact your Focux dealer (or distributor). You can also contact the Focux Technical Service department to obtain the location of the nearest authorized service center. Dust Removal In dusty environments, the front side air filters clog with dust after prolonged use. The dust gathered in the filters will interfere with cooling. You may use compressed air to remove the dust from filters. D Series Digital Amplifier User Manual 2013 Version 6.2 Page 16 of 18 Warranty Product Warranty Focux guarantees its manufactured products to be free from defective components and factory workmanship for a period of 36 (thirty six) months, starting from the date of purchase printed on Focux’s (or any of its Authorized Dealer’s) invoice to the end customer. All warranty repairs and retrofits must be performed at Focux facilities or at an Authorized Service Center at no cost for the purchaser. Warranty exclusion: Focux’s warranty does not cover product malfunctioning or failure caused by: misuse, abuse, repair work or alterations performed by non‐authorized personnel, incorrect connections, exposure to harsh weather conditions, mechanical damages (including shipping accidents), and normal wear and tear. Focux will perform warranty services provided that the product is not damaged during transportation. Return of Goods Goods can be returned to Focux only after they have been granted a Return Merchandise Authorization (RMA) number to be attached to the external packaging. Focux (or its Authorized Service Center) has the right to refuse any returned good without a RMA number. Repair or replacement Focux reserves the right to repair or replace any defective goods covered by product warranty at its sole discretion and as it deems best. Cost and responsibility of transport: The purchaser (or end user/customer) is solely responsible for all transportation costs and risks associated with sending warranty covered goods to Focux or its Authorized Service Center. Focux will assume full responsibility and cover all costs incurred to send the goods back to the purchaser (or end user/ customer). D Series Digital Amplifier User Manual 2013 Version 6.2 Page 17 of 18 Focux Technology LLC 11601 Wilshire Boulevard #500 Los Angeles, CA 90025 USA [email protected] www.focux.us ©2013 Focux Technology LLC all rights reserved. FOCUX is registered trademarks of Focux Technology LLC All other trademarks remain the property of their respective owners. D Series Digital Amplifier User Manual 2013 Version 6.2 Page 18 of 18