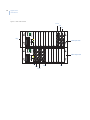
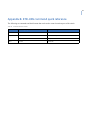
1
GE
Security
Digiplex HDS
User Manual
imagination at work
Copyright
Copyright © 2004, GE Security, Inc. All rights reserved.
This document may not be copied in whole or in part, or otherwise reproduced except as
specifically permitted under US copyright law, without the prior written consent from GE.
Document number/revision: 1044844B.
Disclaimer
The information in this document is subject to change without notice. GE, in keeping pace
with technological advances, is a company of product innovation. Therefore, it is difficult to
ensure that all information provided is entirely accurate and up-to-date. GE accepts no
responsibility for inaccuracies or omissions and specifically disclaims any liabilities, losses,
or risks, personal or otherwise, incurred as a consequence, directly or indirectly, of the use or
application of any of the contents of this document.
This publication may contain examples of screen captures and reports used in daily
operations. Examples may include fictitious names of individuals and companies. Any
similarity to names and addresses of actual businesses or persons is entirely coincidental.
Trademarks and patents
Digiplex HDS product and logo are registered trademarks of GE Security.
GE and the GE monogram are registered trademarks of General Electric.
Other trade names used in this document may be trademarks or registered trademarks of
the manufacturers or vendors of the respective products.
Software license agreement
GE software supplied with GE products is proprietary and furnished under license and can be
used or copied only in accordance with the license terms.
THE ENCLOSED PROGRAM IS FURNISHED SUBJECT TO THE TERMS AND CONDITIONS OF THIS
AGREEMENT. RETENTION OF THE PROGRAM FOR MORE THAN 30 DAYS, OPENING OF THE
SEALED WRAPPER, IF ANY, SURROUNDING THE PROGRAM, OR USE OF THE PROGRAM IN ANY
MANNER WILL BE CONSIDERED ACCEPTANCE OF THE AGREEMENT TERMS. IF THESE TERMS
ARE NOT ACCEPTABLE, RETURN THE UNUSED PROGRAM AND ANY ACCOMPANYING
DOCUMENTATION TO GE FOR A FULL REFUND OF THE LICENSE FEE PAID. (FOR INFORMATION
REGARDING THE RETURN OF PROGRAMS ENCODED OR INCORPORATED WITHIN EQUIPMENT,
CONTACT THE NEAREST GE SALES OFFICE.)
Intended use
Use this product only for the purpose for which it was designed; refer to the data sheet and
user documentation. For the latest product information, contact your GE sales
representative or visit us online at www.gesecurity.com.
FCC compliance
This equipment has been tested and found to comply with the limits for a Class A digital
device, pursuant to part 15 of the FCC Rules. These limits are designed to provide
reasonable protection against harmful interference when the equipment is operated in a
commercial environment. This equipment generates, uses, and can radiate radio frequency
energy and, if not installed and used in accordance with the instruction manual, may cause
harmful interference to radio communications.
You are cautioned that any changes or modifications not expressly approved by the party
responsible for compliance could void the user's authority to operate the equipment.
Contact
Direct all inquiries about GE’s legal policies with regard to this product to:
Director of Legal Services
GE Security
4575 SW Research Way, Suite 250
Corvallis, OR 97333 USA
iii
Contents
Introduction . . . . . . . . . . . . . . . . . . . . . . . . . . . . . . . . . . . . . . . . . . . . . . . . . . . . . . . . . . . . . . . . . . . . . . . . . . . . . . . . . . . . 1
Conventions used in this manual . . . . . . . . . . . . . . . . . . . . . . . . . . . . . . . . . . . . . . . . . . . . . . . . . . . . . . . . . . . . . . . . . . .1
Safety terms and symbols . . . . . . . . . . . . . . . . . . . . . . . . . . . . . . . . . . . . . . . . . . . . . . . . . . . . . . . . . . . . . . . . . . . . . . . . .1
Hardware installation. . . . . . . . . . . . . . . . . . . . . . . . . . . . . . . . . . . . . . . . . . . . . . . . . . . . . . . . . . . . . . . . . . . . . . . . . . . . 2
Unpacking . . . . . . . . . . . . . . . . . . . . . . . . . . . . . . . . . . . . . . . . . . . . . . . . . . . . . . . . . . . . . . . . . . . . . . . . . . . . . . . . . . . . . . . .2
Mounting cage to rack . . . . . . . . . . . . . . . . . . . . . . . . . . . . . . . . . . . . . . . . . . . . . . . . . . . . . . . . . . . . . . . . . . . . . . . . . . . . .2
Removing video input or video output cards . . . . . . . . . . . . . . . . . . . . . . . . . . . . . . . . . . . . . . . . . . . . . . . . . . . . . . . .2
Replacing video input or video output cards . . . . . . . . . . . . . . . . . . . . . . . . . . . . . . . . . . . . . . . . . . . . . . . . . . . . . . . .3
Fiber transmittal and reception. . . . . . . . . . . . . . . . . . . . . . . . . . . . . . . . . . . . . . . . . . . . . . . . . . . . . . . . . . . . . . . . . . . . .3
Before you make connections. . . . . . . . . . . . . . . . . . . . . . . . . . . . . . . . . . . . . . . . . . . . . . . . . . . . . . . . . . . . . . . . . . . . . .4
KTD-HDS to PC . . . . . . . . . . . . . . . . . . . . . . . . . . . . . . . . . . . . . . . . . . . . . . . . . . . . . . . . . . . . . . . . . . . . . . . . . . . . . . . . . . . .5
KTD-HDS to KTD-405 . . . . . . . . . . . . . . . . . . . . . . . . . . . . . . . . . . . . . . . . . . . . . . . . . . . . . . . . . . . . . . . . . . . . . . . . . . . . . .6
System information. . . . . . . . . . . . . . . . . . . . . . . . . . . . . . . . . . . . . . . . . . . . . . . . . . . . . . . . . . . . . . . . . . . . . . . . . . . . . . 7
Troubleshooting . . . . . . . . . . . . . . . . . . . . . . . . . . . . . . . . . . . . . . . . . . . . . . . . . . . . . . . . . . . . . . . . . . . . . . . . . . . . . . . . . . .9
Conclusion . . . . . . . . . . . . . . . . . . . . . . . . . . . . . . . . . . . . . . . . . . . . . . . . . . . . . . . . . . . . . . . . . . . . . . . . . . . . . . . . . . . . . . 11
Contacting technical support . . . . . . . . . . . . . . . . . . . . . . . . . . . . . . . . . . . . . . . . . . . . . . . . . . . . . . . . . . . . . . . . . . . . 12
Online publication library . . . . . . . . . . . . . . . . . . . . . . . . . . . . . . . . . . . . . . . . . . . . . . . . . . . . . . . . . . . . . . . . . . . . . . . . 12
Appendix A. Port number designation . . . . . . . . . . . . . . . . . . . . . . . . . . . . . . . . . . . . . . . . . . . . . . . . . . . . . . . . . . . . 13
Appendix B. KTD-HDS command quick reference . . . . . . . . . . . . . . . . . . . . . . . . . . . . . . . . . . . . . . . . . . . . . . . . . . 15
iv
Digiplex HDS
User Manual
1
Introduction
This is the GE Security Digiplex HDS User Manual for model KTD-HDS. This document includes detailed
instructions explaining:
•
•
how to connect the Digiplex HDS to the System Controller; and
how to connect a keypad to the System Controller.
There is also information describing how to contact technical support if you have questions or concerns.
To use this document effectively, you should have the following minimum qualifications:
•
•
a basic knowledge of CCTV systems and components; and
a basic knowledge of electrical wiring and low-voltage electrical connections.
Read these instructions and all ancillary documentation entirely before installing or operating this product.
The most current versions of this and related documentation may be found on our website. Refer to Online
publication library on page 12 for instructions on accessing our online publication library.
Note:
A qualified service person, complying with all applicable codes, should perform whatever hardware installation is
required.
Conventions used in this manual
The following conventions are used in this document:
Bold
Menu items and buttons.
Italic
Titles of books and various documents.
Emphasis of an instruction or point; special terms
Windows, panes, tabs, fields, variables, and other GUI elements.
Blue italic
Hyperlinks to cross-references, related topics, and URL addresses.
Safety terms and symbols
These terms may appear in this manual:
Improper use may cause equipment damage.
Cautions identify conditions or practices that may result in damage to the equipment or other property.
Improper use could cause equipment damage or serious personal injury.
Warnings identify conditions or practices that could result in equipment damage or serious personal injury.
2
Digiplex HDS
User Manual
Hardware installation
Unpacking
To ensure that your shipment is received in good condition, do the following:
1. Check the containers for any visible damage that may have occurred in the process of shipping. If there
is visible damage to the containers, do not open the containers. Call the transportation company
immediately.
2. Open the containers with caution because contents may have shifted during shipping. Inspect each
piece of equipment as it is unpacked.
The unit can be very heavy. Use caution when unpacking.
3. Locate the packing slip and ensure that all of the parts have arrived.
4. If any piece of equipment appears to be damaged or is missing, contact GE Security.
5. Save the original cartons in case the equipment requires further transportation.
6. Make sure you install the unit near a readily accessible socket outlet.
Mounting cage to rack
The Digiplex HDS (KTD-HDS) cage is delivered from the factory assembled and ready to install into a
standard 19-inch EIA rack. Each 6U rack uses 10.5 inches of vertical space. One 84-inch rack can house 1024
inputs by 256 outputs. Mount the KTD-HDS cage to the rack with four evenly spaced 10-32 screws per rack
segment. Use screws that are long enough so that there are at least 2.5 threads in excess.
Removing video input or video output cards
To remove a video output or video input card, do the following:
Disconnect all power supplies before servicing.
1. Power down the KTD-HDS bay that the card resides in and make note of the card’s slot position.
2. Remove the two hex screws that hold the card’s faceplate to the cage assembly.
3. Without removing any cabling from the faceplate, gently pull the faceplate straight back away from the
cage.
4. Grip the card by its edge connector and pull it from the cage.
3
Replacing video input or video output cards
To add a video output or video input card, do the following:
Disconnect all power supplies before servicing.
1. Power down the KTD-HDS bay and, if necessary, remove the blank panel from where the new card is
to be installed.
2. Slide the card into the cage using the plastic guide rails until the connector is seated. Do not force the
card into the cage. If it does not plug in easily, try adjusting the card until the connector seats and goes
in with minimum force.
Note:
The video input and output cards look very similar. If you get them confused, please note that the video input
cards have a chip mounted in the center of the card, just beside the BNC panel connector; the video output
card does not.
3. Install the BNC module and tighten the two screws.
Note:
The BNC modules are different for video input and video output cards. The back of a BNC module for video
input has terminated BNC connections and resistors showing; the output does not. Refer to BNC panel on
page 9 for more information on BNC panels.
Fiber transmittal and reception
The optional single mode fiber modules on the KTD-HDS allow video data to be transmitted and received
using fiber. This allows for consolidation of your video cables because a single fiber can carry up to eight
video signals.
To use fiber, there must be a transmitter on one end of the cable, and a receiver on the other end. There is a
receiver card (KTD-HDS-RCV), and four transmitter cards (KTD-HDS-ST, KTD-HDS-STL, KTD-HDSSTH, KTD-HDS-STLH). For more information on the optional fiber modules, see Table 1. Additionally, the
cards operate with GE-IFS external components.
Table 1.
Optional fiber modules
Model no.
Description
Wavelength (nm)
KTD-HDS-ST
Single mode transmit
1310 nm
KTD-HDS-STL
Single mode transmit, long reach
1550 nm
KTD-HDS-STH
Single mode transmit, high power
1310 nm
KTD-HDS-STLH
Single mode transmit, long reach and high
power
1550 nm
KTD-HDS-RCV
Receiver
1310 nm
4
Digiplex HDS
User Manual
Before you make connections
The designation of + and - on the signals are for the purposes of this installation only. Other manufacturers’
designations may differ.
5
KTD-HDS to PC
To connect the KTD-HDS to the System Controller or a PC for DCS use (Figure 1), use the provided RS-485
4-wire cable (Figure 2) from the PC1 port on the KTD-HDS to port 8 on COM port card 1 of the System
Controller, or the appropriate port on a PC for DCS.
Figure 1. PC to KTD-HDS connection
System Controller
RS-422 to Port 8 on
COM port card 1
KTD-HDS
ABCD
AUX
1
1
2
3
4
3
PC3
Ext Power
RST
OFF
RST
RST
OFF
TCP/IP
P C1
6
OFF
RST
OFF
VEE
Figure 2. RS-485 4-wire cable
KTD-HDS PC1 port
Tx +
Pin 4
Tx -
Pin 3
Rx -
Pin 2
Rx +
Pin 1
DB9 port on PC
4
5
6
7
8
2
3
4
5
7
Rst
PC2
VEE
PC1
3
5
VCC
1
2
4
VCC
1
2
3
4
1
2
6
7
8
8
6
Digiplex HDS
User Manual
KTD-HDS to KTD-405
You can connect the KTD-405 keyboard directly to the KTD-HDS (Figure 3) for maintenance operations.
Connect the KTD-405 keyboard to the KTD-HDS by running a two-wire RS-485 cable (Figure 4) from the
KTD-405 interface box to the PC2 port on the KTD-HDS.
Figure 3. KTD-405 to KTD-HDS connection
KTD-405 interface box
KTD-HDS
KTD-405
IN
1
2
3
4
5
6
7
OUT
8
1
2
CD
AB
1
2
3
4
AUX
3
4
PC3
wer
Ext Po
5
6
RST
OFF
7
VCC
RST
TCP/
IP
8
OFF
VCC
RST
OFF
P C1
Rst
PC2
VEE
RST
OFF
VEE
RS-485
Figure 4. Two-wire RS-485 cable
1
5
B
6
A
7
B
RS422
OUT
4
A
RS422
IN
B
RS485
A
3
KTD-HDS PC2 port
To A
To B
2
PC2
1
2
3
4
8
SP. SHIELD
9
+
10
SPEAKER
KTD-405 interface box terminal strip
7
System information
The port architecture of the switcher is universal in design, with each port having two addresses depending on
whether the port is an input or an output. When you look at the back of the switch, one set of addresses is
defined by 96 output ports, counted from left to right. The second set of addresses, counted from right to left,
defines 96 input ports. There are 12 slots for input or output cards, not counting the I/O module. Each slot has
either eight input or eight output ports. The slots are numbered from left to right looking at the switcher from
the back, with slot 1 on the far left and slot 12 on the far right. Port addressing takes the form of bay number (1
to 16), slot number (1 to 12), and port number (1 to 8). See Appendix A. Port number designation on page 13
for more information.
The KTD-HDS architecture is made up of only four active PC boards and three interconnect PCB modules.
Table 2 lists the PCBs and PCB modules:
Table 2.
PCBs and modules
Type
Status
Communication and power module
Active together with the power supply
Video output cards
Active
Video input cards
Active
Matrix boards
Active
V bus
Interconnect PCB for matrix boards
Bridge
Interconnect PCB for output boards
BNC panel
Interconnect PCB module for coaxial cable
With the KTD-HDS architecture and this list of PCBs, you can assemble a full matrix routing switcher with
1024 inputs and 256 outputs in one 84-inch rack.
The KTD-HDS does not require a dedicated PC to operate. External serial communications can be either
RS-232, RS-422, or RS-485. The routing algorithms are distributed throughout the four active PCBs such that
each PCB has a dedicated territory of control. The following lists explain.
Communication and power module
•
•
•
•
Handles all communications with a host controller or keypad.
Translates incoming commands and broadcasts them to the output cards.
Communicated with all other bay I/O cards in a master/slave relationship.
Passes data from the input cards to host controllers.
8
Digiplex HDS
User Manual
Video output card
•
•
•
•
•
•
•
•
•
•
•
On power-up, calculates its bay and slot position, determining its territory of control.
Each output card controls eight output ports from all camera inputs.
Filters out the I/O card commands in its territory of eight output ports.
Broadcasts a bus disconnect before routing a new video signal to one of its eight ports.
Broadcasts a bus connect to route a new video signal to one of its eight ports.
Inserts the proper text ident onto the new video signal routed to one of its eight ports.
Provides 3dB gain to the video signal and drives a 75-ohm terminated load.
Clamps the output signal at blanking.
Stores sequence tables.
Stores connection data within its territory of control.
Stores all ident data for all cameras in the system.
Video input card
•
•
•
•
•
•
•
•
•
On power-up, calculates its bay and slot position, determining its territory of control.
Each input card controls eight input ports from all output bus lines.
Filters out the output card commands in its territory of eight input ports.
Provides 3dB gain to the video signal and drives the matrix board.
Clamps the input signal at synch tip.
Converts incoming switch commands from the output cards to matrix chip format.
Provides synch separation for each input port.
Provides synch loss detection.
Provides video loss detection.
Matrix board
•
•
•
•
•
Full matrix switching of up to 96 inputs to 32 outputs per matrix board.
Distributes power and universal timing signals.
Decodes bus addresses from the input card.
Communicates the bay and slot position to each board plugged into a matrix slot.
Can be stacked to multiply the number of bus lines up to 256.
V bus
•
•
Connects matrix boards together between bays, both up and down.
Each stacked level of matrix boards requires V bus connection to the adjoining bays.
Bridge
•
Brings the video signal from the matrix board to the output card.
9
BNC panel
•
Used to interface between the coaxial cables and input or output cards. Refer to Removing video input
or video output cards on page 2 and Replacing video input or video output cards on page 3 for more
information.
Troubleshooting
When troubleshooting a KTD-HDS, think of each input as a vertical bus line and each monitor output as a
horizontal bus line. Where the two bus lines cross is a matrix video switch crosspoint. Each time a route takes
place, the switch disconnects any other camera bus line from the monitor bus line. The selected camera bus line
is then connected to the monitor bus line in the matrix 8 x 8 chip.
In the bigger picture, each input board manages eight vertical camera bus lines while each output card manages
eight horizontal bus lines. Each matrix chip individually routes eight vertical camera bus lines to eight
horizontal monitor bus lines (8 x 8 full matrix switch).
In order to isolate the problem, do what is called patterning. This involves recording enough sample routes
around the problem area to establish a pattern that fits one of the fault categories described. Think through the
possible causes that match the fault pattern. Given an understanding of the KTD-HDS architecture and a fault
pattern, most problems can be logically diagnosed without the need to do any measurements.
Naturally, there are always exceptions to the rules. The exceptions here are when the fault does not fall into one
of the categories described in System information on page 7. For example, in a contiguous block of eight
inputs, some cameras route to the wrong monitors. This is caused by a problem with one of the parallel data
lines between the input card and the matrix board. Again, given a recorded pattern around the problem, it is
logically possible to determine the cause without making any measurements. Usually it is faster to think your
way through the problem than it is to measure your way to a solution.
Another more difficult problem to rectify is when you have two pictures on the same output bus line. This is
caused by a faulty data transmission between the output card and the input card during the disconnect
instruction. There is no way to verify that the instruction to disconnect was carried out. When the new connect
instruction is delivered, two signals are connected to the same bus line. The previous record of what was
connected to the bus line, held in memory by the output card, has now been replaced by the new route. If you
can determine which two cameras are routed to the same bus line, either by picture or ident, you can resolve the
problem by calling up the two cameras and rerouting them. Otherwise, routing through all the cameras will
clear up the problem. The last resort is to reboot the KTD-HDS by powering down and powering up.
A problem can occur given the probability of a data bit getting lost or corrupted. If this were to happen too
often, you should test the out-to-in RS-485 communication line for possible problems. We recommend you
record any such incident to recognize if the problem has a pattern, such as always happening to one group of
eight inputs or coming from the same output card.
From this, four forms of problems can be defined:
•
•
•
•
a single individual problem;
a group problem;
a subuniversal problem; and
a universal problem.
Determine which type of problem you have and check the appropriate equipment.
10
Digiplex HDS
User Manual
A single individual problem
This type of problem is associated with one of the faults listed in Table 3:
Table 3.
Single individual problem
One input to all monitors
One output from all inputs
Input card
Output board (one output from all inputs)
Input connection (BNC)
Input connection to ouput board from matrix board
Input amplifier
Ident chip
Input synch separator
Output amplifier
Connection to matrix board from input card
Output connection to I/O panel module
Matrix board
Matrix chip
Pin connection on matrix chip carrier (input bus line)
Finally, check the application programming to ensure no editing changes were made.
A group problem
This type of problem is associated with a block of eight faults that are contiguous. Possible causes are listed in
Table 4:
Table 4.
Group problem
Eight inputs to all monitors
Eight outputs from all inputs
Input board
Output board
CPU (if a separate chip)
CPU (if a separate chip)
FPGA
FPGA
PROM
PROM
RAM
RAM
EEPROM
EEPROM
EIA-485 receiver
EIA-485 receiver
Salvo bus line
PLL
Write bus line
Matrix board (addressing problem)
CPLD
Matrix chip
PLL
11
A subuniversal problem
The subuniversal problems, listed in Table 5, are associated with a fault pattern that is not necessarily
contiguous. An example would be where all cameras from one bay will not route to outputs on another bay.
Another example is where all monitors on one bay will not route.
Table 5.
Subuniversal problem
Possible causes
H bus
V bus
I/O module
I/O module RS-485 transmitter
I/O module RS-485 receiver
Faulty I/O to out RS-485 transmission line
CPU (if a separate chip)
FPGA
PROM
RAM
EEPROM
PLL
CLK
Synch generator
A universal problem
This type of problem is associated with no routing. Check for one of the faults listed in Table 6:
Table 6.
Universal problem
Possible causes
Input RS-422 commands from host controller missing
Faulty power supply
Faulty out-to-in RS-485 transmission line
Conclusion
Patterns are vital to troubleshooting. It is important to establish which category the problem falls into before
trying to solve it. If these techniques do not allow you to solve the problem, you may contact GE Security with
the pattern information. We will assist in determining the possible causes of the problem.
12
Digiplex HDS
User Manual
Contacting technical support
For assistance installing, operating, maintaining, and troubleshooting this product, refer to this document and
any other documentation provided. If you still have questions, you may contact technical support and sales
24 hours a day, 7 days a week.
For sales and technical support assistance, we provide customers with several options (see Table 7). Our
support phone number is available Monday through Friday (excluding holidays) between the hours of 6 a.m.
and 5 p.m. Pacific Time.
Table 7.
Sales and support contact information
Sales
Technical support
800-469-1676
800-469-1676 (Monday through Friday, 6 a.m. to 5 p.m. Pacific Time)
541-754-9133
541-740-3589 (all other times)
E-mail
[email protected]
[email protected]
Fax
541-754-7162
541-752-9096 (available 24 hours a day)
Phone:
Note:
Be ready at the equipment before calling for technical support.
Online publication library
Another great resource for assistance with your GE Security products is our online publication library,
available to all of our customers on our website. To access our publication library, go to our website at the
following location:
http://www.gesecurity.com
In the Tools area at the top, click the Publication Library link then select Video Surveillance. After you
register and log on, you may search through our online library for the documentation you need.1
1.
Many GE Security documents are provided as PDFs (portable document format). To read these documents, you will need
Adobe Acrobat Reader, which can be downloaded free from Adobe’s website at www.adobe.com.
13
Appendix A. Port number designation
Inputs and outputs on the KTD-HDS are arranged differently.
The KTD-HDS can have up to 1024 inputs. There are eight ports to a slot, and 12 slots to a bay. The ports are
numbered from top to bottom on the slot. As you look at the back of the unit, each input card should be
installed starting from the right, with each video input card following another. There should be no spaces
between video input cards. In Table 8, you can see a sampling of what ports are contained in each slot, where a
table cell represents a slot on the back of the KTD-HDS. If you have more than 12 slots, the port numbering
starts on the right side of the next bay below and continues to the left. See Figure 5 on page 14 for more
information.
Table 8.
Camera port numbers
Cameras
89-96
81-88
73-80
65-72
57-64
49-56
41-48
33-40
25-32
17-24
9-16
1-8
The KTD-HDS can have up to 256 outputs. There are eight ports to a slot, and 12 slots to a bay. The ports are
numbered from top to bottom on the slot. As you look at the back of the unit, each output card should be
installed starting from the left, with each video output card following another. There should be no spaces
between video output cards. In Table 9, you can see a sampling of what ports are contained in each slot, where
a table cell represents a slot on the back of the KTD-HDS. If you have more than 12 slots, the port numbering
starts on the left side of the next bay below and continues to the right. See Figure 5 on page 14 for more
information.
Table 9.
Monitor port numbers
Monitors
1-8
9-16
17-24
25-32
33-40
41-48
49-56
57-64
65-72
73-80
81-88
89-96
14
Digiplex HDS
User Manual
Figure 5. Back of the KTD-HDS
17-24
9-16
1-8
ABCD
AUX
1
1
2
3
4
3
PC3
Ext Power
1
2
3
4
2
3
4
4
RST
OFF
Bay
1
2
5
VCC
RST
RST
OFF
TCP/IP
P C1
6
VCC
7
OFF
Rst
5
6
7
8
PC2
VEE
5
6
7
8
Video input cards
8
RST
OFF
VEE
ABCD
AUX
1
2
3
4
1
1
2
3
PC3
Ext Power
1
2
3
4
RST
OFF
5
1
2
3
4
5
1
2
3
4
5
2
3
4
5
4
Video output cards
5
VCC
RST
RST
OFF
TCP/IP
P C1
VCC
6
7
OFF
Rst
PC2
VEE
6
7
8
6
7
8
6
7
8
6
7
8
8
RST
OFF
VEE
1-8
9-16
17-24
Port
Slot
15
Appendix B. KTD-HDS command quick reference
The following are commands and their formats that can be used to control certain aspects of the switch.
Table 10. Commands and their formats
Command group
Command format
Route
Camera to monitor
<monitor>.<camera>
Sequence
Sequence to monitor
<monitor>s<sequence#>
Stop sequence
<sequence#>t
do salvo
v<salvo#>
Salvo
16
Digiplex HDS
User Manual