1
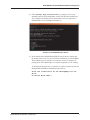
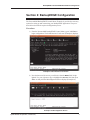
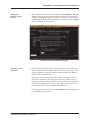
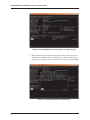
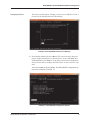
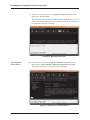
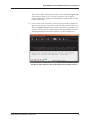
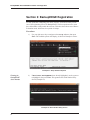
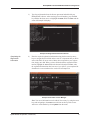
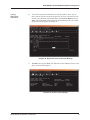
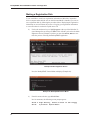
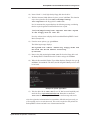
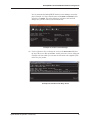
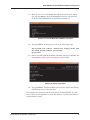
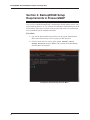
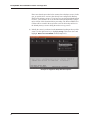
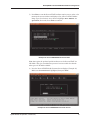
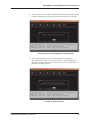
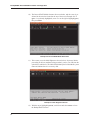
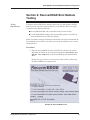
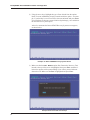
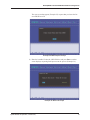
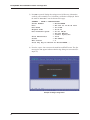
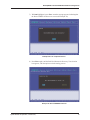
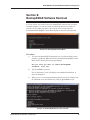
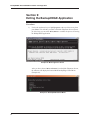
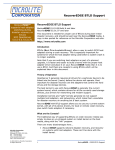
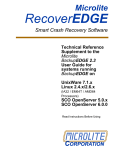
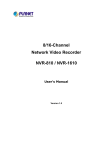
BackupEDGE / RecoverEDGE Installation & Configuration
BackupEDGE / RecoverEDGE Installation
& Configuration for PressureMAP
Overview
This document describes the requirements for installing, configuring and using the
third-party BackupEDGE™ / RecoverEDGE™ Version 03.00.03 application on your
PressureMAP™ system computer. BackupEDGE extends the original system backup
capabilities of PressureMAP to include the variety of device resources / media listed
below. RecoverEDGE assists in the process of creating a disaster recovery bootable
CD for your system and quickly restoring your PressureMAP system if a hardware
failure occurs.
The following resources can be used with BackupEDGE:
n Electronic tape cartridge
n Optical devices
¨ CD Recordable and Rewritable media (CD-R, CD-RW)
¨ DVD media (DVD-RAM, DVD-RW, DVD-R, DVD+RW, DVD+R-DL)
¨ Blu-ray Disk™ drive
n Iomega REV drive
n SharpDrive Media (USB/SATA removable flash drives, cartridges drives,
hard drives, etc.)
n Network-Attached Storage (NAS) servers/devices
n Url backups via file transport protocol (ftp)
¨ Remote computers/servers
¨ Aws - Amazon Simple Storage Service (S3)
Documented
Backup Resource
Due to the excessive amount of instruction required to address each of the above
backup resources, this document, instead, will focus on a single backup medium: optical drive (CD/DVD ROM). Detailed information on how to use other backup resources can be obtained from the BackupEDGE 03.00.03 User Guide. The user guide
is available in PDF format from the Microlite Corporation website
(www.microlite.com).
System Studies Incorporated (2580806.FSD)
1
BackupEDGE / RecoverEDGE Installation & Configuration
The BackupEDGE / RecoverEDGE Version 03.00.03 software packaged with
System Studies’ PressureMAP product is intended to be installed on a MAP Engine
computer (or equivalent hardware) which runs PressureMAP Version 27 or higher.
Depending upon which operating system you are using—SCO UNIX 5.0.7 or
CentOS 5.2 Linux—screen output may vary slightly from what is shown in the
installation examples below.*
*Beginning with PressureMAP Version 28, all current and future development of the PressureMAP and PressureWEB applications will be done using the Linux operating system. This OS environment brings greater
flexibility and programming options for PressureMAP program development.
Document
Organization
The instructions in this document begin with an explanation of what is needed—in
the way of materials and information—before you can install the BackupEDGE /
RecoverEDGE product on your PressureMAP system. This preliminary information
is followed by the more detailed sections listed below:
1. BackupEDGE/ RecoverEDGE Installation — initiated in PressureMAP
via the Supplemental Update Menu. The Supplemental Update function
stops the various MAP processes and makes it possible for PressureMAP users without ROOT access permission to the PressureMAP computer’s operating system to install, configure and remove BackupEDGE.
2. BackupEDGE Configuration — includes BackupEDGE resource selection, setting auto-detection of new devices (scanning for valid resources),
configuring devices, and selecting the default backup device.
3. BackupEDGE Registration — describes procedures for entering the
BackupEDGE serial number, making a registration disk, and activating your
registration.
4. BackupEDGE Setup Requirements in PressureMAP — establishing
BackupEDGE as the daily backup application, confirming the desired
backup resource in PressureMAP (CD-ROM, url, etc.), and designating the
number of daily backup slots (retained copies) for the selected backup resource.
5. RecoverEDGE Boot Medium Creation — describes the process of using
the EdgeMenu controls and RecoverEDGE Media Generator to create a
bootable CD for the selected BackupEDGE resource (optical drive, ftp, etc.).
6. RecoverEDGE Boot Medium Testing — explains the procedure for testing
the RecoverEDGE CD to confirm that it complies with requirements for the
selected default backup resource.
7. Disaster Recovery — explains how to use the RecoverEDGE CD to boot
the computer and restore the PressureMAP system from your backup archive. This section addresses the crash recovery process for the original
computer, for spare computers, and for a computer with different hardware.
8. BackupEDGE Software Removal — how to access the BackupEDGE
Control Menu and remove the application, if necessary, from your system.
2
BackupEDGE / RecoverEDGE Installation & Configuration
9. Exiting the BackupEDGE Application
Installation Preparation
Requirements
Before you proceed with the installation, make sure you have the following items
and/or have met the specified requirements:
n A user ID on the PressureMAP system that grants access to the System Ad-
ministration Menu. If you cannot log onto the System Administration Menu,
please contact the individual(s) within your company who assign user accounts and logins to obtain one.
n PressureMAP Installation CD-ROM.
n BackupEDGE Installation CD-ROM from the Media Kit (Microlite Corpora-
tion, part number MB2SI).
n License Certificate from the BackupEDGE Media Kit. You will need to iden-
tify the serial number as it appears on the license certificate.
PressureMAP
Users Alert
Note: During the supplemental update and BackupEDGE installation, configuration and registration procedures, all PressureMAP processes will be stopped. For
this reason, it important that you complete the procedures described below as
carefully and quickly as possible. If you first review this documentation and prepare for the installation, the entire process can be completed with very little disruption to PressureMAP’s scheduled activity.
Prior to beginning the procedures below, it is strongly recommended that you
inform PressureMAP users and/or administrative personnel that the
PressureMAP system will be down for 5 to 15 minutes during installation and
configuration of the software.
System Studies Incorporated (2580806.FSD)
3
BackupEDGE / RecoverEDGE Installation & Configuration
Section 1: BackupEDGE Installation
After assembling the installation media, you should be ready to install BackupEDGE
onto a PressureMAP system as described in the following steps.
Procedure:
1) At the MAP Engine computer, log onto PressureMAP using an ID and login
that permits access to the System Administration Menu. Once you initially
select the terminal type and printer for the session, you should see the System Options Menu shown below (Example 1).
Example 1: System Options Menu
2) From the System Options Menu, select System Administration by
pressing 3 and Enter. At this point you will need to type the System Administration password. Once PressureMAP accepts the password, it will produce
the System Administration Menu (Example 2).
Example 2: System Administration Menu
4
BackupEDGE / RecoverEDGE Installation & Configuration
3) From the menu selection, choose option 4, Update MAP System, and
press Enter. This produces the Update Types Menu shown below
(Example 3).
Example 3: Update Types Menu
Supplemental
Update Selection
4) Select Supplemental Update by typing 2 and Enter. At this point the
program terminates the standard system processes that are underway and
displays the prompt shown below.
Stopping MAP Processes ....
Inserting
PressureMAP
Installation CD
5) Next you are prompted to insert the PressureMAP Installation CD-ROM into
the CD/DVD drive (Example 4).
Example 4: Supplemental Update Screen
System Studies Incorporated (2580806.FSD)
5
BackupEDGE / RecoverEDGE Installation & Configuration
6) Place the CD-ROM into the drive tray and Type C to continue with the installation.
The software then displays the Supplemental Updates Menu with a list of
Update Profiles (Example 5). Choose option 5, Select Individual
Updates, and press Enter.
Example 5: Supplemental Updates Menu
7) A new screen displays (below), which lists the various Individual Updates
available for the system. Depending upon which operating system you have
installed on your PressureMAP computer, the number of Update Profiles
will differ. Example 6 shows the typical profile display for a SCO UNIX
system.
Example 6: Individual Updates Screens
6
BackupEDGE / RecoverEDGE Installation & Configuration
8) Select Backup Edge Installation by typing 13 (or the corresponding number) and pressing Enter. At this point the PressureMAP software completes the update process and performs a check to determine if
BackupEDGE is a new installation (Example 7).
Example 7: BackupEDGE Detect Screen
9) Notice that the PressureMAP BackupEDGE Control Menu is displayed at
the bottom of the screen. To proceed with the installation, press I and Enter.
The installation process will take a few minutes or more to complete, depending upon which MAP Engine or computer equipment you are running.
As shown in the prompt below, eventually you will be requested to place the
BackupEDGE Installation CD-ROM into the CD drive:
Place the installation CD for BackupEdge into CD
drive:
C)ontinue M)ain Menu ?
System Studies Incorporated (2580806.FSD)
7
BackupEDGE / RecoverEDGE Installation & Configuration
BackupEDGE
Installation CD
10) Remove the PressureMAP Installation CD, and insert the BackupEDGE CD.
Type C and Enter to continue the installation process.
You will see lines of screen data pass by as the installation proceeds automatically. The install utility examines the media, validates selected software,
and installs new BackupEDGE libraries. Finally, the program will indicate
that the software has been installed successfully by displaying the messages
in the example below, followed by the BackupEDGE Control Menu at the
bottom of the screen (Example 8).
Example 8: BackupEDGE Control Menu
8
BackupEDGE / RecoverEDGE Installation & Configuration
Section 2: BackupEDGE Configuration
The PressureMAP BackupEDGE Control Menu (Example 8) provides the necessary
options for setting up and customizing your BackupEDGE application. The procedures below describe the required configuration process.
Procedure:
1) From the PressureMAP BackupEDGE Control Menu, type C and Enter to
begin configuration. The Initial Resource List Screen (Example 9) displays.
Example 9: Initial Resource List Screen
2) Near the bottom of the screen you will notice that the Next field is highlighted. Use your right arrow key to highlight the Cancel field, then press
Enter. At this point the Main Edgemenu Screen displays (Example 10).
Example 10: Main Edgemenu Screen
System Studies Incorporated (2580806.FSD)
9
BackupEDGE / RecoverEDGE Installation & Configuration
Initiating Backup
Resource Selection
3) Use your right arrow key again to highlight the Setup data field at the top
of the screen. Note: If the arrow keys don't seem to work correctly, try pressing your tab key first before using the arrow keys.
With the Setup field highlighted, use the down arrow key to reveal the
submenu shown in Example 11 below.
Example 11: BackupEDGE Setup Submenu
4) Use the down arrow key to highlight Configure BackupEDGE and
press Enter. The configuration options shown in Example 12 are displayed.
Example 12: BackupEDGE Configuration Options
10
BackupEDGE / RecoverEDGE Installation & Configuration
Setting Auto
Detection of New
Devices
5) There should be an arrow positioned to the left of Autodetect New Devices. If not, use the arrow keys to make this selection. You should also
see that the Configure field located at the bottom left corner of the screen
is highlighted. Make sure that both selections are indicated, and press Enter.
Screen 13 displays, as shown below.
Example 13: Device Autodetection Message
Scanning for Valid
Resources
6) Notice the Device Autodetection message displayed on-screen. Make sure
that the BackupEDGE CD-ROM is still in the CD drive, and that any other
backup equipment is connected and/or has media installed. Press Enter to
continue with the autodetection.
In Example 14 on the next page the Optical Drive is the only resource selected. Your system may have other types of devices available, such as a
tape drive, but the tape backup method is no longer the recommend backup
medium. PressureMAP users now favor other, higher capacity, less expensive backup methods, such as CD-ROM, DVD-RAM, etc.
For each screen presented, make sure that the Next field is highlighted, and
press the Enter key to continue.
System Studies Incorporated (2580806.FSD)
11
BackupEDGE / RecoverEDGE Installation & Configuration
Example 14: BackupEDGE Resource Information – CD (Optical) Drive
7) When the Backup Information message appears in the center of the screen,
indicating that bootable backups on these drives are not the default setting
(Example 15), continue with the configuration procedure by pressing Enter.
Example 15: Bootable Backup Resources Message
12
BackupEDGE / RecoverEDGE Installation & Configuration
Configuring Devices
The next screen that appears, Example 16, asks if you would like to create a
resource for file transport protocol (FTP) backups.
Example 16: BackupEDGE FTP Resource Message
8) Notice that the default selection is No for FTP resource creation. Since the
purpose of these instructions is to describe how to set up a CD-ROM drive
for BackupEDGE, press Enter. You can always return to the Configuration
Screen at a later time to configure the FTP resource or other resources, if desired.
After selecting No and pressing Enter, the BackupEDGE Configuration Options Screen redisplays (Example 17).
Example 17: BackupEDGE Configuration Options
System Studies Incorporated (2580806.FSD)
13
BackupEDGE / RecoverEDGE Installation & Configuration
9) At this point, use the arrow keys to highlight the Done field in the lower
right corner, and press Enter.
This will return you to the Main Edgemenu Screen (Example 18). Now, it’s
time to select the default backup device (primary resource). This setting can
be changed at a later time, if desired.
Example 18: Main Edgemenu Screen
Selecting Default
Backup Device
10) Using the left arrow key, first highlight the Admin field and then arrow
down and select Set Default Backup Resource. Press Enter.
The Select Primary Device Screen (Example 19) displays.
Example 19: Primary Device Selection Screen
14
BackupEDGE / RecoverEDGE Installation & Configuration
This screen includes a Resource List with an arrow designating optical0
as the primary backup device. This device represents your computer’s
CD/DVD-ROM drive. Similar screen information is displayed for the other
backup resource types.
11) Use the down arrow, if necessary, to select the desired primary backup medium from the Resource List located on the left center portion of the screen.
Then, with Next highlighted (near the lower left corner), press Enter. The
software will return you to the Main Edgemenu Screen with the activation
information displayed in the Primary Resource section (Example 20).
Example 20: Main Edgemenu Screen Showing Selected Primary Resource
System Studies Incorporated (2580806.FSD)
15
BackupEDGE / RecoverEDGE Installation & Configuration
Section 3: BackupEDGE Registration
At some point after configuring your device resource, it will be necessary to take
care of the registration process for BackupEDGE. The first requirement is to enter
the serial number to fully unlock the software. This takes the software out of Demo /
Evaluation mode, which lasts for a period of 30 days.
Procedure:
1)
Use your right arrow key to navigate to the Setup submenu, then press
Enter. The available options will display, as shown in Example 21 below.
Example 21: Setup Submenu Options
Entering the
BackupEDGE
Serial Number
2)
If Activate BackupEDGE is not already highlighted, use the up arrow
to highlight it, then press Enter. This generates the Serial Number Entry
Screen (Example 22).
Example 22: Serial Number Entry Screen
16
BackupEDGE / RecoverEDGE Installation & Configuration
3)
Type the serial number from the license agreement included with your
BackupEDGE software. After entering your serial number, press the Tab
key and then the down arrow to highlight the Next field. Hit Enter and the
screen in Example 23 displays.
Example 23: Registration Information Screen
Completing the
Registration
Information
4)
Enter the required registration information using the down and up arrow
keys to navigate between fields on the screen. It is important that you fill in
each of the fields. If one or more of them does not pertain to your registration, simply enter NA. When you have finished with the registration information, highlight the Save field at the bottom left and press Enter. After
the registration information has been saved, you will see your completed information in a screen similar to the one shown in Example 24.
Example 24: Product License Manager
Note: Your saved information can be edited, if necessary, by using the arrow
keys and navigating to the Info menu selection at the top of the screen.
Add a new serial number by selecting New from the menu.
System Studies Incorporated (2580806.FSD)
17
BackupEDGE / RecoverEDGE Installation & Configuration
Permanent Activation requires that you send the registration form that was
supplied with the BackupEDGE CD-ROM to Microlite Corporation, who in
turn, will supply you with an Activation Code. Once you receive the Activation Code, you will need to enter it using the Activate field at the top of
the Product License Manager screen.
Registration Note
5)
Highlight the Send option in the BackupEDGE Product License Manager
to either print or send the information via email. A screen similar to the one
in Example 25 will display.
Example 25: Send Registration Information Options
Note: Since a new PressureMAP System will not have email configured, it
is recommended that you print your BackupEDGE registration. You can
then mail or fax it to Microlite Corporation. The steps below address the
procedures for printing the registration information. Please note that you can
also make a registration disk, step 8, and use the generated text file on another computer to register via email.
Another option is to scan the registration information once it has been
printed (step 6 below) and email the image or PDF document to Microlite
Corporation.
18
BackupEDGE / RecoverEDGE Installation & Configuration
Printing
Registration
Information
6)
To print the registration information, use the up and down arrow keys to
move between options, and press the space bar to select or unselect an item.
Choose one of the three print options listed, then highlight Next and press
Enter. The information will be printed to the designated printer. The following screen message appears (Example 26).
Example 26: Registration Print Confirmation Message
7)
With Ok selected, press Enter. The Microlite License Manager Screen redisplays, as shown in Example 27.
Example 27: Product License Manager
System Studies Incorporated (2580806.FSD)
19
BackupEDGE / RecoverEDGE Installation & Configuration
Making a Registration Disk
If you would like to email your registration information to Microlite Corporation
from a computer other than the one on which PressureMAP is installed, you can create a registration disk by following the procedure below. Displaying the registration
information on screen initiates the process of copying your registration information
to a text file where it can then be copied onto a CD.
8)
Use the tab and arrow keys to highlight Quit at the top of the Microlite License Manager Screen, then press Enter. This will take you back to the Main
Edgemenu Screen (Example 29) where you can select File, Exit to continue the process of leaving the BackupEDGE application.
Example 28: Main Edgemenu Screen
Next, the BackupEDGE Control Menu redisplays (Example 29).
Example 29: BackupEDGE Control Menu
9)
From this menu selection, type M and Enter.
In a few moments, the following screen prompt appears:
Place a high density, blank 3½ disk in the floppy
drive: C)ontinue M)ain Menu?
20
BackupEDGE / RecoverEDGE Installation & Configuration
10) Insert a blank 3 ½ inch, high density floppy disk into the drive.
11) With the formatted, blank diskette in place, press C and Enter. This function
copies the registration file from user/lib/edge/config/
info.register to the floppy disk as info.txt.
In a few moments the program displays the following message, confirming
that the required registration information has been copied.
/usr/lib/edge/config/info.register has been copied
to the floppy disk as info.txt
Next, the software then redisplays the PressureMAP BackupEDGE Control
Menu (Example 29).
12) From the menu options, type Q and Enter.
The following message displays:
The system will reboot. Remove any floppy disks and
CDs from the drives before continuing.
C)ontinue?
13) Remove the disk containing the info.txt file from the floppy drive and
the BackupEDGE CD-ROM from the CD drive and type C and Enter.
14) When the PressureMAP Update Types Menu displays (Example 30), type Q
and Enter. PressureMAP will reboot, and all designated MAP processes will
be activated.
Example 30: Update Types Menu
15) Take the disk with the info.txt file to a PC that has email capability and
email the file to [email protected]. Remember to attach the
info.txt file on the registration disk to the email message and send it.
After the registration information has been emailed to Microlite and processed, you
will eventually receive an activation code. This code is required to fully unlock the
BackupEDGE software and take it out of demonstration mode.
System Studies Incorporated (2580806.FSD)
21
BackupEDGE / RecoverEDGE Installation & Configuration
Entering the Activation Code
To enter your activation code, you will first need to access the BackupEDGE Control
Menu, and then follow the procedures presented below.
Example 31: BackupEDGE Control Menu
16) From the PressureMAP BackupEDGE Control Menu above, select C, “Configure,” and Enter. The selection displays the Setup Submenu Options on
the Main EdgeMenu Screen.
Example 32: Setup Submenu Options
17) Use the right and down arrow keys to highlight Setup, Activate
BackupEDGE, as shown in Example 32. Then press Enter.
22
BackupEDGE / RecoverEDGE Installation & Configuration
In a few moments the BackupEDGE Product License Manager screen displays (Example 33). Notice that the status of the Base License field is
currently set to Demo. This is the default pre-activation value and will
change once you have entered your activation code.
Example 33: Product License Manager
18) Use the right arrow key to advance the cursor to the Activate field near
the top of the screen, then press Enter. At this point a new screen will appear
(Example 34) from which you can enter the activation code supplied by Microlite for your product.
Example 34: Activation Code Entry Screen
System Studies Incorporated (2580806.FSD)
23
BackupEDGE / RecoverEDGE Installation & Configuration
19) Carefully type the activation code into the highlighted field, making sure it
is accurate before proceeding. Once the correct code has been entered, press
Enter. The Product License Manager screen redisplays, showing an Activated status for the Base License feature (Example 35).
Example 35: Product License Manager
20) Use the right arrow keys to highlight the Quit data field, then press Enter.
A version of the Edgemenu Screen displays indicating that your copy of
BackupEDGE is now licensed.
Example 36: License Status Screen
24
BackupEDGE / RecoverEDGE Installation & Configuration
21) Move the cursor over to the File data field on the top left of the control
line, and select Exit to leave the BackupEDGE software. This generates
the PressureMAP BackupEDGE Control Menu (Example 37).
Example 37: PressureMAP BackupEDGE Control Menu
22) Type Q and Enter. At this point you will see the following prompt:
The system will reboot. Remove any floppy disks and
CDs from drives before continuing.
C)ontinue?
23) Remove the BackupEDGE installation CD ROM, and type C and Enter. The
PressureMAP Update Types screen displays as shown below.
Example 38: Update Types Menu
24) Type Q and Enter. The PressureMAP system will now reboot, and all designated MAP processes will be activated.
This completes the registration and activation process for BackupEDGE. You will
now be able to use the application to create daily archives of your PressureMAP system data and file systems.
System Studies Incorporated (2580806.FSD)
25
BackupEDGE / RecoverEDGE Installation & Configuration
Section 4: BackupEDGE Setup
Requirements in PressureMAP
Once you have installed BackupEDGE, configured the desired backup resource, and
registered the product for use, you will need to establish the default backup criteria in
PressureMAP. This requires a simple setup procedure that needs to be performed in
the PressureMAP System Administration Menu.
Procedure:
1) Log onto the PressureMAP system and access the System Administration
Menu as described in Steps 1 and 2 on page 4 of this document.
2) From the menu selection, choose option 1, Set Default Daily
Backup Resource and press Enter. This produces the Default Backup
Selection Menu shown below.
Example 39: Default Backup Selection Menu
26
BackupEDGE / RecoverEDGE Installation & Configuration
3) Notice that there are two options available for backing up PressureMAP.
Press option 2 and Enter to select the BackupEDGE Backup Method. This
entry produces the Daily Backup Resources Menu shown below.
Example 40: Daily Backup Resources Menu
This menu displays the BackupEDGE device resources that were configured
in Section 2, plus options to set the number of backup slots for these resources.
4) In this example, two backup resources are available: option 1 (optical) and
option 2 (url). Only one resource at a time can be designated in PressureMAP. Select your desired daily backup resource and press Enter. The following screen information displays, indicating that you have successfully
enabled BackupEDGE as your daily backup source.
Successfully replaced BackupEDGE schedule item!
Traditional daily backups disabled successfully!
BackupEDGE daily backups enabled successfully!
Hit <Return> to continue.
5) Press Enter to remove the screen message. Now you will need to designate
how many slots (number of daily backups) you would like to store on your
designated backup resource.
! Important !
PressureMAP will allow you to retain 1 to 25 backups on a selected device
resource, but not all backup devices can accommodate the full number of
slots. It is your responsibility to assess the backup requirements of your
PressureMAP system and the capacity limitations of your backup resource
before you make the slot selection.
For example, if you select 7 slots for a url device resource (ftp backup to a
network computer), the network computer must have the necessary storage
capacity for this number of backups. If it does not, BackupEDGE will store
System Studies Incorporated (2580806.FSD)
27
BackupEDGE / RecoverEDGE Installation & Configuration
the most current backup in the last available slot that accommodates the full
daily backup capacity requirement. Consequently, your network computer
may allow fewer daily backups than you would like to retain.
Please consult the BackupEDGE User Guide for more specific information
on the type of backup resource you are using. This online information will
help you to maximize the number of slots your resource can utilize.
6) First enter the menu option number which represents the daily backup resource that you selected in step 4 above. The following screen information
displays (showing the option 4 selection):
BackupEDGE current setting for type optical is 1
This means the backup will occur daily and 1 backups
will be kept.
How many backups would you like to keep for type optical (1)?
7) Enter the desired number of slots for the selected device resource, followed
by Enter. Information similar to what is shown below displays at the bottom
of the Daily Backup Resources Menu screen.
You entered "2". Is this correct (y or n)?
8) Selecting N and Enter to the prompt above allows you to make the necessary change. The prompt will then redisplay. When you are ready to confirm
your entry, press Y and Enter.
Successfully modified /var/map/EDGE_BKUP_GEN.TXT
with optical:2
Hit <Return> to continue.
9) Press Enter to complete the procedure.
Recommended
Optical Backup
Medium
Please note that if you choose to use an optical device resource for BackupEDGE,
you are advised to use either a DVD+RW or DVD-RW which will give you 4.8 GB
of storage and can be used over and over.
Usage Note
System Studies recommends switching out the DVD for a new one approximately
once a month. Rewritable DVDs have a tendency to go bad after a number of rewrites. It would also be a good idea to create a weekly backup DVD that is a separate
DVD. The idea here is to create and retain a few backup DVDs that you can rely on
in case something happens to the daily DVD.
28
BackupEDGE / RecoverEDGE Installation & Configuration
Section 5:
RecoverEDGE Boot Medium Creation
Overview
This section of the BackupEDGE Installation & Configuration document explains the
important process of creating a RecoverEDGE CD to use for crash recovery. Crash
recovery is the process of rebuilding a PressureMAP system after a hardware disaster
(disk drive failure, bad motherboard, etc.) without having to separately re-install the
operating system, device drivers, PressureMAP/PressureWEB applications, and PressureMAP system data. The crash recovery software component, RecoverEDGE,
automates boot media creation and testing. It also provides an easy menu-driven user
interface for the disaster recovery process described in the next section.
!Important!
Please note that you will need to create a separate RecoverEDGE bootable CD for
each of your PressureMAP systems using the default resource specified for the system in Edgemenu. (This applies also to your spare computer.) If you later change
your BackupEDGE default resource for a particular system—for example, if you
change from DVD backups (optical drive) to ftp backups on a network computer (url
resource), you will need to create a new RecoverEDGE CD for the url resource.
Once again, please note that for simplification purposes this document describes
backup and disaster recovery procedures for an optical device resource only
(CD/DVD). If you intend to use other supported device resources, you should consult
the BackupEDGE 03.00.03 User Guide for more specific information. The user guide
is available in PDF format from the Microlite Corporation website (www.microlite.com).
Recommended
RecoverEDGE Boot
Medium
Note: System Studies recommends using a CD-R for making your RecoverEDGE
bootable CD. You should also label it with the proper descriptive information, such
as "RecoverEDGE for MACHINE_NAME or Disaster Recovery CD for MACHINE_NAME”. Then store the CD at a location near the server for quick access
during emergencies.
After a backup of your PressureMAP system has been made using BackupEDGE and
you’ve created and tested your RecoverEDGE bootable CD for the system (as described below), your system will be fully protected against loss of data from a hardware crash. If a failure were to occur, for example, you could use a spare computer or
the repaired original and the RecoverEDGE CD created for that specific computer to
restore your system.
The CD boots directly into the RecoverEDGE system which then provides menudriven recovery instructions. After RecoverEDGE prepares the hard drive(s) loads
the kernel and files systems, you can use your BackupEDGE medium to restore the
operating system, PressureMAP data, user information, etc. In most cases, the entire
process can be completed within 10 to 15 minutes.
System Studies Incorporated (2580806.FSD)
29
BackupEDGE / RecoverEDGE Installation & Configuration
RecoverEDGE
Requirements
There are several important considerations and requirements associated with the
crash recovery process:
1) RecoverEDGE must specify the same primary default resource that you selected for your backups in Edgemenu during the BackupEDGE Configuration process. This ensures disaster recovery/data restoral compatibility.
When you create the bootable RecoverEDGE CD for your system, the
selected primary backup resource is displayed (assuming you have already
set your default device resource). For example, if you configured an optical
drive to use for BackupEDGE, you would see this resource listed in Edgemenu when you begin the boot media creation procedure. If, later on, you
desire to create backups on a LAN using the url (ftp) backup resource, you
would then need to change the default primary resource in Edgemenu and
create a new RecoverEDGE CD for the url resource.
2) It is important that you create a RecoverEDGE CD for each of your
PressureMAP systems, including your backup computer. The RecoverEDGE
CDs need to be carefully labeled and stored in an accessible location so that
they can be quickly retrieved if necessary.
3) If you need to update or replace a defective hardware component in your
PressureMAP computer, the replacement com-ponent should be identical to
the original one, if possible (same manufacturer part designation, for example). If it is not, you will need to create a new RecoverEDGE boot CD for
the computer.
To better understand your options for a quick and successful disaster recovery, please review the following section in the BackupEDGE User Guide
(Version 03.00.03): 24 -- Crash Recovery - Preparation on page 225.
Creating the
Boot CD
The instructions below describe how to create a bootable CD for your PressureMAP
computer. Immediately following these procedures is a description of the RecoverEDGE boot medium test procedure.
Procedure:
1) Log onto PressureMAP and access the System Administration Menu. For
information on finding this menu, refer to steps 1 and 2 on page 4 of this
document.
30
BackupEDGE / RecoverEDGE Installation & Configuration
2) From the System Administration Menu, select option 20, BackupEDGE,
and press Enter. The PressureMAP BackupEDGE Menu displays as shown
below.
Example 41: PressureMAP BackupEDGE Menu
3) Select option 1, Launch EdgeMenu, followed by Enter. At the prompt:
Do You Wish To Launch Edgemenu? Y[es], N[o], press Y
and Enter. This produces the Main EdgeMenu Screen.
Example 42: Main Edgemenu Screen
System Studies Incorporated (2580806.FSD)
31
BackupEDGE / RecoverEDGE Installation & Configuration
Please note that the procedure below assumes that a backup resource (in this
case, an optical device resource) has already been configured for BackupEDGE as the primary resource. If you have not yet selected a default backup
resource, you will need to do so as described in the BackupEDGE Configuration section of this document before proceeding. The RecoverEDGE boot
CD that will be created in the steps below retrieves the backup archive for
the default primary resource during the crash recovery process.
4) Initially the cursor is positioned on the File menu heading at the top of the
screen. Use the right arrow key to highlight Setup. Then arrow down and
highlight Make RecoverEDGE media (Example 43).
Example 43: Edgemenu Setup Submenu Options
32
BackupEDGE / RecoverEDGE Installation & Configuration
5) Press Enter to start the RecoverEDGE medium creation process. After a few
moments the screen refreshes and displays a list of RecoverEDGE Media /
Image Types for selection. Arrow down to highlight Boot Media on
optical0 (Screen 44). Press Enter to continue.
Example 44: RecoverEDGE Media Selection Menu
Note: Once again, the preferred optical medium to use for RecoverEDGE is a
CD-R disk. This type of medium has proven to be more trouble-free than the
other types of CD media available.
6) Next, the RecoverEDGE Media Generator Screen displays (Example 45).
Make sure that Continue is highlighted, then press Enter.
Example 45: RecoverEDGE Media Generator Screen
System Studies Incorporated (2580806.FSD)
33
BackupEDGE / RecoverEDGE Installation & Configuration
This command begins the boot media initialization process, which takes a
few minutes to complete. Information similar to what is shown in the example below displays during the process.
Example 46: Media Generation Status
7) When Make Media displays, press Enter. The screen information indicates that the write process is underway.
Example 46: Making Media Message
34
BackupEDGE / RecoverEDGE Installation & Configuration
8) After a minute or two, the RecoverEDGE Media Generator indicates that the
bootable medium has been created successfully (Example 48). Press OK.
Example 48: Successful Boot Medium Creation Message
9) The next screen that appears stresses the importance of testing the
RecoverEDGE CD before you can consider it to be valid (Example 49). A
description of the testing process is offered in the next set of procedures. At
this time press OK to proceed.
Example 49: Media Test Notice
System Studies Incorporated (2580806.FSD)
35
BackupEDGE / RecoverEDGE Installation & Configuration
10) The RecoverEDGE Media Generator Screen refreshes, and the cursor is positioned in the menu box located at the top of the screen (Example 50). If
Quit is not already highlighted, arrow over to the right to highlight Quit,
then press Enter.
Example 50: RecoverEDGE Media Generation
11) This returns you to the Main Edgemenu Screen (below). Important: Before
proceeding to the boot medium testing procedure, remove your CD from the
optical drive and label it. The label should identify the PressureMAP system
name and indicate that it is a recovery disk.
Example 51: Main Edgemenu Screen
12) With the cursor highlighting File, scroll down and select Exit to leave
the BackupEDGE software.
36
BackupEDGE / RecoverEDGE Installation & Configuration
Section 6: RecoverEDGE Boot Medium
Testing
Testing
Requirements
Testing the RecoverEDGE boot medium requires that you shut down the PressureMAP system for a period of approximately five to ten minutes. Before you begin,
you will need the following materials:
n RecoverEDGE bootable CD (as described in the previous section).
n Current BackupEDGE backup of the PressureMAP system on CD, DVD or
remote destination such as URL (ftp backups).
Please note that the testing procedures described below can only be performed at the
PressureMAP system console. You will need access to the machine’s power switch
and optical drive.
Procedure:
1) Place the RecoverEDGE CD in the CD/DVD tray and reboot the system.
Rebooting the system can be performed using option 6, Shutdown and
Reboot the Computer, at the PressureMAP System Administration
Menu.
During boot up you will see several screens of data scroll by, followed by
the RecoverEDGE screen shown below.
Example 52: RecoverEDGE Screen
System Studies Incorporated (2580806.FSD)
37
BackupEDGE / RecoverEDGE Installation & Configuration
2) Using the arrow keys, highlight the type of boot desired from the options
listed. For most installations select the normal mode boot option—for example, if your backup is on a CD or DVD, select normal mode and press Enter.
If your backups are kept at a remote location (ftp backups), you would select
the network recovery boot option.
After a few moments the RecoverEDGE Recovery System screen appears,
as shown below.
Example 53: RecoverEDGE Recovery System Screen
3) Make sure that the Test Media option (Non-Destructive Recovery Test)
located at the top of the screen is highlighted, then press Enter. Another selection box appears with a prompt asking if you wish to proceed with nondestructive test. Make sure that Yes is highlighted and press Enter.
Example 54: Proceed with Test Prompt
38
BackupEDGE / RecoverEDGE Installation & Configuration
The next screen that appears (Example 55) requests that you insert the RecoverEDGE boot CD.
Example 55: Media Request Prompt
4) Place the bootable CD into the CD/DVD drive and press Enter. Another
screen displays requesting final input to start the process (Example 56).
Example 56: Start Test Prompt
System Studies Incorporated (2580806.FSD)
39
BackupEDGE / RecoverEDGE Installation & Configuration
5) Press OK to proceed. During the testing process OS Directory information
scrolls by, and eventually Level 1 Summary verification is displayed. Notice
the status of ALL OK!! near the bottom of this page.
SUMMARY - LEVEL-1 VERIFICATION
Serial Number
= RecoverEDGE
Date
= Thr Jan 29 14:41:04 2011
Data Read
= 627.37MB
Elapsed Time
= 00:01:29
Data Transfer Speed
= 24.767 GB/hr
= 422.949 MB/min
= 7391577 bytes/sec
Files Encoutered
= 67576
Status
= ALL OKAY!!
Exit Status
= 0
Press Any Key To Return To RecoverEDGE....
_
6) Press the <space> bar to return to the main RecoverEDGE screen. The first
message box that appears indicates that the edge listing was successful (Example 57).
Example 57: Edge Listing Notice
40
BackupEDGE / RecoverEDGE Installation & Configuration
7) With OK highlighted, press Enter. Another message appears indicating that
the RecoverEDGE media test was successful Example 58).
Example 58: Test Completion Notice
8) Press Enter again, and the final Non-Destructive Recovery Test selection
box appears, with the option to exit the testing process.
Example 59: RecoverEDGE Exit Screen
System Studies Incorporated (2580806.FSD)
41
BackupEDGE / RecoverEDGE Installation & Configuration
9) With OK highlighted, Press Enter to exit the RecoverEDGE menu.
10) Remove the RecoverEDGE CD or DVD from the optical drive tray, and
store it in a protection case.
11) Next power off the machine using the power switch, and wait approximately
15 seconds. Now turn the machine back on without any CD or DVD in the
system. Follow the instructions in the PressureMAP System Administration
manual to boot the system and place PressureMAP online.
42
BackupEDGE / RecoverEDGE Installation & Configuration
Section 7: Disaster Recovery
Overview
This section explains the process of utilizing the RecoverEDGE CD and most recent
BackupEDGE system backup to rebuild a PressureMAP system after a hardware failure. During disaster recovery, it is important to understand your options for a quick
recovery.
Please review the following section in the BackupEDGE User Manual (Version
03.00.03): 24 - Crash Recovery - Preparation on page 225).
The first step in preparing for a quick response to a potential hardware disaster is to
make sure that you have a RecoverEDGE CD created for each of your PressureMAP
systems, including the spare system. If you want to be able to recover from a DVD or
other device, such as a url/ftp style backup, you will need to create a RecoverEDGE
CD for each device resource. (Follow the instructions in Section 5 of this document.)
Same Machine
Recovery
If you intend to restore to the same machine after a disaster and repair, you would
use your RecoverEDGE CD to boot the system, and then restore system data from
your backup archive. If, for some reason, the system does not work after this process,
you should follow the directions below for rebuilding a system on different hardware.
Spare Computer
Recovery
If would like to restore a system to a spare computer—one that has the identical
hardware configuration and components as the original—you can use the RecoverEDGE CD created for the spare computer for this purpose. The RecoverEDGE CD
will allow you to restore data from the BackupEDGE archive, using the same IP address and other information as the original. The entire recovery process can be completed in approximately ten minutes. Make sure that the original system (the one with
the problems) is powered off before restoring to the spare computer. Note: It is important for ongoing support to inform System Studies’ Technical Support Department that you have moved the system to the spare computer.
If, for some reason, the system doesn’t work after you attempt to restore to the spare
computer, you should follow the instructions below for rebuilding a system on different hardware.
Rebuilding a
System on Different
Hardware
Rebuilding the PressureMAP/PressureWEB system on a different hardware platform
requires the following:
1. Installation of the operating system (either Linux CentOS 5.2 or SCO UNIX
5.0.7, whichever is applicable) and the PressureMAP/PressureWEB
applications—refer to the PressureMAP documentation for instructions.
2. Installation of the office and customized files from the BackupEDGE archive
medium—refer to the Rebuild a System procedure in the PressureMAP System
Administration Manual.
3. If the system that is being rebuilt is on a network, the LAN connection will need
to be reconfigured after the rebuild is complete. Refer to the Network Administration section of the PressureMAP System Administration Manual for
System Studies Incorporated (2580806.FSD)
43
BackupEDGE / RecoverEDGE Installation & Configuration
instructions on each part of this process. It involves the following procedures: Disconnect the MAP System from the Network, Connect the MAP System to the Ethernet
LAN, and Set the Gateway IP Address.
It is also important that you call System Studies’ Technical Support Department and
provide them with the number of the system you are trying to restore. It is important
that they are aware of what is happening with the system.
Once you have completed the restore process, PressureWEB should be checked to
ensure that offices are being called and that information is being processed correctly.
Check System Errors by clicking on the All Offices link, then clicking on the System
Errors link. If you encounter any problems or have any questions, please contact
System Studies Technical Support.
____________________________________________________________________
Author’s Note
44
Please be advised that screen samples are not yet available for the Disaster Recovery
procedure. A revised document or supplemental pages will be provided once this information becomes available.
BackupEDGE / RecoverEDGE Installation & Configuration
Section 8:
BackupEDGE Software Removal
If, for any reason, you need to remove the BackupEDGE software from your PressureMAP computer, you can do so easily by following the basic procedures described in the first eight steps below. The removal process begins when the
PressureMAP BackupEDGE Control Menu displays on the screen (Example 60).
Example 60: BackupEDGE Control Menu
Procedure:
1)
To remove the BackupEDGE application from your PressureMAP system
computer, type R and Enter from the PressureMAP BackupEDGE Control
Menu. Notice that the following prompt displays:
Are you sure you want to remove BackupEDGE
software: Y)es N)o
2)
Type Y and Enter to proceed.
In a few minutes the screen will display some additional information, as
shown in Example 61.
3)
When you see a screen prompt indicating that the removal is complete, take
the CD-ROM out of the CD/DVD tray, and type Q and Enter to quit.
Example 61: BackupEDGE Removal Process Data
System Studies Incorporated (2580806.FSD)
45
BackupEDGE / RecoverEDGE Installation & Configuration
Section 9:
Exiting the BackupEDGE Application
Procedure:
1)
Use the tab and arrow keys to highlight Quit at the top of the screen, then
press Enter. This will take you back to the Main Edgemenu Screen (Example 62) where you can select File, Exit to continue the process of leaving
the BackupEDGE application.
Example 62: Main Edgemenu Screen
After you have selected File and Exit from the Main Edgemenu Screen,
the software will display the PressureMAP BackupEdge Control Menu
(Example 63).
Example 63: BackupEDGE Control Menu
46
BackupEDGE / RecoverEDGE Installation & Configuration
Note: Remember that PressureMAP’s services have been down (inactive)
during the process of installing and configuring the BackupEDGE software.
Since the procedures described in this document are performed in conjunction with a Supplemental Update, the operating system will need to be rebooted after you have quit the BackupEDGE configuration process. It is
important to completely exit or quit the BackupEDGE application so that the
system can be rebooted and the MAP processes resumed.
2)
From the PressureMAP BackupEDGE Control Menu (Example 63), type Q
and Enter. The message below displays:
The system will reboot. Remove any floppy disks and
CDs from drives before continuing:
C)continue?
3)
Remove the BackupEDGE installation CD-ROM, and type C and Enter.
The PressureMAP Update Types menu displays next, as shown below.
Example 64: Update Types Menu
4)
Rebooting
PressureMAP
Type Q and Enter. The PressureMAP system will then reboot, and all designated MAP processes will be activated.
This completes the instructions for installing and configuring the BackupEDGE /
RecoverEDGE applications. The software can be reconfigured at any time to provide
backups to other sources, as desired. Simply select Define Resources from the
BackupEDGE Admin submenu. Additional information about BackupEDGE capabilities and configuration can be obtained from the BackupEDGE User Guide, available in PDF format from the Microlite Corporation website (www.microlite.com).
System Studies Incorporated (2580806.FSD)
47
BackupEDGE / RecoverEDGE Installation & Configuration
48