1
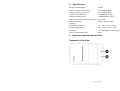
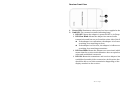
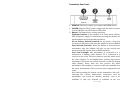
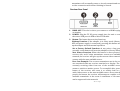
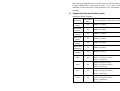
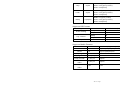
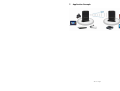
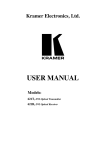
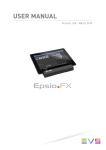
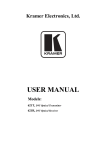
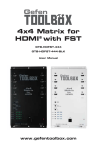
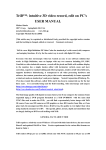
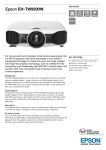
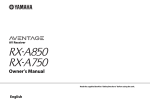
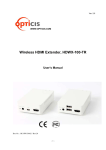
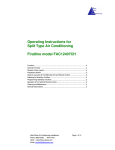
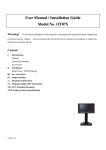
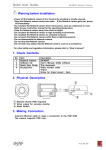
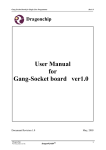
Wireless 60G HD Transceiver
User manual
Thank you for purchasing this product. For optimum performance and
safety, please read the instruction carefully before connecting, operating
or adjusting this product. Please keep the manual for future reference.
1. Introduction
Wireless 60G HD Transceiver include Transmitter and Receiver, it
extender system sends high definition video and audio to any HDTV
display up to 20 meters. It supports resolutions up to 1080p Full HD,
3DTV, CEC, and 7.1-channels of High Bit Rate (HBR) lossless digital
audio such as Dolby TrueHD, DTS-HD Master Audio. The Wireless 60G
HD is specifically designed to transmit within a room.
2. Features
Supports video resolutions:
VGA through WUXGA
480i/576i to 1080p@60Hz
3D video support 1080p/720p
WiHD 1.1 Compliant
Compliant with HDMI1.4,HDCP2.0
Supports Dolby TrueHD, DTS-HD Master Audio and LPCM digital
audio streams up to 7.1channels
Uncompressed High Definition A/V from source to display
Near zero latency
Wireless extension of HDMI up to 30 meters
Support for CEC commands
3. Package
1.
2.
3.
4.
5.
Wireless 60G HD Transmitter --------------------------------------- 1PCS
Wireless 60G HD Receiver ------------------------------------------- 1PCS
5V/1A USB adaptor ------------------------------------------------------ 2PCS
Operation Manual ------------------------------------------------------ 1PCS
USB to Micro-USB Cable-----------------------------------------------2PCS
Ver1.0 Page 1
4. Specifications
Frequency Band Range::
Input resolution (Transmitter):
Output resolution (Receiver):
Input ports (Transmitter):
Output ports (Receiver):
USB Connector (Transmitter/ Receiver):
Dimensions (mm):
Wight (g):
Operating Temperature:
Storage Temperature:
Humidity:
Power Consumption (Max):
60 GHz
up to 1080P@60Hz
up to 1080P@60Hz
1x HDMI (Female type)
1x HDMI (Female type)
Micro USB
90(W) x 56(D) x 17(H)
0°C ~ 40°C / 32°F ~ 104°F
-20°C ~ 60°C / -4°F ~ 140°F
20 ~ 90% RH (Non-condensing)
3.5W
5. Operation controls and Functions
Transmitter Front View
Ver1.0 Page 2
Receiver Front View
1. Power LED: illuminates when power has been supplied to the unit.
2. Link LED: The connection status indicating lamp.
LED OFF: Means the adapter is powered OFF or in Sleep mode.
LED Slow Blink: Means the adapter has started radio
transmission and has not yet found the other side of the link:
If the adapter is a transmitter, the adapter is in Scan mode,
searching for a matching receiver.
If the adapter is a Receiver, the adapter is in Beacon mode,
searching for a matching transmitter.
LED Fast Blink: Means the adapters are associated, which
means that the receiver and transmitter have accepted each
other and established a network.
LED ON: Means the transmitter and receiver adapters have
established an audio/video connection. At this point, the user
should be able to see this transmission happening on the
display attached to the receiver.
Ver1.0 Page 3
Transmitter Rear Panel
1. HDMI IN: This slot is where you connect the HDMI source.
2. POWER: Plug the 5V DC power supply into the unit or connect to the
source USB port via USB to Micro-USB cable.
3. Button: The button has a variety functions.
Wakeup Function: If the adapter is in Sleep mode (Status LED is
OFF and power supply is connected), pressing this button will wake
up the adapter and start normal operation.
Set to Factory Default Function: At any point, a long press (ten
seconds) on the button will reset the adapter to factory default.
Next Network Function: When the button is short pressed on the
transmitter side, the adapter will give up the current associated
network and will join the next available network.
User Case Example: One transmitter is connected to a receiver
attached to a display, while another TV is connected to another
receiver in the room. The user wants to send the audio and video to
the other display. To accomplish this, pressing the button of the
transmitter will cause it to switch from its current TV display to the
other display. Every time the user presses the button, the
transmitter will attempt to connect to the next available receiver in
the room. A maximum of ten receivers can be supported in the same
room.
Note that pressing the button on the transmitter side will always
interrupt the current audio/video connection such that the
transmitter can search for another network, even if none are
available. If only one network is available in the room, the
Ver1.0 Page 4
transmitter will eventually return to its only network and restablish
a video connection with it after finishing its search.
Receiver Rear Panel
1. HDMI OUT: This slot is where you connect to a HDMI equipped TV
or monitor.
2. POWER: Plug the 5V DC power supply into the unit or connect to
the source USB port via USB to Micro-USB cable.
3. Button: The button has a variety functions.
Wakeup Function: If the adapter is in Sleep mode (Status LED is
OFF and power supply is connected), pressing this button will wake
up the adapter and start normal operation.
Set to Factory Default Function: At any point, a long press (ten
seconds) on the button will reset the adapter to factory default.
Next Source Function: When the button is short pressed on the
receiver side, and if other transmitter sources are available in its
network, the receiver will give up the current video connection and
connect with the next available source.
User Case Example: Two or more transmitters are in the room and
are associated with one receiver attached to a display. The user is
currently receiving video from one of the available sources, but
wants to switch to another source. To accomplish this, pressing the
button of the receiver will cause it to switch from its current
audio/video source to the next available source. Every time the user
presses the button, the receiver will attempt to connect to the next
available transmitter in the room. A maximum of 16 transmitters
can be supported in the network.
Ver1.0 Page 5
Note that pressing the button on the receiver will not interrupt the
current audio/video connection if there is no other transmitter
available in the network. In that particular case, the button will do
nothing.
6. Supported Video and Audio Formats
Supported Video Formats
Resolution
Refresh Rate
(Hz)
640 x 480p
(VGA)
60
RGB 4:4:4 (8 bits)
848 x 480
(WVGA)
60
RGB 4:4:4 (8 bits)
800 x 600
(SVGA))
60
RGB 4:4:4 (8 bits)
1024 x 768
(XGA)
60
RGB 4:4:4 (8 bits)
1280 x 1024
(SXGA)
60
RGB 4:4:4 (8 bits)
1680 x 1050
(WSXGA+)
60
RGB 4:4:4 (8 bits)
1920 x 1200
(WUXGA)
60
RGB 4:4:4 (8 bits)
60
RGB 4:4:4 (8/10/12 bits)
YCbCr 4:4:4 (8/10/12 bits)
YCbCr 4:2:2(8 bits)
60
RGB 4:4:4 (8/10/12 bits)
YCbCr 4:4:4 (8/10/12 bits)
YCbCr 4:2:2(8 bits)
50
RGB 4:4:4 (8/10/12 bits)
YCbCr 4:4:4 (8/10/12 bits)
YCbCr 4:2:2(8 bits)
50
RGB 4:4:4 (8/10/12 bits)
YCbCr 4:4:4 (8/10/12 bits)
YCbCr 4:2:2(8 bits)
480i
480p
576i
576p
Color Depth(Color Depth (8, 10, 12 bits))
Ver1.0 Page 6
50/60
RGB 4:4:4 (8/10/12 bits)
YCbCr 4:4:4 (8/10/12 bits)
YCbCr 4:2:2(8 bits)
50/60
RGB 4:4:4 (8/10/12 bits)
YCbCr 4:4:4 (8/10/12 bits)
YCbCr 4:2:2(8 bits)
24/50/60
RGB 4:4:4 (8/10/12 bits)
YCbCr 4:4:4 (8/10/12 bits)
YCbCr 4:2:2(8 bits)
720p
1080i
1080p
Supported 3D Formats
Type
Resolution
Frame Packing
Top - Bottom
Side-by-Side
Refresh Rate(Hz)
1080p
24
720p
50/60
1080p
24
720p
50/60
1080i
50/60
Supported Audio Formats
Format
Channel
Sampling Rates (KHz)
LPCM
2
32/44.1/48/88.2/96/176.4/192
LPCM
6/8
32/44.1/48/88.2/96
2/5.1
48
2/5.1/6.1/7.1
48
Dolby TrueHD
5.1/6.1/7.1
48/96
DTS-HD Master
Audio
5.1/6.1/7.1
48/96
DTS-HD Master
Audio
2/5.1
192
Dolby Digital
Dolby Digital Plus
Ver1.0 Page 7
7. Application Example
Ver1.0 Page 8