1
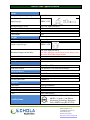
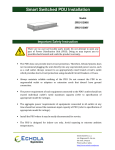
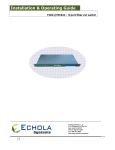
Smart Switched PDU Installation
Model
SPDUSPDU-108L
Important Safety Instruction
There are no user-serviceable parts inside. Do not attempt to open any
part of PDU. Doing so may expose you to possible shock hazard and voids
your product warranty.
•
The PDU does not provide short-circuit protection. Therefore, Echola Systems does
not recommend plugging the unit directly into any unprotected power source, such
as a wall outlet. Always connect to an appropriately rated branch circuit’s outlet
which provides short-circuit protection using standard Circuit Breakers or Fuses.
•
Always maintain reliable earthing of the PDU. Do not connect the PDU to an
ungrounded outlet or adapters or extension cords that doesn’t have ground
connection.
•
The power requirement of each equipment connected to the PDU’s outlet should not
exceed individual outlet’s rated maximum capacity (refer to specification of
appropriate model for ratings).
•
The aggregate power requirements of equipment connected to all outlets at any
time should not exceed the maximum input capacity of PDU (refer to specification of
appropriate model for ratings).
•
Install the PDU where it may be easily disconnected for service.
•
The PDU is designed for indoor use only. Avoid exposing to extreme ambient
temperatures.
Echola Systems L.L.C
1161 Ringwood Ct, Ste 100
San Jose, CA-95131
Phone: 408 321 9663
http://www.echola.com/power
SPDU-108L Specification
Input
Acceptable Input voltage range
100-120V AC
Input plug type
NEMA 5-15P
Maximum Input Current
Input Current Monitoring Accuracy
Input Frequency
Cord Length
15A (12A Agency Derated)
±2%
50/60 Hz
5 feet
Output
Output voltage
Same as Input
Output receptacle type
NEMA 5-15R
Maximum Output current/outlet
Number of Outlets
Outlet Current Monitoring Accuracy
15A (12A Agency derated)
Note: The aggregate current drawn by all outlets at any
time can't exceed Max. Input current.
8
±2%
Interfaces
Network Interface
Front Panel display
RJ45, 10Base-T Ethernet
2x16 character LCD with LED backlight
Environmental
Operating Environment
Operating Relative Humidity
Operating Elevation
32-113° F
0-95%
0-10000 feet
Physical
Form Factor
Net weight
Dimensions (Max - HxWxD)
Color
Certifications
Desktop/WallMount
~4 lbs
2 x 14.5 x 4 inches
White (ABS plastic)
UL60950-1 ( USA ) / CSA C22.2 No.
60950-1 ( Canada ), 2nd Edition,
Information Technology Equipment
Safety. MET Listing ID: E113398
Echola Systems L.L.C
1161 Ringwood Ct, Ste 100
San Jose, CA-95131
Phone: 408 321 9663
http://www.echola.com/power
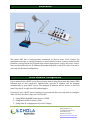
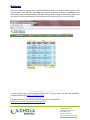
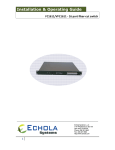
Installation
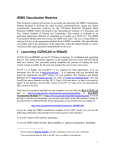
The smart PDU has 8 outlets/sockets numbered as shown above. First connect the
equipment you want to control & monitor to these outlets/sockets. Connect network cable
between a router/hub & the PDU and then connect input power cord to the power source.
Now you should be able see IP Address/Hostname displayed on the LCD screen. Proceed to
next step: the Network configuration.
Initial Network Configuration
If your network has a DHCP server then you may want to skip this section and connect PDU
Ethernet port to their network's switch/router and the IP address will be assigned
automatically by your DHCP server. The assigned IP address will be shown on the LCD
panel. Use that IP to login into PDU and manage it.
If you don't have a DHCP server running on your network then you may want to configure
Static IP; there are three ways you could do this:
1. Using NBNS (NetBIOS Name Service) of PDU
2. Using built-in DHCP server of PDU
3. Using Static IP configuration of your PC/Laptop
Echola Systems L.L.C
1161 Ringwood Ct, Ste 100
San Jose, CA-95131
Phone: 408 321 9663
http://www.echola.com/power
Using NBNS (NetBIOS Name Service)
You would need a Windows based Laptop or a PC to configure PDU using this method for
the first time. You may also need a ethernet crossover cable to connect PDU to a PC or a
Laptop but most of the modern PC/Laptops would work with either type of cable (straight
or crossover). Make sure the PC/Laptop IP option "Obtain IP address automatically" is
checked in the Internet Protcol Properties of the ethernet interface. Now launch the
internet browser and type http://echolasys in the address bar and press Enter key. Now
you will be prompted with a PDU's login dialog; If this is first time then use default
username and password. After login, you will see the main menu page of the PDU. Now
click on the Setup tab of the menu to bring the Network Config menu. From here you can
assign static IP, subnet mask and gateway and save your configuration. Thats it, now you
are set to connect PDU to your network/switch/router and access it from remote.
•
•
Default Username:
Username admin
Default Password:
Password admin
Using builtbuilt-in DHCP server
The procedure is same as above NBNS except that instead of using hostname 'echolasys' in
your browser you will have to use the IP address (like http://192.168.2.222) displayed on
the LCD panel. This method works for non-windows PC/Laptop as well.
Using Static IP configuration
Configure your PC/Laptop ethernet port's IP address to match the network portion of
default IP adress of PDU.
•
•
•
Default IP Address of PDU:
PDU 192.168.2.222
Default Gateway of PDU:
PDU 192.168.2.222
Default Subnet mask of PDU:
PDU 255.255.255.0
For example you can configure your PC/Laptops IP address as 192.168.2.222 and access
the main menu of PDU. After configuring the PC/Laptop ethernet address, just use any
internet browser to access PDU with new configure IP address. Now you will be prompted
with PDU's login dialog; If this is first time then use default username and password. Now
the default network settings of IP, subnet mask and gateway can be changed to match your
network setting through Setup tab.
•
•
Default Username:
Username admin
Default Password:
Password admin
User Authentication
Echola Systems L.L.C
1161 Ringwood Ct, Ste 100
San Jose, CA-95131
Phone: 408 321 9663
http://www.echola.com/power
Admin user is always the previlaged user who can access any web page. You can also create
a different user who can access to main Control/Monitor page but is not allowed to access
Setup page. This user is by default called "guest" but name can be changed using Setup>User tab and default password is "guest" as well.
If the authentication fails "Authentication Required" message will be displayed. The
authentication can optionally be disabled for Control/Monitor web page (the home page)
on the main menu by using Setup->User setting so that admin or guest user can access
main page without login but the Setup web page will still require login.
User Interfaces
Front Panel LCD
LCD moving character display on the front panel displays following important information.
This is useful when you are near the device to setup or monitor.
1.
2.
3.
4.
Hostname
IP Address
Outlet Status
Total Current Consumption in Amps
The outlet status shows the status of all 8 outlets and it could be one of the following,
(1) o (Empty circle): means corresponding outlet is switched OFF
(2) ● (Filled circle): means corresponding outlet is switched ON
(3) x (Cross): means corresponding outlet has been shut off due to overload
(Individual port overload protection feature)
Echola Systems L.L.C
1161 Ringwood Ct, Ste 100
San Jose, CA-95131
Phone: 408 321 9663
http://www.echola.com/power
Web Interface
User can configure, monitor and control the PDU through user friendly web interface. The
web interface uses AJAX for providing near real-time update on power consumption for
each outlet, total power and many other parameters. Before using web interface make sure
you have the latest Java Runtime Environment on PC from where you access the PDU.
To access GUI from any smart phone/mobile devices, just use letter ‘/m’ after the ipaddress
or the hostname, like http://192.168.2.21/m
For more details on web interface please refer to User’s Manual at
http://www.echola.com/power/Support.html .
Echola Systems L.L.C
1161 Ringwood Ct, Ste 100
San Jose, CA-95131
Phone: 408 321 9663
http://www.echola.com/power
Automation
You can either use Tcl scripting language (refer to separate document for automation using
Tcl) or Perl for automation. Here is an example how to use Perl script which uses api.xml
file from the PDU to parse certain outputs. If you are on windows you can use strawberry
perl.
############################################################
# Command Syntax: perl xmlget.pl http://<ipaddress>
#
############################################################
use LWP::UserAgent;
use XML::Simple;
$IPADDR = shift;
# create objects
$xml = new XML::Simple;
$ua = LWP::UserAgent->new;
# send request for api.xml
$REQUEST=$IPADDR . "/api.xml";
$req = HTTP::Request->new(GET => $REQUEST);
$req->header('Cookie' => 'test=quest');
$res = $ua->request($req);
$data = $xml->XMLin($res->content);
# print them
print "Outlet1 Power: $data->{pow1}";
print "Outlet2 Power: $data->{pow2}";
print "Outlet3 Power: $data->{pow3}";
print "Outlet4 Power: $data->{pow4}";
print "Outlet5 Power: $data->{pow5}";
print "Outlet6 Power: $data->{pow6}";
print "Outlet7 Power: $data->{pow7}";
print "Outlet8 Power: $data->{pow8}";
print "Voltage/Frequency: $data->{volt}”;
print "Temperature: $data->{temp}”;
Echola Systems L.L.C
1161 Ringwood Ct, Ste 100
San Jose, CA-95131
Phone: 408 321 9663
http://www.echola.com/power
Troubleshooting
•
If you get connection lost messages when you are on any GUI page (telnet or snmp
might still work), you will have to make sure you are running latest version of
JAVA on the PC where you run the browser to log into the smart PDU. The older
versions of java (ver <= 5 or early 6 versions) doesn't work well with the AJAX
calls that we use for real time updates. You can check whether you have latest java
by clicking on following link http://java.com/en/download/testjava.jsp and do an
update to avoid this intermittent problem.
•
Also check for any malware/anti-virus/firewall software which might block the
http connection to PDU.
•
We don’t support router-behind-router or router hacked to work in bridge-mode
configurations. If you have such configuration you may want to connect the PDU
to the primary router (router that acts as gateway or dhcp server).
For any technical questions, email to [email protected].
Echola Systems L.L.C
1161 Ringwood Ct, Ste 100
San Jose, CA-95131
Phone: 408 321 9663
http://www.echola.com/power