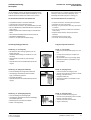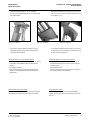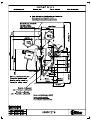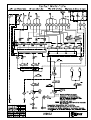
1
Contact Lite
Contact Lite Comfort
Contact World
J1170
V03.00.00
Zahnärztlicher Behandlungsplatz
- Gebrauchsanweisung - Wartungsanweisung - Montageanweisung Dental Work Place
- Operating Manual - Maintenance Instructions - Mounting Instructions -
Ritter® Concept GmbH
Bahnhofstraße 65, D-08297 Zwönitz
Fon: +49 (0) 37754/13-290, Fax: +49 (0) 37754/13-280
e-mail: [email protected]
Internet: http://www.ritterconcept.com
Contact Lite, Contact Lite Comfort,
Contact World
2
Allgemein / General
© Ritter Concept GmbH
J1170 V03.00.00EN&DE
Vorwort
Contact Lite, Contact Lite Comfort,
Contact World
Foreword
Sehr geehrter Benutzer!
Dear user!
Zunächst unseren herzlichen Glückwunsch zur
Our congratulations on the choice of your new Ritter
Wahl Ihres neuen Ritter Produktes und vielen
product and many thanks for your confidence!
Dank für Ihr Vertrauen!
This modern device was produced by our development-
Dieses moderne Gerät wurde mit großer Sorgfalt
and production engineers with great
von unseren Entwicklungs- und Produktions-
carefulness.
Ingenieuren hergestellt.
You and your team will gain absolute joy and benefit of
Uneingeschränkte Freude und wirklichen Nutzen
ziehen Sie aus Ihrer neuen Ritter Einrichtung,
wenn Sie mit Ihren Mitarbeiterinnen und Mitarbeitern
nach der fachgerechten Montage am
Einsatzort, die technischen und anwendungsbezogenen
Ratschläge aus der Übergabedemonstration
befolgen.
Trotz sorgfältiger Einführung in die Bedienung
werden sich im Laufe der Zeit kleinere oder
größere Fragen ergeben, auf die unsere
Gebrauchsanleitung Antworten geben soll.
Damit Ihnen der Umgang leicht von der Hand
geht, technische oder gesetzliche Vorschriften
Beachtung finden und auch die Wartungshinweise nicht
your new Ritter device, when following the tips and
advices, given to you during the handing over
demonstration.
Despite of a careful introduction into the operation, smaller
or greater questions will arise in the course of time. This
operating manual shall give you answers to these
questions.
To make the working easily for you and to be
sure, that all technical or legal regulations and
the maintenance notes receive
their attention, we recommend a careful examination
of this manual for you and your responsible
employees too.
übersehen werden, empfehlen wir Ihnen und Ihren
If you face technical problems, our service
verantwortlichen Mitarbeitern eine sorgfältige
hotline +49 (0) 37754/13-290 is available for you.
Durchsicht dieser Druckschrift.
And now a lot of joy with your Ritter equipment.
Bei technischen Problemen steht Ihnen unsere
Service-Hotline
Telefon +49 (0) 37754 / 13-290 zur Verfügung.
Und nun viel Freude mit Ritter!
© Ritter Concept GmbH
J1170 V03.00.00EN&DE
Allgemein / General
3
Contact Lite, Contact Lite Comfort,
Contact World
4
Allgemein / General
© Ritter Concept GmbH
J1170 V03.00.00EN&DE
Inhaltsverzeichnis
Contact Lite, Contact Lite Comfort,
Contact World
Table of contents
Technische Daten
8
Technical Data
8
Allgemeine Richtlinien
10
General directives
10
EMV - Erklärung
12
EMC - declaration
13
GEBRAUCHSANWEISUNG Behandlerelement
OPERATING INSTRUCTIONS Dentist's Unit
Inhalt
17
Table of content
17
Gerätebeschreibung
19
Description
19
Inbetriebnahme, Bohrerwechsel
20
Startup, burr change
20
Bedienelemente
21
Control elements
21
Bedienelemente I-Panel
24
Control elements, I-Panel
24
Programmierung der Instrumente
25
Programming the instruments
25
Luftturbine
26
Air turbine
26
Mikromotor
27
Micromotor
27
Ultraschall-Zahnsteinentferner
28
Ultrasonic scaler
28
Spraywasserregulierung der Instrumente
29
Spray water regulation of the instruments
29
3/6-Funktion-Spritze
30
3/6-function syringe
30
Operationsleuchte, StarLite
31
Dental operating light, StarLite
31
Operationsleuchte, PlanetLite
32
Dental operating light, PlanetLite
32
OP-Leuchten Programm
33
Operating light program
33
Spülprogramm
34
Rinse cycle program
34
GEBRAUCHSANWEISUNG Patientenliege
OPERATING INSTRUCTIONS Patient`s chair
Inhalt
38
Table of content
38
Gerätebeschreibung
39
Description
39
Arbeitsbereich
41
Working area
41
Inbetriebnahme
45
Startup
45
Bedienungselemente, Manuelle Steuerung
46
Control elements, manual control
46
Programmsteuerung, Stuhlpositionen
47
Program control, programming chair positions
47
Sicherheitsschalter
48
Safety switches
48
Kopfstützen, Armstütze
50
Headrest, armrest
50
© Ritter Concept GmbH
J1170 V03.00.00EN&DE
Allgemein / General
5
Inhaltsverzeichnis
Contact Lite, Contact Lite Comfort,
Contact World
Table of contents
GEBRAUCHANWEISUNG Assistenzelement
OPERATING INSTRUCTIONS Assistant's Unit
Inhalt
55
Table of content
55
Gerätebeschreibung
57
Description
57
Arbeitsbereich
58
Working area
58
Bedienungselemente
59
Control elements
59
Spülglasfüllung
60
Cup filling
60
Speischalenspülung
61
Spittoon bowl rinsing
61
Wasserregulierung
62
Water regulation
62
Speichelsauger, Sprayabsaugung
63
Saliva ejector, spray aspiration
63
3/6-Funktion-Spritze
64
3/6-function syringe
64
Aushärtelicht
65
Curing light
65
Amalgamabscheider
66
Amalgam separator
66
Hydrocolloid Anschluss
67
Hydrocolloid connection
67
Mundspülbeckenventil
69
Spittoon bowl valve
69
WARTUNGSANWEISUNG
MAINTENANCE INSTRUCTIONS
Inhalt
71
Table of content
71
Täglich
72
Daily
72
Vierteljährlich
75
Quarterly
75
Nach Bedarf
76
When necessary
76
Reinigung
81
Cleaning
81
MONTAGEANWEISUNG
MOUNTING INSTRUCTIONS
(Nur für den Servicetechniker)
(only for service technicians)
Inhalt
82
Transport der Einheit
83
Installation der Patientenliege
84
Öffnen der Wassereinheit
86
6
Allgemein / General
Table of content
82
Transport of the unit
83
Installation of the patient`s chair
84
How to open the water unit
86
© Ritter Concept GmbH
J1170 V03.00.00EN&DE
Contact Lite, Contact Lite Comfort,
Contact World
© Ritter Concept GmbH
J1170 V03.00.00EN&DE
Allgemein / General
7
Technische Daten
Contact Lite, Contact Lite Comfort,
Contact World
Zahnärztlicher Behandlungsplatz
Typ:
Nennspannung:
Nennaufnahme:
Betriebsart:
Gerät des Typs:
Schutzklasse:
Absicherung
in der Geräteinstallation:
in der Hausinstallation
Leitungsschutzschalter mit
B-Charakter
Wasserdruck:
Luftdruck:
(bei höheren Drücken
muss ein Druckminderer
vorgeschaltet werden)
Wasserverbrauch max.:
Behandlerelement:
Assistenzelement:
Erläuterungen zu Typenschildern
Contact Lite / World
230 V~ 50/60 Hz
2300 VA
DAB*
BF
I
10 A träge
16 A
3,5 … 5 bar **
5,5 … 7 bar
0,15 l/min
4 l/min
Nichtionisierende
elektromagnetische Strahlung
IPX1
Geschlossenes Gerät mit Schutz
gegen Tropfwasser (Fußanlasser)
* DAB = Durchlaufbetrieb mit Aussetzbelastung. Die zulässigen Belastungszeiten
entsprechen der zahnärztlichen Arbeitsweise
(siehe auch Anleitung der Einzelgeräte bzw.
der Instrumente).
** Bauseits soll ein Rückspül-Schutzfilter (80 120 µm Maschenweite) in der Wasserzuleitung
zur Versorgungseinheit vorgesehen werden.
Die gesamte Installation muss gemäß der Norm
DIN EN 1717 erfolgen.
*** DB
= Dauerbetrieb
Amalgamabscheider (optional)
Typ:
Abscheidewirkungsgrad:
Wasserdurchfluß max.:
Prüfzeichen:
(Institut für Bautechnik,
Berlin, 27. 11. 89)
Metasys
Multi SystemTyp1
mindestens 95 %
4,5 l/min
PA-II 3816
CE-Kennzeichen
entsprechend der Richtlinie 93/42/EWG über
Medizinprodukte
Patientenliege
Nennspannung:
Nennaufnahme:
Betriebsart:
Schutzklasse:
max Hub:
230V~ 50/60 Hz
200VA
DAB* (6 min/h)
I
400mm Lite
500mm World
Operationsleuchte
Typ:
Nennspannung:
Nennaufnahme:
Betriebsart:
Gerät des Typs:
StarLite U
20V~ 50/60 Hz
130VA
DB***
B
optional
Typ:
Nennspannung:
Nennaufnahme:
Betriebsart:
Geräte des Typs:
8
Allgemein / General
PlanetLite U
17V~ 50/60 Hz
95VA
DB***
B
Das Symbol der durchgestrichenen Abfalltonne
weist darauf hin, dass Ritter-Produkte Elektrogeräte sind, die der Richtlinie 2002/96/EG des
Europäischen Parlaments und des Rates über
Elektro- und Elektronik-Altgeräte unterliegen. In
EU-Ländern sind diese Produkte folglich
getrennnt zu entsorgen.
Ritter möchte Sie darin bestärken, mögliche
Auswirkungen von Abfällen auf Umwelt und
Gesundheit auch außerhalb der Europäischen
Union zu minimieren. Bitte folgen Sie den örtlichen Bestimmungen für die Abfallentsorgung
und machen Sie Gebrauch von der getrennten
Sammlung von Elektrogeräten.
© Ritter Concept GmbH
J1170 V03.00.00EN&DE
Technical data
Contact Lite, Contact Lite Comfort,
Contact World
Dental work place
Type:
Rated voltage:
Rated input:
Mode of operation:
Product category:
Protection class:
Fuse
in device installation:
in house installation
line saftey switch with
B-characteristic:
Water pressure:
Air pressure:
(in case of higher pressures,
install a pressure reducer)
Max. water consumption:
Dentist's unit:
Assistant's unit:
Explanations to type plates
Contact Lite / World
230 V~ 50/60 Hz
2300 VA
DAB*
BF
I
10 A time lag
16 A
3,5...5 bar**
5,5...7 bar
0,15 l/min
4 l/min
Non-ionizing
electromagnetic radiation
IPX1
Closed equipment
Protected against spilling water (foot
controller)
* DAB = continuous operation with intermittent load.
The permissible load times are adapted to the working
mode of the dentist (please refer also to the operating
manual for the individual units and/or instruments).
** At site there must be a back-flush protective filter
(mesh size 80 - 120 mm) for the water inlet pipe to the
supply unit. The complete installation must be according to the official standard EN1717.
***DB = continuous operation
Amalgam separator (optional)
Typ:
Separation efficiency factor:
Discharge rate max.:
Check charakter:
(Institut für Bautechnik,
Berlin, 27. 11. 89)
Metasys,
Multi System Typ 1
at least 95 %
4,5 l/min
PA-II 3816
CE-Approval
according to standard 93/42/EEC for medical products
Patient`s chair
Rated voltage:
Rated input:
Mode of operation:
Protection class:
maximum stroke:
230V~ 50/60 Hz
200VA
DAB* (6 min/h)
I
400mm Lite
500mm World
Dental operating light
Type:
Rated voltage:
Rated input:
Mode of operation:
Product category:
StarLite U
20V~ 50/60 Hz
130VA
DB***
B
The symbol of the crossed waste container on wheels
indicates, that Ritter products are electrical equipment
according to the EC Directive 2002/96/EC. Within the
EU-Countries these products have to be separately
disposed.
Ritter wants to encourage you, to minimize possible
effects of waste to environment and health outside of
the EU, too. Please follow to the local directives for
disposal of waste and make use of the separate collection of electrical equipment.
optional
Type:
Rated voltage:
Rated input:
Mode of operation:
Product category:
© Ritter Concept GmbH
J1170 V03.00.00EN&DE
PlanetLite U
17V~ 50/60 Hz
95VA
DB***
B
Allgemein / General
9
Allgemeine Richtlinien
Contact Lite, Contact Lite Comfort,
Contact World
Die Geräte werden unter Beachtung der Anforderungen des Medizinproduktegesetzes (MPG) bzw. der Richtlinie 93/42/EWG über
Medizinprodukte gebaut.
Der sicherheitstechnischen Auslegung liegt die VDE-Bestimmung für elektromedizinische Geräte DIN IEC 601 Teil 1 / DIN VDE 0750 Teil
1 zugrunde. Das Gerät ist vorgesehen zum Anschluss an Versorgungsnetze, die nach den Bestimmungen für medizinisch genutzte
Räume installiert sind (DIN VDE 0107).
Für die sicherheitstechnischen Eigenschaften des Gerätes können wir uns nur dann als verantwortlich betrachten, wenn Montage,
Instandhaltung, Instandsetzung und Änderungen am Gerät durch uns oder eine von uns ausdrücklich hierfür ermächtigte Stelle durchgeführt werden und das Gerät in Übereinstimmung mit der Gebrauchsanweisung verwendet wird.
Weitere Voraussetzung ist, dass Bauteile, die die Sicherheit des Gerätes beeinflussen, bei Ausfall durch Originalteile ersetzt werden.
Bei Geräteinstandsetzung ist von der ausführenden Firma eine Bescheinigung über Art und Umfang der Arbeiten mit Angaben zu
Änderungen der Nenndaten und des Arbeitsbereiches zu fordern. Die Bescheinigung muss das Datum der Ausführung sowie die
Firmenangabe mit Unterschrift enthalten (siehe auch MPG, DIN VDE 0750 / DIN VDE 0751).
In der Nähe der Geräte sollten keine Geräte betrieben werden, die große elektromagnetische Felder erzeugen (Funktelefone, Mikrowellentherapiegeräte,...).
Der Gesetzgeber schreibt vor, dass Elektrogeräte nur bei dafür vorgesehenen Stellen entsorgt werden dürfen.
Das MPG und die entsprechenden Rechtsverordnungen sind vom Betreiber in vollem Umfang zu beachten.
Umfang und Fristen der sicherheitstechnischen Kontrollen nach § 6 der MPBetreibV 29.06.98 werden wie folgt vorgeschrieben:
Spätestens aller 2 Jahre sind unter Beachtung von IEC 60601 mindestens nachfolgend aufgeführte sicherheitstechnische Kontrollen
durchzuführen:
• Sichtkontrolle von Gerät und Zubehör,
• Schutzleiterprüfung nach DIN VDE 0751,
• Ersatzableitstrommessung nach DIN VDE 0751,
• Funktionsprüfung des Gerätes unter Beachtung der Begleitpapiere.
Die Prüfergebnisse sind zu dokumentieren und dem Medizinproduktebuch beizulegen.
Versäumen Sie bitte nicht, die Garantiekarte innerhalb von 15 Tagen nach der Auslieferung des Gerätes an uns zurückzusenden.
10
Allgemein / General
© Ritter Concept GmbH
J1170 V03.00.00EN&DE
General guidelines
Contact Lite, Contact Lite Comfort,
Contact World
Our equipment complies to the safety standards for medical products (MPG) resp. the regulation 93/42/EEC for medical products. It
also complies to the VDE-requirements for electromedical devices DIN IEC 601, part 1 / DIN VDE 0750, part 1.It is suited for connection
to supply lines installed according to the VDE 0107 regulations for medically used rooms.
We can only accept responsibility for the safety properties of our equipment, if installation, maintenance, repair and modifications are
carried out by our workshop or by a person explicitly authorized by us. Further, the equipment has to be correctly handled according to
our operating manual.
In case of failure, structural parts effecting the security of the device are to be replaced by original parts only.
In case of repair, the technician must issue a certificate as to the kind and extent of work performed and, if applicable, indicate any
changes of nominal data and operating range. The certificate must contain the date of repair, the name of the executing company and
a signature (according to MPG, DIN VDE 0750 / DIN VDE 0751).
Close to the equipment do not operate any devices producing electro-magnetic emissions (such as wireless phones, micro-wave
therapeutics devices,...).
According to law, electric equipment is to be disposed by authorized disposal firms only.
The safety standards for medical products and all legal obligations are to be fully observed by the user.
Scope and schedules of safety-relevant inspections are as follows:
Every two years the following safety-relevant inspections according to DIN VDE 0750 and DIN VDE 0751 have to be performed:
• Visual inspection of equipment and accessories,
• Inspection of ground conductor according to DIN VDE 0751,
• Measurement of leakage current according to DIN VDE 0751,
• Performance test of the equipment giving due regard to the accompanying documents.
We recommend to keep an equipment control log for documenting the results of the safety-relevant inspections.
Please do not forget to return us the guarantee card within 15 days after installation of the unit.
© Ritter Concept GmbH
J1170 V03.00.00EN&DE
Allgemein / General
11
EMV - Erklärung
Contact Lite, Contact Lite Comfort,
Contact World
Leitlinien und Herstellererklärung - Elektromagnetische Aussendung
Die Behandlungseinheit ist für den Betrieb in der unten angegebenen elektromagnetischen Umgebung bestimmt. Der Kunde oder der Anwender der
Behandlungseinheit sollte sicherstellen, dass es in einer solchen Umgebung benutzt wird.
Aussendungs-Messungen
Übereinstimmungen
Elektromagnetische Umgebung - Leitlinien
HF- Aussendungen
nach CISPR 11
Gruppe 1
Die Behandlungseinheit verwendet HF-Energie ausschließlich zu seiner
internen Funktion. Daher ist seine HF-Aussendung sehr gering und es ist
unwahrscheinlich, dass benachbarte elektronische Geräte gestört
werden.
HF-Aussendungen
nach CISPR 11
Klasse B
Oberschwingungen
nach IEC 61000-3-2
Klasse A
Die Behandlungseinheit ist für den Gebrauch in allen Einrichtungen
einschließlich Wohnbereichen und solchen bestimmt, die unmittelbar an
ein öffentliches Versorgungsnetz angeschlossen sind, das auch Gebäude
versorgt, die für Wohnzwecke genutzt werden.
Spannungsschwankungen/
Flicker nach IEC 61000-3-3
erfüllt
Leitlinien und Herstellererklärung - Elektromagnetische Störfestigkeit
Die Behandlungseinheit ist für den Betrieb in der unten angegebenen elektromagnetischen Umgebung bestimmt. Der Kunde oder der Anwender der
Behandlungseinheit sollte sicherstellen, dass es in einer solchen Umgebung benutzt wird.
Störfestigkeitsprüfungen
IEC 60601-Prüfpegel
Übereinstimmungspegel
Entladung statischer
Elektrizität (ESD)
nach IEC 61000-4-2
± 6 kV Kontaktentladung
± 6 kV Kontaktentladung
± 8 kV Luftentladung
± 8 kV Luftentladung
schnelle transiente
elektrische Störgrößen/
Bursts
nach IEC 61000-4-4
± 2 kV für Netzleitungen
± 2 kV für Netzleitungen
± 1 kV für Eingangs- und
Ausgangsleitungen
± 1 kV für Eingangs- und
Ausgangsleitungen
Stoßspannungen (Surges)
nach IEC 61000-4-5
± 1 kV
Gegentaktspannung
± 1 kV
Gegentaktspannung
± 2 kV
Gleichtaktspannung
± 2 kV
Gleichtaktspannung
< 5 % UT
< 5 % UT
(> 95 % Einbruch der UT)
(> 95 % Einbruch der UT)
für ½ Periode
für ½ Periode
40 % UT
40 % UT
(60 % Einbruch der UT)
(60 % Einbruch der UT)
für 5 Perioden
für 5 Perioden
70 % UT
70 % UT
(30 % Einbruch der UT)
(30 % Einbruch der UT)
für 25 Perioden
für 25 Perioden
< 5 % UT
< 5 % UT
Spannungseinbrüche,
Kurzzeitunterbrechungen
und Schwankungen der
Versorgungsspannung
nach IEC 61000-4-11
Magnetfeld bei der
Versorgungsfrequenz
(50/60 Hz)
nach IEC 61000-4-8
ANMERKUNG
12
(> 95 % Einbruch der UT)
(> 95 % Einbruch der UT)
für 5 s
für 5 s
3 A/m
3 A/m
Elektromagnetische Umgebung - Leitlinien
Fußböden sollten aus Holz oder Beton bestehen oder mit
Keramikfliesen versehen sein. Wenn der Fußboden mit
synthetischem Material versehen ist, muss die relative Luftfeuchte mindestens 30 % betragen.
Die Qualität der Versorgungsspannung sollte der einer typischen Geschäfts- oder Krankenhausumgebung entsprechen.
Die Qualität der Versorgungsspannung sollte der einer typischen Geschäfts- oder Krankenhausumgebung entsprechen.
Die Qualität der Versorgungsspannung sollte der einer typischen Geschäfts- oder Krankenhausumgebung entsprechen.
Wenn der Anwender der Behandlungseinheit fortgesetzte
Funktion auch beim Auftreten von Unterbrechungen der
Energieversorgung fordert, wird empfohlen, die Behandlungseinheit aus einer unterbrechungsfreien Stromversorgung oder einer Batterie zu speisen.
Magnetfelder bei der Netzfrequenz sollten den typischen
Werten, wie sie in Geschäfts- und Krankenhausumgebungen
vorzufinden sind, entsprechen.
UT ist die Netzwechselspannung vor der Anwendung der Prüfpegel
Allgemein / General
© Ritter Concept GmbH
J1170 V03.00.00EN&DE
EMV - Declaration
Contact Lite, Contact Lite Comfort,
Contact World
guidelines and manufacturers declaration - electromagnetic emission
The unit is dedicated for the operation in below specified electromagnetic environment. The customer or the user of the unit must make sure, that it will
be used in such an environment.
emission-measurements
congruities
electromagnetic environment - guidelines
high frequency emission
according CISPR 11
group 1
The unit uses high frequency energy exclusive for its internal function.
From there the high frequency emission is very low and it is improbable,
that other electronical devices are being disturbed.
high frequency emission
according CISPR 11
class B
overvibration
according IEC 61000-3-2
class A
The unit is determined for the usage in all facilities including living areas
and such, which are directly connected to a public power supply that
supplies also buildings which are used for living purposes.
voltage fluctuation/
flicker according IEC 61000-3-3
compliant
guidelines and manufacturers declaration - electromagnetic stability
The unit is dedicated for the operation in below specified electromagnetic environment. The customer or the user of the unit must make sure, that it will
be used in such an environment.
stability tests
IEC 60601-test level
congruity level
electrostatic discharge (ESD) ± 6 kV contact discharge
according IEC 61000-4-2
± 8 kV air discharge
± 6 kV contact discharge
fast transient
electrical disturbance/
bursts
according IEC 61000-4-4
± 2 kV for main cable
± 2 kV for main cable
± 1 kV for entrance- and
outgoing wires
± 1 kV for entrance- and
outgoing wires
withstanding voltage (surges) ± 1 kV
according IEC 61000-4-5
opposite clock voltage
± 2 kV
equal clock voltage
voltage irruptions,
< 5 % UT
short time intermittent and
(> 95 % irruption of UT)
fluctuations of supply voltage
for ½ period
according IEC 61000-4-11
magnetic field by supply
frequency
(50/60 Hz)
according IEC 61000-4-8
REMARK
± 8 kV air discharge
± 1 kV
opposite clock voltage
electromagnetic environment - guidelines
Floors should be made in wood or concrete or should be
provided with ceramic tiles. If the floor is provided with a
synthetic material, the relative air humidity must be at least 30
%.
The quality of the supply voltage should comply with a typical
business or hospital environment.
The quality of the supply voltage should comply with a typical
business or hospital environment.
± 2 kV
equal clock voltage
< 5 % UT
(> 95 % irruption of UT)
for ½ period
40 % UT
40 % UT
(60 % irruption of UT)
(60 % irruption of UT)
for 5 periods
for 5 periods
70 % UT
70 % UT
(30 % irruption of UT)
(30 % irruption of UT)
for 25 periods
for 25 periods
< 5 % UT
< 5 % UT
(> 95 % irruption of UT)
(> 95 % irruption of UT)
for 5 s
for 5 s
3 A/m
3 A/m
The quality of the supply voltage should comply with a typical
business or hospital environment.
If the user of the unit wants a continuously function also at the
appearance of interruptions, it is advisable to supply the unit
by an uninterruptable power supply (UPS) or a battery.
Magnetic fields at the supply frequency should comply with
the typical values in business or hospital environments.
UT means the alternating supply voltage before the exertion of the test levels
© Ritter Concept GmbH
J1170 V03.00.00EN&DE
Allgemein / General
13
Contact Lite, Contact Lite Comfort,
Contact World
14
Allgemein / General
© Ritter Concept GmbH
J1170 V03.00.00EN&DE
Contact Lite
Contact Lite Comfort
Contact World
Arztelement
- Gebrauchsanweisung -
Dentist`s unit
- Operating manual -
Ritter® Concept GmbH
Bahnhofstraße 65, D-08297 Zwönitz
Fon: +49 (0) 37754/13-290, Fax: +49 (0) 37754/13-280
e-mail: [email protected]
Internet: http://www.ritterconcept.com
Contact Lite, Contact Lite Comfort,
Contact World
16
Arztelement / Dentist`s unit
© Ritter Concept GmbH
J1170 V03.00.00EN&DE
Inhaltsverzeichnis
Contact Lite, Contact Lite Comfort,
Contact World
Table of Content
Inhalt
17
Table of content
17
Gerätebeschreibung
19
Description
19
Inbetriebnahme, Bohrerwechsel
20
Startup, burr change
20
Bedienelemente
21
Control elements
21
Bedienelemente I-Panel
24
Control elements I-Panel
24
Programmierung der Instrumente
25
Programming the instruments
25
Luftturbine
26
Air turbine
26
Mikromotor
27
Micromotor
27
Ultraschall-Zahnsteinentferner
28
Ultrasonic scaler
28
Spraywasserregulierung der Instrumente
29
Spray water regulation of the instruments
29
3/6-Funktion-Spritze
30
3/6-function syringe
30
Operationsleuchte, StarLite
31
Dental operating light, StarLite
31
Operationsleuchte, PlanetLite
32
Dental operating light, PlanetLite
32
Lampenprogramm
33
Operating light program
33
Spülprogramm
34
Rinse cycle program
34
© Ritter Concept GmbH
J1170 V03.00.00EN&DE
Arztelement / Dentist`s unit
17
Contact Lite, Contact Lite Comfort,
Contact World
18
Arztelement / Dentist`s unit
© Ritter Concept GmbH
J1170 V03.00.00EN&DE
Gerätebeschreibung
Description
Contact Lite, Contact Lite Comfort,
Contact World
Um die vielfältigen Vorzüge des Behandlungsgerätes kennen
zu lernen, empfehlen wir, diese Gebrauchsanweisung vor der
Inbetriebnahme des Gerätes aufmerksam durch zu lesen.
We recommend you to read this operating manual very
carefully in order to have full knowledge of all the
advantages this dental workplace is offering you.
Die wesentlichen Merkmale aller Modelle sind:
The essential attributes of all models are:
• Kompakte Konstruktion, minimaler Platzbedarf
• Lichtversorgung für drei Bohrinstrumente
• Bei Instrument “in Funktion” ist jede Stuhlfunktion blockiert
• Nur ein Fußbedienteil für Behandlerelement und Patientenliege (I-Panel)
• Bedienungselemente für Patientenliege und Assistenzeleement
• Verschleissfreie Schaltelemente, Drucksensortechnik
• Pflegeleichte Glattlackflächen
• Funktions- und Anwenderorientiertes Design
• Compact construction, minimal space requirement
• Illumination for 3 burr instruments
• Blocking of any chair function when any instrument is
“in function”
• Only one foot controller for dentist unit and patient
chair (I-Panel)
• Wearless switch elements, pressure transducer
technique
• Varnished surfaces, easy to clean
• Functional- and user-friendly design
Ausstattungsabhängige Merkmale:
Equipment dependent attributes:
Ausführung “C” (Cart-System)
Model “C” (cart-system)
• Mobile cart connected with supply line to the
unit
• non-slip silicone plating for acceptance of
two norm-trays
• Big, steerable castor for good riding quality
• Optional acceptance of multimedia components possible
• Fahrbares Cart über Versorgungsleitung mit der
Einheit verbunden
• rutschfeste Silikonauflage zur Aufnahme von zwei
Normtrays
• Große lenkbare Laufrollen für gute Fahreigenschaften
• Optionale Aufnahme von Multimediakomponenten
möglich
Ausführung “H” (Hängende Schläuche)
• Instrumententräger mit hängenden Schläuchen
• Leichtgängiger Schwenkarm (Präzisionsnadel
lager), pneumatisch gebremst
• Integriertes Doppeltray
• Optionale Aufnahme von Multimediakomponenten
möglich
Ausführung “S” (Schwingbügelsystem)
• Instrumententräger mit Schwingbügeln
• Leichtgängiger Schwenkarm (Präzisionsnadelager),
pneumatisch gebremst
• Reihenfolge der Instrumente frei wählbar
• Einfach- oder Doppeltray
© Ritter Concept GmbH
J1170 V03.00.00EN&DE
Model “H” (hanging hoses)
• Instrument carrier with hanging hoses
• Smooth running swivel arm (precision needle
bearing), pneumatic limited
• Integrated double tray
• Optional acceptance of multimedia components possible
Model “S” (swinging hoses)
• Instrument carrier with swinging lever
• Smooth running swivelarm (precision needle
bearing), pneumatic limited
• Order of instruments free selectable
• single or double tray
Arztelement / Dentist`s unit
19
Inbetriebnahme, Bohrerwechsel
Contact Lite, Contact Lite Comfort,
Contact World
Start up, burr change
2
1
3
Abb.:/Fig.: Hauptschalter / Main switch
Contact World
1
Abb.:/Fig.: Hauptschalter / Main switch
Contact Lite, Contact Lite Comfort
Abb.:/Fig.: Arzttableau / Dentist`s keyboard
Inbetriebnahme
Startup
Die Inbetriebnahme des Gerätes erfolgt durch den Hauptschalter (1) am Sockel der Patientenliege. Nach dem
Einschalten leuchtet die Kontrolllampe des Hauptschalters
und die “Power”-LED (2) im Arzttableau. Die LED`s der
Balkenanzeige (3) und der Tasten leuchten kurz auf.
The unit is activated via the main switch (1) at the patient`s
chair pedestal. The main switch control light and the
“Power”-LED (2) at the dentist`s keyboard are illuminated
after switching-on. The LED`s of the bar-display (3) and the
control keys illuminate shortly.
Nur das gezogene Instrument ist betriebsbereit. Die
anderen Instrumente – mit Ausnahme der Spritze – sind
verriegelt.
Only the instrument which is taken from its holder is ready
for operation. All the other instruments except for the
syringe - are locked.
Täglich vor der ersten Behandlung sollten die Handstücke,
der Spülglasfüller und die Speischalenspülung jeweils
mehrmals betätigt werden, um abgestandenes Wasser
auszuspülen.
Every day before the first treatment is done, it is recommended to rinse out each instrument over a basin or the
spittoon bowl to remove water residues.
Quod vide: “Rinse cycle program” on page 34
Siehe auch: Abschnitt Spülprogramm auf Seite 34
Aus Sicherheitsgründen empfiehlt es sich, die
Anlage beim Verlassen der Praxis auszuschalten !
For safety reasons, shut-off the main switch when
leaving the surgery !
Bohrerwechsel durch die Assistentin
Burr change by the assistant
• Während der Behandlungspause:
• During a pause in treatment:
Die Schalter des I-Panel dürfen während des
Bohrerwechsels nicht betätigt werden, da sonst Verletzungsgefahr besteht.
Do not actuate the I-Panel during the burr change to avoid
the hazard of injuries.
• During treatment:
• Während der Behandlung:
Die Assistentin kann unbesorgt ein zweites Instrument aus
der Ablage zum Bohrerwechsel nehmen und daran
arbeiten.
20
Arztelement / Dentist`s unit
The assistant can take a second instrument from the holder
to exchange the burr and continue working.
© Ritter Concept GmbH
J1170 V03.00.00EN&DE
Bedienelemente
Contact Lite, Contact Lite Comfort,
Contact World
Control elements
1
Abb.:/Fig.: Arzttableau / Dentist`s keyboard
1 LED-Bar display, used for showing different
informations:
1 LED-Bar Anzeige, dient zur Darstellung unterschiedlichster Informationen:
• The adjusted rotation speed of the micromotor, performance of the turbine or the
scaler
(These informations are only shown when the
single instrument is out of its holder)
• Die eingestellte Drehzahl des Mikromotors,
die Leistung der Luftturbine oder des Zahnsteinentfernungsgerätes.
(Diese Informationen werden immer dann
angezeigt, wenn das jeweilige Instrument
entnommen ist)
• Die eingestellten Zeiten für Spülglasfüller und
Speischalenspülung
• Die Anzeige fehlerhafter oder aktivierter
Sicherheitsschalter während der Bewegung der
Patientenliege
• The adjusted times for spittoon bowl rinsing and
cup filler
• Showing defective or active safety switches
during the patient`s chair movement
2
Abb.: / Fig.: Armbremsen / Arm brakes
Armbremsen (H & S Ausführungen):
Arm brakes (H & S models):
Die Öffnung des Gerätegriffs (2) ist mit einer Lichtschranke
versehen, die bei Unterbrechung die pneumatischen
Gelenkbremsen freigibt.
The hole (2) at the device handle bar is provided with
photoelectric barriers. It releases the pneumatic brakes at
interruption.
© Ritter Concept GmbH
J1170 V03.00.00EN&DE
Arztelement / Dentist`s unit
21
Bedienelemente
Contact Lite, Contact Lite Comfort,
Contact World
Control elements
1
2
3
5
6
7
10
11
12
4
8
7
12
13
14
9
8
16
17
9
13
14
15
16
17
Abb.: Arzttableau S & C-Modelle
Fig.: Dentist`s keyboard S & C-models
Abb.: Assistenztableau / Fig.: Assistant`s keyboard
1 Taste “Plus / Minus”
Veränderung der Drehzahl oder Leistung der Instrumente
1 Key “Plus / Minus”
changing rotation speed or performance of the instruments
2 Taste “Instrumentenlicht”
schaltet das Instrumentenlicht AN / AUS
2 Key “Instrument light”
turns the instrument light ON / OFF
3 Programmtaste “P1” , 1.Behandlungsposition
3 Program key “P1” , 1. treatment position
4 Programmtaste “P2” , 2.Behandlungsposition
4 Program key “P2” , 2. treatment position
5 Taste “ENDO/PARO-Funktion”
schaltet die ENDO- oder PARO-Funktion AN / AUS
Taste leuchtet = ENDO-Funktion AN
Taste blinkt = PARO-Funktion AN
5 Key “ENDO/PARO - Function”
turns the ENDO- or PARO-Function: ON / OFF
key illuminated = ENDO-Function ON
key blinking = PARO-Function ON
6 Taste “Drehrichtung”
schaltet die Drehrichtung des Mikromotors um
Taste leuchtet = Linkslauf
6 Key “Rotation direction”
changes the rotation mode of the micromotor
key illuminated = left handed rotation
7 Taste “Operationsleuchte”
schaltet die Operationsleuchte AN / AUS
8 Taste “Patientenliege AUF / AB”
7 Key “Operating light”
switches the operating light ON / OFF
8 Key “Patient chair UP / DOWN”
9
9 Key “Backrest UP / DOWN”
Taste “Rückenlehne AUF / AB”
10 Taste “Spraywasser”
schaltet das Spraywasser für Bohrinstrumente: AN / AUS
Taste leuchtet = Spraywasser AN
10 Key “Spray water”
turns the spray water for burr instruments: ON / OFF
key illuminated = spray water ON
11 Taste “Spanbläser”
schaltet den Spanbläser als Dauerbläser: AN / AUS
11 Key “Chip blower”
turns chip blower constantly: ON/OFF
12 Taste “Klingel / Türöffner”
12 Key “Bell / Door opener”
13 Taste “Spülglasfüller” (Assistenzeinheit)
13 Key “Cup filler” (Assistant`s unit)
14 Taste “Speischalenspülung” (Assistenzeinheit)
14 Key “Spittoon bowl rinsing” (Assistant`s unit)
15 Taste “Sonderfunktion”
15 Key “Special function”
16 Taste “Speiposition”
16 Key “Spittoon bowl position”
17 Taste “Aussteigeposition”
17 Key “Exit position”
22
Arztelement / Dentist`s unit
© Ritter Concept GmbH
J1170 V03.00.00EN&DE
Bedienelemente
Control elements
Contact Lite, Contact Lite Comfort,
Contact World
Abb.: Arzttableau: H-Modelle
Fig.: Dentist`s keyboard: H-models
Das Arzttableau bei den Modellausführungen der Form
“Hängende Schläuche” differiert lediglich in der Anordnung
der Bedientasten.
The dentist`s keyboard at model implementations of the
form “Hanging hoses” differs only in the arrangement of
the control keys.
Die Funktion der einzelnen Tasten ist auf Seite 22 dargestellt.
The function of the particular keys is shown on page 22.
© Ritter Concept GmbH
J1170 V03.00.00EN&DE
Arztelement / Dentist`s unit
23
Bedienelemente, I-Panel
Contact Lite, Contact Lite Comfort,
Contact World
Control elements, I-Panel
1
2
5
3
4
Abb.:I-Panel / Fig.: I-Panel
Alle wichtigen Funktionen während der Behandlung sind über die Tasten des I-Panel abrufbar bzw.
bedienbar.
All important functions during the treatment can be
accessed and controlled via the I-Panel
Wenn alle Instrumente (ausser der Spritze) zurückgelegt
sind:
If all instruments (excepting the syringe) are in its holder:
1
Backrest DOWN
1
Rückenlehne AB
2
Backrest UP
2
Rückenlehne AUF
3
Patient chair UP
3
Patientenliege AUF
4
Patient chair DOWN
4
Patientenliege AB
5
Foot lever
5
Fußbügel
1+2
1+2
automatische Bewegung in “Speiposition”
nochmaliges Betätigen fährt die Patientenliege
zurück in die letzte Behandlungsposition
automatic movement to “spittoon bowl position”
actuating again moves chair into last treatment
position
3+4
automatic movement to “exit-position ”
3+4
automatische Bewegung in “Aussteigeposition”
Bedienelemente:
Control elements:
1
Drehrichtungsumkehr beim Mikromotor oder Aktivierung der ENDO-Funktion beim ZEG.
- Funktion ist auswählbar nur bei entnommenen,
jedoch nicht aktivem Instrument
1
Changing the rotation direction of the micromotor
or activating the ENDO-function of the scaler
- Function is only selectable at taken out, but
not active instruments
2
Spanbläser: AN/AUS
2
Chip blower: ON/OFF
1+2
Instrumentenlicht: AN/AUS
1+2
Instrument light: ON/OFF
3
Bei entnommenen Instrument:
Aktivierung des Instrumentes MIT Spraywasseroder Spanbläserfunktion
(nur wenn die entsprechende LED auf dem
Arzttableau leuchtet)
3
At taken out instrument:
Activates the instrument WITH spray water- or chip
blower-function
(only if corresponding LED at the dentist`s keyboard is illuminated)
4
Bei entnommenen Instrument:
Aktivierung des Instrumentes OHNE SpraywasserSpanbläserfunktion
(unabhängig davon, ob die entsprechende LED am
Arzttableau leuchtet)
4
At taken out instrument:
Activates the instrument WITHOUT spray water- or
chip blower-function
(Irrespectively of the corresponding LED status)
24
Arztelement / Dentist`s unit
© Ritter Concept GmbH
J1170 V03.00.00EN&DE
Programmierung der Instrumente
Programming the instruments
Contact Lite, Contact Lite Comfort,
Contact World
Programmierung der Instrumente
Programming the instruments
Eine spezielle Programmierung für die Instrumente
ist nicht verfügbar.
A special programming of the instruments is not
available.
Nur die Leistung der Turbine, die Drehzahl der
Mikromotoren und die Leistung des Zahnsteinentfernungsgerätes kann durch Entnahme des
entsprechenden Instrumentes und Einstellen des
gewünschten Wertes mittels der Tasten “Plus” oder
“Minus” eingestellt werden.
In der LED-Anzeige wird der eingestellte Wert
durch die Anzahl der leuchtenden Balken repräsentiert. Ein LED-Balken steht dabei für 1/12 des
maximal einstellbaren Wertes.
Only the performance of turbine, the rotation speed
of the micromotor and the performance of the
scaler can be adjusted by taking the desired instrument from its holder and setting the value by pressing the “Plus” or “Minus” keys on the dentist`s
keyboard.
Die eingestellten Werte werden automatisch und
individuell für jedes Instrument gespeichert, so
dass sie bei der nächsten Entnahme der Instrumente sofort zur Verfügung stehen.
This value is being stored automatically and individually for each instrument , so that they are already
preselected, when the instrument is taken from its
holder.
Es ist möglich, die Einstellungen für die Drehzahl /
Leistung , das Spraywasser , den Spanbläser und
das Instrumentenlicht auch bei aktiviertem Instrument zu verändern.
It is possible to change the setting of engine speed
/ performance , spray water , chip blower and
instrument light also at activated instrument.
Die Drehrichtungsumkehr des Mikromotors und die
“ENDO/PARO”-Funktion des Zahnsteinentfernungsgerätes können nur bei entnommenen, jedoch
nicht aktiviertem Instrument verändert werden.
Die Einstellungen aller Instrumentenfunktionen:
The adjusted value is represented by illuminated
bars at the LED display. One LED bar stands for
1/12 of the maximum adjustable value.
Changing the rotation direction of the motor and
the “ENDO/PARO” mode of the scaler is only
possible with selected but not active instrument.
Settings of all instrument functions:
•Instrumentenlicht
•Instrumentlight
•Drehrichtungsumkehr Mikromotor
•Reversion of rotation micromotor
•Spraywasser
•Spray water
•Spanbläser
•Chip blower
•ENDO/PARO-Funktion des ZEG`s
•ENDO/PARO-function of the scaler
werden beim Ausschalten mittels des Hauptschalters automatisch gespeichert.
are stored automatically after switching off at the
main switch.
© Ritter Concept GmbH
J1170 V03.00.00EN&DE
Arztelement / Dentist`s unit
25
Luftturbine
Contact Lite, Contact Lite Comfort,
Contact World
Air turbine
Inbetriebnahme:
Startup:
Entnehmen Sie das Handstück aus der Instrumentenablageposition.
Take the handpiece from its holder.
Die Turbine wird mit Hilfe der Pedale des I-Panel
aktiviert.
The turbine is activated via the pedals of the IPanel.
Die Leistung der Turbine ändert sich von einem
sinnvollen Minimum bis zum vorgewählten Maximalwert je nach Druck auf das Pedal.
Depending on the pressure at the pedal, the performance of the turbine is changing from a senseful
minimum until the adjusted maximum.
Der vorgewählte Maximalwert wird durch die LEDBalkenanzeige angezeigt und kann mit Hilfe der
“Plus”/ ”Minus”- Tasten verändert werden.
The adjusted maximum value is represented by the
LED display and can be changed via the “Plus”/”
Minus”-keys.
Wichtig: Bitte lesen Sie die Gebrauchsanweisung
des Herstellers der Instrumente sorgfältig !
Important: Please read the air turbine manufacturer`s operating manual carefully !
Funktionen auf dem Arzttableau:
Functions on the dentist`s keyboard:
Instrumentenlicht:
Instrument light:
• schaltet Licht am Handstück an oder aus
• switches the light at the handpiece on or off
Spraywasser:
Spray water:
• schaltet die Spraywasserabgabe an der Turbine
an oder aus
• die Aktivierung erfolgt mittels des linken Fußpedals am I-Panel
• switches the spray water at the turbine on or off
• for activation press the left foot pedal of the
I-Panel
Spanbläser:
Chip blower:
• schaltet alternativ einen dauerhaften Lufstrom an
der Turbine ein oder aus
• die Aktivierung erfolgt mittels des linken Fußpedals am I-Panel
• switches an additional constant air flow at the
turbine on or off
• for activation press the left foot pedal of the
I-Panel
Funktionen am I-Panel:
Functions at the I-Panel
rechtes Pedal: Aktivierung der Turbine OHNE
Spraywasser oder Spanbläser
(unabhängig von der Einstellung
am Arzttableau)
right pedal:
linkes Pedal:
Aktivierung der Turbine MIT
Spraywasser oder Spanbläser
(abhängig von der Einstellung auf
dem Arzttableau)
left pedal:
Activation of the turbine
WITHOUT spray water or chip
blower (independent from the
settings at the dentist`s
keyboard)
Activation of the turbine WITH
spray water or chip blower
(dependent from the settings at
the dentist`s keyboard)
rechter Taster: Spanbläser: AN/AUS
right pushbutton: Chip blower: ON/OFF
beide Taster:
both buttons:
Instrumentenlicht: AN/AUS
Hinweis: Die Funktionen Spraywasser und Spanbläser schließen sich gegenseitig aus !
26
Arztelement / Dentist`s unit
Instrument light: ON/OFF
Hint: The functions spray water and chip blower
can not be activated together !
© Ritter Concept GmbH
J1170 V03.00.00EN&DE
Mikromotor
Contact Lite, Contact Lite Comfort,
Contact World
Micromotor
Inbetriebnahme:
Startup:
Entnehmen Sie das Handstück aus der Instrumentenablage. Der Mikromotor wird mit Hilfe der
Pedale des I-Panel aktiviert.
Take the hand piece from its holder. The micromotor is activated via the pedals at the I-Panel.
Drehzahlbereich:
Rotation speed-range:
Die maximale Drehzahl des Motors kann in 12
Schritten von 2000 U/min bis 40.000 U/min voreingestellt werden. Der voreingestellte Maximalwert
wird durch die LED-Balkenanzeige dargestellt.
Bei entnommenen Instrument kann mit Hilfe der
“Plus”/ “Minus”-Tasten die Maximaldrehzahl verändert werden. Der letzte angezeigte Wert wird automatisch gespeichert.
Die Einstellung der Maximaldrehzahl kann auch bei
aktivem Motor erfolgen.
Die Drehzahl des Mikromotors kann im Betrieb
über die Pedale des I-Panel stufenlos vom Minimalbis zum eingestellten Maximalwert geregelt
werden.
The maximum rotation speed of the motor can be
adjusted in 12 steps from 2000 rpm up to 40.000
rpm. The default maximum value is represented by
bars at the LED display.
With taken instrument you can change the
maximum value via the “Plus”/ “Minus”-keys. The
last displayed value is stored automatically.
The changing of the maximum rotation speed can
be also done with active motor.
The rotation speed of the motor can be changed
continuously with the pedals of the I-Panel during
the treatment.
Funktionen auf dem Arzttableau
Functions on the dentist`s keyboard:
Instrumentenlicht:
Instrument light:
• schaltet das Licht am Handstück an oder aus
• switches the light of the handpiece on or off
Spraywasser:
Spray water:
• schaltet die Spraywasserabgabe am Mikromotor
an oder aus
• switches the spray water at the motor on or off
Spanbläser:
Chip blower
• schaltet zusätzlich einen dauerhaften Luftstrom
am Mikromotor ein oder aus
• switches an additional lasting air flow at the
micromotor on or off
Drehrichtungsumkehr:
Reversion of rotation:
• schaltet den Motor in Linkslauf
• switches the motor into left-handed rotation
Funktionen am I-Panel:
Functions at the I-Panel:
rechtes Pedal: Aktivierung des Motors OHNE
Spraywasser oder Spanbläser
(unabhängig von der Einstellung
am Arzttableau)
right pedal:
Activation of the motor
WITHOUT spray water or chip
blower (independent from
settings at the keyboard)
linkes Pedal:
Aktivierung des Motors MIT
Spraywasser oder Spanbläser
(abhängig von der Einstellung auf
dem Arzttableau)
rechter Taster: Spanbläser: AN/AUS
left pedal:
Activation of the motor WITH
spray water or chip blower
(dependent from the settings
at the keyboard)
linker Taster:
Linkslauf EIN/AUS
left pushbutton:
left-hand rotation ON/OFF
beide Taster:
Instrumentenlicht: AN/AUS
both buttons:
Instrument light: ON/OFF
© Ritter Concept GmbH
J1170 V03.00.00EN&DE
right pushbutton: Chip blower: ON/OFF
Arztelement / Dentist`s unit
27
Ultraschall-Zahnsteinentferner
Ultrasonic scaler
Technische Daten:
Betriebsart:
Contact Lite, Contact Lite Comfort,
Contact World
Technical data:
DAB (Durchlaufbetrieb mit Aussetzbelastung. Die zulässigen
Belastungszeiten entsprechen
der zahnärztlichen Arbeitsweise)
Operating mode:
DAB (continuous operation
with intermittent load. The
permissible load times are
adapted to the dentist`s
working mode)
Sicherheitsklasse: BF
Security-class:
BF
Inbetriebnahme:
Startup:
Entnehmen Sie das Handstück aus der Instrumentenablage. Das Gerät wird mit den Pedalen des
I-Panel aktiviert.
Take the hand-piece from its holder. The device is
activated with the pedals of the I-Panel
Intensität:
Intensity:
Die Intensität des Zahnsteinentfernungsgerätes
(ZEG) kann in 12 Schritten vom minimalen bis zum
maximalen Wert voreingestellt werden. Der vorgewählte Maximalwert wird durch die LED-Balkenanzeige dargestellt.
The intensity of the scaler can be adjusted in 12
steps from minimum to maximum. The adjusted
maximum value is represented at the LED display.
Bei entnommenen ZEG-Handstück kann mit Hilfe
der “Plus”/ ”Minus”-Tasten die maximale Intensität
verändert werden. Der zuletzt angezeigte Wert wird
automatisch gespeichert.
With taken scaler-hand-piece you can change the
intensity via the “Plus”/ ”Minus”-keys. The last
shown value is stored automatically.
The scaler can not be regulated with the I-Panel.
Das ZEG ist nicht über das I-Panel regelbar.
Funktionen auf dem Arzttableau:
Functions on the dentist`s keyboard:
ENDO/PARO-Funktion
ENDO/PARO-function
Diese Taste schaltet die ENDO oder PARO-Funktion des ZEG`s ein oder aus.
ENDO Funktion: Taste leuchtet
PARO-Funktion: Taste blinkt.
This key switches the ENDO- or the PARO-function
of the scaler on and off
ENDO-function: key illuminated
PARO-function: key blinking
Die Verfügbarkeit der PARO-Funktion ist vom
Hersteller des ZEG`s abhängig. Bitte lesen
Sie dazu die Gebrauchsanweisung des
Herstellers !
The availability of the PARO-function depends
on the manufacturer of the scaler. Please read
the manufacturer`s operating manual.
Spraywasser
Spray water
schaltet das Spraywasser am ZEG an oder aus
switches the spray water at the scaler on or off
Funktionen am I-Panel:
Functions at the I-Panel:
rechtes Pedal:
Betrieb des ZEG`s OHNE
Wasser (unabhängig von
der Einstellung am Tableau)
right pedal:
Activation of the scaler WITHOUT
water (independent from settings
at the dentist`s keyboard
linkes Pedal:
Betrieb des ZEG`s MIT
Wasser (sofern am Tableau
aktiviert)
left pedal:
Activation of the scaler
WITH water (if activated at the
dentist`s keyboard)
linker Taster:
Einmaliges Betätigen:
ENDO-Funktion: AN
Zweimaliges Betätigen:
PARO-Funktion: AN
left button:
one-time actuation:
ENDO-function: ON
twice-time actuation:
PARO-function: ON
Taster gleichzeitig:
Instrumentenlicht: AN/AUS
Both buttons
simultaneously: Instrument light: ON/OFF
28
Arztelement / Dentist`s unit
© Ritter Concept GmbH
J1170 V03.00.00EN&DE
Spraywasserregulierung
Contact Lite, Contact Lite Comfort,
Contact World
Regulation of spray-water
1
1
1
Model “S”
Model “C”
Für jedes Instrument (außer der Spritze) gibt es die
Möglichkeit der manuellen Regulierung der Menge
des Spraywassers.
Hierzu befinden sich hinter dem Arzttableau auf der
Unterseite des Behandlerelementes einige Handregler (1). Die Anzahl ist abhängig von der Anzahl
der Instrumente.
Model “H”
For each instrument (except the syringe)there is the
possibility to regulate the spray water quantity by
hand.
The regulators can be found at the backside of
keyboard (1). The number of the regulators
depends on the number of the instruments.
Die Reihenfolge der Regler ist abhängig von der
Bestückungsreihenfolge der Instrumente.
The order of regulators depends on the order of
Siehe auch obere Abbildungen!
Please see upper pictures!
Der jeweils unterste Regler ist für das am weitesten
rechts befindliche Instrument der Behandlungseinheit (S-Ausführungen).
The lowest regulator is for the instrument on the
most right side of the unit, the upper regulator is for
the instrument on the most left side (S-Models)
Bei den Modellen “H” & “C” entspricht die Reihenfolge der Regler auch der Reihenfolge der Instrumente.
At “H” & “C” models the order of the regulators
complies to the order of the instruments.
Zur Einstellung entnehmen Sie einfach das
entsprechende Instrument und betreiben es mit
Spraywasser. Nun können Sie die Wassermenge
jederzeit wie in nebenstehender Abbildung dargestellt per Hand regulieren.
To regulate the water, take the according instrument from its holder and actuate it with spray water
function. Now you can adjust the water quantity by
turning the according regulator as illustrated.
instruments on the unit.
AUF/Open
© Ritter Concept GmbH
J1170 V03.00.00EN&DE
ZU/Closed
Arztelement / Dentist`s unit
29
3/6-Funktion-Spritze
Contact Lite, Contact Lite Comfort,
Contact World
3/6-Function-syringe
1
3
2
Abb.: Spritze “Luzzani 6F Minilight” / Fig.: Syringe “Luzzani 6F Minilight”
Inbetriebnahme:
Startup:
Wasser, Luft oder Spray werden von Hand geschaltet. Die
Medienabgabe dauert solange, wie die entsprechende
Taste am Griff gedrückt wird. Wahlweise kann Luft oder
Wasser abgegeben werden. Durch gleichzeitigen Druck auf
beide Tasten wird Spray abgegeben.
Water, air or spray are switched by hand. Supply of the
media lasts as long as the corresponding key of handle is
pressed. Either air or water can be obtained by actuating
the corresponding key. Actuating both keys at the same
time will supply spray.
Dosierung:
Volume
Die Dosierung von Luft, Wasser oder Spray erfolgt durch
unterschiedlichen Betätigungsdruck auf die Tasten.
The dose of air, water and spray depends on the force
applied to the keys during operation.
Heizfunktion:
Heating function:
Einige Hersteller bieten zusätzlich die Funktion der Beheizung der Medien.
Some manufacturers provide a heating function for the
media.
Weitere Informationen finden Sie in der Gebrauchsanweisung des Herstellers der Spritze.
Further informations can be found in the operating manual
of the manufacturer of the syringe.
Funktionen am Beispiel “Luzzani 6F Minilight”:
Functions for example at: “Luzzani 6F Minilight”:
1
2
3
1
2
3
Taste für Luftabgabe
Taste für Wasserabgabe
Wärmeabgabe am Drehgriff einstellbar
Key for air delivery
Key for water delivery
Delivery of heat adjustable at the turning handle
1+2 Abgabe von Spray
1+2 Delivery of spray
Die Heizung der Spritze wird am Drehgriff eingeschalten.
Die aktvierte Heizung wird über die LED am Drehgriff angezeigt.
The heating of the syringe is switched at the twist grip. The
activate heating is displayed by an illuminated LED at the
twist grip.
Die Heizung der 6F-Spritze kann problemlos dauerhaft aktiviert sein, ohne dass es sich nachteilig auf das Handstück
auswirkt.
The heating of the 6F-Syringe can be activated constantly
without having an effect adversely on the hand piece.
• Die Spritzen “Ritter-Topflex” und “Faro 3F bieten keine
Heizfunktion
• The syringes “Ritter-Topflex” and “Faro 3F” provide no
heating function
• Bei “Ritter-Topflex” ist die Taste (1) für Luftabgabe und
die Taste (2) für Wasserabgabe vorgesehen.
• With "Ritter-Topflex", button (1) is for air-delivery and
button (2) for water-delivery
30
Arztelement / Dentist`s unit
© Ritter Concept GmbH
J1170 V03.00.00EN&DE
Operationsleuchte, StarLite
Contact Lite, Contact Lite Comfort,
Contact World
Operating light, StarLite
2
1
Abb.: StarLite / Fig.: StarLite
Die Operationsleuchte ist an einem Federarm an
der Einheit befestigt. Sie ist mit einer 21V / 105W
Halogenglühlampe und einem Facettenreflektor
ausgestattet.
Operating light with facet reflector (and 21V / 105W
Die wesentlichen Merkmale sind:
Essential features:
• angenehmes, schattenarmes Licht
• leicht beweglich, hält sicher die eingestellte Position
• abnehmbare Griffe
• comfortable, shadow less light
• easy flexible, keeps the adjusted position safely
• removable hand grips
Bedienelemente:
Control elements:
1
2
1
2
Dimmer
Schalthebel
halogen bulb) on flexarm mounted to the unit.
Dimmer
Lever
Inbetriebnahme:
Startup:
Bei eingeschaltetem Behandlungsplatz kann die
Operationsleuchte wahlweise über den Schalthebel
(1) oder der Taste am Arzttableau/ Assistenztableau eingeschalten werden.
The operating light can be switched-on alternatively
with the lever (1) or the key at the dentist`s
keyboard.
Achtung: Die Operationsleuchte leuchtet nur, wenn
beide Schalter eingeschaltet sind. Zum
Ausschalten genügt die Betätigung eines Schalters.
Beleuchtungsstärke:
Die Lichtstärke der Operationsleuchte kann
stufenlos im Bereich von 8000-20000 Lux durch
Drehen am Dimmer geregelt werden. Das Lichtfeld
ist 10 x 20 cm groß (Lichtfeld und -stärke im
Abstand von 80 cm vom Reflektor gemessen.
© Ritter Concept GmbH
J1170 V03.00.00EN&DE
Important: The operating light shines only if both
switches are activated. For switching-off, you just
have to activate one of them.
Illumination level:
The light intensity of the operating light can be
adjusted stepless from 8000-20000 lux by turning
the dimmer.
The light field is 10 x 20 cm. (Light field and - intensity measured in 80 cm of distance of the reflector).
Arztelement / Dentist`s unit
31
Operationsleuchte, PlanetLite
Contact Lite, Contact Lite Comfort,
Contact World
Operating light, PlanetLite
1
AN/ON
AUS/OFF
2
3
Abb.: PlanetLite / Fig.: PlanetLite
Als kostengünstigere Alternative kann der Behandlungsplatz auch mit der Operationsleuchte “PlanetLite” ausgerüstet werden.
Die Operationsleuchte wird an einem Federarm an der
Einheit befestigt. Sie ist mit einer 17 V / 95W Halogenglühlampe und einem Facettenreflektor ausgestattet.
Abb.: PlanetLite / Fig.: PlanetLite
The dentist`s working place can be equipped optionally
with the operating light “PlanetLite”.
Operating light with facet reflector and 17 V / 95 W halogen
bulb on flexarm mounted to the unit.
Essential features:
Wesentliche Merkmale:
• angenehmes, schattenarmes Licht
• leicht beweglich, hält sicher die eingestellte Position
• abnehmbare Griffe
• mechanischer Dimmer ohne Elektronik
• geräuscharmer Lüfter
• comfortable, shadowless light
• easy flexible, keeps the adjusted position safely
• removable hand grips
• mechanical dimmer without electronic
• noiseless fan
Control elements:
Bedienelemente:
1
2
3
Schalthebel
Dimmer
Griff
1
2
3
Lever
Dimmer
Handle
Startup:
Inbetriebnahme:
Bei eingeschaltetem Behandlungsplatz kann die Operationsleuchte wahlweise über den Schalthebel (1) oder der
Taste auf dem Arzttableau/ Assistenztableau ein- und
ausgeschaltet werden.
Achtung: Die Operationsleuchte leuchtet nur, wenn beide
Schalter eingeschaltet sind. Zum Ausschalten genügt die
Betätigung eines Schalters.
Beleuchtungsstärke:
The operating light can be switched on alternatively with
the lever (1) or the key at the dentist`s keyboard.
Important: The operating light shines only if both switches
are activated. For turning off, you just have to activate one
of them.
Illumination level:
The required intensity can be adjusted individually by
turning the dimmer.
Die benötigte Lichtintensität kann individuell durch Drehen
am Dimmer eingestellt werden.
32
Arztelement / Dentist`s unit
© Ritter Concept GmbH
J1170 V03.00.00EN&DE
OP-Leuchten-Programm
Operating light program
Contact Lite, Contact Lite Comfort,
Contact World
Das OP-Leuchten-Programm ermöglicht ein
automatisches Aktivieren oder Deaktivieren der OPLeuchte beim Erreichen bestimmter Positionen der
Patientenliege. In der Standardkonfiguration ist das
OP-Leuchten-Programm immer aktiv.
The operating light program allows an automatic
activation or deactivation of the operating light
when arriving certain positions of the patient`s
chair. In standard configuration the operating light
program is always active.
(Nur für Techniker: Um das OP-Leuchten-Programm
auszuschalten, muss der Soft-DIP-Schalter 1
deaktiviert werden. Siehe Anleitung A1180 “Soft-DIPSchalter”)
(For technicians only: To switch off the operating
light program, soft-DIP-switch 1 must be
deactivated. See manual A1180 “soft-DIPswitches”)
Das OP-Leuchten-Programm ist wie folgt
konfiguriert:
The operating light program ist configured as
follows:
Beim Erreichen der programmierten Positionen der
Patientenliege “P1” oder “P2” wird die OP-Leuchte
immer mit eingeschaltet.
At arriving the programmed chair positions “P1” or
“P2” the lamp will always switched on
automatically.
Beim Anfahren der Aussteige- oder Speiposition
wird die OP-Leuchte immer automatisch
ausgeschaltet.
At approaching the exit- or the spittoon bowlposition the lamp is always switched off.
Wird die Taste “Speischalenposition” erneut
betätigt, fährt die Patienteliege in ihre vorherige
Stellung zurück und die OP-Leuchte nimmt wieder
den ursprünglichen Zustand an. Das heisst, die OPLeuchte geht wieder an, wenn sie in dieser Stellung
eingeschaltet war oder bleibt aus, wenn sie
ausgeschalten war.
(Nur für den Techniker: Aktiviert man zusätzlich den
Soft-DIP-Schalter 2, dann wird beim Erreichen der
Speiposition automatisch das Spülbecken für die
voreingestellte Zeitspanne aktiviert.)
© Ritter Concept GmbH
J1170 V03.00.00EN&DE
If the key “spittoon bowl-position” is actuated
again, the chair moves into the last position and
the lamp takes the previous status. This means,
that the light switches on again if it was “on” at the
last position or “off” if it was “off” at the last
position.
(For technicians only: If you activate the soft DIPswitch 2 additionally, the bowl rinsing will be
activated automatically when arriving the spittoon
bowl-position.)
Arztelement / Dentist`s unit
33
Spülprogramm
Rinse cycle program
Contact Lite, Contact Lite Comfort,
Contact World
Funktion:
Function:
Das Spülprogramm reinigt die Instrumente über eine eingestellte Zeitspanne. Aus hygienischen Gründen empfiehlt es sich, dies täglich vor jeder ersten
Behandlung durchzuführen.
The rinse cycle program cleans the instruments over
an adjusted time period. Because of hygienic aspects it is recommended to do this daily before the
first treatment is done.
Bedienung:
Handling:
Das Spülprogramm lässt sich nur aktivieren, wenn
sich alle Instrumente in ihrer Aufnahme befinden.
For activation it`s necessary that all instruments are
in its holders.
Drücken der Taste “Spanbläser” für länger als 3 Sekunden aktiviert das Spülprogramm. Die Taste Spanbläser und die LED Anzeige blinken.
To activate the rinse cycle press the “chip blower”
button longer than 3 seconds. The activation is displayed by a blinking chip blower button and a blinking LED-bar display.
Über die Tasten “Plus/Minus” lässt sich die Spülzeit
einstellen.
Ein LED-Balken entspricht dabei einer Zeitspanne
von 10 Sekunden.
Using the “Plus/Minus” buttons adjusts the time period for the rinse cycle. Every bar at the LED display
represent 10 seconds.
Die zu spülenden Instrumente aus der Halterung entnehmen und durch kurzes Drücken der Taste “Spanbläser” das Spülprogramm starten.
To start the rinse cycle, take the instruments to be cleaned from its holders and press the chip blower button shortly.
Während des Ablaufes der eingestellten Zeit blinkt
die LED-Anzeige.
Aller 10 Sekunden ertönt ein kurzer Signalton und
die LED-Anzeige verringert sich bis Ende des
Programms. Am Ende der Zeitspanne ertönt ein
langer Signalton.
During the cycle of the preselected time the LED-bar
display is blinking.
After every 10 seconds a short beep signal will sound and the LED bar is decreasing until the end of
the cycle. At the end a longer beep will sound.
Der Spülvorgang kann jederzeit durch kurzes Betätigen der “Spanbläser”-Taste abgebrochen werden.
Das Verlassen des Spülprogramms bei Ende oder
Abbruch erfolgt durch kurzes Drücken der “Spanbläser”-Taste.
34
Arztelement / Dentist`s unit
The cleaning procedure can be stopped at anytime
by pressing the chip blower button shortly.
To leave the rinse cycle program, just press shortly
the chip blower button.
© Ritter Concept GmbH
J1170 V03.00.00EN&DE
Contact Lite, Contact Lite Comfort,
Contact World
© Ritter Concept GmbH
J1170 V03.00.00EN&DE
Arztelement / Dentist`s unit
35
Contact Lite, Contact Lite Comfort,
Contact World
36
Arztelement / Dentist`s unit
© Ritter Concept GmbH
J1170 V03.00.00EN&DE
Contact Lite
Contact Lite Comfort
Contact World
Patientenliege
- Gebrauchsanweisung -
Patient`s chair
- Operating manual -
Ritter® Concept GmbH
Bahnhofstraße 65, D-08297 Zwönitz
Fon: +49 (0) 37754/13-290, Fax: +49 (0) 37754/13-280
e-mail: [email protected]
Internet: http://www.ritterconcept.com
Inhalt
Contact Lite, Contact Lite Comfort,
Contact World
Content
Inhalt
38
Table of content
38
Beschreibung Contact Lite
39
Description Contact Lite
39
Beschreibung Contact Lite Comfort
40
Description Contact Lite Comfort
40
Beschreibung Conatact World
41
Description Contact World
41
Arbeitsbereich
42
Working area
42
Inbetriebnahme
45
Startup
45
Bedienungselemente, Manuelle Steuerung
46
Control elements, manual control
46
Programmsteuerung, Stuhlpositionen
47
Program control, chair positions
47
Sicherheitsschalter
48
Safety switches
49
Kopfstützen
50
Headrest
50
38
Patientenliege / Patient`s chair
© Ritter Concept GmbH
J1170 V03.00.00EN&DE
Beschreibung
Contact Lite
Description
Um die vielfältigen Vorzüge der Patientenliege kennen zu
lernen, empfehlen wir, diese Gebrauchsanweisung vor der
Inbetriebnahme des Gerätes aufmerksam durchzulesen.
We recommend you to read this service manual very
carefully in order to have full knowledge of all the advantages this chair is offering you.
Contact Lite, Patientenliege
Contact Lite, Patient`s Chair
Die wesentlichen Merkmale sind:
The main characteristics are:
• Schnell-Programmiereinrichtung für vier Programme.
• Wartungsfreie Spindelantriebe, äußerst zuverlässig und
leise.
• Große Höhenverstellung für sitzende und stehende
Arbeitsweise.
• Großer Verstellbereich der Rückenlehne. Liegeposition
und aufrechte Rückenlehnenposition möglich.
• Rückenlehne mit integrierter Armauflage.
• schmale Rückenlehne für große Beinfreiheit.
• Liegesitz bequem, weich, anatomisch ausgeformt.
• Kleine, kreisrunde, für den Hinterkopf gut ausgeformte
Kopfstütze ermöglicht dem Behandler noch näher an
• quickset programming for four chair positions
• maintenance-free spindle motors, very reliable and
extremely quiet
• great height adjustment for working in sitting or standing position
• large adjustment range of backrest for reclined and
upright backrest position
• backrest with integrated arm support
• slim backrest for more leg space
• comfortable seat , soft and anatomically shaped
• small, round head support, enables the dentist to get
even closer to the patient (standard type).
den Patienten zu kommen (Standardausführung).
• doppelt artikulierte Kopfstütze
• Großer Verstellwinkel der Kopfstütze für Oberkiefer- und
Unterkieferbehandlung.
• Aussparung für Kopfstütze in der Rückenlehne für kleinere Patienten.
• Linke Armstütze für den Patienten.
• Schwenkbare rechte Armstütze (optional).
• Bedienung der Patientenliege kann per Hand über das
Arzttableau oder per Fuß über das I-Panel erfolgen.
• Um Verletzungen, in erster Linie bei Programmbetrieb,
zu vermeiden, ist der Patientenstuhl mit Sicherheitsschaltern ausgestattet.
• double articulated headrest
• large adjustment angle of head support for easier treatment of upper and lower jaw
• recessed backrest for head support allows better
support of smaller patients
• left armrest for patient
• movable right armrest (optional)
• operation of patient`s chair either manually via dentist's
keyboard or via I-Panel
• safety stops, in order to avoid the hazards of injury,
especially during programmed movements
Abb.: Contact Lite / Fig.: Contact Lite
Abb.: Contact Lite / Fig.: Contact Lite
© Ritter Concept GmbH
J1170 V03.00.00EN&DE
Patientenliege / Patient`s chair
39
Beschreibung
Contact Lite Comfort
Description
Um die vielfältigen Vorzüge der Patientenliege kennen zu
lernen, empfehlen wir, diese Gebrauchsanweisung vor der
Inbetriebnahme des Gerätes aufmerksam durchzulesen.
We recommend you to read this service manual very
carefully in order to have full knowledge of all the advantages this chair is offering you.
Contact Lite Comfort, Patientenliege
Contact Lite Comfort, Patient`s Chair
Die wesentlichen Merkmale sind:
The main characteristics are:
• Schnell-Programmiereinrichtung für vier Programme.
• Wartungsfreie Spindelantriebe, äußerst zuverlässig und
leise.
• Große Höhenverstellung für sitzende und stehende
Arbeitsweise.
• Großer Verstellbereich der Rückenlehne. Liegeposition
und aufrechte Rückenlehnenposition möglich.
• Rückenlehne mit integrierter Armauflage.
• schmale Rückenlehne für große Beinfreiheit.
• Liegesitz bequem, weich, anatomisch ausgeformt.
• Zusätzliche Gegenbewegung der Liege beim Fahren
der Rückenlehne (Trendelenburg-Bewegung) zur
Erhöhung des Sitzkomforts für den Patienten und
Vermeidung des “Auszieheffektes”
• Kleine, kreisrunde, für Hinterkopf gut ausgeformte Kopfstütze ermöglicht dem Behandler noch näher an den
Patienten zu kommen (Standardausführung).
• Kopfstütze mit Doppelgelenk
• Großer Verstellwinkel der Kopfstütze für Oberkiefer- und
Unterkieferbehandlung.
• Optional: Kopfstütze mit pneumatischer Feststellung
• Aussparung für Kopfstütze in der Rückenlehne für kleinere Patienten.
• Linke Armstütze für den Patienten.
• Schwenkbare rechte Armstütze (optional).
• Bedienung des Patientenstuhls kann per Hand über das
Arzttableau oder per Fuß über das I-Panel erfolgen.
• Um Verletzungen, in erster Linie bei Programmbetrieb,
zu vermeiden, ist der Patientenstuhl mit Sicherheitsschaltern ausgestattet.
• großflächigere Polster als “Contact Lite”-Patientenliege
• quickset programming for four chair positions
• maintenance-free spindle motors, very reliable and
extremely quiet
• great height adjustment for working in sitting or standing position
• large adjustment range of backrest for reclined and
upright backrest position
• backrest with integrated arm support
• slim backrest for more leg space
• comfortable seat , soft and anatomically shaped
• additional counter-movement of seat while moving the
backrest (Trendelenburg-movement) increases the
comfort and avoids the “undress effect”
• small, round headrest, enables the dentist to get even
closer to the patient (standard type).
• headrest with double pivot
• large adjustment angle of headrest for easier treatment
of upper and lower jaw
• optionally: headrest with pneumatic locking
• recessed backrest for head support allows better
support of smaller patients
• left armrest for patient
• movable right armrest (optional)
• operation of patient`s chair either manually via dentist's
keyboard or via the I-Panel
• safety stops, in order to avoid the hazards of injury,
especially during programmed movements
• more extensive upholstery than “Contact Lite”- patient`s
chair
Abb.: Contact Lite Comfort / Fig.: Contact Lite Comfort
Abb.: Contact Lite Comfort / Fig.: Contact Lite Comfort
40
Patientenliege / Patient`s chair
© Ritter Concept GmbH
J1170 V03.00.00EN&DE
Beschreibung
Contact World
Description
Um die vielfältigen Vorzüge des Patientenstuhls kennen zu
lernen, empfehlen wir, diese Gebrauchsanweisung vor der
Inbetriebnahme des Gerätes aufmerksam durchzulesen.
We recommend you to read this service manual very
carefully in order to have full knowledge of all the advantages this chair is offering you.
Contact World, Patientenliege
Contact World, Patient`s Chair
Die wesentlichen Merkmale sind:
The main characteristics are:
• Schnell-Programmiereinrichtung für vier Programme.
• Wartungsfreie Spindelantriebe, äußerst zuverlässig und
leise.
• Große Höhenverstellung für sitzende und stehende
Arbeitsweise.
• Großer Verstellbereich der Rückenlehne. Liegeposition
und aufrechte Rückenlehnenposition möglich.
• Rückenlehne mit integrierter Armauflage.
• schmale Rückenlehne für große Beinfreiheit.
• Zusätzliche Gegenbewegung der Liege beim Fahren
der Rückenlehne (Trendelenburg-Bewegung) zur
Erhöhung des Sitzkomforts für den Patienten und
• quickset programming for four chair positions
• maintenance-free spindle motors, very reliable and
extremely quiet
• great height adjustment for working in sitting or standing position
• large adjustment range of backrest for reclined and
upright backrest position
• backrest with integrated arm support
• slim backrest for more leg space
• comfortable seat , soft and anatomically shaped
• additional counter-movement of seat while moving the
backrest (Trendelenburg-movement) increases the
Vermeidung des “Auszieheffektes”
• Liegesitz bequem, weich, anatomisch ausgeformt.
• Kleine, kreisrunde, für Hinterkopf gut ausgeformte Kopfstütze ermöglicht dem Behandler noch näher an den
Patienten zu kommen (Standardausführung).
Als Option: Keilförmiges Konturpolster und Kinderkopfkeil.
• Großer Verstellwinkel der Kopfstütze für Oberkiefer- und
Unterkieferbehandlung.
• Aussparung für Kopfstütze in der Rückenlehne für kleinere Patienten.
• Griffstütze für den Patienten.
• Bedienung des Patientenstuhls kann per Hand über das
Arzttableau oder per Fuß über das I-Panel erfolgen.
• Um Verletzungen, in erster Linie bei Programmbetrieb,
zu vermeiden, ist der Patientenstuhl mit Sicherheitsschaltern ausgestattet.
comfort and avoids the “undress effect”
• small, round head support, enables the dentist to get
even closer to the patient (standard type).
As an option: wedge shaped head rest and children's
head rest.
• large adjustment angle of head support for easier treatment of upper and lower jaw
• recessed backrest for head support allows better
support of smaller patients
• handgrip for patient
• operation of patient`s chair either manually via dentist's
keyboard or via I-Panel
• safety stops, in order to avoid the hazards of injury,
especially during programmed movements
Abb.: Contact World / Fig.: Contact World
Abb.: Contact World / Fig.: Contact World
© Ritter Concept GmbH
J1170 V03.00.00EN&DE
Patientenliege / Patient`s chair
41
Arbeitsbereich
Contact Lite
Working area
42
Patientenliege / Patient`s chair
© Ritter Concept GmbH
J1170 V03.00.00EN&DE
Arbeitsbereich
Contact Lite Comfort
Working area
© Ritter Concept GmbH
J1170 V03.00.00EN&DE
Patientenliege / Patient`s chair
43
Arbeitsbereich
Contact World
Working area
44
Patientenliege / Patient`s chair
© Ritter Concept GmbH
J1170 V03.00.00EN&DE
Inbetriebnahme
Contact Lite, Contact Lite Comfort,
Contact World
Startup
1
1
1 Abb.:/Fig.:Hauptschalter / Main switch
Contact Lite, Contact Lite Comfort
1 Abb.:/Fig.: Hauptschalter / Main switch
Contact World
Inbetriebnahme:
Startup:
Die Inbetriebnahme der Patientenliege erfolgt durch den
Hauptschalter (1) im Sockel der Patientenliege. Nach dem
Einschalten leuchten die Kontrolllampe des Hauptschalters
und die LED-Anzeige im Arzttableau .
The patient`s chair is activated via the main switch (1) at
the chair pedestal. After switching-on, the main switch pilot
lamp and the LED indicator at the dentist`s keyboard are
illuminated.
Wichtig: Aus Sicherheitsgründen muss der Patientenstuhl
beim Verlassen der Praxis ausgeschaltet werden.
Important: For safety reasons, shut-off the main switch in
the chair pedestal when leaving the surgery.
© Ritter Concept GmbH
J1170 V03.00.00EN&DE
Patientenliege / Patient`s chair
45
Bedienelemente, manuelle Steuerung
Contact Lite, Contact Lite Comfort,
Contact World
Control elements, manual control
Bedienungselemente
Control elements
Die Patientenliege kann sowohl mit Arzttableau als
auch über das I-Panel bedient werden.
The patient`s chair can be controlled from the
dentist's keyboard or with the I-Panel.
Wichtig: Wird irgendein Instrument (ausser der
Spritze) aus der Instrumentenablage entnommen,
ist die Steuerung über das I-Panel nicht mehr
möglich.
Important: If any instrument is taken from its holder
(except syringe), the control with the I-Panel is not
longer possible.
Manuelle Steuerung per Arzttableau
Manual control via dentist`s keyboard
Mit den Tasten “Rückenlehne AUF/AB” und “Stuhl
AUF/AB” wird die Patientenliege von Hand positioniert. Jede gewünschte Stellung kann angefahren
werden.
The patient`s chair is controlled manually by keys
“Backrest UP/DOWN” and “Chair UP/DOWN” and
can be brought into any desired position.
Die Pfeile auf den Tasten weisen auf die Richtung
der Stuhlbewegung hin.
The arrows on the keys indicate the direction of the
chair movement.
Manuelle Steuerung per I-Panel
Manual control via I-Panel
Die Pedale und Taster des I-Panels haben folgende
Funktionen:
The pedals and buttons of the I-Panel have the
following functions:
rechter Taster: Rückenlehne AUF
linker Taster:
Rückenlehne: AB
right button: backrest: UP
rechtes Pedal: Patientenliege: AB
left button:
backrest: DOWN
linkes Pedal:
right pedal:
chair: DOWN
left pedal:
chair: UP
both pedals:
automatic movement to exit
position
Patientenliege: AUF
beide Pedale: automatische Bewegung in
Aussteigeposition
beide Taster
gleichzeitig:
46
automatische Bewegung in
Speiposition / Bewegung in
letzte Behandlungsposition
Patientenliege / Patient`s chair
both buttons simultaneously:
automatic movement
to spittoon bowl position /
automatic return to last position
© Ritter Concept GmbH
J1170 V03.00.00EN&DE
Programmsteuerung, Stuhlpositionen
Contact Lite, Contact Lite Comfort,
Contact World
Program control, chair positions
Programmsteuerung
Program control
Die Patientenliege ist ausgestattet mit 4
Programmen, d.h. es können 4 unterschiedliche
Positionen der Liege vorprogrammiert und auf
Tastendruck automatisch angefahren werden.
The patient`s chair is provided with 4 programs,
i.e.,4 different chair positions can be programmed
and run up automatically.
• Behandlungsposition P1
Aufruf über Taste P1 auf dem Arzttableau
• Treatment position P1
is called by key P1 at the dentist`s keyboard
• Behandlungsposition P2
Aufruf über Taste P2 auf dem Arzttableau
• Treatment position P2
is called by key P2 at the dentist`s keyboard
• Speiposition
Aufruf über Taste “Speiposition” auf dem Arzttableau oder durch gleichzeitige Betätigung der
beiden Tasten am I-Panel. Bei nochmaliger
Betätigung fährt die Patientenliege die
ursprüngliche Stellung wieder an.
• Spittoon bowl position
• Aussteigeposition
Aufruf über Taste “Aussteigeposition” auf dem
Arzttableau oder durch gleichzeitig Betätigung
der beiden Pedale am I-Panel.
• Exit position
is called by key “exit position” or actuating
both pedals of the I-Panel
Wichtig: Jede automatische Bewegung wird sofort
unterbrochen, wenn eine beliebige Taste für die
Bewegung der Liege auf dem Arzttableau oder
dem I-Panel betätigt wird.
Important: Every automatic movement will be interrupted immediately, if one of the keys for chair
movement is actuated at the dentist`s keyboard or
the I-Panel.
Programmierung der Positionen der Patientenliege
Programming the chair positions
Die Programmierung der Positionen erfolgt über
die jeweiligen Tasten auf dem Arzttableau.
The programming of the automatic chair positions
can be done by using the dentist`s keyboard.
Bitte verfahren Sie wie folgt:
Please proceed as follows:
• Bringen Sie die Patientenliege manuell in die
gewünschte Position.
• Betätigen Sie eine der 4 Programmtasten auf
dem Arzttableau für länger als ca. 2 s, bis Sie
einen einfachen Piepton hören. Dieser Piepton
signalisiert, daß das Speichern der aktuellen
Position für die betätigte Programmtaste erfolgreich war.
• Move the patient`s chair manually into the
desired position.
• Actuate and keep actutated one of the four
program keys on the dentist`s keyboard longer
than 2 sec till you can hear a single beep. This
beep indicates, that the programming of the
position was successful.
Jetzt können die programmierten Positionen durch
Betätigen der entsprechenden Tasten auf dem Arzttableau oder dem I-Panel aufgerufen werden.
Now the automatic program position can be called
by actuating the according key at the dentist`s
tableau or by the I-Panel.
Hinweis:
Die Programmpositionen P1 und P2 können nicht
über das I-Panel angefahren werden.
© Ritter Concept GmbH
J1170 V03.00.00EN&DE
is called by key “spittoon bowl position” or by
actuating both buttons of the I-Panel. When
actuating repeated , the patient`s chair returns
to its last treatment position.
Note:
The stored programs “P1” and “P2” can not be
called via the I-Panel.
Patientenliege / Patient`s chair
47
Sicherheitsschalter
Contact Lite, Contact Lite Comfort,
Contact World
Sicherheitsschalter
Um Verletzungen zu vermeiden, sind die Rückenlehne
(SIS1) sowie die Unterseite der Patientenliege (SIS3,
SIS2* und SIS4) so ausgeführt, daß beim Auffahren auf
einen Widerstand die Abwärtsbewegung sofort gestoppt
wird.
Der Sicherheitsschalter im Gelenk des Assistenzelements
(SIS6) verhindert bzw. stoppt die Stuhlbewegungen, wenn
der Instrumententräger zu weit nach innen geschwenkt
wird.
SIS 1
SIS 3
SIS 4
*SIS2 nur bei “Contact World”
Abb.:/Fig.: Contact Lite / Contact Lite Comfort
Sobald ein Sicherheitsschalter während der Stuhlbewegung aktiviert wird, wird diese sofort gestoppt und ein
Fehlerpiepton ertönt. Gleichzeitig blinken alle roten LED´s
der Tasten auf dem Arzttableau. Außerdem wird über die
LED-Balkenanzeige eine weiterführende Information (siehe
unten auf dieser Seite) angezeigt.
Um die Fehlermeldung zu löschen, deaktivieren Sie den
angezeigten Sicherheitsschalter (zum Beispiel indem Sie
den Instrumentträger in eine andere Position bewegen)
und betätigen Sie eine Stuhlsteuertaste auf dem Arzttableau.
SIS 6
SIS 1
SIS 2
SIS 4
SIS 3
Abb.:/Fig.: Contact World
Die LED-Balkenanzeige zeigt die folgenden Informationen
an:
Die Anzahl der leuchtenden LED´s auf der rechten
Seite der LED-Balkenanzeige gibt die Nummer des
aktivierten Sicherheitsschalters an
(zum Beispiel: 4 LED´s leuchten - SIS4 ist aktiviert)
Wenn zusätzlich die ganz linke LED der LEDBalkenanzeige leuchtet, wurde der entsprechende
Sicherheitsschalter nicht aktiviert, sondern ist entweder
defekt oder nicht richtig angeschlossen.
Wenn ein Sicherheitsschalter defekt oder nicht richtig
angeschlossen ist, steht die entsprechende Sicherheitsschaltung nicht mehr zur Verfügung. In diesem
Falle kann die Patientenliege nur noch per Hand in die
entsprechenden Positionen gefahren werden und es ist
unbedingt ratsam einen Servicetechniker zu rufen.
48
Patientenliege / Patient`s chair
© Ritter Concept GmbH
J1170 V03.00.00EN&DE
Safety switches
Contact Lite, Contact Lite Comfort,
Contact World
Safety switches
In order to avoid the hazard of injuries, backrest (SIS1),
rear side of the seat (SIS3,SIS2* and SIS4) as well as the
yoke housing (SIS4) are so designed, that upon collision
the chair movement stops immediately.
The back end plate of the chair pedestal (SIS 3) at the
“Contact World” chair is provided with micro switches to
stop the downward chair movement when accidentally
placing the foot on it.
SIS 1
SIS 3
The safety switch in the hinged arm of the assistant's unit
(SIS6) will stop the chair movment, if the arm is accidentally swivelled too far into chair direction.
*SIS2 only at “Contact World”
SIS 4
Abb.:/Fig.: Contact Lite / Contact Lite Comfort
SIS 6
The chair movement will stop immediately, when a safety
switch is getting activated. At the same time all keys of the
dentist`s keyboard are illuminated and the LED bar shows
detailed informations.
SIS 1
To clear the blinking failure notice, inactivate the displayed
safety switch and press any key of the dentist`s keyboard
which is relevant for moving the chair.
SIS 2
SIS 4
SIS 3
Abb.:/Fig.: Contact World
The LED bar at the dentist`s keyboard shows the following
informations:
The number of illuminated LED`s on the right side of the
bar indicates the number of the activated safety switch.
(for instance:
4 LED`s illuminated - SIS4 activated)
If additionally the first LED on the left side of the bar is
illuminated, the according safety switch is not
connected or damaged.
If a safety switch is not connected or damaged, the
corresponding safety devices are not longer available.
In that case the chair can only be moved manually and
it`s absolutely recommended to call a service
technician.
© Ritter Concept GmbH
J1170 V03.00.00EN&DE
Patientenliege / Patient`s chair
49
Kopfstützen
Contact Lite, Contact Lite Comfort
Headrest
2
1
Kopfstütze-mechanische Feststellung
Headrest - mechanic adjustment
Kopfstütze - pneumatische Feststellung
Headrest - pneumatic adjustment
Kopfstütze
Headrest
Der Auszug und das Kippen der Kopfstütze ist mit Einhandbedienung möglich. Die Höhenverstellung der Kopfstütze ist
stufenlos (selbsthemmend).
Extension and tilting of the headrest can be easily
performed with one hand only. The height adjustment of
the headrest is infinitely variable (self-locking).
Die Justierung der Kopfstütze mit Hilfe der Doppelgelenke
erfolgt durch Drehung des dafür vorgesehenen Drehknopfes (1). Eine Drehung entgegen des Uhrzeigersinns
löst die Gelenke, eine Drehung im Uhrzeigersinn blockiert
die Gelenke der Kopfstütze.
The double joint for wide articulation can be adjusted by
the knob (1).
Rotating it anticlockwise it is unblocked, clockwise it is
blocked.
Abb.: Auszug Kopfstütze
Fig.: Pull out Headrest
Abb.: Kippen der Kopfstütze
Fig.: Tilting of the headrest
Optional bieten wir auch eine Kopfstütze mit pneumatischer
Feststellung an.
Optionally we offer a headrest with pneumatic locking.
Zum Bewegen der Kopfstütze muss der im oberen, rechten
Bild dargestellte Knopf (2) betätigt werden.
50
Patientenliege / Patient`s chair
For moving the headrest, you have to press the button (2)
shown at the upper, right picture.
© Ritter Concept GmbH
J1170 V03.00.00EN&DE
Kopfstützen
Contact World
headrest
1
Abb.: Kopfstütze Contact World
Fig.: Headrest Contact World
Abb.: Kopfstütze Contact World
Fig.: Headrest Contact World
Kopfstütze
Head support
Der Auszug und das Kippen der Kopfstütze ist mit Einhandbedienung möglich. Die Höhenverstellung der Kopfstütze
ist stufenlos (selbsthemmend). Die nutzbare Ausziehlänge
Extension and tilting of the headrest can be easily
performed with one hand only. The height adjustment of
the headrest is infinitely variable (self-locking). The extension length is approx. 15 cm
beträgt ca. 15 cm.
Für die Kippung nach hinten, ist die Arretierung durch
Ziehen am Auslösegriff (1) auszurasten. Die Kippung nach
vorn kann ohne Betätigung des Auslösegriffs erfolgen. Die
Kopfstütze kann problemlos entfernt und wieder eingesetzt
werden.
For tilting backwards, locking device (1) has to be released
by pulling. Tilting forwards can be performed without
pulling the locking device. The headrest can be taken off
and inserted again without problems.
Optional a headrest with double pivot is possible.
Optional ist auch eine doppeltartikulierte Kopfstütze
möglich.
Abb.: Kopfstütze - Contact World
Fig.: Headrest - Contact World
Abb.: Kopfpolster lang
Fig.: Headrest long
Abb.: Kinderkopfteil
/ Fig.: Childrens head wedge
© Ritter Concept GmbH
J1170 V03.00.00EN&DE
Patientenliege / Patient`s chair
51
Contact Lite, Contact Lite Comfort,
Contact World
52
Patientenliege / Patient`s chair
© Ritter Concept GmbH
J1170 V03.00.00EN&DE
Contact Lite
Contact Lite Comfort
Contact World
Assistenzelement
- Gebrauchsanweisung -
Assistant`s unit
- Operating Instructions-
Ritter® Concept GmbH
Bahnhofstraße 65, D-08297 Zwönitz
Fon: +49 (0) 37754/13-280, Fax: +49 (0) 37754/13-290
e-mail: [email protected]
Internet: http://www.ritterconcept.com
Contact Lite, Contact Lite Comfort,
Contact World
54
Assistenzelement / Assistant`s unit
© Ritter Concept GmbH
J1170 V03.00.00EN&DE
Inhalt
Contact Lite, Contact Lite Comfort,
Contact World
Content
Inhalt
55
Content
55
Beschreibung
57
Description
57
Arbeitsbereich
58
Working area
58
Bedienelemente
59
Control elements
59
Spülglasfüller
60
Cup filling
60
Speischalenspülung
61
Spittoon bowl rinsing
61
Wasserregulierung
62
Regulation of water
62
Speichelsauger, Sekretsauger
63
Suction handpiece
63
3/6- Funktionsspritze
64
3/6- function syringe
64
Polymerisationslicht
65
Curing light
65
Amalgamabscheider
66
Amalgam separator
66
Hydrocolloid-Anschluss
67
Hydrocolloid quick connector
67
Mundspülbeckenventil
68
Spittoon bowl valve
68
© Ritter Concept GmbH
J1170 V03.00.00EN&DE
Assistenzelement / Assistant`s unit
55
Contact Lite, Contact Lite Comfort,
Contact World
56
Assistenzelement / Assistant`s unit
© Ritter Concept GmbH
J1170 V03.00.00EN&DE
Beschreibung
Contact Lite, Contact Lite Comfort,
Contact World
Description
Abb.: Instrumentträger / Fig.: Instrument holder
Um die vielfältigen Vorzüge des Assistenzelements kennen
zu lernen, empfehlen wir, diese Gebrauchsanweisung vor
der Inbetriebnahme des Gerätes aufmerksam durchzulesen.
Die Speifontäne ist in die Gerätesäule fest eingebaut.
Instrumentenablage befindet sich auf einem schwenkbaren
Arm.
We recommend you to read this operating manual very
carefully in order to have full knowledge of all the advantages this assistant's unit is offering you.
Spittoon bowl fully integrated in unit column. Instruments
on swivel arm.
The main characteristics are:
Die wesentlichen Merkmale sind:
• Speischale aus Feinkeramik, farbbeständig, kratzfest.
• Speischale aufgesteckt, zum Reinigen leicht
abnehmbar
• Instrumentenablage auf Doppelarm-Schwenkhalter mit
extrem großen Schwenkbereich
• Sicherheitsschaltung am Schwenkarm
Optional:
• Ceramic cuspidor bowl, colour-and scratch resistant
• Spittoon bowl put on, easy to remove for cleaning
• Instrumentation on swivel arm holder with double articulation with an extreme wide working radius
• Safety switch at swivel arm
Optionally:
• 3-part arm for instrument holder
• Equipment wit 3/6-function syringe
• Equipment with polymerisation light
• 3-teiliger Arm für Instrumentenablage
• Ausstattung mit 3/6-Funktionsspritze
• Ausstattung mit Aushärtelicht
Abb.: 3-teiliger Gelenkarm
Fig.: 3-partet pivot arm
© Ritter Concept GmbH
J1170 V03.00.00EN&DE
Assistenzelement / Assistant`s unit
57
Arbeitsbereich H&S-Modelle
Contact Lite, Contact Lite Comfort,
Contact World
Working area H&S-Models
Das Assistenzelement ist in der Gerätesäule der Einheit. Es
befinden sich keine Kabel oder Versorgungsschläuche auf
dem Fußboden.
The assistant's unit is integrated in the unit column. No
cables or supply hoses are located on the floor.
Abb.: Arbeitsbereich der “H” und “S” Modelle
Fig.: Working area of the “H” and “S” models
Der Doppelarm des Assistenzelements hat einen extrem
großen Schwenkbereich. Der Instrumententräger kann
entweder ganz nah an den Patienten herangezogen oder
auch weit weg geschwenkt werden, um der Assistentin
Platz zu machen.
The double-arm of the assistant's unit has an extremely
wide working radius. Instrument holder can be brought
very close to the patient or swivelled far off in order to give
the assistant space.
Abb.: Arbeitsbereich H&S-Modelle / Fig.: Working area H&S-models
58
Assistenzelement / Assistant`s unit
© Ritter Concept GmbH
J1170 V03.00.00EN&DE
Bedienelemente
Contact Lite, Contact Lite Comfort,
Contact World
Control elements
4
2
6
5
3
7
1
1
Schwenkarm mit Doppelgelenk
1
Swivel arm with double articulation
2
Speischale
2
spittoon bowl
3
Spülrohr
3
Rinsing tube
4
Spülglasfüller
4
Cup filler
(Spülrohr und Spülglasfüller abnehmbar für
Reinigung. Vor der Reinigung ist es ratsam,
den Behandlungsplatz auszuschalten.
(Rinsing tube and the cup filler are
removable for cleaning. Before cleaning,
you have to switch off the complete unit.)
5
Spraysauger
5
Spray suction
6
3/6-Funktion-Spritze für Assistentin
6
3/6-function syringe for assistant
7
Speichelsauger
7
Saliva suction
Bedienelemente auf der Heferintastatur:
Control elements at the assistant`s panel
Taste “Aussteigeposition”
Key “Exit position”
Taste “Speiposition”
Key “Spittoon bowl position”
Taste “Spülglasfüller”
Key “Cup filler”
Taste “Speischalenspülung”
Key “Spitton bowl rinsing”
Taste “Operationslicht”
Key “Operating light”
Taste “Türöffner”
Key “Bell/ Door opener”
Taste “Rückenlehne AUF/AB” und
“Stuhl AUF/AB”
Key “Backrest UP/DOWN” and
“Chair UP/DOWN”
© Ritter Concept GmbH
J1170 V03.00.00EN&DE
Assistenzelement / Assistant`s unit
59
Spülglasfüller
Contact Lite, Contact Lite Comfort,
Contact World
Cup filling
Spülglasfüller:
Cup filling
Die Taste “Spülglasfüller” startet die Befüllung des
Spülglases und stoppt diese automatisch nach
einer vorgegebenen Zeit.
The cup filling starts when pressing the key “Cup
filler” and stops automatically after a programmed
time.
Ein vorzeitiges Stoppen ist jederzeit durch
erneutes Betätigen der Taste möglich.
Premature stop of cup filling can be released by
pressing key “Cup filler” once more.
Die empfohlene Füllmenge beträgt ca. zwei Drittel
des Glases oder Kunststoffbechers. Eventuell überlaufendes Wasser beim Füllen des Spülglases wird
automatisch in den Abfluss abgeführt.
The recommended filling level is two thirds of the
glass or plastic cup. Overflowing water will run off
through the cup support plate to the drain.
Programmierung der Füllzeit:
Programming of cup filling time
Zur Änderung der programmierten Füllzeit halten
Sie einfach die Taste “Spülglasfüller” so lange
gedrückt, bis die LED-Balkenanzeige erscheint.
Jetzt können Sie die Füllzeit mit den “Plus/Minus”Tasten verringern oder erhöhen.
Jede einzelne LED der Balkenanzeige entspricht
einer Füllzeit von ca. 1 s.
Somit ist es möglich eine Füllzeit zwischen minimal
1 s (1 LED leuchtet) und maximal 12 s (12 LED´s
leuchten) einzustellen.
To change the adjusted cup filling time, simply
press and keep pressed the key “Cup filler” till the
LED bar appears.
Now you can increase or decrease the filling time
with the keys “Plus/Minus”.
Every single LED of the illuminated bar means a
filling time of about 1 sec. So it is possible to select
a time between a minimum of 1 sec ( 1 LED illuminated) and a maximum of 12 sec (12 LED`s illuminated).
Sobald die gewünschte Füllzeit eingestellt ist, wird
die Programmierung mit der Taste “Spülglasfüller”
beendet. Die LED-Balkenanzeige verschwindet und
der zuletzt eingestellte Wert der Füllzeit wird automatisch abgespeichert.
As soon as the wanted filling time is adjusted,
press key “Cup filler” once more. The LED bar
disappears and the last selected cup filling time is
being stored automatically.
Zur Einstellung der Wassermenge des Spül
glasfüllers lesen Sie bitte auf Seite 62 dieser
Gebrauchsanweisung.
60
Assistenzelement / Assistant`s unit
To regulate the water intensity of the cup filler
please see page 62 of this manual.
© Ritter Concept GmbH
J1170 V03.00.00EN&DE
Speischalenspülung
Contact Lite, Contact Lite Comfort,
Contact World
Spittoon bowl rinsing
Manuelle Speischalenspülung
Manual bowl flush
Die Spülung der Speischale wird über die Taste
“Speischalenspülung” gestartet und stoppt automatisch nach einer vorprogrammierten Zeit.
Ein vorzeitiges Stoppen während des Spülvorganges durch ein erneutes Betätigen der Taste ist
jederzeit möglich.
The spittoon bowl flush starts when pressing key
“spittoon bowl rinsing” and stops automatically
after a programmed time. Premature stop during
bowl rinsing is possible by pressing the key once
more.
Programmierung der Spülzeit
Programming of spittoon bowl flush time
Zur Änderung der programmierten Spülzeit halten
Sie einfach die Taste “Speischalenspülung” des
Arzttableaus so lange gedrückt, bis die LEDBalkenanzeige erscheint.
Jetzt können Sie die Spülzeit mit den
“Plus/Minus”-Tasten verringern oder erhöhen.
Jede einzelne LED der Balkenanzeige entspricht in
etwa einer Spülzeit von ca. 10 s.
Somit ist es möglich eine Spülzeit zwischen
minimal 10 s (1 LED leuchtet) und maximal 120 s
(12 LED´s leuchten) einzustellen.
To change the adjusted rinsing time, simply press
and keep pressed the key “spittoon bowl rinsing”
till the LED bar appears.
Now you can increase or decrease the rinsing time
with the “Plus/Minus” keys.
Every single LED of the illuminated bar corresponds in approximately of 10 sec. of rinsing time.
So it is possible to select a time between a
minimum of 10 sec ( 1 LED illuminated) and a
maximum of 120 sec (12 LED`s illuminated).
Sobald die gewünschte Spülzeit eingestellt ist, wird
die Programmierung mit der Taste “Speischalenspülung” beendet. Die LED-Balkenanzeige
verschwindet und der zuletzt eingestellte Wert der
Spülzeit wird automatisch abgespeichert.
As soon as the wanted rinsing time is adjusted,
press the key “spittoon bowl rinsing” once more.
The LED bar disappears and the last selected
rinsing time is being stored automatically.
Zur Einstellung der Wassermenge der
Speischalenspülung lesen Sie bitte auf Seite
62 dieser Gebrauchsanweisung.
© Ritter Concept GmbH
J1170 V03.00.00EN&DE
To regulate the water intensity of the spittoon
bowl rinsing, please see page 62 of this
manual.
Assistenzelement / Assistant`s unit
61
Wasserregulierung
Contact Lite, Contact Lite Comfort,
Contact World
Water regulation
Regulierung der Wassermenge
Regulation of water intensity
Die Wassermenge für den Spülglasfüller kann mit
dem Einstellregler (2), die der Speischalenspülung
mit dem Einstellregler (3) reguliert werden.
The water-quantity of the cup filler can be regulated
by adjustment knob (2), the amount of the spittoon
bowl rinsing by using adjustment knob (3).
Eine Drehung der Einstellregler nach links erhöht
jeweils die Wassermenge, durch eine Drehung
Turning the adjustment knobs to the left increases
nach rechts wird die Wassermenge verringert.
Die Einstellregler befinden sich hinter der Seitentür
der Einheit (1) welche mit einem Magnetverschluss
versehen ist.
1
the water quantity , turning to the right reduces the
water quantity.
These adjustment knobs are to be found in the unit
column behind the cover door (1) which has a
magnetic lock.
Auf/
Open
Zu /
Close
2
3
Abb.: Wasserregler
Fig. : Water regulators
62
Assistenzelement / Assistant`s unit
© Ritter Concept GmbH
J1170 V03.00.00EN&DE
Speichelsauger, Sprayabsaugung
Contact Lite, Contact Lite Comfort,
Contact World
Saliva suction, spray aspiration
Speichelsauger
Saliva ejector
Bei Entnahme des Speichelsaugers aus dem Köcher wird
automatisch die Absaugung aktiviert. Das andere im
Köcher verbleibende Saughandstück sollte stets
geschlossen sein.
When taking the saliva ejector from its holder, the central
aspiration system is activated. The hand piece which
remains in the instrument holder should be always closed.
Design and size of the handpiece allow easy handling with
one hand. It can be slided with thumb and forefinger into
the desired position without torsion of the hose.
Aufbau und Größe des Handstückes erlauben eine
einfache Handhabung. Es kann mittels Daumen und Zeigefinger in die gewünschte Position gebracht werden ohne
dabei den Saugschlauch zu verdrehen.
Auf / Open
Zu / Close
Abb.: Saughandstück “Cattani” (großer Schlauch)
Fig.: Suction hand piece “Cattani” (big hose)
Um das Saughandstück zu öffnen, schieben Sie einfach
den Öffner mit dem Daumen in die dargestellte “Auf”-Position.
To open the handpiece simply slide the opener with the
thumb in the illustrated „open“-position.
You can also regulate the aspiration intensity by opening
the handpiece more or less.
Sie können außerdem die Intensität des Saugstromes
regeln, in dem Sie das Handstück mehr oder weniger
öffnen.
When returning the handpiece into the holder, the aspiration system is deactivated.
Nach dem Zurücklegen des Saughandstückes in die dafür
vorgesehene Aufnahme, wird die Absaugung deaktiviert.
It is recommended to close the handpiece completely
anytime when returning it to its holder. This guarantees
always a full suction power if using the other hand piece.
Es ist ratsam das Saughandstück immer komplett zu
schließen, bevor es in den Köcher zurückgelegt wird. Dies
garantiert immer die volle Saugleistung bei Verwendung
des anderen Handstückes.
The handpiece can be equipped with commercially available suction cannulas.
For surgical cannulas a special adaptor is necessary.
Das Handstück kann mit handelsüblichen Saugkanülen
ausgestattet werden.
Für die Verwendung von chirurgischen Kanülen ist ein
spezieller Adapter notwendig.
Auf / Open
Zu / Close
Abb.: Saughandstück “Dürr” (kleiner Schlauch)
Fig.: Suction hand piece “Dürr” (small hose)
© Ritter Concept GmbH
J1170 V03.00.00EN&DE
Assistentinnenelement / Assistant`s unit
3/6-Funktionsspritze
Contact Lite, Contact Lite Comfort,
3/6-function syringe
Contact World
Optional kann das Assistenzelement auch mit einer
zusätzlichen 3/6-Funktionsspritze ausgestattet
werden.
Optionally the assistant`s unit can be equipped
with an additional 3/6-function syringe.
Startup:
Inbetriebnahme:
Wasser, Luft oder Spray werden von Hand
geschaltet. Die Medienabgabe dauert solange an,
wie die entsprechende Taste am Griff gedrückt
wird. Wahlweise kann Luft oder Wasser abgegeben
werden. Durch Druck auf beide Tasten wird Spray
abgegeben.
Water, air or spray are switched by hand. Supply of
the media lasts as long as the corresponding key
of handle is pressed. Either air or water can be
obtained by actuating the corresponding key.
Actuating both keys at the same time will supply
spray.
Volume
Dosierung:
Die Dosierung von Luft, Wasser oder Spray erfolgt
durch unterschiedlichen Betätigungsdruck auf die
Tasten.
The volume of air, water and spray depends on the
force applied to the keys during operation.
Heating function:
Some manfacturers provide a heating function for
the media.
Heizfunktion:
Einige Hersteller bieten zusätzlich die Funktion der
Beheizung der Medien an.
Further informations can be found in the operating
manual of the manufacturer of the syringe.
Weitere Informationen finden Sie in der Gebrauchsanweisung des Herstellers der Spritze.
1
3
2
Abb.: Spritze “Luzzani 6F Minilight”
Fig.: Syringe “Luzzani 6F Minilight”
Funktionen am Beispiel “Luzzani 6F Minilight”:
Functions at example: “Luzzani 6F Minilight”:
1
2
3
1
2
3
Taste für Luftabgabe
Taste für Wasserabgabe
Wärmeabgabe am Drehgriff einstellbar
1+2 Abgabe von Spray
Button for air delivery
Button for water delivery
Delivery of heat adjustable at the turning
handle
1+2 Delivery of spray
64
Assistenzelement / Assistant`s unit
© Ritter Concept GmbH
J1170 V03.00.00EN&DE
Aushärtelicht
Contact Lite, Contact Lite Comfort,
Curing light
Contact World
Bedienung
Operation
Nehmen Sie das Handstück von der Ablage. Das
Gerät wird durch Betätigung des Tasters (1) am
Instrument in Betrieb gesetzt. Nach einer Zeitspanne von 20 Sekunden schaltet sich das Instrument automatisch ab. Nach Ablauf von 10
Sekunden und am Ende ertönt ein Signalton.
Take the handpiece from its holder. The hand piece
starts working by pressing the button (1) at the
instrument. After a time period of 20 seconds the
instrument switches off automatically. A signal
sounds after 10 seconds and at the end of the time
period.
Bei unzulässiger Erwärmung erfolgt eine vorübergehende automatische Abschaltung durch einen
Thermoschalter. In der Praxis können jedoch
ausreichend viele Aushärtezyklen nacheinander
durchgeführt werden.
The instrument will stop automatically at inadmissible heat. However, in practise you can execute
enough cycles of curing in succession.
Arbeitshinweise
Operating hints
Beachten Sie bitte die Vorschriften des KompositHerstellers, da verschiedene Materialien und
Farben besondere Aushärteeigenschaften
besitzen. Für eine effektive Härtung des KompositMaterials ist es wichtig, daß der Lichtleiter und der
blaue Filter (siehe: Wartung) immer sauber
gehalten werden. Häufig mit Isopropyl-Alkohol
reinigen. Kontakt der polierten Enden des Lichtleiters mit unausgehärtetem Komposit-Material soll
vermieden werden. Notfalls mit Alkohol reinigen.
Please adhere to the composite material manufacturer's operating manual as different materials and
shades have specific curing characteristics. A
precondition for proper curing of the composite
material is that light guide and blue filter are clean
(please refer to "Maintenance"). Clean very
frequently with isopropyl alcohol. Avoid any contact
between the polished end of the light guide and
non-cured composite material. If necessary, clean
with alcohol.
Es wird empfohlen, den Lichtstrahl nicht in die
Augen zu lenken.
Do not look directly into the curing beam.
Important: Please read the manufacturer`s operating manual carefully !
Wichtig: Bitte lesen Sie die Gebrauchsanweisung
des Herstellers sorgfältig !
1
Abb.: Aushärtelicht “Mectron Starlight”
Fig.: Curing light “Mectron Starlight”
© Ritter Concept GmbH
J1170 V03.00.00EN&DE
Assistenzelement / Assistant`s unit
65
Amalgamabscheider MST 1
Contact Lite, Contact Lite Comfort,
Contact World
Amalgam separator MST 1
Durch den (optional) Amalgamabscheider MST1
können sämtliche Umweltschutzauflagen
problemlos eingehalten werden. Die Gewässerbelastung durch Amalgam ist hiermit drastisch reduziert.
Die wesentlichen Merkmale des Amalgamabscheiders sind:
• Zweistufige Abscheidung in kurzen,
systemschonenden Intervallen (Sedimentation
und Zentrifugation).
• Integrierte schmutzunempfindliche Luft-Wasser
Separation.
• Selbstreinigende Zentrifugen-Doppelkammern.
• Abscheidewirkungsgrad für Amalgam:
98,6 %.
• Getrennte Verarbeitung der beiden unterschiedlichen Schmutzströme (Absaugung, Abwasser).
Wenn der Sammelbehälter für Amalgam zu
95 % gefüllt ist ertönt ein Signalton. Der Sammelbehälter muß umgehend ausgetauscht werden. Mit
dem Gerät kann man jedoch weiter arbeiten. Um
den Signalton abzuschalten, muss die “Reset”Taste (1) betätigt werden. Ist der Sammelbehälter
zu 100 % gefüllt oder wenn eine Störung vorliegt,
ertönt ein langer Signalton, der nicht mit der ResetTaste abschaltbar ist.
Bitte beachten Sie die Gebrauchsanweisung des
Herstellers des Amalgamabscheiders.
The (optionally) integrated amalgam separator
MST1 helps you to meet all environmental protection requirements. Contamination of waste water by
amalgam is drastically reduced.
The main characteristics of the amalgam separator
are:
• Two-step separation in short and systemadapted intervals (sedimentation and
centrifugation)
• Integrated dirt-resistant air/water separation
• Self-cleaning centrifuge double chambers
• Degree of amalgam separation: 98.6 %
• Separate processing of the two different waste
streams (aspiration waste, water)
When the amalgam collector is filled by 95 % a
signal beep will sound. The collector must be
exchanged soon. However, operation is still
possible.
To switch off the signal beep, press the “Reset”
button (1). When the amalgam collector is 100 %
full, the suction flow valve does not open any more
and thus operation is made impossible. In this case
or if a disruption is existent, the signal beep can`t
be cancelled with the “Reset” button.
Please pay attention to the operating manual of the
manufacturer of the amalgam separator !
In case of a disruption please call a service technician !
Im Falle einer Störung verständigen Sie bitte den
Service Techniker !
1
Abb.: Amalgamabscheider MST1
Fig.: Amalgam separator MST1
66
Assistenzelement / Assistant`s unit
Abb.: Bedienteil
Fig.: Control element
© Ritter Concept GmbH
J1170 V03.00.00EN&DE
Hydrocolloid-Anschluss
Contact Lite, Contact Lite Comfort,
Hydrocolloid connection
Contact World
Der zur Schnellkupplung (1) gehörige Stecknippel
(2) ist passend für einen
1/4 Zoll-Schlauch als Kühlwasserzuleitung zum
Hydrocolloid-Abformlöffel.
The plug nipple (2) of the hydrocolloid quick
connection (1) is suited for a ¼" hose which
serves as coolant water supply line to the
hydrocolloid moulding spoon.
Der Stecknippel (im Zubehör) wird in die Schnellkupplung gesteckt und mittels des Rasthebels in
der Ringnut der Schnellkupplungsbuchse gesichert. Vorher für einen einwandfreien Abfluß aus
der Kühlwasser-Rückleitung in die Speischale
sorgen, da durch das Ankuppeln der Kühlwasserstrom selbsttätig freigegeben wird.
The nipple (in the accessories) is plugged into
the quick connect and secured with the
locking lever in the annular groove of the quick
connect bushing. Prior to connection, assure
proper water discharge of the coolant water
discharge pipe into the spittoon bowl as the
coolant water supply is released automatically
as soon as the connection is made.
1
2
Abb.: Hydrocolloid Anschluss
Fig.: Hydrocolloid connection
© Ritter Concept GmbH
J1170 V03.00.00EN&DE
Assistenzelement / Assistant`s unit
67
Mundspülbeckenventil
Contact Lite, Contact Lite Comfort,
Contact World
Spittoon bowl valve
Optional kann das Assistenzelement mit einem Mundspülbeckenventil ausgerüstet werden. Das Ventil verhindert
Sauggeräusche an der Speischale.
Optionally, the assistant's unit can be provided with a spittoon bowl valve. This valve eliminates suction noises at the
spittoon bowl.
Um die einwandfreie Funktion des Ventiles zu garantieren,
muß mindestens zweimal am Tag die Reinigungsautomatik
aktiviert werden.
In order to warrant proper function of this valve, the automatic cleaning process has to be activated at least twice a
Mundspülbeckenventil (1) und Bedienelement (2) sind in
die Säule des Assistenzelementes integriert.
The spittoon bowl valve (1) and the control element (2) are
integrated in the column of the assistant's unit.
Zur Aktivierung der Reinigungsautomatik den Taster (3)
betätigen.
For activating the automatic cleaning process press key
(3).
Beachten Sie bitte auch die beigelegte Gebrauchsanweisung des Herstellers.
The manufacturer's operating manual has to be adherred
too.
day.
1
3
2
Abb.: Mundspülbeckenventil
Fig.: Spittoon bowl valve
68
Assistenzelement / Assistant`s unit
Abb.: Bedienteil
Fig.: Control element
© Ritter Concept GmbH
J1170 V03.00.00EN&DE
Contact Lite
Contact Lite Comfort
Contact World
Zahnärztlicher Arbeitsplatz
- Wartungsanweisung -
Dental Work Place
-Maintenance instructions-
Ritter® Concept GmbH
Bahnhofstraße 65, D-08297 Zwönitz
Fon: +49 (0) 37754/13-290, Fax: +49 (0) 37754/13-280
e-mail: [email protected]
Internet: http://www.ritterconcept.com
70
Wartung / Maintenance
© Ritter Concept GmbH
J1170 V03.00.00EN&DE
Inhalt / Content
Contact Lite, Contact Lite Comfort,
Contact World
Inhalt
71
Content
71
Täglich
72
Daily
72
Vierteljährlich
75
Quarterly
75
bei Bedarf
76
When necessary
76
Reinigung/Pflege
80
Cleaning
80
© Ritter Concept GmbH
J1170 V03.00.00EN&DE
Wartung / Maintenance
71
Täglich / Daily
Contact Lite, Contact Lite Comfort,
Contact World
Die Erfüllung der Anforderungen an die Hygiene und die
Erhaltung der Funktionstüchtigkeit des Gerätes wird
gewährleistet durch die sorgfältige Beachtung der
Hinweise zur Desinfektion, Reinigung und Wartung.
Conformity with the hygienic standards as well as good
performance of the equipment are warranted by adhering
to the recommendations for disinfection, cleaning and
maintenance.
Bohrinstrumente
Burr instruments
• Vor der ersten Behandlung bei allen Sprayleitungen
durch Inbetriebnahme der Instrumente abgestandenes
Wasser ca.
120 Sekunden lang ablaufen lassen.
• Every day before the first treatment, let instruments run
for approx. 120 seconds to purge all spray tubes.
• Turbine, Hand- und Winkelstücke reinigen und pflegen.
• Lesen Sie dazu auch den Abschnitt “Spülprogramm”
auf Seite 34
Wichtig: Die Wartungsanweisungen der Hersteller der
Bohrinstrumente sind genau zu beachten.
Instrumentenschläuche dürfen nicht im Thermodesinfektor gereinigt werden. Die Temperaturbelastung für
Schläuche beträgt maximal 40 °C
• Clean and maintain turbine, handpieces and contraangle attachments.
• Read the chapter “Rinse cycle” on page 34 for more
informations.
Important: Please read the manufacturer's operating
manual for the burr instruments very carefully.
Instrument hoses may not clean in the thermodesinfektor. Temperature load for the tubes is max. 40
degrees Celsius.
Speichelsauger, Sekretsauger, Spraysauger
Saliva ejector, Surgical suction, Suction handpiece
Alle Aufbauteile der Handstücke abziehen bzw.
abschrauben und reinigen. Jetzt die zugänglichen Enden
der Ansatzstücke am Schlauchende reinigen. O-Ringe mit
Vaseline fetten. Handstücke wieder zusammensetzen.
Detach handpiece from hose. Clean accessible hose ends
and handpieces. Lubricate O-rings with vaseline and reassemble handpiece to the hose.
Ungeeignet und unzulässig sind Reinigungsmittel auf der
Basis quaternärer Ammoniumverbindungen, phenol- und
aldehydhaltige, sowie stark schäumende Reinigungsmittel.
Die Dosierungshinweise entnehmen Sie bitte dem Beipackzettel des Reinigungs- und Desinfektionsmittels.
72
Wartung / Maintenance
Unsuited and not permitted are cleaning agents based on
quaternary ammonium compositions, cleaning agents
containing phenol and aldehyde as well as foam generating agents.
For dosage directions, please refer to the recommendations given for the individual cleaning and disinfection
agents.
© Ritter Concept GmbH
J1170 V03.00.00EN&DE
Täglich / Daily
Contact Lite, Contact Lite Comfort,
Contact World
Reinigung der Speischale
Cleaning of the cuspidor bowl
Vor der Durchführung der folgenden
Schritte, ist es unbedingt ratsam den
Behandlungsplatz mittels des Hauptschalters am Stuhlsockel auszuschalten!
Before proceeding with the following
steps it is absolutely necessary to
switch OFF the unit via the main
switch in the patient`s chair pedestal!
Remove and clean insert (1) and
gold trap (2). For cleaning, the
rinsing tube (3) and cup filler (4) can
be removed. First remove cup filler
(4), then the rinsing tube (3) can be
removed together with the spittoon
bowl (6). Finally, remove and clean
the cup support (5).
Abflußdeckel (1) und Goldfänger (2)
herausnehmen und reinigen. Zum
Reinigen der Speischale können
auch das Spülrohr (3) und der Spülglasfüller (4) herausgezogen werden.
Das Spülrohr (3), nachdem der Spülglasfüller (4) herausgezogen wurde,
am besten zusammen mit der Speischale (6) abnehmen. Zuletzt wird die
Glasablage (5) abgenommen und
gereinigt.
4
3
5
1
6
2
Please do not use scouring powder,
aggressive or foam generating cleaning agents.
Keine aggresiven, sandhaltigen und
schaumbildenden Reinigungsmittel
verwenden.
Raumpflegerinnen sind darauf
aufmerksam
zu machen, daß zur Nachreinigung
der Speischale keine Haushaltsreiniger verwendet werden dürfen.
Unzulässig ist Entsorgung von Chemikalien (z.B. Desinfektionsmittel, Haushaltsreiniger) über die Speischale.
Die Speischale (6) kann in einem Thermodesinfektor bis zu
95 °C gewaschen werden.
Vor dem Einstecken des Spülrohrs und des Wasserspenders, O-Ringe mit Vaseline fetten.
Cleaning personnel have to be
instructed not to use any common
household cleaning agents for cleaning the spittoon bowl.
It is prohibited to drain chemicals
(i.e., disinfectant agents, household
cleaners) via the spittoon bowl.
The spittoon bowl (6) can be cleaned in a thermodisinfector with a temperature up to 95° C.
Please lubricate O-rings with vaseline before inserting cup
filler and rinsing tube.
Important: Amalgam residues from the gold trap are not to
be poured into the waste water.
Wichtig: Amalgamreste aus dem Goldfänger nicht in die
Abwässer auskippen.
Spülglas
Täglich vor der ersten Behandlung den Spülglasfüller
dreimal betätigen, um abgestandenes Wasser ablaufen zu
lassen.
Spülgläser können im Autoklaven bei 105 °C und 0,25 bar
sterilisiert werden, wobei die Schocktemperatur von 60 °C
nicht überschritten werden darf.
Achtung!
Vor Demontage des Spülglasfüllers sowie des Spülrohres
unbedingt den Behandlungsplatz ausschalten. (Hauptschalter am Stuhlsockel.)
© Ritter Concept GmbH
J1170 V03.00.00EN&DE
Cup filler
Daily, before the first patient treatment, actuate the cup filler
three times to have fresh water.
The glass cups can be sterilized in an autoclave at 105° C
and 0.25 bar, however, a shock temperature of 60° C
should not be exceeded.
Attention!
Before taking off the cup filler and the rinsing tube switch
off the unit at the main switch in the patient`s chair pedestal.
Wartung / Maintenance
73
Täglich / Daily
Contact Lite, Contact Lite Comfort,
Contact World
Saugfilter
Separation filter (filter sieve)
Zu dieser Arbeit werden Schutzhandschuhe
empfohlen.
It is recommended to wear protective gloves.
Open cover (1) via the opening for the suction hose
(snap lock). Open the cover door (2) of the unit
column (magnetic lock).
Now remove the suction hose adapter (3) as
shown at the picture below.
Die Klappe (1) durch die Öffnung für den Spraysauger-Schlauch anfassen und herunterklappen
(Schnappverschluß). Öffnen Sie die Seitentür (2)
der Assistenzeinheit (Magnetverschluß). Nun kann
der Adapter für die Saugschläuche (3) wie bildlich
dargestellt geöffnet werden.
Lift out the aspiration filter (4) from the filter
container and rinse the filter or, if necessary,
replace the filter by a new one.
(order No. F000032358)
Entnehmen Sie den Filtereinsatz (4) aus dem
Saugschlauchadapter (3) und waschen Sie ihn
sorgfältig aus. Gegebenenfalls sollte der Filter
durch einen neuen ersetzt werden.
(Bestell-Nr. F000032358)
It is not permitted to operate the aspiration system
without separation filter.
The contents of the filter (amalgam particles)
are not to be poured into the waste water.
Die Sauganlage darf nicht ohne den Filter in
Betrieb gesetzt werden.
Den Inhalt (Amalgamreste) des Filters nicht in
das Abwasser einleiten.
1
2
3
74
Wartung / Maintenance
4
© Ritter Concept GmbH
J1170 V03.00.00EN&DE
Vierteljährlich/ Quarterly
Contact Lite, Contact Lite Comfort,
Contact World
Nur vom Servicetechniker durchzuführen!
To be performed by service technician only!
Achtung!
Vor allen Reparatur- und Wartungsarbeiten unbedingt
die Hauptwasserzuleitung schließen und vom Druck
entlasten!
Attention!
Before any repair and replacement, shut off water line
and make it non-pressurized!
• Sieb, grob (1), reinigen oder ersetzen (Bestell-Nr.
F001182067).
• Ersetzen des Hauptwasserfilters (2) an der Wassereingangsgruppe unter der Abdeckhaube des Assistenzelements
(Bestell-Nr.: F000032405).
• Siebeinsatz (3) im Absaugstutzen reinigen oder
ersetzen
(Bestell-Nr. 0000300003).
• Clean or replace coarse strainer (1)
(order No. F001182067).
• Replace main fine water filter (2) at the main water inlet
of the unit under the plastic cover.
(order No. F000032405).
• Clean or replace strainer (3) for suction connection
(order No. 0000300003).
1
2
3
© Ritter Concept GmbH
J1170 V03.00.00EN&DE
Wartung / Maintenance
75
Nach Bedarf
Contact Lite, Contact Lite Comfort,
Contact World
When necessary
Spritzenhandstück
Hand piece of the syringe
Je nach Kalkgehalt des Wassers wird sich die Düse in der
Kanüle früher oder später zusetzen. Es wird daher
empfohlen, die Düse von Zeit zu Zeit mit einer Reinigungsnadel (enthalten im Zubehörset) zu reinigen.
According to the lime concentration of the water, the
cannula will pollute sooner or later. Because of that it is
recommended to clean the cannula from time to time with a
cleaning needle (included in accessory set).
Die Kanüle (1) lässt sich durch leichten Druck von dem
The cannula (1) can be detached with light pressure from
Spritzenhandstück (2) entfernen.
the hand piece (2).
Wichtig: Bei nicht von “Ritter” hergestellten Spritzen
beachten Sie bitte die Gebrauchsanweisung des Herstellers !
Important: With not of “Ritter” produced syringes please
adhere to the manufacturers operating manual !
1
3
2
Abb.: Ritter-Spritze “Topflex”
Fig.: Ritter-syringe “Topflex”
Abb.:Reinigungsnadel
Fig.: Cleaning needle
Zahnsteinentfernungsgerät
Ultrasonic scaler
• Instrumenteneinsatz des Zahnsteinentferners im
Autoklaven bis zu 135 °C sterilisieren.
• Wechsel der Spitzen am Zahnsteinentferner.
• Sterilize the instrument insert of the ultrasonic scaler in
the autoclave with a temperature up to 135° C.
• Replace the scaler tip.
Wichtig: Bei nicht von “Ritter” hergestellten ZEG`s
beachten Sie bitte die Gebrauchsanweisungen des Herstellers !
Important: With not of “Ritter” produced scalers please
adhere to the manufacturers operating manual !
Abb.: / Fig.: Ritter-ZEG “Flamengo” / Ritter-scaler “Flamengo”
76
Wartung / Maintenance
© Ritter Concept GmbH
J1170 V03.00.00EN&DE
Nach Bedarf
Contact Lite, Contact Lite Comfort,
Contact World
When necessary
• Turbinenrückluft-Ölbehälter (1) leeren und Watte
ersetzen. Der Ölbehälter befindet sich an der Unterseite
des Arztelementes.
• Empty turbine exhaust air oil container (1) and replace
cotton wool. The container is located at the bottom side
of the dentist`s unit
1
1
1
Abb.:/Fig.: C-System
Abb.:/Fig.: S-System
Abb.:/Fig.: H-System
• Der bauseits vorgeschriebene Schutzfilter (1) muss
regelmäßig gewartet werden. Bitte beachten Sie die
Vorschriften des Herstellers.
• The specified obligatory protective filter (1) at site must
be subjected to regular maintenance. Please adhere to
the manufacturer's regulations.
Aqua Bottle System und Aqua Hygiene System
Aqua Bottle System und Aqua Hygiene System
• Nach einer mechanischen Beschädigung oder vor Ablauf
eines halben Jahres muss ein Wechsel der Flaschen
erfolgen !
• An exchange of the bottle must be performed after a
mechanical destruction of the bottle or after a half year
of operating time.
• Aqua Hygiene System:
Nach Ablauf eines Jahres sollte der Filter gewechselt
werden um die Betriebssicherheit der Wasserwege zu
gewährleisten.
• Aqua Hygiene System
After one year the filter should be replaced to guarantee
the operating safety of the waterways.
Wasserentkeimungssystem (WEK)
Water sterilisation system
Die Wartungsanweisung für das WEK entnehmen Sie bitte
der beiliegenden Gebrauchsanweisung des Herstellers.
The maintenance instructions of the water sterilisation
system can be found at the enclosed manual of the manufacturer.
© Ritter Concept GmbH
J1170 V03.00.00EN&DE
Wartung / Maintenance
77
Nach Bedarf
Contact Lite, Contact Lite Comfort,
Contact World
When necessary
Operationsleuchte StarLite
Operating light StarLite
Um die Lichtleistung auf dem hohen Niveau zu halten, von
Zeit zu Zeit den Splitterschutz (1) abnehmen und mit
Seifenlauge reinigen. Der Splitterschutz ist zwischen die
beiden Griffe geklemmt und kann unter leichtem beidseitigen Druck in Richtung Glühlampe nach vorn abgenommen werden. Mitunter kann es erforderlich sein zur
Demontage des Splitterschutzes die beiden Griffe (3) zu
entfernen.
In order to keep the light quality on a constant level, the
safety shield (1) must be cleaned frequently with warm
water and soap. The safety shield is wedged between the
two handles and can be removed by applying slight pressure to both ends towards the bulb. Sometimes it is necesarry to disassemble the handles (3) for detaching the safety
shield.
Hierfür lösen Sie einfach nur die beiden Knebelschrauben
(2) und nehmen die Griffe zur Seite ab.
Zur Desinfektion (Wischdesinfektion) der Griffe ist es ebenfalls ratsam, diese zu demontieren.
Therefore unlock the both capstan-head screws (2), lift and
remove handles.
For disinfection of the handles it`s also recommended to
disassemble the handles.
1
2
3
Wechseln der Halogenglühlampe
Replacement of the halogen bulb
Operationsleuchte vom Netz trennen, Halogenglühlampe
abkühlen lassen und Splitterschutz abnehmen. Den Blendschutz (4) nun eindrücken, nach links drehen (Bajonettverschluß) und abnehmen. Halogenlampe (6) aus der
Lampenfassung (5) herausnehmen. Beim Ersetzen der
Glühlampe darf der Glaskörper nicht mit den Fingern
berührt werden. Fingerabdrücke sofort mit einem alkoholgetränkten Baumwolltuch entfernen.
Cut-off main power supply. Let the halogen bulb cool down
and remove safety shield. Just push in, twist to the left and
take off deflector (4) (bayonet-type lock). Remove halogen
bulb (6) from socket (5). When replacing with a new
halogen bulb take care not to touch the glass. Any finger
prints are to be wiped off with an alcohol-moistened cloth.
5
6
4
78
Wartung / Maintenance
© Ritter Concept GmbH
J1170 V03.00.00EN&DE
Nach Bedarf
Contact Lite, Contact Lite Comfort,
Contact World
When necessary
1
2
Operationsleuchte StarLite U
Operating light StarLite U
Einjustieren des Lichtfeldes
Adjustment of the illuminated field
Das Lichtfeld der Operationsleuchte wurde bereits werksseitig einjustiert und muß daher nur bei dejustiertem Lichtfeld eingestellt werden.
The illuminated field has already been adjusted at the
factory. Therefore, only de-adjusted light fields have to be
adjusted again.
Achtung! Wir machen dringend darauf aufmerksam, daß
eine durch nachträgliche Justage zu klein eingestellte
Leuchtfeldfläche eine Erhöhung der Beleuchtungsstärke
und damit eine unzulässig erhöhte Wärmeabstrahlung zur
Folge hat.
Attention! We would like to emphasize that a reduction of
the illuminated field at a later date will increase the light
Zunächst auf eine mattschwarze Unterlage mit weißer
Kreide ein Rechteck 10 x 20 cm aufzeichnen.StarliteReflektor in 80 cm Abstand senkrecht über der Unterlage
einstellen und Lampe mit der niedrigsten Helligkeitsstufe
einschalten. Behandlungsraum verdunkeln. Mit Sechskantschraubendreher (Schlüsselgröße 3, im Zubehör mitgeliefert) durch Rechts- oder Linksdrehen der Schraube (1) das
Lichtfeld entsprechend dem Rechteck einjustieren, wobei
der Übergang zwischen hell und dunkel im Bereich des
aufgezeichneten Rechtecks sein soll.
reflector vertically at a distance of 80 cm over this rectangle
Einstellen der Gelenkbremsen
Adjustment of yoke pivot friction
Die Gelenkbremsen der Operationsleuchte sind bereits
werksseitig eingestellt und müssen nur nachgestellt
werden, wenn sich der Reflektor nur schwer bewegen lässt
oder die Position nicht mehr hält.
The adjustment of the yoke pivot friction has already been
made at the factory. It has to be readjusted only in case the
reflector is moving too hard or pivots too freely.
Zum Einstellen der Gelenkbremsen die beiden selbstsichernden Gewindestifte (2) im Lampenbügel verstellen,
dazu den im Zubehör mitgelieferten Sechskantschraubendreher (Schlüsselweite 2,5) verwenden.
Operationsleuchte “PlanetLite”
Zur Wartung und Pflege der Operationsleuchte
“PlanetLite” lesen Sie bitte in der beiliegenden
Gebrauchsanweisung der Operationsleuchte !
© Ritter Concept GmbH
J1170 V03.00.00EN&DE
intensity and results in a inadmissibly high temperature.
A black surface and some chalk are required. Draw a 10 x
20 cm rectangle on the surface. Position the Starlite
and select the lowest light intensity. Darken the room.
Adjust the illumination field to the rectangle by right or left
turn of screw (1) with hexagon wrench key (size 3, in the
accessories). The transition between light and dark must
be within the rectangle.
The friction can be reduced or increased by readjusting the
two self-securing threaded pins (2) in the yoke. Use
hexagon wrench key (size 2.5) in the accessories.
Operating light “PlanetLite”
For maintenance of the operating light
“PlanetLite” , please adhere to the operating manual
of the operating light
Wartung / Maintenance
79
Reinigung / Pflege
Contact Lite, Contact Lite Comfort,
Contact World
Reinigen der Geräte
Cleaning of the dental work place
Lackteile und Kunststoffteile mit Seifenlauge reinigen.
Clean painted and plastic parts with water and soap.
Zur Desinfektion und Reinigung verwenden Sie bitte die
marktüblichen Reiniger.
For disinfection and cleaning please only use agents usual
in the market.
Wir weisen dringend darauf hin, daß im Umgang mit Desinfektionsmitteln die Vorschriften der Hersteller des jeweils
verwendeten Präparates eingehalten werden müssen.
Ansonsten sind Verfärbungen an Verkleidungsteilen nicht
gänzlich auszuschließen.
We would like to emphasize that the manufacturer's operating manual must be strictly adhered to when handling
disinfectants. Otherwise, discoloring of covers cannot be
excluded entirely.
Bei Verwendung von Einmalhandschuhen aus Latex
können Verfärbungen an den Kunststoffteilen auftreten. Bei
Einsatz von Silikon-, Vinyl- oder Polyäthylenhandschuhen
wurden keine negativen Auswirkungen hinsichtlich Farbveränderungen festgestellt.
Metallputzmittel dürfen nicht verwendet werden.
Chemikalien, Blut- und Wasserspritzer bitte sofort
entfernen.
Reinigung der Polster und Abdeckung
When wearing disposable gloves made of latex, discoloring
of the plastic parts may occur. No such discoloring was
registered with disposable gloves made of silicone, vinyl or
polyethylene.
Do not use any metal polish.
Dry drops of water, blood or chemicals immediately.
Cleaning of upholstery and covers
Use only warm water and soap. Remove soap residues
with a damp sponge. Dry with a soft cloth.
Verwenden Sie bitte nur lauwarmes Wasser und Seife.
Seifenrückstände mit feuchtem Schwamm entfernen und
mit einem weichem, faserfreiem Tuch trockenreiben.
80
Wartung / Maintenance
© Ritter Concept GmbH
J1170 V03.00.00EN&DE
Contact Lite
Contact Lite Comfort
Contact World
Nur für den Servicetechniker ! / For service technicians only !
Zahnärztlicher Behandlungsplatz
- Montageanweisung -
Dental Work Place
-Installation instructions-
Ritter® Concept GmbH
Bahnhofstraße 65, D-08297 Zwönitz
Fon: +49 (0) 37754/13-0, Fax: +49 (0) 37754/13-290
e-mail: [email protected]
Internet: http://www.ritterconcept.com
Inhalt
Contact Lite, Contact Lite Comfort,
Contact World
Content
Inhalt
82
Content
82
Transport der Einheit
83
Transport of the unit
83
Installation der Patientenliege
84
Installation of the patient`s chair
84
Öffnen der Einheit
86
Opening the unit
86
82
Montage / Mounting
© Ritter Concept GmbH
J1170 V03.00.00EN&DE
Transport der Einheit
Transport of the unit
Contact Lite, Contact Lite Comfort,
Contact World
Transport der Einheit:
Transport of the unit column:
Um Transportschäden zu vermeiden, wird beim Tragen
dringend empfohlen, eine spezielle Tragevorrichtung zu
benutzen.
To avoid damgage during the transport, it is recommended
to use special carrying equipment.
Wie die Tragevorrichtung am Gerät montiert wird, zeigt das
Bild unten.
Zuvor die Abdeckhaube (1) abnehmen.
The picture below shows the mounting of the carrying
equipment.
At first detach the protective cover (1).
1
© Ritter Concept GmbH
J1170 V03.00.00EN&DE
Montage / Mounting
83
Installation der Patientenliege
Contact Lite, Contact Lite Comfort
Installation of the patient`s chair
Installation der Patientenliege
1)
Installation of the patient`s chair
1) Remove the upper and side parts of the
packing leaving the chair assembled on the
pallet (1) in order that it can be transported
more easily. Remove the protections of the
chair and all the fittings contained in the
packing itself.
1) Entfernen der oberen Verpackung
wobei die Patientenliege aufgrund des
einfacheren Transports noch auf der
Palette (1) verbleiben sollte. Des
Weiteren sollten alle Transportsicherungen und Befestigungen der oberen
Verpackung entfernt werden.
2) Nach dem Lösen der Muttern (2), mit
denen die Patientenliege auf der Palette
befestigt ist, kann die Liege an der dafür
vorbereiteten Stelle auf dem Fußboden
platziert werden.
2) Unscrew the nuts (2) fastening the
ground plate to the pallet and place the
chair at the point pre-arranged for the
installing.
1
2)
2
3) Zur horizontalen Ausrichtung der Patientenliege werden je nach Vorhandensein entweder die beiliegenden
Stahlscheiben (7) oder ein Blech in der
Form der Grundplatte der Liege
verwendet. Die Stahlscheiben müssen
After this, the ground plate of the chair (5)
can be mounted to the floor. Therefore,
according to the kind of material of wich
the floor is made (lumber, concrete), correlative dowels and screws (2x) with a
minimum diameter of 10mm are needed.
hierbei vor der Montage der Patientenliege unter den Niveauregulierungsschrauben (6) platziert werden.
Danach kann die Montage der Grundplatte der Patientenliege (5) auf dem
Fußboden erfolgen. Hierfür sind je nach
Ausführung des Fußbodens (Holz, Beton
etc.) entsprechende Dübel und
Schrauben (2x) mit einem Mindestdurchmesser von 10mm zu verwenden.
Vor der endgültigen Befestigung der
Grundplatte (5 ) die Patientenliege mit
Hilfe der Niveauregulierungsschrauben
(6) korrekt ausrichten.
Before the final fastening of the ground
plate (5) on the floor, if it is necessary the
level of the chair can be adjusted by using
the levelling screws (6).
3)
4) Die linke Armstütze wird mittels
zweier Abstandsscheiben (8) und zweier
Schrauben (10) mit Unterlegscheiben
(9) an dem dafür vorgesehenen Haltewinkel befestigt.
Achtung!
Aus Platzgründen ist die Armstütze im
verpackten Zustand der Patientenliege
nach unten montiert!
84
Montage / Mounting
If necessary, act on the rear screws (3) and
remove the guard (4), unscrewing the
screws and pulling it upwards.
3
Assembly of left armrest
4
Falls notwendig, kann nach dem Lösen
der hinteren Schrauben (3) die hintere
Abdeckung (4) nach oben abgenommen
werden.
Montage der linken Armstütze
3) Place either the supplied steel disks (7)
or the metal sheet in form of the ground
plate of the chair (not shown at the picture!)
under the levelling screws (6) of the ground
plate.
5
4)
6
7
4) Fit the armrest on the proper bracket
after having placed 2 wide washers (8).
Then tighten completely the screws (10)
interposing the washers (9).
Attention!
For packing reasons, the armrest is assembled downwards during the delivery of the
chair!
8
9
10
© Ritter Concept GmbH
J1170 V03.00.00EN&DE
Installation der Patientenliege
Contact Lite, Contact Lite Comfort
Installation of the patient`s chair
11
5) Nach der Installation und dem Test des
kompletten Arbeitsplatzes, kann die vordere
Abdeckung (11) der Patientenliege montiert und
mit der dafür vorgesehenen Schraube (12) befestigt werden.
12
5) After the installation and the test of the
complete unit, the front cover of the patient`s
chair (11) can be assembled by using the allocated screw (12).
Allgemeine Montage
General mounting
Die bauseitigen Installationen (Elektrik, Wasserzulauf, Wasserablauf, Luft usw.) müssen den jeweiligen örtlichen Vorschriften entsprechen.
Installations at site such as electricity, fresh
water, waste water, air etc. must correspond to
the local regulations.
Die Anschlußleitungen müssen bauseits gemäß
dem Installationsplan U 11049 verlegt sein.
The connection lines at site must be according
to installation plan U 11049.
Bauseits soll an gut zugänglicher Stelle ein Handabsperrventil und ein Rückspülschutzfilter (80–120
µm) in der Wasserzuleitung zur Versorgungseinheit vorgesehen werden.
Die gesamte Installation der Behandlungseinheit
muß gemäß der Norm DIN EN 1717 erfolgen.
At site there has to be an easy accessible
manual shut-off valve and back-flush protective filter (80 - 120 µm) for the water inlet pipe
to the supply unit. Furthermore the installation
must be according to the official standard
EN1717.
Bevor die Versorgungseinheit angeschlossen wird,
ist die bauseitige Wasserleitung durchzuspülen
und die Luftleitung durchzublasen, damit keine
Schmutzpartikel in das Gerät gelangen können.
Before connecting the supply unit, purge the
water line and the air line at site to prevent dirt
particles coming into the unit.
Elektrischer Anschluß:
Die Versorgungseinheit für den Behandlungsplatz
ist für den Festanschluß vorbereitet. Bei fest angeschlossenen Geräten darf der Neutralleiter nicht
abgesichert sein.
Wir danken für eine sorgfältige Montage.
© Ritter Concept GmbH
J1170 V03.00.00EN&DE
Electrical connection:
The supply unit for the dental work place is
prepared for fixed connection. For fixed
connection, the neutral wire is not to be fused.
We thank you for mounting the equipment
carefully.
Montage / Mounting
85
Öffnen der Gerätesäule
Contact Lite, Contact Lite Comfort,
Contact World
Opening of the unit column
Bei Aufstellung eines Behandlungsplatzes muß man die
Abdeckhaube (4), Seitenverkleidung (1) und ggf. Radiusverkleidung (6) entfernen, um die notwendigen Verbindungen (Strom, Luft, Wasser) zwischen Gerätesäule,
Instrumententisch und Patientenstuhl herzustellen.
In order to perform the connections (for electricity, air,
water) between unit column, instrument table and patient`s
chair, several covers have to be removed when installing
the dental work place. These are cover (4), lateral cover (1)
and (if necessary) radius cover (6).
Bei Abnahme der Seitenverkleidung (1) folgendes
beachten:
When removing lateral cover (1) please observe the following:
• Abdeckhaube (4) abnehmen.
• Take off cover (4)
• Loosen screw (2).
• Open unit column door (5). Loosen screw (8) and push
in holding angle (7).
• The lateral cover (1) can now be removed.
• Zylinderschraube (2) lösen.
• Seitentür (5) öffnen, Zylinderschraube (8) lockern und
den Arretierwinkel (7) hineinschieben.
The radius cover (6) can be removed after loosening the
two screws (9).
• Seitenverkleidung (1) kann jetzt ausgehängt werden.
Die Radiusverkleidung (6) kann man abnehmen, wenn
zuvor zwei Zylinderschrauben (9) gelockert werden.
4
5
1
2
7
8
6
9
6
86
Montage / Mounting
© Ritter Concept GmbH
J1178 V03.00.00
Contact Lite
Contact Lite Comfort
Contact World
Nur für den Servicetechniker ! / For service technicians only !
Technische Pläne
Technical Documents
Ritter® Concept GmbH
Bahnhofstraße 65, 08297 Zwönitz
Fon: +49(0)37754/13-280, Fax: +49(0)37754/13-290
e-mail: [email protected]
Internet: http://www.ritterconcept.com
Contact Lite, Contact Lite Comfort,
Contact World
88
© Ritter Concept GmbH
J1170 V03.00.00EN&DE
Inhalt
Content
Contact Lite, Contact Lite Comfort,
Contact World
Aufstellungspläne / Setting up drawings
Contact World S
Contact World H
Contact World C
U000012112
U000012113
U000012115
Contact Lite (Comfort)
Contact Lite (Comfort) S
Contact Lite (Comfort) H
Contact Lite (Comfort) C
U000012114
U000012117
U000012116
Installationspläne / Installation drawings
Contact World
U000011049
U000011050
Contact Lite (Comfort)
U000011057
Ventilblock / Valve block
Contact World/Lite
U000010053
Luft-Wasser-Pläne / Air-Water-Drawings
Standard-Version
WEK-System
ABS-System
AHS-System
U000010052
U000010055
U000010056
U000010057
Montageanweisung Zubehör / Mounting instructions accessories
Contact World S&H / Contact Lite S&H
© Ritter Concept GmbH
J1170 V03.00.00EN&DE
A1169
89