1
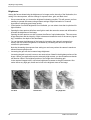
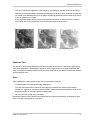
Basler ace INSTALLATION AND SETUP GUIDE FOR CAMERA LINK CAMERAS Document Number: AW000996 Version: 01 Language: 000 (English) Release Date: 6 June 2011 Contacting Basler Support Worldwide Europe: Basler AG An der Strusbek 60 - 62 22926 Ahrensburg Germany Tel.: +49-4102-463-515 Fax.: +49-4102-463-559 [email protected] Americas: Basler, Inc. 855 Springdale Drive, Suite 203 Exton, PA 19341 U.S.A. Tel.: +1-610-280-0171 Fax.: +1-610-280-7608 [email protected] Asia: Basler Asia Pte. Ltd 8 Boon Lay Way # 03 - 03 Tradehub 21 Singapore 609964 Tel.: +65-6425-0472 Fax.: +65-6425-0473 [email protected] www.baslerweb.com All material in this publication is subject to change without notice and is copyright Basler Vision Technologies. Table of Contents Table of Contents 1 Introduction . . . . . . . . . . . . . . . . . . . . . . . . . . . . . . . . . . . . . . . . . . . . . . . . . . . . . 1 1.1 General Preparations . . . . . . . . . . . . . . . . . . . . . . . . . . . . . . . . . . . . . . . . . . . . . . . . . . . 1 1.2 Frame Grabber Preparations . . . . . . . . . . . . . . . . . . . . . . . . . . . . . . . . . . . . . . . . . . . . . 2 1.2.1 Location of the Serial Port File . . . . . . . . . . . . . . . . . . . . . . . . . . . . . . . . . . . . . . 2 1.2.2 Frame Grabber "Camera Files" . . . . . . . . . . . . . . . . . . . . . . . . . . . . . . . . . . . . . 3 2 Hardware Installation . . . . . . . . . . . . . . . . . . . . . . . . . . . . . . . . . . . . . . . . . . . . . 5 2.1 Avoiding EMI and ESD Problems . . . . . . . . . . . . . . . . . . . . . . . . . . . . . . . . . . . . . . . . . . 5 2.2 Hardware Installation Procedure . . . . . . . . . . . . . . . . . . . . . . . . . . . . . . . . . . . . . . . . . . 2.2.1 Precautions . . . . . . . . . . . . . . . . . . . . . . . . . . . . . . . . . . . . . . . . . . . . . . . . . . . . 2.2.2 Hardware Installation Steps When Powering the Camera Via Power Over Camera Link (PoCL) . . . . . . . . . . . . . . . . . . . . . . . . . . . . . . . . 2.2.3 Hardware Installation Steps When Powering the Camera with a Separate Power Supply . . . . . . . . . . . . . . . . . . . . . . . . . . . . . . . . . . . . . . 6 6 7 8 3 Software Installation . . . . . . . . . . . . . . . . . . . . . . . . . . . . . . . . . . . . . . . . . . . . . 11 3.1 Installing Basler pylon. . . . . . . . . . . . . . . . . . . . . . . . . . . . . . . . . . . . . . . . . . . . . . . . . . 11 3.2 Configuring the Camera Link Serial Port . . . . . . . . . . . . . . . . . . . . . . . . . . . . . . . . . . . 14 4 Acquiring Your First Images . . . . . . . . . . . . . . . . . . . . . . . . . . . . . . . . . . . . . . 17 4.1 Getting Started with the pylon Viewer. . . . . . . . . . . . . . . . . . . . . . . . . . . . . . . . . . . . . . 19 5 Adjusting Image Quality. . . . . . . . . . . . . . . . . . . . . . . . . . . . . . . . . . . . . . . . . . 25 6 Next Steps . . . . . . . . . . . . . . . . . . . . . . . . . . . . . . . . . . . . . . . . . . . . . . . . . . . . . 29 Revision History . . . . . . . . . . . . . . . . . . . . . . . . . . . . . . . . . . . . . . . . . . . . . . . . . . . . . . . . . . . 31 Basler aceCamera Link i Table of Contents ii Basler aceCamera Link Introduction 1 Introduction The procedures in this guide assume that you want to get your camera operational and begin capturing images as quickly and as simply as possible. Accordingly, the procedures describes the installation for one camera in a test setup on a desk top. The procedures also assume that you will be using the Basler pylon software package to set the parameters on your camera and that you will only have Camera Link cameras connected to your computer. 1.1 General Preparations Make sure that the following items are available before starting installation: A Basler ace Camera Link camera. The appropriate Camera Link cables. If you will be supplying power to the camera via Power over Camera Link (PoCL), make sure that the cables are specified for use with PoCL. If you are not using PoCL to supply power to the camera, obtain a power supply for the camera. Make sure that the power supply meets all of the requirements listed in the camera user’s manual. An appropriate C-mount lens. If you already know which lens you will be using in your application, use this lens. Otherwise, we suggest that you use a zoom lens for your initial testing and setup. If you need assistance in determining the best lens for your application, contact Basler technical support. The contact numbers appear in the title pages of this guide. A PC equipped with an appropriate Camera Link frame grabber. The PC must be equipped with a 32 bit or 64 bit Windows XP/Vista/7 operating system or Linux (from Kernel 2.6). The frame grabber must support at least the base Camera Link configuration. It also should be able to handle a camera with an 82 MHz Camera Link pixel clock (see Section 1.2 on page 2). A copy of the Basler pylon driver and software package version 2.3 or higher. You can download the pylon package free of charge from the Basler website: www.baslerweb.com You should perform the hardware installation first and the software installation second. Basler ace Camera Link 1 Introduction 1.2 Frame Grabber Preparations The camera installation procedures assume that you have already installed a Camera Link frame grabber in your PC, that you have properly installed all software included with the frame grabber, and that you understand how your frame grabber operates. To correctly use a Camera Link camera, you must be thoroughly familiar with the operation of your frame grabber. All ace camera models have a default Camera Link clock speed of 82 MHz, however, not all frame grabbers are compatible with a clock speed this high. You should check the documentation for your frame grabber and make sure that it can operate at a 82 MHz pixel clock speed. If it cannot, the clock speed on the camera can be changed to 32.5 MHz, 48 MHz, or 65 MHz. For more information about changing the Camera Link pixel clock speed, see Section 4 on page 17. 1.2.1 Location of the Serial Port File All Camera Link compliant frame grabbers must be supplied with a dll file that describes the characteristics of a serial port that is built into the frame grabber. This serial port is used for communication between your PC and your camera via the Camera Link interface. The name of the file supplied by the frame grabber manufacturer will have the form clser***.dll where *** is determined by the manufacturer of the grabber and usually represents the manufacturer’s name. For example, a frame grabber made by the "Acme" company may supply a file called clseracme.dll. In order for PC-to-camera communication via the serial port to work properly, the clser***.dll must typically be present in the PC’s Windows system folder (usually C:\Windows\System32 on 32 bit systems or C:\Windows\SysWOW64 on 64 bit systems). Check your system folder and make sure that a copy of the clser***.dll file is present in the appropriate folder. If the file is not there, look for it in the software supplied by your frame grabber manufacturer and copy the file into the system folder. 2 Basler ace Camera Link Introduction 1.2.2 Frame Grabber "Camera Files" For your camera to operate properly with your frame grabber, you must install the correct frame grabber "camera file". In essence, the camera file informs the frame grabber about how the pixel information coming from the camera will be ordered and about the bit depth of the pixel data. Depending on the frame grabber supplier, there can be a separate camera file for each combination of camera model and pixel data format or a camera file may cover several different camera models. Typically, each frame grabber supplier has a different naming scheme for their camera files. For example, Matrox refers to the camera files for their grabbers as "Digital Configuration Files" or DCF files and National Instruments refers to theirs as "Interface Camera Descriptors" or ICD files. Camera files appropriate for the ace must be supplied by your frame grabber manufacturer. If you don’t have the camera files for your frame grabber, you can usually find them at the supplier’s web site. Once you have the camera files, there are three things you must keep in mind: The camera file you obtain and install must be appropriate for the pixel data format setting and Camera Link tap geometry setting that you will be using on your camera. Refer to the camera user’s manual for information about available pixel data formats and tap geometries. The camera file must be installed in the correct location on your PC. This location varies depending on your frame grabber supplier. Consult the documentation for your frame grabber to determine where the camera files should be installed. The camera must be set for your desired pixel data format and tap geometry. You can set the camera’s pixel data format and tap geometry using the pylon software you will be installing later in this guide. Basler ace Camera Link 3 Introduction 4 Basler ace Camera Link Hardware Installation 2 Hardware Installation 2.1 Avoiding EMI and ESD Problems The cameras are frequently installed in industrial environments. These environments often include devices that generate electromagnetic interference (EMI) and they are prone to electrostatic discharge (ESD). Excessive EMI and ESD can cause problems with your camera such as false triggering or can cause the camera to suddenly stop capturing images. EMI and ESD can also have a negative impact on the quality of the image data transmitted by the camera. To avoid problems with EMI and ESD, you should follow these general guidelines: Always use high quality shielded cables. The use of high quality cables is one of the best defenses against EMI and ESD. Try to use camera cables that are the correct length and try to run the camera cables and power cables parallel to each other. Avoid coiling camera cables. If the cables are too long, use a meandering path rather then coiling the cables. Avoid placing camera cables parallel to wires carrying high-current, switching voltages such as wires supplying stepper motors or electrical devices that employ switching technology. Placing camera cables near to these types of devices may cause problems with the camera. Attempt to connect all grounds to a single point, e.g., use a single power outlet for the entire system and connect all grounds to the single outlet. This will help to avoid large ground loops. (Large ground loops can be a primary cause of EMI problems.) Use a line filter on the main power supply. Install the camera and camera cables as far as possible from devices generating sparks. If necessary, use additional shielding. Decrease the risk of electrostatic discharge by taking the following measures: Use conductive materials at the point of installation (e.g., floor, workplace). Use suitable clothing (cotton) and shoes. Control the humidity in your environment. Low humidity can cause ESD problems. The Basler application note called Avoiding EMI and ESD in Basler Camera Installations provides much more detail about avoiding EMI and ESD. The application note can be downloaded from the Basler website: www.baslerweb.com Basler ace Camera Link 5 Hardware Installation 2.2 Hardware Installation Procedure 2.2.1 Precautions NOTICE If you are supplying power to the camera via Power over Camera Link (PoCL), you must use a PoCL compliant frame grabber and you must use Camera Link cables that are specifically designed for PoCL as specified in the Camera Link standard. Failure to use a PoCL compliant frame grabber or the correct cables can result in severe damage to the camera. If you are supplying power to the camera via the 4-pin M5 connector, the voltage of the power to the camera must be between +10.8 VDC and +13.2 VDC. 1. If the voltage is greater than +13.2 VDC, severe damage to the camera can result. 2. If the voltage is less than +10.8 VDC, the camera may operate erratically. Applying power with the wrong polarity can result in severe damage to the camera. NOTICE Making or breaking Camera Link connections incorrectly can severely damage the camera. 1. If you are supplying power to the camera via the Camera Link connection (PoCL), be sure that the power to the frame grabber is switched off before you connect or disconnect the Camera Link cables. 2. If you are supplying power to the camera via the 4-pin M5 connector, switch off the power supply for the camera before you connect or disconnect the Camera Link cables. NOTICE An incorrect plug can damage the 4-pin connector. The plug on the cable that you attach to the camera’s 4-pin connector must have 4 female pins. Using a plug designed for a smaller or a larger number of pins can damage the connector. NOTICE The lens thread length is limited. If a lens with a very long thread length is used, the camera can be damaged and will no longer operate properly. Refer to the Ace Camera Link User’s Manual for more details about the maximum lens thread length. 6 Basler ace Camera Link Hardware Installation 2.2.2 Hardware Installation Steps When Powering the Camera Via Power Over Camera Link (PoCL) To install the camera hardware, follow these steps: 1. Make sure the power to the host PC that contains your frame grabber is switched off. In the following step, you will be removing the plastic seal from the camera’s lens mount. To avoid collecting dust or dirt on the imaging sensor, be sure that the lens mount is pointing down when you remove the seal. 2. Remove the plastic seal from the lens mount on the camera and mount a lens on the camera. 3. Mount the camera in your test setup. 4. Plug one end of a Camera Link cable into the base SDR connector on the camera and the other end of the Camera Link cable into the base configuration connector on your frame grabber. 5. Plug one end of a Camera Link cable into the medium/full SDR connector on the camera and the other end of the Camera Link cable into the medium/full configuration connector on your frame grabber. (Note: if you will be operating you camera in a fashion that only requires the base Camera Link configuration, it is not necessary to attach a cable to the medium/full connector. For more information about when a camera will use the base configuration and when it will use the medium/full configuration, see the camera user’s manual.) Medium/Full SDR Connector Base SDR Connector 6. Use the locking screws built into the Camera Link cable connectors to securely fasten the connectors to the camera and to the frame grabber. If the connectors are loose, they WILL CAUSE PROBLEMS with your images and may cause electrical problems that can damage the camera. 7. Switch on the power to your host PC and let the PC boot up. Hardware installation is complete. Go to the software installation procedure that starts on page 11. Basler ace Camera Link 7 Hardware Installation 2.2.3 Hardware Installation Steps When Powering the Camera with a Separate Power Supply To install the camera hardware, follow these steps: 1. Make sure the power to the host PC that contains your frame grabber is switched off. In the following step, you will be removing the plastic seal from the camera’s lens mount. To avoid collecting dust or dirt on the imaging sensor, be sure that the lens mount is pointing down when you remove the seal. 2. Remove the plastic seal from the lens mount on the camera and mount a lens on the camera. 3. Mount the camera in your test setup. 4. If you obtained the power supply for your camera directly from Basler: a. Make sure that the power supply is not plugged into an AC outlet. (The power supply must not have AC power applied to it at this point.) b. Connect the plug on the power supply’s output cable to the 4-pin power connector on the camera. Make sure that the screw lock on the connector is securely fastened to the camera. c. Go on to step 5. If you are using a power supply that was not obtained from Basler: a. Refer to the Interface chapter in your camera user’s manual and locate the information regarding camera input power. Make sure that your power supply can meet the input power requirements. b. In the Interface chapter of the user’s manual, locate the information regarding the power connector on your camera. Make sure that the output cable on your power supply is correctly wired and that the cable is terminated with the proper type of plug. If the cable is miswired or the incorrect plug is used, severe damage to the camera can result. c. Make sure that the power supply is not connected to an AC outlet. (The power supply must not have AC power applied to it at this point.) d. Connect the plug on the power supply’s output cable to the 4-pin power connector on the camera. Make sure that the screw lock on the connector is securely fastened to the camera. e. Go on to step 5. 5. Plug one end of a Camera Link cable into the base SDR connector on the camera and the other end of the Camera Link cable into the base configuration connector on your frame grabber. 6. Plug one end of a Camera Link cable into the medium/full SDR connector on the camera and the other end of the Camera Link cable into the medium/full configuration connector on your frame grabber. (Note: if you will be operating you camera in a fashion that only requires the base Camera Link configuration, it is not necessary to attach a cable to the medium/full connector. For more information about when a camera will use the base configuration and when it will use the medium/ full configuration, see the camera user’s manual.) 8 Basler ace Camera Link Hardware Installation Medium/Full SDR Connector Base SDR Connector 7. Use the locking screws built into the Camera Link cable connectors to securely fasten the connectors to the camera and to the frame grabber. If the connectors are loose, they WILL CAUSE PROBLEMS with your images and may cause electrical problems that can damage the camera. 8. Switch on the power to your host PC and let the PC boot up. 9. Apply AC power to the camera power supply. Hardware installation is complete. Go to the software installation procedure that starts on the page 11. Basler ace Camera Link 9 Hardware Installation 10 Basler ace Camera Link Software Installation 3 Software Installation 3.1 Installing Basler pylon If you have not already done so, obtain a copy of the appropriate Basler pylon software package (see Section 1.1 on page 1.) Once you have downloaded the software package, you can install the software by doing the following: 1. Close all open Windows-based applications on your computer. We most strongly recommend that you close all open applications now. 2. Use Windows Explorer to navigate to the location where you downloaded the pylon software installation package. Double-click the downloaded file. The program will prepare to install and then a Welcome window will open. 3. Click the Next button in the Welcome window. A License Agreement window will open. 4. Accept the agreement and click the Next button. A Customer Information window will open. 5. Enter the appropriate information in the Customer Information window and click the Next button. A Destination Folder window will open. Basler ace Camera Link 11 Software Installation 6. In the Destination Folder window: a. Click the Next button if you want the software to be installed in the default location. b. Click the Change button if you want the software to be installed in a different location, navigate to the location where you want the software installed, and click the OK button. A Custom Setup window will open as shown below. 7. In the Custom Setup window: a. Deselect the features you do not want to install: To deselect an item, click the drop down menu that appears. button beside the item and select the red X from the In the example shown above, we have deselected the Pylon GigE Vision Drivers and the Pylon IEEE 1394 Drivers. If you will only be using Camera Link cameras with your PC, we strongly suggest that you do not install these two features. We have also deselected the Speed-O-Meter, the DirectShow Driver, and the Twain Driver. These features are not useful for Camera Link cameras. We have selected the SDK for C++ and deselected the SDKs for all of the other available programming languages. You should select the SDK for the programming language(s) you use and deselect those you do not use. (Features that you do not install now can easily be added at a later time by rerunning the installer.) b. Click the Next button. A Ready to Install the Program window will open. 8. Click the Install button in the Ready to Install the Program window. The program will be installed and when the installation process is complete, a Completed window will open. 12 Basler ace Camera Link Software Installation 9. Click the Finish button. An Installer Information window may open informing you about the need to restart the computer. If you want to restart the computer now, click the Yes button. If you want to restart the computer later, click the No button. If the Installer Information window does not open, there is no need to restart the computer. 10. Note that the installation program has added a shortcut to the desktop for the Pylon Viewer. 11. To see all of the installed software features: Click Start > All Programs > Basler Vision Technologies > Pylon x.x. Basler ace Camera Link 13 Software Installation 3.2 Configuring the Camera Link Serial Port To communicate with the ace camera, the pylon software uses a serial port that is built into the Camera Link interface on your frame grabber. Before pylon can communicate with the camera, you must configure the serial port. To configure the Camera Link serial port: 1. Click Start > All Programs > Basler Vision Technologies > Pylon x.x > Pylon CL Configuration Tool. A pylon CL Configurator window will open as shown below. A list of ports that are supported by the Camera Link interface will be displayed in the window. 2. Determine which port(s) pylon should use to look for devices. Usually, this will be the port that is built into the frame grabber. For the port on the frame grabber, you will typically see the name of the frame grabber manufacturer included as part of the port name. In the example shown below, we are using a frame grabber from the "Acme" company, and "Acme" is included as part of the port name. Check the port that you want to use as shown below. In the next step, you will be probing ports to see if ace cameras are attached. We suggest that you only probe the port(s) that you will be using to communicate with an ace camera. Probing a port that has a device other than an ace camera connected to it may change the configuration of the port and may cause the device to stop operating correctly. 14 Basler ace Camera Link Software Installation 3. In this step, you will probe the checked port(s) to see if an ace camera is connected to the port. When the port is probed, the port configuration will be changed as required and then the configurator will attempt to establish communication with any camera connected to the port. To probe the checked port(s), click the Probe Selected Ports button. The checked port(s) will be probed and if an ace camera is detected, it will be indicated in the tool as shown below. This indicates that serial communication is working correctly. (You can also probe an individual port by right clicking on a port ID in the list and clicking on Probe this port from the menu that appears.) 4. Click the Save button to save the port configuration and then click the Close button to close the tool. Basler ace Camera Link 15 Software Installation 16 Basler ace Camera Link Acquiring Your First Images 4 Acquiring Your First Images Before attempting to acquire images, make sure that the camera hardware and software have been installed as described earlier in this guide. To adjust your camera settings, we suggest that you use the Basler pylon Viewer. The pylon Viewer will give you the most complete access to your camera’s parameters. The steps below assume that you are using the pylon Viewer. The pylon Viewer cannot display the images acquired by Camera Link cameras (this is due to the proprietary methods used by frame grabbers to assemble the image data captured by the camera). To view the images you are acquiring, we strongly suggest that you use the software supplied with your frame grabber. Most frame grabbers include software for viewing acquired images. If you have not already done so, you should install this software now, and you should review the instructions for how to use it. The procedure below assumes that you are using your frame grabber’s software to view captured images. Note that when a new ace camera "wakes up", it will be loaded with a default set of parameters and will be set for "free run". This means that as soon as you apply power to the camera and the camera finishes booting up, it will begin acquiring images and transmitting pixel data. Check the Camera Link Clock Speed Compatibility All ace camera models have a default Camera Link pixel clock speed of 82 MHz. Not all frame grabbers are compatible with a clock speed this high. Check the documentation for your frame grabber and see whether it can handle a 82 MHz clock speed. On ace cameras, the clock speed can be changed to 32.5 MHz, 48 MHz, 65 MHz, or 82 MHz. If you need to set your camera for a lower clock speed so that it will be compatible with your frame grabber, do it now. The easiest way to change the clock speed is to use the pylon Viewer. To use the Viewer to change the clock speed: Follow steps 1 through 3 in the "Getting Started with the pylon Viewer" procedure that starts on page 19. Expand the Transport Layer parameters group that appears under the camera name. Look for the Pixel Clock parameter and set it to your desired value. Go on with the "To Get a First Look at the Acquired Images" section on the next page. Basler ace Camera Link 17 Acquiring Your First Images To Get a First Look at the Acquired Images 1. If you have not already done so, mount the camera in your test setup. The test setup should mimic as much as possible the way that you intend to use the camera in your system. 2. Make sure that your frame grabber has the proper "camera file" installed (see Section 1.2.2 on page 3). 3. Make sure that the object your are viewing is properly illuminated. If you need assistance in determining the optimum illumination for your application, contact Basler technical support. The contact numbers appear in the title pages of this manual. 4. Start the viewing software that is included with your frame grabber and make sure that you can view acquired images. You will probably need to focus the lens and you may need to adjust the lens aperture to obtain reasonable quality images at this point. On some systems, you will may be able to operate your frame grabber’s image viewing software and the Basler pylon viewer at the same time. If you see errors when you try to use both at the same time, then you will need to close the grabber’s image viewing software when you are using the pylon Viewer and close the pylon Viewer when you are using the grabber’s image viewing software. 18 Basler ace Camera Link Acquiring Your First Images 4.1 Getting Started with the pylon Viewer In this section, we introduce using the pylon viewer to adjust the camera’s parameters. One of the main objectives of this section is to familiarize you with how three particular settings, gain, black level, and exposure time, impact image quality. 1. To start the pylon Viewer, double-click on the Pylon Viewer icon on your desktop The pylon Viewer will open as shown below. Basler ace Camera Link 19 Acquiring Your First Images 2. Click on the ace camera’s name in the device tree to select the camera. A camera Feature pane will open in the pylon Viewer as shown below. Notice the user level selector drop down box that now appears in the lower left corner of the Feature pane. You can select the beginner, expert, or guru user level. For the beginner level, the Feature pane will display only the most basic camera settings. For the expert level, the Feature pane will display all of the most commonly used camera settings. And for the guru level, the Feature pane will display all camera settings including the most advanced settings. 20 Basler ace Camera Link Acquiring Your First Images 3. In the Feature pane of the pylon Viewer, click the + Sign next to your camera’s name. A list of parameter groups will appear as shown below. Basler ace Camera Link 21 Acquiring Your First Images 4. Click the + Sign next to the Analog Controls group to expand the group as shown below. 5. On the camera lens, open the lens aperture "halfway" by choosing an intermediate f-number. To get an initial feel for how to adjust your image quality, you will make adjustments to the camera lens and you will use the pylon Viewer to make adjustments to the camera’s gain, black level, and exposure time settings. You should also use your frame grabber software to capture images and to see what they look like. 6. In the Analog Controls group of the pylon Viewer: a. Change the Gain Raw parameter setting to its lowest allowed value. You can set the Gain Raw by using the slider that appears next to the value box, by using the up / down arrows that appear next to the value box, or by typing a new value into the box and pressing the Enter key. b. Change the Black Level Raw setting to a value between 16 and 32. 22 Basler ace Camera Link Acquiring Your First Images 7. Click the - Sign next to the Analog Controls group to collapse the group, and click the + Sign next to the Acquisition Controls group to expand the group. The controls for setting several camera parameters, including the Exposure Time Raw, will appear as shown below. a. Use the slider to set the Exposure Time Raw parameter to its lowest allowed value. 8. Use the frame grabber program to display your captured images. At this point, the images should be very dark or completely black. Gradually increase the Exposure Time Raw setting so that your image brightness is almost at the desired level. 9. Adjust the focus ring on the lens so that the image is properly focused. 10. If required, increase the Gain Raw setting slightly to improve the contrast. 11. Adjust the lens aperture to fine tune the overall image brightness. Also take note of the depth of focus in the acquired images. Adjusting the aperture affects the depth of field. 12. Adjust the Black Level Raw setting to ensure that detail in the dark parts of the acquired images is still visible. 13. Continue making adjustments to the Exposure Time, Gain Raw, and Black Level Raw until you are comfortable with these settings and you have improved your images as much as possible. Now that you have made the basic adjustments to your image quality, go on to the next chapter of this guide. The next chapter provides more detailed information about making adjustments to achieve the best image quality. Basler ace Camera Link 23 Acquiring Your First Images 24 Basler ace Camera Link Adjusting Image Quality 5 Adjusting Image Quality In the following descriptions, image quality is discussed in terms of focus, depth of field, brightness and contrast. You can adjust image quality with regard to these criteria by choosing appropriate settings. However, the "best" image quality will depend on the specific requirements of your application and therefore no generally applicable "best" settings can be recommended. The adjustments will involve the following: Adjusting the brightness of the illumination Adjusting the focus Setting the lens aperture Setting the gain Setting the black level Setting the exposure time We recommend carrying out all fine adjustments with the illumination that you will be using in your actual application. You should be aware that your choice of lens is a major factor in determining image quality. Using a high quality lens will give you much better images than using a low quality lens. If you need assistance in determining the best lens for your application, contact Basler technical support. The contact numbers appear in the title pages of this manual. Focus: You will obtain a focused image only if the lens is correctly mounted on the lens adapter of the camera and if the glass surfaces are clean. The object to be imaged must be within the range of focus of the lens. You can obtain a focused image by turning the focal ring on the lens. Depth of Field: If the objects you want to image are located at different distances from the camera, you must consider depth of field. (Depth of field is usually defined as the distance between the nearest and farthest objects in a scene that appear acceptably sharp in an image.) The depth of field must be sufficiently deep to allow all objects in the scene to appear focused in the image. You can change the depth of field by turning the aperture ring on the lens. Closing the lens aperture (turning the aperture ring to higher f-numbers) increases the depth of field and vice versa. Note that closing the aperture also decreases the amount of light reaching the camera’s sensor and therefore results in a darker image. Basler ace Camera Link 25 Adjusting Image Quality Brightness: Among the factors determining the brightness of an image are the intensity of the illumination, the setting of the lens aperture, and the settings for exposure time, gain, and black level. We recommend that you choose the brightest illumination possible. This will prevent you from needing to operate the camera using extreme settings. Bright illumination is of central importance to achieving good image quality. If illumination of sufficient brightness is not available, you can select a lens that is optimized for light utilization. Opening the lens aperture will allow more light to reach the camera’s sensor and will therefore increase the brightness of the image. Opening the lens aperture can also increase the effects of optical aberrations. This can cause image distortions and the intensity of light to decrease towards the ends of the sensor (vignetting). In addition, the depth of field decreases. You can increase the brightness of the image by increasing the camera’s exposure time setting. With this method, brightness is increased by increasing the amount of photons collected for pixel readout. Note that increasing the exposure time setting too much may reduce the camera’s maximum allowed frame acquisition rate. Increasing the gain will also increase image brightness. Increasing the gain too much, however, can cause a loss of detail in the brightest portions of the image. Unless your application requires extremely high contrast, you should make sure that detail remains visible in the brightest portions of the image when increasing gain. In the captured images below, notice how brightness increases as the gain increases. Also notice that at very high gain, detail can be lost in the brightest areas of the image. Low Gain 26 Normal Gain Very High Gain Basler ace Camera Link Adjusting Image Quality You can increase the brightness of the image by increasing the camera’s black level setting. Normally, you should increase the black level setting only as much as is necessary to make detail visible in the darkest portions of an image. Increasing the black level too much may cause a loss of contrast in the image. In the captured images below, notice how brightness increases as the black level increases. Also notice that at very high black levels, the overall image loses contrast. Low Black Level Normal Black Level Very High Black Level Exposure Time: The exposure time setting determines the time interval that the sensor is exposed to light during each frame acquisition. Increasing the exposure time is a good way to increase brightness. But keep in mind that increasing exposure time too much may reduce the camera’s maximum allowed frame acquisition rate. Gain: Gain amplifies the values output by the pixels in the camera’s sensor. Increasing gain will increase the image brightness. You can also increase the contrast in the image by increasing the camera’s gain setting. Unless your application requires extreme contrast, make sure that detail remains visible in the brightest portions of the image when increasing gain. Set the gain only as high as is necessary. Because the gain function amplifies the signal and the noise proportionately, increasing the gain does not improve the signal-to-noise ratio. Basler ace Camera Link 27 Adjusting Image Quality Contrast: Strong contrast in an image is obtained when objects of different brightnesses are represented by very different grey values. For most applications, optimum contrast is achieved when the image displays a wide range of gray values with fine detail remaining visible in the darkest and brightest parts of an image. Some applications, however, may require extreme contrast. You can increase the contrast in the image by increasing the camera’s gain setting. High black level settings will prevent high contrast. Closing the lens aperture not only decreases image brightness but also increases contrast towards the edges of an image. If you must use a low level of illumination and this results in dark images, you may notice the blurring influence of noise. If you operate the camera near the high end of its specified temperature range, the effects may be particularly noticeable. You can increase contrast by lowering the operating temperature of the camera. Since increasing the gain will increase both signal and noise in equal proportion, increasing the gain does not improve the signal-to-noise ratio. 28 Basler ace Camera Link Next Steps 6 Next Steps We assume that you have succeeded in acquiring images and setting the camera’s basic parameters using the pylon Viewer and that you were able to optimize the image quality. To meet the requirements of your application, you will likely need to change additional camera settings and to modify earlier camera settings. Refer to the Features chapter in your camera user’s manual for details about additional camera settings. Contact Basler technical support if you need more assistance. The contact numbers appear in the title pages of this manual. If you have not already done so, implement the typical conditions of operation as required by your application before proceeding with the next steps. In particular, choose the lens and the illumination required by your application. Before making the additional camera settings, you must know the requirements for your application regarding depth of field, image acquisition rate, size of the AOI, and contrast. And you must know what the priority of the requirements are since some of the settings depend on each other or have opposite effects. Your next steps will involve some or all of the following: Selecting the pixel data format. Selecting a triggering scheme and an exposure control mode. Fine tuning the exposure time. Defining an AOI. Enabling and parameterizing other features available on your specific camera model. Configuring the camera from within your application program using the pylon API or using direct register access. Basler ace Camera Link 29 Next Steps 30 Basler ace Camera Link Revision History Revision History Doc. ID Number Date Changes AW00099601000 6 Jun 2011 Initial release of this document. Basler ace Camera Link 31 Revision History 32 Basler ace Camera Link