1
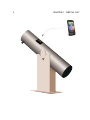
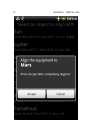
2
SkEye User Manual
A How-to guide and reference for SkEye
Harshad R J
ii
Contents
Preface
v
1 Introduction
1.1 A note about Accuracy . . . . . . . . . . . . . . . . . . . . .
1.2 Operational Modes . . . . . . . . . . . . . . . . . . . . . . .
1
1
2
2 Magnetometer Calibration
2.1 Calibration procedure . . . . . . . . . . . . . . . . . . . . . .
2.2 Substances that cause interference . . . . . . . . . . . . . . .
3
3
4
3 Virtual DSC
3.1 Advantages over a real DSC . . .
3.2 Disadvantage . . . . . . . . . . .
3.3 Tutorial for Virtual DSC . . . . .
3.3.1 Prepare your phone . . . .
3.3.2 Attach to telescope . . . .
3.3.3 First Alignment . . . . . .
3.3.4 Adding more Alignments .
4 User Interface
4.1 Features . . . . . . . . . . .
4.2 Color themes . . . . . . . .
4.3 Catalog filters . . . . . . . .
4.4 Double Tap to launch Menu .
4.5 Principal Orientation . . . .
.
.
.
.
.
iii
.
.
.
.
.
.
.
.
.
.
.
.
.
.
.
.
.
.
.
.
.
.
.
.
.
.
.
.
.
.
.
.
.
.
.
.
.
.
.
.
.
.
.
.
.
.
.
.
.
.
.
.
.
.
.
.
.
.
.
.
.
.
.
.
.
.
.
.
.
.
.
.
.
.
.
.
.
.
.
.
.
.
.
.
.
.
.
.
.
.
.
.
.
.
.
.
.
.
.
.
.
.
.
.
.
.
.
.
.
.
.
.
.
.
.
.
.
.
.
.
.
.
.
.
.
.
.
.
.
.
.
.
.
.
.
.
.
.
.
.
.
.
.
.
.
.
.
.
.
.
.
.
.
.
.
.
.
.
.
.
.
.
.
.
.
.
.
.
.
.
.
.
.
.
.
.
.
.
.
.
.
.
.
.
.
5
5
5
6
6
7
9
11
.
.
.
.
.
15
15
15
16
16
16
CONTENTS
iv
4.6
4.7
4.8
4.9
4.10
FOV angles . . . .
Sensitivity settings
Search . . . . . . .
Manual mode . . .
Misc Features . . .
.
.
.
.
.
.
.
.
.
.
.
.
.
.
.
.
.
.
.
.
.
.
.
.
.
.
.
.
.
.
.
.
.
.
.
.
.
.
.
.
.
.
.
.
.
.
.
.
.
.
.
.
.
.
.
.
.
.
.
.
.
.
.
.
.
.
.
.
.
.
.
.
.
.
.
.
.
.
.
.
.
.
.
.
.
.
.
.
.
.
.
.
.
.
.
.
.
.
.
.
.
.
.
.
.
.
.
.
.
.
.
.
.
.
.
16
16
17
17
17
5 Appendix A - Managing system time
19
6 Appendix B - Adjusting Sensitivity
21
Preface
This document was written for SkEye version 6.6 in the summer of 2014. Get
the latest updates from SkEye website.
v
vi
PREFACE
Chapter 1
Introduction
SkEye is a planetarium for Android devices (phones and tablets). It can
orient its view using sensors available on the device.
The unique feature in SkEye is that you can use your Android device as
a PushTo guide for telescopes, binoculars and other observing equipment.
1.1 A note about Accuracy
The accuracy of SkEye is affected by a number of factors, both internal and
external.
The external factors have the maximum effect and include the following:
• Accuracy of the phone’s sensors and environmental effects such as surrounding magnetic fields.
The effect of external factors can be mitigated to a large extent by multiple
alignments.
Internally, SkEye is yet to account for the following (tiny) effects:
• Atmospheric refraction (which is most evident near the horizon)
• Proper motions of stars.
1
CHAPTER 1. INTRODUCTION
2
1.2 Operational Modes
• Hand-held mode
Users of Google SkyMap would be familiar with this mode. It lets you
quickly identify objects visible in the sky as well as search for them.
• Virtual-DSC
This is the most innovative feature in SkEye. It is the cheaper, convenient
(and possibly less accurate) alternative to encoder based DSCs.
After attaching your phone to the telescope OTA, you can use it as a
finder-scope and a PushTo guide, without any additional equipment.
Please make sure you read the detailed tutorial below before using it.
• Bluetooth DSC
Support for encoder based Digital Setting Circles connected over Bluetooth is in the works. (Checkout the DSC test app in the Play Store).
Chapter 2
Magnetometer Calibration
IMPORTANT: Please read this section before using SkEye. It is a simple procedure but a crucial one for the proper operation of SkEye on some
phones.
Android phones are equipped with a device called a Magnetometer. This device
helps to determine the orientation of the phone relative to the Earth’s magnetic
field. (Similar to a compass needle but in three dimensions).
The magnetometer on some phones requires to be calibrated. This needs to
be done every time you use an app that needs the magnetometer!
2.1 Calibration procedure
The procedure is very simple and takes just a few seconds. After starting the
application, wave your arm (holding the phone) in a figure-8 motion. You may
have to repeat this a couple of times.
This is best illustrated with a video. (If you can’t click the link, try searching YouTube for best compass calibration method).
After doing so, check whether North as shown in the app, is approximately
where you think it is. (If the sensors are not calibrated, you will see really wild
errors that are easy to notice).
3
CHAPTER 2. MAGNETOMETER CALIBRATION
4
2.2 Substances that cause interference
Since the operation of SkEye is affected by interference from metals, it is
worthwhile to understand this phenomenon in brief.
Every substance interacts with ambient magnetic fields (such as the Earth’s
magnetic field) in a unique way. Their level of interaction is measured by the
relative magnetic permeability of the substance. Higher the value, the more the
substance distorts ambient magnetic fields. The relative permeability of some
materials can be found in this wikipedia article.
Among the commonly found materials the following are cause for concern
to us:
• Iron
• Nickel
• Cobalt
• Alloys of the above. For example, Steel.
All other materials don’t pose a problem. Examples are:
• Aluminum
• Copper and it’s alloys like Brass
• Wood, Plastic and most of the other commonly found substances
The latest versions of SkEye show a warning if abnormal magnetic fields
are detected. This warning may only be shown in certain directions. When you
see this warning, you should consider shifting the device to a different location.
Chapter 3
Virtual DSC
DSC stands for Digital Setting Circles. These are typically implemented using
optical or magnetic encoders in the mount. It is quite accurate (typically within
5 arc-minutes on an amateur setup), but it is costly and cumbersome to install.
In contrast, the Virtual DSC mode in SkEye uses only the sensors on your
device to guide the planetarium view.
3.1 Advantages over a real DSC
• Cheaper (if you already own an Android device)
• Isn’t affected by mounting errors.
• Quicker to install and get started
• Less messy (no wires, batteries, etc)
3.2 Disadvantage
Possibly less accurate than a real DSC. The source of the inaccuracy is in the
magnetic field measurement.
Magnetometers sense the direction of Earth’s magnetic field to provide orientation. There are various errors introduced at this stage:
5
CHAPTER 3. VIRTUAL DSC
6
• The Earth’s magnetic field itself is not consistent. It varies from place to
place, and time to time, quite unpredictably. The major components of
the variation are more predictable and taken care of but smaller components aren’t.
• There is often some magnetic interference from the environment, such as
large metal structures, electric circuits, underground metal deposits, and
so on.
• Some phones induce a magnetic field around themselves, affecting their
own sensors.
In-spite of all these caveats, I have found this method to be accurate to
about 15 arc-minutes with single point alignment. With two or three alignment
points, accuracy can be improved further to about 8 arc-minutes. Complete
accuracy is possible under ideal conditions.
3.3 Tutorial for Virtual DSC
Since SkEye is the only application (that I know of) with a Virtual DSC feature,
I am writing a detailed step-by-step guide for using it. It’s actually quite simple
once you get familiar with it.
3.3.1 Prepare your phone
• Make sure the phone’s system time is accurate to within a minute (if not
seconds). You can use, for example, the Navy Time application to verify
system time accuracy. (See Appendix A for more details)
• Start the SkEye application.
• You will be prompted for your location when you first start the app. Specify your precise location for maximum accuracy. I recommend you use
GPS to specify the location. The locations you specify are remembered
so you can use them quickly later.
3.3. TUTORIAL FOR VIRTUAL DSC
7
If you specify the location manually, note that the input is in decimal
degrees. Hence, a latitude of 15°30’ should be entered as 15.5 and not
15.3! You can use Google Maps to find the co-ordinates of your location.
• Important! Calibrate the magnetometer as described in the previous section.
Now attach the phone to the OTA, as described below.
3.3.2 Attach to telescope
• You need to attach your phone to the telescope’s Optical Tube Assembly
(OTA), such that the phone moves whenever the OTA moves. See figure
below for an example.
8
CHAPTER 3. VIRTUAL DSC
3.3. TUTORIAL FOR VIRTUAL DSC
9
• You can use a phone jacket (or case, holster, etc) and attach the jacket
permanently to the OTA. That way, you can plug-in the phone quickly
when needed. To attach the jacket to the OTA you can use, for example,
Velcro or two sided tape.
Checkout several ideas contributed by users on my website.
• The direction in which you attach doesn’t matter. The type of mount
doesn’t matter either. Attach in such a way that the display is conveniently visible and operable.
• You will get best results if your telescope doesn’t have steel1 tubes or
mounts, since they cause magnetic interference. If they do, try to attach
the phone farthest from the metallic content.
• Try to observe from a location where there is little magnetic interference,
for example, keep away from electric poles and wires, large buildings or
steel railings.
3.3.3 First Alignment
Although, in theory, you need just one alignment, you would be making about
three alignments in practice. Choose a bright and well-known star/planet for
your first alignment.
Click Menu button Indirect Mode Add new Alignment. You will see a list
of objects sorted by their ease of viewing. SkEye prioritizes objects by their
current altitude and visual magnitude.
Chose one of these objects and a dialog will show up asking for confirmation:
1
Not all metals are problematic. Read the note on substances that cause interference.
10
CHAPTER 3. VIRTUAL DSC
3.3. TUTORIAL FOR VIRTUAL DSC
11
Now move your telescope so that this object is centered in the field-of-view.
Only then, press Accept. Keep the telescope stationary for a few seconds, after
clicking Accept. The alignment is done!
To help you to center the star in the field-of-view you can use an illuminated
reticule eyepiece. If you don’t have that you can use a high-power eyepiece and
defocus it so that the star appears like a blob. Centering a large blob of light is
easier than centering a pin-point source of light.
In the alignment screen click Return to get back to the planetarium view.
The object you selected in the previous step should now appear in the center of
the cross-hairs.
If you move the telescope now, you will see the display changing in tandem!
You can now try finding a few objects or do more alignments as described in
the next section.
3.3.4 Adding more Alignments
You can add more alignments by repeating the procedure above, but SkEye\
offers a quicker way to do this: Insta-Align. Here’s how you use it.
Slew your scope to find another bright object. If there is a difference between the scope’s view and the planetarium’s view, you can simply drag the
view until it is centered in the cross-hairs. The words Insta-Align will be shown
along with a couple of buttons as in the figure below:
12
CHAPTER 3. VIRTUAL DSC
Once the object is centered, press the + button and you are done!
As a further shortcut, SkEye will show a button to align to the nearest
object. For example the Align to Pollux button in the figure. This is handy and
more precise than relying on your eyes to match the cross-hairs.
To cancel the alignment procedure you can click the red X button, or simply
move the telescope away.
You can add as many alignment points as necessary. SkEye uses a weighted
average of the alignment points, with the alignments nearest to current location
having more weight.
TIP: Here is a typical observation session: Let’s say I have made the first
alignment to Sirius. Now, I try to find M33. But first, I will check the alignment
in this direction. I see that there is a nearby star called Mirach. I get it into the
FOV, and observe that Mirach is slightly off-center on the phone. I Insta-Align
to it. When I push to M33 using SkEye I see it right in the center of the FOV.
3.3. TUTORIAL FOR VIRTUAL DSC
13
I can now find several objects in this part of the sky without checks or
alignments. When I move to another part of the sky, it is time to check the
alignment with a nearby bright star and Insta-align if needed.
14
CHAPTER 3. VIRTUAL DSC
Chapter 4
User Interface
Here is a walk-through of the main user interface of SkEye.
4.1 Features
There are many features packed inside SkEye, some of which may not be immediately obvious. I recommend reading or at least skimming through this
section once.
4.2 Color themes
The night color theme is designed to preserve dark adaptation. Accessed via
Menu Change Color Theme
There are actually three color themes to chose from:
• Day – No color filtering, display brightness is kept normal.
• Dusk – Green and Blue colors are filtered by 50%, display brightness is
kept normal, Android navigation buttons are dimmed.
• Night – Only Red color shows through, display brightness is kept at minimum, Android navigation buttons are dimmed.
15
16
CHAPTER 4. USER INTERFACE
4.3 Catalog filters
Only available in SkEye Pro. Accessed via Menu Ý Catalogs.
With filters, you can choose which catalog objects are shown in the display based on their surface brightness and size. In the case of Open Clusters,
magnitude is used instead of surface brightness.
4.4 Double Tap to launch Menu
Android has a dedicated menu button but on most phones this button requires
a hard-press, which might disturb the telescope’s or phone’s alignment. As an
alternative you can double tap anywhere on the screen to bring up the menu.
(Tapping requires less force than pressing a hardware button).
4.5 Principal Orientation
The default orientation of SkEye’s main screen is portrait. But if you prefer
landscape, you can change it via the Settings screen. There is also an Auto
mode which changes the orientation dynamically to match the phone’s orientation, but beware, there is a noticeable pause while switching orientations.
4.6 FOV angles
The FOV angles in the horizontal and vertical directions are shown in the HUD
and updated when you zoom in or zoom out, or change the principal orientation.
4.7 Sensitivity settings
Each Android phone model has slightly different sensors (types and sensitivity). If you find the display is too jerky or too laggy, SkEye lets you alter the
sensitivity of each sensor. Seen Appendix B for more details.
4.8. SEARCH
17
4.8 Search
You can search for any of the objects in SkEye’s database. Click the search
button or invoke via Menu Search.
After selecting the object to search, an arrow is shown to guide you the
target. Also shown are the Alt-Azm and RA-Dec co-ordinates and the delta
angle between the current position and the target.
4.9 Manual mode
When you drag your finger on the main display, SkEye switches to manual
mode. You can move the view around by single touch gestures. You can even
zoom and rotate the display with multi-touch gestures. Click the Back button
to return to normal mode. Or click the Align button to align to the highlighted
object (if you are using it with a telescope).
4.10 Misc Features
• Precession of the equator calculated to arc-minute accuracy.
• Alt-azimuth and Equatorial grids.
• Real-time Alt/Azimuth, RA/HA/Dec coordinates
• Complete Messier catalog
• NGC Catalog
• The Free version has a subset of NGC (the most prominent 200 NGCs).
• The Pro version has the complete NGC and IC catalogs.
• Intelligent positioning of labels that avoids overlap.
• Pinch to zoom in and zoom out, twist to rotate the view.
CHAPTER 4. USER INTERFACE
18
• Major star names
• Constellation lines and labels
• Multiple locations that are saved between sessions
Chapter 5
Appendix A - Managing
system time
The accuracy of phone’s system time is important for all planetarium apps.
It is especially important in the case of SkEye since it uses real time object
locations for alignment. If the time is wrong by a few minutes the errors add
up, sometimes up to several degrees of bearing.
Normally, Android doesn’t let applications change the system time. There
are basically two choices to the user for setting the system time:
• Automatically set to network provided time (the mobile carrier network,
not the Internet).
The problem with this is that the network’s time may not be accurate or
may not even exist in certain parts of the globe.
• Set to the time manually.
The problem with this is that the timer may drift over a period of time.
So you will have to periodically check and reset the clock.
To check how accurate your system time is you can use a GPS app or the
Clock Sync app (former uses GPS time while the other uses the Internet to
access the atomic time).
19
20
CHAPTER 5. APPENDIX A - MANAGING SYSTEM TIME
I recommend the Clock Sync app. If you have a rooted phone, this app
can automatically sync the system time to the atomic time. If you don’t have
a rooted phone, the app pops out notifications when the phone’s time drifts too
far from the atomic time.
Chapter 6
Appendix B - Adjusting
Sensitivity
How to adjust the sensitivity of the display.
First, start SkEye and calibrate the sensors with a figure 8 motion. Now
observe the display for a few seconds.
In case of too much jitter, keep the phone on a level surface.
• If the jitter is such that the display rotates around the Nadir, then you
need to reduce sensitivity of the magnetometer.
• If the jitter seems random, then you need to reduce the sensitivity of the
accelerometer.
On the other hand, if there is too much lag, determine the direction of the
lag.
• If there is a lag when moving along the horizon (azimuth change), you
need to increase the sensitivity of the magnetometer.
• If there is a lag when going from horizon to Nadir (altitude change), then
you need to increase the sensitivity of the accelerometer.
21