1
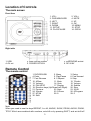
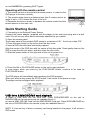
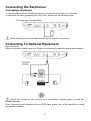
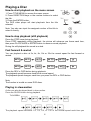
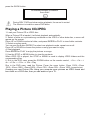
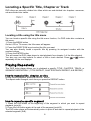
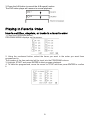
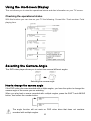
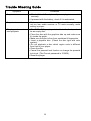
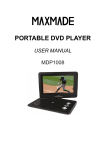
PORTABLE DVD PLAYER
USER MANUAL
MDP701
Table of Contents
Safety Precautions ................................................................................................................2
Introduction ...........................................................................................................................2
Location of Controls ..............................................................................................................3
Remote Control .....................................................................................................................3
Quick Starting Guide .............................................................................................................4
Connecting the Earphones....................................................................................................5
Connecting To Optional Equipment ......................................................................................5
Playing a Disc .......................................................................................................................6
Playing a Picture CD/JPEG...................................................................................................7
Locating a Specific Title, Chapter or Track ...........................................................................8
Playing Repeatedly ...............................................................................................................8
Playing In Favorite Order ......................................................................................................9
Using the On-Screen Display.............................................................................................. 10
Selecting the Camera Angle ............................................................................................... 10
Setting the Parental Lock .................................................................................................... 11
Customising the Function Settings...................................................................................... 12
Specifications ...................................................................................................................... 13
Trouble Shooting Guide ...................................................................................................... 14
This device complies with Part 15 of the FCC Rules.
Operation is subject to the following two conditions:
(1) this device may not cause harmful interference, and
(2) this device must accept any interference received, including interference that may
cause undesired operation.
1
Safety Precautions
The lightning flash with an arrowhead symbol within an equilateral triangle is
intended to alert the user of the presence of uninsulated "dangerous voltage"
within the product's enclosure that may be of sufficient magnitude to constitute a
risk of electric shock to persons.
Warning: Risk of electric shock, do not open the battery cover, the back battery cover for
your safety.
The exclamation point within an equilateral triangle is intended to alert the user
of the presence of important operating and maintenance (servicing) instructions
in the literature accompanying the appliance.
Operation is subject to the following two conditions:
(1) This device may not cause harmful interference,
(2) This device must accept any interference received.
Including interference that may cause undesired operation.
Warning: Do not expose this appliance to rain or moisture, due to the high risk of fire or
electric shock. And do not open the cabinet for dangerous high voltages are present inside
the enclosure. Only qualified service personnel should attempt this.
Caution: During playback, the disc spins at high speed, so do not lift or move the player,
doing so may damage the disc.
CAUTION: This Digital Video Disc Player employs a Laser System. There are no user
serviceable parts therefore refer all servicing to qualified personnel. Visible laser radiation
when open and interlocks defeated. Use of controls or adjustments or performance of
procedures other than those specified herein may result in hazardous radiation exposure.
DO NOT STARE INTO BEAM.
Introduction
This new portable DVD player is designed for enjoyment of all forms of
disc media. And it has USB and MMC/SD/MS port automatic
identification, compatible with various formats of AV files. It's slim shape
allows it to be easily carried.
This player incorporates the latest digital audio/video (AV) technologies
to give you the ultimate in listening and viewing pleasure.
This new player also supports CD, and JPEG. This player also has
several unique features, large LCD screen, multi-angle and
multi-language, Parental Control (to prevent children from viewing
inappropriate content), and Kodak Picture CD compatibility.
2
Location of Controls
The main screen
Front face
1. VOL3. DVD/USB/CARD
5. LEFT
7. RIGHT
9. DOWN
11. SETUP
13. PLAY/PAUSE
2. VOL+
4. MUTE
6. UP
8. OK
10. MENU
12. STOP
14. OPEN
Right side
1. USB
4. AV out
2. MMC/SD/MS socket
5. POWER OFF/ON
3. EARPHONE socket
6. DC IN 9V
Remote Control
The remote control
1. DVD/SD/USB
2. Menu
4. Enter
5. Play/Pause
7. Fast Reverse
8. 1/Repeat
10. 4/Slow
11. Mute
13. Volume+
14. Goto
16. PAL/NTSC
17. Display
19. Direction keys (Up/Down/Left/ Right)
21. Previous
22. Next
24. 3/Angle
25. 5/Zoom
27. 8/Title
28. 9
30. Shift
3. Setup
6. Fast forward
9. Step
12. 7/Audio
15. Volume18. Subtitle
20. Stop
23. 2/A-B
26. 6/Program
29. 0
Note:
When you need to use the keys REPEAT, A<->B, ANGLE, SLOW, PRGM, AUDIO, ZOOM,
TITLE. Which are combined with numbers, set shift on by pressing SHIFT, and set shift off
3
to use NUMBERS by pressing SHIFT again.
Operating with the remote control
1. The remote control must point at the remote sensor, in order for the
DVD player to function correctly.
2. The remote works best at a distance less than 5 meters and at an
angle of up to +/-30° toward the front of the unit.
3. Obstacles should not remain in between the remote control and the
remote sensor on the main unit.
Quick Starting Guide
1. Connecting to an External Power Source
Connect the power adapter (supplied with the player) to the side input plug and to a wall
outlet. Do not use any other device otherwise specified by your dealer.
2. Open the screen panel.
The screen panel of the portable DVD opens to a maximum 180 °. And it can rotate 270°.
3. Press the open button on the left to open the disc cover.
4. Insert a DVD disc with label side facing upward.
Align the center of the DVD disc with the center of the disc guide. Press gently down on the
DVD to snap the disc into place, and then close the disc cover.
5. Slide the power switch on the right side of the unit to power it on.
6. Press the OK or PLAY/PAUSE button on the unit to start playback.
In most cases, when you leave by the PLAY/PAUSE button, continue to be used by
PLAY/PAUSE button.
The DVD player will immediately start rendering the DVD program.
When you want to stop, press the STOP button, it will return to the power-on logo.
The player can be recharged while playback.
USB drive & MMC/SD/MS card playback
Insert a USB drive into the USB port. Press DVD/USB/CARD on the unit or
DVD/SD/USB on the remote to play the readable files in it.
● Insert a MMC /SD/ MS Card into the MMC/SD/MS Card port. Press DVD/USB/CARD on
the unit or DVD/SD/USB on the remote to play the readable files in it.
●
NOTE: If it has not any U drive or memory card being inserted in the player, it will return to
DVD mode.
4
Connecting the Earphones
Connecting earphones
1. Connect the earphones. Earphones with a 3.5 mm stereo plug can be connected.
2. Adjust the volume by pressing the VOL+/VOL- buttons on the remote control.
The right side of the portable
Avoid listening to sound at levels which may be harmful to your ears.
Connecting To Optional Equipment
Enjoy Dolby life.
Enjoy the dynamic realistic sound of Dolby by connecting an amplifier and speaker system.
Adjust the volume of your receiver to a comfortable listening level to avoid any
speaker damage.
When connecting and disconnecting the DVD video player, turn off the amplifier to avoid
any speaker damage.
5
Playing a Disc
How to start playback on the menu screen
1. Press TITLE/MENU to access the menu screen.
2. Press DIRECTION keys or the number buttons to select
the title.
3. Press the ENTER button.
The DVD video player will start play-back from the title
selected.
Note: You also can input the assigned number of the title to
select it directly.
How to step playback (still playback)
Press the STEP once during playback.
Press STEP repeatedly during playback, the picture will advance one frame each time,
then press PLAY/PAUSE or ENTER button to resume normal playback.
During the still playback the sound is muted.
Fast forward & rewind
You can playback a disc at 2x, 4x, 8x, 16x or 32x the normal speed for fast forward or
rewind.
Press the REV or FWD button during playback.
The playback speed becomes double the normal speed.
The playback speed changes, each time you press the REV or FWD button.
Note:
The function is invalid on some DVD discs.
Playing in slow-motion
A disc can also be played back in slow motion.
Press the SLOW button during playback.
TV SCREEN
The playback speed becomes 1/2, 1/4, 1/8, or 1/16 of the normal speed each time you
6
press the SLOW button.
TO RESUME NORMAL PLAYBACK.
Press PLAY.
During REV, FWD and slow-motion playback, the sound is muted.
The function is invalid on some DVD discs.
Playing a Picture CD/JPEG
1. Load your Picture CD or JPEG disc.
When a Picture CD is loaded, it will start playback automatically.
2. Select a folder or a picture/song contained on the JPEG or other data disc, a menu will
appear on the screen.
Press UP or DOWN to select a folder, and press ENTER or PLAY to view folder contents.
3. Select one play mode.
You can use the button REPEAT to select one playback mode, repeat one or all.
Press UP or DOWN to choose the picture or song you want to enjoy.
4. Start playback
Press ENTER or PLAY to enjoy the pictures or songs.
5. Use the STOP or MENU button to view the contents.
When JPEG CD is played, the STOP or MENU is used to display JPEG folders and the
corresponding files.
6. Run in the DVD case, press the ZOOM button on the remote control, ⊕2x→⊕3x→⊕
4x→⊕1/2x→⊕1/3x→⊕1/4x→Play
Run in the DVD case, read the Picture. Press the zoom button, Zoom 100%→Zoom
125%→Zoom 150%→Zoom 200%→Zoom 75%→Zoom 50%→Zoom 100% (normal size).
Creating your own Picture CDs Using your computer save pictures as JPEG format and
burn them on a CD-R disc, then you can watch on your TV.
7
Locating a Specific Title, Chapter or Track
DVD discs are normally divided into titles which are sub-divided into chapters. moreover,
cds are divided into tracks.
Locating a title using the title menu
You can locate a specific title using the title menu function, if a DVD video disc contains a
title menu.
1. Press the MENU button
On the LCD or TV screen, the title menu will appear.
2. Press the DIRECTION keys to select the title you want.
You can also directly locate a specific title by pressing its assigned number with the
number buttons.
3. Press the ENTER button
This will cause the DVD video player to start playback from chapter 1 of the title selected.
You also can use skip buttons to select a title or track desired: Press
or
button
repeatedly till the one displays.
Playing Repeatedly
This DVD video player allows you to playback a specific TITLE, CHAPTER, TRACK, or
SEGMENT REPEATEDLY. (TITLE REPEAT, CHAPTER/TRACK REPEAT, A-B REPEAT)
How to repeat a title, chapter, or disc
During normal playback, press the REPEAT button.
The repeat mode changes, each time you press the REPEAT button.
How to repeat a specific segment
1. Press the A-B button at the beginning of the segment in which you want to repeat
playback (point A).
2. Press the A-B button again at the end of the segment (point B)
The DVD video player will automatically return to point A and start to repeat playback of the
selected segment (A-B).
8
3. Press the A-B button to cancel the A-B repeat function
The DVD video player will resume to normal playback.
Playing In Favorite Order
How to set titles, chapters, or tracks in a favorite order
1. Press the PROGRAM button.
PROGRAM MENU displays on the screen.
2. Using the numbered button, select the items you want in the order you want them
programmed in.
The number of the item selected will be input into the PROGRAM volume.
3. Highlight START and press ENTER to start program playback.
4. To clear the programmed, move the cursor to STOP and then press ENTER to confirm
it.
9
Using the On-Screen Display
This unit allows you to view the operational status and disc information on your TV screen.
Checking the operational status
With this function you can view on your TV the following: Current title -Track number -Total
playing time.
Selecting the Camera Angle
This DVD video player allows you to select from several different angles.
Selecting the camera angle
How to change the camera angle
If the DVD video disc was recorded with multiple angles, you have the option to change the
camera angle of the scene you are watching.
When you play back a scene recorded with multiple angles, press the SHIFT and ANGLE
button, then select the number button.
The angle function will not work on DVD video discs that does not contains
recorded with multiple angles.
10
Setting the Parental Lock
You can use the parental lock function only with DVD video discs equipped with the
parental lock feature.
Setting the parental lock
DVD video discs equipped with the parental lock function are rated according to their
content. The contents allowed by a parental lock level and the way a DVD video disc can
be controlled may vary from disc to disc. For example, if the disc allowed, you could edit
out violent scenes unsuitable for children and replace them with more suitable scenes, or
lock out playback of the disc all together.
1. Press SETUP, the SETUP MENU appears on the screen.
2. Select Preference Page, press DIRECTION keys.
3. Select Parental, press ENTER or PLAY.
4. Select ratings, press PLAY.
5. Enter your password then press PLAY. The pre-set password is 123456.
6. Press SETUP to exit setup.
11
To change your password
1. In the setup menu, highlight the lock icon (the 3th one on the top) and enter it.
2. Enter old password.
3. Enter new password.
4. Re-enter to confirm your new password.
5. Press ENTER or PLAY.
6. Press SETUP to exit.
Customising the Function Settings
This unit allows you to customize the performance to your personal preference.
1. Press SETUP.
2. Press DIRECTION keys to select category (highlight), then press ENTER or PLAY.
3. Press SETUP to quit the menu.
General Setup
Audio Setup
Press DIRECTION keys to choice according to confirm the menu.
12
Video Setup
Note:
To access preference menu, first you should press STOP twice when in DVD playback.
Specifications
Screen size
7 inches (18cm)
Frequency range
From 20Hz to 20KHz
Sound pressure
+85dB
Power source
DC 9 V
Consumption
8W
Operation condition
5~40 C
Built-in Battery type
Li Polymer
Dimension
8.1x6.5x1.7 inches (w/d/h)
Weight
1.5lb (675g)
o
13
Trouble Shooting Guide
Symptom
Correction
No power
• Check if the AC adapter of power plug is connected
securely.
• If powered with the battery, check if it is exhausted.
No picture/sound
• Make sure the connection is in good condition; volume is
not too low; audio receiver or TV work normally; audio
setting is proper.
The player does not
start playback
• The DVD+-RW you played should be finalized, and not
be an empty disc.
• Place the disc with the graphics side up and make sure
it's inside the guide.
• Make sure the disc is free from scratches & fingerprints.
• Insert a playable disc. (Check the disc type and color
system).
• Do not playback a disc which region code is different
from that of your player.
• Clean the disc.
• Cancel the parental lock function or change the parental
lock level. (The Pre-set password is 123456.)
• Reset the player.
14
Warranty Terms and Conditions Maxmade warrants your Maxmade products against defects in material and workmanship during the warranty period from the original date of purchase, subject to the following terms and conditions. If a product proves to be defective in material or workmanship during the warranty period, Maxmade will, at its discretion, repair or replace the product with the same model provided the purchaser adheres to certain return authorization procedures and guidelines. Warranty Period All Maxmade televisions/media players/DVD players/speaker systems/digital photo frames are warranted for one (1) year for parts and ninety (90) days for labor, starting from the original date of purchase/invoice. After warranty period, the customer is responsible for parts fee and minimum $15.00 labor fee charges. Rechargeable batteries are warranted for ninety (90) days for parts and labor. Non‐rechargeable batteries are not covered by warranty. A new warranty does not start with the replacement of a new product. This Warranty Does Not Apply to: 1. Any product, on which the serial number has been defaced, modified or removed. 2. Damage, deterioration or malfunction resulting from: a. Accident, misuse, neglect, fire, water, lightning, or other acts of nature, unauthorized product modification, or failure to follow instructions supplied with the product. b. Repair or attempted repair by anyone not authorized by Maxmade. c. Any damage of the product due to shipment. d. Removal from or installation to the product. e. Causes external to the product, such as electric power fluctuations or failure. f. Use of supplies or parts not meeting Maxmade's specifications. g. Normal wear and tear h. Any other cause which does not relate to a product defect. 3. Cosmetic damage by purchaser, such as markings, discoloration, scratches, dents, gouges or any other defacement 4. Physically damaged products by purchaser, such as broken PCB, Housing, damaged LCD Module 5. No Defect Found (product returned to Maxmade as defective but failure is not duplicated by Maxmade's test method). 6. Product without proof of purchase. (The proof of purchase should be one of the following documentations: purchase receipt, gift receipt, sales invoice, and packing list that contains the product model number, price, vendor, and purchase date.) 7. Any damage caused by battery leakage. How to Get Warranty Service 1. To obtain the warranty service, you will be required to reach Maxmade's Customer Service by phone number at (866) 709‐1999 or by email to [email protected] for assistance. You will be asked to provide the following information: a. Customer information (name, day‐time phone number, e‐mail address and/or residential address) b. Proof of your purchase (purchase receipt, gift receipt, sales invoice, order No#, and/or packing list) c. Product model number d. Product serial number e. A description of the problem f. Payment information (If any payment is required, you will be asked to provide this information beforehand. At this moment, we only accept personal check, money order, credit card or cashier's check. Sorry for the inconvenience.) 2. We will issue you an RMA number for your returned item. Please take or ship product with the RMA number to Maxmade service center. All products should be returned in secured packaging, preferably in the original package, with the complete set of accessories. 3. Upon receiving the product, depending on the condition of the defects, Maxmade will repair or replace product, and ship it back to the customer within 2~4 weeks. 4. For additional information, please contact Maxmade Customer Service. Out of Warranty Repair For additional information on obtaining an extended warranty service, contact Maxmade Customer Service Department by e‐mailing [email protected] or call (866) 709‐
1999. Products out of warranty requiring replacement will be reviewed individually, but all will require the shipping and handling fee. During the period of product warranty, we support your basic configuration, setup and troubleshooting questions; and when necessary, we will provide you with all the instructions on how to return your product for repair. For more customer service and support inquiries, please call (866) 709‐1999 or e‐mail us at [email protected].