1
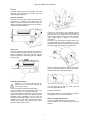
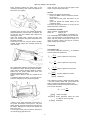
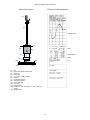
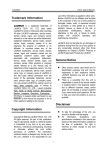
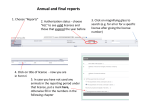
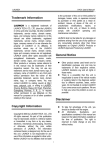
Gerhard Zorn Mechanische Werkstätten Inhaber: Maschinenbauingenieur Bernd Zorn Benzstr. 1 39576 Stendal , Germany Telefon +49 3931 212579 Telefax +49 3931 713004 http://www.zorn-online.de mailto:[email protected] Operating manual Light Drop Weight Tester ZFG 2000 (Light Weight Deflectometer, Portable Falling Weight Deflectometer) for the dynamic plate loading test, corresponding to the German "Technical Specification for Soil and Rock in Road Construction" TP BF - StB Teil B 8.3 © 1992-2005 Zorn Stendal. All rights reserved. Copy only with previous permissions of Zorn company, Stendal. We reserve the right to make technical alternations in case of further development. 18.10.2005 Light Drop Weight Tester ZFG2000 The test area should be preloaded with three load pulses. Lift up the falling weight and snap it in into the fix and release mechanism at the top of the guide rod. After adjusting the guide rod to the vertical, the falling weight has to be released and, after rebound, snapped in again at the top of the guide rod. After three preloading pulses, switch on the electronic device by pressing the <Start> button. Contents Page Contents ..................................................................2 Intended Purpose ....................................................2 Using .......................................................................2 Menu .......................................................................3 Calibration mode .....................................................3 Setting the clock ......................................................3 Printer ......................................................................4 Formulas..................................................................5 Maintenance ............................................................6 Automatic switch off.................................................6 Software ..................................................................6 View of the device..................................................10 Printout of the miniprinter.......................................10 Examples of the display.........................................11 Operating advice for the handling of the weight.....11 Technical data .......................................................12 View of the electronic device .................................13 Calibration Institutes for Light Drop Weight Testers ..................................................................14 Mo 02.04.01 14:17:56 Battery ------- The display show the current date and time and the charge condition of the built in rechargeable batteries (8 dashes = battery empty, 8 blocks = battery full). If you want to store the measurements insert the chip card now. Press <Start>: start measurements Measuring mode: 300mm 1. execute pulse You see the current size of the loading plate and the hint to execute one pulse. Execute 3 pulses. During measurement you see the settings of the 3 pulses on the display: S1= 0.63mm 2. execute pulse s1= 0.63mm s2=0.62mm 3. execute pulse s1= 0.63mm s2=0.62mm s3= 0.62mm Intended Purpose The Light Drop-Weight Tester ZFG 2000 is used to inspect subgrade and/or subsoil as well as granular base layers during road construction. It is a quick method to evaluate the dynamic deflection modulus Evd in MN/m². This modulus is an index of the bearing capacity on subgrade, subsoil, granular layers made of unbound aggregates or recycled materials, backfilling materials, soil stabilisation with lime and on earth-roads. The measurement results are stored at the chip card automatically. After app. 2 seconds the data are stored and the number of the data set is shown (#1). s1= 0.63mm s2=0.62mm s3= 0.62mm #1 The Light Drop-Weight Tester is a alternative to the static Plate Bearing Test (DIN 18134; BS 1377; ASTM D1195,D1196) and offers the following advantages: - No necessity of a loaded truck as a required counterbalance of the static plate bearing test - Measurements are also possible under narrow conditions, i. e. ditch fillings, back fillings, core holes or other points, that are difficult to reach - Only little space is needed and the mass of the test equipment is low - The measurement takes only three minutes per test point Press <Start>: show Evd s= 0.62mm Evd= 36.3 MN/m² You see the mean of the 3 settings and the dynamic deflection modulus Evd. Press <Print>: to print a test record You can print as many test records as you want. To execute a new measurement, you have to switch off the device before (<Off> button). If you have not inserted a chip card you will get a warning. Simply press <Start> to do your measurements nevertheless. The data are not stored in this case. Using To carry out a measurement, the loading plate should be placed carefully on the prepared test surface. By aid of turning and sliding it should be possible to get the plate in full contact to the ground. To ensure an even test surface, dry sand should be used if necessary. The sand does not have to fill more than the cavity immediately beneath the loading plate. Connect the loading plate with the electronic device with the cable. Put the guide rod with the falling weight on top of the loading plate. Pull the lock pin at the drop weight and turn it by 90° to release the weight. To avoid damages, ensure that the lock pin is NOT in lock position! It has 2 positions one (locked) for transportation and one (90° released) for measurements. Please verify after a measurement that the data are stored on the card. (menu "view card") Before first using the card has to be formatted/deleted (menu "delete card"). In case of error you get the message “repeat pulse”. Possible reasons are: - the soil is to soft ( v> 4000 mm/s or s>65 mm ) - the accelerometer is faulty - there is a faulty contact between the plug and the socket in the loading plate - the cable to the loading plate is broken In any one of this cases it is not possible to make any further measurements with the Light DropWeight Tester. 2 Light Drop Weight Tester ZFG2000 Menu Calibration mode Pressing the <Mode> button (several times) you can access additional functions of the device. Pressing <Start> selects the chosen option. The calibration mode is used for the calibration and the function test of the device. The current values of the sensors are shown: Menu entry View card Card info delete card Set clock Sprache Deutsch Language English Change device type Plate 300mm Plate 150mm falling weight 15kg CBR stamp Calibration Deviceinfo-calibdate Version No. description function of the keys browse through the data of a chip card inserted Start: browse forward Mode: browse backwards Print: print the selected test record Show the current/maximal number of data sets at the card and the card number . Start: Show additional data (size of card and write cache in Bytes) Mode: back to the menu Print: Format/delete the card. The card is signed with a number (combination of the current date/time) Start: start deleting Mode: back to the menu Print: Change clock settings Start: change the digit above the cursor Mode: switch to next digit Print: Choose the language for printing and menu (German) Choose the language for printing and menu Choose the plate or loading device used (only available if you have that options) a=51.6 g k=0.993 upper right: lower right: current acceleration (offset 50g) in g (1g=9,81m/s² gravity) calibration factor, set by the calibration institute (see calibration sheet) Pressing the <Start>-button will start a single measurement. After execution you see on the display the maximum velocity and maximum setting of the pulse. Function test In calibration mode you can prove the correct function of the sensor and the device. The acceleration shown (e.g. a=51.6 g) is reduced by 1 g±0.1 g (e.g. to a=50.6 g) if you turn the loading plate by 90° and changed another 1 g±0.1 g (e.g. to a=49.6 g) if you put the plate on top (180° turn) The acceleration shown have to be in the range of 40..60. Setting the clock Press <Mode> button several times, until you get: Set clock <Start> selects Press <Start> We 29.05.02 14:17:56 Press <Start>: change the value above the cursor (underlined value) Switch to calibration mode (see chapter calibration mode) Start: start one single measurement Mode: back to the menu Print: Set F to zero Shows the device number. and the date of the last calibration Start: Mode: back to the menu Print: Shows the version of the device and the firmware Start: Mode: back to the menu Print: - Press <Mode>: The cursor jumps to the next position. Switch the device off to leave this mode. 3 Light Drop Weight Tester ZFG2000 Printer There are 2 keys at the top of the printer. The outer right one opens the front door. The left one is for controlling the paper feed. Open the front door Press the outer right key towards the other button using thumb or forefinger (see figure) This will release the latch and the door can be swung outwards to expose the paper roll and you are ready to change the paper and ribbon. Take a new roll of paper, and separate the end from the rest of the roll. Remove any damaged or gummed part of the paper, and cut the free and squarely with a pair of scissors or a knife, leaving a clean straight edge to present to the printer mechanism. Thread the new roll past the retention button onto the spindle with the paper unspooling in an anticlockwise direction when viewed from the open end (see figure) and put the paper in the paper slot. Paper feed Press the lower part of the inner key (see figure) to carry out empty line feeds. This will continue for as long as the button is held down. Be sure that the printer is switched on (eventually press the <Print> button before) Press the paper feed actuator arm (at lower right) until the mechanism grips the paper and pulls it through to the front of the printer. (figure) Paper Roll Replacement Attention! To avoid dust, damage and exhaustive wear of the printer, change the paper always indoors. Turn the paper roll so that any loose turns are wound snugly against the roll. Tear off any paper emerging from the printer. Open the printer door as described above and swing the door open to expose the paper roll. If any paper remains in the printer, tear the end off against the paper tear back and carefully pull the remaining paper backwards, from the rear the mechanism mounting chassis, until the free end remerges. Press the paper roll retaining button inwards using thumb and forefinger (see figure) and remove the empty roll core. Close the printer door. More paper may now be fed through by pressing the paper feed button on the front panel. Ribbon Cartridge Replacement Tear off any paper emerging from the printer. Open the printer door by pressing the door latch inwards. 4 Light Drop Weight Tester ZFG2000 Close the door and check that the paper flows freely, using the paper feed button. Place forefinger against the upper edge of the mechanism mounting case and thumb against the base of the door. (figure) Self test To perform the self test of the printer: − press the <Start > button to switch the measuring device on − press and hold the paper feed button of the printer − press and release the <Print> button of the measuring device The printer is printing test lines for as long as the paper feed button is held down Consumables available ribbon cartridge: EPSON ERC09 paper roll: width 57 mm diameter Ø 4,5 cm (length19 m) The consumables are available from the manufacturer. Use of this paper is recommended, as most paper rolls from other sources are too large to fit within the printer housing, and may be of inferior quality causing dust and wear. Carefully press the door and chassis in vertically opposite directions until the catch is released. Do not pull the door and chassis apart without first releasing the catch. Swing the chassis back, leaving the door fully open. This will expose the printer mechanism and ink ribbon cartridge. Press down on the end of the ink ribbon cartridge marked "PUSH" (figure) and carefully remove the used cartridge. Formulas Calculation of Evd The dynamic deflection modulus Evd is calculated from the measured settlement s. E vd = 22.5 s (300 mm plate and 10 kg load) 45 s (150 mm plate and 10 kg load) E vd = Fit a replacement cartridge, ensuring that the paper lies between the ribbon and the steel printer platen. Check that the ribbon cartridge spindle is correctly seated over the printer ribbon drive shaft, and shape the cartridge into place. Ensure that the ribbon is taut and parallel to the paper. If necessary tighten the ribbon by turning the faceted disc clockwise by using fingernail. (figure) 33.75 s ⎡ MN ⎤ E vd ⎢ 2 ⎥ ⎣m ⎦ s [mm ] E vd = (300 mm plate and 15 kg load) dynamic deflection modulus settlement This is based on a theory called "half space model" - the static loaded elastic half space below the plate. The static Plate Bearing Test (BS 1377; ASTM D1195,D1196) is also based on that theory. The common formula is E vd = 1.5r r [mm ] Δσ [MPa ] Δs [mm ] If there is some paper protruding from the front of the printer mechanism, ensure that it will pass clearly through the guide channel and past the tear bar before snapping the chassis shut against the back of the door. Turn the paper roll by hand so that any loose turns are wound snugly against the roll. 5 Δσ Δs radius of the plate stress (pressure) below the plate (0.1 Mpa for the 10 kg load) settlement Light Drop Weight Tester ZFG2000 Maintenance Software Store the Light drop weight tester at a dry place if not used. The device is shipped with a chip card reader and software on CDROM. A PC with at least Windows 95 and Microsoft Excel is required. The chip card reader is connected to a spare USB port. Batteries The NiCd rechargeable batteries in the Electronic Device can be recharged by using the supplied ACDC adapter or directly from a car's electrical power supply. Recharge the batteries in a regularly interval (at least 6 month). After 3 month of no use the batteries can be discharged by up to the half of the capacity. The charging is done after 3 to 12 hours. Installation Install the software of the chip card reader according to the enclosed manual and CD of the reader. Insert the CD-ROM and start the setup software (e.g. Menu Start - Execute "D:\Setup.exe" ) Follow the instructions of the setup software. A new folder is created in the start menu: Maintenance of the loading device Clean the loading device by removing any dirt with a dry cloth. Do not grease the guide rod, which is made of rustproof steel. Store the tester carefully when transporting it and check the drop height regularly (see calibration sheet). Automatic switch off Protection against deep discharge The device is protected against deep discharge of the batteries. If the voltage of the battery is too low, the device is permanently switched of. In this case it can not switched on with the <Start > button. Connect the charger and charge the batteries to get it working. Automatic switch off (no use) The device is automatically switched of after 4 minutes of no use (key pressed). 6 Light Drop Weight Tester ZFG2000 Software ZFG2000 - Excel-template A CDROM is included in the shipment of the ZFG2000. It includes software – a template for Microsoft Excel – to read the data from the chip card into a PC. To install the software insert the CD into the CDROM drive of your PC. Usually the installation software is starting automatically. Please click at Install . Please install the driver of the card reader also. A new item ZFG 2000 appears in the start menu after installation. Several sample files are installed in your “My Documents” path. Click at <Excel-Template> and a new empty sheet is opened in Excel. It is required to allow the execution of macros that are not signed. (Menu: Extras->Macro-Security: middle or low). The template contains two pages. All results are stored at the page <Statistik dyn> and evaluated using statistical methods. The page <ZFG (0)> is a template for the single test sheets that are created for each test point itself. We recommend editing the page <ZFG (0)> before you transfer the data (fill in the fixed header data). This information is taken automatically to the new pages. Please click at <Read card>. The dialog window for the card reader will appear. Please choose the right card reader: - <card reader (PC/SC)> for the card reader that is shipped with the equipment - <card reader (scard)> for older (Towitoko) card reader (old scard.dll driver) - <ZFG2000 (serial)> The ZFG2000 can itself be used as PC card reader. Connect it using a standard SUBD9 cable to the PC. You can also use a USB-Serial adapter cable (you can get both in computer shops) Click at <Read card> and all records are read from the card. You have to provide a filename to store the rawdata. Enable the test records you want to transfer (change color to blue). Using <Data->Excel> the selected data sets are transferred into the excel tables. The raw data can be read in afterwards using <Read file>. Use <Delete card> to delete all data from the card. Checkbox <All> is used to enable/disable all data sets of the same device type. Select <transfer only to statistics> and the test records are only transferred into the statistics sheet. (no single pages for each test are created). 7 Light Drop Weight Tester ZFG2000 Sheet "Statistik dyn" Please enter in <Statistik dyn> the minimum quantile that is required (depending on the street classification). The quality number is calculated automatically. At least 2 tests are required for a working statistics. The statistic evaluation is done using the principle “Simple plan – variable testing” (see standard TP BF-StB, Teil E1, 1993). Only Evd is evaluated. Sheet ZFG (single records) For each single test (3 drops) one single sheet is created (using ZFG (0) as template). The numerical results and the deflection-time diagram are shown. 8 Light Drop Weight Tester ZFG2000 Customizing the Excel-template You can easily change the template (e.g. store company logo or company address permanently). Open the template as xlt-file directly. The template zfg_enlg.xlt is stored in the template directory of Microsoft Excel. Usually you can not see this directory in the Explorer. To enable it go to c:\ Documents and Settings\user\ using the windows explorer (replace "user" with your user name) Select folder options in the menu and activate Show hidden files and folder – show all files and folders. Now you should see the path Application Data. Typical template folders of Microsoft Office are (depending on version): C:\Documents and Settings\User\Application Data\ Microsoft\Templates C:\Program Files\Microsoft Office\Templates\ In Excel go to that path and open the template zfg_engl.xlt. The header of Excel now changes to Microsoft Excel – zfg_engl.xlt. If not - you can try to open the file by holding the shiftkey down when you click at „Open“. Now you can change the template. Please be careful. It is required that the cell names for some special cells are not changed or deleted. You can also rename an already created xls file to zfg_engl.xlt. Copy it into the template directory. Remarks, Hints: It is required to allow the execution of macros that are not signed. (Menu: Extras->Macro-Security: middle or low). If you use an older card reader (“Towitoko”) open the sheet “Statistik dyn” and go to the cell B51 (the field behind the cell “Dll:”). Delete the content of this cell (MCSCM.dll). During installation of the card reader you are probably asked not to install the driver, because it is not signed by Microsoft. You should nevertheless continue with the installation! 9 Light Drop Weight Tester ZFG2000 View of the device Printout of the miniprinter (1) (2) (3) settling curves (4) (5) date (6) single values (7) (10) (12) mean (8) (9) Evd (10) (11) (13) (1) (2) (3) (4) (5) (6) (7) (8) (9) (10) (11) (12) grip top fix and release mechanism guide rod round grip 10 or 15 kg - falling weight lock pin set of steel springs anti tipping fixture load centre ball carry grip loading plate socket for the connection to the electronic device (13) adapter plate 10 Light Drop Weight Tester ZFG2000 Examples of the display Operating advice for the handling of the weight After switch on After switching the device on the display shows: Mo 02.04.01 14:17:56 To click the falling weight into the fix and release mechanism use both thumbs as the sketch shows! Battery ------- The date and the remaining power of the battery are shown empty battery = -------- battery full = battery at 50% = ---- Read card In the mode “read card” the data at the chip card are shown. Upper line: Number of a data set #2 date and time of the measurement #2 01.04.01 Evd: 58.9 MN/m² The falling weight should be lifted up using both hands until both thumbs are able to press on the top of the fix and release mechanism, as the sketch shows. Then the falling weight should be slowly lifted higher until the falling weight is snapped into the fix and release mechanism, to prevent a hard snap in, which may cause a wrong measurement. 10:48 lower line: dynamic deflection modulus Evd The display changes every second.. #2 01.04.01 10:48 s=0.39 0.38 0.37 lower line: single settings [mm] 11 Light Drop Weight Tester ZFG2000 Scope of delivery Technical data − Technical Data of the loading device Mass of the falling weight 10 kg (15 kg) Mass of the guide rod including the spring element made of steel springs, lock pin of the falling weight, release mechanism and stabiliser 5 kg Maximum amplitude of load pulse (calibrated) 7,07 kN pulse width 18 ms − − − − − Technical data of the loading plate, CBR Stamp diameter (optional) 300 mm (150 mm) diameter CBR - stamp (optional) (50 mm) Mass of loading plate or CBR stamp 15 kg Technical data of the electronic device overall dimensions 180x80x45 mm³ mass app. 4 kg measuring range of deflection 0,2 to 30 mm ± 0,02 mm measuring range of the sensors ±100 g frequency range 0-500 Hz temperature range 0 to 50 ° C power supply battery pack power supply unit input: output: automatic switch of after no use battery voltage too low 9,6 V, 5 Ah (8 x NiCd) 100-240V 50/60Hz 16-18V, 2,19A 4 min 7,6 V (values in bracket can delivered on request) 12 electronic device ZFG2000F, belt, key cable (connection of the plate) card reader for PC (serial) power supply unit guide rod with falling weight loading plate 300 mm with sensor (option: exchangeable loading plate, (diameters 300mm, 150mm, 50mm-CBR) Light Drop Weight Tester ZFG2000 View of the electronic device 13 Light Drop Weight Tester ZFG2000 Calibration Institutes for Light Drop Weight Testers (incomplete list, a full list is available from http://www.bast.de/htdocs/qualitaet/p-stelle/tp-bf_neu.htm) Mechanische Werkstätten Stendal, Gerhard Zorn Benzstr. 1 39576 Stendal, Germany Tel.: +49 (0)3931) 212579, Fax.: +49 (0)3931 713004 Materialprüfungsamt des Landes Brandenburg/Berlin Müggelsee Damm 109 12587 Berlin, Germany Tel.:+49 (0)30 64186-154, Fax.:+49 (0)30 64186-177 14