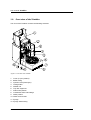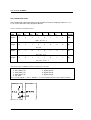
1
Triathlon
user manual
Version 2.1, April 2000
(0060.123-21)
P.O.BOX 388, 7800 AJ EMMEN, THE NETHERLANDS, TEL. (31) 591 631700, FAX. (31) 591 630065, E-MAIL: [email protected]
DECLARATION OF CONFORMITY
Spark Holland BV,
Pieter de Keyserstraat 8,
NL-7825 VE Emmen.
We
Declare that the product:
Autosampler “Triathlon”, type 900
is in conformity with the following documents:
• EEC directives 89/392 incl. 91/368 and 93/44 (machine safety) and EEC
directives 73/23 and 93/68 (low voltage safety), applied with the following
standard:
EN 61010-1
Safety requirements for laboratory equipment
(Class I, Installation cat. II, Pollution degree II)
Spark Holland will not accept any liability for damages directly or
indirectly caused by connecting this instrument to devices which do not
meet relevant safety standards.
WARNING
• EEC directives 89/336 and 92/31 (EMC requirements, applied with the following
standards:
EN 50081-1
EN 50082-1
EN 61000-3-2
Generic emission standard
Generic immunity standard
Harmonic current emissions
Use shielded cables and connectors for all remote connections.
Emmen, October 1998.
Rein van den Berg, QA manager.
User manual Triathlon
About this manual
This manual has been written for laboratory technicians who use the Triathlon for execution
of analytical runs. It is assumed that the user of this manual has basic knowlegde of how to
use menu-driven software and that she/he is familiar with standard laboratory and HPLC
terminology.
Chapters 1 and 2 of this manual contain basic information that should be read by every user
of the Triathlon:
• Chapter 1 identifies main parts of the Triathlon.
• Chapter 2 explains how to install parts either for maintenance purposes or for preparing
the Triathlon for an analytical run.
For first-time users:
• Chapter 3 explains the main menus of the Triathlon and offers a basic explanation of
how to operate the Triathlon.
• Chapter 4 offers a number of examples that teach the user how to work with the
Triathlon.
For experienced users:
• Users who understand how the Triathlon works will probably only use the reference part
of this manual (Chapter 5) to look up the purpose of a particular function.
• Experienced users may find the overview of programming options (Appendix G) useful
for quick reference of possibilities of the Triathlon.
The appendices in this manual offer specialist information.
An index has been provided to allow the user to find required information quickly.
Typographical conventions
The following typographical conventions are used in this manual:
Initial Capitals
<CAPITALS>
bold type
[0100]
0060.123-21
are used for names of the menus: Ready Menu, Series
Menu etc.
are used to refer to soft function keys
is used for names of keys in the keypad
is used to indicate values that have to be entered with the
numerical keypad
i
User manual Triathlon
Symbols
The following symbols are used on the Triathlon:
WARNING
SHARP NEEDLE
AND MOVING PARTS
KEEP HANDS CLEAR
This sticker indicates that care should be taken to prevent
personal injury or damage to parts of the Triathlon.
This sticker (with yellow background color) at the back of the
Triathlon calls attention to the fact that you are expected to consult
this manual for instructions on how to operate the Triathlon.
The following pictograms are used in this manual:
calls attention to a procedure, which, if not correctly executed, could
result in injury or loss of life. Do not proceed beyond a "DANGER"
sign until the indicated conditions are fully understood and met.
WARNING
CAUTION
calls attention to a procedure, which, if not correctly executed, could
result in personal injury. Do not proceed beyond a "WARNING" sign
until the indicated conditions are fully understood and met.
calls attention to a procedure, which, if not correctly executed, could
result in damage to the equipment. Do not proceed beyond a
"CAUTION" sign until the indicated conditions are fully understood
and met.
calls attention to important information. Read this information before
continuing.
ii
0060.123-21
User manual Triathlon
Safety practices
The following safety practices are intended to ensure the safe operation of the equipment.
•
Removal of panels may expose users to dangerous voltages. Disconnect the Triathlon
from all power sources before removing protective panels.
•
Always replace blown fuses with fuses of the size and rating indicated on the fuse panel
and holder. Refer to Appendix B of this manual for more information on fuses.
•
Replace or repair faulty insulation on power cords.
•
Check that the actual power voltage is the same as the voltage for which the Triathlon is
wired. Make sure power cords are connected to correct voltage sources.
•
The Triathlon must only be used with appliances and power sources with proper
protective grounding.
•
Perform periodic leak checks on supply lines.
•
Do not allow flammable and/or toxic solvents to accumulate. Follow a regulated,
approved waste disposal program. Never dispose of flammable and/or toxic solvents
through the municipal sewage system
•
Using the Triathlon in other ways than indicated in the instructions given in this manual
may cause unsafe conditions.
0060.123-21
iii
User manual Triathlon
iv
0060.123-21
User manual Triathlon
Table of contents
Chapter 1.
1.1
1.2
1.3
1.4
Chapter 2.
2.1
2.2
2.3
2.4
2.5
2.6
2.7
2.8
2.9
2.10
Chapter 3.
3.1
3.2
3.3
3.4
3.5
Chapter 4.
Introduction ............................................................. 1
Injection principle ............................................................................1
Front view of the Triathlon ..............................................................2
Back view of the Triathlon ...............................................................3
Keypad and display of the Triathlon ...............................................4
Preparations for use ............................................... 7
HPLC connections ..........................................................................7
Waste tubing ...................................................................................8
Wash solvent ..................................................................................8
Syringe ............................................................................................9
Needle assembly ..........................................................................10
Optional needles ...........................................................................11
Combination of syringe, sample loop and buffer tubing ...............11
Tray segments and Vial types ......................................................14
Vial handling .................................................................................18
Loading the sample tray ................................................................18
Getting started ...................................................... 19
Menus of the Triathlon ..................................................................19
Convenient working order .............................................................20
Types of Methods and links to Series ...........................................20
Executing a Series ........................................................................21
Executing a Series in remote control ............................................21
Using the Triathlon ............................................... 23
Example 1. A 10 µL partial loopfill injection .................................................23
Example 2. A 3 x 10 µL injection with µL pick-up ........................................25
Example 3. A 1:10 dilution followed by a 10 µL partial loopfill .....................27
Example 4. Defining a template and adding a protection code ...................29
Chapter 5.
5.1
5.2
5.3
5.4
Chapter 6.
6.1
6.2
6.3
6.4
0060.123-21
Reference .............................................................. 31
Ready Menu .................................................................................31
System Menu ................................................................................33
Methods Menu ..............................................................................37
Series Menu ..................................................................................43
I/O Connections .................................................... 45
Contact closures outputs ..............................................................45
TTL outputs ...................................................................................46
TTL inputs .....................................................................................49
Multilink connector .........................................................................49
v
User manual Triathlon
Appendix A
Appendix B.
Appendix C.
Appendix D.
Appendix E.
Appendix F.
Appendix G.
Appendix H.
Appendix I.
Appendix J.
Index
vi
Installation ...........................................................
Specifications .......................................................
Error codes ............................................................
Options and accessories .......................................
Calibration and performance ..............................
Rheodyne injection valve .....................................
Programming options ...........................................
Injection principles ...............................................
Trouble shooting ...................................................
Logbooks ..............................................................
..............................................................................
51
53
57
59
63
69
73
75
81
85
95
0060.123-21
User manual Triathlon
Chapter 1.
Introduction
The Triathlon is an autosampler that offers a wide variety of possibilities for HPLC. It
incorporates among other things the following features:
•
•
•
•
•
suitable for use with various types of vials by various manufacturers
capable of executing flushed loop injections, partial loopfill injections and µL pickup (see
section 1.1 below)
accomodates use of various types of syringes (volumes of 100, 250, 500, 1000 µL, or
10 mL)
fully compatible with other laboratory equipment
apparatus designed for routine analysis and method development
In addition options like tray cooling and switching valves are available for the Triathlon.
These options enhance the uses for the Triathlon considerably (refer to Appendixes B and D
for more information on options).
1.1
Injection principle
The Triathlon offers three different methods of injection for an analytical run:
Flushed loop
Partial loopfill
µL pick-up
The sample loop is completely (quantitatively) filled with sample resulting in
extremely good reproducibility.
The sample loop is partially filled with sample; this means low sample loss
and programmable injection volumes.
After aspiration of sample, the sample is transported into the loop with
transport liquid (mobile phase); this means no sample loss.
The Triathlon uses a syringe to aspirate the sample from a vial into the sample loop. To
prevent contamination of the syringe the Triathlon is equipped with a buffer tubing between
the syringe and the injection valve. Wash solvent is used to remove the sample from the
buffer tubing and sample needle, and to rinse the buffer tubing and sample needle. For more
technical information on the injection principle used by the Triathlon refer to Appendix H.
For an overview of fluid connections of the Triathlon refer to the illustration inside the cover
of the Triathlon.
0060.123-21
1
User manual Triathlon
1.2
Front view of the Triathlon
The front of the Triathlon contains the following elements:
Figure 1.1 Front view of the Triathlon
1.
2.
3.
4.
5.
6.
7.
8.
9.
10.
11.
12.
2
Cover (in open position)
Buffer tubing
Injection valve (Rheodyne)
Tubing holder
Needle unit
Tray with segments
Drain wash-position
Condensed water and leakage
Wash position
Wash solvent bottle
Syringe
Syringe waste tubing
0060.122-21
User manual Triathlon
1.3
Back view of the Triathlon
The back of the Triathlon contains the following elements:
Figure 1.2 Back of the Triathlon
1.
2.
3.
4.
5.
6.
7.
8.
9.
10.
SparkLink communication interface connector.
CE-mark
I/O connectors
Mains switch
Mains input
Fuses and voltage selector
UL label
Type label
Fan (if tray cooling is installed)
Ventilation holes
0060.123-21
3
User manual Triathlon
1.4
Keypad and display of the Triathlon
The keypad of the Triathlon contains the following elements:
Soft-function keys
Cursor keys
7
8
9
4
5
6
1
2
3
0
CL
E
Numeric keys
Function keys
Figure 1.3 Keypad and display
Soft function keys: the label assigned to these keys depends on the menu that is active.
The label of each key is shown in the bottom line of the display.
Cursor keys: can be used to move to a different field in the display, to move to a different
field in a menu, or to make a displayed value higher or lower.
Numeric keys:
•
0 to 9: to enter numerals in the various programming fields.
•
CL: to clear a value in a field or replace it by NONE or AUTO.
•
E: stands for Enter; to go through menu lines or to confirm a choice made in a menu or
a value entered. The entered value is checked for validity and then saved.
Function keys:
•
Run control keys:
Start/Stop: to start or stop automatic processing, or to reset the system after an error
has occurred.
Hold/Cont.: to hold or continue the analysis time. The analysis time is extended by the
period that Hold is active.
Interrupt: not used.
Priority: to stop a run to process a priority sample before analyzing the rest of the
programmed sample series. Before the run is interrupted processing of the present
sample will be finished. As soon as the priority sample has been analyzed, the
analytical run is resumed. A priority sample is a series of one vial with an injection
4
0060.122-21
User manual Triathlon
•
•
method, a wash method and a time base method defined in a template (only possible if
the correct settings are entered in the System Menu).
Programming keys (see also section 3.1 and Chapter 5):
Series: to enter the Series Menu in which series can be defined for an analytical run.
Methods: to enter the Methods Menu in which methods can be programmed for use in
an analytical run.
Menu: this key can only be used if [MENU] or [MN] is shown in the top right hand corner
of the display. If pressed more possibilities of the menu are displayed.
System: to enter the System Menu in which system settings can be entered.
General keys:
Escape: allows the user to leave the progamming mode or go to a previous level in the
menu. Entered values are checked for validity and then saved.
Help: to display help information; available only for a limited number of functions!
0060.123-21
5
User manual Triathlon
6
0060.122-21
User manual Triathlon
Chapter 2.
Preparations for use
This chapter describes procedures for replacement or installation of parts, either for
maintenance or for preparation of the Triathlon for an analytical run.
Please note that the power should not be switched off for any of the
procedures described below as soft function keys in the Ready Menu
must be used.
A number of items required for use of the Triathlon are factory-installed (see Appendix A).
However, after the installation procedure described in Appendix A has been executed, check
that the following have been correctly installed before you start to use the Triathlon:
•
HPLC pump & column connections
•
waste tubing
•
wash solvent bottle
•
syringe
•
needle assembly
•
syringe, sample loop and buffer tubing
•
tray segments and tray types
•
reagent vials/transport vials
Loosen the screw at the right-hand side of the cover and lift the
cover to be able to execute the procedures described in this chapter.
2.1
HPLC connections
Make the following connections:
•
HPLC pump to port 1 of the Rheodyne injection valve
•
HPLC column to port 6 of the Rheodyne injection valve
The instrument has been flushed with isopropanol before dispatch from the factory. Make
sure that the mobile phase of your HPLC system is miscible with isopropanol, or start up with
an intermediate solvent as mobile phase (disconnect the HPLC column).
It is very important that the contents of the sample loop are injected
in back flush onto the column, therefore: do not exchange column
and pump connections at the injection valve.
0060.123-21
7
User manual Triathlon
2.2
Waste tubing
Make the following connections:
•
Syringe waste: put the end of the syringe waste tube (see figure 1.1, number 12) in a
bottle placed next to the Triathlon.
•
Drain wash-position: connect the hose to the drain wash connector of the Triathlon (see
figure 1.1, number 7); place the other end of the hose in a bottle placed on the floor.
Through this drain all liquid dispensed to waste at the back of the tray is removed.
•
Condensed water and leakage: connect the hose to the drain port of the Triathlon (see
figure 1.1, number 8). Place the other end of the hose in a waste container on the floor.
Through this hose all leakage solvents and condensed water (if Peltier cooling is
installed) are drained.
Make sure that the flow path of the hoses is not obstructed in any way.
2.3
Wash solvent
The Triathlon has a 250 mL wash solvent bottle. Execute the following steps to install the
250 mL wash solvent bottle:
1. Fill the wash solvent bottle with the appropriate
wash solvent. Use of methanol (organic solvent,
no buffers) or a mixture of water and isopropanol
(80/20) is recommended. Before using the wash
solvent, degas it with Helium or an ultrasonic
bath.
2. Screw the bottle to the cap in the holder.
3. Place the holder in the Triathlon as indicated in
figure 2.1.
4. Put the wash solvent tube in the wash solvent.
5. Lower the cover of the Triathlon.
6. Select soft function key <SYR END> in the
Ready Menu to fill the syringe.
7. Place the syringe back in home position by
Figure 2.1 Wash solvent bottle
selecting soft function key <SYR HOME>.
8. Repeat steps 6 and 7 until the wash solvent tube and the syringe are completely filled.
9. Select soft function key <WASH> to perform a standard wash routine.
10. If any air remains in the syringe, select <SYR END> again to fill the syringe with wash
solvent; press <SYR HOME> again to move contents to waste. Repeat if there is still air
in the syringe and gently tap the syringe as wash solvent is dispensed to waste.
8
0060.122-21
User manual Triathlon
If you use an application that requires more than 250 mL of wash solvent for a complete run,
install a longer tube (with flanged end for valve fitting) and place a larger bottle next to the
Triathlon. To fill the wash solvent tube, you may have to repeat the above-mentioned filling
procedure (steps 6 and 7) a few times.
2.4
Syringe
The Triathlon is supplied with a 250 µL syringe. It is also possible to use the Triathlon with a
100µL , 500 µL , 1000 µL or 10 mL syringe. Execute the following steps to install a syringe:
1. Select soft function key <SYR END> in the Ready Menu to
move the syringe to end position.
2. Lift the cover.
3. Unscrew the top of the syringe (turn clockwise).
4. Pull the bottom of the syringe towards you; you can now
remove the syringe (refer to figure 2.2).
5. Fill the new syringe with wash solvent and make sure that all
air bubbles are removed from the syringe.
6. Connect the bottom of the filled syringe to the Triathlon.
7. Screw the top of the filled syringe to the Triathlon (counter
clockwise).
8. Lower the cover.
9. Select soft function key <SYR HOME> to remove air from
the syringe. The syringe moves to home position and its
contents is dispensed to waste.
10. If any air remains in the syringe, select <SYR END> again to
fill the syringe with wash solvent; press <SYR HOME> again
to move contents to waste. Repeat if there is still air in the
syringe and gently tap the syringe as wash solvent is
Figure 2.2 Replacing the syringe
dispensed to waste.
11. Select soft function key <WASH> in the Ready Menu to
execute a standard wash routine. All tubing connected to the syringe valve is filled
and rinsed.
Select the appropriate syringe in the System Menu and install the correct buffer tubing
(refer to section 2.7).
0060.123-21
9
User manual Triathlon
2.5
Needle assembly
The needle used for sampling consists of two parts:
•
prepuncturing needle: a hollow needle used for puncturing of the septum, capmat or
sealer; also used to put headspace pressure on the sample (approximately 0.5 bar).
•
sample needle: placed inside the hollow prepuncturing needle; used for the actual
transport of sample. Different types of needles can be used here (refer to section 2.6,
and options mentioned in Appendix D). If a needle with deviating diameter is used, a
different air outlet nut (see figure 2.3, number 6) must be used that matches the
injection needle.
Most commercially available sealers or capmats cannot be used in combination
with headspace pressure. You are advised to switch off headspace pressure in
those cases (System Menu, General Menu).
The following elements can be identified in the needle
assembly:
1. Rheodyne Rheflex nut and ferrule
2. Needle tubing
3. Needle connection nut
4. Standard sample needle
5. Needle holder
6. Air outlet nut
7. Prepuncturing needle
8. Sensor (detects tray height, missing tray and
missing vials).
Numbers 1, 2, 3, 4, and 6 constitute the sample needle.
Execute the following steps to replace a needle:
1. Loosen the needle connection nut (3).
2. Loosen the Rheodyne Rheflex and ferrule nut (1) .
3. Carefully pull out sample needle and tubing.
4. Insert a new sample needle and tube through the
needle holder (5) and tighten the nut (4).
5. Connect the other end of the tube to port 4 of the
Figure 2.3 Needle assembly
Rheodyne injection valve using a Rheodyne nut and
ferrule. Do not tighten too much to prevent block of tubing.
6. Lower the cover of the Triathlon.
7. Check sample needle height (default height: 2 mm). If necessary, adjust the value in the
System Menu (General Menu; refer to Chapter 5).
8. Select soft function key <WASH> in the Ready Menu to clean the new sample needle.
10
0060.122-21
User manual Triathlon
2.6
Optional Needles
Needles of the following types can be installed in the Triathlon:
•
LSV needle
•
•
•
PEEK needle
Fused silica needle
Extended needle
•
Silica-coated needle
sample needle with large inner diameter for viscous samples, or
in case large volumes are loaded in the loop
biocompatible needle
needle with small inner diameter for small injection volumes
needle for switching valve placed in the side panel of the
Triathlon
needle for use with liquids that would be damaging to a
stainless steel needle
Refer to Appendix D for an overview of options available for the Triathlon.
Execute the following steps to install any of these needles:
1. Remove needle as described in section 2.5.
2. Remove the standard air outlet nut (figure 2.3, number 6) and replace it by the nut
supplied with the optional sample needle.
3. Install optional sample needle as described in section 2.5.
4. Adjust settings in System Menu (General Menu) to the volume of the new needle tubing
(see section 5.2).
2.7
Combination of syringe, sample loop and buffer tubing
The 250 µL syringe is the standard syringe; combined with the standard 500 µL buffer and
the standard 100 µL sample loop, the following injection volume range is available for the
various injection modes:
Flushed loop
Partial loopfill
µL pick-up
100 µL
1 - 50 µL
1 - 27 µL
The maximum injection volumes are calculated with the following formulas:
Flushed loop:
injection volume
= loop volume
Partial loopfill: max. injection volume
= 50% of loop volume
µL pick-up:
max. injection volume
= (loop volume - 3 x needle tubing volume) / 2
0060.123-21
11
User manual Triathlon
Five sizes of syringes can be used in the Triathlon: 100, 250, 500, 1000 µL and 10 mL. The
10 mL syringe can only be used in the User Program (must be enabled in System Menu; see
section 5.3) and not for the standard injection modes.
Flushed loop gives maximum reproducibility (RSD < 0.3%), but not maximum
accuracy, since loop volume is specified with an accuracy of ± 10%.
Minimum sample loss = 230 µL (2 x loop overfill + flush volume for needle) for
the standard 100 µL loop.
Partial loopfill gives maximum accuracy (depends on syringe accuracy) and
reproducibility better than 0.5% RSD for injection volumes > 5 µL
Minimum sample loss (Flush volume) = 30 µL
30 µL is the recommended minimum flush volume (combined with an air
segment); smaller flush volumes can be programmed, but will result in
decreased performance.
µL Pick-up means zero sample loss, maximum accuracy (same as partial
loopfill), but slightly diminished reproducibility: RSD better than 1% for injection
volumes > 5 µL.
5 µL of air is injected together with the sample, if an air segment is selected in
the System Menu.
For some cases other combinations of syringe, loop and/or buffer are advised:
Injection volumes smaller than 5 µL:
•
Partial loopfill: use a 100 µL syringe for maximum reproducibility and accuracy. Use a
20 µL sample loop to avoid loss of accuracy due to expansion of the loop content when
switching from inject to load position prior to sample loading. Specially when working
with high pressure (200 bar), this loss may be 0.1 - 0.5 µL for a 100 µL loop.
Note that the minimum sample loss in partial loopfill mode is 30 µL (recommended
minimum flush volume) for the first injection and an additional 15 (always half the
programmed flush volume) for additional injections from the same vial. If a wash
between injections has been programmed, sample loss is 30 µL for every injection. For
zero sample loss injections, use the µL-pick injection mode.
•
12
µL Pick-up: use a 100 µL syringe for optimum accuracy and reproducibility. Do not use
a smaller sample loop! The sample plug is transported into the loop, preceded by a
programmable air segment of 5 µL (if selected in System Menu; you are advised to
switch off the air segment with µL pick-up), with a plug of transport liquid which equals
2.5 times the programmed needle tubing volume.
0060.122-21
User manual Triathlon
Injection volumes up to twice the standard:
With the standard 250 µL syringe, standard needle with tubing (15 µL) and standard 500 µL
buffer, but with a 200 µL sample loop, the maximum injection volumes are:
Flushed loop
Partial loopfill
µL Pick-up
200 µL (sample loss remains 230 µL since loops > 100 µL need
only one loop volume overfill; 30 µL pre-flush)
100 µL
77 µL
Volumes smaller than 5 µL may be injected, but reproducibility and accuracy may not be
< 0.5% for partial loopfill or < 1% for µL pick-up.
In short:
loop < 100 µL: loop has to be filled three times
loop ≥ 100 µL - 499 µL: loop has to be filled twice
loop ≥ 500 µL: loop has to be filled 1.5 times
For volumes larger than 200 µL:
Use the 2000 µL buffer, use the appropriate sample loop size and the appropriate syringe:
Syringe volume > 2 x injection volume. Injection volumes larger than 500 µL are possible,
but the sample may contaminate the syringe. Program sufficient wash after use!
Overview of appropriate buffer tubing for each type of syringe:
Syringe
100 µL
250 µL
500 µL
1000 µL
10 mL
Buffer tubing
500 µL
500 µL
2000 µL
2000 µL
15 mL
The 10 mL syringe and the 15 mL buffer tubing can only be used in
combination with the User Program and not with the standard injection
methods.
0060.123-21
13
User manual Triathlon
2.8
Tray segments and Vial types
A wide range of vials and septa can be used for the Triathlon, from micro vials (0.5 mL) to
super LSV vials (10 mL). The volumes of standard vials can be reduced by using inserts.
The Triathlon can be equipped with four types of tray segments to accomodate use of the
various types of vials (see figure 2.4).
Type A: Standard tray segment. Type B: LSV tray segment. Type C: Super LSV tray segment. Type D: Micro vial
tray segment.
Figure 2.4 Types of tray segments
The Triathlon allows you to use more than one type of segment in a tray. Enter the
configuration of the tray in the System Menu (Tray Menu).
The following vial types can be used:
•
Chromacol vials for standard tray
(outer vial diameter :12mm)
Figure 2.5 Chromacol vials
14
0060.122-21
User manual Triathlon
Figure 2.6 Conical vials with support
Figure 2.7 Plastic vials
Chromacol inserts (02.MTV, 02-MTVWG, 03-MTV) can be used in combination with the
appropriate vial and support sleeve or spring.
Figure 2.8 Standard vials with insert
0060.123-21
15
User manual Triathlon
•
Eppendorf micro centrifuge tubes for standard tray
Max. 4 mm
Figure 2.9 Eppendorf micro centrufuge tubes with support sleeve
Eppendorf micro centrifuge tubes can be used with a support sleeve.
However, the prepuncuring needle may not be able to pierce the
caps of some brands of tubes because of the depth of the caps. This
may result in damage to the sample needle.
•
Chromacol vials for LSV tray
(outer vial diameter: 15 mm)
Figure 2.10 Vials and inserts
16
0060.122-21
User manual Triathlon
•
Chromacol vials for super-LSV tray (outer vial diameter: 22 mm)
Figure 2.11 Vials for super-LSV tray
•
Chromacol vials for micro tray (outer vial diameter: 7mm)
Figure 2.12 Vials and support
0060.123-21
17
User manual Triathlon
2.9
Vial handling
It is best to fill vials with a narrow-end pipette to allow air to escape when filling the vial. Do
not fill vials to the edge to avoid that sample liquid will be forced into the air needle (risking
cross-contamination of samples and fouling of the needles).
If you want to use headspace pressure for a sample handling routine, it is important to make
sure that the seal is airtight. An airtight seal is also important to prevent air bubbles from
forming and to prevent evaporation of volatile samples.
Check the seal after crimping; if the cap can be turned easily, the seal is not airtight and you
will have to adjust the handcrimper.
2.10 Loading the sample tray
The tray segments can be placed in any position in the Triathlon tray. The tray segment
types used must be defined in the System Menu (Tray Menu). Tray segments can only be
placed in an open position in the front half of the tray. Select <ADVANCE> in the System
Menu to rotate the tray if the Triathlon is not executing a run. You can then place a tray
segment in the front half of the tray.
Do not place or remove a tray segment at the rear half of the
Triathlon tray, as this may damage the tray sensors.
CAUTION
18
0060.122-21
User manual Triathlon
Chapter 3.
Getting started
This chapter describes how to get started with the Triathlon. The following will be explained:
• menus of the Triathlon
• convenient working order
• methods that can be programmed and linked to series
• executing a series.
3.1
Menus of the Triathlon
The software of the Triathlon is menu-driven. The most important menus are:
• Ready Menu: this menu appears after the Triathlon has been switched on. It offers very
general possibilities for among other things methods management and communication
with other apparatus.
• System Menu: this menu appears after the System key in the keypad has been
selected. It offers general possibilities for entering settings for an analytical run. Please
note that settings may have been factory-installed to suit particular wishes of the user. In
that case no changes will have to be made in the System Menu. You are advised to
enable only those facilities that you will need, to ensure that menus are as concise as
possible.
• Methods Menu: this menu appears after the Methods key in the keypad has been
selected. The menu allows you to program a method to be used in an analytical run and
to assign a number to it.
• Series Menu: this menu appears after the Series key in the keypad has been selected.
The menu allows you to define a series, and to assign a number and a method to it for
the analytical run.
Use the following keys to go through the menus:
E
ENTER; to confirm a choice or to select a choice made in a screen,
or to step through menu lines
cursor keys
to change values in a field or to move to a different field in a screen
Escape
to return to a previous menu
CL
to remove a value from a field and enter NONE or DEFAULT
soft function keys
labels displayed in bottom line of the screen; to go to submenus
If [MENU] or [MN] is displayed in the top right hand corner of the screen, you can press the
Menu key in the keypad to display more possibilities offered by the menu. Refer to section
1.4 for an explanation of all keys in the keypad.
0060.123-21
19
User manual Triathlon
3.2
Convenient working order
After you have determined what type of analytical run you want to perform, the most
convenient working order for the Triathlon is:
1. Enter settings in the System Menu. Note that the settings for the Triathlon probably
already have been correctly entered (factory-installed).
2. Program a method for the analyses you wish to perform in the Methods Menu.
3. Define a series and link a programmed method to a range of vials in the Series Menu.
4. Execute the series.
Please note that it is allowed to use a different order; however, you should keep in mind that
settings entered in the System Menu determine which possibilities appear in the Methods
and Series menus. Refer to chapter 5 for more information on specific items in menus and
the way they influence the other menus.
3.3
Types of Methods and links to Series
The Triathlon offers the following types of methods for different parts of the sample handling
routine:
• injection method: contains information on the injection routine, flush volume and
analysis time.
• wash method: describes a wash volume and when a wash must be executed.
• mix method: a pre-injection method in which additional sample handling can be
performed (e.g. pre-column derivatization).
• timebase method: a post-injection method with which outputs to other devices (e.g.
integrator or pump) and switching of the ISS valve are controlled.
• user program: offers the possibility to program sequences of all actions that can be
executed by the Triathlon in separate steps.
Each programmed method is assigned a number. The Triathlon offers the possibility to store
a combination of defined methods in a template. A template is also identified by a number.
Methods must be linked to series before they can be used. The following possibilities are
offered by the Triathlon:
• You can assign an individual method to a series: methods (mix, injection, wash,
timebase) can be linked to vials in a series.
• You can assign a template to a series: a combination of various programmed methods
(mix, injection, wash, timebase) can be defined in a template. The template is linked to a
range of vials in a series. In this way all steps in an analytical run are laid down and
stored.
20
0060.122-21
User manual Triathlon
•
You can assign a user program to a series: a possibility to combine all possible steps in
the analytical process in one program. The user determines the order of the separate
actions the Triathlon has to perform.
3.4
Executing a Series
Execution of a series is only possible if you have programmed a method and defined a
series for the samples you wish to analyse. Series are not stored in battery backup and exist
only for as long as the Triathlon is switched on.
Execute the following steps:
1. Start programming the series by pressing Start/Stop.
2. Enter the number of the first series to perform and the number of the last series to
perform.
3. Select <START> to start the actual analytical run. The Triathlon starts to execute the
series you have defined.
After the Triathlon has executed the run, the Ready Menu will appear again.
Refer to Chapter 4 for a number of examples illustrating this working order.
It is possible to program series and methods during a run. Press Series or Methods; the
possibilities offered in the menus are identical to those offered when the Triathlon is idle.
If a series or method is changed, the new values become active the next time the Triathlon
starts a series. The series currently running are not affected by the changes.
3.5
Executing a Series in remote control
To execute a series from remote control, execute the following steps:
1. Press Start/Stop.
2. Enter the number of the first and the last series to be performed.
3. Select <REMOTE> to enter the remote control mode. The Triathlon will now operate as
slave of another device and can be controlled with Next injection input and Next vial
input. To indicate that remote control is active, an “r” is displayed in the bottom left
corner of the display during execution of the series. At the end of the series the message
“Series completed via remote control” is displayed.
4. Press Escape to return to the Ready Menu.
Refer to Chapter 6 for more information on remote control.
0060.123-21
21
User manual Triathlon
22
0060.122-21
User manual Triathlon
Chapter 4.
Using the Triathlon
This chapter describes a number of examples of actions that can be performed with the
Triathlon. Please note that this chapter does not describe all types of actions that can be
performed. Try to do these examples to learn to work with the Triathlon.
These examples can be executed after the Triathlon has been installed in accordance with
Appendix A and after all items described in Chapter 2 have been correctly set up.
Example 1. A 10 µL partial loopfill injection
After the Triathlon has been switched on, an initialization procedure is executed. In this
example it is assumed that a loop of 100 µL, needle tubing of 15 µL, a syringe of 250 µL and
a type A tray has been installed. Wait until the Ready Menu appears on the screen, then
execute the following steps:
For system settings:
Press keys
System
<GENERAL> E
[0100] E
[015] E
<250> E
<NORMAL> E
[02] E
<YES> E
<YES> E
Escape Escape
Description
to enter the System Menu
to enter the General Menu
to define the volume of the installed loop
to define the volume of the needle tubing
to define the volume of the syringe
to set syringe speed to normal
to set sample needle height to 2 mm
to enable use of air segment
to switch headspace pressure on
to return to the Ready Menu
For this example all other settings used will be default.
0060.123-21
23
User manual Triathlon
To program a method:
Press keys
Methods
<INJECTION> [01] E
<PARTIAL> E
[100] E
[030] E
[1] E
[10] E
Escape Escape
Description
to enter the Methods Menu
program injection method number 1
to select partial loopfill injection method
to define an analysis time of 1 minute
to define a flush volume of 30 µL
to define the number of injections per vial
to set the injection volume at 10 µL
to return to the Ready Menu
To define the series:
Press keys
Series
[01] E
[01] E
CL E
[01] E
[01] E
Escape
Description
to enter the Series Menu
to define the Series number
to define the injection method number
to enter <NONE> for wash method
to define location of the first sample vial
to define location of the last sample vial
to return to the Ready Menu
To run the series:
Place a sample in position A 1 of the tray.
Press keys
Description
Start/Stop
to start the Triathlon
to start at series number 1
[01] E
to stop after execution of series number 1
[01] E
<START>
to start the analytical run
The Triathlon will now locate vial A 01 and perform a 10 µL partial loopfill injection. The
display of the Triathlon will indicate the status (Checking tray, Flushing, Loopfill, Running,
Rinse buffer, Running). The display also indicates the number of the defined series (01), the
method number (01) and the vial on which the analysis is performed (A 01).
At the end of the defined analysis time the Ready Menu will be displayed again to indicate
that the Triathlon is ready for the next analytical run.
24
0060.122-21
User manual Triathlon
Example 2. A 3 x 10 µL injection with µL pick-up, wash between
injections
In this example a different injection method is used than in the previous one. For that reason
several settings must be adapted in the System Menu.
For system settings:
Press keys
System
<GENERAL> E
E until Air segment appears
<NO> E
Escape
<TRAY> E
E until transport vial appears
<TYPE_A>
[1] E
[1]
Escape Escape
Description
to enter the System Menu
to enter the General Menu
to go to the Air segment field
to switch off air segment
to return to the System Menu
to enter the Tray Menu
to go to transport vials field
to select type A tray segment
to define position of the first transport vial
to define position of the last transport vial
to return to the Ready Menu
To program a method:
Press keys
Methods
<INJECTION> [02] E
<PICK-UP> E
[100] E
[3] E
[10] E
[10] E
[10] E
Escape
<WASH>
[01] E
<INJECTION> E
[300]
Escape Escape
Description
to enter the Methods Menu
to define method number 02
to select the injection mode for this method
to define the analysis time
to define the number of injections per vial
to define volume of 10 µL for 1st injection
to define volume of 10 µL for 2nd injection
to define volume of 10 µL for 3rd injection
to return to the Methods Menu
to enter the Wash Menu
to define wash method number 01
to select wash between injections
to define the wash volume
to return to the Ready Menu
0060.123-21
25
User manual Triathlon
To define the series:
Press keys
Series
[01] E
[02] E
[01] E
[02] E
[02]
Escape
Description
to enter the Series Menu
to define the series number
to define the injection method for this series
to define the wash method for this series
to define the location of the first sample vial
to define the location of the last sample vial
to return to Ready Menu
To run the series:
Put a vial with transport solvent (mobile phase) in transport vial position A 1 and a vial filled
with sample at position A 2. Make sure the transport vial is correctly filled before starting a
new series.
Press keys
Description
to start the Triathlon
Start/Stop
to start at series 01
[01] E
to stop after series 01
[01] E
to start execution of the series.
<START>
At the end of the defined analysis time the Ready Menu will appear again to indicate that the
Triathlon is ready for the following next run.
26
0060.122-21
User manual Triathlon
Example 3. A 1:10 dilution followed by a 10 µL partial loopfill
injection
This example describes how to let the Triathlon transfer 360 µL from Reagent A to the
destination vial, add 40 µL of sample, mix 3 times with 250 µL and subsequently inject 10 µL.
For system settings:
Press keys
System
<USAGE> E
EE
<ENABLED>
Escape Escape
Description
to enter the System Menu
to enter the Usage Menu
to go to the Mix field
to enable use of mix methods
to return to the Ready Menu
As soon as a change has been entered in the System settings, the message “ALL SERIES
DEFAULT” appears. The user will have to redefine series because the settings have been
changed.
To program the injection method:
Press keys
Methods
<INJECTION> [03] E
<PARTIAL> E
[100] E
[50] E
[3] E
[10] E
[10] E
[10] E
Escape
0060.123-21
Description
to enter the Methods Menu
to enter the Injection Menu
to select partial loopfill injection mode
to define the analysis time
to define the flush volume
to define the number of injections per vial
to enter the injection volume for 1st injection
to enter the injection volume for 2nd injection
to enter the injection volume for 3rd injection
to return to the Methods Menu
27
User manual Triathlon
To program the mix method:
Press keys
<MIX>
[1] E
<INSERT>
<ASPIRATE> [5] <AIR> E
<INSERT
<ASPIRATE> [225]
Menu <REAG-A> E
<INSERT>
<DISPENSE> [180]
44[02] E
<INSERT>
<DISPENSE> [50]
<WASTE>4[5] E
<INSERT>
<REPEAT> [1] 3[4] E
<INSERT>
<ASPIRATE> [5] <AIR> E
<INSERT>
<ASPIRATE> [60] <SAMPLE> E
<INSERT>
<DISPENSE> [40]
<DESTINATION> 44[2] E
<INSERT>
<DISPENSE> [50] <WASTE>
4[5] E
<INSERT>
<ASPIRATE> [50] <AIR> E
<INSERT>
<ASPIRATE> [200]
<DESTINATION> 4[3] E
<INSERT>
<DISPENSE> [200] 4[9] E
<INSERT>
<REPEAT [3]
Escape Escape
28
Description
to enter the Mix Menu
to define Mix method number 1
to define mix method step number 1
to aspirate an air segment of 5 µL
to define mix method step number 2
to aspirate 225 µL
to perform defined asp. From reagent vial A
to define mix method step number 3
to dispense 180 µL to
destination vial
to define mix method step number 4
to dispense 50 µL
to dispense defined volume to waste
to define mix method step number 5
to repeat last four steps once
to define mix method step number 6
to aspirate an air segment of 5 µL
to define mix method step number 7
to aspirate 60 µL of
sample
to define mix method step number 8
to dispense 40 µL
to destination vial
to define mix method step number 9
to dispense 50 µL
to waste
to define mix method step number 10
to aspirate an air segment of 50 µL
to define mix method step number 11
to aspirate 200 µL
from the destination vial
to define mix method step number 12
to dispense 200 µL to the destination vial
to define mix method step number 13
to repeat the last 2 steps three times
to return to the Ready Menu
0060.122-21
User manual Triathlon
To define the series:
Press keys
Series
[01] E
[01] E
[03] E
CL E
[1] E
[1] E
[2] E
[3] E
Escape
Description
to enter the Series Menu
to define series number 1
to select Mix method number 1 for this series
to select Injection method number 3
to select <NONE> for wash method
to define location of first sample vial
to define location of last sample vial
to define location of first destination vial
to define position of Reagent A
to return to the Ready Menu
To run the series:
Put sample in position A 01; position A 02 is used as empty destination vial. Place a filled
reagent vial in position A 03. Make sure the reagent vial is filled correctly before starting a
new series.
Press keys
Start/Stop
[01] E
[01] E
<START>
Description
To start the Triathlon
To start at series number 1
To stop after series number 1
To start processing of sample
The Triathlon will now start searching for the Reagent vial and transport 180 µL to the
destination vial twice, then 40 µL of sample will be added and after mixing 3 times a 10 µL
injection will be performed.
Example 4. Defining a template and adding a protection code
This examples describes how to incorporate the injection method (02) and wash method (01)
defined in example 2 in a template. A protection code will be added.
For system settings:
Press keys
System
<USAGE> E
[123456] E
0060.123-21
Description
To enter the System Menu
To enter the Usage Menu
To enter a 6-digit code (memorize this code!)
29
User manual Triathlon
E
<DISABLED> E
EE
<ENABLED>
Escape Escape
to go to the mix methods field
to disable use of mix methods
to go to the template field
to enable templates
to return to the Ready Menu
After use of templates has been enabled the message "ALL SERIES DEFAULT" appears.
The user will have to redefine series because the settings have been changed.
To select the methods to be incorporated in the template:
Press keys
Description
to enter the Methods Menu
Methods
to enter the methods protection code
[123456] E
to enter the Template Menu
<TEMPLATE>
to define the number for the template
[01] E
to define the injection method for this template
[02] E
to define the wash method for this template
[01]
to return to the Ready Menu
Escape Escape
To define the series:
Press keys
Series
[01] E
[01] E
[01] E
[02] E
Escape
Description
to enter the Series Menu
to define the Series number
to define the Template method number
to define the first sample vial
to define the last sample vial
to return to the Ready Menu
To run the series:
Press keys
Start/Stop
[01] E
[01] E
<START>
Description
to start the Triathlon
to start analysis at series 01
to stop after analysis of series 01
to start the analytical run
The Triathlon now performs the same actions as in Example 2, except that analysis is
performed on two vials: A 01 and B 01.
Note: select <DEFAULT ALL> in the Ready Menu (Utilities Menu) to erase all series and
methods defined in these examples and to default all settings.
30
0060.122-21
User manual Triathlon
Chapter 5.
Reference
This chapter describes all possibilities offered by the Triathlon software, in the order in which
they appear in the screen.
5.1
Ready Menu
The Ready Menu contains the following soft function keys:
<ADVANCE>
Use this key to rotate the tray of the Triathlon. You can now fill the tray with segments by
placing the segment at a free position in the front half of the tray.
<WASH>
Use this key to start a standard wash procedure. All tubing connected to the syringe valve
will be filled and rinsed with wash solvent.
<SYR END>
Use this key to move the syringe to end position if you wish to replace the syringe needle or
to simplify filling of wash solvent tubing. A syringe volume of wash solvent is aspirated from
the wash solvent bottle and the wash solvent tube is filled.
Select soft function key <SYR HOME> to dispense the syringe contents to syringe waste
and to move the syringe to standard operating position again.
<UTILS>
Use this key to go to the Utilities Menu. If use of a method protection code is enabled in the
System Menu, the code must be entered to access the Utilities Menu. The menu offers the
following possibilities:
<COPY>
to copy a method. Enter the type (mix, injection, timebase, wash) and
the number of the method to be copied. Then enter a number to define
the destination method. Any existing method stored under that number
will be overwritten.
<ERASE>
to erase a method (Template, Methods, User Program). If Template and
User Program are disabled in the System Menu, the soft function keys
for erasing a standard Method (mix, injection, wash, timebase) appear.
Note that it is not possible to erase the user program if the protection
code for the user program is enabled in the System Menu.
0060.123-21
31
User manual Triathlon
<LOG>
the Triathlon keeps a log of system-relevant events (<EVENTS>; records
error messages that have been generated) and keeps count of actions of
valves and syringe movements (<COUNT>). A message appears after
every 50,000 syringe actions and after every 200,000 syringe valve
actions: “Lifetime of syringe (valve) maybe exceeded. Check for possible
leakage!” .
Syringe: if you do not replace the syringe at this moment and tell the
system “not to display this message again”, the message will not be
displayed again until 50,000 more syringe actions have been counted.
Syringe valve: will have to be replaced and the counter for valve actions
will have to be reset by the maintenance engineer.
<DEFAULT ALL>
to change all software settings to default. All series, methods,
templates and the user program (unless protected by protection code)
will be erased.
If <DEFAULT ALL> is selected, check whether hardware configuration
still is compatible with settings entered in the System Menu.
<SSV> (option)
Use this key to start a procedure in which all lines of the solvent selection valve can be
primed. The menu offers the following possibilities:
<SSV1> to
<SSV6>
to open the corresponding port of the solvent selection valve.
<PRIME>
to prime the selected solvent line with one syringe volume.The last
selected port will remain active after leaving the SSV mode.
<COOL> (option)
Use this key to enter the programming mode for Peltier tray cooling. The programmable
temperature range is 4°C to 40°C. The maximum cooling capacity is approximately 20°C
below ambient (refer to Appendix B for specifications). Connect the condensed water and
leakage connector to a waste container on the floor to drain condensed water.
If the cool option is switched <ON> the following soft function keys can be selected:
<MANUAL>
temperature control will remain OFF until it is switched on again by the
user (in this menu).
<AUTOMATIC>
temperature control will be switched OFF after all programmed series
have been executed.
<DATE-TIME>
temperature control will be switched OFF at a date and time that can
be programmed.
32
0060.122-21
User manual Triathlon
<SERIAL>
Use this key to put the Triathlon in serial mode to allow for control of the autosampler by way
of PC (RS232 interface). Select a device identifier in the System Menu (refer to
section 5.2). If a method protection code was defined in the system settings, this code must
be entered to get access to serial mode. The following soft function keys appear:
<PANIC>
press this key to begin a stop sequence in which all tubing is rinsed
and the valve and I/O ports are reset. At the end of the sequence
serial mode is resumed.
<EXIT>
press this key to end serial mode and return to the Ready Menu.
<SERVICE>
For service to the apparatus. To be used by authorized personnel only. The Service Menu is
protected by a service code.
5.2
System Menu
The System Menu contains the following soft function keys:
<GENERAL>
Press this key to enter values for:
•
loop volume, needle tubing, syringe volume: these values have to be entered
because the Triathlon can be fitted with various types of syringes. Every needle and
needle tubing volume requires a different minimum flush volume. The default flush
volume equals two times the volume of needle and tubing.
The 10 mL syringe can only be selected if the use of the User Program
is enabled in the System Menu (Usage Menu). When the 10 mL syringe
is selected, only the User Program can be used. Use of other types of
methods will be disabled.
•
syringe speed and scale factor: The aspirating speed of the syringe used in injection
methods can be adapted depending on viscosity of samples. Alternatively syringe
speeds can be reduced by entering a scale factor. The syringe speed will be the scale
factor multiplied by the syringe speed. The speed of the syringe during the wash or the
rinsing procedure of the buffer are not affected by this setting. (Refer to table 5.3,
page 42).
0060.123-21
33
User manual Triathlon
•
needle height: distance between the needle point and a
reference point, a few millimetres above the bottom of the
sample tray(Not the bottom of the vial, see figure 5.1),
can be programmed. The value in the system settings is
only used in injection methods, for mix methods this value
is programmable in the method itself).
CAUTION
A height of 0 mm is not the bottom of the
tray, but a reference value related to a point
a 2.5 mm above the bottom of the tray.
Check sample needle height with an empty
vial.
•
skip missing vials: YES means that empty spaces are skipped during the run. NO
means that the Triathlon will stop if an empty space is encountered during the run; an
error code will be generated.
•
air segment: decide whether an air segment will be used for analytical runs (for
explanation of air segment refer to Appendix H).
.
•
headspace pressure: to switch headspace pressure on or off. The Triathlon uses
headspace pressure to facilitate transport of sample into the loop. The compressor will
always be used during a wash procedure. Please note that accuracy and reproducibility
may decrease if headspace pressure is switched off. However, headspace pressure will
only be useful if sample vials are airtight (refer to sections 2.5 and 2.8).
•
time display: offers a choice between two types of time representation.
•
key click, error beep and alarm buzzer: offer the possibility to switch sound signals on
or off.
34
0060.122-21
User manual Triathlon
Table 5.1 Overview of General settings
general setting for
loop volume
needle tubing
syringe volume
syringe speed
scale factor
needle height
skip missing vials
air segment
headspace pressure
time base display
key click
error beep
alarm buzzer
default
100 µL
15 µL
250 µL
normal
1.0
2 mm
yes
yes
yes
HH:MM:SS
on
on
on
possible range
5 - 1000 µL
1 - 200 µL
100, 250, 500, 1000 µL or 10 mL
low, normal or high
0.1 - 1.0
0 - 40 mm
yes or no
yes or no
yes or no
H:MM:SS or H:MM:mm
on or off
on or off
on or off
<USAGE>
Press this key to enter the following Usage settings:
•
protection code: to enter a code for protection of methods. Enter a six digit code
(000000-999999) for protection of all methods. Press CL to erase the code. If a code
has been defined it is not possible to enter the System Menu and the programming
menus without entering the protection code. Default: none.
•
timebase methods: to enable or disable the possibility to program timebase methods.
The Triathlon controls other connected equipment during analysis time. Program
timebase methods in the Methods Menu. Default: disabled.
•
mix methods: to enable or disable the possibility to program mix methods for the
Triathlon. Program mix methods in the Methods Menu. Please note that the Triathlon
cannot analyze priority samples during a run if the mix method is enabled. Default:
disabled.
•
user program: to enable or disable the possibility to program a user program. If this
function is enabled it is possible to enter a user program protection code (6 digits).
Program the user program in the Methods Menu. Please note that the Triathlon cannot
analyze priority samples during a run if the user program is enabled.
Default: disabled.
•
labeled vials: to enable or disable the possibility to program labeled vials. Program the
location of labelled vials in the Series Menu. Default: disabled.
•
templates: to enable or disable the possibility to program templates. Pogram templates
in the Methods Menu. Default: disabled.
0060.123-21
35
User manual Triathlon
•
calibration vials: to enable or disable the possibility of programming calibration vials.
Program the location of the calibration vials in the Series Menu. Default: disabled.
You are advised to disable as many functions in the Usage Menu
as possible to make sure that other menus do not contain
possibilities that are irrelevant for the type of analyses you are to
perform.
<TRAY>
Use this key to define the type of tray that will be used. Four types of tray segments can be
selected: Type A (default), type B, type C and type D numbered 1-8 (see fig. 2.4). After all
tray types have been has been selected, enter:
•
type of tranport vials (A-D), or press CL
•
first transport vial: enter a number
•
last transport vial: enter a number
Vials can be placed in any of the vial positions. Transport vials must be placed in a
continuous row.
<IO>
Use this key to enter the I/O configuration mode and define the following:
•
vial output BCD or HEX: to define the vial output.
•
inject-marker pulse length: to define the length of the inject-marker pulse.
•
vial-marker pulse length: to define the length of the vial-marker pulse.
•
labeled vial marker pulse length: to define the length of the vial-marker pulse of the
labeled vial.
•
input edge next injection: to define the edge sensitive inputs for the next injection.
•
input edge next vial: to define the edge sensitive inputs for the next vial.
•
freeze input active: to define whether the freeze input is active when high, or freeze
input is active when low.
•
reset outputs after last series: to determine whether the outputs should be reset to
default after the last series.
Refer to Chapter 6 for more specific information on I/O connections.
36
0060.122-21
User manual Triathlon
Table 5.2 Overview I/O menu
Possibility
inject-marker pulse length
vial-marker pulse length
labeled vial marker pulse length
input edge next injection
input edge next vial
freeze input active
reset outputs after last series
default
1.0 s
1.0 s
1.0 s
falling
falling
low
no
Range
0.1 - 2.0
0.1 - 2.0
0.1 - 2.0
falling or rising
falling or rising
low or high
yes or no
<CLOCK>
Use this key to switch the system clock on or off. Select ON to enter the clock menu in which
you can set date (yy,mm,dd) and time (hh,mm). This date and time will be displayed in the
Ready Menu.
<COMM.>
Use this key to define a device identifier for communication with other equipment (e.g. a PC).
An identifier between 20 and 29 can be selected for the Triathlon.
5.3
Methods Menu
This menu allows the user to program various types of methods: it is possible to define 24
separate injection methods, 5 wash methods, 5 timebase methods, 9 mix methods and one
user program.
It is also possible to program a combination of methods and save them in a template. The
settings entered in the System Menu determine the possibilities offered by the Methods
Menu.
<TEMPLATE>
Use this key to enter a menu in which the contents of a template can be defined. First assign
a number to the template, then link the numbers of methods to the template. The following
items can be entered to fill a template:
• user program instead of methods: if soft function key <YES> is selected, the complete
template is filled with the user program; no other methods can be added. If soft function
key <NO> is selected the template can be filled with the following:
• mix method number
injection method number
wash method number
timebase method number.
A maximum of 24 templates can be programmed.
0060.123-21
37
User manual Triathlon
<METHODS>
Use this key to enter a menu in which methods can be defined:
<MIX> (if enabled in System Menu, Usage Menu)
Use this key to program a method that allows you to perform pre-injection sample handling,
e.g. pre-column derivatization, dilution or adding of internal standard. Nine mix methods can
be programmed; the maximum number of steps that can be programmed for the total of 9
mix methods and the user program is 240. Assign a number to the mix method. The Mix
Menu appears:
• <EDIT> an existing step or a new step for a new mix method
• <INSERT> a new step in an existing method before the displayed step
• <DELETE> the displayed step.
“End of mix method” means that the mix method is empty; if an existing mix method is
selected, the first line of the mix method is displayed. Scroll through the steps of the existing
method with the cursor keys and use the soft function keys to enter changes in an existing
method.
The following types of steps can be programmed for a mix method:
<ASPIRATE>
(sample, air, destination, reagent A-D) a programmed volume. Speed
of syringe can be selected from 1-9. (Refer to table 5.1, page 34 for
values). Height (H) indicated is the distance of the needle point to the
tray holder (default: 2 mm).The maximum amount which can be
aspirated is the total volume of the syringe.
<DISPENSE>
(sample, waste, destination, reagent A-D) a programmed volume from
the buffer tubing. Speed of the syringe can be selected from 1 - 9.
(Refer to table 5.1, page 34). Height (H) indicated is the distance of
the needle point to the sample tray (default: 2 mm). It is possible to
dispense a larger volume than the volume aspirated in previous
actions. The aspirated amount will be complemented with liquid from
the wash solvent bottle to total the programmed dispense volume.
<WAIT>
to define a pause (H:MM:SS, maximum of 9 hours, 59 minutes and 59
seconds).
During the pause, the needle will move to home position (if the previous
step is an aspirate or dispense action). If you want the needle to stay in
the same position, an aspirate or dispense step of 0 µL must be
programmed at the desired position.
<REPEAT>
Enter the number of steps that must be repeated and how often they
must be repeated.
<WASH>
enter the volume for needle wash. Buffer is rinsed to waste.
38
0060.122-21
User manual Triathlon
<INJECTION>
Use this key to program a method that defines injection methods (max. 24) for a run of the
types full loop, partial loopfill or µL pick-up. Enter a number for the injection method you are
going to program. If the selected method is locked because of changes in the settings
(System Menu) after programming the method, the word LOCK is displayed. The method
can be unlocked by programming valid values in the method itself or by restoring the values
in the System Menu.
Use the soft function keys to select an injection method, then enter values for:
•
analysis time: the time between switching the injection valve to inject and the start of
processing the next sample.
•
flush volume: the amount of sample taken from a vial before the loop is filled with
sample. Default value: 30 µL (combined with an air segment).
Flush volumes of less than twice the volume of the needle and tubing
will result in decreased performance.
•
number of injections per vial: maximum value is 9.
•
injection volume: can be entered for each injection per vial. The maximum
programmable injection volumes are:
partial loopfill: 50% of the programmed loop volume
µL pick-up: injection volume = (loop volume – 3 x needle volume)/2
flushed loop: not programmable, is equal to the loop volume but needs more
sample to fill the loop (3 x loop volume for loop volumes < 100 µL; 2 x loop volume
for loop volumes ≥ 100 µL - 499 µL; 1.5 x loop volume for loop volumes ≥ 500 µL).
<WASH>
Use this key to program wash methods. It is possible to program a wash between injections,
samples or series. For each wash method the volume of wash solvent can be defined. The
minimum programmable volume is 300 µL.
<TIMEBASE> (if enabled in System Menu, Usage Menu)
Press this key to enable control of the optional ISS valve and other devices via auxiliary or
binary outputs. A maximum of 5 timebase methods can be programmed. The menu offers
the following soft function keys:
<AUX>
scroll through all program lines by pressing E or select AUX to move to
the next auxiliary.
<VALVES>
controls the ISS valve and the solvent selection valve. The ISS valve
can only be programmed if the optional ISS valve is installed. 6-1 and
2-1 refer to the interconnected ports of the valves. Press E to scroll
through programming lines (Only if SSV option is installed). Enter the
time and the SSV port number (value between 1 and 6).
0060.123-21
39
User manual Triathlon
Figure 5.2 ISS valve; interconnected ports
<CODE>
outputs: enter a time and a value between1 and 15, hexadecimal
output. Press E to scroll through the programming lines.
<END>
to enter the end time for timed events program; press E to scroll
through the programming lines. If no value is filled in or if CL is
pressed, the Triathlon will automatically generate an end time. The
end time is equal to the analysis time programmed in the injection
method used in the same series.
If end time exceeds the programmed analysis time, this end time
overrules the analysis time.
It is possible to program events after the end time, but these events
are not carried out during a run.
<USER PROGRAM>
The user program offers the possibility to program all possible actions required for a sample
handling sequence in separate steps. Note that the total number of steps for the user
program and all nine mix methods cannot exceed 240. The user program can be protected
by a special user program protection code (System Settings, Usage Menu). If no user
program has been programmed yet, “end of user program” is displayed. Otherwise, the first
line of the programmed method appears. The soft function keys appear:
• <EDIT> an existing step or program a new step for the user program
• <INSERT> a new step before the displayed step
• <DELETE> delete the displayed step.
The edit and insert menus offer the following soft function keys:
<ASPIRATE
a programmed volume from sample vial, ambient air, destination vial,
wash, or one of the reagent vials into the buffer tubing. Speed and
height of syringe can be entered (refer to table 5.1, page 34). The
maximum volume that can be aspirated is the total volume of the
syringe.
<DISPENSE>
a programmed volume from the buffer tubing into the sample vial,
waste , destination vial, wash or one of the reagent vials. Speed and
height of syringe can be entered (refer to table 5.1, page 34).
It is not possible to dispense a larger volume than the total volume
aspirated in previous actions.
40
0060.122-21
User manual Triathlon
<SYR_VALVE>
to control the connections of the syringe to one of its three tubes:
<NEEDLE>: connection to sample needle
<WASH>: connection to wash solvent bottle
<WASTE>: connection to syringe waste tubing.
<SYR>
to control the movements of the syringe.
<LOAD>: the syringe with the programmed volume
<UNLOAD>: the syringe with the programmed volume
<HOME>: the volume previously aspirated will be dispensed to the last
programmed position, and the syringe will be initialized again.
<WASH>
to execute a needle wash; the content of the buffer tubing is not rinsed
to waste before the start of the wash. The programmed volume of
wash solvent is used to wash the needle at the wash position.
The wash position may be contaminated with the contents of the buffer
tubing, which may generate cross-contamination. To prevent
contamination of the wash position, program a dispense to waste action
before programming a wash action.
<VALVES>
to program positions of high pressure valves (ISS, injector valve,
SSV). The injector valve has two positions: <INJECT> and <LOAD>.
The ISS optional valve has positions 1-6 and 1-2 (see figure 5.2).
<WAIT>
to program a pause (max. 9 hours, 59 minutes, 59 seconds).
During the pause, the needle will move to home position (if the
previous step is an aspirate or dispense action). If you want the needle
to stay in the same position, an aspirate or dispense step of 0 µL must
be programmed at the desired position.
<COMPRES>
to activate the compressor to put air pressure on a sample. The
compressor will stay active until it is switched off (in a next
programmed step). The compressor will be automatically switched off
at the end of the needle wash routine if a needle wash is used.
<AUX>
to control the four standard auxiliaries (contact closures). Refer to
Chapter 6.
<WAIT-IN>
to program a pause in which the Triathlon waits for one of the four
inputs to become <HIGH> or <LOW> before continuing with the next
step. Refer to Chapter 6.
<PROG-OUT>
to define two programmable outputs (contact closures). These are
similar to the auxiliaries, but only available in the user program. Refer
to Chapter 6.
0060.123-21
41
User manual Triathlon
<CODE>
to program the output to the connector P3 TIMED OUTPUTS. This is a
HEX output in the range 0 to 15. Refer to Chapter 6.
<MARKERS>
the markers normally generated in the Triathlon are not active in the
user program, but can be programmed in this screen (refer to
Chapter 6). Select marker and status (inject, vial, labeled).
<SSV>
(option): to define the Solvent Selection Valve (SSV) port position,
range 1 to 6.
Table 5.3 Syringe speed
SYRINGE
SPEED
100 µL
250 µL
500 µL
1000 µL
10 mL
1
50 µL/min
125 µL/min
250 µL/min
500 µL/min
0.5 mL/min
2 (low)
125 µL/min
315 µL/min
630 µL/min
1255 µL/min
1.3 mL/min
3 (normal)
250 µL/min
625 µL/min
1250 µL/min
2495 µL/min
2.5 mL/min
4 (high)
375 µL/min
940 µL/min
1880 µL/min
3765 µL/min
3.8 mL/min
5
770 µL/min
1920 µL/min
3840 µL/min
7680 µL/min
7.7 mL/min
6
1070 µL/min
2675 µL/min
5335 µL/min
10665 µL/min
10.7 mL/min
7
1370 µL/min
3430 µL/min
6855 µL/min
13710 µL/min
13.7 mL/min
8
1745 µL/min
4365 µL/min
8725 µL/min
17450 µL/min
17.5 mL/min
9
2135 µL/min
5335 µL/min
10670 µL/min
21335 µL/min
21.3 mL/min
CAUTION
42
During the dispense action the pressure in the buffer tubing will increase. To
prevent damage of the buffer tubing, the flow should not exceed the value of
6 mL/min for water. (Maximum speed 9 for 100 µL and 250 µL-syringes, speed 6
for a 500 µL syringe and speed 4 for 1000 µL and 10 mL syringe.) If more
viscous liquids are used the speeds should be reduced.
0060.122-21
User manual Triathlon
5.4
Series Menu
This menu allows you to define the run sequence in a series. A maximum of 24 series can
be programmed. A series contains information about the methods to be used for a range of
vials. This can be a template, a separate method (mix, injection, wash, timebase), or the
user program. Information on location of vials, labeled vials or calibration vials is also
programmed in a series.
The settings entered in the System Menu and the methods defined in the
Methods Menu determine which possibilities appear in the Series Menu.
Table 5.4 Series parameters
Without templates
With templates
m Use user programYes/No
l Injection method number
l Wash method number
mTime base methods number
m Mix method number
l Template number
Time base and mix method are only available if enabled in the System Menu
m Use calibration vials Yes/No
m First calibration vial
m Last calibration vial
m No. of samples between calibration
Calibration vials are only available if enabled in the System Menu; not available if Mix Method has
been programmed
l First sample vial
l Last sample vial
Only if a mix method has been programmed, or if used in user program:
m First destination vial
m Vial Reagent-A
m Vial Reagent-B
m Vial Reagent-C
m Vial Reagent-D
Only if the use of labeled vials has been enabled in the System Menu:
m Labeled vial no. 1
m Labeled vial no. 2
m Labeled vial no. 3
m Labeled vial no. 4
l marked questions are always asked in series,
m marked questions depend on the used methods and the settings entered in the System Menu.
0060.123-21
43
User manual Triathlon
Explanation:
After you have entered the required settings in the System Menu and after you have
programmed methods to be used for an analytical run, you can press Series to enter the
Series Menu. Table 5.4 gives an overview of the items you have to define for the Series.
•
With Templates
If you are going to execute an analytical run by way of a template, you will only be asked
to enter the template number and to indicate the location of the first sample vial and the
last sample vial.
•
Without Templates
If you are going to execute an analytical run without using a template, you will be asked
to enter an injection method number and a wash method number, and you will have to
indicate the location of the first sample vial and last sample vial.
If you have enabled use of calibration vials in the System Menu (Usage Menu), you will have
to define whether you will use calibration vials, and indicate the location of the first and last
calibration vial, and indicate the number of vials between calibration vials (refer to
figure 5.3).
However, if you have for example enabled use of a Mix Method in the System Menu (Usage
Menu), you will also have to define the location of the First destination vial and Reagent
vials.
Series are stored in the Triathlon memory for as long as the power is on. As
soon as power is switched off, all programmed series will be deleted.
It is not possible to leave the Series Menu before all values have been
programmed.
Figure 5.3 Injection sequence with 3 calibration vials between every 5 vials
44
0060.122-21
User manual Triathlon
Chapter 6.
I/O Connections
The Triathlon has six standard I/O connectors on the rear side; five OUTPUT connectors and
one INPUT connector. Refer to figure 1.2 for location of connectors.
The communication connector is a standard RS232 or an RS422/485 communication
interface connector. The configuration of the I/O connector is described in the tables below.
CAUTION
6.1
The manufacturer will not accept any liability for damages directly or
indirectly caused by connecting the Triathlon to instruments which do
not meet relevant safety standards.
Contact closures outputs
The following three tables with programmable outputs (P1), marker outputs (P4) and
auxiliary outputs (P5) are contact closures outputs (floating NO/NC contact); see figure 6.1,
page 44.
Table 6.1 Connector P1 OUTPUTS (2 programmable outputs and alarm output)
1
2
3
4
5
6
7
OUT 1 - Normally open
OUT 1 - Common
OUT 1 - Normally closed
OUT 2 - Normally open
OUT 2 - Common
OUT 2 - Normally closed
Spare
8
9
10
11
12
13
14
15
Spare
Spare
Alarm output - Normally open
Alarm output - Common
Alarm output - Normally closed
24 V DC
Power ground
Power ground
VMAX = 28 VDC / VAC, IMAX = 0.25 A
The Alarm output will be activated whenever an error occurs; refer to
Appendix C for a description of the error codes of the Triathlon.
Table 6.2 Connector P4 MARKERS
1
2
3
4
5
6
7
Inject marker - Normally open
Inject marker - Common
Inject marker - Normally closed
Vial marker - Normally open
Vial marker - Common
Vial marker - Normally closed
Labeled vial marker - Normally open
8
9
10
11
12
13
14
15
Labeled vial marker - Common
Labeled vial marker - Normally closed
STOP I/O - Normally open
STOP I/O - Common
STOP I/O - Normally closed
24 V DC
Power ground
Power ground
VMAX = 28 VDC / VAC, IMAX = 0.25 A
0060.123-21
45
User manual Triathlon
Table 6.3 Connector P5 AUXILIARIES
1
2
3
4
5
6
7
AUX 1 - Normally open
AUX 1 - Common
AUX 1 - Normally closed
AUX 2 - Normally open
AUX 2 - Common
AUX 2 - Normally closed
AUX 3 - Normally open
8
9
10
11
12
13
14
15
AUX 3 - Common
AUX 3 - Normally closed
AUX 4 - Normally open
AUX 4 - Common
AUX 4 - Normally closed
24 V DC
Power ground
Power ground
VMAX = 28 VDC / VAC, IMAX = 0.25 A
Maximum current for 24 VDC supply is 0.5 A total.
Figure 6.1 Contact closures outputs
6.2
TTL outputs
The following tables show the marker outputs (P2) and a 4 bit time base code output (P3),
programmable in a time base method. Both connectors are TTL level outputs, a connection
diagram is shown in figure 6.2 (page 45).
Table 6.4 Connector P2 TTL OUTPUTS
1
2
3
4
5
6
7
8
INJECT MARKER
VIAL/VIAL MARKER
LABELED VIAL MARKER
STOP I/O
D O (BCD or HEX) (1)
D 1 (BCD or HEX) (2)
D 2 (BCD or HEX) (3)
D 3 (BCD or HEX) (4)
9
10
11
12
13
14
15
D 4 (BCD or HEX) (10 or 16)
D 5 (BCD or HEX) (20 or 32)
D 6 (BCD or HEX) (40 or 64)
D 7 (BCD or HEX) (80 or 128)
Signal ground
Signal ground
Signal ground
All markers are active low (logical 0).
VMAX = 5.5 V, logical 1 > 3.5 V , logical 0 < 1.0 V. DC output source / sink current ± 20 mA.
A marker output pulse will be generated when the injection valve
switches from LOAD to INJECT. However, in a User Program
markers have to be programmed by the user.
46
0060.122-21
User manual Triathlon
BCD: Binary Coded Decimal
The BCD output consists of a 2-digit vial number. D3-D0 represent the single digits (0-9) and
D7-D4 represent the tens.
Table 6.5 BCD output conversion
Value
Output
• = active
D0
(1)
0
1
2
3
4
5
6
7
8
9
D1
(2)
•
D2
(4)
•
•
•
•
•
•
•
•
•
•
•
D3
(8)
•
•
•
Table 6.6 Examples of BCD vial number output
BCD
Output
Tens
D7 D6
D5
D4
(8)
(4)
(2)
(1) (8)
(4)
(2)
(1)
0
0
1 0
1
1
0
1
1
9 x 10 (10 )
Output
0
1
0
5 x 10 (10
0
0
1 x 10 (10 )
0060.123-21
1 1
0
1 0
0
0 x 1 (10°)
Vial number
96
90 + 6
0
1
59
50 + 9
9 x 1 (10°)
0
1
D0
6 x 1 (10°)
1)
Output
Single digit
D3 D2 D1
0
0
10
10 + 0
47
User manual Triathlon
Hex: Hexadecimal Code
The hexadecimal output represents the vial number as 8 bits by assigning values of 1, 2, 4,
8, 16, 32, 64 and 128 to every single bit (D0-D7).
Table 6.7 Examples of hexadecimal output
HEX
D7
(128)
Output
1
D6
(64)
D5
(32)
D4
(16)
0
0
1
D3
(8)
D2
(4)
D1
(2)
D0
(1)
Vial
number
1
1
0
150
0
0
0
0
96
0
1
0
1
85
0
1
1
59
0
128 + 16 + 4 + 2
Output
0
1
1
0
64 + 32
Output
0
1
0
1
64 + 16 + 4 + 1
Output
0
0
1
1
1
32+ 16 + 8 + 2 + 1
Table 6.8 Connector P3 TIMED OUTPUTS; 4 bit time base code output
1
2
3
4
5
TB 0 (HEX) (1)
6 Signal ground
TB 1 (HEX) (2)
7 Signal ground
TB 2 (HEX) (4)
8 Signal ground
TB 3 (HEX) (8)
9 Signal ground
not used
VMAX = 5.5 V, logical 1 > 3.5 V , logical 0 < 1.0 V. DC output source / sink current ± 20 mA.
Autosampler
Ext. device
Figure 6.2 TTL output
48
0060.122-21
User manual Triathlon
6.3
TTL inputs
The following connector is an active high or active low TTL input; it can be defined in the
System Menu. The NEXT INJECTION INPUT and the NEXT VIAL INPUT can be used when
the Triathlon works in REMOTE CONTROL. The FREEZE INPUT and STOP I/O input can
be used to control the Triathlon by other devices. The four inputs (INPUT 1 to 4) can only be
used in the user program, e.g. to control the sequence of the steps in this method. A
connection diagram is shown in figure 6.3 (page 46).
Table 6.9 Connector P6 INPUTS (TTL)
1
2
3
4
5
6
7
8
NEXT INJECTION INPUT
NEXT VIAL INPUT
FREEZE INPUT
STOP I/O
INPUT 1
INPUT 2
INPUT 3
INPUT 4
9
10
11
12
13
14
15
Signal ground
Signal ground
Signal ground
Signal ground
Signal ground
Signal ground
Signal ground
Next injection input:
This input will start the next injection sequence when the Triathlon is started in remote
control. When the injection sequence is finished the Triathlon will wait for the next input.
From the Ready Menu a NEXT INJECTION INPUT will start the last programmed series. In
this case the Triathlon will not wait for the NEXT INJECTION INPUT before continuing with
the next injection. The Triathlon will execute the complete RUN as if it was started with the
Start/Stop key.
Next vial input:
With this input the Triathlon will perform the next injection from the next vial, even if not all
injections from that vial in the programmed injection method have been executed.
Freeze input:
The Triathlon will freeze the analysis time for the time this input is active. If the FREEZE
INPUT is activated while the analysis time is not running, the Triathlon will perform all
programmed pre-injection sample handling (mix method and loading part of the injection
method). But the Triathlon will wait with injecting the sample until the FREEZE INPUT is no
longer active.
Stop I/O:
With this input the run of the Triathlon is immediately aborted. The Ready Menu appears in
the display. In case the Triathlon is in remote control, the run of the Triathlon is immediately
aborted but the Triathlon remains in remote control and cannot be restarted with a NEXT
INJECTION INPUT.
0060.123-21
49
User manual Triathlon
INPUT 1-4:
Programmable input, can be used in the user program.
Autosampler
Autosampler
Figure 6.3 TTL input
6.4
MultiLink connector
The MultiLink connector is used to make the Triathlon communicate with the SparkLink
software.
Set the dipswitch S1 and S2 as follows to let the
communication work probably:
S1
1
2
3
S1
ON
S2
DIP
ON
DIP
4
ON
OFF
S2
1
2
3
4
OUT
ON
OFF
Port
S1:
S2:
OUT
IN
IN
Figure 6.4: MultiLink board
Description
to next device
to PC or previous device
Connections for 9 pin connector:
pin 2
TD Transmitted data to the computer.
pin 3
RD Received data from the computer.
pin 5
SG Signal ground (Also indicated as GND in some devices)
50
0060.122-21
User manual Triathlon
Appendix A. Installation
The Triathlon shipping container is supplied with a packing list. Please check that all items
mentioned in the list are included in the package before you start the installation procedure
for the Triathlon.
Do not install the Triathlon in areas subject to shock, dust, or in direct
sunlight. Do not place it near a source of heat, as this will disturb tray cooling
(if this option is installed).
The Triathlon must only be connected to power sources and apparatus with
protective grounding.
Execute the following steps to install the Triathlon:
1. Lift the Triathlon from the shipping container. Make sure you keep the apparatus upright;
lift it by placing your hands under the Triathlon.
2. Place the Triathlon in its operating location, preferably on the left hand side of the HPLC
system. Make sure the ventilation holes are not obstructed. Allow the instrument to
acclimatize for 1 hour.
3. Install tray (figure 1.1, number 6) in the Triathlon.
4. Check whether local voltage matches voltage indicated on back panel of the Triathlon.
5. Connect the power cord to the Triathlon (figure 1.2, number 5).
6. Switch the Triathlon on by using the switch at the back of the apparatus (figure 1.2,
number 4).
The Triathlon now starts up. The display indicates that a self-test and initialization procedure
are executed. After completion of this procedure the following appears on the display:
10:26 TUESDAY DECEMBER 16-97 [MENU]
READY (x.xx)
<ADVANCE>
0060.123-21
<WASH>
<SYR END>
<UTILS>
51
User manual Triathlon
Factory installed items
The Triathlon is factory-installed with:
• fuses in power switch:
115 V (AC) ± 10%: two 5 AT fuses (slow, ¼” x 1¼”, UL/CSA) or
230 V (AC) ± 10%: two 2.5 AT fuses (slow, 5 x 20 mm, IEC127).
• 100 µL loop
• 250 µL syringe.
• 500 µL buffer tubing
• stainless steel 15 µL sample needle
The fuses used are UL-listed and CSA-certified.
Tubing
Material and dimensions
Standard sample needle and tubing
SS tubing; 135 mm x 0.65 mm O.D. x 0.25 mm I.D.
Tefzel tubing; 140 mm x 1/16" O.D. x 0.25 mm I.D.
(total volume 15 µL)
Buffer tubing from high pressure valve to syringe valve
PTFE tubing; 640 mm x 1/16" O.D. x 1.0 mm I.D.
(volume 500 µL)
Tubing syringe valve to wash solvent bottle
PTFE tubing; 300 mm x 1/16" O.D. x 1.0 mm I.D.
Tubing syringe valve to waste
PTFE tubing; 400 mm x 1/8" O.D. x 1.6 mm I.D.
For installation of HPLC connections, waste tubing, wash solvent, syringe, sample needle,
trays, etc. refer to Chapter 2 of this manual.
52
0060.122-21
User manual Triathlon
Appendix B. Specifications
General
Sound pressure level
Working temperature
Storage temperature
Humidity
Sample viscosity
Safety
Sample capacity
LeAq < 70 dB
10 - 35°C
-25 / +60°C
20 - 80% RH
0.1 - 5 cP
according to IEC 1010
96 vials of 1.5 mL (STD), 12 vials per segment
72 vials of 4.0 mL (LSV), 9 vials per segment
160 microvials of 0.5 mL, 20 vials per segment
32 vials of 10.0 mL, 4 vials per segment
Tray segment types
4 types of tray segments (see figure 2.4):
Type A: Standard tray segment
Type B: LSV tray segment
Type C: Super LSV tray segment
Type D: Micro vial tray segment
Vial diameter
12 mm (Standard tray), 15 mm(LSV tray), 22 mm (Super
LSV) and 7 mm (Micro tray)
Dimensions Vial
Maximum height: 47 mm (including cap); minimum height: 32
mm (including cap).
Loop volume
5-1000 µL
Puncturing accuracy needle ± 0.6 mm
Pre-puncturing septa/caps
With air needle, dual needle action
Vial & height detection
Missing vial & height detection by vial sensor
Switching time injection valve Electrically < 100 msec
Headspace pressure
Built-in compressor
Wash solvent
250 mL internal wash solvent bottle
Dispenser syringe
100 µL , 250 µL (standard), 500 µL, 1000 µL, or 10 mL
Wetted parts
SS316, PTFE, TEFZEL, VESPEL, Glass, Teflon
(Optional PEEK, Fused silica)
Analytical performance
Capped and sealed vials:
•
flushed loop injections
•
partial loopfill injections
•
µL pick-up injections
Memory effect
0060.123-21
Reproducibility
RSD ≤ 0.3 %
RSD ≤ 0.5 %, injection volumes > 5 µL, with headspace
pressure on the vial and 30 µL pre-flush with air segment.
RSD ≤ 1.0 %, injection volumes > 5 µL, with headspace
pressure on the vial.
< 0.01 % with programmable needle wash
53
User manual Triathlon
Programming
Injection methods
Injection volume
Injections per vial
Analysis time
Needle wash
Priority sample
Series
Flushed loop injections
Partial loopfill injections
µL pick-up injections
1 µL – 1 mL, full loop, depending on system settings
1 - 500 µL, with 1 µL increments for partial loopfill
1 µL - max. volume, with 1 µL increments for µL pick-up
max. volume = ((loop volume - 3 x needle volume)/2)
Max. 9 (volumes are programmable for each injection)
Max. 9 hrs. 59 min. 59 sec.
Programmable (between injections, vials or series)
Freely programmable
Freely programmable, 24 series max.
Physical
Dimensions (W x D x H)
Weight
280 mm x 540 mm x 440 mm
22 kg
30 kg if cooling option is installed
Electrical
Power requirements
Fuses
Internal fuse
115 VAC; ± 10 %; 50 Hz/60 Hz; 250 VA
230 VAC; ± 10 %; 50 Hz/60 Hz; 250 VA
For 115 VAC; two 5.0 AT-fuses
(¼” x ¼”, UL/CSA)
For 230 VAC; two 2.5 AT-fuses
(5 x 20 mm, IEC 127)
All fuses UL-listed and CSA-certified
One 6.3 AT fuse
(5 x 20 mm, IEC 127)
Communication
OUTPUTS
54
Inject marker
Vial marker
Labeled vial marker
Stop I/O
BCD output
4 Auxiliary outputs
2 Programmable outputs
Alarm output
4 Bit timebase
0060.122-21
User manual Triathlon
INPUTS
SERIAL COMMUNICATION
PORT
PC-CONTROL
SPARKLINK PROTOCOL
Next injection input
Next vial input
Freeze input
Stop I/O
4 Programmable inputs
RS232C
Microsoft Windows ‘95 / Windows NT
Yes
Options
Sample cooling
Built-in Peltier cooling processing unit
Programmable Range : 4° C - 40° C
Accuracy: " 2° C
Cooling capacity: Ambient -20° C (measured on cooling tray)
Note: Ring temperature at relative humidity of 80% and
ambient temperature of 31° C, decreasing to 50% at 40° C
One or two optional high pressure 6-port valves
Integrated stream switching
(ISS)
Solvent selection valve (SVV) 6-way integrated solvent selection valve
Biocompatible option
Rheodyne 9000 series biocompatible valve, with PEEK
sample needle and PEEK loop
Biocompatible ISS valve
One or two optional Rheodyne 9000 series biocompatible
high pressure 6-port valves
Micro option
Triathlon for small injection volumes, down to 0.1 µl
(equipped with VALCO valve, fused silica needle and special
software)
Optional trays
LSV-tray: 9 vials of 4.0 mL per segment
Micro-tray: 20 micro vials per segment
Super LSV-tray: 4 vials of 10 mL per segment
Column oven
Mistral column oven combined with the Triathlon. The
injection valve and optional high pressure valve fit into the
column oven
0060.123-21
55
User manual Triathlon
56
0060.122-21
User manual Triathlon
Appendix C. Error Codes
The Triathlon will display an error message if the user tries to enter invalid data. Information
on the allowed range will be displayed. If something goes wrong in the physical operations of
the Triathlon, an error code will be displayed. Press the Start/Stop key twice to lift the
message and try to repair the failure condition with the help of the explanation of the code
concerned.
Injection valve and ISS unit
ERROR 11
ERROR 12
ERROR 13
ERROR 14
ERROR 15
ERROR 17
ERROR 18
Injection valve is not in a valid position.
The injection valve did not switch within 1.5 seconds.
The switching time of the injection valve exceeds 500 msec.
ISS A valve is not in a valid position.
The ISS A valve did not switch within 1.5 seconds.
ISS valve B is not in a valid position.
ISS valve B did not switch within 1,5 seconds.
Syringe dispenser unit
ERROR 21
ERROR 22
ERROR 23
ERROR 24
ERROR 25
The syringe valve did not switch.
The syringe did not reach home position in time.
The syringe spindle did not make the correct number of rotations.
The spindle does not rotate.
The syringe valve did not find a valid position.
Injection needle unit
ERROR 30
ERROR 31
ERROR 32
ERROR 33
ERROR 34
ERROR 35
ERROR 36
ERROR 37
ERROR 39
ERROR 40
ERROR 41
ERROR 42
0060.123-21
The sample needle arm did not reach or leave home position
(vertical).
The sample needle arm is in an invalid horizontal position while
moving down.
The sample needle arm did not reach or leave destination within a
certain time (horizontal).
The sample needle arm needed too many or too few steps to reach
destination.
Sample needle arm not in vertical home position while moving
horizontally.
The sample needle is at an invalid horizontal position.
The sample needle detects too many code gaps while moving
to the next position.
The samlpe tray is not at a valid position while moving down the
needles. Stop sensor is not in tray gap.
Vial sensor sticks.
The sample needle spindle does not rotate correctly.
The sample needle did not reach or leave home position.
The sample needle is not at home position.
57
User manual Triathlon
Tray
ERROR 51
ERROR 52
ERROR 53
Incorrect tray rotation.
No segment found.
The sample needle arm is not in the home position while moving the
tray.
Vials
ERROR 60
ERROR 61
ERROR 62
ERROR 63
ERROR 64
ERROR 65
ERROR 66
ERROR 67
ERROR 68
ERROR 69
Missing vial. Only available when Skip Missing Vial is set to NO in the
System Settings.
Missing segment.(Only available when Skip Missing Vial is set to NO
in the System Settings and during the execution of a Mix Method).
Missing transport vial.
Missing transport segment. (Only available when Skip Missing Vial is
set to NO in the System Settings and during the execution of a Mix
Method).
Missing vial for reagent A.
Missing vial for reagent B.
Missing vial for reagent C.
Missing vial for reagent D.
Missing destination vial.
Not enough transport liquid available due to missing transport
vials or segments.
Electronics
ERROR 71
ERROR 72
ERROR 73
ERROR 75
58
Flexprint of the sample needle is not connected.
Invalid configuration of the Triathlon, PCB missing.
Current limit of the external I/O exceeded.
Error occurred during initialization, the Triathlon cannot start.
0060.122-21
User manual Triathlon
Appendix D. Options and accessories
The following configuration options are available for the Triathlon:
number
description
0900.000
0900.830
0900.831
0900.832
Triathlon Autosampler
Integrated Stream Switching option, two six-way valves
½ Integrated Stream Switch option, one six-way valve
Triathlon SSV: Solvent Selector Valve (SSV), a six-way solvent
selector valve
Triathlon Integrated Stream Switch, two six-way biocompatible
Rheodyne 9000 series valves
Tray cooling, Peltier type cooling elements
Biocompatible option, Rheodyne 9000 series injection valve, Peek
needle and Peek loop
Micro option Triathlon
Mistral, HPLC column thermostat to be used in combination with
the Triathlon autosampler
Mistral, Peltier cooled HPLC column thermostat to be used in
combination with the Triathlon autosampler
0900.836
0900.840
0900.872
0900.978
0880.914
0880.915
Trays and tray segments:
0900.313
0900.315
0900.314
0900.316
0900.317
0900.351
0900.352
0900.353
0900.354
0900.355
0900.356
0900.357
0900.358
0900.361
0900.362
0900.363
0900.364
0900.365
0900.366
0900.367
0900.368
0060.123-21
Tray set (for cool option); 8 segments, 1.8 mL vial, 12 positions,
12 mm O.D.
Tray set (standard); 8 segments, 1.8 mL vial, 12 positions, 12 mm
O.D.
Tray segment, 0.5 mL vial, 20 positions, 7 mm O.D.
Tray segment, 4 mL vial, 9 positions, 15 mm O.D.
Tray segment, 10 mL vial, 4 positions, 22 mm O.D.
Tray segment; standard tray, number 1
Tray segment; standard tray, number 2
Tray segment; standard tray, number 3
Tray segment; standard tray, number 4
Tray segment; standard tray, number 5
Tray segment; standard tray, number 6
Tray segment; standard tray, number 7
Tray segment; standard tray, number 8
Tray segment; tray with cooling option, number 1
Tray segment; tray with cooling option, number 2
Tray segment; tray with cooling option, number 3
Tray segment; tray with cooling option, number 4
Tray segment; tray with cooling option, number 5
Tray segment; tray with cooling option, number 6
Tray segment; tray with cooling option, number 7
Tray segment; tray with cooling option, number 8
59
User manual Triathlon
number
description
The following accessories are available for the Triathlon:
60
number
0043.344
0043.364
0043.473
0060.123
0700.002
0700.003
0700.008
0700.009
0700.010
0700.011
0700.012
0700.018
0700.019
description
Tray cooling cover
Needle wash insert vial
Needle body
User manual
Long Bushing Rheodyne (pck/10)
Ferrule Rheodyne (pck/10)
Rheflex ferrule (pck/10)
Rheflex nut (pck/10)
Flanged tube fitting 1/8 (pck/5)
Flanged tube fitting 1/16 (pck/5)
Plunger replacement tip 100 µL (pck/10)
Plunger replacement tip 500 µL (pck/10)
Plunger replacement tip 1 mL (pck/10)
0900.300
0900.301
0900.303
0900.304
0900.311
0900.321
0900.322
0900.323
0900.325
0900.326
0900.700
0900.710
0900.711
0900.712
0900.713
0900.714
0900.715
0900.718
0900.721
0900.811
0900.812
2140.160
3796.004
3796.005
3796.035
3796.009
3796.010
3796.019
Biocompatible injection valve assembly
Injection valve assembly
Sample needle including tubing ferrules and nuts
Serum sample needle including tubing ferrules and nuts
Peek sample needle including tubing ferrules and nuts
Sample needle extra long including tubing ferrules and nuts
Serum sample needle extra long including tubing ferrules and nuts
Peek sample needle extra long including tubing ferrules and nuts
Fused silica needle including tubing ferrules and nuts
Fused silica needle extra long including tubing ferrules and nuts
Software Triathlon
Buffer tubing 500 µL
Buffer tubing 2000 µL
Syringe waste tubing
Syringe wash tubing
Tubing Solvent Selector valve, Syringe valve
Buffer tubing 15 mL
Air/prepuncturing needle
Tefzel buffer tubing 2000 µL
Inject marker cable
Next injection input cable
Luerlock connection syringe valve
Rheodyne 7010 rotor seal
Rheodyne 7010 stator
Rheodyne loop 5 µL
Rheodyne loop 10 µL
Rheodyne loop 20 µL
Rheodyne loop 50 µL
0060.122-21
User manual Triathlon
number
description
3796.012
3796.013
3796.014
3796.015
3796.016
3796.076
3796.032
3796.033
3796.040
3796.041
3796.042
3796.050
3796.062
3796.065
4340.025
4400.000
4400.030
4400.250
4400.500
4400.251
4400.001
4400.601
4400.602
4400.603
4400.604
4400.607
4400.605
4400.606
Rheodyne loop 100 µL
Rheodyne loop 200 µL
Rheodyne loop 500 µL
Rheodyne loop 1000 µL
Rheodyne loop 100 µL Peek
Rheodyne loop 20 µL Peek
Rheodyne Rheflex ferrule
Rheodyne Rheflex nut
Rheodyne 9010 Rotor seal
Rheodyne 9010 Stator
Rheodyne Stator face assembly
Rheodyne 7010 Tefzel rotor seal
Flanged tubing fitting 1/8 "
Flanged tubing fitting 1/16"
Wash solvent bottle 250 mL
Syringe 1000 µL
Syringe100 µL
Syringe 250 µL
Syringe 500 µL
Syringe 25 µL (for micro option Triathlon)
Syringe 10 mL
Plunger replacement tip 100 µL (pck/10)
Plunger replacement tip 250 µL (pck/10)
Plunger replacement tip 500 µL (pck/10)
Plunger replacement tip 1000 µL (pck/10)
Plunger replacement tip 25 µL (pck/10) (micro option)
Plunger replacement o-ring 500 µL (pck/10)
Plunger replacemnt o-ring 1000 µL (pck/10)
0060.123-21
61
User manual Triathlon
62
0060.122-21
User manual Triathlon
Appendix E. Calibration and performance
The Triathlon is factory tested for reproducibility, carry-over and mixing according to the
following test procedure.
E.1 Analytical performance test
E.1.1 Analytical system
The Triathlon is tested in an analytical system under the following conditions:
flow:
1.5 mL/min
Pump
eluent:
distilled water
Detector wavelength: 254 nm
Uracil in distilled water (50 ppm)
Sample:
The following configuration was used:
PUMP
1.5 ml/min
UV-Detector
254 nm
Integrator
10 mtr SS-tubing (0.25 mm ID),
for peak modelling.
E.1.2 Relative standard deviation (RSD%)
The following formulas are required for calculating the RSD:
Peak area =
σ n −1 =
∑ Peak area
n
∑ ( Peak area
−
n −1
σ n −1
RSD% =
× 100%
Peak area
0060.123-21
Peak area
)
2
63
User manual Triathlon
E.1.3 Reproducibility test
The default system settings were used, except for the following:
<GENERAL>
<TRAYS>
Air segment: NO
Location first transport vial: A7
Location last transport vial: A7
Sx vials are filled with sample on positions A1 - A6.
The transport solvent vial is filled with eluent and placed on position A7.
The wash solvent bottle is filled with 80% H2O / 20% Iso-propanol.
Injection method
Wash method
Number
1
Number
Type
µL pick-up
Wash between injections
Analysis time
1:00 min
Wash volume
Injections/vial
Injection volume 1
Injection volume 2
5 µL
Injection volume 3
5 µL
Series
1
Number
1
First vial
A 01
Last vial
A 06
3
Injection method
1
5 µL
Wash method
1
300 µL
Example chromatogram of the reproducibility test:
64
0060.122-21
User manual Triathlon
Peak
number
1
2
3
4
5
6
7
8
9
10
11
12
13
14
15
16
17
18
Area
206342
204773
205425
205203
205566
205568
206156
206174
205956
206165
205765
205960
206296
205617
205619
205648
206147
207070
From the integration results the RSD% for the Triathlon can
be calculated.
For this example the results are:
RSD%
= 0.25 %
The specified value is an RSD% < 1%.
E.1.4 Mixing and carry-over test
The default system settings were used, except for the following:
<USAGE>
Use of mix methods: ENABLED
A tray with one sample vial filled with sample (50 ppm Uracil, A01), one sample vial filled
with eluent (A02), and one empty (destination, A03) vial are placed in the Triathlon. A 1:10
dilution of sample from the sample vial will be made in the empty destination vial. After
dilution from both vials (sample and destination) 10 µL will be injected. The Reagent-A vial is
filled with eluent.
The wash solvent bottle is filled with 80% H2O / 20% Iso-propanol.
0060.123-21
65
User manual Triathlon
Injection method
Series 1
Series 2
Number
1
Number
1
Number
2
Type
partial loopfill
Injection method
1
Injection method
1
Analysis time
1:00 min
Wash method
None
Wash method
none
Flush volume
35 µL
Mix method
1
Mix method
none
Injections/vial
3
First vial
A 01
First vial
A 01
Injection volume 1
10 µL
Last vial
A 01
Last vial
A 02
Injection volume 2
10 µL
First destination vial
A 03
Injection volume 3
10 µL
Reagent A vial
A 02
Mix method 1
Step Action
Speed
5 µL Air
Height
1
Aspirate
2
Aspirate
225 µL Reagent A
2
02
3
Dispense
180 µL to Destination
3
02
4
Dispense
5
Repeat last 4 steps 1 time
6
Aspirate
7
Aspirate
60 µL Sample
2
02
8
Dispense
40 µL to Destination
3
02
9
Dispense
50 µL to Waste
5
10
Aspirate
50 µL Air
2
11
Aspirate
200 µL from Destination
3
0
12
Dispense
200 µL to Destination
9
20
13
Repeat last 2 steps 3 times
14
End of mix method
50 µL to Waste
5 µL Air
2
5
2
Example chromatogram of the mixing and carry-over test:
66
0060.122-21
User manual Triathlon
Peak
number
1
2
3
4
5
6
7
8
9
From the integration results the RSD% for the two vials and the
carry-over for the Triathlon can be calculated.
Area
38802
38968
39088
395258
394090
394471
-
For this example the results are:
RSD% (vial A01, sample) = 0.15 %
RSD% (vial A03, 1:10 dilution) = 0.37 %
1:10 dilution = 1:10.13: variation -1.29%
The specified variation is ± 5%
Carry-over (vial A02):
< 0.2%
The real value cannot been calculated, the specified value is a
Carry-over <0.2%.
E.2 Syringe calibration
To calibrate the syringe dispense a volume of 200 µL water from a sample vial to an empty
destination vial with the following mix method.
Mix method 1
Step Action
Speed
Height
1
Aspirate
250 µL Sample
2
02
2
Dispense
200 µL to Destination
3
02
3
End of mix method
Series 1
Injection method
None
Wash method
None
Mix method
1
First sample vial
A 01
Last sample vial
A 01
First destination vial
A 02
•
•
Weigh the destination vial before and after the Run.
The difference is the dispensed volume
•
The specified variation is ± 2%
0060.123-21
67
User manual Triathlon
E.3 Tray cooling calibration
1.
2.
3.
4.
Place a thermocouple on the bottom of the tray, make sure the contact is good.
Switch on the tray cooling and program a setpoint of 10°C
Wait minimal 15 minutes for equilibration of the Triathlon
Read out the temperature of the thermocouple.
The value must be in a range of ± 2°C of the programmed setpoint.
E.4 Loop calibration
1.
2.
3.
4.
5.
6.
7.
Disconnect the loop from the injection valve.
Remove all liquids from the loop with air.
Weigh the empty loop on an analytical balance.
Fill the loop with minimal 2 times its volume of water.
Weight the filled loop again.
The difference in weight is the capacity of the loop.
The weight divided by the specific weight of water (1 g/mL) gives the calibrated volume
of the loop.
Allowed variation: ± 10% (According to Rheodyne).
68
0060.122-21
User manual Triathlon
Appendix F. Rheodyne injection valve
The Triathlon is standard equipped with a Rheodyne 7739 valve; the biocompatible Triathlon
is equipped with a Rheodyne 9740 valve. The text below is a copy of the Rheodyne
Operating instructions.
F.1 Operating Instructions for Rheodyne Model 7739 Valve
2
2
1
1
3
3
6
4
5
Shaft Assembly
R ota ted
C lockwise
6
4
5
Shaft Assembly
R ota ted
C ounterclockwise
Figure F.1 Flow diagram of Model 7739 as viewed from stator.
Model 7739 is a two-position, six-port stainless steel valve. Figure F.1 shows the flow
diagram of the valve. The six small circles
Shaft Assembly
represent the ports in the valve stator. The slots are
the connecting passages in the rotor seal. Rotation
of the valve 60° switches the valve from one
position to another.
Body
Specifications:
Maximum temperature is 100°C.
The valve is set to hold 345 bar (5000 psi).
The wetted surfaces are stainless steel and an inert
polymer.
Rotor Pins
Isolation Seal
Rotor Seal
Stator Ring
Maintenance
With normal use the valve will give many tens of
thousands of cycles without trouble. The main
cause of early failure, which is seen as a leak in the
valve, is abrasive particles in the sample and/or
mobile phase which can scratch the rotor seal.
Following is the procedure for changing the rotor
seal and isolation seal.
Refer to figure F.2 and proceed:
Stator
Location Pin
Stator
Stator Screws
Figure F.2 Exploded view of model
7739
0060.123-21
69
User manual Triathlon
1.
2.
3.
4.
5.
6.
Remove the three stator screws with the 9/16” hex key.
Remove the stator and stator ring from the valve body.
Pull the rotor seal off the pins.
Remove the isolation seal.
Mount the new isolation seal with the spring side facing away from the rotor seal.
Mount the new rotor seal. The three pins on the shaft assembly fit into the mating holes
in the rotor seal only one way. Mount the seal with the grooves facing the stator.
7. Replace the stator ring so that the body locating pin in the stator ring enters the mating
hole in the body.
8. Mount the stator on the valve so the stator locating pin in the stator ring enters the
mating hole in the stator.
9. Replace the three stator screws. Tighten each an equal amount until the screws are
tight.
F.2 Operating Instructions for Rheodyne Model 9740 Valve
2
2
1
1
3
3
6
4
5
Shaft Assembly
R ota ted
C lockwise
6
4
5
Shaft Assembly
R ota ted
C ounterclockwise
Figure F.3 Flow diagram of model 9740 as viewed from stator.
Model 9740 is a two-position, six-port PEEK valve. Figure F.3 shows the flow diagram of the
valve. The six small circles represent the ports in the valve stator. The slots are the
connecting passages in the rotor seal. Rotation of the valve 60°switches the valve from one
position to another.
Specifications
Maximum temperature is 50°C.
The valve is set to hold 345 bar (5000 psi).
The wetted surfaces are PEEK alumina ceramic, and an inert polymer.
CAUTION
70
Use only plastic ferrules in the stator ports. Metal ferrules can cause
irreparable damage to the plastic stator.
0060.122-21
User manual Triathlon
Maintenance
With normal use the valve will give many tens of thousands of cycles without trouble. The
main cause of early failure, which is seen as a leak in the valve, is abrasive particles in the
sample and/or mobile phase which can scratch the rotor seal.
Following is the procedure for changing the rotor seal,
stator face assembly, and isolation seal. Refer to figure F.4
and proceed:
Body
1. Remove the three stator screws with a 9/64 inch hex
Shaft Assembly
Isolation Seal
key.
Rotor Seal
2. Remove the stator, stator face assembly and stator ring
Body Location Pin
from the valve body.
Stator Ring
3. Pull the rotor seal off the pins.
Stator Location Pin
4. Remove the isolation seal.
5. Mount the new isolation seal with the spring side facing
Stator Face
Assembly
away from the rotor seal.
Stator
6. Mount the new rotor seal. The three pins on the shaft
assembly fit into the mating holes in the rotor seal only
Stator Support
Ring
one way. Mount the seal with the grooves facing the
stator.
7. Replace the stator ring so that the body locating pin in
the stator ring enters the mating hole in the body.
Stator Screws (3)
8. Put the new stator face assembly on the stator. The
three pins on the assembly fit the mating holes in the
Figure F.4 Exploded view of Model
9740
stator only one way.
9. Mount the stator and stator face assembly on the
valve so the stator locating pin in the stator ring enters the mating hole in the stator.
10. Replace the three stator screws. Tighten each an equal amount until the screws are
tight.
0060.123-21
71
User manual Triathlon
72
0060.122-21
User manual Triathlon
Appendix G. Programming options
•
Ready Menu
<ADVANCE>
<WASH>
<SYR END>
<COPY
Advance tray
•
[System]
Perform
standard wash
<ERASE>
<LOG>
<SSV> **
<COOL> **
<SERVICE>
• Cool ON/OFF
• Setpoint
• Switch
ON/OFF
Copy method Erase methods Logbook
All methods
Communication Prime solvent
& Userprog
erased, all settings
valve
protocol
to default
Service mode
ß [Menu] à
<USAGE>
<TRAY>
•
•
•
•
•
Loopvolume
Needle tubing
Syringe volume
Syringe speed
Needle height
Skip missing vials
Air segment
Headspace pressure
Time base display
Key click
Error beep
Alarm buzzer
<SERIAL>
<DEFAULT ALL>
System Settings
<GENERAL>
•
•
•
•
•
•
•
•
•
•
•
•
Move syringe
ß [Menu] à
<UTILS>
Method protection code
Use time base method
Use mix method
Use user-program
User-program protection
code
• Use labeled vials
• Use templates
• Use calibration vials
•
•
•
•
•
•
•
•
•
1: type /number
2: type/number
3: type/number
4: type/number
5: type/number
6: type/number
7: type/number
8: type/number
number of transport
vials
<IO>
•
•
•
•
•
•
•
•
Vial output
Inj. Marker pulse
Vial marker pulse
Lab. Vial marker pulse
Input edge next inj.
Input edge next vial
Freeze input active
Reset outputs after
series
<CLOCK>
• System clock
• Date
• Time
<COMM.>
• Device identifier
Methods
[Method]
<INJECTION>
<WASH>
Injection methods
<FLUSHED>
• Analysis time
• Flush volume
• Injection/vial
[Series}
•
•
•
•
<PARTIAL>
<PICK-UP>
Analysis time
Flush volume
Injection/vial
Inj. Volumes
• Analysis time
• Injection/vial
• Inj. volumes
• Wash volume
• Wash between:
–Series
–Vials
–Injections
<TIMEBASE> *
Timebase program:
• 4x AUX 1
• 4x AUX 2
• 4x AUX 3
• 4x AUX 4
• 4x ISS-A
• 4 x ISS-B
• 8x SSV
• 8x CODE OUT
• END TIME
<MIX> *
Mix method:
• ASPIRATE
–sample
–destination
–air
–reagent
• DISPENSE
–sample
–destination
–waste
–reagent
• REPEAT
• WAIT
• WASH
• Template
• Use calibration vials (yes/no) *
– calibration vials
– calibration interval
• Sample vials
• Destination vials *
• Reagent vials *
• Labeled vials *
Note *:
These parameters depend on the contents of the
methods used and/or the System Settings of the
Triathlon.
• First series
• Last series
• <START> <REMOTE>
Note **:
Optional Soft-function keys.
[Priority]
• Template
• Vial number
[Interrupt]
Not used
PRIORITY:
Only available when user-program and mix
method have been disabled in the System
Settings.
[Start/Stop]
[Help]
0060.123-21
Context and status sensitive help screen (if available)
73
User manual Triathlon
•
Ready Menu
<ADVANCE>
<WASH>
<SYR END>
ß [Menu] à
<UTILS>
<COPY
Advance tray
•
[System]
Perform
standard wash
<LOG>
<COOL> **
<SERVICE>
• Cool ON/OFF
• Setpoint Switch
ON/OFF
Copy method Erase methods Logbook
All methods
Communication Prime solvent
& Userprog
erased, all settings
valve
protocol
to default
Service mode
ß [Menu] à
<USAGE>
<TRAY>
•
•
•
•
•
Loopvolume
Needle tubing
Syringe volume
Syringe speed
Needle height
Skip missing vials
Air segment
Headspace pressure
Time base display
Key click
Error beep
Alarm buzzer
<SSV> **
<DEFAULT ALL>
System Settings
<GENERAL>
•
•
•
•
•
•
•
•
•
•
•
•
Move syringe
<ERASE>
<SERIAL>
Method protection code
Use time base method
Use mix method
Use user-program
User-program protection
code
• Use labeled vials
• Use templates
• Use calibration vials
•
•
•
•
•
•
•
•
•
1: type/number
2: type/number
3: type/number
4: type/number
5: type/number
6: type/number
7: type/number
8: type/number
number of transport vials
<IO>
•
•
•
•
•
•
•
<CLOCK>
• System clock
• Date
• Time
Inj. Marker pulse
Vial marker pulse
Lab. Vial marker pulse
Input edge next inj.
Input edge next vial
Freeze input active
Reset outputs after
series
<COMM.>
• Device identifier
Methods programming
[Method]
<TEMPLATE>
• Userprog *
or
• Mix method *
• Injection method
• Wash method
• Timebase meth.*
<METHODE>
<USRPROG> *
Methods
<INJECTION>
<WASH>
Injection methods
<FLUSHED>
• Analysis time
• Flush volume
• Injection/vial
Series}
[Start/Stop]
With templates
• Template
• Use calibration vials (yes/no) *
– calibration vials
– calibration interval
• Sample vials
• Destination vials *
• Reagent vials *
• Labeled vials *
• Template
• Vial number
[Interrupt]
Not used
74
<PICK-UP>
Analysis time
Flush volume
Injection/vial
Inj. volumes
• Analysis time
• Injection/vial
• Inj. Volumes
Without templates
• Userprogram (yes/no)
or
• Mix method *
• Injection method
• Wash method
• Timebase method *
• Use calibration vials (yes/no) *
– calibration vials
– calibration interval
• Sample vials
• Destination vials *
• Reagent vials *
• Labeled vials *
• First series
• Last series
• <START> <REMOTE>
[Priority]
[Help]
•
•
•
•
<PARTIAL>
•
•
•
•
Injection method
Wash method
Timebase method *
Vial number
• Wash volume
• Wash between:
–Series
–Vials
–Injections
<TIMEBASE> *
•
•
•
•
•
•
•
•
•
<MIX> *
Timebase program: Mix method:
4x AUX 1
• ASPIRATE
–sample
4x AUX 2
–destination
4x AUX 3
–air
4x AUX 4
–reagent
4x ISS-A
•
DISPENSE
4x ISS-B
–sample
8x SSV
–destination
8x CODE OUT
–waste
END TIME
–reagent
• REPEAT
• WAIT
• WASH
•
•
•
•
•
•
•
•
•
•
•
•
•
•
User program:
ASPIRATE
DISPENSE
SYR-VALVE
SYRINGE
WASH
VALVE
WAIT
COMPRESS
AUX
WAIT INPUT
PROG-OUT
CODE
MARKERS
SSV
Note *:
These parameters depend on the contents of the
methods used and/or the System Settings of the
Triathlon.
Note **:
Optional Soft-function keys.
PRIORITY:
Only available when user-program and mix
method have been disabled in the System
Settings.
Context and status sensitive help screen (if available)
0060.122-21
User manual Triathlon
Appendix H. Injection principle
This appendix offers specialist information on the injection principles used by the Triathlon.
H.1 Flushed loop injections
The switching sequence for a flushed loop injection is schematically shown in the following
figures:
The initial situation: the injector is in the INJECT position.
The sample needle has entered the vial after the air neede
has prepunctured the septum. Headspace pressure is
applied through the outer air needle to ensure that no air
or vapor bubbles are formed during sample aspiration.
The syringe dispenser aspirates the programmed flush
volume from the sample vial to fill the sample line with
sample and remove wash solvents.
The injection valve switches in LOAD position, placing a
"sharp" sample front at the inlet of the sample loop.
0060.123-21
75
User manual Triathlon
For flushed loop injections the sample loop is
quantitatively filled by transporting two or more times the
loop volume through the loop, depending on the volume of
the loop.
The injection valve switches in INJECT position. The
sample loop is now part of the HPLC mobile phase flow
path: sample is transported to the column. The analysis
time starts.
If one injection is to be done from each vial or if a wash routine has to be performed after
every injection, the needle withdraws from the vial directly after the injection and, if
programmed, directly performs a wash. After the analysis time a new sequence is started.
If more than one injection is done from the same vial without a wash routine, the Triathlon
withdraws a flush volume after the analysis time to compensate for diffusion of mobile phase
from the rotor groove into the first part of the sample line during the analysis time. The flush
volume between injections is not programmable and is always 50% of the programmed flush
volume. If the total amount of sample withdrawn with the next injection from the vial will
exceed the total volume of the buffer tubing, the buffer tubing is emptied into the wash
position before the next injection. The next fill sequence will then start with a full flush
volume.
Air segment
An air segment can be used to reduce the amount of flush volume. This air segment is at the
front of the flush volume and will not be injected and therefore will not influence the injection.
Use of an air segment can be enabled in the System Menu (General Menu).
76
0060.122-21
User manual Triathlon
With a standard needle the flush volumes must be: minimal 30 µL for injections with air
segment and 35 µL for injections without air segment. If the samples are highly viscous it
may be necessary to program larger flush volumes and reduce the syringe speed for better
performance.
A = with air segment; B = without air segment
H.2 Partial loopfill injections
The switching sequence for a partial loopfill injection is schematically shown in the following
figures:
The first three steps are identical to those for Full loop injections (see H.1).
For partial loopfill injections the sample loop is filled by
transporting the programmed injection volume into the
sample loop.
The injection valve switches into the INJECT position. The
sample loop is now part of the HPLC mobile phase flow
path: the sample is transported to the column. The
analysis time starts.
0060.123-21
77
User manual Triathlon
The next injection sequence will start with a flush of 50% of the programmed flush volume, in
case an injection from the same vial and no wash routine is programmed. Otherwise it will
start with a flush of the programmed flush volume. If the aspiration of sample for the next
injection will exceed the total volume of the sample buffer tubing, the buffer tubing is emptied
before the next injection. The next injection will start with the programmed flush, see also the
full loop injections.
Air segment
An air segment can be used to reduce the amount of flush volume. This air segment is at the
front of the flush volume and will not be injected. Use of an air segment can be enabled in
the System Menu (General Menu).
A = with air segment; B = without air segment
H.3 µL pick-up injections
The switching sequence for a µL pick-up injection is schematically shown in the following
figures:
The initital situation: the injection valve is in INJECT
position. The sample needle has entered the vial of
transport liquid (mobile phase, to avoid disturbance of the
chromatogram with an additional peak of the transport
solvent) after the air needle has prepunctured the septum.
The headspace pressure, applied through the outer air
needle, ensures that no air or vapor bubbles are formed
during wash solvent aspiration.
For the first injection after a wash or after emptying of the
buffer tubing, the syringe dispenser aspirates transport
liquid from the transport vial to fill the sample line with
transport liquid and remove wash solvent.
78
0060.122-21
User manual Triathlon
The needle moves from the transport vial to the sample
vial. The injection valve is switched to the LOAD position.
The programmed injection volume is aspirated from the
sample vial.
The sample needle moves back to the transport vial. The
sample is quantitatively transported into the loop, with
transport liquid (mobile phase) from the transport vial.
The injection valve is switched to INJECT. The sample
loop is now part of the HPLC mobile phase flow path:
sample is transported to the column. The analysis time
starts to run.
0060.123-21
79
User manual Triathlon
The next sequence will skip the first withdrawal of transport solvent, unless a wash routine is
performed or the Triathlon has emptied the buffer tubing to waste. In those cases the
sequence is completely repeated.
Air segment
If an air segment has been programmed, it appears at the front of the first plug of transport
liquid and at the front of every sample plug. Use of an air segment can be enabled in the
System Menu (General Menu).
Note: The air segment at the front of the sample plug is injected into the HPLC system.
µL pickup injections with (A) or without (B) air segment.
In case of µL pick-up injections there will be no air pressure
(headspace pressure) on the sample vial to prevent errors due to air
expansion during switching from sample vial to transport vial.
You are advised to switch off use of an Air segment in the System
Menu if the µL pick-up injection method is used.
80
0060.122-21
User manual Triathlon
Appendix I. Trouble shooting
Start up
problems
The instrument
does not work
after switching-on
of power
Power cord
unplugged or
faulty
Yes
Plug in/
replace power
cord
Yes
Replace fuse
No
Blown fuse
No
Defective
electronics
The instrument is
working, but
display doesn't
work
Display
component(s)
failure
Call your
service
representative
No response from
keyboard but
display works
Keyboard
component(s)
failure
Call your
service
representative
Error code
appears on the
display
0060.123-21
Call your
service
representative
Check Appendix C,
to locate error
message
81
User manual Triathlon
Analytical problems
In case of analytical problems you will have to determine whether they are caused by the
autosampler or by the rest of the system.
Quick check!
Replace the valve by a manual injection valve to discriminate between
valve problems and other problems.
Perform a number of manual Flushed loop injections. If the results are
good, the autosampler is faulty; if not, the HPLC system should be
checked.
WA RNIN G
SHARP NEEDLE
AND MO VINGPARTS
KEEPH AN DSCLEAR
In the flowcharts on the next pages it is assumed that the Triathlon does not
display any error messages.
Please keep in mind that analytical problems might be caused by external
influences, like temperature and/or light-sensitive samples. For this reason it
is important to make sure that the application was running without problems
before and that no changes have been made in the settings (System Menu).
82
0060.122-21
User manual Triathlon
NO
INJECTION
Blockage
in Flow
Path
Disconnect
needle from
Valve
Start
manual
wash
Solvent
flowing out of
inj. port
Check
needle
Yes
No
Disconnect
Buffer tubing
from valve
Start
manual
wash
Solvent
out of open
end
Yes
Check rotor
seal
Yes
Check
buffer
tubing
Yes
Check rotor
seal
No
Disconnect
Buffer tubing
from Syringe
valve
Start
manual
wash
Solvent
out of syringe
valve
No
Leakage inside
Injection Valve
Disconnect the needle tubing
and the buffer tubing.
Connect port 1 to an HPLC pump
Block port 6.
Start the pump at a low flow
Check for over tightened
connections in the entire
Flow Path &
Check the syringe valve
Observe
ports 3 and 4
for leakage
No
Recheck with manual valve
0060.123-21
83
User manual Triathlon
BAD
REPRODUCIBILITY
84
Air in Flow Path
Start manual wash
Leaking Syringe
Replace plunger tip or
Syringe
Leaking Syringe
Valve
Replace Valve
Rotor seal worn out
Replace seal.
Check Stator
Dead volumes in
tubing connections
Redo connections with new
Ferrules and nuts
0060.122-21
User manual Triathlon
Appendix J. Logbooks
The following pages contain sample pages for logbooks that can be used with the Triathlon.
Keep a record of settings (System Menu) and of programmed methods and templates
(Methods Menu) for future reference. Use copies of the provided pages.
0060.123-21
85
User manual Triathlon
User information
Name of user
Company
Department
Address
Telephone
Telefax
Triathlon information
Serial number
Firmware version
Purchase date
Installed options
Local dealer
Service engineer
Address
Telephone
Telefax
Comments:
86
0060.122-21
User manual Triathlon
System Menu settings
<GENERAL>
Loop volume
Needle tubing volume
<USAGE>
µL Protection code:
Timebase methods
µL
Syringe volume
µL Mix methods
Syringe speed
.... factor
......
enabled
disabled
enabled
disabled
....
User program
Needle height
Skip missing vials
yes
no
Air segment
yes
no
Headspace pressure
yes
no
Time display
enabled
disabled
mm
HH:MM:SS H:MM:mm
Key click
Error beep
Alarm buzzer
<TRAY>
1: type /number
2: type /number
3: type /number
4: type /number
5: type /number
6: type /number
7: type /number
8: type /number
position first transport vial: ....
position last transport vial: ....
<CLOCK>
On (yy/mm/dd and hh/mm)
Off
on
on
on
off
off
off
User program
protection code
......
Labeled vials
enabled
disabled
Templates
enabled
disabled
Calibration vials
enabled
disabled
<IO>
Inject-marker pulse length
....sec.
Vial-marker pulse length
....sec.
Labeled vial-marker pulse
length
....sec.
Input edge next injection
falling
rising
Input edge next vial
falling
rising
Freeze input active
low
high
Reset outputs after last series
yes
no
<COMM.>
Device identifier: 2..
Comments:
0060.123-21
87
User manual Triathlon
Templates
Template
number
1
2
3
4
5
6
7
8
9
10
11
12
13
14
15
16
17
18
19
20
21
22
23
24
Injection
method
Mix
method
Wash
method
Timebase
method
User program
Y/N
Comments
Comments:
88
0060.122-21
User manual Triathlon
Injection methods
injection type
Anal.
method flushed time
number partial
Flush Inj.
vol.
per
vial
Injection volumes:
1
2
3
4
5
6
7
8
9
pick-up
1
2
3
4
5
6
7
8
9
10
11
12
13
14
15
16
17
18
19
20
21
22
23
24
Comments:
0060.123-21
89
User manual Triathlon
Wash methods
Wash method
number
Wash between
1
injections
vials
series
2
injections
vials
series
3
injections
vials
series
4
injections
vials
series
5
injections
vials
series
Wash volume
Comments:
Comments:
90
0060.122-21
User manual Triathlon
Timebase methods
Method number
Action
AUX 1
AUX 2
1 AUX-1 ON AT TIME:
Time
Action
ISS-A
1 AUX-1 OFF AT TIME:
1 ISS-A POSITION 1-2 AT TIME:
2 AUX-1 ON AT TIME:
2 ISS-A POSITION 6-1 AT TIME:
2 AUX-1 OFF AT TIME:
2 ISS-A POSITION 1-2 AT TIME:
3 AUX-1 ON AT TIME:
3 ISS-A POSITION 6-1 AT TIME:
3 AUX-1 OFF AT TIME:
3 ISS-A POSITION 1-2 AT TIME:
4 AUX-1 ON AT TIME:
4 ISS-A POSITION 6-1 AT TIME:
4 AUX-1 OFF AT TIME:
4 ISS-A POSITION 1-2 AT TIME:
1 AUX-2 ON AT TIME:
ISS-B
1 ISS-B POSITION 1-2 AT TIME:
2 AUX-2 ON AT TIME:
2 ISS-B POSITION 6-1 AT TIME:
2 AUX-2 OFF AT TIME:
2 ISS-B POSITION 1-2 AT TIME:
3 AUX-2 ON AT TIME:
3 ISS-B POSITION 6-1 AT TIME:
3 AUX-2 OFF AT TIME:
3 ISS-B POSITION 1-2 AT TIME:
4 AUX-2 ON AT TIME:
4 ISS-B POSITION 6-1 AT TIME:
4 ISS-B POSITION 1-2 AT TIME:
1 SSV PORT:
AT TIME:
1 AUX-3 OFF AT TIME:
2 SSV PORT:
AT TIME:
2 AUX-3 ON AT TIME:
3 SSV PORT:
AT TIME:
2 AUX-3 OFF AT TIME:
4 SSV PORT:
AT TIME:
3 AUX 3 ON AT TIME:
5 SSV PORT:
AT TIME:
3 AUX 3 OFF AT TIME:
6 SSV PORT:
AT TIME:
4 AUX 3 ON AT TIME:
7 SSV PORT:
AT TIME:
8 SSV PORT:
AT TIME:
1 CODE-OUT:
AT TIME:
1 AUX 4 OFF AT TIME:
2 CODE-OUT:
AT TIME:
2 AUX 4 ON AT TIME:
3 CODE-OUT:
AT TIME:
3 AUX 4 OFF AT TIME:
4 CODE-OUT:
AT TIME:
3 AUX 4 ON AT TIME:
5 CODE-OUT:
AT TIME:
1 AUX-3 ON AT TIME:
SSV
4 AUX 3 OFF AT TIME:
AUX 4
1 ISS-B POSITION 6-1 AT TIME:
1 AUX-2 OFF AT TIME:
4 AUX-2 OFF AT TIME:
AUX 3
Time
1 ISS-A POSITION 6-1 AT TIME:
1 AUX 4 ON AT TIME:
CODE
3 AUX 4 OFF AT TIME:
6 CODE-OUT:
AT TIME:
4 AUX 4 ON AT TIME:
7 CODE-OUT:
AT TIME:
4 AUX-4 OFF AT TIME:
8 CODE-OUT:
AT TIME:
END
0060.123-21
END OF TIMED EVENTS AT:
91
User manual Triathlon
Mix method
Method number:
Line
Action
Value
1
2
3
4
5
6
7
8
9
10
11
12
13
14
15
16
17
18
19
20
21
22
23
24
25
26
27
28
29
30
31
32
33
34
35
36
37
38
39
40
Position
Speed
Height
Line
Action
Value
Position
Speed
Height
41
42
43
44
45
46
47
48
49
50
51
52
53
54
55
56
57
58
59
60
61
62
63
64
65
66
67
68
69
70
71
72
73
74
75
76
77
78
79
80
Comments:
92
0060.122-21
User manual Triathlon
User program
Method number:
Line
Action
Value
1
2
3
4
5
6
7
8
9
10
11
12
13
14
15
16
17
18
19
20
21
22
23
24
25
26
27
28
29
30
31
32
33
34
35
36
37
38
39
40
Position
Speed
Height
Line
Action
Value
Position
Speed
Height
41
42
43
44
45
46
47
48
49
50
51
52
53
54
55
56
57
58
59
60
61
62
63
64
65
66
67
68
69
70
71
72
73
74
75
76
77
78
79
80
Comments:
0060.123-21
93
User manual Triathlon
94
0060.122-21
User manual Triathlon
Index
µL pick-up 1, 11-13, 78-80
example 23, 24
A
accessories 59-61
accuracy 12, 13
air outlet nut 10, 11
air segment 34, 73, 74, 76, 77
alarm buzzer 34
analysis time 39
<ASPIRATE> 38, 40
<AUTOMATIC> 32
<AUX> 39, 41
device identifier 37
<DISPENSE> 38, 40
display 4
drain wash-position 2, 8
E
BCD 36
buffer tubing 1, 2, 11-13
buttons see keys
E 4, 19
<EDIT> 38, 40
<END> 40
<ERASE> 31
error beep 34
error codes 57, 58
Escape 5, 19
<EVENTS> 32
examples 23-30
<EXIT> 33
experienced users i
extended needle 11
C
F
calibration Triathlon 63-68
calibration vials 36, 42
carry-over test 65-67
CE-mark 3
CL 4, 19
<CLOCK> 37
<CODE> 40, 42
<COMM.> 37
communication interface 3
<COMPRES> 41
condensed water and leakage 2, 8, 32
contact closures outputs 45, 46
<COOL> 32
cooling 3, 8, 32
calibration 63
<COPY> 31
<COUNT> 32
cover 2
create template 29
cursor keys 4, 19
factory installed items 52
fan 3
first-time users i
first transport vial 36
fluid connections 1
flush volume 12, 13, 39
flushed loop 1, 11-13, 75-77
freeze input 49
freeze input active 36
fused silica needle 11
fuses 3, 54
B
D
<DATE-TIME> 32
<DEFAULT ALL> 32
define series 24, 26, 29
<DELETE> 35, 38
<DESTINATION> 28
0060.123-21
G
<GENERAL> 33, 34
Getting started 19-21
H
headspace pressure 10, 34
HEX 36
Help 5
<HIGH> 41
Hold/Cont. 4
<HOME> 41
HPLC connections 7
95
User manual Triathlon
I
initialization 51
<INJECT> 41
<INJECTION> 39injection principle 1, 7580
injection method 20
number 37
injection valve see Rheodyne valve
injection volume 11-13, 39
inject-marker pulse length 36, 37
INPUT 1-4 45, 46
input edge next injection 36
input edge next vial 36
<INSERT> 38, 40
installation 7, 51, 52
Interrupt 4
introduction 1-5
<IO> 36
I/O connections 3, 45-46
ISS 39
K
key click 34
keypad 4, 5
keys 4, 5
L
labeled vial 35, 43
labeled vial marker pulse length 36
last transport vial 36
<LOAD> 41
<LOG> 32
logbooks 85-94
loop volume 33
calibration 67
<LOW> 41
LSV needle 11
M
mains input 3
mains switch 3
<MANUAL> 32
<MARKERS> 42
[MENU] 5, 19
Menu 5, 19
Methods 5, 19, 20, 21
<METHODS> 38-42
<INJECTION> 39, 40
<MIX> 38, 39
<TIMEBASE> 39
96
<USER PROGRAM> 40-42
<WASH> 40
Methods Menu 29, 37-42
missing tray detection 10
missing vials detection 10
<MIX> 38
mix method 20, 37
enable/disable 35
number 37
[MN] 5, 19
N
needle 2, 10
height 35, 38, 39
holder 10
prepuncturing 10, 16
replacing 10
sample 10
standard 10
tubing 10, 33, 35
types 11
next injection input 49
next vial input 49
number of injections per vial 39
numeric keys 4
O
options 55, 59
P
<PANIC> 33
partial loopfill 1, 11-13, 77, 78
example 23, 24 27-29
PC control 31
PEEK needle 11
Peltier cooling 8, 32, 56
performance Triathlon 63-68
pictograms ii
tray detection 10, 14
tray segments 2, 14
installation 51
<TRAY> 36
types 14
preparations for use 7-18
<PRIME> 32
Priority 4
priority sample 4, 5
<PROG-OUT> 41
program method 24, 25, 27, 28
programming keys 5
0060.122-21
User manual Triathlon
programming options 73, 74
protection code 29, 30, 35
R
"r" 21
Ready Menu 19, 31-33, 51
reagent vials 7
reference 31-44
<REMOTE> 21
remote control 21, 49
<REPEAT> 38
replacement of parts 7-18
reproducibility 1, 12, 13, 63, 64
reset outputs after last series 37
Rheodyne valve 2, 69-71
RS232 3, 33
RS422/485 3
run control keys 4
run series 21, 24, 26, 29, 30
S
safety practices iii
sample handling 20
sample loop 11-13
sample loss 1, 12, 13
sampling needle 10, 11
scale factor 33
sensor 10
<SERIAL> 33
Series 5, 19, 20
executing 21
in remote control 21
Series Menu 19, 43, 44
parameters 43
without templates 43, 44
with templates 43, 44
<SERVICE> 33
settings see System Menu
silica-coated needle 11
skip missing vials 34
soft function keys 4
specifications 53-55
<SSV> 32, 42
<START> 21, 24
Start/Stop 4
stop I/O 49
symbols i, ii
<SYR> 41
<SYR END> 8, 9, 31
<SYR HOME> 8, 9, 29
0060.123-21
syringe 2, 9, 11-13
calibration 67
replacing 9
types of 11
waste 8
syringe speed 33, 35, 42
<SYR_VALVE> 41
syringe volume 33
syringe waste tubing 2
System 5, 19
System Menu 19, 23, 25, 27, 29, 29, 3337
T
Tefzel tubing 53
temperature control 32
<TEMPLATE> 30, 37
template 20
create 29
example 29, 30
enable/disable 35
<TIMEBASE> 39
timebase method 20
enable/disable 35
number 37
time display 34
transport vials 7
tray segments 2, 14
trouble shooting 81-84
TTL inputs 49, 50
TTL outputs 49, 50
tubing 52
tubing holder 2
type label 3
typographical conventions i
U
<UNLOAD> 41
<USAGE> 35, 36
<USER PROGRAM> 40
user program 12, 13, 20, 21, 33, 37
enable/disable 35
user program instead of methods 37
using the Triathlon 23-30
<UTILS> 31
97
User manual Triathlon
V
<VALVES> 39, 41
ventilation holes 3
vials 14
voltage 51
voltage selector 3
W
<WAIT> 38, 41
<WAIT-IN> 41
<WASH> 8, 9, 31, 38, 39, 41
wash method 20
number 38
wash position 2
wash solvent 2, 8, 9
<WASTE> 28
waste tubing 8
vial-marker pulse length 36, 37
vial processing method 36
vials see trays
working order 20
98
0060.122-21
User manual Triathlon
Index of soft function keys
<ADVANCE> 31
<ASPIRATE> 38, 40
<AUTOMATIC> 32
<AUX> 39, 41
<CLOCK> 37
<CODE> 40, 42
<COMM.> 37
<COMPRES> 41
<COOL> 32
<COPY> 31
<COUNT> 32
<DATE-TIME> 32
<DEFAULT ALL> 32
<DELETE> 38, 40
<DESTINATION> 28
<DISPENSE> 38, 40
<EDIT> 38, 40
<END> 40
<ERASE> 31
<EVENTS> 32
<EXIT> 33
<GENERAL> 33, 34
<HIGH> 41
<HOME> 41
<INJECT> 41
<INJECTION> 39
<INSERT> 38, 40
<IO> 36
<LOAD> 41
<LOG > 32
<LOW> 41
0060.122-20
<MANUAL> 32
<MARKERS> 42
<METHODS> 38-42
<MIX> 38
<NEEDLE> 41
<PANIC> 33
<PRIME> 32
<PROG-OUT> 41
<REMOTE> 21
<REPEAT> 38
<SERIAL> 33
<SERVICE> 33
<SSV> 32, 42
<START> 21, 24
<SYR> 41
<SYR END> 8, 9, 31
<SYR HOME> 8, 9, 31
<SYR_VALVE> 41
<TEMPLATE> 30, 37
<TIMEBASE> 39
<TRAY> 36
<UNLOAD> 41
<USAGE> 35, 36
<USER PROGRAM> 40
<UTILS> 31
<VALVES> 39, 41
<WAIT> 38, 41
<WAIT-IN> 41
<WASH> 8, 9, 31, 38, 39, 41
<WASTE> 28
1