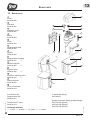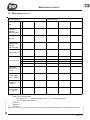
1
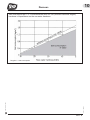
User Manual
Attentively read the use and installation
instructions prior to any work!
Should questions remain unanswered in these
instructions, please contact the manufacturer.
Hans Sasserath & Co. KG
Safety and regulating valves
Mühlenstraße 62, D-41352 Korschenbroich
Postfach 1151, D-41335 Korschenbroich
Phone: +49 2161 6105 - 0
Fax: +49 2161 6105 - 20
The company Hans Sasserath & Co. KG remains the owner of the copyright of the present instructions manual. No part of this
publication may be reproduced, transmitted in any form or by any means or used for competitive ends without prior permission of the
author.
©
1701395 • 2005/06
INSTRUCTIONS for USE and INSTALLATION: IT 3000
© Copyright Hans Sasserath & Co. KG
IT 3000 9.0264.04 0633
Website: www.syr.de
E-Mail: [email protected]
II
ToC
TABLE OF CONTENTS
CHAPTER
PAGE
1
SAFETY INSTRUCTIONS ................................................................................... 1-1
1.1
1.2
1.3
1.4
1.5
Symbols .......................................................................................................................
General safety instructions ..........................................................................................
Safety instructions, Electricity ......................................................................................
Safety instructions, Salt ...............................................................................................
Safety instructions, Temperature ..................................................................................
2
PREFACE ..................................................................................................... 2-1
3
HOW THE SYSTEM WORKS ............................................................................... 3-1
4
INSTALLATION SITE REQUIREMENTS ................................................................... 4-1
5
INSTALLATION / START-UP ............................................................................... 5-1
1-1
1-1
1-1
1-2
1-2
5.1 Installation ................................................................................................................... 5-1
5.2 Start-up ........................................................................................................................ 5-2
6
OPERATION / INTERRUPTION ............................................................................ 6-1
6.1 Operation ..................................................................................................................... 6-1
6.2 Interruption................................................................................................................... 6-1
7
MAINTENANCE / INSPECTION / CLEANING .......................................................... 7-1
7.1 Maintenance ................................................................................................................ 7-1
7.2 Inspection .................................................................................................................... 7-2
7.3 Cleaning ...................................................................................................................... 7-2
8
MALFUNCTIONS ............................................................................................. 8-1
9
WARRANTY .................................................................................................. 9-1
10 DIAGRAMS ................................................................................................ 10-1
13 MAINTENANCE REPORT ................................................................................ 13-1
III
1701395 • 2005/06
12 SPARE PARTS ............................................................................................ 12-1
©
IT 3000 9.0264.04 0633
11 TECHNICAL SPECIFICATIONS ......................................................................... 11-1
SAFETY
1
SAFETY INSTRUCTIONS
1.1
SYMBOLS
1
INSTRUCTIONS
Warning! Danger! Caution!
Important instructions regarding the correct
operation of the device. To be followed
imperatively!
1.2
GENERAL SAFETY
INSTRUCTIONS
Only use original spare parts and accessories that are
tested and approved by the manufacturer. The
manufacturer is not liable for damages caused by the
use of non-original spare parts or improper handling.
For remaining questions not being dealt with in the
instructions of installation and use, please contact the
manufacturer.
1.3
SAFETY INSTRUCTIONS
ELECTRICITY
An electric shock can be lethal or cause serious
injuries. Any non-authorised work on the electric
system is strictly forbidden!
Prior to cleaning works on the device or
close to it, always unplug the apparatus as
water and current form a lethal mixture!
The device is delivered with a shockproof plug and
shall only be plugged in a grounded shockproof
socket.
When no such shockproof socket is available, only
qualified personnel is authorised to make the
connection. The local regulations in effect (for instance
EN standards in Europe) shall be observed.
Only qualified service technicians are authorized to
install the device.
SAFETY INSTRUCTIONS, SALT
The residual regeneration salt will be flushed out of the
regeneration tanks along with the waste water, which
should not be used for watering flowers or similar
purposes.
Follow the instructions in chapter “Installation site
©
IT 3000 9.0264.04 0633
1.4
1–1
1701395 • 2005/06
Ensure that the socket is always readily
accessible. When the cable of the device is
damaged, it has to be exchanged in order to
avoid any risk. Unplug the device prior to
changing any setting in the electronic system.
SAFETY
INSTRUCTIONS
requirements” to ensure perfect safety as regards the
drain of waste water and salt.
1.5
SAFETY INSTRUCTIONS
TEMPERATURE
Warning: danger of burns! Load resistances
may become hot in operation and should not
be touched.
©
1701395 • 2005/06
IT 3000 9.0264.04 0633
Vent the water softening system right after the
connection to the water mains to ensure perfect safety.
1–2
2
PREFACE
2
PREFACE
To the customers' attention!
you made a very good decision in selecting this water
softening system, as it stands for the latest
developments in the water conditioning technology.
The SYR water softener IT 3000 is designed to protect
pipes and water heaters against scale deposits, which
reduce the water flow through the pipes and lead to a
high energy consumption. The device protects the
appliances and valves and prevents expensive repair
works.
The IT 3000 water softener is a system with two tanks,
which run alternately. The ion exchanger resin is
located in two separate tanks. The ion exchanger resin
is regenerated in two consecutive cycles. During
regeneration, the two tanks alternately ensure the soft
water supply.
Under consideration of the calculated flow rate
capacity, the IT 3000 ensures that partially softened
water is available any time at any draw-off point.
Synthetic pipes or other corrosion resistant pipes shall
be installed in all cases, where water of 0 ° dH
(German hardness degree) flows through the pipes.
Galvanized or copper tubes can be also used in case
of partial softening (approximately 8 °dH), however, it
is advisable to install a dosing pump in the mixed
water pipe downstream of the water softener, which
continuously adds a proportional amount of mineral
solution to the water
This allows to stabilize the remaining carbonate
hardness particles and forms the prerequisite for
building up a homogenous protective coating in the
downstream piping system.
2–1
1701395 • 2005/06
When delivered, immediately verify that the device
shows no visible damages.
In case of damage caused by transport, directly contact
the forwarding agency.
The warranty does not cover damages caused by
©
IT 3000 9.0264.04 0633
The functional parts are made of high-quality
materials, which all meet the local regulations and
specifications.
PREFACE
improper handling or operation.
Please refer to the terms of delivery and payment of
your local dealer for any further or other claims.
To ensure trouble-free functionality, the regeneration
salt used must comply with the requirements of the
European Standard EN 973. We recommend Broxo- or
Solvay-salt (block or tabs).
©
1701395 • 2005/06
IT 3000 9.0264.04 0633
We recommend to conclude a service contract to make
sure that the perfect functionality of all water treatment
devices is verified on a regular basis.
2–2
3
HOW THE SYSTEM WORKS
3
HOW THE SYSTEM WORKS
The IT 3000 is a system with two tanks, which run
alternately. The ion exchanger resin is located in two
separate tanks.
The ion exchanger resin is made up of small synthetic
resin beads allowing the replacement of water
hardness causing calcium ions with sodium ions.
The water becomes "soft". However, the ion
exchanger resin absorbs only a limited amount of
hardness particles. Depending on the water hardness,
the absorbing capacity of the resin becomes depleted
sooner or later and needs to be regenerated.
Regeneration in this system means removing the
hardness particles from the ion exchanger resin.
A diluted salt brine that flows through the resin bed
removes the hardness particles, which are then
directed to the sewer.
The ion exchanger resin is regenerated in two
consecutive cycles. During regeneration, the two tanks
alternately ensure the soft water supply.
As a result, the user always has soft water at his
disposal, even during regeneration.
The regeneration process requires only a small
amount of salt.
The water softening system undergoes automatic
disinfection on a regular basis in order to prevent
microbial growth. The amount of chlorine required for
that process is generated electrolytically from the brine
sucked in during regeneration.
The regeneration is carried out automatically with
wear-resistant ceramic disks.
3–1
1701395 • 2005/06
A water meter integrated in the device records the
quantity of softened water produced, which is summed
up in the electronic system. When the value that
depends on the setting of the raw water hardness is
reached, the electronic system triggers the
regeneration process.
©
IT 3000 9.0264.04 0633
The regeneration process is predetermined by the
geometry of the disks and does not need to be reset in
case of power failure. The regeneration period lasts
approximately 18 minutes for each tank, which means
that softened water can be drawn off any time due to
the alternately operating resin tanks.
HOW THE SYSTEM WORKS
©
1701395 • 2005/06
IT 3000 9.0264.04 0633
When the pressure loss in the water softening system
exceeds 0.8 bar due to a considerable amount of
water drawn off (for instance caused by a flushing
valve), an overflow valve integrated in the control unit
opens, a bypass is opened, which reduces the
pressure loss and a small amount of water is not
treated during that short moment. As a result, the
hardness of the blended water is somewhat higher for
a short while.
3–2
4
INSTALLATION SITE REQUIREMENTS
4
INSTALLATION SITE
REQUIREMENTS
Carefully follow these instructions to prevent
any problem with the water softener.
Install the water softening system in a dry room, which
is not liable to frost and is equipped with a floor drain.
The ambient temperature should not exceed 30 °C.
The system requires a power supply (230 V, 50 Hz)
under constant voltage, which is independent of the
light switch.
A connection to the sewer for the waste water hose
and the salt tank's safety overflow is also necessary.
The water softening system is usually installed behind
the water meter, pressure reducing valve and
backwash filter and upstream of a dosing pump and
the manifold. To prevent huge damage on the installation site due to a leaking device or supply line ( for
instance in an office, medical practice etc), it has to be
ensured that during the personnel's absence the water
and power supply are interrupted upstream of the
system. However, the disconnection is not allowed
during the regeneration process. Should the water and
power supply be interrupted for more than 4 days,
initiate a regeneration process manually, when the
device is put into operation again. The resulting
automatic disinfection will ensure a perfectly hygienic
operation.
Do not position the waste water hose above the control
unit. The maximum length of the hose is 3 m. Do not
extend it. Install the overflow hose with a continuous
inclination towards the sewer without bending it.
©
1701395 • 2005/06
IT 3000 9.0264.04 0633
The water to be softened has to be clear, free of solid
impurities as well as iron and manganese-free.
4–1
5
INSTALLATION / START-UP
5.1 INSTALLATION
1.
Install the flange.
2.
Remove the cover of the device.
3.
Mount the IT 3000 on to the flange.
4.
Connect the regeneration hose to the top of the
control unit (pict. 1) and pull it through the left
lateral insulation to the backside of the device.
5.
Fix the emergency overflow hose to the backside
of the salt tank (pict. 2).
6.
Bundle up both hoses and direct them to the
sewer by providing a continuous gradient.
Pict. 1
The upper edge of the salt tank must be
positioned below the connection of the
regeneration hose (pict. 1) !
©
1701395 • 2005/06
IT 3000 9.0264.04 0633
Pict. 2
5–1
INSTALLATION / START-UP
5.2 START-UP
To start up the device, proceed as follows:
a)
To start up the apparatus, the water softening
device must be connected to the water pipe, but
the water supply shall not be opened yet. Do not
plug in yet.
b)
Fill in the regenerating salt. We recommend
Broxo or Solvay salt, block or tabs.
When using another type of salt, the strainer in
the suction hose and the salt tank need to be
cleaned more often according to our experience.
c)
Fill 4 litres of water in the salt tank.
d)
Remove the cover from the control unit.
Record the date of installation and the water
meter reading on the relevant label and in the
maintenance report (see chapter "Maintenance
report").
e)
Changing the preset raw water hardness:
Enter the raw water hardness of your tap water in
the electronic system (see DIP switch 20 and 21,
pictures 3 and 4).
First, determine the hardness of your tap water by
means of an appropriate measuring device or ask
your local waterworks.
The two DIP switches 20 and 21 allow to enter
this value in the electronic system: enter the
decimal by means of the DIP switch 20 (see
picture 3) and the unit of the raw water hardness
by means of the contacts 1 to 4 of the DIP switch
21 (see picture 4).
Pict. 3: Raw water hardness, decimal
(DIP switch 20)
Use only one contact of the decimal and one
contact of the unit.
IT 3000 9.0264.04 0633
England
France/
Italy
Pict. 4: Raw water hardness, unit
(DIP switch 21)
Example (raw water hardness 26 °dH):
To adjust the raw water hardness to 26, push the
contact 2 of the DIP switch 20 and the contact 3 of
the DIP switch 21downwards.
©
1701395 • 2005/06
Germany
For setting the decimal and unit, push the relevant
contact of the DIP switch downwards:
5–2
5
INSTALLATION / START-UP
(see pict. 4). The total of the decimal and the unit
amounts in this case to 20 °dH + 6 °dH = 26 °dH
(German hardness degree).
In the event of a raw water hardness below 10
°dH, push all contacts of the DIP switch upwards
in the "OPEN" position.
An acoustic signal indicates when a setting is
wrong, for instance when the decimal and the
unit have been adjusted to 0 °dH (see chapter
"Malfunctions").
f)
Changing the preset country:
The contact 5 must be in the lower position
(closed). The contacts 6, 7 or 8 allow to set the
country, which the set raw water hardness refers
to.
g)
Open the water supply (or the bypass valve).
Vent the water softener immediately after the
connection to the water network (bypass valve in
operating position) to ensure perfect safety. The
device is automatically vented when the initial
regeneration takes place.
h)
Connect the device to the power supply. Each
time the water softener is plugged in, the
electronic system carries out a self-test, which
can last up to 10 seconds. When the test is
concluded with a positive result, all six LEDs
light up briefly. Afterwards, the power supply LED
goes on.
i)
Press the regeneration key to activate a manual
regeneration. During the regeneration process,
the left or the right salt LED goes on.
©
1701395 • 2005/06
IT 3000 9.0264.04 0633
Verify the correct function of the system as
described in chapter "Maintenance". When the
regeneration process is finished (roughly 35
minutes), the water softener is ready to operate.
The suction time should last at least one minute.
Should this not be the case, verify whether a
sufficient quantity of water has been filled in the
salt tank (filling level of salt and water 10 - 11 cm
above the bottom of the tank).
5–3
INSTALLATION / START-UP
If necessary, refill water and verify the suction
time by initiating a regeneration process.
j)
Turn the adjustment screw for the admixture of
hard water so that the water downstream of the
water softener gets the desired hardness usually approximately 8 °dH (German hardness
degree). The measurement of the water hardness
can be carried out by means of a hardness
testing device.
Clockwise turn (screwing in,
—> Soft): softer mixed water.
Anticlockwise turn (screwing out,
—> Hard): harder mixed water.
The adjustment screw juts maximally 1 mm out of the
body. The adjustment range lies within a half-turn
(Hard-Soft). The test water for measuring and adjusting
the water hardness can be drawn off at a draw-off point
downstream of the water softener. Prior to draw off
water, ensure that the mixed water, which has
undergone a new adjustment has flown through a
possibly long pipe from the water softener to the drawoff point. For a correct comparison of the values
measured, the test water should be drawn off at normal flow rate (1 draw-off point fully opened) without
simultaneously consuming water at another spot.
The standard limit value for sodium in potable water is
200 mg/l. This value does not apply to mineral and
table waters, which sometimes contain more than
1.000 mg of sodium per litre.
The table below "Calculation of the sodium content"
allows to determine whether the blended water is still
in compliance with this maximum value of the sodium
content.
©
1701395 • 2005/06
IT 3000 9.0264.04 0633
When the calculated total sodium content exceeds the
admissible value of 200 mg/l, adjust the setting of the
mixed water hardness to a higher value.
5–4
5
INSTALLATION / START-UP
Calculation of the sodium content
- °dh
Raw water hardness (ask your local
waterworks or measure with a hardness
measuring device)
Hardness of mixed water (value measured)
= °dh
Reduction of the water hardness
x 8,2
mg NA/°dh sodium ions exchange value
°dh
= mg/l
Increase of the sodium content by
softening
+ mg/l
sodium already present in the raw water
(ask your local waterworks)
= mg/l
Total sodium content in mixed water
Table 1: Calculation of the sodium content
Example: calculation of the sodium content
20
°dh
Raw water hardness
-8
°dh
Hardness of the mixed water
12
°dh
Reduction of the water hardness
x
8.2
98
mg/l
by softening
10
mg/l
from the waterworks
108
mg/l
Total sodium content in mixed water
Table 2: Example: calculation of the sodium content
Place the cover of the control unit (2) back in its
position.
©
1701395 • 2005/06
IT 3000 9.0264.04 0633
k)
5–5
6
OPERATION / INTERRUPTION
6.1 OPERATION
As the water softener works automatically, salt needs
to be refilled only from time to time, but at the latest
when the adhesive label "refill salt" becomes visible in
the salt tank.
Do not allow the salt stock to lower to the extent that
the liquid level gets above the salt, as it would rise
excessively when salt is refilled. The level of the liquid
should be 10 - 12 cm above the bottom of the tank.
When no softened water or just a little quantity of
softened water is drawn off, the water softening system
automatically carries out an additional regeneration
every 4 days to ensure perfect hygiene.
6.2 INTERRUPTION
Always initiate a manual regeneration process when a
dismounted water softening system is re-installed and
put back into operation. This allows to vent the water
softener (refer to chapter "Start-up"). Protect the
dismounted water softening system against frost,
humidity and dirt. Place the flange cover on the
connection flange to provide protection against
damages (especially the sealing edges).
©
1701395 • 2005/06
IT 3000 9.0264.04 0633
Should the water supply of the water softener
be interrupted (main isolation closed or on
"bypass"), the power supply of the device must
be interrupted as well.
6–1
7
MAINTENANCE / INSPECTION / CLEANING
7
MAINTENANCE / INSPECTION /
CLEANING
It is recommended to carry out maintenance works at
least once a year, in case of multi-family houses every
six months.
7.1 MAINTENANCE
Proceed as follows to service the device:
8
a)
Remove the cover of the control unit (1) (fig. 2).
b)
Should a regeneration take place at this very
moment (LED (2) or (3) is on, fig. 1), wait until it is
completed. Afterwards, initiate a regeneration
process by pressing the regeneration key (4).
c)
The operating piston turns the driver (5) (fig. 1),
which drives the small gear wheel. Each lift of the
operating piston causes the LED (6) to go on.
The position of the driver can be read on the
position indicator (7). The "sodium" position
(pos. 2) is reached after two lifts. After a maximum of 15 minutes, the operating piston
initiates another lift. The waste water quantity
used so far amounts to approximately 4.5 litres.
d)
After this lift, the "backwash" position is reached
(pos. 3). The resin is flushed upwards. Duration
100 seconds, waste water roughly 3 - 4.5 litres.
e)
Two further lifts are carried out afterwards until
the position "Primary filtrate" (pos. 5) is reached.
At this stage, the resin is flushed downwards
(duration 100 seconds, waste water 2.5 - 4 litres).
f)
After two further lifts, the regeneration of the
first tank is completed. Total duration:max. 18
min. The driver now turns with two lifts the right
gear wheel to the position "Influx of brine" (pos.
2) to regenerate the second tank
7
Fig. 1
5
4
2
9
3
6
10
1
After this lift, the "backwash" position (pos. 3) is
reached. The resin is flushed upwards (duration
100 seconds, waste water approx. 3 - 4.5 l).
h)
Two further lifts are carried out afterwards until
the position "Primary filtrate" (pos. 5) is reached.
At this stage, the resin is flushed downwards
(duration 100 seconds, waste water 2.5 - 4 litres).
i)
After two further lifts, the regeneration of the
second tank is completed and the "Operation"
position (pos. 1) is reached again. The total
7–1
1701395 • 2005/06
Fig. 2
g)
©
IT 3000 9.0264.04 0633
After maximally 15 minutes, the operating piston
initiates another lift (waste water quantity roughly
4.5 l).
MAINTENANCE / INSPECTION / CLEANING
duration is approximately 35 minutes.
j)
Should the values measured distinctly deviate
from the target values (refer to chapter
"Maintenance report"), inform the after-sales
service. Please, always indicate the serial
number, which you will find on the upper side of
the device's connection flange (8).
7.2 INSPECTION
Depending on the water volume used, regularly verify
the salt consumption. If necessary, refill regeneration
salt (use only quality complying with EN 973). Take
the necessary hygienic care when refilling salt. For
instance, the salt packages should be cleaned prior to
use to prevent impurities from getting into the salt tank.
The regenerating salt should be poured in the salt tank
as soon as the package has been opened.
Make sure not to overfill the salt tank and close it
correctly when the work is completed. Avoid the use of
opened packages. Store the salt exclusively in clean
and dry rooms.
7.3 CLEANING
The external surface of the water softening system can
be cleaned with a usual household cleaner (soft soap).
Solvents, detergents with alcohol and lacquers affect
the durability of synthetic parts (danger of breaking)
and shall not be used.
©
1701395 • 2005/06
IT 3000 9.0264.04 0633
Should the water supply to the water softener be
interrupted (main isolation closed or on "bypass"),
simultaneously unplug the water softening (1).
7–2
8
MALFUNCTIONS
8
MALFUNCTIONS
Malfunctions are indicated by means of two different
signals:
a) a red flashing LED (9)
b) an acoustic signal, which lasts two minutes and is
repeated every 5 hours.
Cancelling the error message:
Unplug (10) the device and replug after approximately
5 seconds.
When the self-test is completed, the red LED (9)
remains on without acoustic signal. The operating
piston turns the driver (5) until the operating position is
reached. Then, the red LED (9) goes out and the
system is ready to operate again.
When a malfunction was caused
– by a temporary interruption of the pipe pressure,
– by refilling salt too late,
– by manual rotation of the driver during a regeneration process or
– by an operating error, for instance when setting the
hardness level (refer to chapter "Start-up"),
just initiate a regeneration process manually to cancel
the error message.
©
1701395 • 2005/06
IT 3000 9.0264.04 0633
When there is no further error, the system automatically gets back to trouble-free operation. If an error
message is displayed again after 5 hours, contact the
customer service.
In this case, unplug the device (10) and rotate the
driver (5) by means of a spanner of size 13 in the
operating position (pos. 1). If available, activate the
bypass (refer to chapter "Interruption").
8–1
9
WARRANTY
9
WARRANTY
The operator of the device is requested to make an
inspection of the device at least every two months.
Warranty claims may not apply when this inspection
interval is not being observed.
Servicing by the manufacturer or qualified installers is
also required at least once a year, in case of multifamily houses twice a year.
We recommend to conclude a service contract, as it
ensures best perfect functionality, also beyond the
warranty period.
Make sure that qualified installers or the manufacturer's customer service regularly carry out maintenance
works and provide the necessary consumables or
wear-out parts etc.
The warranty period lasts 24 months as of the date of
installation.
We commit ourselves to repair or replace as quickly as
possible all parts that become unserviceable during
the warranty period as a result of verifiably bad
materials, a defective construction or a faulty model.
Our highest objective is to manufacture a high-quality
product.
Should you be faced with a problem, for which no
solution is proposed in these instructions, contact us.
We will be glad to help you.
Please, always indicate the model and the serial
number of the device.
Our address:
Hans Sasserath & Co. KG
Mühlenstrasse 62
D- 41352 Korschenbroich
©
1701395 • 2005/06
IT 3000 9.0264.04 0633
Phone: +49 2161 6105 - 0
Fax: +49 2161 6105 - 20
Email: [email protected]
Website: www.syr.de
9–1
10
DIAGRAMS
10 DIAGRAMS
Pressure loss in operating position (pos. 1) with a raw water hardness of 20 °dH (German
hardness degree) and a blended water hardness of 8 °dH in dependence on the
volumetric flow rate.
Diagram 1 Pressure loss in operating position
1701395 • 2005/06
Diagram 2 Draw-off quantity per day
©
IT 3000 9.0264.04 0633
Max possible draw-off quantity per day depending on the raw water hardness with a
blended water hardness of 8 °dH (German hardness degree).
10 – 1
DIAGRAMS
Max. possible permanent draw-off quantity depending on the raw water hardness with a
blended water hardness of 8 °dH (German hardness degree).
Diagram 3 Permanent draw-off quantity
IT 3000 9.0264.04 0633
Diagram 4 Waste water quantity
©
1701395 • 2005/06
Waste water quantity per 1 m3 of blended water with a 8 °dH hardness (German hardness
degree) in dependence on the raw water hardness.
10 – 2
10
DIAGRAMS
Salt consumption per 1 m3 of blended water with a 8 °dH (German hardness degree)
hardness in dependence on the raw water hardness.
©
1701395 • 2005/06
IT 3000 9.0264.04 0633
Diagram 5 Salt consumption
10 – 3
TECHNICAL
11
SPECIFICATIONS
11 TECHNICAL SPECIFICATIONS
1.7 m3/h
Nominal capacity:
0.9 mol
Nominal pressure:
PN 10
Capacity per kg of salt:
5 mol
Min. operating pressure:
2 bar
Max. operating pressure:
7.0 bar
Max. operating temperature:
30 °C
Pressure loss at nominal flow rate:
0.5 bar
Salt stock:
40 kg
Power supply:
230V / 50Hz / 15W
Salt consumption and waste water
per m3 as well as pressure loss and
max. draw-off quantity:
see chapter "Diagrams"
©
1701395 • 2005/06
IT 3000 9.0264.04 0633
Nominal flow rate:
11 – 1
12
SPARE PARTS
12 SPARE PARTS
1
1
Cover
3000.00.900
2
Salt tank
3000.00.901
3
Insulating cover
3000.00.902
5
8
10
9
7
4
Board
3000.00.903
4
5
Driver
3000.00.904
*
6
Regeneration tank
3000.00.905
7
Injector
3000.00.906
3
3
11
6
*
8
13
Regeneration cartridge
3000.00.907
***
9
Suction indicator
3000.00.908
***
2
10
Bypass valve
3000.00.909
****
11
Pressure reducing valve
3000.00.910
***
12
12
Suction strainer
3000.00.912
*
13
Cover of salt tank
3000.00.914
Exchange intervals:
* = 1 year, ** = 2 years, *** = 3 years, **** = 4 years
Double connection flange (parallel flange)
2315.32.030 (DN 32)
2315.40.030 (DN 40)
2315.50.030 (DN 50)
12 – 1
1701395 • 2005/06
Titration test IT 3000
3000.00.913
Y-distribution flange
2315.00.071
©
IT 3000 9.0264.04 0633
not shown in fig.:
Regeneration salt
3000.00.911
MAINTENANCE
13
REPORT
13 MAINTENANCE REPORT
Date of installation:
Network pressure:
Date:
Raw water
hardness
measured [°dH]:
set [°dH]:
Blended water
hardness
measured [°dH]:
Water meter [m3]:
S
No. of regenerations 1
L
N
M
Suction time 2
[minutes] (max.
15 min.)
Waste water
quantity [Litre]
(max. 4.5 litres)
Flushing out
4.5 litres)
3
(3 -
Primary filtrate 4
(2.5 - 4 litres)
3
4
N = Normal regeneration,
Values for suction time, waste water quantity, flushing out and primary filtrate applicable to relevant regeneration step
©
IT 3000 9.0264.04 0633
2
filled in by customer service
( S = Total sum,
L = Prolonged influx of brine,
M = shortened influx of brine)
Position 2
Position 3
Position 5
13 – 1
1701395 • 2005/06
1