1
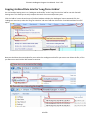
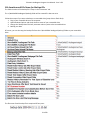
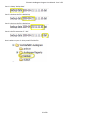
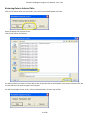
Electronic Audiogram Program User Manual - Part 3 of 3 Electronic Audiogram Program User Manual Part 3 of 3: Created by Benny Yu Revised by Ken Rushton, May 2012 1 of 60 Electronic Audiogram Program User Manual - Part 3 of 3 Preface This user manual is split into three word documents so they are of a manageable size. Part 1: Introduction & Getting Started: - how to enter hearing tests in the simpler Form Mode - generating audiogram data files - sending them securely to WorkSafeBC though our portal Part 2: Walks you through entering hearing tests in the traditional Data Entry Mode. Part 3: Instructions on the maintenance and update of this audiogram program, plus the appendix with technical instructions related to the audiogram program. (This volume) Supported is the audiogram program running in Microsoft’s Excel 2003, Excel 2007, and Excel 2010. This manual shows Excel 2007 examples. Electronic Audiogram Program Overview The Electronic Audiogram Program (EAP) is a program embedded in a Microsoft Excel workbook. It replaces the paper form and incorporates many features to assist in entering accurate, error-free audiograms in the field. It also assists in sending in the information to WorkSafeBC. Finally, it includes a set of reporting functions that may assist you in your work. This “highly detailed” manual is designed to assist audio labs that have little or no experience in using computers, with screenshots for every step in the instructions and likely errors. This manual is updated as new features are added. 2 of 60 Electronic Audiogram Program User Manual - Part 3 of 3 TABLE OF CONTENTS PREFACE ........................................................................................................................................................................................... 2 ELECTRONIC AUDIOGRAM PROGRAM OVERVIEW ............................................................................................................................ 2 SETTING UP FIRMS FOR ENTERING HEARING TESTS .......................................................................................................................... 5 Method One: Manual Entry .............................................................................................................................................................. 5 Method Two: Loading WorkSafeBC’s Firm Data file ......................................................................................................................... 5 ARCHIVING HEARING TESTS .............................................................................................................................................................. 6 RESTORING ARCHIVED HEARING TESTS ............................................................................................................................................ 9 MOVING ARCHIVED DATA TO A FILE AND THE LONG-TERM ARCHIVE ............................................................................................. 11 FILE LOCATION AND FILE NAME FOR AUDIOGRAM ARCHIVE FILE ....................................................................................................................... 13 MOVING ARCHIVED DATA BACK FROM A FILE ................................................................................................................................ 16 NOTE: ................................................................................................................................................................................................... 17 COPYING ARCHIVED DATA INTO THE ‘LONG-TERM ARCHIVE’ ......................................................................................................... 18 DOING A FULL BACKUP OF DATA IN THE AUDIOGRAM PROGRAM ...................................................................................................................... 20 FILE LOCATION AND FILE NAME FOR BACKUP FILE .......................................................................................................................................... 21 RESTORING BACKUP DATA TO AN AUDIOGRAM PROGRAM ........................................................................................................... 23 RESTORING DATA TO SELECTED TABS........................................................................................................................................................... 25 UNDERSTANDING PARAMETERS IN ‘PARAMETERS’ TAB ................................................................................................................. 27 ‘SESSION’ PARAMETER.............................................................................................................................................................................. 28 ‘WORKSAFEBC AUDIOGRAM FILE PATH’ PARAMETER .................................................................................................................................... 29 ‘WORKSAFEBC AUDIOGRAM FILE NAME’ PARAMETER ................................................................................................................................... 29 ‘ARCHIVED DATA UNLOAD FILE PATH’ PARAMETER ........................................................................................................................................ 30 ‘ARCHIVED DATA UNLOAD FILE NAME’ PARAMETER....................................................................................................................................... 30 ‘AUDIOGRAM WINDOW ZOOM %’ PARAMETER ............................................................................................................................................ 31 ‘DATA ENTRY VALIDATION’ PARAMETER ...................................................................................................................................................... 31 ‘RESET NOISE HISTORY TAB AFTER EXPORTED DATA’ PARAMETER ..................................................................................................................... 32 'RESET MEDICAL HISTORY (HEARING) TAB AFTER EXPORT DATA' PARAMETER ..................................................................................................... 33 'RESET MEDICAL HISTORY (GEN) TAB AFTER EXPORT DATA' PARAMETER ........................................................................................................... 34 'AUDIOGRAM CHART ZOOM %' PARAMETER................................................................................................................................................. 35 'MEDICAL HISTORY REMINDER FOR TYPE TYPES OF 'BASELINE' AND '1ST TIME IN NOISY INDUSTRY'' PARAMETER ...................................................... 35 'BACKUP DATA FILE PATH' PARAMETER ....................................................................................................................................................... 37 'SAVE WORKBOOK AFTER EACH TEST RESULT IS SAVED' PARAMETER................................................................................................................. 37 'RESET NOISE CONTROL TAB AFTER EXPORT DATA' PARAMETER ....................................................................................................................... 38 'CONTRACTOR NUMBER/IN HOUSE NAME' PARAMETER ................................................................................................................................. 39 ‘DEFAULT DRIVE’ PARAMETER.................................................................................................................................................................... 39 ‘VALIDATE FIRM NUMBER AND CLASSIFICATION BEFORE SAVE TEST’ PARAMETER ................................................................................................ 40 ‘WORKSAFEBC AUDIOGRAM WEBPAGE FILE PATH’ PARAMETER ...................................................................................................................... 40 UPDATING CLASSIFICATION CODES TAB ......................................................................................................................................... 41 UPDATING OCCUPATION CODES TAB ............................................................................................................................................. 44 DISPLAYING THE AUDIOGRAM PROGRAM VERSION ....................................................................................................................... 47 APPENDIX A – OPENING WINDOWS EXPLORER .............................................................................................................................. 48 3 of 60 Electronic Audiogram Program User Manual - Part 3 of 3 APPENDIX B – CREATING A DATA FOLDER ...................................................................................................................................... 51 APPENDIX C – DISPLAYING THE DEVELOPER TAB IN EXCEL 2007 ..................................................................................................... 53 APPENDIX D – SETUP YOUR EXCEL PROGRAM TO RUN THE AUDIOGRAM PROGRAM..................................................................... 55 APPENDIX F – MOVING TO A NEW VERSION OF THE ELECTRONIC AUDIOGRAM PROGRAM ........................................................... 59 4 of 60 Electronic Audiogram Program User Manual - Part 3 of 3 Setting up Firms for Entering Hearing Tests When you enter a hearing test result into the audiogram program, you have to select a firm number, firm location, firm name and classification code combination for the hearing test. There are two methods you can setup a firm number, firm location, firm name and classification code for use when you are entering data for a hearing test: manual entry or loading our Firm master file. Method One: Manual Entry Enter the firm number, firm location, firm name and classification code in the ‘Firms’ tab. The firm number and firm location fields in the ‘Firms’ tab are mandatory. Firm name can be any name you want to identify a firm number, firm location and classification combination. In fact you can even have two entries with the same firm number, firm location and classification but with different firm names. This is one way to separate hearing tests with the same firm number, firm location and classification in the audiogram report. This will be discussed in more details in the section ‘Printing Audiogram Reports for Saved Hearing Tests’ in Part 1 of the user manual. The ‘Classifications’ field is optional because one may also search for the classification code when entering a hearing test. Now this firm number, firm location, firm name and classification code entry can be selected when you are entering a hearing test. Method Two: Loading WorkSafeBC’s Firm Data file A file with all the firm number, firm location, firm name and classification in the WorkSafeBC system is available to audio labs using the audiogram program. This file is ‘audiogramFirmCU.dat’ and is available from us. It is not sent out with the audiogram program initially. If you wish to load it, please request a copy from [email protected]. It can be a considerable time saver. To setup this file, save or copy the ‘audiogramFirmCU.dat’ file to the c:\WorkSafeBC Audiogram\Data folder. If you cannot find the c:\WorkSafeBC Audiogram\Data folder in your hard drive then just create a new folder called ‘data’ on the c:\WorkSafeBC Audiogram\ folder (see Appendix B in Part 3 of the user manual on how to create the c:\WorkSafeBC Audiogram\Data folder). Once the ‘audiogramFirmCU.dat’ file is saved to the c:\WorkSafeBC Audiogram\Data folder, you can search for any firm number, firm location, firm name and classification combinations in this file when you are entering a hearing test. Detailed instructions on how to search a firm from the ‘audiogramFirmCU.dat’ file are in the section ‘Entering Hearing Test Results In Data Entry Mode’, sub section ‘Select Firm From The Firm Data File’ in Part 2 of this user manual. 5 of 60 Electronic Audiogram Program User Manual - Part 3 of 3 Archiving Hearing Tests Each time you generate an audiogram data file, the hearing tests saved in the ‘Audiogram Data Entry’ tab are marked “generated” and moved to the ‘Audiogram Data Archive’ tab. You can also manually move hearing tests that have not been generated into an audiogram data file to the ‘Audiogram Data Archive’ tab. You might do this is when you have some hearing tests that are waiting for some information such as SIN or birth date. Thus you can: 1. Archive the hearing tests that are not ready to be sent to WorkSafeBC 2. Generate the audiogram data file for the other hearing tests that are ready. 3. Restore the hearing tests that await additional information back from the ‘Audiogram Data Archive’ tab back to the active ‘Audiogram Data Entry’ tab. You can move a block of hearing tests by selecting them before starting the archive function or you can move all the hearing tests. 6 of 60 Electronic Audiogram Program User Manual - Part 3 of 3 You can select a block of, or just one hearing tests by selecting the first column of the targeted rows. Click the ‘Add-Ins’ menu tab at the top of the Excel window to display the ‘Audiogram’ menu command. Click the ‘Audiogram’ menu item, select the ‘Data Archive’ sub menu and then click on the “Move Data Entry(s) …” option. 7 of 60 Electronic Audiogram Program User Manual - Part 3 of 3 When you see the next message box, click ‘OK’ to continue or ‘Cancel’ to abort the archive process. Next you will asked if you want to archive all the hearing tests in the ‘Audiogram Data Entry’ tab. Click ‘Yes’ to move all the hearing tests or ‘No’ to only move the hearing tests that you have selected. At this point you can also click ‘Cancel’ to abort the archive process. You will see the following message if you click ‘No’ and have selected an empty row in the ‘Audiogram Data Entry’ tab. Click ‘OK’ to close the message window. Either you are archiving all or only the selected hearing tests, you will see the following message to confirm the number of hearing tests that have been archived. Click ‘OK’ to close the message window. You should see the hearing test that you have selected in the ‘Audiogram Data Archive’ tab. 8 of 60 Electronic Audiogram Program User Manual - Part 3 of 3 Restoring Archived Hearing Tests Each time you generate an audiogram data file for hearing tests that have been saved in the ‘Audiogram Data Entry’ tab, these hearing tests are archived to the ‘Audiogram Data Archive’ tab after the file is generated. If you want to make changes to the hearing tests in the ‘Audiogram Data Archive’ tab, you must move them back to the ‘Audiogram Data Entry’ tab first. You can also move hearing tests that have not been generated from the ‘Audiogram Data Archive’ tab back to the ‘Audiogram Data Entry’ tab so you can include them in the next generated audiogram data file. You must select one hearing test or a block of hearing tests by selecting the first column of the targeted rows. Then click on the “Restore to Data Entry” Button. When you see this message box, click ‘OK’ to continue or ‘Cancel’ to abort the restore process. This message confirms the number of hearing tests that have been restored. Click ‘OK’ to close the message window. 9 of 60 Electronic Audiogram Program User Manual - Part 3 of 3 You will see the following message if you have selected an empty row in the ‘Audiogram Data Archive’ tab. Click ‘OK’ to close the message window. Now you should see the hearing test that you have selected in the ‘Audiogram Data Entry’ tab. 10 of 60 Electronic Audiogram Program User Manual - Part 3 of 3 Moving Archived Data to a File and the Long-Term Archive Over time hearing tests will accumulate in the ‘Audiogram Data Archive’ tab. It will become more difficult to find the hearing tests that you want. A good way of keeping these older hearing tests is to backup the tests and then load them into the “Long Term Archive”. We provide a button to do this, as shown below. . The ‘Move to Long Term’ option first moves the old hearing tests to an archive file, them loads the archived data into the Long Term Archive tab. The date ran selection is by ‘Create Date and Time’ between the “from” and “to” dates you specify, not by test-date. 11 of 60 Electronic Audiogram Program User Manual - Part 3 of 3 First, you should see the following input box for the ‘From Date’. Enter a date in the ‘YYYYMMDD’ format and click the ‘OK’ button to continue. You can also select the ‘Cancel’ button if you want to abort the unload process. Next you should see the following input box for the ‘To Date’. Enter a date in the ‘YYYYMMDD’ format and click the ‘OK’ button to continue. You can also select the ‘Cancel’ button if you want to abort the unload process. A message box will be displayed to show the number of archived records that have been unloaded and the file name and location of the file. In our example, the file name is ’66 Audiogram form 1 2009-09-21 08.26.31.arc’. 12 of 60 Electronic Audiogram Program User Manual - Part 3 of 3 File Location and File Name for Audiogram Archive File The folder location and file name of the audiogram archive file is setup in the ‘Parameters’ tab. The c:\WorkSafeBC Audiogram\archive\ folder will be created if it does not exist. The file name of each audiogram archive file is comprised of six parts: Part 1 is the IAB number. Part 2 is the ‘Archived Data Unload File Name’ from the ‘Parameters’ tab. Part 3 is the ‘Session’ number from the ‘Parameters’ tab. 13 of 60 Electronic Audiogram Program User Manual - Part 3 of 3 Part 4 is the date the archive file is created. Part 5 is the time the archive file is created. Part 6 is the file extension .arc To find the file, open your Windows Explorer (see Appendix A on how to open Windows Explorer) and click on the + sign besides ‘My Computer’ in the ‘Folder’ panel on the left of the window to see the drives in your computer. Click on the + sign beside the C drive to expand the sub-folders. Here is a screen shot of my C drive. Yours will be different, but you should see the (C:) for your C drive. Find the ‘WorkSafeBC Audiogram’ folder and click on the + sign to expand the sub-folders. 14 of 60 Electronic Audiogram Program User Manual - Part 3 of 3 You may only see the ‘archive’ and ‘output’ sub-folders, because the other folders are only created as needed. Click on the ‘archive’ folder. You should be able to find the file you have just unloaded on the right hand side panel. You will need to remember the location of this file, because this is the file you will select when you want to load these hearing tests back into the ‘Audiogram Data Archive’ tab. Note: All hearing tests within the specified from and to date range will be moved, even hearing tests that have not been sent to WorkSafeBC. 15 of 60 Electronic Audiogram Program User Manual - Part 3 of 3 Moving Archived Data Back from a File You can use this function to load the hearing tests from an “audiogram archive file” back to the ‘Audiogram Data Archive’ tab. Note that the “audiogram archive file” will be deleted to prevent the loading of duplicate data. Click the ‘Add-Ins’ menu tab at the top of the Excel window to display the ‘Audiogram’ menu command. Click the ‘Audiogram’ menu item, select the ‘Archive’ sub menu and then click on the ‘Load Archived Data From File’ option. Next you should see the next window for you to select the audiogram archive file you want to use. Select the file you want to use and click the ‘OK’ button to continue. The following message box will be displayed to confirm the number of file and number of hearing tests that have been loaded into the ‘Audiogram Data Archive’ tab. 16 of 60 Electronic Audiogram Program User Manual - Part 3 of 3 All audiogram archived files that have been used will be deleted. You should see the hearing tests that have been loaded back to the ‘Audiogram Data Archive’ tab from the file. The load process also added the date and time these hearing tests are loaded. Note: You can select more than one audiogram archive file to load at the same time. Select multiple files by selecting the first file by clicking on the first file, then hold down the ‘Shift’ key on your keyboard and click on the last file you want to select. Click the ‘OK’ button to process the files. 17 of 60 Electronic Audiogram Program User Manual - Part 3 of 3 Copying Archived Data into the ‘Long-Term Archive’ You can load the hearing tests in an “audiogram archived file” to the ‘Long-Term Archive’ tab for use with ‘Periodic’ hearing tests. This allows you to easily compare the result of current and previous years. Click the ‘Add-Ins’ menu tab at the top of the Excel window to display the ‘Audiogram’ menu command. Click the ‘Audiogram’ menu item, select the ‘Long-Term Archive’ sub menu and then click on the ‘Load Archived Data From File’ option. Next you should see the next window for you to select the audiogram archive file you want to use. Select the file, or files you want to use and click the ‘OK’ button to continue. 18 of 60 Electronic Audiogram Program User Manual - Part 3 of 3 The following message box lets you select either to append the test results to the ‘Long-Term Archive’ tab or clear the ‘Long-Term Archive’ before loading. Click the ‘Yes’ button to append or the ‘No’ button to clear all the test results before loading. The following message box will be displayed to confirm the number of file and number of hearing tests that have been loaded into the ‘Long-Term Archive’ tab. Note: the audiogram archived files used will NOT be deleted because this is a copy function. You should see the loaded hearing tests in the ‘Long-Term Archive’ tab. The load process also added the Load Date and Time. 19 of 60 Electronic Audiogram Program User Manual - Part 3 of 3 Doing a Full Backup of Data in the Audiogram Program Data from each of the tabs can be backed up into a backup file in just seconds. We recommend regularly backing up the data in your EAP. This backup allows recovery of all or part of the data as desired. This function is also useful when you need to copy all the data in your current version of the EAP to a new version, see Appendix F. During the backup process, you can choose to backup all the tabs or only backup the tabs you want. Click the ‘Add-Ins’ menu tab at the top of the Excel window to display the ‘Audiogram’ menu command. Click the ‘Audiogram’ menu item, select the ‘Backup’ sub menu and then click on the ‘Backup Data’ option. You will be asked if you want to backup data from all the tabs. Click ‘Yes’ to backup all the tabs in the audiogram program. This message confirms which tabs were backed up and the location and name of the backup file created. Click the ‘OK’ button to close the window. If you click the ‘No’ button to select which tabs you want to backed up, you will be asked about each one on turn. 20 of 60 Electronic Audiogram Program User Manual - Part 3 of 3 File Location and File Name for Backup File The folder location of the backup file is setup in the ‘Parameters’ tab. The c:\WorkSafeBC Audiogram\backup\ folder will be created if it does not exist. Follow these steps if you want to backup to a removable drive (jump drive or flash drive): 1. Plug in your removable drive to the computer. 2. Open Windows Explorer and check the drive name of your removable drive. 3. Change the ‘Backup Data File Path’ parameter value to point to the removable drive. 4. Backup your data. Of course, you can also copy the backup file from the c:\WorkSafeBC Audiogram\backup\ folder to your removable drive. The file name of each backup file is comprised of four parts: 21 of 60 Electronic Audiogram Program User Manual - Part 3 of 3 Part 1 is always ‘backup data’. Part 2 is the date the file is backed up. Part 3 is the time the file is backed up. Part 4 is the file extension of “.dat”. Here is where on your C: drive you will find the file: 22 of 60 Electronic Audiogram Program User Manual - Part 3 of 3 Restoring Backup Data to an Audiogram Program Also useful when you need to migrate from your current version of the EAP to a new version. During the restore process, you can choose to restore data to all the tabs or only restore the tabs you want. However, you can only restore data to a tab if the backup file contains data from that tab. Click the ‘Add-Ins’ menu tab at the top of the Excel window to display the ‘Audiogram’ menu command. Click the ‘Audiogram’ menu item, select the ‘Backup’ sub menu and then click on the ‘Restore Backup Data’ option. The expected message boxes will be displayed. Select the backup file you want to use, click the ‘OK’ button to continue. 23 of 60 Electronic Audiogram Program User Manual - Part 3 of 3 You will see a message like this for every item in the backup that contained data. Click the ‘Yes’ button to overwrite the existing data and continue. You may see this error message if there are firm data that do not pass validation. Click the ‘OK’ button to continue. 24 of 60 Electronic Audiogram Program User Manual - Part 3 of 3 Restoring Data to Selected Tabs Click the ‘No’ button when you are asked if you want to restore backup data to all tabs. Select the backup file you want to use. Click the ‘OK’ button to continue. You will be asked if you want to restore data to each of the tabs that has backup data in the file you selected. Click ‘No’ to those tabs that you want to bypass restoring data. You will see messages similar to this, if there is backed up data, for each type of data. 25 of 60 Electronic Audiogram Program User Manual - Part 3 of 3 Note: If you click ‘Yes’ the data in the ‘Parameters’ tab will always be overwritten because you cannot append backup data to parameters. You will see the next message to confirm which tabs were restored and the location and name of the backup file the data is restored from. You will see the following message if you have bypassed all the tabs to restore data. 26 of 60 Electronic Audiogram Program User Manual - Part 3 of 3 Understanding Parameters in ‘Parameters’ Tab ‘Parameters’ tab contains all the parameters that control the audiogram program. You can change any one of the parameter values to customize the audiogram program. But before you change any of the parameters, you should understand their purpose and the impact of your changes. 27 of 60 Electronic Audiogram Program User Manual - Part 3 of 3 ‘Session’ Parameter This parameter identifies the session number for the audiogram program. In some test site, the technician may need to conduct two hearing tests simultaneously. If the technician is also entering the two hearing tests directly into the audiogram program using the form mode, then the technician must create two audiogram programs one for each session. The technician may creates one audiogram program called ‘‘Work Safe BC Audiogram Program Session 1.xls’ and set the ‘Session’ parameter to 1. And creates a second audiogram program called ‘‘Work Safe BC Audiogram Program Session 2.xls’ and set the ‘Session’ parameter to 2. See Appendix H in Part 3 of the user manual for details instructions on how to create special purpose audiogram programs. When the technician is conducting the two hearing tests, he opens both audiogram programs and opens the audiogram forms in each audiogram program. It is not mandatory that you have to set the ‘Session’ parameter for the second audiogram program to 2. But if you don’t then it is not easy to distinguish between the two forms. The audiogram form with ‘Session’ set to 1 will have a normal audiogram form background color. The audiogram form with ‘Session’ set to 2 will have a light yellow audiogram form background color. 28 of 60 Electronic Audiogram Program User Manual - Part 3 of 3 ‘WorkSafeBC Audiogram File Path’ Parameter This parameter specifies the folder where the audiogram data file will be generated. See section ‘Generate Audiogram Data File’ in Part 1 of the user manual for instructions on how to generate audiogram data file. The ‘WorkSafeBC Audiogram’ and the ‘output’ folders will be created if they do not exist. You can change the drive and folder names in this parameter and the new folders will be created the first time when they are used by the audiogram program. ‘WorkSafeBC Audiogram File Name’ Parameter This parameter makes up part of the name for the audiogram data file that will be generated. See section ‘Generate Audiogram Data File’ in Part 1 of the user manual for instructions on how this parameter is used. 29 of 60 Electronic Audiogram Program User Manual - Part 3 of 3 ‘Archived Data Unload File Path’ Parameter This parameter specifies the folder where the archived data unload file will be created. See section ‘Move Archived Data To A File’ in Part 3 of the user manual for instructions on how to unload archived data to a file. The ‘WorkSafeBC Audiogram’ and the ‘archive’ folders will be created if they do not exist. You can change the drive and folder names in this parameter and the new folders will be created the first time when they are used by the audiogram program. ‘Archived Data Unload File Name’ Parameter This parameter makes up part of the name for the archive data file that will be created. See section ‘Move Archived Data To A File’ in Part 3 of the user manual for instructions on how this parameter is used. 30 of 60 Electronic Audiogram Program User Manual - Part 3 of 3 ‘Audiogram Window Zoom %’ Parameter This parameter controls the size of the audiogram form window when it is first opened. You can also control the window size once the window is opened with the ‘Zoom’ control buttons. The new zoom percentage is saved in this parameter each time you change the window size. So the next time you open the audiogram form window, it will be the same size when you close the window. See section ‘Change Audiogram Form Window Size’ in section ‘Audiogram Form Mode Functions’ in Part 2 of the user manual for instructions to change the form window size. ‘Data Entry Validation’ Parameter This parameter controls whether validations are done on the fly while you are entering data in data entry mode. If it is set to ‘Yes’ then each field is validated while you are entering data in the ‘Audiogram Data Entry’ tab. If it is set to ‘No’ then no validation is done while you are entering data in the ‘Audiogram Data Entry’ tab. However, all the fields in the ‘Audiogram Data Entry’ tab are always validated before they are saved. This parameter should be set to ‘No’ for users that want to speed up the data entry of hearing tests into the ‘Audiogram Data Entry’ tab. This parameter should be set to ‘Yes’ for first time users that want to get immediate feed back. 31 of 60 Electronic Audiogram Program User Manual - Part 3 of 3 ‘Reset Noise History tab After Exported Data’ Parameter This parameter control whether the fields in the ‘Noise History’ tab in the Audiogram Form will be reset to blanks after the data is exported to the ‘Audiogram Data Entry’ tab. If this parameter is set to ‘Yes’, then all the fields in the ‘Noise History’ tab will be reset to blanks. If this parameter is set to ‘No’, then all the fields in the ‘Noise History’ tab will not be reset to blanks. 32 of 60 Electronic Audiogram Program User Manual - Part 3 of 3 'Reset Medical History (Hearing) tab After Export Data' Parameter This parameter control whether the fields in the ‘Medical History (Hearing)’ tab in the Audiogram Form will be reset to blanks after the data is exported to the ‘Audiogram Data Entry’ tab. If this parameter is set to ‘Yes’, then all the fields in the ‘Medical History (Hearing)’ tab will be reset to blanks. If this parameter is set to ‘No’, then all the fields in the ‘Medical History (Hearing)’ tab will not be reset to blanks. 33 of 60 Electronic Audiogram Program User Manual - Part 3 of 3 'Reset Medical History (Gen) tab After Export Data' Parameter This parameter control whether the fields in the ‘Medical History (Gen)’ tab in the Audiogram Form will be reset to blanks after the data is exported to the ‘Audiogram Data Entry’ tab. If this parameter is set to ‘Yes’, then all the fields in the ‘Medical History (Gen)’ tab will be reset to blanks. If this parameter is set to ‘No’, then all the fields in the ‘Medical History (Gen)’ tab will not be reset to blanks. 34 of 60 Electronic Audiogram Program User Manual - Part 3 of 3 'Audiogram Chart Zoom %' Parameter This parameter controls the size of the audiogram charts. You should adjust the size of the chart to fit the size of your computer monitor screen. This parameter applies to all the different types of audiogram charts. 'Medical History Reminder For Type Types of 'Baseline' and '1st Time In Noisy Industry'' Parameter Some audio labs have a policy of always entering medical history information for workers that are taking the hearing test the first time. This parameter control whether a reminder message is displayed when the medical history fields are not entered for test types of ‘Baseline’ or ‘1st Time In Noisy Industry’. 35 of 60 Electronic Audiogram Program User Manual - Part 3 of 3 You will see the following message box if you set this parameter to ‘Yes’, the test types is ‘1st Time In Noisy Industry’ and the all the medical history fields are blank. This is just a reminder and you can still click the ‘Yes’ button to save the hearing test. Or you can click the ‘No’ button and enter data into the medical history fields. 36 of 60 Electronic Audiogram Program User Manual - Part 3 of 3 'Backup Data File Path' Parameter This parameter specifies the folder where the backup file will be created. See section ‘Backup Data From The Audiogram Program’ in Part 3 of the user manual for instructions on how to backup data to a file. The ‘WorkSafeBC Audiogram’ and the ‘backup’ folders will be created if they do not exist. You can change the drive and folder names in this parameter and the new folders will be created the first time when they are used by the audiogram program. 'Save Workbook After Each Test Result is Saved' Parameter This parameter control whether the audiogram program Excel workbook is saved when the ‘Save’ button in the ‘Audiogram Data Entry’ tab is used to save a hearing test or when the ‘Export Data’ button in the Audiogram Form is used to export a hearing test to the ‘Audiogram Data Entry’ tab. This parameter should be set to ‘Yes’ for new users that are not familiar with Microsoft Excel or computer. This eliminates the confusion that some users assume the ‘Save’ button in the ‘Audiogram Data Entry’ tab or the ‘Export Data’ button in the Audiogram Form also save any changes they made in the audiogram program Excel workbook. However, this will slow down the data entry process because it usually takes a few seconds to save the Excel workbook. This parameter should be set to ‘Yes’ for users that prefer to control when the Excel workbook is saved. This will speed up the data entry process. When a new audiogram program is sent out, this parameter is default to ‘Yes’. 37 of 60 Electronic Audiogram Program User Manual - Part 3 of 3 'Reset Noise Control tab After Export Data' Parameter This parameter control whether the fields in the ‘Noise Control’ tab in the Audiogram Form will be reset to blanks after the data is exported to the ‘Audiogram Data Entry’ tab. If this parameter is set to ‘Yes’, then all the fields in the ‘Noise Control’ tab will be reset to blanks. If this parameter is set to ‘No’, then all the fields in the ‘Noise Control’ tab will not be reset to blanks. 38 of 60 Electronic Audiogram Program User Manual - Part 3 of 3 'Contractor Number/In House Name' Parameter This parameter makes up part of the name for the audiogram data file that will be generated. See section ‘Generate Audiogram Data File’ in Part 1 of the user manual for instructions on how this parameter is used. It is very important that this parameter is setup properly, because when a generated audiogram file is sent to WorkSafeBC, this is the only information in the generated audiogram data file that identifies the origin of the file. The first message box you see every time you open an audiogram program always ask you to confirm the contractor number or in house name in this parameter is correct. When the new version of audiogram program is sent out, this parameter is always set to 0. So the first time you open the new audiogram program, you should enter your contractor number or in house name. ‘Default Drive’ Parameter This parameter specifies the drive name of the main hard drive in the computer where the audiogram program is running. When the audiogram program is accessing the hard drive for any reasons, this is the drive location it will use. Occasionally a computer may be setup with another drive location other than ‘c’ as the main hard drive. Then you must change this parameter to the correct drive letter. Not used now 39 of 60 Electronic Audiogram Program User Manual - Part 3 of 3 ‘Validate Firm Number and Classification Before Save Test’ Parameter When a hearing test result is entered and the ‘Save’ button in the ‘Audiogram Data Entry’ tab or the ‘Export Data’ button in the Audiogram Form is clicked to save the data to the ‘Audiogram Data Entry’ tab. The audiogram program has the option to check whether the firm number, firm location and classification code combination entered is in the ‘audiogramFirmCU.dat’ file in the ‘c:\data’ folder. This parameter specifies whether the above validation will be performed. Set this parameter to ‘Yes’ if you want this validation to be performed every time you save a hearing test result. Set this parameter to ‘No’ if you want to suppress this validation to be performed every time you save a hearing test result. ‘WorkSafeBC Audiogram Webpage File Path’ Parameter This parameter specifies the folder where the audiogram webpage files and audiogram report webpage files will be generated. See section ‘Save Audiogram Report As Web Page’ in Part 1 of the user manual for instructions on how to generate audiogram webpage file and section ‘Print Audiogram Report For Saved Hearing Tests’ in Part 1 of the user manual for instructions on how to generate audiogram report webpage file. The ‘WorkSafeBC Audiogram’ and the ‘webpage’ folders will be created if they do not exist. You can change the drive and folder names in this parameter and the new folders will be created the first time when they are used by the audiogram program. 40 of 60 Electronic Audiogram Program User Manual - Part 3 of 3 Updating Classification Codes Tab From time to time, WorkSafeBC will send out an update file for the classification codes in the ‘Classification Codes’ tab. An example of the file name is ‘WorkSafeBC Classification Code Sept 25 2009.dat’. This function will load the classification codes and their descriptions into the ‘Classification Codes’ tab and also remove any classification codes in the ‘New Codes’ tab that exist in the updated ‘Classification Codes’ tab. Here are the steps to load the classification codes from the update file. You should have received the classification code update file in an email from WorkSafeBC. Save the update file into a folder in your PC. In our example we have saved the update file ‘WorkSafeBC Classification Code Sept 25 2009.dat’ in the c:\data folder. Click the ‘Add-Ins’ menu tab at the top of the Excel window to display the ‘Audiogram’ menu command. Click the ‘Audiogram’ menu item, select the ‘Utilities’ sub menu and then click on the ‘Update Classification Codes’ option. The following window will be displayed for you to select the classification code update file. In our example we have saved the update file ‘WorkSafeBC Classification Code Sept 25 2009.dat’ in the c:\data folder. Select the update file and click the ‘OK’ button to continue. 41 of 60 Electronic Audiogram Program User Manual - Part 3 of 3 The following message box is displayed to confirm the number of classification code records that have been loaded. Click the ‘OK’ button to close the message box. You should see the classification codes from the update file have been loaded into the ‘Classification Codes’ tab. 42 of 60 Electronic Audiogram Program User Manual - Part 3 of 3 If you want to abort without loading the classification update file, click the ‘Cancel’ button in the update file selection window. You should see the follow confirmation message box. Click ‘OK’ to continue. You should see the follow message box. Click ‘OK’ to close the message box. 43 of 60 Electronic Audiogram Program User Manual - Part 3 of 3 Updating Occupation Codes Tab From time to time, WorkSafeBC will send out an update file for the classification codes in the ‘Occupation Codes’ tab. An example of the file name is ‘WorkSafeBC Occupation Code Sept 25 2009.dat’. This function will load the occupation codes and their descriptions into the ‘Occupation Codes’ tab and also remove any occupation codes in the ‘New Codes’ tab that exist in the updated ‘Occupation Codes’ tab. Here are the steps to load the occupation codes from the update file. You should have received the occupation code update file in an email from WorkSafeBC. Save the update file into a folder in your PC. In our example we have saved the update file ‘WorkSafeBC Occupation Code Sept 25 2009.dat’ in the c:\data folder. Click the ‘Add-Ins’ menu tab at the top of the Excel window to display the ‘Audiogram’ menu command. Click the ‘Audiogram’ menu item, select the ‘Utilities’ sub menu and then click on the ‘Update Occupation Codes’ option. The following window will be displayed for you to select the occupation code update file. In our example we have saved the update file ‘WorkSafeBC Occupation Code Sept 25 2009.dat’ in the c:\data folder. Select the update file and click the ‘OK’ button to continue. 44 of 60 Electronic Audiogram Program User Manual - Part 3 of 3 The following message box is displayed to confirm the number of occupation code records that have been loaded. Click the ‘OK’ button to close the message box. You should see the occupation codes from the update file have been loaded into the ‘Occupation Codes’ tab. 45 of 60 Electronic Audiogram Program User Manual - Part 3 of 3 If you want to abort without loading the occupation update file, click the ‘Cancel’ button in the update file selection window. You should see the follow confirmation message box. Click ‘OK’ to continue. You should see the follow message box. Click ‘OK’ to close the message box. 46 of 60 Electronic Audiogram Program User Manual - Part 3 of 3 Displaying the Audiogram Program Version You can display the version number and version date of the audiogram program to verify what version of the audiogram program you are running. You need to display the version date before and after you upgrade your audiogram program to verify the upgrade is run successfully. See Appendix E in Part 3 of the user manual for instructions on how to upgrade your audiogram program code to a new version. Click the ‘Add-Ins’ menu tab at the top of the Excel window to display the ‘Audiogram’ menu command. Click the ‘Audiogram’ menu item and select the ‘About WorkSafeBC Audiogram’ option. Note: the options appear as a pop-up: The version number and version date is displayed in the next message box. Click the ‘OK’ button to close the window. 47 of 60 Electronic Audiogram Program User Manual - Part 3 of 3 Appendix A – Opening Windows Explorer Click the ‘start’ button at the lower left hand corner of your desktop. Then click the ‘All Programs’ option at the bottom of the next window. Then select the ‘Accessories’ option. 48 of 60 Electronic Audiogram Program User Manual - Part 3 of 3 Select the ‘Windows Explorer’ item and click your right mouse button. Select the ‘Send To’ item in the next popup window. 49 of 60 Electronic Audiogram Program User Manual - Part 3 of 3 Click on the ‘Desktop (create shortcut)’ item in the next popup window. You should see the Windows Explorer icon in your desktop. Whenever you need to open the Windows Explorer window, just double click (click the left mouse button twice) this icon. 50 of 60 Electronic Audiogram Program User Manual - Part 3 of 3 Appendix B – Creating a Data Folder Open the ‘Windows Explorer’ program. If you cannot find the Windows Explorer icon on your desktop, see Appendix G on how to put the Windows Explorer icon on your desktop. Click the + sign besides ‘My Computer’ to expand it. Select the C: drive and click the ‘File’ menu at the top of the Windows Explorer window. 51 of 60 Electronic Audiogram Program User Manual - Part 3 of 3 Select the ‘New’ item in the next popup window and then click on ‘Folder’ as the new item. Next you will see a new folder is created with the folder name as ‘New Folder’. Type ‘Data’ as the name of the new folder and press the ‘Enter’ key. Now you have just created a new folder called ‘Data’ in the C drive. 52 of 60 Electronic Audiogram Program User Manual - Part 3 of 3 Appendix C – Displaying the Developer Tab In EXCEL 2007 Click the ‘Office’ button at the top of the EXCEL window. Click the ‘Excel Options’ button at the bottom. 53 of 60 Electronic Audiogram Program User Manual - Part 3 of 3 Select the ‘Popular’ option at the left if it is not selected. Check the ‘Show Developer tab in the Ribbon’ checkbox then click the ‘OK’ button to close the ‘Excel Options’ window. Now you should see the ‘Developer’ tab. 54 of 60 Electronic Audiogram Program User Manual - Part 3 of 3 Appendix D – Setup Your EXCEL Program to Run the Audiogram Program When you run the audiogram program in a computer the first time, the EXCEL program in that computer might now setup to run the audiogram program. Here are the instructions on how to setup your EXCEL program to run the audiogram program. When you started the audiogram program, if the Microsoft Visual Basic’ window is opened and a message box similar to the one below is displayed. Then your EXCEL program is not setup to run the audiogram program yet. Click the ‘OK’ button to close the message box. Now you are in the ‘Microsoft Visual Basic’ window with the audiogram program still running. Next we will stop the audiogram program. 55 of 60 Electronic Audiogram Program User Manual - Part 3 of 3 Click on the ‘Run’ menu item at the top of the ‘Microsoft Visual Basic’ window. Select and click the ‘Reset’ option to stop the audiogram program. Click the ‘Tools’ menu item at the top of the ‘Microsoft Visual Basic’ window. Select and click the ‘References…’ option. 56 of 60 Electronic Audiogram Program User Manual - Part 3 of 3 Check each item in the ‘References – VBAProject’ window that has a check mark in the checkbox. Uncheck checked items that begin with a ‘Missing’ For example, if there is a ‘Missing’ in front of ‘Microsoft Outlook 12.0 Object Library’. Uncheck the checkbox and click the ‘OK’ button to close the ‘References – VBAProject’ window. Click the ‘File’ menu item at the top of the ‘Microsoft Visual Basic’ window. Select and click the ‘Close and Return to Microsoft Excel’ option. 57 of 60 Electronic Audiogram Program User Manual - Part 3 of 3 When you are returned to the Excel window, Click the ‘Office’ button at the top left corner of the EXCEL window. Click the ‘Save’ option to save the changes you have just made to the audiogram program. Click the ‘Office’ button again and then click the ‘Close’ option to close the audiogram program. Now your EXCEL program is setup to run the audiogram program. Refer to the ‘Start Audiogram Program’ section for instructions on how to start up the audiogram program. 58 of 60 Electronic Audiogram Program User Manual - Part 3 of 3 Appendix F – Moving to a New Version of the Electronic Audiogram Program When there are extensive changes in the new version of audiogram program, you must move all your data from your old version to the new version of the audiogram program. 1. Rename your previous version of audiogram program. Open the Windows Explorer window and find the folder where you saved your audiogram program. Select the audiogram program. Select the ‘File’ menu item at the top of the ‘Windows Explorer’ window and click the ‘Rename’ option. 59 of 60 Electronic Audiogram Program User Manual - Part 3 of 3 Now you can change the name of the previous version of the audiogram program. 2. Save the new version of audiogram program sent to you by WorkSafeBC in the same folder in your PC. 3. Open your previous version of audiogram program. 4. Backup data from all the tabs to the backup file. See section ‘Backup Data from the Audiogram Program’ for detail instructions. 5. Close your previous version of audiogram program. 6. Open the new version of audiogram program. See section ‘Start Audiogram Program’ for detail instructions on starting the audiogram program the first time. 7. Restore data from the backup file created in step #4 to all the tabs. See section ‘Restore Backup Data To an Audiogram Program’ for detail instructions. 8. Save the new version of audiogram program. 60 of 60