1
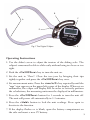
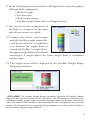
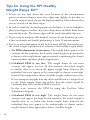
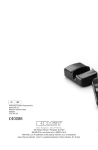
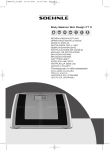
User Manual
FIRST EDITION
HPI Healthy Weight Range KitTM
The HPI Healthy Weight Range Kit™ is designed for calculating the
client’s fat-free mass, skeletal weight, body fat percentage and healthy
weight range. These calculations take into account the unique body frame
of each client.
This scientifically based method was created by Swedish professor of
physiology Wilhelm von Döbeln and has been used extensively in Sweden
throughout the past 30 years.
The HPI Healthy Weight Range Kit™ includes the Digital Skeletal
Caliper and the HPI Healthy Weight Range Software.
Note: This method applies only to individuals 18 years of age or older.
The Digital Skeletal Caliper
The Digital Skeletal Caliper provides an accurate, fast and safe way
to measure the client’s wrist and knee joints. This is an easy and noninvasive way to obtain information about the client’s body composition.
These measurements create the basis for calculating the client’s fat-free
mass, skeletal weight, body fat percentage and healthy weight range.
The Digital Skeletal Caliper’s Parts (fig.1)
The digital skeletal caliper includes the following parts:
A. Caliper’s arms
B. Sliding guide
C. Digital gage
D. Slider’s screw to adjust the mobility of the arms
E. Battery compartment
2
B
C
A
D
Fig.1 The Digital Caliper
E
Operating Instructions
1. Use the slider’s screw to adjust the tension of the sliding scale. The
caliper’s arms must be able to slide easily without being too loose or too
tight.
2. Push the <On/Off/Zero> key to turn the unit on.
3. Set the unit to “Zero”: Close the two jaws by bringing their tips
tightly together and press the <On/Off/Zero> key once.
4. Set measurement units: Press the <mm/in/F> key repeatedly until the
“mm” sign appears on the upper left corner of the display. When set on
millimeters, the caliper will display 0.0. In order to correctly perform
the calculations, the measuring units must be displayed in millimeters.
5. Press the <On/Off/Zero> button for 3 seconds to turn the unit off.
The unit will power off automatically in 3-5 minutes.
6. Press the <Hold> button to lock the unit readings. Press again to
deactivate the function.
7. If the display flashes or is blank, open the battery compartment on
the side and insert a new 3V battery.
3
Technical Specifications
• Measuring range: 0” – 6.0”
• Accuracy: 0.01”
• 3 Way reading: 0.01”, 0.1mm, 1/64”
• 3V CR2032 Battery
• Battery life: approx 1 year
• Three measurement systems: inches, metric (millimeters)
and inch fractional.
Inch
Metric
Fraction
• Patent Pending
Cleaning
It is recommended that you disinfect the caliper’s arms with a 70% alcohol
solution and air dry after each use.
Maintenance
Make sure to inspect the tool on a regular basis for cleanliness or damage.
Any change in the shape of the caliper arms will lead to incorrect
readings. If the caliper is bent or damaged it must be replaced.
Recycling
This is an electronic device and contains a battery. It is considered
hazardous waste and it must be recycled. Do not throw away.
4
The HPI Skeletal Measurement Method
General Instructions
1. Be firm when measuring, but without hurting the client.
2. Make sure that your caliper is set to measure in millimeters (the display
shows 0.0).
3. If one of the joints is different from the other due to an accident or surgery, measure only the unaffected joint. Use this measurement in your
calculations to replace the dimension of the injured joint.
How to Measure the Diameter of the Wrists
(fig. 2, 3 and 4)
In order to obtain accurate results, follow
these instructions:
1. You and your client must be sitting
directly across from one another.
2. Ask the client to put their hands on
their knees so that their hands are
steady.
3. Use your index fingers to find the
widest boney part on the client’s wrist
(fig. 2). This is usually located on the
outer edges of the radius and ulna
bones (fig. 4). Remember that the
rounded edges of these bones are
typically the widest part of the wrist.
4. Position the tips of the caliper at the
apex of the bone edges, as indicated in
fig.4. Support the caliper’s tips with
your index fingers in order to prevent
the caliper from sliding off the edge of
the bones (fig. 3).
Fig. 2
Fig. 3
5
5. Be careful to measure the bone only
and not add the soft tissue that covers
the bone. In order to do this, you must
apply enough pressure on the caliper’s
tips, however without hurting the
client.
6. Read the skeletal caliper display and
record the results in the provided
software.
7. Measure both right and left wrists.
8. If one of the joints is different from the
other due to an accident or surgery,
measure only the unaffected joint. Use
this measurement for both right and
left wrist diameters in your calculation.
Fig. 4 The measurement
points on the wrist
How to Measure the Diameter of the Knees
(fig. 5, 6 and 7)
1. You and your client must be sitting
directly across from one another.
2. The client must be sitting in a chair
with their knees at a 90 degree angle,
with their feet flat on the floor.
3. Use your index fingers to find the
widest boney part of the client’s knee
(fig. 5). This is typically located on the
widest edges of the femur bone (fig. 7).
Fig. 5
4. Sometimes it is easier to find the edge of the knee joint if you ask the
client to swing their lower leg back and forth. However, during the
actual measurement, the knee must be still.
6
5. Position the tips of the caliper at the
apex of the bone edges, as indicated in
fig. 7. Support the caliper’s tips with
your index fingers in order to prevent
them from sliding off the edge of the
bones (fig. 6).
6. Read the skeletal caliper scale and
record the results in the provided
software.
Fig. 6
7. Measure both right and left knee joints.
8. If one of the joints is different from the
other due to an accident or surgery,
measure only the unaffected joint. Use
this measurement for both right and
left knee diameters in your calculation.
9. If you cannot accurately measure a
client’s knees due to excess tissue surrounding the bones, check the box on
the right side of the knee measurement
section in the provided software. This
will allow you to do the calculations
taking into consideration the wrist
diameters only.
Fig. 7 The measurement
points on the knee
7
The HPI Healthy Weight Range Software
Install the software in your computer, following the instructions on the
provided CD. Please see CD sleeve for system requirements.
Instructions for Using the HPI Healthy Weight
Range Software
1. Use the Tab key to move from one field to the next one. Make sure you
enter the correct values for wrist and knee diameters. You can also use
the mouse to click in a field. If using the mouse, make sure you delete
the default zero before entering any data.
2. Enter Personal Data:
• First Name
• Last Name
• Date of Birth
• Gender
3. Fill in the Height field, preferably in centimeters. Feet and inches can
also be used. The software will always display height in both US and
Metric systems.
4. Fill in the Wrist and Knee diameter fields, after measuring them with
the digital caliper. Make sure you only
enter numerical data, and not text. The
fields cannot be blank either. In such
cases an error pointer will be displayed.
5. If you cannot measure a client’s
knees, check the corresponding box
on the right side of the screen. The
software will calculate all values
using wrist diameters only.
6. Fill in the Actual Weight field, using either lbs or kg.
7. Ask your client about their desired weight and fill in the corresponding
field.
8
8. In the Calculations area the software will display the assessed weight of
different body components:
• Skeletal weight
• Fat-free mass
• Body fat percentage
• Healthy weight limits (lower and upper limits)
9. You can also see the composition of
the body as a diagram on the right
side of your screen (see right).
10. Compare the client’s actual weight
with the healthy weight limits indicated by the software. A weight that
is in between the weight limits is
considered healthy. A weight above
the upper weight limit is considered
overweight. A weight below the lower weight limit is considered
underweight.*
11. The weight status will be displayed by the Healthy Weight Range
Diagram (see below).
*DISCLAIMER: The Healthy Weight Range calculation using the HPI Healthy Weight
Range Kit may not be accurate for all individuals. The HPI method of calculating an
individual’s healthy weight range is based on average skeletal proportions and muscle
mass. HPI Health Profile Institute is not responsible for the consequences of inaccurate
results. HPI also declines any responsibility for improper use of the skeletal caliper or
of HPI Healthy Weight Range Software.
9
Fat-Free Mass Adjustment
For inactive individuals or for those who exercise a lot, deviations from
the calculated fat-free mass may occur as follows1:
• For individuals who are inactive, the actual fat-free mass can be
lower than the displayed value.
• Certain types of exercise lead to an increase of muscle mass. For
those individuals, their actual fat-free mass can be higher than the
displayed value.
Following the calculation of fat-free mass, the result must be categorized
as correct or incorrect based on the specific situation of each client. Using
the weight limits as a starting point makes this assessment easier (see
below).
The HPI Healthy Weight Range Software allows for easy adjustment of
fat-free mass for each individual.
For example, if an
individual has a muscle mass greater than
average due to specific training, the fatfree mass can be increased by clicking on the + sign in the Fat-Free Mass
Adjustment window. Each click will increase the fat-free mass with a
certain value.
If an individual has a
muscle mass lower
than average due to
specific sports (e.g.
marathon runners) or
due to lack of physical activity, the fat-free mass can be decreased by clicking on the - sign in the Fat-Free Mass Adjustment window. Each click will
decrease the fat-free mass with a certain value.
1) In some cases, inaccurate results can be obtained due
to measuring errors or unusual skeletal diameters.
10
Be aware that by adjusting the fat-free mass, you only modify the muscle
mass and, accordingly, the fat mass. The other components of fat-free
mass (skeleton, organs, blood, etc.) do not change mass.
Observe the new values obtained by adjusting fat-free mass (fat-free mass,
body fat percentage and healthy weight limits). Observe also the changes
in the Body Composition and Healthy Weight Range diagrams.
Saving and Printing the Files
In order to save the file you created,
click on the Save HWR icon on top of
the screen. The file will be saved as a
.HWR file, displaying the name and
date of birth of the participant.
In order to open a .HWR file previously created, start the program, click the
Open existing HWR icon on top of the
screen and choose the file you want to
open.
You can also save the files as .PDF. In
order to do this and print the results,
click on Export HWR to PDF icon on
top of the screen:
11
Tips for Using the HPI Healthy
Weight Range KitTM
1. If you are not sure about the exact location of the measurement
points on wrists or knees, move the caliper tips slightly on the skin, in
a circular motion, until you get the highest number. That indicates that
you are exactly on the bone edges.
2. In order to find the measuring points on the knees, it can be helpful to
place your fingers 2 inches above the clients knee and slide them down
towards the joint. The femur edges will be easily identified this way.
3. If you want to integrate this method as part of your business, practice
it first on friends and family, performing at least 30 measurements.
4. For an accurate adjustment of the fat-free mass (FFM), observe the way
the actual weight is positioned in relation to the healthy weight limits:
a. No FFM adjustment is necessary: The weight limits appear to be
accurate. In this situation, the way the actual weight is positioned in
relation to the weight limits appears normal, considering the client’s
exercise habits and their physical appearance.
b. Calculated FFM is too low: The weight limits do not seem
accurate and appear too low. In this situation, the actual weight
is usually close to or above the upper weight limit; however the
individual does not appear to be overweight or almost overweight.
Instead, their appearance shows a healthy weight, without excess fat.
If you attempt to imagine how the client would look at a weight close
to the lower weight limit and realize that the client would be
extremely thin, the calculated FFM is too low.
In this case, increase the FFM by using the Fat-Free Mass
Adjustment diagram.
c. Calculated FFM is too high: The weight limits do not seem
accurate and appear too high. In this situation, the actual weight is
usually close to or below the lower weight limit; however the
individual does not appear to be underweight or almost underweight. Instead, their appearance shows a healthy weight.
12
If you attempt to imagine how the client would look at a weight close
to the higher weight limit and realize that the client would have
excess fat, the calculated FFM is too high.
In this case, decrease the FFM by using the Fat-Free Mass
Adjustment diagram.
13
90 DAY LIMITED WARRANTY
Health Profile Institute, Inc. (“HPI”) warrants this product to be free of defects in
workmanship and material under normal use and conditions for a period of 90 days from
the date of original purchase. HPI disclaims all other warranties express and implied.
There are no warranties which extend beyond the description on the face hereof.
IN WARRANTY PROCEDURE
Should service be required during the warranty period, HPI will repair or, at its discretion replace
this product, without charge except for a $12.00 fee for handling, packing, return postage and
insurance, subject to verification of the defect or malfunction, upon delivery of this product to HPI
SERVICE CENTER listed below with proof of date of purchase.
1.
Pack the unit in a well-padded heavy corrugated box.
2.
Enclose a copy of your sales receipt, credit card statement or other proof of
date of purchase, along with your name, address, and phone number and a
description of the problem.
3.
Enclose a check or money order for the sum of $12.00 payable to
Health Profile Institute, Inc.
4.
Mail (prepaid) to:
HPI SERVICE CENTER
PO Box 777178
Henderson, NV 89077
Note: This warranty is valid only if the product is used for the purpose for which it was
designed. It does not apply to:
1.
Damage or loss caused by negligence, misuse, accident,
improper installation or operation.
2.
A defect that has been caused by modification or repair
other than through Health Profile Institute, Inc.
3.
Any liability for incidental or consequential damages.
The Warranty is valid only in the United States of America. This warranty gives you
specific legal rights, and you may also have other rights which vary from state to state.
OUT OF WARRANTY PROCEDURE
If the item is out of the warranty period or if you do not have proof of purchase date,
then Health Profile Institute, Inc. will perform service for a handling fee of $29 for most
items. Follow the shipping / packing instructions listed under the "In-Warranty
Procedure" section of the 90 Day Warranty. If you have any questions, email the
technical service department at [email protected].
All other returns need to be made directly to the retailer where you purchased the HPI
product. The respective return policies for that retailer shall be the guidelines of your
purchase.
14
RETURN POLICY & REFUNDS & EXCHANGES
for product purchased directly from
Health Profile Institute, Inc.
RETURNING/EXCHANGING NEW WITHIN 30 DAYS of delivery:
You may return any NEW, UNOPENED items purchased directly from Health Profile
Institute, Inc. within 30 days of delivery date. Refused packages will have a 20%
restocking fee assessed. Items must be returned at the buyers’ expense. We will only
pay the return shipping costs if the return is a result of our error.
Any NEW, UNOPENED items may be returned for up to 30 days from the delivery date.
New product returns will be eligible for refund, less a 10% restocking fee to help
absorb our initial shipping costs.
RETURNING OPENED NEW WITHIN 30 DAYS of delivery:
Any OPENED NEW item returned within 30 days of delivery, and shipped back in the
original manufacturer's packaging: The refund is 80% of item's price.
RETURNING USED WITHIN 30 DAYS of delivery:
Any OPENED item returned within 30 days of delivery that is not in its original
condition, is damaged, missing parts, or missing packaging: The refund is up to 50%
of item's price.
PROCESSING TIME
Returns are processed during normal business hours Monday-Friday. Please allow 1014 business days from receipt of your package for processing.
This time period includes:
5 to 7 business days for us to receive your return from the courier
5 to 7 business days for us to process your return
All other returns need to be made directly to the retailer where you purchased the HPI
product. The respective return policies for that retailer shall be the guidelines of your
purchase.
15
HPI Healthy Weight Range Kit™ User Manual
First Edition
Published by HPI Health Profile Institute, Inc.
PO Box 777178, Henderson, NV 89077
www.healthprofileinstitute.com
Version 1.0/August, 2010
Copyright ©2010 HPI Health Profile Institute, Inc. All rights reserved.
No part of this publication may be reproduced or distributed in any form
or by any means, without the prior written consent of HPI Health Profile
Institute, Inc.
Article No. 040303
Save this manual for future reference.