1
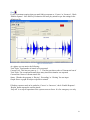
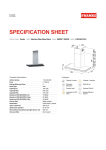
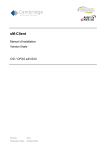
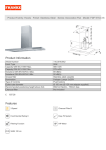
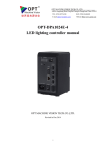
Boys Town National Research Hospital
User Manual for Production
September 2010
Contents
Overview: ...................................................................................................................................................... 3
System Requirements: .................................................................................................................................. 3
Getting Started:............................................................................................................................................. 4
Production Main Window: ............................................................................................................................ 4
Simple Calibration: ................................................................................................................................... 5
Set Subject Data: ....................................................................................................................................... 6
Select or Edit Definitions File: ................................................................................................................... 6
Play: ........................................................................................................................................................... 8
Result Files: ................................................................................................................................................... 9
Appendix I ................................................................................................................................................... 10
Appendix II .................................................................................................................................................. 12
2
Overview:
Production helps researchers to play stimuli and to record responses. Stimuli can be played at
any desired level. Users have an option to mix noise with stimuli and vary signal-to-noise ratio
by changing signal level or noise level.
Production started off as a stripped-down version of BART , but has since been customized to
have features that are unique to its own. Among its unique features is ability to play stimuli at
various SNR, ability to introduce noise at any time along the stimuli, ability to present stimuli at
random, ability to present feedback at random, ability to mark response as correct/incorrect at
runtime etc.
Simplicity is at the heart of production. The various program options can be managed by a
definitions file. The definitions file is in text format and can be edited by a simple text editor like
notepad.
System Requirements:
Windows XP or higher
SoundCard
DirectX 9.0 or higher
3
Getting Started:
It is recommended that you copy latest version of Production to your machine before using it.
Latest version of Production is available at X:\Res_Progs\Production . Make sure you copy all
other supporting files in this directory. Once you have copied all the files, you can launch
Production by double clicking on Production.exe icon
Production Main Window:
Production has a simple-touse interface that allows
you to get it running in 4
steps:
(i) Calibrate
(ii)Set Subject Data
(iii)Select or edit definitions
file
(iv) Play
Each of these steps is
described in detail in
following sections.
Figure 1: Production Main Window
4
Simple Calibration:
The calibration window can be
used for two purposes: 1) to
measure a calibration tone and
2) to play noise or wave files at
designated levels. The first
option is necessary for any
testing where the level of the
stimulus must be controlled.
The second option allows the
user to generate stimuli to
verify the output of the signal
processing features within the
program.
The Set Calibration Level
section allows you to play a
high level pure tone at a
Figure 2: Simple Calibration
selected frequency via the
transducer to be used in the experiment (see fig 3 for circuit diagram). Signal level (in an
appropriate coupler or in the sound field) should be measured by an independent system (e.g.,
sound level meter). The level measured at the sound level meter should then be entered into the
Ref dB Level field followed by Stop. All subsequent stimuli presented by the program will be
referenced to this level until another calibration is performed.
The Test Calibration section is used to generate signals in order to verify that the program
calculates the output levels correctly. To play a pure tone (at the frequency specified in the Set
Calibration Level section), type the desired level in the
Target dB field and press the Play Attenuated Tone
button. The output then can be measured using an
oscilloscope, sound level meter, or voltmeter.
The Play Wave File section allows the user to play a
stored wave file at the specified Target dB Level. If no
level is specified, the wave file will be played at 80 dB
SPL. The wave file can be selected either by typing in
the path to the file or by using the Browse button. If the
wave file contains a pure tone, the Peak option should
be selected. If the wave file contains speech or noise,
the RMS option should be selected.
Figure 3: Calibration Circuit Diagram
The Record section allows user to record sound for specified milliseconds, or until Stop is
pressed.
NOTE: The OK button MUST be clicked after entering the calibration level. If not, the value
will not be saved when exiting this screen.
5
Set Subject Data:
Production result files are stored in
folders named after Subjects Name as
filled in Subject Data window. This is
thus a required field. You may enter
Group and ID number for the subject.
Figure 4: Subject Details
Select or Edit Definitions File:
Various program options are set through definitions file. This file is kept in text format and can
be edited easily.
Figure 5: Definition File Selection
See Appendix I for a sample definitions file. Following table gives overview of different
parameters included in the definitions file.
Parameter
Description
Default
Name/Symbol
Values
%
Comment. If a new line starts with this, the line is ignored
by the program.
SourceFolder
Folder that the stimuli you want to play are in
Must provide
DestinationFolder
AmplificationType
PresentationLevel
TimeToRecord
Folder to write results to. A new folder will be created
using
DestinationFolder/SubjectInitials
RMS or Peak amplification of input stimuli.
None. Must
provide.
Stimuli is presented at Ref db Level-PresentationLevel .
Ref db Level is obtained by SimpleCalibration (usually
105)
Duration in milliseconds. Response is recorded for this
long.
0
Peak
0
6
NoiseFile
Full path of file to be used as noise.
NoiseLevel
Noise is presented at Ref db Level-NoiseLevel. Ref db
Level is obtained by SimpleCalibration ( usually 105)
Time in milliseconds. Noise is added after NoiseOffset
milliseconds into stimuli. If this value is negative, noise
starts first, followed by stimuli.
Number of times a single stimuli can be presented
NoiseOffset
NumOfPresentations
RandomizeStim
Whether or not to present stimuli in random order.
1=Random, 0= not random. When set 0, stimuli are
always presented in the same order.
AddStimToResponse Adds Stim to the front of Response. Result file will be
Stim followed by Response in one wav file. 1=true,
0=false
ShowGames
Whether or not to present pictures along with playing
sounds.
If ShowGames=1, make sure to include feedbackfiles and
folder
FeedbackDirectory
Directory where feedback files are.
FeedbackFile
List of pictures files to use from FeedbackDirectory
RandomizeFeedback
Whether or not to present feedback pictures in random
order.
Must provide
if noise is
needed.
0
0
1
0
0
0
Needed if
Showgames=1
Needed if
showgames=1
0
7
Play:
If your experiment requires that you mark Subject response as ‘Correct’ or ‘Incorrect’, Check
‘Enable response’. Now Hit Play. Production will now play stimuli as per the settings in the
definitions file.
Figure 6 : Production In Use
At a glance you can notice the following:
Total Trials: Total number of stimuli to be presented
Current Trial: This has two parts eg: 1 – 2 . The first part shows order of Current trial out of
Total Trials. The second part denotes how many times this stimulus was repeated.
Current Stim: Name of current stimuli file
Status: Whether the program is ‘Playing’, ‘Recording’ or ‘Waiting’ for user input
Graph: Shows a graph for subject response to stimuli
If Subject response needs to be graded as ‘Correct’ or ‘Incorrect’, check ‘Enable Response’.
‘Repeat’ button repeats the current stimuli.
‘Stop All’ is to stop all operations if the system seems to freeze. It is for emergency use only.
8
Result Files:
Result files are stored in location specified by parameter ‘DestinationFolder’ in definitions file.
Results for each subject is stored in a subdirectory <subject name> where <subject name > is the
‘Name’ parameter specified while entering subject data ( ref Set Subject Data). A new directory
is created if one already doesn’t exist.
Inside each subdirectory for a subject, there is a text file with the same name as the folder name
for this subject. Eg: if Subject Name is ‘Prasan’, there will be a file named ‘Prasan.txt’ inside a
subdirectory named ‘Prasan’. This text file lists all the details of tests conducted on this subject.
A sample of a result file is given in Appendix II. Recordings of subject responses are also in this
directory. Subject response files are named as <stimuli name>_<subject name><index>.wav
where, <stimuli name> is the file name (without extension) of the stimuli for which subject gave
this response and <index> is the number of repetitions made for this stimuli for this subject. Eg .
S9_Prasan2.wav indicates that this response was made for stimuli S9.wav, subject name was
‘Prasan’ and that this stimulus was played twice (perhaps ‘NumberOfPresentations’ was greater
than 1 in definitions file, or that ‘Repeat’ button was pressed)
9
Appendix I
%Production Definition File
%SourceFolder: Folder that the stimuli you want to play are in
%DestinationFolder: Folder to write results to. A new folder will be created using
%
DestinationFolder/SubjectInitials
%
For Example, if DestinationFolder is R:\HARL\Common\ProductionResults and
%
Subject's initials are CMR, results will be written to folder
%
R:\HARL\Common\ProductionResults\CMR
%%%%%%%%%%%%%%%%%%%%%%%%%%%%%%%%%%%%%%%%%%%%%%%%%%%%%%%%%%%
%%%%%%%%%%%%%%%%%%%%%%%%%%%%%
SourceFolder: U:\Aryal\HintFiles\hintc\List16
DestinationFolder: U:\Aryal\Results
%%%%%%%%%%%%%%%%%%%%%%%%%%%%%%%%%%%%%%%%%%%%%%%%%%%%%%%%%%%
%%%%%%%%%%%%%%%%%%%%%%%%%%%%%
%AmplificationType: RMS or Peak - will usually want RMS
%PresentationLevel: dB Level to play stimuli at
%TimeToRecord:
Milliseconds to record. 10000 (10 seconds) is recommended
WriteBits:24
% Bit length to use in writing wave files. 24 or 32
%%%%%%%%%%%%%%%%%%%%%%%%%%%%%%%%%%%%%%%%%%%%%%%%%%%%%%%%%%%
%%%%%%%%%%%%%%%%%%%%%%%%%%%%%
AmplificationType: RMS
PresentationLevel: 65
TimeToRecord: 5000
%%%%%%%%%%%%%%%%%%%%%%%%%%%%%%%%%%%%%%%%%%%%%%%%%%%%%%%%%%%
% Noise to be added to stimuli
10
% Same Noise signal is mixed with all stim signals
% noiselevel in DB, noiseoffset in ms . Noise is played at <noiselevel>DB after <ms>milliseconds into
%original stim
% comment out if no noise is needed
%%%%%%%%%%%%%%%%%%%%%%%%%%%%%%%%%%%%%%%%%%%%%%%%%%%%%%%%%%%
%%%%%%%%%%%%%%%%%%%%%%%%%%%%%
noisefile: U:\Aryal\nishi\mono24\boy.wav
noiselevel: 55
noiseoffset:100
%%%%%%%%%%%%%%%%%%%%%%%%%%%%%%%%%%%%%%%%%%%%%%%%%%%%%%%%%%%
%NumOfPresentations: How many times to Play - Record
%%%%%%%%%%%%%%%%%%%%%%%%%%%%%%%%%%%%%%%%%%%%%%%%%%%%%%%%%%%
NumOfPresentations: 4
%%%%%%%%%%%%%%%%%%%%%%%%%%%%%%%%%%%%%%%%%%%%%%%%%%%%%%%%%%%
% RandomizeStim : Whether or not to feed stims in random order 1=Yes, 0=NO
%%%%%%%%%%%%%%%%%%%%%%%%%%%%%%%%%%%%%%%%%%%%%%%%%%%%%%%%%%%
%%%%%%%%%%%%%%%
RandomizeStim: 1
%%%%%%%%%%%%%%%%%%%%%%%%%%%
%AddStimToResponse: Appends Stim to the front of Response . Result file will be Stim followed by
% Response. 1=Yes, 0=No
AddStimToResponse=0
%%%%%%%%%%%%%%%%%%%%%%%%%%%%%%%%%%%%%%%%%%%%%%%%%%%%%%%%%%%
%%%%%%%%%%%%%%%%%%%%%%%%%%%%%
%ShowGames: 0 = off, 1 = on
%if games are on, be sure to include feedbackfiles and folder
11
%RandomizeFeedback: Whether or not to present feedback files in random order 1=Yes, 0=No
%%%%%%%%%%%%%%%%%%%%%%%%%%%%%%%%%%%%%%%%%%%%%%%%%%%%%%%%%%%
%%%%%%%%%%%%%%%%%%%%%%%%%%%%%
ShowGames: 1
RandomizeFeedback:1
feedbackdirectory: C:\Feedback\Animals\
feedbackfile: ss_animals_32
Appendix II
Sample result text file. Comments not included in actual result file.
Prasan
%Name of subject (ref Set Subject Data)
Group1
%Group (ref Set Subject Data)
001
%Id Number (ref Set Subject Data)
9/30/2010
9:28 AM
u:\aryal\hintfiles\hintc\list16\S5.wav
1
%Stimuli file , Response : Correct = 1, Incorrect=0
u:\aryal\hintfiles\hintc\list16\S9.wav
0
% if EnableResponse is not checked, response is not
u:\aryal\hintfiles\hintc\list16\S6.wav
0
% shown
u:\aryal\hintfiles\hintc\list16\S3.wav
0
u:\aryal\hintfiles\hintc\list16\S2.wav
0
u:\aryal\hintfiles\hintc\list16\S9.wav
0
u:\aryal\hintfiles\hintc\list16\S10.wav 1
12