1
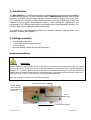
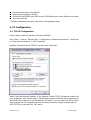
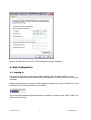
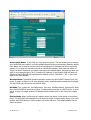
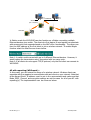
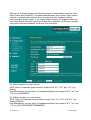
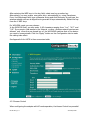
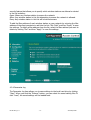
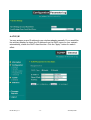
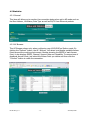
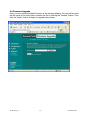
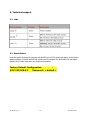
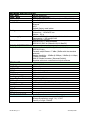
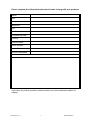
USER’S MANUAL
Industrial Wi-Fi
WLI2454G
DS WLI2454_V1.1
-1-
ATIM Sept 2006
1- Introduction
The WLI-2454G Wi-Fi interface is designed for applications requiring sturdiness and reliability
in industrial environment. It is fully complyant with the IEEE 802.11b standard. With its RJ45
connector, it enables communication between industrial Ethernet devices (PCs, PLCs, I/Os,
CNCs, displays, etc.) through a wireless Ethernet structure using the 2.4GHz band in DSSS. Its
installation is very simple: Windows-based utility or Web browser for configuration and
management. The 8-39Vdc power supply is connected through screw-cage plug connector. The
compact metal case is designed for DIN rail mounting.
This product has been successfully tested with industrial Ethernet protocols (PLCs from
Schneider, Siemens, Allen Bradley, …).
2- Package contents
•
•
•
•
1 WLI2454G Access point
1 small 2dBi omnidirectionnal antenna
1 User’s manual
No driver needed (Setup with any Web navigator).
Hardware Installation
Read first :
Connect tightly the External dipole antenna on the antenna connector. A loosen antenna will reduce the radiant
energy or even lose it. In order to improve the RF signal radiation of the antenna, proper antenna placement is
necessary. Try to place the antenna as high as possible to increase the coverage area. In case the WLI2454G is
installed inside an instrument cabined then uses antenna cable to relocate the antenna outside the cabined. A
higher gain antenna may be then necessary to compensate the cable losses.
When the WLI2454G is working, do not touch the antenna.
SMA-RP connector
Factory default
Reset (Hold the
button during the
power on)
RJ-45
(10/100)
8-39 Vdc Power supply
DS WLI2454_V1.1
-2-
ATIM Sept 2006
Connect the antenna on the SMA-RP.
Plug the power supply (8-39 Vdc).
Connect the WLI2454G (port RJ45) to your PC’s Ethernet port via an Ethernet cross cable
Turn the power ON
The basic installation procedure is the same in all operating modes
3- PC Configuration
3.1- TCP/IP Configuration
How to assign a static IP Address in Windows XP/2000?
Go to “Start” > Click on “Control Panel” > Double-click on “Network Connections” > Right-click
on “Local Area Connections” > Click “Properties”
Highlight “Internet Protocol (TCP/IP)” and then click “Properties”.
Select “Use the following IP address” in the Internet Protocol (TCP/IP) Properties window. Set
your “IP address” and “subnet mask”. (The IP Address must be within the same range as your
WLI2454G. The IP address of your WLI2454G is 192.168.0.2. You can assign 192.168.0.100 for
your computer. No two computers can have the same IP Address. Assign a subnet mask of
(255.255.255.0.) and then Click “OK” button.
DS WLI2454_V1.1
-3-
ATIM Sept 2006
Click on the OK button, your PC’s TCP/IP settings have been configured.
4- Web Configuration
4.1- Logging In
Connect your computer to the wireless station adapter either through wireless or wired
connection. Please set a fixed IP address within the range of 192.168.0.X (X can’t be 2), to your
computer.
Activate your browser, then type this Station Adapter’s address (e.g. http://192.168.0.2), in the
Location (for IE) or Address field and press Enter.
Key in the system password (the default setting is “default”) and click on the “Login” button. You
will see the main page.
DS WLI2454_V1.1
-4-
ATIM Sept 2006
The main window provides 5 items for you to monitor and configure the Wireless LAN Access
Point: Information, Configuration, TCP/IP, Statistics and Firmware Upgrade.
4.2- Information
This item shows the current information on the 802.11g Wireless WLI2454G such as MAC
Address, Firmware Version, Web UI Version as well as Boot Version.
4.3- Configuration
4.3.1 General
DS WLI2454_V1.1
-5-
ATIM Sept 2006
Access Point Name: In this field, you may enter any name. This will enable you to manage
your WLI2454G more easily if you have multiple Access Points on the network. Besides, Access
Point Name can be used to prevent you from forgetting an IP Address and fail to access the
website. Try to type the nickname you like to identify the website, then press the button of
“Apply” to reboot. Whenever you want to get back to the website again, just type the name you
login. In this example typing “AP1” (instead of IP Address) in the location field will take you
directly to the WLI2454G web configuration. Default name is “APac248c” (“AP” + the 6 last
digits of the Mac address).
Wireless Mode: The default wireless operating mode of the WLI2454G is Access Point (AP)
mode. To switch to Station or AP with repeating mode, select the desired mode and click Apply.
The WLI2454G will reboot into the desired mode.
AP Mode: The system can be configured to work as a wireless network access point. Note
that the WLI2454G AP acts only as a layer 2 bridge and does not act as a DHCP server. In other
words, it does not supply dynamic IP addresses and instead relies on the network to supply
them.
Station Mode: When configuring as a station mode, the device is now acting as a wireless
client. The WLI2454G will associate to an AP within its range in infrastructure mode, or join with
another WLI2454G device in Client mode in an ad-hoc network. The implementation can be
shown as below:
DS WLI2454_V1.1
-6-
ATIM Sept 2006
Ethernet
WLI2454G
(AP + Répéteur)
WLI2454G
WLI2454G
(Répéteur)
WLI2454G
In Station mode the WLI2454G can also function as a Bridge connecting multiple
Ethernet devices via a switch. The client who first begins to send packet can associate
with access point that responds based on the MAC clone functionality. The others use
then the MAC address of the first client to join a wireless network. To enable Brigde
function select the MacClone as shown below.
Note 1: A switch could connect with up to 8 different Ethernet devices. However, it
would reduce the transmission rate if connected with too many units.
Note 2: If all clients do not support TCP/IP protocol, only the first client can connect to
WLI2454G.
AP with repeating (WDS mode) :
In this mode, you can extend the range of a wireless network. Wireless clients can
associate with the repeater to communicate with each client on your network. Note that
all the Access Points’ IP address must be set in the same network and make sure that
Mode, SSID, Channel and encryption settings are set the same for all of your AP with
repeating(s). The implementation can be shown as below:
DS WLI2454_V1.1
-7-
ATIM Sept 2006
Network Type: There are 2 network types for the wireless station adapter to operate.
If you need to access company network or Internet via Access Point, select
“Infrastructure”. To set up a group of wireless stations for files and printer sharing,
select “Ad-Hoc” (without Access Point). For Ad-Hoc operation, the same ESSID is
required to set for the wireless stations.
ESSID: The ESSID is a unique ID used by Access Points and Stations to identify a
wireless LAN. Wireless clients associating to any Access Point must have the same
ESSID. The default ESSID is “Wireless”. The ESSID can have up to 32 characters.
Channel: Select a clear and available channel as an operational channel for your
wireless station adapter when it performs as Ad-Hoc mode. Default channel is 1.
Mode: There are three different wireless modes to operate, “B Only Mode”, “G Only
Mode”, and “B/G Mixed Mode”. In B/G Mixed Mode, the wireless station adapter is
compatible with a mix of both 802.11g and 802.11b clients. You will see that the
factory-set default “B/G Mixed Mod” will prove the most efficient. B Only Mode is
compatible with 802.11b clients only. This mode can be used only if you do not allow
any 802.11g clients to join a network. G Only Mode is compatible with 802.11g clients
only. This mode can be used only if you do not allow any 802.11b clients to access to the
network. To switch the mode, select the desired mode form the pull-down menu next to
“Mode”. Default mode is B/G Mixed Mode.
DS WLI2454_V1.1
-8-
ATIM Sept 2006
Rate: The wireless station adapter provides various data rate options for you to choose.
Data rates options include Auto, 1, 2, 5.5, 11, 6, 9, 12, 18, 24, 36, 48 and 54. The
default setting is Auto. Note that in AP modes the rate is always in Auto and it can not
be changed.
Country/Region: Allows you to select country domain in case there is any chances
that you would use wireless network in other countries. There are a total of 11
countries for you to select. They are Africa, Asia, Australia, Canada, Europe, France,
Israel, Japan, Mexico, South America, and USA. Note that if your AP and station adapter
are in different standards, please use the “Country/Region” item to switch the standards
of the station adapter (For example, when set to client mode, if your Access Point is
America standard but your station adapter is Japanese standard, you can pull down the
“Country/Region” option to switch your station adapter from Japanese standard to
American standard.). Default country in WLI2454G is USA.
For France, choose “Europe” instead of “France”
Password: You may change the default password by entering the new password. Click
“Apply” if you have made any changes.
4.3.2 Security
WEP Mode: This wireless adapter allows you to create up to 4 data encryption keys to
secure your data from being eavesdropping by unauthorized wireless user. To enable
the encryption, all devices on the network must share the same WEP key.
Disable: Allows the wireless station adapter to communicate with the Access Point
without any data encryption.
WEP40: Requires the wireless station adapter to use data encryption with 40-bit
algorithm when communicating with the Access Point.
WEP128: Allows the wireless station adapter to communicate with the Access Point with
data 128-bit encryption algorithm.
WPA-PSK: Allows the wireless station adapter to communicate with the Access Point
with a more secure data protection than the WEP. Here you can select the WPA with PSK
mode to improve the data security and privacy during wireless transmission. The
present WPA supplied with this adapter is used in a pre- shared key mode, which does
not require an authentication (Radius) server.
DS WLI2454_V1.1
-9-
ATIM Sept 2006
Moreover, the wireless adapter provides three types of authentication services: Auto,
Open System and Shared Key. The default authentication type is Auto. Open System
requires no authentication since it allows any device to join a network without
performing any security check. If you require higher security for wireless access, you
may select Shared Key. Note that when Shared Key is selected, a WEP key is required
and must be the same between the Access Point and client.
For 40bit encryption you may choose:
ASCII: Enter 5 characters (case sensitive) ranging from “a-z”, “A-Z” and “0-9” (e.g.
MyKey).
Hex: Alternatively, you may enter 10 hexadecimal digits in the range of “A-F”, “a-f” and
“0-9” (e.g.11AA22BB33).
For 128bit encryption you may choose:
ASCII: Enter 13 characters (case sensitive) ranging from “a-z”, “A-Z” and “0-9” (e.g.
MyKey12345678).
Hex: Alternatively, you may enter 26 hexadecimal digits in the range of “A-F”, “a-f” and
“0-9” (e.g.00112233445566778899AABBCC).
DS WLI2454_V1.1
- 10 -
ATIM Sept 2006
After entering the WEP keys in the key field, select one key as active key.
Alternatively, you may create encryption keys automatically by using Passphrase.
From the Passphrase field, type a character string and click Generate. As you type, the
wireless adapter will use an algorithm to generate 4 keys automatically. Select one key
from the 4 WEP keys.
For WPA-PSK mode you may choose:
In the WPA-PSK field, you may enter 8-63 characters ranging from “a-z”, “A-Z” and
“0-9”. If you require that access to the Internet or other wireless network services are
allowed only when the pre-shared key of the WLI2454G matches that of the device
you want to communicate. Click the “Apply” button on the Configuration tab to make
the setting take effect.
See Appendix A for ASCII to Hex conversion table.
4.3.3 Access Control
When configuring the adapter with AP mode operation, the Access Control is a powerful
DS WLI2454_V1.1
- 11 -
ATIM Sept 2006
security feature that allows you to specify which wireless stations are allowed or denied
in the list including:
Open: Allows any wireless station to access the network.
Allow: Any wireless station in this list attempting to access the network is allowed.
Deny: Any wireless station in this list will be denied access.
To add the Mac address of each wireless station on your network by entering the Mac
address of the client you desire to add into the list. Click “Add”, and then “Apply” to save
the settings. To delete a Mac address from the list, select the Mac address you want to
delete by clicking “Del” and then “Apply” to save the settings.
4.3.4 Parameter log
The Parameter log item allows you to save settings to the local hard drive by clicking
“Save”. When you click the “Browse” button, you can select the saved setting files.To
click “Load”, the saved settings will be loaded back.
DS WLI2454_V1.1
- 12 -
ATIM Sept 2006
4.4 TCP/IP
You may assign a proper IP address to your wireless adapter manually. If you would like
the wireless adapter to obtain the IP address from the DHCP server on your network
automatically, enable the DHCP client function. Click the “Apply” button to make it
effect.
DS WLI2454_V1.1
- 13 -
ATIM Sept 2006
4.5 Statistics
4.5.1 General
This item will allow you to monitor the connection status when set to AP mode such as
the Mac Address, LinkStatus, Rate Type as well as RX/TX from Ethernet packets.
4.5.2 AP Browser
This AP Browser shows only when configuring your WLI2454G as Station mode. By
clicking the “Refresh” button, the AP Browser will reload and display available Access
Points around the working environment. Besides showing the BSSID of each Access
Point, it also displays ESSID, Channel, Support Rate and Capability. To connect one of
displayed Access Points, just select the Access Point you desire and then click the
“Connect” button to make the connection.
DS WLI2454_V1.1
- 14 -
ATIM Sept 2006
4.6 Firmware Upgrade
Here, you can upload the latest firmware of the wireless adapter. You may either enter
the file name in the entry field or browse the file by clicking the “Browse” button. Then
click the “Apply” button to begin to upgrade the process.
DS WLI2454_V1.1
- 15 -
ATIM Sept 2006
5- Technical support
5.1- Leds
5.2- Reset Button
Press the button for about 10 seconds until all LED’s go off. This action will restore to the factory
default settings of the WLI2454G and enable you to configure the WLI2454G via web again.
Besides, this is also used when you forget the password.
Factory Default Configuration
:
@ IP 192.168.0.2
Password : « default »
DS WLI2454_V1.1
- 16 -
ATIM Sept 2006
HARWARE SPECIFICATIONS
CPU / MAC
Flash / RAM
LAN
CPU / MAC
Leds & Misc
Casing
Power supply
Standards
Marvell 88W8510H
Flash 1 Mo, RAM 4 Mo
1 x 10/100 Base Tx RJ45 LAN ports (Auto-MDI / MDI-X)
Marvell 88W8510H
Power supply
Ethernet
Wi-Fi
Default Factory reset button
IP54 - DIN Rail mounting
Dimensions : 105x60x50 mm
Weight : 250 g
External 8-39 Vdc (bornier à vis) – Not included
Cunsumption ~ 200 mA@12 Vdc
IEEE 802.11b (2.4GHz)
IEEE 802.11g 7.1 draft compliant
IEEE 802.3/ 802.3u (Ethernet 10/100-BaseTX)
RADIO SPECIFICATIONS
Radio Interface
Frequency Band : 2,4 GHz (2,412 ~ 2,483 GHz)
IEEE 802.11b/g
Transmit output Power: 17 dBm (19dBm with the standard
antenna)
Receive sensitivity : -65dBm @ 54Mbps / -80dBm @ 11 Mbps /
-87dBm @ 1Mbps
SMA-RP female connector (Reversed Polarity)
Supplied with short omnidirectional dipole antenna
FIRMWARE
Modes
DHCP Client
NAT/ NATP
PPPoE
SNMP :
RADIUS Server
Routing and VPN
Spanning Tree Protocol
IAPP
Encryption
MAC Address filter
Management
802.1x
TKIP
802.11d
AP / SA / WDS
Client only
Supported
Supported
Supported – MIB V2
Supported
Not supported
Supported (802.1d)
Yes (Pre 802.11f)
WEP40 (64 bits) / WEP128 (128 bits) / WPA-PSK
Yes
Web management
Yes
Yes
Yes (regulatory domain selection)
ENVIRONNEMENT
Operating temperature range: -10 / +55°C
Storage temperature range: -20 / +70°C
Country of origin: FRANCE
DS WLI2454_V1.1
- 17 -
ATIM Sept 2006
LIMITED WARRANTY
This Warranty constitutes the sole and exclusive remedy of any buyer or reseller’s
equipment and the sole and exclusive liability of the supplier in connection with the
products and is in lieu of all other warranties, express, implied or statutory, including, but
not limited to, any implied warranty of merchantability of fitness for a particular use and
all other obligations or liabilities of the supplier.
In no even will the supplier or any other party or person be liable to your or anyone else
for any damages, including lost profits, lost savings or other incidental or consequential
damages, or inability to use the software provided on the software media even if the
supplier or the other party person has been advised of the possibility of such damages.
The following are special terms applicable to your hardware warranty as well as services
you may use during part of the warranty period.
Duration of Hardware Warranty: One Year
Replacement, Repair or Refund Procedure for Hardware:
If your unit needs a repair or replacement, return it to your dealer/distributor in its
original packaging. When returning a defective product for Warranty, always include
the following documents:
•
The Warranty Repair Card
•
A copy of the invoice/proof of purchase
•
The RMA Report Form (To receive a Return Materials Authorization form (RMA),
please contact the party from whom you purchased the product).
Upon proof-of-purchase we shall, at its option, repair or replace the defective item at no
cost to the buyer.
This warranty is contingent upon proper use in the application for which the products
are intended and does not cover products which have been modified without the
reseller’s approval or which have been subjected to unusual physical or electrical
demands or damaged in any way.
DS WLI2454_V1.1
- 18 -
ATIM Sept 2006
Please complete the information below and include it along with your products.
Name:
Title:
Company:
Telephone:
Fax:
Email:
City/State/Zip code:
Country:
Product Name:
Serial Number:
Invoice Date:
Product Description:
If you have any further questions, please contact your local authorized reseller for
support.
DS WLI2454_V1.1
-1-
Date: 2006/06/14