1
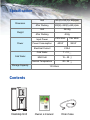
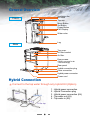
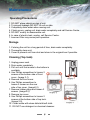
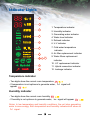
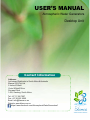
USER’S MANUAL
Atmospheric Water Generators
Desktop Unit
Contact Information
Address:
Authorized Distributor in South Africa & Australia
Blanca GIS (Pty) Ltd
9 Isola di Palme
Victor Whitmill Drive
Sunward Park
1459, Gauteng, South Africa
Tel: +27 11 306 7007
Fax: +27 86 662 6060
Email: [email protected]
Website: www.blanca.co.za
https://www.facebook.com/AtmosphericWaterGenerators1
Atmospheric Water Generators
Desktop Unit
Table of Contents
Safety Precautions
3
4
4
5
5
6
General Specifications
Contents
General Overview
Hybrid Connection
Installation & Operation
Location of installation
Installation precautions
Operational procedures
Maintenance
7
Operation precautions
Storage
Cleaning (top tank)
Cleaning (bottom tank)
Cleaning (exterior case)
Filter Replacement
8
Water Filter
U.V Light
Air Filter
Water Production Chart
9
10
13
14
15
Operational indicator
Menu/ Set button
Troubleshooting
Warranty
2
Safety Precautions
Desktop Unit - Safety Instructions
1. Check country electric power supply 230V or 115.
2. Ensure to plug into appropriate grounded socket.
3. Use socket connected to circuit breaker only.
4. DO NOT share socket with other appliances.
5. DO NOT touch power plug with wet hands.
6. DO NOT place heavy object on power cord.
7. Avoid exposure to extreme temperature or rain.
8. Place unit on hard, flat surface.
9. Place unit in an well-ventilated area.
10. Place unit 30 cm away from wall for proper air flow.
11. DO NOT place unit near inflammables.
12. DO NOT place objects on top of unit.
13. If transporting, unit keep up-right.
14. Drain water prior to moving & installing unit.
15. DO NOT modify or disassemble unit / warranty void.
16. If leak occurs, unplug unit, drain water, call Service
Centre. 17. In case of electric leak, unplug, call Service
Centre.
18. Using incorrect filter may cause operational failure.
19. For all operational problems, call Service Centre.
20. For Service Centre contact, refer to back of manual.
Specification
Dimension
Weight
Power
Unit
380 (W) x 520 (D) x 560(H)mm
After Packing
455(W) x 580 (D) x 640 (H)mm
Unit
39.5 Kg
After Packing
42 Kg
Input Power
230V 50Hz
115V 60Hz
Power Consumption
440 W
550 W
Electrical Current
Cold Water
Storage Capacity
2.35 A
Cold Water
7 ~ 12
Mild Cold
15 ~ 20
Normal Temperature
20 ~ 25
13.5 liters
Contents
Desktop Unit
Owner s manual
Drain hose
General Overview
Ventilation fan
Air outlet
Top cap
Front
Menu Button
Set Button
Power Button
FND Display
Water valve
Leg
Rear
Top cover
Air filter bracket
Air filter
Easy screws
(Simpiy unscrew for air
filter exchange)
Rear panel
Hybrid connection plug
Drain connection
Hybrid power connector
Power cord
Hybrid Connection
Connect to the tap water through only Hybrid Kit (Option)
1 : Hybrid power connection
2 : Hybrid Connection plug
3 : Hybrid power connection (Kit)
4 : Tap water out (Kit)
5 : Tap water in (Kit)
AD-5
Hybrid
Hybrid
kit
Hybrid kit
kit
② ①
③④
⑤
To the tap
5
Installation & Operation
Location of installation (Indoor use only)
1. Avoid direct sunlight, exposure to rain and extreme heat or cold.
(water parts may freeze or rupture)
2. Place the unit on hard, flat surface to prevent noise, leakage or
shaking.
3. Place unit in an well-ventilated place.
4. For proper air flow and operation, place unit at least 30 cm away
from wall.
5. To keep unit sanitary, avoid harmful gas or excessive heat.
Installation Precautions
1. Check country power supply: 230V or 115V.
2. Ensure unit is plugged into the right socket.
3. Use grounded socket ONLY.
4. Use socket with circuit breaker.
5. DO NOT share plug with other appliances.
6. DO NOT touch power socket with wet hands.
7. DO NOT place heavy object on power cord.
Operational Procedures
1. If unit has been tilted or laid down on side, do not start-up for at
least 30 minutes.
2. Connect plug to socket.
3. Push Power Button for 3 seconds to start-up.
4. Do a priming process. (See image 1-1, 1-2)
5. Use Menu/Set button for desired water temperature. (see page 13)
6. Wait until unit has generated enough water to drink.
Note: Priming process
for Quick Start and
sanitary reason, open
cap on top of unit and
pour approx. 5 liters of
drinkable water.
(Image 1-1 , 1-2)
Image1-1
6
Image1-2
Maintenance
Operating Precautions
1. DO NOT place objects on-top of unit.
2. To prevent leakage DO NOT tilt unit on side.
3. Completely drain water when moving unit.
4. If leak occurs, unplug unit, drain water completely and call Service Centre.
5. DO NOT modify or disassemble unit.
6. In case of electric leak, unplug, call Service Centre.
7. Incorrect filter may cause poor operation.
Storage
1. If storing the unit for a long period of time, drain water completely.
2. Thoroughly clean unit.
3. Cover to prevent unit from dust and store in the original box if possible.
Cleaning (Top tank)
1. Unplug power cord.
2. Drain water completely.
3. Pull unit until the access to the bottom is
available.
4. Use Phillips screwdriver to loosen 2
screws at the bottom side of front
cover. (Image 2-1)
5. Remove the front cover.
6. Use Phillips screwdriver to
loosen 2 screws on the rear
side of top cover. (Image2-2)
7. Remove rubber plugs and loosen 2
screws. (Image2-2)
Image2-2
8. Remove top cover.
9. Use Phillips screwdriver to loosen 2
screws at the bottom side of top tank.
(Image 2-3)
10. Clean inside with clean dishcloth/soft cloth.
11. DO NOT use detergent or chemical cleanser.
7
Image2-1
Image2-3
Cleaning (Bottom tank)
1. Use Phillips screwdriver to loosen 2
screws and remove rear panel.
(Image 3-1)
2. Touch water level sensor with finger.
(5 seconds) (Image 3-2)
3. Wait 2 minutes before unplugging
power cord.
4. Disconnect fitting and wire from
booster pump and water level
sensor respectively. (Image 3-3)
5. Slide out bottom tank.
(Image 3-4)
6. Clean with clean soft dishcloth.
7. DO NOT use detergent or chemical
cleanser.
Image3-1
Image3-2
Image3-4
Image3-3
Cleaning (Exterior case)
Use clean dishcloth or soft cloth and mild detergent and water solution
if necessary.
Filter replacement
Water filter
1. Power off and unplug the unit.
2. Remove rear cover/ Loosen 2 screws with
Phillips screwdriver. (Image 3-1)
3. Carefully remove filter from filter clip.
(There may be water in hose, fitting and
filter) (Image 4-1)
4. Pull and remove filter while pushing the
adaptor of the fitting in opposite direction.
(Image 4-2)
5. Install new filter. (Place new filter in the
same way)
6. After filter exchange, reset the filter
replacement function by using Menu/Set
button. (see page 13)
8
Image4-1
Image4-2
UV light
1. Power Off and unplug unit. Separate rear cover. (loosen & remove 2
screws with Phillips screwdriver)
2. Remove filters. (See water filter replacement)
3. Disconnect the housing of the U.V from ballast.
4. Remove U.V from U.V clip carefully.
(There may be water in hose, fitting and U.V)
5. Pull to remove U.V while pushing the adaptor of the fitting in
opposite direction.
6. Install a new U.V.
7. After U.V exchange, reset the U.V replacement function by using
Menu/Set button. (see page 13)
Note: DO NOT look at UV ray with naked eyes
Air filter
1. Separate air filter bracket by
loosening 2 easy screws with
hand or Phillips screwdriver.
(Image 5-1)
2. Remove air filter and replace
with new air filter. (Image 5-2)
3. After air filter exchange, reset
the air filter replacement
function by using Menu/Set
button. (see page 13)
Image5-2
Image5-1
Water Generating Capacity
Daily Water Production in Lab (liters/day)
Humid.
Temp.
50%
60%
70%
80%
90%
15
3.2
4.1
5.9
6.4
8.3
20
5.2
5.8
7.2
8.2
11.3
25
6.6
8.3
11.7
13.9
17.0
30
8.4
11.5
16.1
18.2
23.0
9
Indicator Lights
1
2
1. Temperature indicator
3
2. Humidity indicator
3. Generating water indicator
4
4. Water level indicator
5. Refresh indicator
5
6. U.V indicator
7. Cold water temperature
6
indicator
8. Air filter replacement indicator
7
8 9 10
9. Water filters replacement
indicator
10. U.F replacement indicator
11
11. Hybrid connection indicator
12
12. Leakage indicator
Temperature indicator
- Two digits show the current room temperature
- If temperature is not optimum to generate water, Lo signal will
appear
Humidity indicator
- Two digits show the current room humidity
- If humidity is not optimum to generate water, Lo signal will appear
Notes: In low temperature and humidity conditions, the unit stop generating
water to save energy. Both temperature and humidity indicators will show as
Lo signal.
10
Self-Error detection function
In case of error during operation 2digits on the temperature/humidity
indicator show ERROR signals respectively. Turn off and unplug unit.
Wait few seconds and Plug In and Turn On again. If the ERROR
signal continues to light up, turn unit off and call the Service Centre
- Cold temp. sensing failure (Er / S1)
- Room temp. sensing failure (Er / S2)
- Fan motor failure (Er / Fn)
- Control board failure (Er / Cn)
- Pump failure (Er / BP)
Generating water indicator
- Dropping motion becomes active : Unit is now generating water
- Icon is in hold motion : Unit is in pause cycle
- No icon showing : Water generating function has stopped.
See Menu/Set button function
Water level indicator
- Shows level of water in top tank.
- If water level sensor is incorrect, text will start blinking and bars light
up intermittently
Refresh indicator
- Icons rotating clockwise : Unit is in re-circulation cycle.
U.V indicator
- Replacement of U.V indicated by red text light.
install new U.V and reset the U.V indication function by the Menu/Set
button (see page 13). Yellow light text will appear
- If both the U.V icon and U.V text blink : Check if U.V. light or ballast
has a problem
Notes : U.V is most important to keep water clean and pure. If both the
icon and text are blinking continuously, call the Service Centre
immediately.
11
Cold water temperature indicator
- Shows water temperature selected by Menu/Set button.
- Coldest : 7 ~ 12 Celsius degrees
- Colder : 15 ~ 20 Celsius degrees
- Normal : 20 ~ 25 Celsius degrees.
- Yellow text light turns green when cooling system is active
Air filter replacement indicator
- Air filter needs replacing when the green light turns red.
- Replace with new air filter and reset the air filter replacement
indicator function by Menu/Set button (See page 13). Light will return
to Green.
Water filters replacement indicator
- Water Filter needs replacing when the green light turns red.
- Replace both 1st and 2nd filters with new ones and reset the water
filters replacement indicator function by Menu/Set button
(See page 13). Light will return to Green.
U. F replacement indicator
- U.F replacement : Green light becomes Red.
- Replace U.F filter with new one and reset the U.F replacement
indicator function by Menu/ Set button (See page 13 ). Light will return
to Green
Hybrid connection indicator
- Icon and text shows when hybrid water connection is active
- Customer s selection by Menu/Set button(see page 13)
Note: Connect to the tap water only through Hybrid Kit (Option)
Direct connection to the tap water cause serious leakage problem.
Leakage indicator
Note: If icon and text is showing, the unit has a leak.
Turn off and unplug the unit and drain water completely.
Call Customer Service Centre immediately.
12
Set / Reset Button
Set/ Reset function
1. Push the menu button for 3 seconds
2. Set/Reset function is selected with blinking text as indicated by
pushing the menu button for ½ seconds in sequence, as follows;
1) AWS : Water Generating function - SET
2) U.V : U.V light self-detector function - RESET
3) Cold water temperature - Coldest ( 7~12 ) -SET
4) Cold water temperature - Colder ( 15~20 ) - SET
5) Cold water temperature - Normal ( 20~25 ) - SET
6) Air filter replacement function - RESET
7) Water filters replacement function - RESET
8) U.F replacement function - RESET
9) Hybrid connection function - SET
3. When function is selected (text blinking), push set button for
3 seconds to set/ reset the working mode.
4. To clear the Set/Reset stage, push the menu button again 3
seconds or leave it for more than 5 minutes. Then Set/Reset
function will return to previous stage.
Example)
1. To reset Air filter replacement after exchanging air filter.
1) Push menu button for 3 seconds.
2) Push menu button 5 times to go to Air filter indicator.
3) Push the Set button for more than 3 seconds.
Note: U.V/ Air filter/ Water filters/ U.V filter replacement function must be
individually reset. DO NOT reset any function without reset
indicator signal.
2. Setting normal cold water temperature
1) Push menu button for 3 seconds
2) Push menu button 4 times to go to Normal water temperature indicator.
3) Push the Set button for more than 3 seconds.
13
Trouble shooting
Water generating system-related problems.
1. Is unit connected to proper voltage socket?
2. Is humidity and temperature right to generate water ?
(Check if temperature and humidity shows Lo signal)
3. Has air filter been changed? Is RED indicator showing?
(Check if air filter exchange indicator shows red)
4. Is it time to change the water filters? Check indicator light.
5. Are the humidity digits showing Error?
(Turn off/ Unplug unit. Then plug-in & Turn back on.
If digits still show Error signal, call Service Center)
6. Is the unit installed in well-ventilated area?
7. Has a large amount of water just been consumed? Wait for unit to
regenerate more water.
Noise-related problems.
1. Move the unit to hard /flat surface
2. Has any object come in contact with the unit?
Cold water temperature-related problems.
1. Is the cold water temperature set to normal / colder?
(Set temperature to Coldest. Wait at 20 minutes, If water does not get
cold call Service Centre)
2. Has there been a large amount of water consumed?
(When approx. 1 liter of water has been taken out, the cold water
becomes lukewarm. Wait for 5~10 minutes for cold)
Leakage-related problems.
1. If a leak occurs, turn off and unplug the unit.
2. Disconnect the unit from hybrid connection, if any.
3. If water valve is leaking, press it down several times.
If it does not work, replace the valve.
4. Do the humidity digits show Er/ Bp signal?
(Turn off/ Unplug unit. Turn unit back on.
If leak continues, turn off/ unplug the unit and call for Service)
14
Warranty
Our products and accessories are warranted against natural defects in
material or faulty workmanship.
One(1) year warranty on defective product. Defective parts will be
replaced free of charge. Defective parts must be returned to supplier
and will be exchanged (at the discretion of the manufacturer) for
new or rebuilt replacement parts. Warranty does not cover cosmetic
damage or damage due to acts of god, accident, misuse, abuse,
negligence, or modification of, or to any part of the unit.
Warranty does not cover damage due to improper operation
or maintenance, connection to improper voltage supply, or attempted
repair by anyone other than a facility authorized to service the unit.
Warranty does not cover the unit sold As-Is or With-All-Faults,
or consumables as fuses or water valves.
Warranty will be determined with proof of purchase, unit lot number
and date of issue. Purchase receipt must accompany returning defective
unit or parts. A return authorization from your supplier must be issued prior
to returning the products for repair or warranty. RA# must be displayed
on outside of box.
Atmospheric Water Maker
Product name
Model number
Desktop Unit
Serial number
(YYYY-MM-DD)
Purchase date
Customer
Address
Name
Phone
Address
Name
Phone
Note: Failure to follow proper maintenance & cleaning procedures of the unit,
as per the owner s manual may deem the warranty void