1
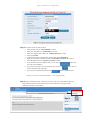
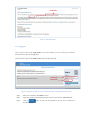
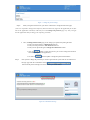
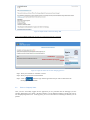
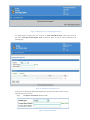
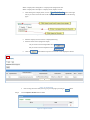
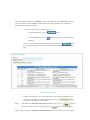
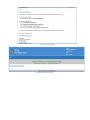
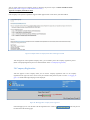
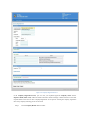
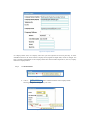
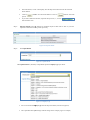
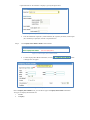
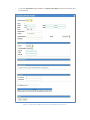
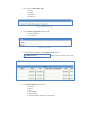
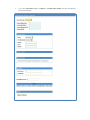
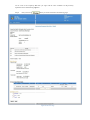
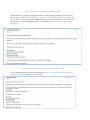
1 Getting Started Welcome to OCR e-Services (Office of Company Registrar Online Services) User Manual! This manual will assist you in working with the different online Modules of OCR e-Services. This online company registration module will help user for online registration of the company and view details of their company. 2 New Company Registration In order to register a new company please read the instruction below: 2.1 Create User To create a user please follow the below steps: Step 1: Open any browser as per your convenience (Mozilla Firefox is preferred) and type the following URL: https://www.ocr.gov.np/CRO/, you will view the following page. Figure 1: Login Page Here in Login Page of OCR e-services, you can view Sign In form and list instructions to be read carefully before proceeding to OCR e-Services. Step 2: Click on highlighted button as shown in Figure 2 for new User Registration and you will be redirected to create user form as in the Figure 3 page: Figure 2: Link for new User Registration Figure 3: Create User Form Step 3: Fill up the Create user form as below: Enter your full name in “Your Full Name” text box. Enter your email address in “Email Address” text box. Enter your company phone number in “Company Phone No” text box. Select your Gender. If registration is done on behalf of the company then selects Intermediary. Enter your citizenship or passport number in “Citizenship or Passport No.” textbox. Enter the displayed code in “Type the code shown” textbox. If you find the code to be difficult then you can click on button and new code will be displayed. If you want to go back to previous page then you can click on button and you will be redirected to the Login Page. If you want to submit the form then click on button to submit the form. Note: Here, in Create User form fields marked as ‘*’ are all required fields. Step 4: After you submit the form, a mail will be send to your given email address with your Login Details(Username And Password) and you will be redirect to Login Page with the confirmation message as shown below: Confirmation Message USERNAME PASSWORD Figure 5: Confirmation mail 2.2 Logging In Once you have received your Login details (in your email address), you can use the given Username and Password to Login into the application. For the first time Login into the OCR e-service follow the following steps: USERNAME PASSWORD Figure 6: Login into the OCR-eService (for the first time after receiving Login Details in mail) Step 1: Step 2: Enter your Username in ‘Username’ text box. Enter your temporary password that you have received in your email in ‘Password’ field. Step 3: Click on the following page: button to login into the application and you will be redirected to Figure 7: Change the password Page Step 4: When you login for the first time, you will be re-directed to ‘Change the Password’ page. (Users are requested to change their Temporary Password when they login into the application for the first time as the application will always redirected you to this Change the password page every time you login into the application until you change your temporary password) Here, in Change the Password page you can change your password by filling the form: Enter your old password in ‘Old password’ text box. Enter your new password in ‘New Password’ text box. Enter you new password again in ‘Retype New Password’ textbox. Click on button to cancel the process (you can also change the Password next time you login into the application). Or click on Step 5: button to update or change the password information. After you have change the password you will be logout from the system and will be redirected to the login page with the confirmation message and mail about password change will also be send to your email address. Figure 8: Confirmation message Figure 9: Sample format of Password Change Mail Login into the OCR e-service after the user have change their temporary password: USERNAME NEW PASSWORD (Changed) Figure 10: Login into OCR e-Service after changing password Step 1: Enter your Username in ‘Username’ text box. Step 2: Enter your password in ‘Password 'field. Step 3: Click on button to login into the application and you will be redirected to the Home page of OCR e-service 2.3 Reserve Company Name Once you have successfully logged into the application you are presented with the homepage (of New Company Registration User) which is the main interface to access different modules of OCR e-Services for new Company Registration User. At the top panel, you can view the menu bar containing the task that you can perform. Figure 11: Homepage for New Company Registration User To Check/ Reserve company name you can click on ‘Name Check/Reservation’ menu in the menu bar and select ‘Name Reservation Request Form’ as shown in figure 14 and you will be redirected to the following page Figure 12: Name Reservation Request Form In the process of filling Name Reservation Request Form to request new name at OCR e-services following process are involved: Step 1: Fill Request Name Details. Details include: Figure 13: Request Name Detail Enter Company Name in English in ‘Company Name (English)’text box. Enter Company Name in Nepali in ‘Company Name (Nepali)’ text box. After entering the Company Name, click on option on the right side (if you want to check the name of the company). You will be directed to the following pages Figure 14: Search by Company Name Enter the company name to search in 'CompanySearchTag' Select the search criteria (English or Nepali) If you want to search in English then select If you want to search in Nepali then select Click on button and the respective search result will be displayed as follows: Figure 15: Search Result Step 2: After viewing the search result you can go to previous page by clicking on Fill the Objective Details. Detail includes: Figure 16: Objective Details button. Fill in the Company Objective in the ‘Objective’ option or the NSIC Code in the ‘NSIC Code’ de’ option. For your convenience if you enter Objecti tive or NSIC Code then the respective NSIC code or Objective ective is automatically generated by the system m. A Company can have ve single or multiple objectives. To add more ore objectives, click on To delete thee objective click on button. button and the respective NSIC C Code will be Removed. If you have any uncerta ncertainty regarding the NSIC Code, you can click button for information about various codes. You will be directed to the following NSIC Code Help page: Figure 17: Objective Details In NSIC Code Help page, p you can search the NSIC code by entering the English sh or Nepali description of your objective ob or NSIC Code number and click on The respective search result will be displayed. Step 3: After filling the Name Reservation Request Form you can click on submit the company name me reservation request form or button. button to button to cancel the he request. Step 4: After submitting the Namee Reservation Request Form mail will be send to your eemail address and the confirmation message will be displayed on your screen as follows: Figure 18: Format of Name Reservation Figure 19: Confirmation Mail Figure 20: Confirmation Message Now further process will be carried out at Office of Company Registrar. You can view detail of your requested Company Name by clicking on the Home menu in your menu bar and the detail information will be shown as in figure 21. Figure 21: Company Name Reservation Detail page If company name you have reserved is approved or rejected, notification mail for Approval or Rejection will be send to your email address from Office of Company Registrar. Rejection of Company Name Reservation If the Company name you have requested is rejected then rejection mail will be sent to your email address. Figure 22: Sample format of Company Name Reservation Rejection mail You can again request for new Company name by following the pervious steps of Check Name/Reservation process (refer section 2.3 figure 12 Check Name/Reservation) Approval of Company Name Reservation If the Company name you have requested is Approved then approval mail will be sent to your email address. Figure 23: Sample format of Company Name Reservation Approval mail After the approval of the requested company name, you can further process the company registration process (detail of Company Registration process is described below section 2.4 Company Registration). 2.4 Company Registration After the approval of the Company Name you can fill the company registration form. To fill company registration form login into OCR e-service with your username and password (refer to section 2.2 Logging In figure 10) and the following homepage will be displayed: Click Here Figure 24: Homepage after Company name is approved In the homepage you can view the link to fill the registration form. Click on be redirected to the following page: link and you will Figure 25: Company Registration Form In the Company Registration Form, you can view your requested approved Company Name and the Objective Detail (NSIC Code). These two fields in the form cannot be change or edited. You have to fill other required details in the form for new Company Registration. In the process of filling the company registration form of any company following process are involved: Step 1: Fill the Company Details. Details include: Figure 26: Company Details In Company Details form, the Company Name that you had requested and reserved previously in Check Name/Reservation will be shown and this Company Name (English and Nepali both) cannot be changed. You have to fill other required details in the Company Details form which includes Telephone No, Fax No, Company Email and Company Address. Step 2: Fill Branch Details. Figure 27: Add branch Address Link Click on link to add branch address of the company and the following dialogue box will appear in your screen: Figure 28: Add Branch Address Step 3: Select the District, V.D.C. C. / Municipality from the drop down menu and enter the ward and block numbers. Click on process. If you wish to add more branches, repeat the same process, i.e., click on link and do the same. button to save the branch address or click on button to cancel the Objective Details cannot be b changed or modified. Objective detail will be same as you have requested in Name Reservati vation process previously. Figure 29: Objective Details Step 4: Fill Capital Details. Figure 30: Capital Details The Capital Structure (Amount) t) –is dependable upon the Company Type you choose. Figure 31: Company Type You can choose the Company pany Type from the drop down menu (as shown in Figure Figure33). The Capital Structure option tion changes with the change in the Company Type. For ex example, Capital Structure for “Private Ekal” Company is given by the figure below. Figure 32: Capital Structure for Company Type ‘Private Ekal’ Step 5: Enter the Authorized Capital (Rs.), Authorized Rate (Rs.), Quantity of Shares, Issued Capital (Rs.) and Paid Up Capital (Rs.) amount in Capital Structure. Fill Company Share Holders Details. Detail includes: Figure 33: Add Company Share Holder Details To add Company Share Holder information, click on A dialogue box will appear. button. Figure 34: Company Share Holder Form Here in Company Share Holder form, you can add two types of Company Share Holder information. Two types of Company Share Holders are: i. Person ii. Company i. If you select Shareholder Type as Person in Company Share Holder form then the following form will be displayed : Figure 35: Company Share Holder form format for Share Holder Type as Person In the Company Share Holder form fill the required information: Enter the Name of the Share Holder (in English and Nepali). Select Gender Enter ‘Father/ Husband’s Name’. Select the ‘Foreigner’ option. o If the Share Holder is a Nepali citizen, select “No” and enter the Citizenship Number, District, and Permanent Address. Figure 36: Share Holder form format for Nepali Citizen o If the Share Holder is a foreigner, select “Yes” and enter the Passport Number and permanent address. Figure 37: Share Holder Form format for Foreigner Now, select the Share Holder Type. Director Founder Shareowner Jurisdiction Figure 38: Share Holder Type Enter the Share Lagat Details. Details include: Number of Shares Total Amount Figure 39: Share Detail Enter the number of witnesses in No. of Witness Person text box and the respective number of row to add witness will be shown as below: Figure 40: Witness Detail Enter Witness Details. Details include: Full Name District Area Ward Number Block Number Citizenship Number and District of Registration. If you y want to remove Witness Detail then click on button and the resp pective witness detail will be removed. If you y want to add another Witness Detail then enter the nu number of Witness to be b added in ‘No. of Witness Person’ text box. For exam mple, of you want to add another 3 witness tthen enter and additional three rows will be added. a Enter the Optional D Detail of the Share Holder (if any) Figure 41: Optional Detail After filling all the required r information in Company Share Holder form you can click on button to saave the Company Share Holder details or click on the process. to Cancel ii. If you select Shareholder Type as Company in Company Share Holder form then the following form will be displayed: Figure 42: Company Share Holder form format for Share Holder Type as Company You can fill the inform mation in this form as in Company Share Holder Type as Person form. After filling up the fo orm you click on Holder or click on Step 6: button to save the details of C Company Share button to cancel. If there any Documents to be uploaded then upload the related documents in Docum ment Details. Figure 43: Documents Details To upload documents ts click on button and then select the file you ou want to upload (Note: Only .pdf form rmat file can be uploaded). If you don’t have soft so copy of the related document but you have the hard copy of the document then you can just click on select box on right side of the document nt name as shown below (checking this select box is similar to uploading the document): Figure 44: Selecting Document Step 7: If you want to view w the uploaded document then you can click on uploaded document will w be displayed. If you want to delete elete the uploaded file then you can click on respective document will w be deleted. icon and the button and the After filling all the required uired information in the Company Registration Form you can click on or click or click on button to preview the Company Registration detail button to cancel the registration process button if you want to save the file. All the information yo ou have entered will be saved in file temporary and when you login with the same credentials all the previously input fields will be automatically pop opulated. Step 8: After you click on button you will be redirected to the following page: age: Figure 45: Preview Page In the Preview Page, you u can view all the details entered previously and search for or any further corrections. To edit furt rther click on button, you will be directed to the previous Company Registration paage where you can alter your details, else click submit the Company Regi gistration form and proceed further. button to After you submit the form m you will be redirected to the following page: Figure 46: Registra ration Detail after submitting the company registration form After submission of the Company y Registration form you can view the detail inform mation of the registration. The information includes udes Revenue Amount to Be Paid, Temporary Applicati lication ID and confirmation message. And along with ith this message the detail information about the compan ny registration will also be send to your email address with the attachment of company registration detail etail as in Fig47. Figure 47: Sample format of Application Submission Detail Figure 48: Sample format of Company Registration Detail mail After the submission of company registration documents, If your company registration process is rejected then following message (fig 49: Sample format Rejection of Company Documents Detail mail) will be sent in your email Id then you can again use OCR e-Service to resubmit your application. You can follow the previous steps for Company Registration process as mentioned above (refer to section 2.4 New Company Registration). Figure 49: Sample format Rejection of Company Documents Detail mail If your submitted application is approved following mail (Figure 50: Sample format Approval of Company Documents Detail mail) will be sent in your email ID. Figure 50: Sample format Approval of Company Documents Detail mail After approval of your application which will be updated in your lodgment section as well as an email notification will be sent in your email address, visit the Office of the Company Registrar with all the original Certificates and Documents for further verification of Registration Process. Office of Company Registrar will now verify all the company registration process. From here the online Company Registration process ends, After your company is registered and you have received your company registration number then you will be presented with already registered company user Homepage (for detail refer section 2.4 Figure 51 the Homepage of already Registered Company User who have received a Registration Number). Figure 51: Homepage (for newly Registered Company User who has registered company online)