1
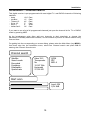
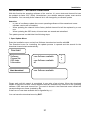
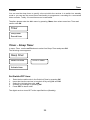
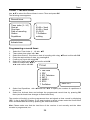
Contents
User’s Manual
Digital
Satellite
Receiver
FREE TO AIR
ENGLISH
LC Mini SAT V.0155
1
Contents
Contents
Contents .........................................................................................................................................2
General instructions .......................................................................................................................3
Safety Instructions ..........................................................................................................................3
Cleaning and care ..........................................................................................................................4
Connecting the receiver .................................................................................................................5
Control elements, front and rear panels ........................................................................................6
Remote control ...............................................................................................................................7
Initial installation .............................................................................................................................8
Initial installation .............................................................................................................................9
Operating the receiver..................................................................................................................10
Settings .........................................................................................................................................12
Settings – Receiver setup.......................................................................................................13
Settings – OSD Parameters ...................................................................................................14
Settings – Sound.....................................................................................................................15
Settings – DVB Subtitling .......................................................................................................15
Settings – Child lock ...............................................................................................................16
Child lock – device lock ..........................................................................................................16
Child Lock – changing the PIN ...............................................................................................16
Installation.....................................................................................................................................17
Installation – Antenna configuration.......................................................................................17
Installation – Antenna configuration.......................................................................................18
Installation – Channel search .................................................................................................19
Installation – Factory reset .....................................................................................................20
Installation – Software download............................................................................................21
Channel list ...................................................................................................................................23
Channel list – Edit main list ....................................................................................................23
Channel list – Edit favourites list ............................................................................................23
Channel list – Delete Antenna................................................................................................24
Timer.............................................................................................................................................25
Timer – Sleep Timer ...............................................................................................................25
Timer – record timer ...............................................................................................................26
Information....................................................................................................................................27
Videotext.......................................................................................................................................27
EPG – Electronic Programme Guide...........................................................................................28
Audio settings ...............................................................................................................................28
SPDIF – AC 3 mode (Option) ......................................................................................................28
Using serial interface....................................................................................................................28
Trouble-shooting...........................................................................................................................29
Make a contribution to environmental protection ........................................................................30
Technical data ..............................................................................................................................31
2
General instructions
General instructions
Warranty
The period of warranty starts when buying the device. Please verify the exact date by sales
check, delivery note, invoice, etc. Keep the documents carefully. Our warranty service refers
to our warranty terms valid at the time of buying the apparatus.
In case you require technical service please take or send the device to your specialised
dealer.
The unit is labelled with the CE-sign and therefore conforms with the general requirements of
the European guideline 89/336 EWG concerning electromagnetic security.
Dumping hint for packaging
Any packaging material is recyclable and should principally be supplied to the recycling
process.
Packaging and wrapping materials as plastic foils, etc. should never be available for children.
Safety Instructions
Before installing your digital satellite receiver, all security and operating instructions should be
read carefully. The User’s Manual should be retained for future reference.
All operating and using instructions should be followed.
Never allow children to operate this electrical device without supervisor.
ENVIRONMENTAL CONDITIONS
Protect the receiver against humidity, heat and cold. Allow 10cm space around the receiver for
sufficient ventilation. Do not cover the receiver’s ventilation openings with items like
newspapers, tablecloths, curtains, etc. .
Do not place any objects filled with liquids, such as vases, on the satellite-receiver.
Take care that no foreign bodies or liquids are getting into the device.
Do not expose the set-top-box (receiver) to dripping or splashing liquids.
CONNECTING TO ANTENNA
Before connecting to the power supply the receiver must be cabled completely.
Attention: The total current consumption of all devices (LNB, multiswitch, …) connected to the
IF-Input must not exceed 300mA. The connected antenna must be grounded correctly.
Please note the VDE prescriptions.
3
CONNECTING TO MAINS SUPPLY (SAFETY FEATURE!)
Only connect the original mains adapter to a well reachable mains supply socket 230V~ 50Hz
only. Do not tilt, do not use disproportionate power and do not damage the receiver’s power
socket and its electrical connections when connecting the power cord. If the mains adapter
should fail to fit, contact your supplier.
FAILURE
If the mains adapter or the power socket or its electrical connection is damaged, immediately
unplug the mains adapter from the mains supply socket. Do not try to open or repair the mains
adapter or the receiver on your own! Service must be carried out only by experts at a proper
service centre.
If replacement parts are required, only original components are allowed to use. The use of
unauthorised components may result in risk of fire and electric shock.
Image interfaces by programmes with a frequency of approx. 12480 MHz (DSF etc.) can
possibly be caused by cellular phones, which are located near the receiver or the antenna
cabel. If so the distance between receiver and telephone should be enlarged until the
problems stop to emerge.
Cleaning and care
Before cleaning, unplug the device from the mains adapter.
For cleaning the casing, please use a soft, damp cloth. Do not use any washing-up liquids that
affect the casing. Do not spray a cleaner towards the receiver
PLACEMENT
In touch with certain furniture surfaces it may happen that the receiver’s feet may rub off. You
should place the device on a proper underground that is stable and not easily inflammatory.
Otherwise the receiver may fall and cause serious injury to people and serious damages to the
device.
Do not use this product near water (e.g. bath tube, wash bowl, …).
Image interference at programmes with a frequency of approx. 12480 MHz may be caused by
cellular phones, which are located close to the receiver or the antenna cable. If so the distance
between receiver and telephone should be enlarged until the problems disappear.
4
Connecting the receiver
Connecting the receiver
Connecting a satellite antenna
Connect your satellite system’s coaxial cable to the IF-INPUT DIGITAL socket (3).
Warning: If, after connecting the receiver to the mains, the message ”short circuit or
antenna input overload!” is displayed on the screen, then there is a short circuit in the
LNB cable or the LNB. In this case the receiver must be disconnected from the mains
immediately until the short circuit has been dealt with.
Connecting a television
Use a scart cable to connect the TV socket (5) on the receiver to the corresponding scart
socket on the television set.
Connecting a video recorder
Use a scart cable to connect the VCR socket (4) on the receiver to the corresponding scart
socket on the video recorder.
When the video recorder is switched to playback mode, the video and sound signals will be
relayed to the television via the receiver (loopthrough mode). This requires the digital receiver
to be in standby mode.
Connecting a digital multi-channel amplifier (optional)
The receiver is optionally available with an AUDIO OUT socket (6) for a DOLBY DIGITAL signal.
Use a suitable cable to connect this socket to your multi-channel amplifier.
Connecting an IR mouse (optional)
If you want to set up the receiver where it can’t be seen, you can connect a so-called IR
mouse to the RJ-11 socket (7). This must be positioned in such a way that it can receive the
signals from the remote control. When installing the receiver, always be sure to follow the
safety and installation instructions.
Connecting the mains adaptor
Connect the DC plug ofthe mains adaptor supplied with the unit to the socket DC-INPUT +12V
(2) on the receiver.
5
Control elements, front and rear panels
Control elements, front and rear panels
Front panel
1
1a
Display
Channel
rEC.
FAIL
4-digit display (optionally) shows channel number
2color LED shows ON/OFF status
LED
red
Receiver in standby mode.
green
Receiver is ON
Timer activated
LNB short cut
Rear panel
2
3
4
5
9
Connector for mains adapter 12VDC
IF Input Digital – Connector for LNB
VCR-Scart port for connecting to the video recorder
TV-Scart port for connecting to the TV
HDMI-Output for digital Audio and Video (optionally)
Left side
These connectors are optional. i.e. not all units have these connections. This depends on the
configuration options of the receiver.
6
Optical Outputsocket for DOLBY DIGITAL-Signal.
7
RJ-11-Socket: Connection for an Infraredmouse and Interface for softwareupdate
8
RS232 interface for connecting to a PC in order to use further PC-based functions of
the receiver
6
Remote control
Remote control
ON-/OFF-Key: Switches receiver in “Standby”
or “Power On” mode
Mute: Turns sound on/off
0-9
Numeric input of channel numbers.
In Menu: Input of numeric parameters (frequency, etc.)
i/EPG
Displays Electronic Programme Guide (EPG)
LIST
Shows list of stations.
VOL◄ ► Volume control
In menu: Change parameters or scroll lists
CHst
Performs channel change (up/down).
In menu: selects menu lines
TV
Switches between RADIO and TV mode
RADIO
Switches between RADIO and TV mode
SWAP
Activates last selected channel.
In menu: Swaps between lists and replaces channels.
OK
In menu: Opens, confirms or modifies currently
selected item
EXIT
Leave current menu or OSD (On Screen Display)
MENU
Activates main menu (back with EXIT)
Red button In video and audio menus: Moves cursor downwards.
Delete-function in menu “Channel list”.
Green button
No function.
Yellow button
Opens the information menu.
Blue button (TEXT) Turns on video text
F1
Activates Audio-menu
F2
Activates Timer-menu
No function
No function
7
Initial installation
How to insert batteries
Open the cover at the rear side of the remote control.
Insert two AAA type batteries (1.5V).
Attention: Take care of appropriate +/- polarity!
Note:
If the operational range of the remote control is getting smaller, it indicates that the batteries
are almost consumed. Always replace both batteries.
Caution:
Do not heat, disassemble or recharge the batteries.
Consumed batteries are not allowed to be disposed in domestic refuse. They must be supplied
to a facility, collecting and disposing exhausted batteries according to the EU environmental
protection rules.
Initial installation
After reading the safety instructions (see chapter “safety instructions)” and finishing the actions
explained in chapter “connecting the receiver” please use the supplied power cord for
connecting the apparatus to the power supply. When running the receiver for the first time the
“welcome menu” of the installation guide is displayed at the TV screen.
It helps you installing the most important settings.
Willkommen
Language of the menu
Menüsprache [1/8]
In the first step of the installation guide please select your language
by using s or t . Confirm your choice by OK.
Deutsch
English
Italiano
Polski
Français
Čeština
Türkçe
Country
In the next step please select your country. Therefore press s t
and then OK. If you want to get back to the language selection,
you have to use the EXIT button.
Welcome
Country [1/9]
NOTE: The choice of the country affects the the channel list sorting.
Germany
Austria
Italy
France
Poland
8
Initial installation
Initial installation
Satellite
Welcome
In the last step please select the satellite whose channels
are to be sorted first in the channel list (use s or t ).
End the installation with OK.
A correction of the previous settings can be carried out
by pressing EXIT.
Satellite
Astra 19.2
Hot Bird
Turksat 1C
Sirius 2/3
Amos 1
Helas Sat 2
ATTENTION:
If this installation is not finished (e. g. by power failure) or if the receiver is reset to
factory default status, the apparatus starts with the Welcome screen again.
-
During summer time please adjust the time difference in menu „Receiver Setup“. It is
necessary for displaying the times, EPG, … correctly and avoiding mistakes at timer
records.
-
If you use a DiSEqC-Switch in your reception system you may need to adjust the preinstalled settings in menu Installation – LNB configuration. Following settings are preinstalled:
DiSEqC Switch input
A
B
C
D
Satellite
Astra
Hot Bird
Sirius 2/3
Amos 1
9
19.2° Ost
13° Ost
5° Ost
4° West
Operating the receiver
Operating the receiver
Switching receiver ON/OFF
You can switch on the receiver by pressing OK, s t or by using one of the numeric buttons
1…0. The last activated channel will be displayed (e.g. 0015).
The digital receiver is switched into standby mode by pressing
.
ATTENTION: Only by pulling the power cable the receiver is disconnected from the power
supply completely.
TV & Radio mode
You can choose between the operation mode TV (viewing TV channels) and RADIO (listening
to radio channels) by pressing RADIO.
Volume control & Muting
The volume level can be adjusted by pressing ◄ ► or VOL -/+ . The corresponding scale is
displayed on the screen.
Hint:
-
It is not possible to change the volume level while the menu is active.
The volume control only affects the audio output at the TV, VCR and AUDIO
ANALOG OUT ports of the receiver.
By pressing the
button you can totally switch off the audio output (muting). For switching on
again, simply use the same button.
Selecting a channel
1.
Using the directional up/down keys
To change the channels stepwise press the buttons s / t. In order to switch the
channels quicker hold these buttons pressed longer.
2.
Using the numeric keys (direct input)
One or more digit channel numbers can be input by using the numeric buttons 0…9
and pressing OK. Not available channel numbers are ignored.
3.
Using the channel list
By pressing the LIST button the last activated channel list or favourite list is
displayed. Browse the channel list by pressing ◄ / ► or s / t and activate the
desired channel by pressing OK.
10
Operating the receiver
When pressing key LIST twice the following menu appears:
Select List
Favourites List
Radio List
TV List
Alphabetic List
Favourites List:
Radio List:
TV List:
Alphabetic List:
Your personal list of favourite channels
List of stored Radio channels
List of stored TV channels
List of stored TV or RADIO channels in alphabetical order.
Choose the favoured list by pressing s / t and activate it by pressing OK.
In alphabetic list mode the channels are sorted alphabetically. It helps you searching a
certain channel. Therefore press LIST for displaying the alphabetic channel list and its char
locator. Then enter the char locator menu by pressing SWAP. Use s t and ◄ ► for
selecting the first letter of the searched channel and confirm by OK. If available the channel
list shows the wished channel now.
For re-entering the channel list press SWAP, for activating the channel use OK.
4. Swap from current channel to the previous one:
Your receiver remembers the previous activated channel:
- By pressing SWAP you can switch from the current to the previous channel
- By pressing SWAP again switch back to the current channel
Every time you perform a channel change, the title and start/stop time of the current and the
following programme are displayed in the channel change OSD (on screen display).
Thereby the scale of progression below the programme number signals the temporal
progress of the current programme.
If faded out you can display this information again by pressing OK.
11
Settings
Settings
The basic functionality of the receiver is defined in the Settings menu.
Usually the default settings of this receiver enable a quick installation, especially when
connected to a satellite antenna that is directed to the ASTRA 19.2° satellite.
Merely the derivation of your local time against the GMT (Greenwich Mean time) time needs to
be corrected, otherwise the displayed times may be wrong.
Hint:
At each on screen display the possible user inputs are explained in the help bar at the lower
screen brink.
By pressing ◄ and ► you can change the corresponding settings. When leaving a menu
(EXIT button) you will be asked to store the performed modifications (Yes) or to keep the
previous settings (No). Please choose one of these possibilities by pressing s t and confirm
your choice by OK.
Turn on the receiver by pressing .
For entering the main menu, please press the MENU button.
The main menu is displayed:
Main menu
Settings
Installation
Channel List
Timer
Information
Press the OK button.
The following menu is displayed:
Settings
Receiver Setup
OSD configuration
Sound
Subtitle
Parental Lock
The first line Receiver Setup is marked.
Choose this menu item by pressing st and confirm by OK.
12
Settings
Settings – Receiver setup
Receiver setup
Scart output TV
Time difference
Menu language
Display format
Display adjustment
HDMI output
RGB
+1.00 hrs
English
4:3
Letterbox
22_720x576i
1) SCART output TV
The video output at the
SCART socket can be
modified by pressing ◄ or ►.
You can select among
following options: CVBS,
RGB [Option], YUV or Y/C.
2) Time difference
When operating the receiver for the first time you should set the derivation between your
local time and the received GMT time (Greenwich Mean Time) by pressing ◄ or ►.
For Central Europe the following settings are recommended:
Winter time:
Summer time:
+1.00 hour
+2.00 hours
Note: This setting has to be updated at each summertime shift.
3) Menu language
Choose your language by pressing ◄ or ►.
4) Display format
Use ◄ or ► for selecting the screen format of your TV set (4:3, 16:9).
5) Display adjustment
Use ◄ or ► for adjusting the video signal: pan & scan, letterbox, pillar box or centre.
6) HDMI output (optionally)
If your receiver is connected to the TV by a HDMI-cable, than in this line of the menu the
digital video-format is indicated.
Use ◄ or ► for changing the video-format (720x576p, 1920x1080i, 1280x720p).
For an optimal function of the HDMI-connection your TV should use EDID- (Extended
Display Indentification DATA) and DDC-function (Display Data Channel).
If your TV has a resolution of 720x576i (i=interlaced), you will get the best picture quality.
After changing the settings you see no picture. After 2-3 seconds you should see the picture
on the TV, if not, please change the video-format by using ◄ or ► until you can see a
picture.
Press EXIT to leave this menu. For storing your modifications select Yes (◄ or ►), for
keeping the previous settings select No.
Confirm your choice by pressing the OK button.
13
Settings
Settings – OSD Parameters
For entering the OSD configuration menu, please select menu item OSD configuration in the
Settings menu (see page 13) and press OK. The following menu appears:
OSD configuration
OSD transparency
Display time
OSD colour
10 %
5s
blue
1) OSD transparency:
You can set the transparency of the on screen graphics by pressing ◄ or ►.
2) Display time:
By using ◄ or ► you can modify the display duration of the channel change graphics (1-10
seconds).
3) OSD colour:
You can choose the colour of the OSD display by pressing ◄ or ► .
Press EXIT to leave this menu. If you want to store your modifications select Yes by
pressing ◄ or ►. For the restoring the previous settings you have to choose No.
Confirm your choice by using OK.
14
Settings
Settings – Sound
Sound
Initial volume
Sound settings
Sound channel TV
Sound channel Dig
100 %
Stereo
deu
Same as TV
1) Initial volume
The initial volume after a power reset of the receiver is adjusted here by pressing ◄ or ►.
2) Sound setting
Using ◄ or ► you can activate following audio modes: Stereo, Mono left or Mono right.
3) Audio channel TV
If the broadcasted programme offers different audio options you can select the desired
audio output at the TV Scart by keys ◄/►.
4) Audio channel digital
If the broadcasted programme offers a digital audio channel, you can use ◄/► for selecting
the audio signal that is to be output at the digital audio port.
Press EXIT to leave the menu. If you want to save your modifications choose Yes, for
restoring the previous parameters choose No (keys ◄/►).
Confirm your choice by pressing the OK button.
Settings – DVB Subtitling
Subtitle
Subtitle
Subtitle language
Off
-
1) Subtitle
By using ◄/► you can activate/deactivate the display of DVB subtitles (if transmitted).
2) Language of the subtitle
To select the language of the subtitle you must use ◄ or ►. If there is no subtitle available
this is indicated by “-“.
Use EXIT to leave the menu. If you want to save the modifications choose Yes, for restoring
the previous parameters choose No (keys ◄/►).
Confirm your choice by pressing the OK button.
15
Settings
Settings – Child lock
Your receiver is equipped with a child lock. This secures the receiver against unauthorised
use. When the child lock ist activated, the receiver can only be switched on after entering a 4digit PIN code.
In the Main menu, use the
CH▲▼ buttons to move the
cursor to the line Child lock and
press the OK button.
Child lock – device lock
To activate or deactivate the
device lock, move the cursor to
the line Device lock and press
OK. The following menu will
appear:
Use the VOL◄► buttons to switch the device lock on or fof. When the lock is activated, the
PIN code must be entered when switching on the receiver.
Press EXIT to leave the menu. Use the VOL◄► buttons to choose whether you want to store
the changes made (Yes) or keep the previous settings (No). Confirm your choice with the OK
button.
Child Lock – changing the PIN
To change the PIN code, move
the cursor to the line Change Pin
and press OK. The followin menu
will appear:
The PIN code is set at the factory to 0000. Using the code 9976, the receiver can always be
switched on, regardless of what PIN code has been set.
Use the CH▲▼ buttons to move the cursor to the line New PIN and press the OK button. Use
the 0-9 buttons to enter a 4 digit PIN code, the press OK. Use the CH▼ button to move the
cursor to the line Confirm PIN and press the OK button. Now confirm your entry by entering
your chosen PIN code one more time, then press OK.
Press Exit to leave the menu. Use the VOL◄► buttons to choose whether you want to store
the changes made (Yes) or keep the previous settings (No). Confirm your choice with the OK
button.
WARNING
You must not forget the PIN code. Should this happen, please contact your specialist dealer!
16
Installation
Installation
This digital receiver is pre-installed already and is ready for use with most satellite antennas
and LNB configurations without further fittings. Changes in menu LNB configuration directly
effect the reception characteristics of your receiver and should only be done by specialists.
After entering the Main Menu, select line Installation by using st and confirm with OK.
The following menu is displayed:
Attention:
If DiSEqC mode “DiSEqC 1.0” is selected in the
LNB configuration menu, the line Motor settings
is not displayed.
Press st to select the desired menu item and
confirm with OK.
Installation
Antenna configuration
Channel search
Factory reset
Software download
Motor settings
Installation – Antenna configuration
Choose the required line by
pressing st and enter your
preferred settings with OK.
Antenna configuration
Antenna
Antenna power
LOW band
HIGH band
DiSEqC switch
Toneburst switch
1 Astra 19.2
On
9.750
10.600
A
A
DiSEqC mode
DiSEqC 1.2
17
Installation
Installation – Antenna configuration
1) Antenna:
Contains all available satellites. By using ◄ or ► you can select the satellite your LNB is
directed to. After pressing OK you can rename the selected satellite name.
2) Antenna power
Here you can switch on/off the supply voltage for the LNB (◄ or ►).
3) LOW Band
The oscillator frequency for LOW band can be fine adjusted by pressing ◄ or ►.
For directly entering the frequency press OK and use the numeric buttons 1-0 then.
4) HIGH Band
The oscillator frequency for HIGH band can be fine adjusted by pressing ◄ or ►.
For directly entering the frequency press OK and use the numeric buttons 1-0 then.
5) DiSEqC switch
If your receiver is connected to a satellite antenna system that receives several satellites
(multi feed antenna system) via a DiSEqC controlled switch unit:
Specify the input of the DiSEqC switch, where the selected LNB (line 1) is connected to
(◄/►).
6) Toneburst switch
If your receiver is connected to a satellite antenna system that receives two satellites (multi
feed antenna system): Specify the input of the A/B-Switch where the selected LNB (line 1)
is connected to (◄ or ►).
7) DiSEqC mode
Choose the required DiSEqC mode by pressing ◄ or ►.
For fixed antennas select DiSEqC 1.0, for motorized antennas DiSEqC 1.2 is required.
Press EXIT to leave the menu. If you want to store the modifications choose Yes by pressing
◄ or ►. For the previous settings you have to choose No. You confirm the new settings by
pressing the OK button.
Attention:
If you have selected DiSEqC mode “DiSEqc 1.2” than the menu item Motor settings appears in
the previous menu Installation. There you will find all necessary parameters for setting up your
motorized antenna system (see page 23).
18
Installation
Installation – Channel search
This digital receiver is pre-programmed with most digital TV- and RADIO channels of following
satellites:
- Astra
19.2° East,
- Hot Bird
13° East,
- Türksat 1C
42° East,
- Sirius 2/3
5°
East,
- Amos 1
4°
West,
- Hellas Sat 2
39° East
If you want to see a list of all programmed channels just open the channel list for TV or RADIO
mode by pressing LIST.
As the broadcasters quite often add new channels to their downlinks or change the
parameters of already distributed channels, we recommend to perform a channel search every
now and then.
For getting into the corresponding on screen dialog, please enter the Main Menu (key MENU);
from there step into the Installation menu, select line Channel search and press OK for
entering the Channel Search menu:
Channel search
Satellite
Search mode
Encrypted
Frequency
Polarisation
Symbol rate
Astra 19.2
Transponder
No
12.187 GHz
Horizontal
27.500 MS
QPSK
FEC
BER: 0
Start scan
Level: 234
C/N: 9dB
19
Installation
Channel search
1.
Press st for moving the cursor to line satellite. There select the satellite you want to
scan (◄ or ►).
2.
Move the cursor to line search mode (st). There use ◄/ ► for selecting the desired
search mode.
Transponder: In this mode a certain transponder (channel) is scanned only. Therefore
you have to specify this transponder by entering its frequency,
polarisation and symbol rate.
Satellites:
In this mode all stored transponders of the selected satellite are scanned
for new channels.
3.
In line Encrypted you can specify whether you want to search for encrypted channels,
too.
No
= encrypted channels are ignored
Yes
= encrypted channels are searched, too
The following settings are used only in search mode Transponder.
4.
Frequency:
For entering the frequency of the desired transponder please select line Frequency. Then
press OK and use the numeric input buttons 1…0 for entering the 5 digit frequency.
Confirm your inputs by OK.
5.
Polarisation:
In menu item Polarisation you can set the polarisation (vertical or horizontal) of the
desired transponder by using ◄ or ►.
6.
Symbol rate:
For entering the symbol rate of the desired transponder please select line Symbol rate.
Then press OK and use the numeric input buttons 1…0 for entering the 5 digit symbol
rate. Confirm your inputs by OK.
For starting the Channel search please navigate to line Start scan (keys CH st) and press
the OK button on your remote control.
Now a new menu is displayed with two lists displaying the founded TV and RADIO channels.
Thereby the „Status:“ graphic keeps you informed on the progression of the channel search:
- Status scan => search algorithm is active
- Status end => search algorithm is finished
You can leave this menu by pressing EXIT. If not finished, the channel search algorithm is
aborted. If new channels are found, you are asked to store them (Yes). Select your choice by
◄/► and confirm with OK. If selected YES the new channels are stored at the end of the
channel list now.
Chapter Channel List (page 25) describes how to sort the channel list.
Installation – Factory reset
This menu item allows you to reset the receiver to its default factory status. Afterwards the
receiver starts up with the Welcome Screen (initial installation) again.
20
Installation
Installation – Software download
With this function the operating software of the receiver, it´s menu texts and channel list can
be updated via Astra 19.2” (East). Nevertheless, your satellite antenna system must receive
this satellite. Your currently active channel list is not changed by a software update.
Attention:
In case of a software update the current operating software will be erased and a new
software version will be installed.
When updating the channel list the factory default channel list will be replaced by a new
one.
When updating the OSD texts, all menu texts are erased and actualised.
The update process is subdivided into following steps:
1. Open Update Menu:
Enter the Installation menu, select line Software download and confirm with OK.
The Download menu for controlling the update process is opened and the search for the
download channel starts automatically.
Download
Software
Channel list
OSD texts
Information
new Software available
new Software available
all
Start download
new Software available
a
x
a
Please wait until this search is completed. It may take a few minutes. When the download
stream is found the receiver verifies whether there are available new versions of the operating
software, OSD texts and channel list. The result is shown in the Download menu behind the
corresponding menu items (marked by µ).
If there are no new data available this is signalled by a „-“.
You can leave the download menu by EXIT.
21
Installation
2. Selection of available data:
Depending on their availability in the update stream you can select the download of following
data by pressing t s:
a.) Software:
Operating software
b.) Channel list: Channel list
c.) OSD texts:
All menu texts displayed on the screen
d.) Information: Information concerning the available download data e. g. version
number, innovations, etc..
If you want to update one of the options a.) to c.) press OK at the corresponding menu item. If
required by the receiver, it may happen that there are selected additional menu items
automatically.
In line Information
data (keys ◄ ►):
All :
None:
Software:
OSD texts:
Channel list :
you can specify, if you want to receive further information on the selected
Information on all available data
Information on none of the available data
Information on the new software version.
Information on the new menu texts.
Information on the new channel list.
Hint:
If you like to read these information before doing the update, please leave menu items a.) to
c.) inactive (µ) and specify the desired information at d.). Then start downloading these data.
When received, you can view the information at menu items a.) to c.) by pressing the yellow
button. For leaving the corresponding on screen graphic use EXIT please.
3. starting the update:
The update-/download process is started as follows:
- select the desired data pressing OK at a.), b.) or c.) (mark changes from µ to 4)
- select None at menu line Information (keys ◄ or ►).
- Start the update procedure by pressing OK in line start download.
You are informed about the download process immediately when the first data are received.
As the reception of the data happens blockwise, several minutes may pass between the single
data blocks. When the first and second data block are received (100%), the data are stored.
The storage process is signalled by flashing the numbers in the LED display.
Please wait until all data blocks are received.
When the update is completed, the receiver automatically restarts and turns into Stand By
mode.
Attention:
As long as the storage process has not begun, the download can be cancelled by pressing
EXIT at any time. When the first data have been stored cancelling is no longer possible.
An interruption of the update process (e. g. by pulling the power cable) may damage the
operating software receiver and the receiver does not work any more!
Hint:
If the download includes a new channel list, the receiver needs to be reset to factory default
status for activating this list (after download is completed and receiver was restarted).
22
Channel list
Channel list
You can resort and/or erase TV and radio channels found in the course of an automatic
channel search. This function is available for all TV and radio channels.
For entering the corresponding on screen dialog, please press the Menu key to enter the Main
Menu, then select menu item Channel List and confirm with OK.
Following sub-menu appears:
Channel list
Edit main list
Edit favourites list
Delete antenna
Channel list – Edit main list
This sub-menu enables you to erase or move certain channels in the channel list. For entering
this menu simply enter OK at line Edit main list.
a) Erase channels
Select the channel to be erased with s t and mark it with OK. You can select more
channels by pressing s t and OK. To erase them press the red button.
b) Sort channels
Select the channel to be sorted by using s t and mark it with OK. You can select further
channels by pressing s t and OK (max. 20 channels can be selected at the same time).
Use s t to select the position where to insert the marked channels and confirm with the
yellow button.
Channel list – Edit favourites list
This sub-menu allows you to add your favourite channels to the favourites list. Therefore
please press OK in line Edit favourites list.
Now two lists are displayed:
- the Main list: all stored channels are listed (max. 4000).
- the favourites list: contains your favourite channels (max. 4000).
Now you can select your favourite channels from the Main list and copy them into the
favourites list:
Select the channels you like to add to the favourites list by using s t and mark them with
OK. Then press button SWAP to enter the favourites list. There use s t to select the
position where to insert the channel and press OK. With SWAP you return to the main list
again.
Use EXIT to leave the channel list menu. By pressing VOL◄► you can store your
modifications (Yes) or keep the previous settings (No). Confirm your choice by OK.
In radio mode you can create your own favourites list for radio programmes, too.
23
Channel list
Channel list – Delete Antenna
This dialog allows you to delete all channels of the selected satellite from the channel list.
Therefore please enter menu channel list and select menu item Delete Antenna (OK).
Delete Antenna
Select the satellites to be erased with s t and mark them with OK. For erasing their
channels from the channel list please press the red button on your remote control.
For leaving this menu please press EXIT. If the “Save?” popup appears, please select if you
want to store your modifications (Yes) or keep the previous settings (No). Confirm your choice
by pressing OK.
24
Timer
Timer
You can use the sleep timer to specify a time at which the receiver is to switch into standby
mode or you can use the record timer functionality to programme a recording for a connected
video recorder. Totally 10 record timers can be activated.
Therefore please enter the Main menu by pressing Menu; then select menu item Timer and
confirm with OK.
Timer
Sleep timer
Record timer
Timer – Sleep Timer
In menu Timer use the s t buttons to select line Sleep Timer and press OK.
The following menu appears:
Sleep timer
Switch-off time
00:00 o`clock
Activate timer
Set Switch-OFF time:
1.
2.
3.
4.
5.
Enter the time edit mode in line Switch-off time by pressing OK
Insert the time the receiver is to switch off by using 0-9 and OK
Select line Activate timer with st
Activate your settings by pressing OK
Press EXIT to leave menu.
The digital receiver turns OFF at the specified time (Standby).
25
Timer
Timer – record timer
Use s t to select line Record timer in menu Timer and press OK.
The following menu appears:
Record timer
Timer index (1...10)
Start at
Stop time
Date of recording
Station
Repetitions
1
00:00 o`clock
00:00 o`clock
21.09.05
7 ProSieben
nothing
Activate timer
Programming a record timer:
1.
2.
3.
4.
5.
6.
7.
Select line Timer index (1...10) with st
There select timer place with ◄ ►
Select lines Start at , Stop time or date of recording with using st and confirm with OK
Enter the required time or date by pressing 0-9
Confirm your input with using OK
Select line Station with st and confirm with OK
Select a channel with st or
◄ ► and confirm with OK .
TV List
1
2
3
4
5
6
7
8.
9.
Das Erste
ZDF
RTL Television
SAT.1
KABEL1
RTL2
ProSieben
Astra 19.2
Select line Repetitions with st and use ◄ ► to specify the number of repetitions of
this record.
Select line Activate timer and activate the programmed record timer by pressing OK
there (text Activate timer changes to Deactivate timer).
The receiver will switch on at the programmed time and signals a timer record by displaying
“rEC.“ in the 4 digit LED Display. If you want to abort a record, please enter the record timer
menu and deactivate the timer by pressing the Deactivate button.
Hint: Please make sure that the local time of the receiver is set correctly and the video
recorder is programmed, too.
26
Information
Information
Enter the main menu, there use s t to select line Information and press OK.
In the upper section of the menu the channel parameters of the activated channel are
displayed.
In the lower section of the menu the signal qualities are displayed.
- Level:
- C/N:
The further the bar turns right the better the reception.
The further the bar turns right and the higher the dB value, the better
the signal quality.
Hint:
The power of the signal depends on the antenna set up and also on the currently activated
channel. Please remember this if you want adjust your antenna by controlling the signal
power.
After pressing the ◄ ► or the yellow buttons two further charts with channel, software and
hardware information are displayed. With PR +/- or st and BACK you can change the
channel.
Use EXIT to leave this menu.
Videotext
Press the TEXT button to display the videotext of the current channel. The first site to be seen
is site number “100“.
In order to view a specific page, use the buttons 0-9 to enter the three-digit page number. Your
input is displayed in the left corner on the screen. When the site number is input completely
the receiver starts to search the corresponding site. Because the video text sites are sent site
by site it may take some seconds until the required site is found. Enter “100” at any time to
return to the home page of the videotext.
You may use st to quickly page through the complete videotext section of a particular TV
channel.
If you press the TEXT button again you can switch into the mixed mode (background
transparent). Use the TEXT button to return to the normal mode.
For leaving the video text please press EXIT.
27
EPG – Electronic Programme Guide
EPG – Electronic Programme Guide
Almost all TV and radio broadcasters provide further information on their programme. Your
receiver stores and decodes these data and displays them in the so called Electronic
Programme Guide (EPG).
This programme preview is activated by using the EPG button. The appearing list contains all
programmes of the current channel.
With s t or ◄ ► you can select the programme you want to be informed about. You can get
more detailed information by pressing OK.
Also you can use the EPG list to program a record timer very easily: Just press the yellow
button and activate the record timer in the corresponding menu.
Please use EXIT to leave this on screen dialog.
Audio settings
If a certain channel offers different audio options (e.g. languages)
these are displayed in the audio sub-menu of the channel change
on screen graphic.
With the red button on the remote control you can select the
desired option/language. Activate your choice by OK.
[1/2]
German
English
SPDIF – AC 3 mode (Option)
If a channel offers a digital audio sound (SPDIF/AC-3) this is
displayed in the audio sub-menu of the channel change graphic, too.
By using the red button on your remote
control you can select this AC-3 mode and activate it (OK).
[1/2]
German
AC-3
If you own a HIFI amplifier and a digital Audio signal is broadcasted by the provider you can
enjoy this excellent sound. Therefore you have to connect the DIGITAL AUDIO port of the
receiver with the corresponding input port of your amplifier.
Using serial interface
The serial data interface offers you the possibility to connect the receiver to a PC. Therefore
you need a PC and serial cable with 1:1 pin assignment (i.e. all pins are connected directly).
Via this connection you can perform software updates and channel lists up- and downloads.
The required information and software tools are available at the manufacturer’s homepage.
28
Trouble-shooting
Trouble-shooting
Every electric device can have a malfunction. It does not automatically mean that it is
defective. In most cases it happens because of a feed cable, plug-and-socket connections or
access mistakes. Please control the following items before taking the receiver to your
specialised dealer:
Problem
Possible causes
Receiver can not be Mains adapter not connected to
turned ON
mains
No or bad picture
No audio
Remote control does
not work
Help, Tips
Check if power cord is plugged
in correctly.
Try another electric device at
the same power socket.
Check batteries
Batteries of the remote control
are not inserted / inserted faulty
TV set is running on wrong Check set up of the TV set
channel
Scart cable is damaged or
plugged in incorrectly
Replace or plug in the Scart
cable correctly
Volume is set too low
Cable damaged or plugged in
incorrectly
Distance to big
Increase volume
Check cable and ports
Come closer to receiver, point
remote control directly towards
receiver
Insert batteries correctly
Batteries are exhausted or
inserted incorrectly
IR receiver is covered or not Remove barriers between
reachable by the IR signal
remote control and receiver
Timer is activated
Deactivate timer
Time
is
displayed
wrongfully
Timer is activated at the
wrong time
Channel Change On
Screen graphic shows:
„short circuit or overload
at the antenna input“
Interference at
programmes with a
frequency at about
12480 MHz
No picture,
Channel change on
screen graphic shows
”No valid signal!”
Difference between local time Enter menu Receiver setup and
and GMT is set incorrectly.
set time difference correctly
Difference between local time Enter menu Receiver setup and
and GMT is set incorrectly.
set time difference correctly
Coaxial cable damaged
Check coaxial cable and F-plug
LNB damaged or defective
Check or exchange LNB
Interference may be caused by
cellular phones (DECT) near the
receiver
Eep more distance between
cellular phone and
receiver/antenna cable.
Cable is defect or plugged in
incorrectly
Channel has changed
transponder
Satellite antenna is not installed
correctly
Incorrect Settings in menu
„Settings“
Check cable and ports
29
Perform channel search
Re-Adjust satellite antenna
Correct settings or restore the
factory default status
Make a contribution to environmental protection
Make a contribution to environmental protection
Do not throw batteries into domestic waste. As a consumer you are obliged to return used
batteries. You can bring them to a public collection station in your commune or elsewhere
where batteries of the same type are sold.
The following signs can be found on batteries including harmful substances:
Pb = battery includes lead
Cd = battery includes cadmium
Hg = battery includes mercury
Hints for disposal
Pb
Cd
Hg
If your device is once disused you should not just throw it into domestic waste.
Surely there is a collecting point for old devices where it can be collected and
recycled.
30
Technical data
Technical data
General
Fast-OSD
EPG
Channel list editor
Channel search
Further details
Hardware
CPU
HDMI
Video
· 4000 channels
· 30 satellites (individually activate able)
· On screen video text and VBI video text
· quick channel change (zapping)
· no delay at on screen graphic display
· big type for better readability
· concise help for all menus
· OSD transparency and OSD display duration adjustable
· Electronic Programme (EPG)
· copy, replace, delete
· blockwise operations
· automatic channel search
· identification of encrypted channels
· manual channel search
· DiSEqC control (Level 1.2)
· Display for signal strength and quality
· Separate audio output settings for SCART and Digital
· SWAP function
· Plug & Play by pre-programmed channel list for Astra 19,2° East,
Hot Bird 13° East, Türksat 1C 42° East, Sirius 2/3 5° East, Amos 1
4°West and Hellas Sat 2 39° East
· DVB subtitling
· Software updates via satellite
· DATA interface for updates and channel list transfer; updates
available via website
· 32 bit RISC CPU
· with Upscaler (optionally)
· 2 × SCART with FBAS, Y/C, YUV or RGB support (Optionally)
· 16:9 signal
· Audio-DAC (Optionally)
· Optical audio out (Optionally)
· Volume control
· VCR connection to TV
Audio
Reception
Handling
Power requirement
Batteries for remote
control
Surrounding
temperature
Dimensions
Weight
· 2 – 45 MSym/s
· DiSEqC 1.0 und DiSEqC 1.2 control
· Remote control, rare panel control
· +12 Volt
· Standby mode about 6W
· 2x1.5V (size AAA)
· +5°C to +40°C
· B x H x T: 230 x 35 x 140 mm
· Ca. 580g
Subject to change without prior notice. Errors in interpretation excepted.
31