1
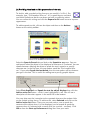
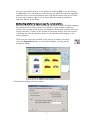
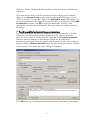
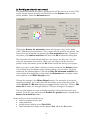
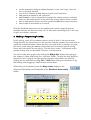
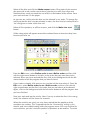
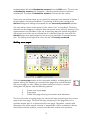
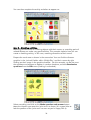
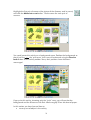
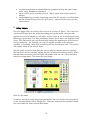
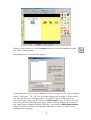
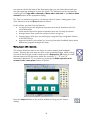
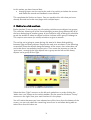
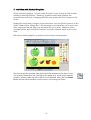
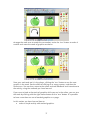
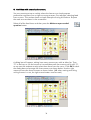
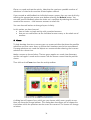
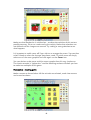
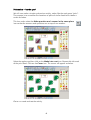
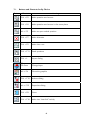
Tutorial
Creating activities in ‘Expert’ mode
1
Index
1. Making a simple “one answer” activity …………………
3
2. Making a “sequencing” activity……………………….…..
11
3. Making a “sorting” activity…………………………………
15
4. Some additional tips and things to practice…………….
Idea 1 – Selecting text objects……………………………..
Idea 2 – Framed objects…………………………………….
Idea 3 – Matching activities…………………………….…..
18
18
18
20
5. Using Layers…………………………………………………..
Note about Layers……………………………………………
Using layers with rewards………………………………….
22
27
28
6. Making two-click questions…………………………………
Using two-click answer for shape matching…………….
Adding feedback to activity with no final fixed frame…
31
33
34
7. Activities with Stacked Graphics……………………………
36
8. Activities with unmarked answers…………………………
38
9. Cover……………………………………………………………
Pelmanism – moving pairs………………………………….
Pelmanism – on the spot…………………………………….
39
40
42
10. Extra note on Auditory Scanning…………………………..
43
11. Buttons and shortcuts………………………………………...
44
2
Creating activities in ‘Expert’ mode
This document assumes that you have already taken the time to familiarise yourself
with the By Choice player, and with the By Choice editor in ‘Edit Only’ mode. (This
is the documentation that is in the printed manual.) You may find it helpful to keep
the user manual for By Choice to hand while following this tutorial, so that you can
learn more about specific features as you go along. It is also helpful to be familiar
with Communicate:In Print. To assist this the In print manual is available as a PDF
file from the Windows start menu Widgit->By Choice->In Print manual.
1. Making a simple “one answer” activity.
Start up the editor and switch to Expert mode. If you would like the
editor to start in expert mode by default then select the View and Edit
tab on the Start-up preferences dialog. Then check the Expert radio
button in the Edit section.
This is going to be a simple “one answer” activity. When it is complete, the user
will be asked to match a car, from the group of cars on the right, with the car on
the left. Before you begin, lock the print area in place. You can do this by clicking
once on the print area to select it and then selecting Locking->Lock position
from the Frames and Pictures menu.
Using the techniques you’ll remember from ‘In Print’,
prepare the activity as seen in the screenshot. You can
use a new feature of ‘By Choice’, the alignment tools, to
help you arrange the objects in the work area.
The car pictures used in this example can all be found in the ‘transport’ section of
‘Widgit Pics’.
You should have four cars on the right of the screen, and one matching blue car in
the white ‘print area’ on the left.
3
We need to tell the program that the blue car on the right is the correct
answer. Select it and then click the Make question and answer button
on the activity toolbar.
An identical graphic with a shaded background appears which shows “the
answer”.
This graphic indicates where the answer will appear when the user makes the
correct selection. Move this to be beneath the graphic that shows what needs to be
matched.
Notice that the link between the question and answer is indicated. The question
shows a black number “1” and the answer a red number “1”. As new
question/answer pairs are added to the page, they are given a number to help you
identify them easily.
4
We now need to show that the other three answers are wrong by making them
distractors. Click on one of them to select it. Then hold down the Ctrl and Shift keys
and click on the other two (This is the quickest way of selecting a group of objects).
Dotted lines will appear around all three to indicate that they are selected.
Now click the Make distractor button on the activity toolbar.
.
When you click on one of the distractors individually, you will see that they have
pale blue drag points. The question and the answer have green drag points, and
the blue car on the left, which simply illustrates the match and has no special
properties, has the normal dark blue drag points.
You can now test the activity in the player by pressing Ctrl + J or by clicking the
Go button. Click on one of the distractors to see visual feedback of the wrong
selection. Click on the correct object and you will see the answer appear. Press Ctrl
+ J to return to the editor or select Return to editor from the File menu. Save
your work.
(Note: Other people may be using this tutorial so please be sure to choose a file
name that does not clash with work they have done. If you see the file name
already exists it is best to choose a new one unless you are sure it is OK to
overwrite. Please bear this in mind throughout this tutorial.)
So now we have a very basic activity, we can improve on the activity by:
(a) Providing audible and visual presentation of the task
(b) Deciding whether to move or copy the correct selection
(c) Providing audible feedback of incorrect selections
(d) Providing audible feedback of the correct selections
(e) Providing an animation as a reward.
5
(a) Providing visual and audible presentation of the task.
To do this, add a symbol writing frame as you would in ‘In Print’. For
example, type, “Find another blue car”. It is a good idea to use black
and white symbols so that the car does not have a conflicting colour.
You can centre this writing and click the Expand to fit button so as to improve
appearance.
To add to speech to this, click on the object and then on the Actions
button on the activity toolbar.
Select the Speech/Sound tab and look at the Speech to say area. You can
add speech when the object is first displayed or whenever it is selected. You can
choose between allowing the object to speak the text it contains or specify
alternate text. In the first case, the text spoken would be “Find another blue
car”. If you select Speak the text below, then the text spoken will be whatever
you type in the box. This is useful for adding text to purely graphic objects.
Select First displayed and Speak the text the object displays then click the
Add to action list button – which is now highlighted in red. You will see a
description of the action appear in the action list at the bottom.
You may also want the instruction to be repeated whenever the student clicks
on the symbol writing frame. To achieve this, select Selected and click on the
Add to action list button. There are now two actions, one to speak the
contents of the object when it is first displayed, and a second to speak the
contents when it is selected with a mouse click (or a switch – see later). Click
OK to close the Start-up Preferences dialog box. Save your work.
6
You can now test the activity in the player by pressing Ctrl + J or by clicking
the Go button. You will hear the instruction as we asked the object to speak its
contents when it was first displayed. Now click on the object and you will hear
the instruction spoken again, as we also added the action to speak on
selection. Return to the editor.
(b) Deciding whether to move or copy the correct selection.
When the user correctly selects something, you have a choice of either copying
the answer to the answer position or moving it. If you choose to copy the
answer, then a copy of the answer will appear in the answer position when the
correct selection is made. If you choose to move the answer, then the answer
will disappear from the position where it was selected and reappear in the
answer position.
Click once on either the question or the answer to select it and then
press the Properties button, on the activity toolbar, to bring up the
properties dialog.
The properties dialog will now appear.
7
In the Action when selected section are the options, Move when selected
and Copy when selected. To see the difference between the two, apply the
alternate setting now, click OK to close the Properties dialog and test the
activity. Return to the editor, choose whichever setting you prefer, and save your
work.
(c) Providing audible feedback of incorrect selections
There are two methods for giving audible feedback of an incorrect selection,
playing a ‘negative’ sound or speech indicating that the choice was wrong.
Let’s set all three distractors to play a negative sound when they’re selected.
Click once on one of the distractors to select it, then hold down Ctrl + Shift on
the keyboard and click on the other two. Now that all three are selected, press
the Actions button on the activity toolbar and select the Speech/Sound tab. In
the Sound section of the Speech/Sound tab, click the Browse button to look
for a sound to play. The Selected in error radio button will be active by
default, as the program knows this object is a distractor.
Clicking the Browse button will put you in the ‘sounds’ folder within
‘Widresources’ by default. From here, navigate to the ‘wrong’ folder and pick a
sound to play when the distractors are selected. If you want to hear the sound
without having to run the activity then you can use the Test button in the Sound
section of the Speech/Sound tab. When you have found a sound, click Add to
action list to apply your changes.
You may find that, for some students, you don’t want any audible feedback for
an incorrect selection. To disable negative audio feedback in an activity, select
Hear wrong answer sounds from the Configure menu in the player. The tick
next to Hear wrong answer sounds will disappear, indicating that they are
disabled. You can set this as the default behaviour on the Speech, Sound and
Spelling tab of the Start-up Preferences dialog.
Press the Go button, or Ctrl + J on the keyboard and test your changes. If the
sounds do not play, then check that Hear wrong answer sounds is enabled
in the Configure menu of the player. When you’re finished, return to the editor
and we’ll try adding more specific, spoken feedback to the distractors.
Unless you want the sound to be played as well, let’s remove it before adding
the speech. Select all three of the distractors and click the Actions button on the
activity toolbar. At the bottom of the ‘Actions’ dialog is a list of actions for the
currently selected object(s). Highlight the action to play a sound on selection by
clicking on it and then press the Delete button to remove it from the action list.
8
Close the ‘Actions’ dialog and click anywhere in the work area to deselect the
distractors.
Click once on one of the red cars to select it and then bring up the ‘Actions’
dialog. In the Speech to say section, type an appropriate message, such as
“This is a red car. It is not blue.” Again, the Selected in error radio button will
be active by default, as the program knows this object is a distractor. Click Add
to action list and then click OK to close the dialog box. Similarly, add
appropriate text to the other distractors. Save your work and test the activity in
the player.
(d) Providing audible feedback of the correct selections
The method for providing positive feedback for a correct selection is virtually
identical to the method for providing feedback on an incorrect selection.
However, in the ‘Actions’ dialog you will notice that the Correctly answered
button is active by default, as the program knows that this object is a
question/answer object. Enter the speech and/or sound of your choice. Do not
forget to click the Add to action list button for each action you require. If there
are no actions in the action list, then nothing will happen!
Click OK when you’re finished and then test what you have done in the player.
9
(e) Providing an animation as a reward.
It is possible to provide animation; generally this will be used as a reward. Click
on the correct answer (the blue car) and then on the Actions button on the
activity toolbar. Select the Animations tab.
Clicking the Browse for animation button will put you in the ‘amfs’ folder
within ‘Widresources\animations’. This is where all the amf files are stored. You
can preview the animation by pressing the See animation button. Choose an
animation, click Add to action list and then click OK to close the dialog box.
The animation will have placed itself over the answer, the blue car. You can
move the animation and resize it. When you are happy with the size and
position of the animation, press the Go button to test the activity in the player.
When you return to the editor, select the answer and press the Actions button.
In the action list at the bottom of the actions dialog, you can see a list of the
actions for the selected object. Click on the Play the animated metafile item
in the action list to highlight it. Now select the Animation tab and take a look
at the options in the When Played section.
Change the settings in the When Played section. For example, by using the
compass headings, you could make the animation move across the screen. Or
use the Shrink and Bounce options to exaggerate the movement. Click on Edit
action list to make the changes effective. Test your changes in the player.
You can also choose to move a standard graphic around on the screen as a
reward. To do this you would choose Browse for graphic button instead of the
Browse for animation button
At this point you have learned how to:
• make a question/answer pair
• make distractors
• quickly select multiple items (Ctrl+Shift)
• switch between the editor and the player (Ctrl +J) or the Go button
10
•
•
•
•
•
•
use the properties dialog to choose between ‘move’ and ‘copy’ when an
item is correctly selected
use ‘In Print’ features to add objects to give visual instruction
add speech to objects to aid instruction
add feedback in terms of sound and speech for wrong answers, and that
these can be made specific to the particular wrong answer where needed.
how to add speech and/or sound as positive feedback for correct answers
how to add an animation as a reward.
All of the feedback techniques can be applied to the whole range of types of
question that you will learn to create, so it is well worth practising these in this very
simple ‘one answer’ example.
2. Making a “sequencing” activity.
In this activity, users will be asked to select a series of dice in the correct order.
Using the skills you have learned in the previous tutorials, prepare the work area to
match the screenshot below. Resize the print area and lock it in position, arrange
the dice in order along the bottom of the work area and add a symbol writing
frame with instructions for the activity, “Put the dice in order”. Add speech to the
symbol writing area, as described in Section 1 of this tutorial.
You can find the dice graphics by clicking the Widgit Pics button, then going to
the “patterns” folder and finally, the “numbers” folder. To align the dice graphics,
place them all in roughly the right position and then select them all, either by
clicking on one and then pressing Ctrl + Shift while clicking on the others or by
left-clicking and dragging a selection box around them.
When they are all selected, press the Align centre button on the
alignment/distribution panel followed by the Distribute horizontally
button.
11
Select all the dice and click the Make answer button. Drag each of the answers
(the ones with a red number next to them) into the print area, then align and
distribute them evenly to match the row of dice at the bottom of the screen. Save
your work and test it in the player.
As you can see, at this point the dice can be selected in any order. To change the
activity so that the dice must be selected in order, the dice must be made part of a
‘set’ and given an order within that ‘set’.
Select all five questions, or all five answers, and click the Make into a set
button.
Yellow drag points will appear around the selected items to show that they have
become part of a set.
From the Edit menu, select Define order in set->Define order and then click
with the right mouse button on the dice in the order that you want them to be
selected. When you have ordered the dice, click on the background with the left
mouse button to tell the program that you have finished.
If you make a mistake, click once on any member of the set to select it. From the
Edit menu, select Define order in set->Define order and then click with the
right mouse button on the dice in the order that you want them to be selected.
Again, click on the background with the left mouse button to tell the program that
you have finished.
Save your work and test the activity. Now if you try to select the dice in the wrong
order, the selection will be shown as incorrect.
When the activities are used, you may have noticed that the positions of the
questions are random. This is appropriate for the “dice sorting” activity in this
tutorial, and is the default setting when the program starts. You may find that for
some activities, you don’t want the position of questions to be random. To switch
12
randomisation off, select Randomise answers from the Edit menu. The tick next
to Randomise answers will disappear, indicating that the feature has been
switched off. The state of Randomise answers is saved with the activity.
If you have not already done so, you could use what you have learned in Section 1
to add speech and sound feedback. Try selecting all of the dice, going to the
Actions dialog and adding some speech for an Incorrectly answered question.
You can add an action to the action list for when a ‘set’ is completed. To do this,
select the set by dragging a selection box around the entire set or by clicking in the
space between two members of the set. A bounding box with yellow drag points
will appear around the set to indicate that it is selected. Now you can press the
Actions button and apply actions to the set as you would for a question/answer
pair. Try adding some speech for when the set is Correctly answered.
Making more pages.
Click the Insert page button on the navigation toolbar. A dialog box will
appear asking you whether you want the new page to be inserted before
the current page, or after. When you have made your choice, a second
dialog box will appear with the following options:
1.
2.
3.
Create new empty page
Copy page
Create new page clearing out answers and distractors
The first will create an empty page; the second will copy everything on the current
page to the new page. The third will copy everything on the page that isn’t a
question/answer pair or a distractor to the new page. Questions, answers and
distractors will not be copied. Instead, a ‘placeholder’ will be created to indicate
the location of each question, answer and distractor so that new questions,
13
answers and distractors can be added in the same positions. This is very helpful if
you want to maintain the same layout across a number of pages.
Let’s add a new page, clearing out answers and distractors. So click the Insert
page button, adding the new page after the current one, then select Create new
page clearing out answers and distractors and click OK.
As you can see, the symbol writing frame has been copied from the previous
page and ‘placeholders’ have been created for the questions and answers.
To add new graphics to the ‘placeholders’, first select the Overwrite graphic
button on the activity toolbar.
Then click on a graphic in the graphics browser to highlight it then click once on
the placeholder for the question or the answer. The program will automatically fill
in the other half of the question/answer pair. Create this page of the activity using
the dice graphics again, but do not make them sequential, e.g. 1, 3, 4, 6, 8.
Notice that the placeholders have been put into the same sequence as the
question/answer pairs that they were copied from.
Now that the activity has more than one page, you can navigate between pages by
using the buttons on the navigation toolbar, by entering a page number into the
text area on the navigation toolbar or by pressing the Page Up and Page Down
keys on the keyboard. You can also use the Page Up and Page Down buttons to
move between pages in the player. You can use the player to test the page you are
currently working on by pressing the Go button or by pressing Ctrl + J. To test the
whole activity, you will need to return to the first page of the activity before pressing
the Go button or Ctrl + J.
Go back to the first page of the activity and then test it in the player. You will see
that upon completing a page, the program pauses for a short time and then
moves onto the next page.
14
In this section you have learned how to:
• make an activity where questions must be answered in order
• make multiple pages with the same question type
• use ‘Randomise answers’
3. Making a “sorting” activity.
There are a variety of ways of making sorting or grouping activities with ‘By
Choice’, and this section will deal with a simple example. The activity will be to sort
eight things, 3 items of clothing and 5 items of food.
Using the techniques you’ll remember from ‘In Print’, prepare the activity as seen
in the screenshot below.
Select the ‘print area’ and then lock it in position by selecting it and then choosing
Locking->lock position from the Frames and Pictures menu. This will make it
easier to move objects around on top of the ‘print area’. Next, select all 8 items
and press the Make answer button on the activity toolbar. Arrange the answers so
that the page appears as below, and then add the two symbol labels. To find the
images for the symbol labels, you can use the Use list tab on the graphic panel to
find the symbols for “food” and “clothes”.
15
.
Now select all the items of food and click the Make into a set button. Similarly,
select the items of clothing and put those into a set.
To see what happens, test the activity. Experiment by clicking on different objects.
You will see that it does not matter which item you select first, but once you have
selected the first item then you must complete that group, otherwise your selection
is marked wrong. A set must be completed before the user will be allowed to start
another set, but any order of sets is acceptable.
For some activities, it may be better to insist that one particular set is completed
before any other. To do this, go to the Edit menu, select Order of sets->Define
order. You will see that a number appears underneath each of the sets. Click with
the right mouse button on the sets in the order that you want them to be
completed. You will see that the numbers change to reflect the order that you have
selected them in. Do this now, and define the order of sets so that the food set
must be answered before the clothes set. Save your work and test it in the player.
16
Number
showing the
order in
which the
set must be
answered.
Now there is a fixed order that the questions need to be answered in, it would be
good to give some instructions to the user. Use what you have learned in Section 1
to add speech to the “Food” symbol when it is first displayed, for example, “First
find the food”.
When the user has found all of the food items, the activity should ask them to find
all of the clothes. To do this, select the set of food items and press the Actions
button. Add something like “Now find the clothes” to the Speech to say section
and make sure that Correctly answered is selected in the Do this when the
object is section. Click Add to action list.
You may want to modify the activity further by adding distractors or creating more
pages. You could also choose to vary the move/copy setting to change what
happens when each item is selected.
In this section you have learned how to:
• make simple sorting activities
• define the order for answering sets
Here is a suggestion for making an activity that combines sorting and sequencing,
using some of the skills that you have learned.
Using five dice and five numbers, sort the dice from the numbers but insist that
they be selected in order within a set and that the dice be selected first.
1.
2.
3.
4.
5.
Add 5 dice and numbers
Make answers and position into 2 separate groups
Make answers into 2 sets
Set order with in each set
Set the order of the sets so that dice are first.
17
4. Some additional tips and things to practice.
Idea 1 – Selecting text objects.
So far we have used graphics as the selectable items. You can, however, use any
object. Here is an activity to match text and image and the student must click on
text objects to answer. Randomise should be on so that the text does not generally
appear in the correct order.
In this activity the answers are in a set and must be answered in the order shown.
An instruction needs to be given to tell the student to find the words for cat, dog
and lion.
Idea 2 – Framed objects.
For some activities, it is important that you know exactly how much space the
graphics will occupy, especially if the position of the graphics on the page is going
to be randomised when the activity is used. To do this quickly, you can create
symbol writing frames and use them as “placeholders” for the images. Users of ‘In
Print’ should note that this works a little differently than the method they may be
used to in that an Overwrite graphic button has been introduced to make editing
of activities much easier in other activities.
First of all, create your “placeholder” using a symbol writing frame.
Copy and paste the place holder for each item that you want.
Then press the Overwrite graphic button on the activity toolbar.
18
Select the image that you want to use from the graphics browser by clicking on it,
then click in the “placeholder” that you want it to occupy. The graphic will
automatically expand within the limits of the “placeholder”. Repeat this until you
have filled all of the “placeholders” then click the Overwrite graphics button
again to turn Overwrite graphics off.
19
You can then complete the activity as before to appear as:
Idea 3 – Matching activities.
Matching activities such as matching objects with their names, or matching pairs of
related objects can make very good activities. This example explains how you can
create a matching activity, in this case, matching dinosaurs to their names.
Prepare the work area as shown in the screenshot. You can find the dinosaur
graphics in the ‘animals’ folder within ‘Widgit Pics’, and their names by right
clicking on their image in the graphics browser. For this example, we do not want
the questions and answers to appear in random locations; so select Randomise
questions from the Edit menu (making it unchecked).
Select everything and click on the Make question and answer button.
Move the answers over onto the ‘print area’ as shown (It’s a good idea to
lock the position of the ‘print area’ as soon as you’re happy with it).
20
Highlight the first pair of answers (the picture of the dinosaur and its name)
and click the Make into a set button. Do the same for each pair of
answers.
You could create this activity on a background scene. Position the background so
that it just fits inside the ‘print area’, then move it backwards using the Send to
back button on the activity toolbar. Here, their positions have also been
rearranged.
If you print this activity, choosing only the “print” area, you will see that the
background and the dinosaurs with their labels roughly fill an A4 sheet of paper.
In this section you have learned how to:
• use any sort of object in the activity
21
•
•
•
use fixed text objects as placeholders for graphics to keep the layout neat
when using ‘Randomise questions’
set an activity which matches pairs of “ideas” rather than exact match of
objects
use backgrounds to make interesting scenes for the answers, and that these
can be printed if kept within the ‘print area’ – otherwise you must print the
whole screen.
5. Using Layers.
On each page within an activity, there can be a number of ‘layers’. You may have
noticed while looking at the properties dialog during the earlier exercises that
objects can be set to appear on all layers, a given layer or on all subsequent layers
following a given layer. It is also possible to choose which layers are displayed and
when. This means that you can dramatically change the appearance of the screen
during an activity – for example, to reveal a related question as the previous
question is answered, rather than presenting all the questions at once. This section
will explain some of the uses of layers.
We will make an activity that asks the user to select the largest animal, and then
the next layer will be revealed, asking the user to select the smallest vehicle. When
that has been answered, the final layer will appear and the user will be asked to
select the largest plant. This shows the final stage:
Here are the steps:
Create an activity to match the screenshot below. You can find the animal pictures
in the ‘animals’ folder within ‘Widgit Pics’. Make the elephant the question/answer
pair and make the other animals distractors.
22
When you have done this, click the layers button in the activity toolbar to make
the ‘layers’ dialog appear.
The dialog box on the below will appear:
In the list on the left, you can see that there is only one layer so far, with the default
name, “First Layer”. The “1#” is a reminder that you are on page 1 of the activity.
You can edit the name of a layer; this is very useful if you’re working with an
activity that uses layers heavily. Click on the First Layer entry in the list on the left.
The name will be transferred to the ‘Layer Name’ edit box. Delete the contents of
the ‘Layer Name’ edit box and type “Animals”, then click the Edit selected name
button. The list on the left will be updated with the new name, as shown in the
dialog on the next page.
23
Let’s make the next layer. Select “1# Animals” from the list, this will enable the
New cloned layer (emptied) button. Click the New cloned layer (emptied)
button and the “1# Animals” layer will be copied to “1# Copy of Animals”.
Rename the “1# Copy of Animals” layer to “Vehicles”.
If you look at the “1# Vehicles” layer, you will see that question/answer pairs and
distractors have been replaced with ‘placeholders’, ready for you to add new
content. This is similar to what happens when a page is cloned, except that
placeholders are created for all the objects.
Move the ‘placeholders’ (the red shaded objects) down the screen as shown to
occupy the space for the next question. Type the next question in the symbol writing
frame, “Which is the smallest vehicle?” and use vehicles from the “transport” folder
in “Widgit Pics” for the question/answer pair and the distractors. The two graphics
24
below show these stages. Don’t forget to select the Overwrite graphics button so
that you can put new images on the shaded squares.
We want the program to show the “Vehicles” layer when the elephant is selected
on the “Animals” layer. To do this, we’ll need to add an action to the
question/answer pair in the “Animals” layer. Click the elephant once to select it
and then click the Actions button.
25
In the General actions section, remove the check from the When selected do
nothing checkbox and select “1# Vehicles” from the drop down box labelled
When selected/answered show layer. This will tell the program to switch to the
“Vehicles” layer when the elephant is selected. Click the Add to action list button
to confirm your changes and click OK to close the ‘Actions’ dialog. Save your work
and test your changes in the player. You will see that after selecting the elephant,
the next question appears. Return to the editor.
Return to the “Animals” layer using the layer navigation buttons on the
activity toolbar. To navigate through the different layers, click on the Layer
up and Layer down buttons. There show as red and blue respectively
when they can be used. The appropriate button will become grey when you
reach the lowest or highest layer. You can also use the F2 and F3 keys on
the keyboard to move down and up respectively.
Notice that the answers appear in the editor on all layers. This is helpful as you can
spot that other layers are present.
You may want to add some audible feedback when the elephant is selected, for
example, add speech saying, “Yes! The elephant is the largest animal”. Do this
now, using the methods learned in the earlier tutorials.
26
Notice that when you click the Add to action list button, the speech will be added
after the instruction to change layer. This will be confusing for the user when the
activity runs – it will be better to have the speech before the change of layer, while
it is still relevant to what is happening on the screen. You can alter the order of the
actions. Click once on the action that you want to move in the action list, then
press the Move up or Move down buttons as appropriate. Change the order of
action list now so that the speech happens before the next layer is shown. Test your
changes in the player.
Now add a third layer by cloning the “Vehicles” layer and rename it to “Fruit”. You
can find graphics for this layer in the “food” folder within “Widgit Pics”, edit the
symbol writing frame to say, “Which is the largest fruit?” Save your work, and test it
in the player.
Note about layers.
When you place an object on the screen it will appear, by default, on the current
layer and any (higher) layer after that. This is the reason why, when you display the
vehicles layer, the “Animals” layer does not disappear. There are times when this
behaviour is unsuitable and you want an object to only appear on one layer, and
to disappear on higher layers. To see how this is done, select the bear in the last
example making sure you are on the animals layer. Then click the Properties
button.
At the bottom of the properties dialog in the Layers section, note that ‘Make this
object appear from this layer on’ is checked. This means that the bear will appear
on the “Animals” layer and all higher layers. If you remove the check, it will only
appear on its own layer. Remove the check, run the activity and note the effect. If
27
you want to do this for both of the distractors then you can select them both and
use the properties dialog to remove the check. The elephant can be removed by
switching from Copy when selected to Move when selected in the Action when
selected section of the properties dialog.
Tip: You can continue to work on an activity with the ‘layers’ dialog open if you
wish, otherwise click the Done button to close it.
In this section you have learned how to:
• use layers to vary the display and present a series of questions with less
visual distraction
• clone/create layers that present questions that are similarly structured.
• change layers when particular correct answers are given
• change layers while you are working by using the layer navigation buttons
or the F2/F3 keys
• organise actions in the action list, ensuring that other feedback takes place
before the program changes the layer.
Using layers with rewards.
This section describes how to use layers to make rewards and feedback
clearer. Prepare the work area as seen in the screenshot below. Make writing
frames for each of the numbers and press the Expand to fill button to make
the text expand to fill the frame. Make the numbers “1”, ”2” and “4”
distractors. Make the “3” an answer by pressing the Make question and
answer in the same place button as shown.
Press the Layers button on the activity toolbar to bring up the ‘Layers’
dialog.
28
We’re going to create a new layer for the reward. Type “reward” in the Layer
Name box and then press the New empty layer button. Press Done to close the
‘Layers’ dialog. Now we need to remove the distractors on the “rewards” layer.
Select the “1”, “2” and “4” writing frames and press the Properties button on the
activity toolbar.
In the ‘Properties’ dialog, you will see that the Make this object appear from this
layer on is checked. Uncheck it as shown above and click OK. You will find that
the distractors disappear, as they are now only shown on “layer 1”.
Now select the answer, the “3” writing frame. When this is selected, we want to:
• Go to the next layer
• Give some speech feedback
• Play a tune
• Display an animation.
29
Bring up the ‘Actions’ dialog for the “3” writing frame. To go to the next layer
when this object is selected, you will need to uncheck When selected do nothing
and then make sure that the When selected/answered go to next layer option
is checked. Press Add to action list to confirm your changes. Now add the other
actions to this object using the methods you have learned in earlier tutorials. For
example add some speech and sound when the correct answer is selected. ‘red
dots.amf’ makes a good reward as it can be positioned around the correct answer.
Save your work and test it by pressing Go.
30
In this section you have learned that:
• changing layers can be used at the end of an activity to isolate the answer
and make the reward and feedback more effective.
This completes the Section on layers. You can combine this with what you have
already learned and make new pages with multiple layers.
6. Making two-click questions.
Earlier (section 3) we saw one way of creating activities to put objects into groups.
This relied on choosing all of the items belonging to one group followed by all of
the items belonging to another group. A less restrictive way of doing this would be
to ask the student to select an object and then indicate which group it belongs to.
This requires two mouse (or switch) selections to give an answer.
The activity we’re going to create during this tutorial is about distinguishing
between light and heavy objects. Prepare the work area as shown in the following
screenshot. Place the objects along the bottom of the screen, then select them all
and make them into question/answer pairs. Then move the answers up into the
‘print area’, arranging the light objects into a group on the left and the heavy
objects into a group on the right.
Select the three “light” answers on the left and make them a set by clicking the
‘Make into a set’ button on the activity toolbar. Do the same for the three “heavy”
answers on the right. Save your work and test it in the player.
You will notice that once you have selected one of the items from the bottom of the
screen, you can only select the remaining items from its set before being able to
select items from the other set.
31
Return to the editor and press the Make into a “two-click” activity button
on the activity toolbar. You do not need to have anything selected; pressing
this button changes the page and everything on it, not just the currently
selected object.
When you press the Make into a “two-click” activity button, a frame will appear
around each of the sets. If you press the Go button now and take a quick look at
the activity in the player, you will see that when you select an item, you can click
inside the frame surrounding either set to try and add the item to that set. You can
also click within the framed set to select it first, and then click on the item that you
want to try and add to the set. Return to the editor.
Now that the mechanics of the activity are working as required, we can add
instructions for the activity and labels for the sets. Select the Use list tab on the
graphics browser panel and type “light” in the box to search for the “light” symbol,
then place the “light” symbol next to the “light” items in the frame on the left. Do
the same for “heavy”.
Let’s add some instructions, to be spoken when the activity is begun. Select the
“light” symbol by clicking on it once and bring up the ‘Actions’ dialog. Type
something like “Click on an object, and then in the space where it goes” in the
Speech to say section, making sure that First displayed is selected, then click the
Add to action list button. Save your work and test it in the player.
32
Using two-click answer for shape matching.
One of the many features of ‘By Choice’ is its ability to generate a “silhouette” of
an object. This means that you can easily create shape-matching activities using
the two-click method. Students can first identify an object and then match its
shape.
There are pictures of cars in the “transport” folder within “Widgit Pics” which we
will be using for the purposes of this tutorial. The pictures of cars have very similar
shapes, and this activity could be made quite difficult – so you could choose
pictures with shapes that are more easily identifiable.
Prepare the work area as shown in the following screenshot. Arrange the cars, or
whatever pictures you chose, on the left of the screen, moving the ‘print area’ over
to the right. Select all of the pictures on the left and make them into
question/answer pairs. Move all of the answers over to the ‘print area’. Now press
the Make into a “two-click” activity button on the activity toolbar. You do not
need to have anything selected; pressing this button changes the page and
everything on it, not just the currently selected object.
33
When you press the Make into a “two-click” activity button, all of the answers
will become grey silhouettes of the questions. Save your work and test it in the
player. Click on the picture, or its silhouette and then on the correct picture or
silhouette
Adding feedback to activities with no fixed final frame.
Return to the editor. In this activity there is not one frame or group that the student
must answer last, so it is not possible to add any reward feedback to any of the
objects so far used. You could add the initial instructions to the “print area” object
to be delivered when it is first displayed, but there is no corresponding end object.
We can, however, and provide suitable feedback for the student by the use of
“reward” graphics. In the graphics browser select the Widgit Pictures button. In the
browser window you will see a “rewards” folder. There are three forms of each
34
graphic which are chosen according to the number of errors a student makes. For
example you will see adjacent graphics with one, two and three starts. The three
stars is delivered for no mistakes and two or one (or no graphic at all ) are
delivered according to the proportions of wrong selections.
Choose one of these ( it does not matter which of each set of three you choose )
and place it onto your activity. Not only can you use this object to indicate to the
student the level of achievement, but you can also add speech, sound and
animations to this object when it is first displayed. This therefore acts as a carrier
for any feedback or rewards that you want to deliver when all the questions have
been answered.
Click in the reward graphic and then use the Actions button to produce the usual
dialog box. In the example you could add speech to say “Well done! You have
found all the cars”, then a sound of a car driving off which played at the same
time as the animation of the penguin doing a little dance.
In this section you have learned:
• how to make sorting activities using the idea of selecting an object and then
where it goes (two click)
• how to use two click activities for matching
• how to make answers “grey” to match with silhouettes
• how to add reward graphics where the graphic presented varies according
to how well the student has done
• how to add rewards at the end of an activity where there is no clear last
answer – by making use of the reward graphics as carriers for the actions.
35
7. Activities with Stacked Graphics.
Using “stacked” graphics, we can create a simple “snap” activity as well as other
memory/matching activities. “Stacking” graphics means that graphics are
presented one at a time, changing when the user presses the ‘turn’ button on the
screen.
Prepare the work area as shown in the screenshot. You can find the pictures in the
“food” folder within “Widgit Pics”. Put the apple on the left of the ‘print area’ and
then, staying on the left, copy it to just below the ‘print area’. Make this into a
question/answer pair and put the answer next to the original apple on the ‘print
area’.
Place three further graphics as shown and turn these into distractors.
We want to put the question (the apple) and the distractors (the other fruits)
into a stack. Select them all, clicking on the apple first, as all of the stacked
graphics will be made the size of the first one selected. Now click the Stack
button on the activity toolbar and the screen will change as shown.
36
Arrange the work area to match the screenshot, resize the ‘turn’ button to make it
smaller and move the stack of graphics as shown.
Save your work and test it in the player, clicking the ‘turn’ button to see the next
graphic in the stack. See the effect of clicking on a wrong answer, and then the
correct one. You can then return to the editor and add feedback and instructions to
the activity, using the methods you have learned.
If you want to look at the stack of graphics while you are in the editor, you can turn
the stack by clicking with the right mouse button on the ‘turn’ button. It is possible
to have more than one set of stacked graphics on a page.
In this section you have learned how to:
• make a simple activity with stacked graphics.
37
8. Activities with unmarked answers.
You may want to set up an activity where the learner can simply express
preferences and there are no right or wrong answers. For example, selecting food
from a menu. This section shows a simple example of using this feature. Prepare
the work area as shown in the screenshot.
Select all of the food items and then press the Make an open-ended
question button.
A dialog box will appear, asking how many answers you wish to allow for. Type
“3” in the box, or use the arrows to increase/decrease the amount until it says “3”,
as we want the students to only select three items from the menu. Click OK to close
the dialog box and arrange the three answers as shown below. Use the right
mouse to move the three answers as shown below. (NB when moving and sizing
writing frames in a set, the right mouse button must be used )
38
Go to run made and test the activity. Note that the maximum possible number of
selections is limited to the number of total options offered.
If you wanted to add feedback to individual answer spaces, then you can do this by
selecting the appropriate answer area before selecting the Actions button. You
can also provide feedback when the whole set is complete by selecting the set that
contains the answers – click between answers to select this.
You can also add actions to change layers similarly.
In this section you have learned:
• how to make a simple activity with unmarked answers
• that you can add actions to the individual answer areas, or the whole set of
answers.
9. Cover
To help develop short term memory you can create activities that show the possible
selections and then cover them up so that their locations need to be remembered.
If wrong selections are made the objects are recovered after showing the incorrect
selection for a short time.
Make a screen as shown below. The two green apples are made into distractors,
and the red apple is made as the answer with the answer moved into the position
shown.
Then click on the Cover icon from the activity toolbar.
A dialog box will appear from which you can choose which cover graphic to use.
Here we chose the orange balloon. This dialog box also allows you to choose the
time before which the questions on the screen are covered. The screen will change
as below.
39
Make sure that Randomise is switched on – as otherwise activities of this sort are
possibly too easy. Go to run mode and try the activity. Notice that selections are
not allowed until the images are covered. Try making a wrong selection to see
what happens.
It is important to switch cover off if you wish to re-arrange the screen. You can then
switch it back on when the changes have been made. To switch cover off simply
select one of the cover graphics and click again on the Cover icon.
You can obvious make cover activities more complex than this very simple one.
The classic example is “pelmanism” and the following sections will show you how
to make two examples of this game.
Pelmanism – moving pairs
Make a screen as shown below. All the animals are selected, made into answers
and moved as shown.
40
Select the two insects at the top of the yellow area and then click on the ‘Make into
a set’ icon. Repeat this with each of the pairs of animals. The screen will then
appear as shown below.
You could use this activity perfectly well as it is as a task to put animals into pairs of
the same general type. Go to run mode and test it.
Return to edit mode. Use the Cover icon to switch on cover, this time we used the
“squares” icon so the activity appears as below. Go to run mode and try again.
It is now much more difficult!
41
Pelmanism – ‘on the spot’
We will now make a simpler pelmanism activity, rather like the card game “pairs”.
The purpose is to remember the locations of pairs of similar food items. Make a
screen as below.
This time make select the Make question and answer in the same place
icon so that the answers and questions are on top of one another.
Select the apples and then click on the Make into a set icon. Repeat this with each
of the pairs food. Click on the Cover icon. The screen will appear as below.
Go to run mode and test the activity.
42
10.
Extra note on Auditory Scanning
It is possible to give speech feedback when any object is scanned during switch
access. This feedback is heard when the scanning cursor falls on the object. It can
also be heard by mouse users if they click with the right mouse button. Such
feedback may be useful for a variety of reasons including help where there is
visual impairment.
To attach such speech first select the object. Then click on the Actions button. In
the Speech to say area select the Help button and type in the text you wish to use
as feedback.
Then select Add to action list. This instruction will be picked out of the list when
the program needs to provide the auditory feedback.
Auditory scanning can be switched on for a particular user by saving a switch
configuration file with the same name as that used to log-on. This is described in
the printed documentation B4 – section 2. Auditory Scanning can also be switched
on and off using the Configure menu and selecting Auditory scan.
43
11.
Buttons and Shortcuts for By Choice
Button
Shortcut
Meaning
Ctrl + F5
Make question and answer
Ctrl + F6
Make question and answer in the same place
Alt + F5
Make an open-ended question
Ctrl + F7
Make distractor
Ctrl + F9
Make into a set
Ctrl + F11
Stack questions
Ctrl + L
Layers dialog
F3 up
F2 down
Change layer
Alt + F6
Overwrite graphics
Ctrl + F12
Actions dialog
Alt + F12
Properties dialog
Ctrl + F8
Cover
Ctrl + F10
Make into “two-click” activity
44
Button
Shortcut
Meaning
Alt + C
Align centres horizontally
Alt + V
Align centres verticcally
Alt + Z
Distribute evenly horizontally
Alt + D
Distribute evenly vertically
Alt + W
Make same width
Alt + H
Make same height
Alt + A
Make same height and width
45