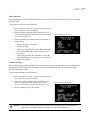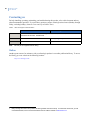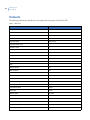
1
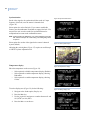
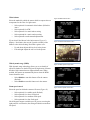
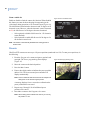
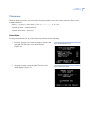
UltraView PTZ
User Manual
Copyright
Copyright © 2012 UTC Fire & Security. All rights reserved.
This document may not be copied or otherwise reproduced, in whole or in part, except as
specifically permitted under US and international copyright law, without the prior written
consent from UTC Fire & Security.
Document number: 1069677D-EN (April 2012)
Disclaimer
THE INFORMATION IN THIS DOCUMENT IS SUBJECT TO CHANGE WITHOUT
NOTICE. UTC FIRE AND SECURITY ASSUMES NO RESPONSIBILITY FOR
INACCURACIES OR OMISSIONS AND SPECIFICALLY DISCLAIMS ANY LIABILITIES,
LOSSES, OR RISKS, PERSONAL OR OTHERWISE, INCURRED AS A CONSEQUENCE,
DIRECTLY OR INDIRECTLY, OF THE USE OR APPLICATION OF ANY OF THE
CONTENTS OF THIS DOCUMENT. FOR THE LATEST DOCUMENTATION, CONTACT
YOUR LOCAL SUPPLIER OR VISIT US ONLINE AT WWW.INTERLOGIX.COM.
This publication may contain examples of screen captures and reports used in daily
operations. Examples may include fictitious names of individuals and companies. Any
similarity to names and addresses of actual businesses or persons is entirely coincidental.
Trademarks and
patents
Interlogix name and logo are trademarks of UTC Fire & Security.
UltraView is a trademark of UTC Fire & Security.Other trade names used in this document
may be trademarks or registered trademarks of the manufacturers or vendors of the
respective products.
Intended use
Use this product only for the purpose it was designed for; refer to the data sheet and user
documentation. For the latest product information, contact your local supplier or visit us
online at www.interlogix.com.
Manufacturer
UTC Fire & Security Americas Corporation, Inc.
2955 Red Hill Ave, Costa Mesa, CA 92626, USA
Certification
FCC compliance
N4131
This equipment has been tested and found to comply with the limits for a Class A digital
device, pursuant to part 15 of the FCC Rules. These limits are designed to provide
reasonable protection against harmful interference when the equipment is operated in a
commercial environment. This equipment generates, uses, and can radiate radio
frequency energy and, if not installed and used in accordance with the instruction manual,
may cause harmful interference to radio communications.
Changes or modifications not expressly approved by the party responsible for compliance
could void the user’s authority to operate the equipment.
ACMA compliance
Canada
Notice! This is a Class A product. In a domestic environment this product may cause radio
interference in which case the user may be required to take adequate measures.
This Class A digital apparatus complies with Canadian ICES-003.
Cet appareil numérique de la classe A est conforme à la norme NMB-003 du Canada.
EU Directives
2004/108/EC (EMC Directive). Non-European manufacturers must designate an
authorized representative in the Community. Our authorized manufacturing representative
is UTC Fire & Security B.V., Kelvinstraat 7, 6003 DH Weert, Nederland.
2004/108/EC (EMC Directive): Hereby, UTC Fire & Security declares that this device is in
compliance with the essential requirements and other relevant provisions of Directive 2004/
108/EC.
2002/96/EC (WEEE directive). Products marked with this symbol cannot be disposed of
as unsorted municipal waste in the European Union. For proper recycling, return this
product to your local supplier upon the purchase of equivalent new equipment, or dispose
of it at designated collection points. For more information, visit www.recyclethis.info.
Contact information
For contact information, see www.interlogix.com.
iii
iv
UltraView PTZ
User Manual
v
Contents
Preface. . . . . . . . . . . . . . . . . . . . . . . . . . . . . . . . . . . . . . . . . . . . . . . . . . . . . . . . . . . . . . . . . . vii
Conventions used in this document. . . . . . . . . . . . . . . . . . . . . . . . . . . . . . . . . . . . . . . . . . . . . vii
Safety terms and symbols . . . . . . . . . . . . . . . . . . . . . . . . . . . . . . . . . . . . . . . . . . . . . . . . . . . . . vii
Chapter 1.
Programming. . . . . . . . . . . . . . . . . . . . . . . . . . . . . . . . . . . . . . . . . . . . . . . . . 1
Introduction. . . . . . . . . . . . . . . . . . . . . . . . . . . . . . . . . . . . . . . . . . . . . . . . . . . . . . . . . . . . . . . 2
Menu navigation . . . . . . . . . . . . . . . . . . . . . . . . . . . . . . . . . . . . . . . . . . . . . . . . . . . . . . . . . . . 3
Programming shortcuts . . . . . . . . . . . . . . . . . . . . . . . . . . . . . . . . . . . . . . . . . . . . . . . . . . . . . . . . 4
Accessing programming menus . . . . . . . . . . . . . . . . . . . . . . . . . . . . . . . . . . . . . . . . . . . . . . . . . 4
Menu navigation . . . . . . . . . . . . . . . . . . . . . . . . . . . . . . . . . . . . . . . . . . . . . . . . . . . . . . . . . . . 5
Top-level access and information screens . . . . . . . . . . . . . . . . . . . . . . . . . . . . . . . . . . . . . 6
Memory management. . . . . . . . . . . . . . . . . . . . . . . . . . . . . . . . . . . . . . . . . . . . . . . . . . . . . . . 7
Program select . . . . . . . . . . . . . . . . . . . . . . . . . . . . . . . . . . . . . . . . . . . . . . . . . . . . . . . . . . . . 8
Setup . . . . . . . . . . . . . . . . . . . . . . . . . . . . . . . . . . . . . . . . . . . . . . . . . . . . . . . . . . . . . . . . . . . . . . . 8
Presets. . . . . . . . . . . . . . . . . . . . . . . . . . . . . . . . . . . . . . . . . . . . . . . . . . . . . . . . . . . . . . . . . . . . . 20
Titles/areas . . . . . . . . . . . . . . . . . . . . . . . . . . . . . . . . . . . . . . . . . . . . . . . . . . . . . . . . . . . . . . . . . 21
Current status . . . . . . . . . . . . . . . . . . . . . . . . . . . . . . . . . . . . . . . . . . . . . . . . . . . . . . . . . . . . . . . 26
Tours . . . . . . . . . . . . . . . . . . . . . . . . . . . . . . . . . . . . . . . . . . . . . . . . . . . . . . . . . . . . . . . . . . . . . . 27
Additional menus . . . . . . . . . . . . . . . . . . . . . . . . . . . . . . . . . . . . . . . . . . . . . . . . . . . . . . . . . . . . 31
Exposure control . . . . . . . . . . . . . . . . . . . . . . . . . . . . . . . . . . . . . . . . . . . . . . . . . . . . . . . . . 36
Chapter 2.
Troubleshooting and support . . . . . . . . . . . . . . . . . . . . . . . . . . . . . . . . . . 37
Troubleshooting . . . . . . . . . . . . . . . . . . . . . . . . . . . . . . . . . . . . . . . . . . . . . . . . . . . . . . . . . . 38
Common issues . . . . . . . . . . . . . . . . . . . . . . . . . . . . . . . . . . . . . . . . . . . . . . . . . . . . . . . . . . . . . 38
Contacting us . . . . . . . . . . . . . . . . . . . . . . . . . . . . . . . . . . . . . . . . . . . . . . . . . . . . . . . . . . . . 40
Online . . . . . . . . . . . . . . . . . . . . . . . . . . . . . . . . . . . . . . . . . . . . . . . . . . . . . . . . . . . . . . . . . . . . . 40
Appendix A. Defaults and hazardous materials . . . . . . . . . . . . . . . . . . . . . . . . . . . . . . 41
Defaults . . . . . . . . . . . . . . . . . . . . . . . . . . . . . . . . . . . . . . . . . . . . . . . . . . . . . . . . . . . . . . . . . 42
Toxic and hazardous element levels . . . . . . . . . . . . . . . . . . . . . . . . . . . . . . . . . . . . . . . . . 44
Index . . . . . . . . . . . . . . . . . . . . . . . . . . . . . . . . . . . . . . . . . . . . . . . . . . . . . . . . . . . . . . . . . 45
vi
UltraView PTZ
User Manual
vii
Preface
This is the Interlogix UltraView PTZ User Manual. This document includes an overview of the product and
detailed instructions explaining:
•
•
how to access the menus; and
how to customize the settings.
There is also information describing how to contact technical support if you have questions or concerns.
To use this document effectively, you should have a basic knowledge of CCTV systems and components.
Read these instructions and all ancillary documentation entirely before installing or operating this product. The
most current versions of this and related documentation may be found on our website at www.interlogix.com.
Note: A qualified service person, complying with all applicable codes, should perform all required hardware installation.
Conventions used in this document
The following conventions are used in this document:
Bold
Menu items and buttons.
Italic
Emphasis of an instruction or point; special terms.
File names, path names, windows, panes, tabs, fields, variables, and other GUI elements.
Titles of books and various documents.
Blue italic
(Electronic version.) Hyperlinks to cross-references, related topics, and URL addresses.
Monospace
Text that displays on the computer screen.
Programming or coding sequences.
Safety terms and symbols
These terms may appear in this manual:
CAUTION:
Cautions identify conditions or practices that may result in damage to the equipment or other property.
WARNING: Warnings identify conditions or practices that could result in equipment damage or serious personal
injury.
viii
UltraView PTZ
User Manual
Chapter 1 Programming
This chapter provides an overview of your UltraView PTZ menu system,
including steps you may want to perform before you begin using your UltraView
PTZ.
In this chapter:
Introduction . . . . . . . . . . . . . . . . . . . . . . . . . . . . . . . . . . . . . . . . . . . . . . . .2
Menu navigation . . . . . . . . . . . . . . . . . . . . . . . . . . . . . . . . . . . . . . . . . . . .3
Accessing programming menus. . . . . . . . . . . . . . . . . . . . . . . . . . . . . .4
Menu navigation . . . . . . . . . . . . . . . . . . . . . . . . . . . . . . . . . . . . . . . . . . . .5
Top-level access and information screens . . . . . . . . . . . . . . . . . . . . . . . . .6
Memory management . . . . . . . . . . . . . . . . . . . . . . . . . . . . . . . . . . . . . . . .7
Program select. . . . . . . . . . . . . . . . . . . . . . . . . . . . . . . . . . . . . . . . . . . . . .8
Setup . . . . . . . . . . . . . . . . . . . . . . . . . . . . . . . . . . . . . . . . . . . . . . . . . .8
Presets . . . . . . . . . . . . . . . . . . . . . . . . . . . . . . . . . . . . . . . . . . . . . . . .20
Titles/areas . . . . . . . . . . . . . . . . . . . . . . . . . . . . . . . . . . . . . . . . . . . .21
Current status . . . . . . . . . . . . . . . . . . . . . . . . . . . . . . . . . . . . . . . . . .26
Tours . . . . . . . . . . . . . . . . . . . . . . . . . . . . . . . . . . . . . . . . . . . . . . . . .27
Additional menus . . . . . . . . . . . . . . . . . . . . . . . . . . . . . . . . . . . . . . .31
Exposure control . . . . . . . . . . . . . . . . . . . . . . . . . . . . . . . . . . . . . . . . . . .36
2
UltraView PTZ
User Manual
Introduction
This manual contains programming instructions for the UltraView PTZ series pan/tilt/zoom cameras
(Figure 1). The most common UltraView PTZ programming options and screen sequences are illustrated.
Notations indicate where options may differ among camera models.
Figure 1. UltraView PTZ dome with wall-mount arm
UltraView PTZ supports many protocols to work with various keypad controllers, DVRs, and other video
surveillance equipment. Please refer to Appendix B of the UltraView PTZ Installation Manual for the details on
supported protocols.
Chapter 1
Programming
Menu navigation
We use the KTD-405 keypad controller (Figure 2) in this manual to explain the features of UltraView PTZ
because of the KTD-405’s ability to control all of the UltraView PTZ’s advanced features. (For detailed
keypad instructions, refer to the KTD-405/KTD-405A/KTD-405-2D Controller Keypad User Manual.)
Figure 2. Navigating with a KTD-405/405A/KTD-405-2D keypad
Numeric keys
Shaded keys
appear on the
KTD-405A only
Select
Advance
Scroll up
ZONE 32
PARKING GARAGE
CAMERA 22
MONITOR 2
1ST
auto
focus
Previous
Next
last
mon
1
4
A
D
7
view
zone
dsr/vcr
aux 1
aux 2
aux 3
aux 4
2
3
seq
alarm
tour
store
find
face
badge
over
vol
vol
5
8
Select
E
C
6
9
+
zoom
-
+
focus
-
+
iris
-
Scroll down
set
clear
esc
B
0
Previous
Scroll up
Next
Edit (turn
joystick
clockwise)
Change setting
Scroll down
You can use multiple methods to navigate through the menu system with your keypad:
Joystick navigation. Use the keypad joystick to move through menu items. When you have the desired
menu item selected, move the joystick to the right to advance through the available options. Once you are
in a menu, move the joystick to the left to back out of that menu.
Button navigation. Use the pause button to scroll up; play to scroll down; fast forward or forward frame
for the next item; fast rewind or reverse frame for the previous item. When you have navigated to the item
you want, use seq, set, or fast forward to select that item. The arrow indicator on the UltraView PTZ menu
identifies the property that will be changed.
To change a setting, press the iris + button. The setting will be saved when you advance to the next menu.
Alternatively, you may be able to use the zoom + button to advance, depending on your protocol. (Use of
shortcuts on the KTD-405 keypad to navigate and select may not work with all protocols.)
Numerical navigation. Press the number associated with a menu item to select or highlight that option or
proceed to that menu. You will also use the number keys to enter numerical data, such as passwords.
Note: When you press the number associated with an option and there is a value to set, you will automatically be
asked to set that value. If there is no value to set, when you press the number associated with an option,
that option will be selected and you will proceed to the next menu.
3
4
UltraView PTZ
User Manual
Programming shortcuts
This section lists the keypad programming shortcuts for presets and tours. For detailed instructions, refer to the
KTD-405/KTD-405A/KTD-405-2D Controller Keypad User Manual.
Presets:
•
•
To store: Position the camera. Press the store key and then enter the preset number. Press store again.
To call up: Press find and enter the preset number.
Shadow Tours:
•
To store: Press and hold the esc key and then press the tour key. Then press the + side of the zoom,
focus, or iris key to start recording a shadow tour. Athe end of the shadow tour, press esc.
Accessing programming menus
To access the programming menus using the keys on a KTD-405 keypad, do the following:
1. Switch the keypad to the camera site you want to program.
2. Press and hold the set key until Enter programming code displays.
3. At the code entry display, enter the programming code 9, 5, 1. Then press the seq button.
4. At the first menu display, press 3.
5. At the Enter camera site number screen, enter the site number of the camera you wish to program.
At this point, you have access to the UltraView PTZ programming menus. For more information on the
programming menus, see Menu navigation on page 5.
Note: If you are prompted to enter a password, refer to Passwords on page 33 for the default pass code key.
Chapter 1
Programming
Menu navigation
The UltraView PTZ menu structure generally follows an alphabetical order (in English) of the functions and
features that can be set with a few exceptions. Table 1 shows the order of the menu screens and their
relationship to each other, as well as the options and defaults for each screen.
Table 1.
UltraView PTZ menu hierarchy
Password (page 6).
Site number display (page 17).
Product information (page 6).
Synchronization (page 18).
System information (page 6).
Temperature display (page 18).
Memory management (page 7).
White balance (page 19).
Copy housing to PTZ
Wide dynamic range (WDR) (page 19).
Copy PTZ to housing
Zoom speed control (page 19).
Program select (page 8).
Setup (page 8)
Clear memory (page 8).
Zoom variable tilt (page 20)
Presets (page 20).
Titles/areas (page 21).
Automatic slow shutter (page 9).
Preset titles.
Autopan speed (page 9).
Area and titles.
Auto Return (page 10).
Camera title.
Azimuth indicator (page 10).
Tour title.
Day/night switch (page 12).
Current status (page 26).
Electronic zoom (page 12).
Tours (page 27).
Exposure control (page 13).
ShadowTours (page 27).
Image freeze (page 13).
Preset tours (page 29).
Image stabilization (page 13)
Additional menus (page 31).
Lens initialization. (page 14)
Privacy masks (page 31).
Lift/gain (page 14).
Alarms and relays (page 32)
Max tilt/pan speed (page 15).
System startup (page 33)
Preset speed (page 15).
Password protection
Proportional speed (page 16).
Installation date
Quick spin (page 16).
Power-up action
Serial update (page 16)
Position reporting
Shutter speed (page 17). NTSC.
Shutter speed (page 17). PAL.
5
6
UltraView PTZ
User Manual
Top-level access and information screens
When you access the UltraView PTZ series, the following three menus display:
Password. The camera will come from the factory with the
default password turned off, but saved in memory. See
Passwords on page 42 for details. If you have previously
input some information to set up the camera and have
passwords enabled, you will be prompted to enter your
password (Figure 3) to proceed. Use the directional buttons
to navigate to the numbers, and press iris + to input those
numbers. Input the wrong password and you will
automatically exit the menu. If the password is correct, you
will proceed to the Product information screen.
Product information. This screen (Figure 4) provides
product information, including:
•
•
•
•
•
•
•
Product name
Camera type
Site ID number
Unit serial number
Installation date (This should be set by the installer.)
Video format
Protocol
Figure 3. Password screen
ULTRAVIEW PTZ
Figure 4. Product information for UltraView PTZ
UltraView PTZ
DAY/NIGHT 27X WDR
-- SITE 0083 -SERIAL :
INSTALLATION :
VIDEO FORMAT : NTSC
PROTOCOL : GE Impac
EXIT HOLD SEQ
NEXT
There are no customizable options on this screen. Go to the
next screen by pressing fast forward on the keypad.
System information. This screen (Figure 5) provides
information pertaining to the current software, hardware, and
installation information.
P=
Type and version date for the pan processor.
T=
Type and version date for the tilt processor.
B = Camera type and firmware version.
I=
Type and version date for the housing card.
Note: If you see no type and version date info, verify proper
connections, mounting, and presence of the housing
card.
If there is no housing card, you will see the message, “I:
NOT INSTALLED.”
There are no customizable options on this screen. Go to the
next screen by pressing fast forward on the keypad.
Figure 5. System Information for UltraView PTZ
UltraView PTZ
B: LM703n-8
091217
091217
V 1.48
Chapter 1
Programming
Memory management
If the settings stored in the memory of the housing differ from the settings stored in the memory of the camera
(PTZ), Memory will flash on your monitor. When you log on, you will see the Memory management menu
(Figure 6) asking you to choose which settings you want. The settings you choose overwrite any existing
settings. Until you decide which settings to use, the unit will use the settings stored in the camera. Once the
settings have been successfully transferred, Memory will stop flashing on the monitor.
The Memory management screen appears after the System information screen in the menu sequence. So if the
memory message is flashing, the menu order will be Product information, System information, Memory
management, Program select.
Figure 6. Memory flashing menu
Note: DIP switch settings on the camera can be set to automatically copy the settings from the housing, or push the
settings from the camera to the housing. See the UltraView PTZ Installation Manual for more information.
7
8
UltraView PTZ
User Manual
Program select
The Program select menu (Figure 7) is where you will find the bulk of the UltraView PTZ configuration
menus.
Figure 7. Program select menu
The submenus on the Program select menu are as follows:
•
•
•
•
•
•
Setup on page 8
Presets on page 20
Titles/areas on page 21
Current status on page 26
Tours on page 27
Additional menus on page 31
Use the Program select menu (Figure 7) to choose which of these submenus you wish to change. To access a
particular submenu, either press the number associated with it, or navigate to the desired submenu and press
the fast forward button on the keypad.
Setup
Use the setup menus to restore factory default settings, adjust the camera, and adjust system settings.
Previously stored settings in the camera (PTZ) and housing nonvolatile memory will be overwritten.
Clear memory
Clear certain settings and information and return to factory
default settings (Figure 8):
1. Select options 1, 2, 3, 4, 5, or 6 to clear the memory for
the indicated feature. You can also press iris+ and select
the option you wish to clear.
Figure 8. Clear memory
Chapter 1
Programming
2. To confirm the restoration of factory defaults (Figure 9)
for the feature chosen on the previous menu, do one of
the following:
•
•
Figure 9. Clear memory confirmation
Select option 1 to keep the current settings.
Select option 2 to delete the current settings and
reload the factory default settings.
This process may take some time. The screen will update with an
estimated time counter.
Automatic slow shutter
Figure 10.Autoslow shutter menu
Enable or disable the autoslow shutter feature (Figure 10) to slow
down the shutter speed of the camera for better image quality in
dark environments.
Note: This feature is disabled by default and is only available on
cameras with day/night capability.
See Exposure control on page 36 for more information about light
settings.
Autopan speed
Select the speed at which the camera automatically pans. Use the
joystick or number pad to choose from three speed settings: slow,
med (default), or fast (Figure 11).
Figure 11.Autopan speed menu
9
10
UltraView PTZ
User Manual
Auto Return
Figure 12.Autoreturn menu
Set the camera to automatically return to an activity after a period
of inactivity, to a home position (preset 000), a specific preset, a
preprogrammed tour, or autopan mode (Figure 12). This feature
is disabled by default.
•
•
•
•
•
To disable the autoreturn feature, select option 1. Default
is Disable.
To automatically return to the home position (preset 000),
select option 2.
To automatically return to a preset position, select option
3, press iris +, and choose the preset to return to.
To automatically return to a preprogrammed tour, select
option 4, press iris +, and choose the preprogrammed
tour you want to return to.
To automatically return to autopan, select option 5.
If you choose to autoreturn to a certain setting, set the period of
inactivity (return time) referenced in the Autoreturn menu
(Figure 13). Access the time selection option by pressing the
joystick after selecting any option other than Disable.
Figure 13.Autoreturn timer
The minimum return time is 15 seconds. The maximum return
time is 60 minutes. Use the joystick to increase or decrease the
return time for items 2 through 5 in the following increments:
•
•
•
Increments of fifteen seconds to increase the return time
from 15 to 60 seconds.
Increments of one minute to increase the return time from
one to ten minutes.
Increments of five minutes to increase the return time
from ten to 60 minutes.
Azimuth indicator
Enable a direction indicator to be displayed on the monitor/screen
(Figure 14).
•
To disable the azimuth indicator select option 1.
(The default setting is 1, Disable.)
Figure 14.Azimuth indicator menu
Chapter 1
Programming
•
To enable the azimuth indicator to show the heading (N,
NE, E, SE, S, SW, W, or NW), select option 2 and use the
joystick to move through the heading options
(Figure 15).
•
To enable azimuth indicator to show the pan, tilt, and
zoom coordinates, select option 3 and use the joystick to
select numerical settings for P (pan), T (tilt), and Z
(zoom) (Figure 16).
To calibrate the indicator (Figure 17), do the following:
Figure 15.Azimuth indicator menu: Set heading
Figure 16.Azimuth indicator menu: Set coordinates
Figure 17.Azimuth indicator: Set north
1. Select set north, and press iris +.
2. Move to the desired position for north and press the iris +
button. Press the iris - button to cancel.
To set where on the screen/display the indicator displays
(Figure 18), do the following:
1. Select display row, and press iris +.
2. Set the row between 01 (the heading default) and 11 (the
NTSC coordinate default; 14 is the default for PAL) by
using the joystick to navigate to the desired number and
press iris +.
Figure 18.Azimuth indicator: Display row option
11
12
UltraView PTZ
User Manual
Day/night switch
Figure 19.Day/night switch menu
Set the method by which the camera’s infrared filter
automatically switches in and out at dawn and dusk (Figure 19).
•
•
•
•
Select option 1, to disable the day/night switch.
Select option 2 to use the KTD-405 keypad to manually
activate the switch.
Select option 3 to switch based on a sensor in the camera.
Select option 4 to switch based on a sensor on the PTZ
tilt arm (default).
Note: This menu will only be present if the camera supports day/night
switching.
If you select the PTZ tilt arm sensor, you’ll have to indicate at
which level you want the switch to happen (Figure 20). The light
level switch point is adjustable, but should be set only during
dawn/dusk conditions.
Figure 20.Day/night switch level choices
See Exposure control on page 36 for more information about light
settings.
Electronic zoom
Set the electronic zoom on the camera. Electronic zoom is
sometimes called digital zoom and indicates how much zoom the
camera’s software can add to the optical limit.
The maximum optical zoom limit will be multiplied by the
electronic zoom setting to increase total zoom. For example, if
the camera is capable of 27X, with the factory default setting of
4x (Figure 21), the camera will be able to digitally zoom in up to
108X.
Note: Electronic zoom may degrade image quality.
To deactivate electronic zoom, choose option 1 for 1X.
Figure 21.Electronic zoom menu
Chapter 1
Programming
Exposure control
Figure 22.Exposure control menu
Set the method the camera uses to adjust to different light levels
(Figure 22).
•
•
•
Select option 1 to enable the camera to automatically
adjust to different light levels.The iris + button toggles
the shutter speed (see Figure 30 on page 16 and
Figure 31 on page 16), and the iris - button toggles
backlight compensation for image enhancement.
Select option 2 for manual control of the iris using the
iris + and iris - buttons.
Select option 3 to allow manual control of the iris, with
return to automatic mode upon pan/tilt movement
(default).
See Exposure control on page 36 for more information about light
settings.
Image freeze
Figure 23.Image freeze menu
Sets whether the most recent camera image will freeze on the
screen while the camera is traveling to a manual preset. Enabling
Image freeze (Figure 23) causes the camera to freeze the last
image while the camera is moving and display a static image on
the monitor until the camera stops. Disabling the image freeze
causes the camera to display live video as the camera moves to
the preset location.
•
•
Select option 1 to disable (Default).
Select option 2 to enable. Fast speed is used when
image freeze is enabled and overrides the preset
speed setting.
Note: This menu will only be present if the camera supports day/night
switching.
Image stabilization
Image stabilization reduces blurry camera images caused by
camera shake.
•
•
Select option 1 to disable (Default).
Select option 2 to enable.
Note: This feature can degrade video performance. It is recommended
that it is used with a static picture where pan and tilt motion is not
used. An example would be a preset tour with Image Freeze
enabled.
Figure 24.
IMAGE STABILIZATION
-- SITE 0083 -DISABLE
ENABLE
(1)
(2)
ENTER SELECTION: 1
PREV
SCROLL NEXT
13
14
UltraView PTZ
User Manual
Lens initialization
Figure 25. Lens initialization menu
Set the duration between automatic camera lens initializations
(Figure 25). During lens initialization 27X and 37X cameras will
zoom in and zoom out while displaying "Lens Init" on the video
screen. This is a normal function that is performed in order to
maintain lens focus accuracy over prolong periods of time.
When you set the lens initialization time and then reset power to
the PTZ, the lens initialization will trigger at the set time.
However, if the PTZ is not power cycled after setting the lens
initialization time then the lens initialization time will trigger any
time within the last hour of the timer setting. For example, if the
lens initialization time is set to 4 hours and power is not cycled to
the unit, the lens initialization may trigger any time between three
hours one minute and three hours 59 minutes. In other words, lens
initialization time occurs any time within a one hour window of
when it was set regardless of the time interval selected.
If you are running a ShadowTour, lens initialization every 24
hours is recommended.
•
•
Select option 1 to initialize the lens manually (Default).
Manual initialization works only if you are using a
KTD-405 keypad and press the key sequence Esc (hold)
and Alarm.
Select options 2 to 5 to set the duration between
automatic lens initializations.
Lift/gain
Lift optimizes the video’s color over long runs of coaxial cable.
To set the lift value, do the following:
1. Navigate to Lift (0-7).
2. Press iris +.
3. Move the joystick up to increase the lift and down to
decrease the lift. Choices range from 0 to 7. Default is 0.
Figure 26.Lift/gain menu
Chapter 1
Programming
Gain optimizes the video’s brightness over long runs of coaxial
cable (Figure 27). Gain increases the video signal’s amplitude to
increase the brightness of darkened video and to reduce the noise
of weakened video. Use the joystick to adjust the gain. Up
increases and down decreases the gain.
Figure 27.Changing gain settings
To set the gain value, do the following:
1. Navigate to Gain (0-31).
2. Press iris +.
3. Use the joystick up to increase the gain and down to
decrease the gain. Range is 0 to 31. Default is 0.
CAUTION:
Lift and gain compensate for long runs of video coaxial
cable. Only qualified personnel should adjust these
settings. Incorrect adjustments can impair video quality.
Max tilt/pan speed
Figure 28.Setting pan speed
Use this to set the maximum manual control pan and tilt speed.
To set the pan and tilt speed, do the following:
1. Select the setting you want to change (pan—as shown in
Figure 28—or tilt).
2. Press iris +.
3. Use the joystick to set the tilt speed from 20 to 120
(Default). The pan speed setting is 20 to 200 (Default
120.)
4. When finished, press iris +.
Note: The units of measure used for this feature are in degrees per
second.
Preset speed
Set the speed at which the camera travels between presets
(Figure 29). This setting is used when calling up presets
manually. Use the joystick to set the four speed settings: slow,
med, fast (default), or max.
Figure 29.Preset speed menu
15
16
UltraView PTZ
User Manual
Proportional speed
Figure 30.Proportional speed menu
The proportional speed feature (Figure 30) decreases the pan/tilt
speed of the camera to provide better tracking when the camera is
zoomed in. This helps reduce pan/tilt overshoot when zooming in
on objects far from the camera.
•
•
Select option 1 to disable proportional speed.
Select option 2 to enable proportional speed (Default).
Quick spin
Figure 31.Quick spin menu
Quick spin (Figure 31) automatically rotates the camera 180
degrees when the bottom tilt limit is reached. This feature enables
tracking of a target passing directly under the camera.
•
•
Select option 1 to disable quick spin.
Select option 2 to enable quick spin (Default).
Serial update
This menu lets you update the firmware in your UltraView PTZ
camera. For details, contact technical support. (See Contacting
us on page 40.)
Figure 32.Serial update menu
Chapter 1
Programming
Shutter speed
Figure 33.Shutter speed menu (NTSC)
Select the shutter speed by choosing the number that corresponds
with the desired speed for either NTSC (Figure 33) or PAL
(Figure 34) camera.
During pan/tilt operation, shutter speed is controlled
automatically by the camera. To use the settings in the Shutter
speed menu during live video, press the iris + button. Press iris or move the camera to return the settings to automatic (Auto is
default).
Note: When you set the shutter speed to anything other than automatic,
the setting will override the manual return to autoiris control,
making the iris always fully automatic.
Figure 34.Shutter speed menu (PAL)
While the camera is moving in low light conditions, enable
Autoslow shutter so that shutter speed can be adjusted to enhance
the video image.
See Exposure control on page 36 for more information about light
settings.
Site number display
Enable or disable the display of the camera site number in the
upper left-hand corner of the monitor screen (Figure 35).
•
•
•
Select option 1 to disable site number display.
Select option 2 to enable site number display.
Select option 3 to enter diagnostic mode.
Note: When you re-enter the menus after being in live mode, the
diagnostics mode is automatically turned off. So when you exit
from the first menu and return to live view, the diagnostics will not
display. Diagnostics is a temperary setting that displays raw pan,
tilt, zoom, and protocol selected information on your live video
screen. This information is intended for use when contacting
technical support.
Figure 35.Site number display menu
17
18
UltraView PTZ
User Manual
Synchronization
Figure 36.Synchronization menu
Set the video signal to be synchronized either to the AC input
frequency (line lock) or to the camera’s internal clock
(Figure 36).
Select option 1 to select line lock. If you want to enable this
feature, press the set button. Press iris+ to engage line lock. You
may need to wait several seconds for synchronization to be
completed and to return to the confirmation menu.
Note: If after pressing the set button, your menus disappear, press the
iris - button to escape out of this setting. The setting will go back
to option 2.
Select option 2 to set the video signal to the camera’s internal
crystal (default).
Figure 37.Vertical phase adjust
Adjusting the vertical phase (Figure 37) requires an oscilloscope
or a KTS-56 phase adjustment tool.
Temperature display
Figure 38.Temperature display
Show the temperature on the screen (Figure 38).
•
•
•
Select option 1 to disable temperature display (Default).
Select option 2 to enable temperature display, showing
Fahrenheit.
Select option 3 to enable temperature display, showing
Celsius.
To set the display area (Figure 39), do the following:
1. Navigate to the fourth option, Display row.
2. Press the iris+ key.
3. Use the joystick to navigate to a number between 01 and
011 (NTSC) or 014 (PAL).
4. Press the iris + to set the row.
Figure 39.Setting display area
Chapter 1
Programming
White balance
Figure 40.White balance menu
Select the method by which the camera shifts its output colors to
compensate for the color of a light source.
•
•
•
•
•
Select option 1 for automatic white balance (Default is
Auto).
Select option 2 for ATW.
Select option 3 for a static indoor setting.
Select option 4 for a static outdoor setting.
Select option 5 to make manual adjustments.
If you select 5, the Manual wbal adjust menu (Figure 41)
displays. Press iris +, then use the joystick to modify white
balance to the desired setting. Press iris + again to save.
•
•
Figure 41.Manual white balance menu
Up and down adjusts the blue level in the picture.
Left and right adjusts the red level in the picture.
Wide dynamic range (WDR)
Figure 42.Wide dynamic range menu
Wide dynamic range technology allows you to see details of
objects in shadows or details of objects in bright areas of frames
that have high contrast between light and dark areas. When
enabled, the camera can automatically detect when the WDR
feature should be used.
•
•
Select Disable to turn this feature off in the camera
(Default).
Select Enable to turn this feature on in the camera.
Zoom speed control
Select the speed at which the camera will zoom (Figure 43).
•
•
•
•
Select option 1 for variable speed (Default).
Select option 2 for a slow fixed speed.
Select option 3 for a medium fixed speed.
Select option 4 for a fast fixed speed.
Not all keypads support variable speed. If you are not using the
right protocol or connection, the setting will default to mediumfast speed.
Figure 43.Zoom speed control menu
19
20
UltraView PTZ
User Manual
Zoom variable tilt
Figure 44.Zoom variable tilt menu
Enable or disable to limit the camera tilt function. When disabled
this feature prevents the dome housing from appearing in the
video image during operation at 1X electronic zoom (Figure 44).
The tilt function is then limited to between 0 and 79 degrees at 1X
electronic zoom. However, when the electronic zoom is increased
to 6X, the full tilt travel of 90 degrees becomes functional.
•
•
Select option 1 to disable full tilt travel at 1X electronic
zoom (Default).
Select option 2 to enable full tilt travel of 90 degrees for
all electronic zoom levels.
Note: This feature is automatically disabled when setting presets or
shadow tours.
Presets
UltraView PTZ cameras can store up to 129 preset positions (numbered 0 to 128). To enter preset positions, do
the following:
1. From the Program select menu, navigate to option 2 and
pan right. The Preset programming menu displays
(Figure 45).
2. Move the camera to the desired position.
3. Press the iris + button.
4. Enter a three-digit number to indicate the preset position
(000 to 128). The lowest unused preset number will
display automatically.
Note: Preset numbers 62 and 63 are reserved for autopan limit
settings but can be used as regular presets.
A message displays for two seconds to confirm that the
preset position has been stored.
5. Repeat steps 3 through 5 for all additional preset
positions to be stored.
6. Press iris- to return to the Program select menu.
Note: When setting preset outside of the menus you can only
set presets 1 to 127.
Figure 45.Preset programming menu
Chapter 1
Programming
Titles/areas
Under the titles/areas menu, you can set titles for preset positions, areas, the camera, and tours. Here are the
available characters:
(Space), /, up arrow, ), down arrow, (, Z to A, +, ?, >, -, <, ;, :, 9 - 0, z to a
Joystick up arrow = counterclockwise
Joystick down arrow = clockwise
Preset titles
To assign onscreen titles for any of the 128 preset positions, do the following:
1. From the Program select menu, navigate to option 3 and
pan right. The Edit titles/areas menu displays
(Figure 46).
2. Navigate to option 1 and pan right. The Preset titles
menu displays (Figure 47).
Figure 46.Edit titles/areas menu
Figure 47.Preset titles menu
21
22
UltraView PTZ
User Manual
3. Enter the preset number (000 to 128) of the preset title to
be edited. The Title entry menu displays (Figure 48).
Figure 48.Title entry menu
4. You can move the display location for the title up and
down onscreen. To set the location, confirm that the
cursor (arrow) is under the preset number on the left. Use
the joystick to move the position of the title up and down.
The title cannot be moved from left to right.
5. To enter or edit the title, move the cursor to the right
(inside the parentheses). Use the joystick to scroll up and
down to the desired alphanumeric character.
Note: You cannot edit a preset title on a preset that is not
programmed.
6. When the title is set, press the iris + button to return to
the Preset titles menu.
7. Repeat steps 4 through 7 for any additional titles, or press
iris - to return to the Edit Titles/Areas menu.
Area and titles
To program a titled area, do the following:
1. From the Program select menu, navigate to option 3 and
pan right. The Edit titles/areas menu displays (Figure 46
on page 21).
2. Navigate to option 2 and pan right. The Assigning area
titles menu displays (Figure 49).
Figure 49.Assigning area titles menu
Chapter 1
Programming
3. Use the keypad to enter the number (01 to 16) of the area
to be programmed and titled. The Area 01 programming
menu displays.
4. To define the boundaries of an area, use the joystick to
pan/tilt the camera to the upper left corner of the desired
area and press the iris + button.
Figure 50. Area 01 programming menu
Figure 51.Title entry menu
5. Use the joystick to pan/tilt the camera to the lower right
corner of the desired area and press the iris + button.
6. The Title entry menu displays (Figure 51).
To assign and edit area titles, do the following:
1. Confirm that the cursor (arrow) is under the area ###.
2. To move the display location for the title up or down on the screen, move the joystick up or down. (The
title cannot be moved left or right.)
3. To enter or edit the title, move the cursor to the right (inside the parenthesis).
4. Move the joystick up and down to scroll to the desired alphanumeric character. (See Titles/areas on
page 21 for available characters.)
5. Move the joystick right and left to move to the next character or edit the previous character.
6. When the title is complete, press the iris + button to save the title and return to the Assigning area titles
menu.
7. Repeat steps 3 through 5 of the previous process, and steps 1 through 6 of this process for any
additional area titles. Otherwise, press iris - to return to the previous menu.
Note: To make the defined area blank, use ‘?’ as the first character of the title. The title will display but not the
video.
23
24
UltraView PTZ
User Manual
Camera title
UltraView PTZ models show a title for the camera. To set a title for the camera, do the following:
1. From the Program select menu, navigate to option 3 and
pan right. The Edit titles/areas menu displays (Figure 46
on page 21).
2. Navigate to option 3 and press iris +. The Title entry
menu displays (Figure 52).
Figure 52.Camera title entry
3. Confirm that cursor (arrow) is under the camera ###
(three-digit number).
4. To move the display location for the title up or down on
the screen, move the joystick up and down. (The title
cannot be moved from left to right.)
5. To enter or edit the title, move the cursor to the right
(inside the carets).
6. Move the joystick up and down to scroll to the desired
alphanumeric character.
7. Move the joystick right or left to move to the next
character or edit the previous character.
8. When the title is complete, press the iris + button to save
the title and return to the Edit Title/Areas menu.
Note: Once the camera title is set, there are two ways to stop
the title from displaying. Use ‘?’ as the first character of
the title, or erase the title (Clear All Titles) to set the title
so it does not show.
Tour title
UltraView PTZ models do not by default show a title when on a tour. To set a title for a tour, do the following:
1. From the Program select menu, navigate to option 3 and
pan right. The Edit titles/areas menu displays (Figure 46
on page 21).
2. Navigate to option 4 and pan right. The Tour titles menu
displays (Figure 53).
Figure 53.Tour titles menu
Chapter 1
Programming
3. Use the keypad to enter the number (1 through 8) of the
tour to be titled and programmed. The Tour title entry
menu displays (Figure 54).
4. Confirm that the cursor (arrow) is under the tour ###.
5. To move the display location for the title up or down on
the screen, move the joystick up and down. (The title
cannot be moved from left to right.)
6. To enter or edit the title, move the cursor to the right
(inside the carets).
7. Move the joystick up and down to scroll to the desired
alphanumeric character.
8. Move the joystick right or left to move to the next
character or edit the previous character.
9. When the title is complete, press the iris + button to save
the title and return to the Tour titles menu.
10. Repeat steps 3 through 9 for any additional titles you
wish to set or edit. Otherwise, press iris - to return to the
Edit titles/areas menu.
Note: To display the tour title remove the ? as the first
character. A question mark as the first character in a title
will make the title blank.
Figure 54.Tour title entry menu
25
26
UltraView PTZ
User Manual
Current status
To review the current settings for your PTZ camera, select option 4 (Current status) from the Program select
menu and pan right. UltraView PTZ cameras with preset and area features have status menus that show
programmed presets and programmed areas by putting an X next to them in the menu.
Figure 55 shows typical Setup status screens. Use the joystick to page up and down through the screens. To
return to the last status screen, press iris -. You cannot add/change settings from these status screens.
Figure 55.Status menus
SETUP STATUS CAM: 0083
DAY/NIGHT:
DOME
ELECTRONIC ZOOM:
4X
EXP CONTROL:
M/A
LIFT:
0
GAIN:
00
SHUTTER SPEED:
AUTO
IMAGE FREEZE:
OFF
SYNCHRONIZATION:
INT
WHITE BALANCE:
AUTO
CAMERA:
LG LM703HM
PREV
NEXT
TOUR STATUS CAM: 0083
001 ?SHADOWTOUR 1
X
002 ?SHADOWTOUR 2
003 ?PRESET TOUR 1
X
004 ?PRESET TOUR 2
X
005 ?SHADOWTOUR 3
006 ?SHADOWTOUR 4
007 ?PRESET TOUR 3
X
008 ?PRESET TOUR 4
X
PREV
NEXT
Note: If the camera does not support an option, it is not displayed on the status page.
Chapter 1
Programming
Tours
Tours 1, 2, 5, and 6 in the PTZ programming menu are ShadowTours. Tours 3, 4, 7, and 8 in the PTZ
programming menu are preset tours.
ShadowTours
UltraView PTZ cameras have ShadowTour capability. A ShadowTour is a tour that a PTZ camera “learns” by
recording up to five minutes of manual PTZ operation. Use a keypad to manually direct your camera through
the desired PTZ movements, and the camera stores in memory the movements you performed. This recorded
tour can be replayed at any time.
To program a new ShadowTour, do the do the following:
1. From the Program select menu, select option 5.
2. From the PTZ tour programming menu, pan right with
the joystick to advance to the menu that displays
ShadowTours (Figure 56).
Figure 56.PTZ tour programming (ShadowTours)
3. Select the tour you want to create by pressing Iris+ to
enter the tour programming menu.
4. Select 1 to choose New tour (Figure 57).
5. Press iris + to start the timer.
6. Move the PTZ camera through the desired movements.
7. Press iris + to exit back to the PTZ tour programming
menu.
8. Repeat steps 2 through 8 for more ShadowTour
programming. Otherwise, press iris- until you exit back
to the Program select menu.
To edit a previously programmed ShadowTour, do the following:
1. From the Program select menu, select option 5.
2. From the PTZ tour programming menu, pan right with
the joystick to advance to the menu that displays
ShadowTours (Figure 56 on page 27).
3. Select the tour you want to edit.
Figure 57.ShadowTour programming menu
27
28
UltraView PTZ
User Manual
4. Select 2 to edit the tour (Figure 58).
Figure 58.Edit ShadowTour
5. The tour will start to play. Use the joystick to edit the tour
at any point. From that breakpoint, only the new
movements will be saved and all previously saved tour
movements will be lost. To exit, without modifying the
tour, press iris - before moving the joystick.
6. When you finish editing, press iris + to return to the
ShadowTour menu.
7. Repeat steps 3 through 6 to edit other ShadowTours.
To play an existing ShadowTour, do the following:
1. From the Program select menu, select option 5.
2. From the PTZ tour programming menu, pan right with
the joystick to advance to the menu that displays
ShadowTours (Figure 56 on page 27).
3. Select the tour you want to play.
4. Select 3 to play the tour (Figure 59).
5. The tour will play indefinitely until stopped by a key or
joystick movement.
6. Press iris- to exit back to the PTZ tour programming
menu.
7. Repeat steps 3 through 6 to play other ShadowTours.
To delete a ShadowTour, do the following:
1. From the Program select menu, select option 5.
2. From the PTZ tour programming menu, pan right with
the joystick to advance to the menu that displays
ShadowTours (Figure 56 on page 27).
3. Select the tour to be deleted.
Figure 59.Play ShadowTour
Chapter 1
Programming
4. Select 4 to delete the tour (Figure 60). A Please wait
message displays.
Figure 60.Delete ShadowTour
5. Press iris - to exit back to the PTZ tour programming
menu.
6. Repeat steps 2 through 5 to delete any other ShadowTour.
Preset tours
UltraView PTZ cameras have preset tour capability. A preset tour is composed of a group of preset positions
that the operator can program to be linked together in a sequence. Each tour consists of a string of up to 64
steps, or presets, which are programmed by the user.
To create a preset, do the following:
1. Navigate to option 5 on the Program select menu and pan
right. The PTZ tour programming menu displays
(Figure 61).
2. Select the tour to be edited. The Tour programming
menus (Figure 62) display.
3. Navigate to option 1 and pan right to edit the tour.
Edit Tour
(1)
Play Tour (2)
4. Navigate through and use iris + to set the preset,
position, dwell time, speed, zoom, and TTL (Figure 62 on
page 29).
Figure 61.PTZ tour programming for preset tours
Figure 62.Tour programming menus
29
30
UltraView PTZ
User Manual
5. For each step programmed, the following information
must be entered:
•
•
•
•
•
The preset number (0 to 128).
The dwell time at each step (1 to 31 seconds). The
default dwell time is 2 seconds.
The speed at which the camera moves between
presets. There are three speed settings: SLW (slow),
MED (medium), and FST (fast). Press the iris + to
cycle through the speed settings.
The zoom level (freeze (FZ) or zoomed out (ZO) or
normal (--)).
The title (TTL) (on or off).
6. To finish programming a tour, select the step number and
press the iris - key. The PTZ tour programming menu
displays.
Note: If the step number is not selected, pressing the iris - key
will delete the step.
7. Navigate to option 2 to play the tour, to verify, and press
the iris + to exit back to the previous menu.
To better understand preset tour programming, review the following abbreviations:
•
•
•
•
•
•
ST = Step of the preset. May have up to 64 presets and must be set for a preset tour.
POS = Preset number assigned to that step of the tour.
DW = Dwell time, or amount of time the position is held before moving.
SPD = Speed that the camera travels to the next preset.
ZM (also FZ or ZO) = Freezes the last image while moving to the next preset. ZO zooms out first,
moves to the next preset, then zooms to the preset number’s zoom factor.
TTL = Turns the preset title on or off.
Chapter 1
Programming
Additional menus
Selecting the Additional menus option from the Program select menu displays the Program select menu 2
screen (Figure 63).
Figure 63.Program select additional menus
27X and 37X camera models
The Privacy mask, Alarms and relays, and System startup are submenus of Program select menu 2.
Privacy masks
If you have an 27X or 37X camera, you can set privacy masks that hide certain areas from view.
To set a privacy mask, do the following:
1. From the Program select menu, select 6 to go to
Additional menus.
2. From Program select menu 2, select 1. The Privacy
masks menu displays (Figure 64).
3. Select the letter of the mask you want to create or edit (A
through H).
4. Pan right with the joystick to proceed.
Figure 64.Privacy mask
31
32
UltraView PTZ
User Manual
5. Center the crosshairs on the center of the area you want
to mask off and press the iris + button (Figure 65).
6. Using the joystick, set the size of the mask by pushing up
or down to increase or decrease the vertical size of the
mask (Figure 66), or left or right to increase or decrease
the horizontal size of the mask.
Figure 65.Privacy mask set
Figure 66.Privacy mask adjust
7. When finished, press iris + again to set the mask and
return to the Privacy masks menu.
8. Repeat steps 3 through 7 for additional masks.
Alarms and relays
The alarms and relays menu lets you program presets for alarms and program relays, and set alarm reporting.
Note: Alarms are available only when using a UPIB housing card.
Alarm programming
To set an alarm preset, do the following:
1. Select 1 from the Alarms and relays menu. The Alarm
programming menu displays (Figure 67).
2. Use the joystick to select alarms 01 through 04 and press
iris+ to set a preset number that corresponds with the
alarm.
Figure 67.Alarm programming menu
Chapter 1
Programming
To set alarm reporting, do the following:
1. Select 2 from the alarms and relays menu. The Alarm
reporting menu displays (Figure 68).
Figure 68.Alarm reporting menu
2. Enter selection 1 to disable (the default) or 2 to enable.
To set a relay, do the following:
1. Select 2 from the Alarms and relays menu. The Relay
programming menu displays (Figure 69).
Figure 69.Relay programming menu
2. Use the joystick to select an alarm number 01 through 04
and press iris+ to choose a relay.
3. Press iris+ again to set a delay time for the relay.
System startup
The system startup menu allows you to enable, disable, and change passwords, as well as set the installation
date, set an action on power-up, and set position reporting.
Passwords
To change the password from the default of 3477, do the following:
1. From Program select menu 2, select System startup. The
Password protection menu displays (Figure 70).
Figure 70.Password protection
33
34
UltraView PTZ
User Manual
2. Select 3. The Change password menu displays
(Figure 71).
Figure 71.Change password menu
3. Using the number selecting line, enter four numbers for
your password.
4. Enter those same numbers again when prompted.
5. Password saved is displayed onscreen, and the menu
exits back to the Password protection menu (Figure 70
on page 33).
To enable passwords, do the following:
1. From Program select menu 2, select System startup. The Password protection menu displays.
2. Select 2.
You have now enabled passwords, which means when you log onto the camera with a controlling device,
you’ll need to enter that password to access any programming.
To disable passwords, do the following:
1. From Program select menu 2, select System startup. The Password protection menu displays.
2. Select 1.
You have now disabled passwords. Anyone can access the camera’s programming without a password.
CAUTION:
If you change the password from the default, when you select Password disable, the password is
changed back to the default automatically. So, if you ever reenable passwords, make sure to change
the password again, or remember that the password is the default password (3477).
Installation date
To customize your installation date, do the following:
1. From Program select menu 2, select System startup. The
Password protection screen displays.
2. Using the joystick, pan right, past the Password
protection screen. The Installation date menu displays
(Figure 72).
3. Press iris + to edit the date.
4. Using the joystick to navigate the number selection
string, enter the installation date in YY/MM/DD format.
5. Once you have verified that it is the correct date, press
iris + again to save the date.
Note: Once set, the installation date can only be cleared by doing a
Clear all to reset to factory defaults.
Figure 72.Installation date menu
Chapter 1
Programming
Power-up action
You can program the UltraView PTZ to perform a certain action when it first powers up. The power-up action
default is home.
To set a power-up action, do the following:
1. From Program select menu 2, select System startup. The
Password protection screen displays.
2. Using the joystick, navigate right, past the Password
protection and Installation date screens, to the Power-up
action screen (Figure 73).
Figure 73.Power-up action menu
3. Choose the action you want the camera to take when it
first powers up.
•
•
•
•
•
Select 1 for none, or no actions.
Select 2 for home.
Select 3 for a specific preset. Press iris + to enter the
three-digit-number (000 to 128) of the preset you
want to use.
Select 4 for a specific tour. Press iris + to enter the
one-digit number (1 to 8) of the tour you want to use.
Select 5 for autopan.
Position reporting
Position reporting provides the capability for a remote device to get pan, tilt, and zoom position information for
doing analysis on the image data. This feature is only supported when the unit is in the Interlogix Impac
RS-485 9600 protocol mode.
To set position reporting, do the following:
1. From Program select menu 2, select System startup. The
Password protection screen displays.
2. Using the joystick, navigate right, past the Password
protection, Installation date, and Power-up action
screens, to the Position reporting screen (Figure 74).
Figure 74.Position reporting menu
3. Press 1 to disable, or press 2 to enable.
E
CAUTION:
If more than one unit has the positioning reporting feature enabled and the units share the same
control data line, enabling this feature may flood the RS-485 communication lines.
35
36
UltraView PTZ
User Manual
Exposure control
Exposure control for a UltraView PTZ is controlled through five different menus that affect the image
exposure.
Automatic slow shutter. This feature only works when the camera is in day (color) mode. It extends the
useful range of the color mode in dark situations and keeps the camera in color mode longer before having
to switch to night mode.
Motion can become blurry when the shutter is set to autoslow. If manual shutter speed or iris is set, those
settings will override the autoslow shutter setting.
Day/night switch. This switch controls when the camera switches to day or night mode (night mode
displays black-and-white images with improved contrast and sacrificed clarity).
Autoslow shutter can be set to delay the switch to night mode until the lighting levels are very low. The
Camera Sensor takes the Autoslow shutter setting into account when it switches to night mode. The Dome
Sensor, however, does not, and must be manually adjusted towards the dark end of the settings to make the
Autoslow shutter viable.
Exposure control (iris control). Auto mode enables Backlight compensation and disables manual
control. Manual and Manual return to auto allow manual iris adjustments (or require them in Manual
only), but can vary between different camera modules.
27X and 37X cameras: The camera is put into Aperture priority mode. Aperture priority means that the iris
size remains constant at the set value, while the camera adjusts the shutter speed to compensate. When
making initial adjustments, observe the effects of the shutter speed. The image will get much brighter or
darker on subsequent adjustments, as the shutter speed becomes maxed.
The Backlight compensation feature tells the camera to adjust its total exposure (iris and shutter) to ignore
the brightest areas of the image, and instead concentrate on darker areas. Backlight compensation doesn't
have a separate menu, but is enabled by setting the iris (exposure control) to Auto.
One practical application of Backlight compensation enables you to see detail inside a room with a window
on a bright day. The autoexposure will average all the light in the scene, so bright areas, such as windows,
get greater weight, and the camera will adjust so you can see the bright area (outside). Backlight correction
forces the camera to ignore areas of high brightness, so the rest of the scene (the inside of the building) will
be properly exposed. You can see detail inside, but in the process the lighting at the window will be
adjusted so seeing outside is not possible.
Shutter speed. This menu enables the option of using iris- to manually set the shutter speed of the
camera, much in the way the iris is manually set above. For all day/night camera types, the camera is put in
Shutter priority mode. The shutter speed is fixed, and the Iris will automatically adjust to compensate.
Setting the shutter speed is always done with the Manual/return to auto menu option, where the shutter
speed will remain fixed only as long as the camera is stationary. As soon as pan or tilt movements are
made, the shutter speed returns to Auto.
Wide dynamic range. Wide dynamic range, which is a feature of the 27X and 37X cameras, overrides all
image exposure settings except day/night switch). When Wide dynamic range is on, you should set
exposure (iris) and shutter speed to automatic. Also, Backlight compensation should not be used in wide
dynamic range mode; the feature allows you to see both dimly and brightly lit environments at the same
time.
Chapter 2 Troubleshooting and support
This chapter provides information to help you troubleshoot problems and contact
technical support in case you need assistance with your Interlogix equipment.
In this chapter:
Troubleshooting . . . . . . . . . . . . . . . . . . . . . . . . . . . . . . . . . . . . . . . . . . . .38
Common issues . . . . . . . . . . . . . . . . . . . . . . . . . . . . . . . . . . . . . . . . .38
Contacting us. . . . . . . . . . . . . . . . . . . . . . . . . . . . . . . . . . . . . . . . . . . . . .40
Online . . . . . . . . . . . . . . . . . . . . . . . . . . . . . . . . . . . . . . . . . . . . . . . .40
38
UltraView PTZ
User Manual
Troubleshooting
This section provides information to help you diagnose and solve various problems that may arise while
configuring or using your Interlogix product and offers technical support contacts in case you need assistance.
Common issues
The following are the most common troubleshooting issues and their solutions:
• I cannot control the camera.
This may be due to an incorrect address or a problem with RS-422 data lines. See the UltraView PTZ
Installation Manual for information on how to correctly set the PTZ unit’s address. If that does not resolve
the matter, check the RS-422 data communication lines to the camera.
• I can control the camera, but it is acting strangely.
This is likely a general failure. You can perform a restart from the controlling device, as long as you have
control. To restart the camera, do the following:
1. Switch the keypad to the camera site you wish to reset.
2. Press and hold the set button until Enter programming code appears.
3. Press 1, 4, 7, 6, seq on the keypad.
4. You will see Reset to defaults appear in the keypad window. Press iris + to proceed.
Note: Despite the term Reset to defaults, this action does not reset any settings on the camera. It will only restart
the camera, as if you had cycled the power at the camera.
5. Press 3 for camera.
6. You will see Reset camera X? Are you sure? where X refers to the camera that the keypad was set to
before entering 1, 4, 7, 6, seq. Press iris + to proceed. The camera will reset.
If problems persist after restarting, there may be an issue with communication or power cables. Check the
data communication lines and power to the camera.
• I am having trouble programming a ShadowTour.
The protocol for specific mappings to keypads or functionality may be incorrectly addressed. Check the
protocol tables in the UltraView PTZ Installation Manual and check the specific protocol or keypad
documentation.
For more information on how to program a Shadow Tour, see ShadowTours on page 27.
• I cannot make the camera return to a tour or preset after a timeout period.
The protocol for specific mappings to keypads or functionality may be incorrectly addressed. Check the
protocol tables in the UltraView PTZ Installation Manual and check the specific protocol or keypad
documentation.
Make sure the autoreturn is set up correctly. See Auto Return on page 10 for instructions.
• I cannot program autopan functionality.
To set the speed and settings for autopan, see Autopan speed on page 9.
Chapter 2
Troubleshooting and support
• I cannot program a preset.
The protocol for specific mappings to keypads or functionality may be incorrectly addressed. Check the
protocol tables in the UltraView PTZ Installation Manual and check the specific protocol or keypad
documentation.
You can program up to 128 presets in the UltraView PTZ. See Preset tours on page 29 for instructions.
• How do I get the latest firmware for my UltraView PTZ camera?
To update the firmware with the latest CyberDome_BF.ge file, you will need to contact technical support.
39
40
UltraView PTZ
User Manual
Contacting us
For help installing, operating, maintaining, and troubleshooting this product, refer to this document and any
other documentation provided. If you still have questions, contact us during business hours (Monday through
Friday, excluding holidays, between 5 a.m. and 5 p.m. Pacific Time).
Table 2. Sales and support contact information
Sales
Phone:
Technical support
Toll-free: 888.437.3287 in the US, including Alaska and Hawaii; Puerto Rico; Canada.
Outside the toll-free area: 503.885.5700.
E-mail
[email protected]
Fax
Note:
888.329.0331
888.329.0332
Be ready at the equipment before calling.
Online
Another great resource for assistance with your Interlogix product is our online publication library. To access
the library, go to our website at the following location:
http://www.interlogix.com1
1.
Many Interlogix documents are provided as PDFs (portable document format). To read these documents, you will
need Adobe Reader, which can be downloaded free from Adobe’s website at www.adobe.com.
Appendix A Defaults and hazardous materials
This appendix provides a list of default settings.
In this appendix:
Defaults . . . . . . . . . . . . . . . . . . . . . . . . . . . . . . . . . . . . . . . . . . . . . . . . . .42
Toxic and hazardous element levels. . . . . . . . . . . . . . . . . . . . . . . . . . . . .44
42
UltraView PTZ
User Manual
Defaults
The following table lists the defaults for each setting in the Setup menu on UltraView PTZ.
Table 3. Setup menu
Menu property
Default setting
Autoreturn
Disable
Autoslow shutter
Disable
Autopan speed
Medium
Azimuth indicator
Disable
Day/night switch
Dome sensor
Day/night switch level
5
Electronic zoom
4x
Exposure control
Manual/return to automatic
Image freeze
Disable
Image stabilization
Disable
Lens initialization
Disable
Lift
0
Gain
0
Max pan speed
120
Max tilt speed
120
Password Protection
Disable
Position Reporting
Disable
Power-up action
Home
Pressure warning
Disable
Preset speed
Fast speed
Proportional speed
Enable
Quick spin
Enable
Shutter speed
Automatic
Site number display
Disable
Synchronization
Internal 2:1
Temperature display
Disable
White balance
Automatic
Wide dynamic range
Disable
43
Table 3. Setup menu
Menu property
Default setting
Zoom speed control
Variable speed
44
UltraView PTZ
User Manual
Toxic and hazardous element levels
The levels for toxic and hazardous elements listed in this table apply to the following SKUs:
•
CYH-4101, CYH-4201, CYH-4202, CYH-4301, CYH-4401, CYH-4402, CYH-4501, CYH-4502,
CYH-4602, CYH-4701, CYH-5101, CYH-5201, CYH-5202, CYH-5301, CYH-5401, CYH-5402,
CYH-5501, CYH-5502, CYH-5602, CYH-5701, CYP-1111, CYP-1121, CYP-1301, CYP-1302, CYP1311, CYP-1312, CYP-1411, CYP-1412.
Toxic or hazardous substances and elements
有毒有害物质或元素
Lead
(Pb)
Mercury
(Hg)
Cadmium
(Cd)
铅
汞
镉
Hexavalent
chromium
(Cr(VI))
Polybrominated
biphenyls
(PBB)
Polybrominated
diphenyl ethers
(PBDE)
六价铬
多溴联苯
多溴二苯醚
Circuit boards
电路板
X
O
O
O
O
O
O
O
O
O
O
O
O
O
O
O
O
O
O
O
O
O
O
O
Motors
外壳
Plastics
支架
Hardware
硬件
X:
Indicates that this toxic or hazardous substance contained in all of the homogeneous materials for this part is below the limit requirement in SJ/T11363-2006.
表示该有害物质至少在该部件的某一均质材料中的含量超出SJ11363-2006标准规定的限量要求。
0:
Indicates that this toxic or hazardous substance contained in at least one of the homogeneous materials for this part is below the
limit requirement in SJ/T11363-2006.
表示该有害物质在该部件所有均质材料中的含量均在SJ/T11363-2006标准规定的限量要求下。