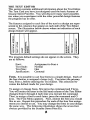
1
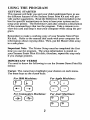
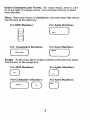
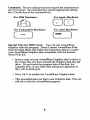
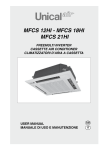
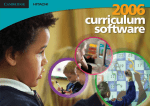
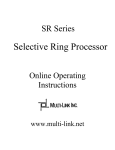
SESAME STREET®
rint
User's Manual
it
Program Copyright © 1988 Hi Tech Expressions.
All Rights Reserved. SESAME STREET MUPPET Characters © 1988,
Muppets, Inc. All Rights Reserved. SESAME STREET MUPPET
Characters are trademarks of Muppets, Inc. TIM HENSON and MUPPET
are trademarks of Henson Associates, Inc. SESAME STREET and Street
sign are trademarks of Children's Television Workshop.
SESAME STREET
PRINT KIT
TABLE OF CONTENTS
Introduction
1
Using the Program
• Getting Started
• ImportantTerms
2
2
2
Create a Card Tutorial
5
5
• Starting the Tutorial
Main Menu
Printer Setup
Creating a Card
• The Text Editor
Fonts
Text Styles
Text Size
Justification
Vertical Scroll
Horizontal Scroll
14
• Additional Editing Features
Masking Text
Help Screen
Exiting the Text Editor
17
Experimenting With Design Options
•
•
•
•
Signs
Banners
Storybooks
Your First Activity
Activity Suggestions
• Cards
Table Name Cards
Birthdays
Invitations
Book Plates
19
19
19
20
20
21
21
• Signs
Seasonal Posters
Calendars
Project Charts
Family Schedules
Bookmarks
21
• Banners
Alphabet Banner
Special Events
Welcoming Banners
23
• Storybooks
Alphabet Books
Autobiography
23
Trouble Shooting
24
INTRODUCTION
The Sesame Street Print Kit is a versatile print utility program. It
allows young children, with the help of an adult or older child, to
design and create a variety of printouts using their favorite Muppet
characters. The Sesame Street Print Kit encourages the development
of your child's imagination by offering an extensive selection of
interesting type faces, border designs and graphics with which to
write captions, sayings, or stories. The program provides unlimited
entertainment. Options include:
• Greeting cards, invitations, and announcements
• Signs, posters, and flyers
• Banners with variable letter sizes, borders,
and graphics
• Stationery, letterhead, memos, note paper, and
postcards
• Plus: Storybook pages to write, color, and
assemble
Children can choose Big Bird to send a get well card or Grover to
reward a job well done. Your child can dictate a story and assign a
favorite Muppet character to each page of a storybook. You can
personalize announcements and note paper with Bert and Ernie or
any other Sesame Street Pal. For a special birthday, make Sesame
Street decorations or advertise a bake sale with a banner featuring
Cookie Monster. The creative possibilities are endless. So, if you're
ready for fun, let's start!
1
USING THE PROGRAM
GETTING STARTED
This manual will help you and your child understand how to use
the different features of the Sesame Street Print Kit and will provide useful suggestions. Read the Reference Card included in the
box for specific instructions on how to boot your system and to
setup your printer. The Reference Card also contains a description
of the command keys that run the program. Take a minute to review this card and keep it near your computer while using the program.
Remember to make a working copy of your Sesame Street Print
Kit disk. Refer to the manual that came with your computer for
information about copying disks. Then, put the Master disk away
in a safe place.
Important Note: The Printer Setup must be completed the first
time you use the program. The setup information is stored on
your Sesame Street Print Kit disk; therefore, repeat this step only
if you change printers.
IMPORTANT TERMS
You need to know the following to use the Sesame Street Print Kit
menus:
Cursor. The cursor keys highlight your choices on each menu.
Use these keys as the cursor keys:
For IBM- Machines:
For Apple Machines:
COCO
CDGJ
88
For Commodore Machines:
2
88
For Alan Machines:
Initial Consonants and Vowels. On many menus, there is a letter to the right of a design choice. You can press this key to make
your selection.
Select. Once your choice is highlighted, you must enter that choice.
Use this key as the select key:
For IBM Machines:
For Apple Machines:
J
For Commodore Machines:
(
"",UNN
For Alan Machines:
J
J
Escape. At any time, press escape to return to the previous menu.
Use this key as the escape key:
For IBM Machines:
For Apple Machines:
GJ
For Commodore Machines:
(,-----"",J
IIHIFT
For Atari Machines:
CD
3
Command. The text editing functions require the simultaneous
use of two keys: the command key and the appropriate editing
key. Use this key as the command key:
For Apple Machines:
For IBM Machines:
GJO
For Commodore Machines:
For Atari Machines:
)
[---)
CTRL
Special Note for IBM Users: You can use AwardWare
Graphics with this program. Select Convert AwardWare Disk
from the Main Menu and follow the instructions below to make
your AwardWare Graphics disk compatible with the Sesame
Street Print Kit.
• Insert a copy of your AwardWare Graphics disk in drive A.
Be certain that you have inserted the Graphics disk into the
drive. Do not insert the program side of the disk, the
expander disk, or any other disk during this operation or
they will be destroyed..
• Press Alt-V to modify the AwardWare Graphics disk.
• This procedure does not harm your Graphics disk. You can
still use it with the AwardWare program.
4
CREATE A CARD TUTORIAL
It's time to be creative. This section of the manual details a step-bystep explanation of the program with illustrations that show you
how to design a card.
Look at the Reference Card once more. Follow the instructions to
boot your computer with the Sesame Street Print Kit working disk
you have already made.
STARTING THE TUTORIAL
Main Menu
The first screen you see after the title screen is the Main Menu. It
contains these choices:
• Printer Setup allows you to indicate which printer
you will be using.
• Cards lets you create or edit greeting cards.
• Signs/Stationery lets you create or edit signs,
letterheads and personalized stationery.
• Banners lets you create or edit large signs with a
maximum length of forty-two pages.
• Storybook lets you create individual pages
that can be fastened together to read and color.
• Convert AwardWare Disk is for IBM users only
and lets you use AwardWare graphics with this
program.
• Exit Print Kit allows you to save your last
printout and leave the program.
5
Printer Setup. Select the Printer Setup Menu. See your Reference Card to make sure you use the correct printer from the list.
When the setup procedure is complete, you have the option to test
your system. After running the printer test, the Main Menu reappears on the screen. Now, you are ready to begin.
Sesame Street Print Kit work screens have this format:
EJ
DESIGN
AREA
WORK
AREA
The screen is split in half. The top half is the design area. Each
time you add or delete a feature, the change is represented here.
The bottom part of the screen contains program menus and is
where you enter and edit.
Creating a Card. Select the Cards option/rom the Main
Menu. Then choose the Create a new Card option. There are
three card styles to choose from: a wide card, a tall card and a tent
card. The wide and tall cards are two-fold cards. The program allows you to print on all four quadrants of the cards. See the illustrations below for clarification and folding instructions.
WIDE CARD
FRONT
BACK
LEFf
RIOHr
0
\ \
6
TALL CARD
FRONI'
BACK
LEFT
RIGlIT'
\
For this lesson, select the Tent Card option. The following instructions will help you create this Tent Card:
TENT CARD
SIDE 1
SIDE 2
You have completed the choices indicated in screen illustrations one
and two below. Move the cursor to select each of the the highlighted choices on screens three andfour.
Screen 2
Screen 1
Create a new Card
C
Edit Last Card
E
Exit to the Main Menu X
Select Card
option.
..
Wide
Tall
7
Select Card
W type. See your
T manual for an
N illustration of
each type.
Screen 3
Screen 4
I
------
Print
sides?
on both
I'N'·o¥
__J
Important Note: If at any point in the design process you make a
mistake, you can use the Escape key to undo your mistakes. The
previous menu will reappear, allowing you to change your selection.
Screen 5: Notice the rectangle in the design area of your screen.
This area represents your tent card. You may choose to have no
border, a half-inch border, or a one-inch border. Note that the size
of the border limits the space available for your text. Choose the
one-inch border size option as shown below.
[]
No Border
Half-inch
m,Mi,N.
SIDEl
N
H
0
8
-
Select border
size.
Screen 6: There are several border display options. You can place
a border around the entire card, on the left or right sides only, on the
top or bottom only, on both sides, or on both the top and bottom of
the card. Choose the top and bottom border option, as shown
below.
CJ
AlI_
....
-LdtSidc
A
L
•
Tap
T
UD'+iUoIIM
H
a-
B
S
SIDE I
-
Select border
position.
Notice that the border you have chosen is displayed on your screen
as a bar at the top and bottom of the design area
Screen 7: This screen asks for the number of the disk drive in
which you have inserted the graphics disk. If you are using one disk
drive, press 1. If you are using two disk drives, press either 1 or 2
to indicate where you intend to insert the graphics disk.
CJ
1---------Insert
SIDE I
the new disk in any drive. Then type the
letter of the drive where the new disk resides.
Press ESC to return to previous screen.
Important Note: If you are using an IBM computer, this screen
does not appear automatically. It does appear if you do not have a
graphics disk in your drive. The IBM program disk is considered the
graphics disk. If you want to use the AwardWare Graphics disk
with this program, choose the New Disk option at the top of the list.
In the future, this option will allow you to use other graphics disks
from Hi Tech Expressions.
9
Screen 8: Now you must choose a border design for this example. The Cookie Monster border was chosen for this example.
Move the cursor down the screen to view a list of the border
choices. Select the Cookie Monster option and press the Enter
or Return key.
CJ
l'
T..,Hal
T-a
TlIIIlo
. (, ''':'111441;_
=..
Important Note: You can use a shortcut to move through this
long list. Simply type in any letter of the alphabet and the cursor
will move to the border choices on the list beginning with that letter.
Screen 9: Now you must choose the size for your graphic. Depending on the option you select, the graphic will fill either the entire space available on your card (Big), half the available space
(Half), or one-quarter of the available space (Quarter). Or, you can
choose the two-inch or one-inch graphic size options which describe the width of the graphic. Select the Two-inch option.
CJ
-l&-_
NollnlfJio
B.
AS;;··;·
SIDE1N
B
H
Select graphic
Size.
Q
T
0
Important Note: Some graphics are not suitable to be printed in
smaller sizes. To view the graphics choices, see the Design Card.
10
Screen 10: Now you will choose a graphic for the front and back
of your card (remember, in Screen 4 you selected the option that
prints the same border, graphic and text on each side of the card).
The cursor keys allow you to move the graphic. Use the cursor
keys to review the list of graphics until you see the name Cookie 1. Or, type the letter C to move quickly through the list. Press
the Enter or Return key.
D
II
SIDE1-
CoIIoe
Select graphic.
See Design Card
for an illustration
of each choice.
1'l!5DaipI(An)
ou.o.DoIpIJiD
1..1="
Screen 11: Now you must place the Cookie 1 graphic in the location you desire. The Space Bar places or removes a graphic from a
location on the design area. You may place your graphic in as
many available locations as you like, but they cannot overlap. Use
the cursor keys to position the graphic in the top left corner of
the design area and press the Space Bar. Now, use the cursor
keys and move to the top right corner of the design area. Press
the Space Bar to place the graphic in this location. Press the
Enter or Return key to go on.
t--------------
SIDE 1Use the Arrow Keys to move graphic to the desired location(s). Images may not overlap.
Press Space Bar to add or remove a graphic.
Press RETURN when finished.
11
Screen 12: Now you must select the primary font (type face) for
your design. Move the cursor to select Avant Garde and press
the Enter or Return key.
!:::!J
II
SIDE 1Select primary font.
SeeReferenceCard
for illustration of
each choice.
--
NEWmSK
FOIePdol
0Id1!D&lioll
ZII"
Screen 13: After choosing the primary font, the Text Editor
screen appears.
You can select the other design features you want to use on your
card such as text styles, text size, justification (left, right, and center), and fonts (as many as four). Three of the design features are
set to a default mode. Your text automatically formats according to
the following conditions:
Text Style:
Text Size:
Justification:
Normal
One
Centered
In the step below, you will learn how to change the default selections.
12
l
1
Screen 14: Now you are ready to enter text on your card. You
must press the Enter or Return key after typing each line of text or
when skipping a line. Each time you type a line, a representation of
it will appear in the design area. Press Enter or Return and type
"Happy" on line 2. Then type "Birthday" on line 3, type ''from''
on line 4 , type "Cookie Monster" on line 6, type "and" on line 7,
and type your name on line 8.
Happy
Birthday
From
Cookie Mmstcr
and
(your name)
Now, move the cursor back to line 8. Press the command and F
keys to change the font. Then, press your command and G keys
to designate Headline as font selection b. Now, add the Shadow
text style by pressing the command and S keys. Press the command and X keys to exit the Text Editor.
13
THE TEXT EDITOR
This section contains additional information about the Text Editor.
The Tent Card you have just designed used the basic features of
Sesame Street Print Kit. You will discover many more possibilities when you experiment with the other powerful design features
the program has to offer.
The features assigned to each line of the text in a design are represented in the columns that appear on each side of the Text Editor
screen. The illustration below shows where an indication of each
design feature will appear.
z0
0
....
0
00
0....
2
Col
>Eo<
N
....
00
'"
Eo<
0
Eo<
lZ.o
00
00
:t:oo
0....
lZ.o
....
Eo<
00
'":l
The program default settings do not appear on the screen. They
are as follows:
Font:
Text Style:
Text Size:
Justification:
Assignment to Font a
Normal
One
Centered
Fonts. It is possible to use four fonts in a single design. Each of
the font choices is assigned a letter (a-d). You select the primary
font, Font a, before entering the Text Editor. This selection becomes the default mode for your design.
To assign or change fonts, first press the command and F keys.
You will notice the letter in the left hand column of the Text Editor
changes from b through d each time you execute the command.
Then, to assign a font to each letter, press the command and G
keys. The Font Menu appears. Now, choose the font you would
like to use. Repeat this procedure for each of the four font assignments you intend to use. You may change the fonts in your design
the same way. The following illustration shows the seven font
choices provided by the Sesame Street Print Kit.
14
Fine Print
Avant Garde
Headline
Times
<!&IlJ QEnglisb
Zapj
X.
Text Styles. You can enhance your text by using different text
styles. It is possible to change the text style for each line of text.
Press the command key and the letter for the style you would like to
use. The letter in the text style column of the Text Editor indicates
your selection. The following list illustrates the seven text styles
provided by the Sesame Street Print Kit.
Normal
Bold
IlaIfc
@illanBw®
Jazz
Text Size. The program allows you to vary the text size in your
design. To increase the size of text, press the command and A keys.
To reduce the size of text, press the command and Z keys. The
number of text lines that will fit in your design will vary according to
your border and text selection.
IS
There are three text sizes available for cards, signs, and stationery:
Size 1
(three-eighths inch)
Size 2
(three-fourths inch)
Size 4
(one and one-half inches)
There are eleven text sizes available for banners. Be sure to watch
your design area to make certain both your design and text fit on
the banner. When creating multi-line banners, assign text sizes to
each line or they will not print.
Important Note: If the color of a text line changes when you
are entering text, it means you have entered more text than the line
can accommodate. The text must be shortened before you can
leave the Text Editor. You may want to try moving some text to
the following line. Or, you may need to reduce the text size.
Justification. To justify a line of text on the left margin, press
the command and L keys. To justify text on the right margin,
press the command and T keys. To Center a line of text, press the
command and C keys.
Vertical Scroll. If an up or down arrow appears in the text editing columns, it indicates that there are available lines above and/or
below your text. The number of lines available depends on the
amount of space left over after you have chosen the border. or
Horizontal Scroll. If an arrow pointing to the left or right appears, it indicates that some of your text has moved off the
screen. Though you cannot see it, this portion of the line still exists. This happens most often when designing multi-paged banners. To see this text, simply move the cursor to the end of the
line.
16
ADDITIONAL EDITING FEATURES
Masking Text. When you overlay text on a graphic, press the command and M keys. This function highlights your text on the printout,
making your text easier to read. Press these two keys again to tum
off the highlighting.
Special Note for Commodore Users: Press the command and K
keys to mask and unmask text.
Help Screen. Press the command and H keys for a quick reference
of the available design features and their command keys.
Exiting the Text Editor. Press the command and X keys to exit
the Text Editor. You can also exit the Text Editor by pressing the
Enter or Return key on the last line available for entering text.
Remember, you cannot exit the Text Editor if a line of text is too
long.
Screen 15: You are now ready to print your Tent Card. Make sure
the printer is properly connected to your computer and that the paper
is properly aligned. From the print option menu, select the Print
Card option.
!:!
1m. . .
New Card
Exit to Main Menu
II
SIDE1 -
p
N
X
17
Select option.
Screen 16: From the print option menu, select F (final)for high
quality printing. If you select D (draft), your printout appears
lighter, but requires less printing time. (For IBM users: the P
command prints out your design on the screen for preview.) You
can stop your printer by selecting Q (quit). Please be patient,
printing takes time.
Select Printing Option
Final
Draft
Preview on Screen
Exit to Main Menu
F
D
P
X
Screen 17: You now have the option to print your card again. If
you select No, you are returned to the Main Menu.
Printing Complete. Print Again?
I
Press 'Q' to stop printing.
Important Note: The program saves only your last completed
design on the program disk. You can edit your last design by
choosing the Edit Last Card option from the appropriate menu.
18
EXPERIMENTING WITH DESIGN OPTIONS
After completing the Create a Card Tutorial, you are ready to make
any of the variety of designs available in The Sesame Street Print Kit.
Keep in mind that there are many ways to add flair to your creations.
Try some of the following suggestions:
1)Use different colored printer paper.
2) Use colorful markers or crayons to highlight your
designs.
3) Use a colored printer ribbon. Two colors can be used on your
design by putting the design through your printer a second
time, changing ribbons in between.
Let us know about your projects. Send us some samples of your
creative printouts, so we can pass the ideas along!
SIGNS
There are three sign formats to choose from: vertical, horizontal and
half-page.
The procedure for creating a sign is similar to the one used to design
a card. First, choose a border and graphic. Then enter your text.
Experiment with the text editing options: fonts, text styles, type sizes. For instance, try the Raised or Shadow text style to enhance your
design. Use the Reference Card for a quick review of available attributes.
BANNERS
The length of your banner is determined by the type size and length
of your text. It is possible to print a banner up to forty-two pages
long! The largest type size creates the longest banner. You can also
print bumper stickers, small signs and postcards by using the smaller
type sizes and adjusting the length of your text.
Select the Banner option from the Main Menu. Choose a border
design.
19
Select a graphic and position it at either end of your banner. It is
possible to flip the graphic to enclose the banner text as if with
bookends. Keep in mind that the graphic is equal in height to that of
your text area.
Now, type in the text. The number of lines available depends on the
presence and size of a border. As you increase the type size, you
reduce the amount of space remaining for text.
The Sesame Street Print Kit offers eleven type sizes for banners-one through nine, Large (L) and Extra-Large (X). Notice that when
you enter the Text Editor, the first line is already set on Size One
and all the others are set on Size O. It is necessary to assign a type
size to each line of text to print the banner.
STORYBOOKS
Select the Storybook option from the Main Menu to create story,
activity or coloring books. Each page of the book must be designed
and printed before starting a new one. Try using the Size Two font
for your text. It provides large, legible letters, appropriate for
young children. After all the pages are printed, assemble them into
a book.
Your First Activity. You can use the text below to make your
first storybook. Choose a graphic that goes along with each page
and type the text below. After each page is printed, have your child
color the graphic and border. Fasten the book with staples or colored yarn. Read the completed book with your child.
Page One:
One day (insert child's name) takes a
walk in the woods.
Page Two:
There are trees and flowers.
Page Three: (Insert child's name) bends down to look
at rocks and bugs.
Page Four:
It's fun to go outside!
20
ACTIVITY SUGGESTIONS
The Sesame Street Print Kit contains hours of entertaining projects
that you or an older child can do with younger children. The activities described below are suggestions to help you get started.
CARDS
Table Name Cards. Setting the table for dinner need not be drudgery. Help your child make name cards for each member of the
family. Use the Card option to create a Tent Card for each place setting. Encourage your child to experiment with different borders and
type faces for each name.
Birthdays. Help your child celebrate birthdays of family and
friends. Use the Design Card to find an interesting picture for each
card. Encourage your child to think about a family member's favorite possession or hobby as you write the message together. Print
the card on colored paper, or suggest that your child color the designs.
Invitations. Make your own party invitations. Help your child design invitations by using any of the Card options. Select a special
Muppet friend and try using different text styles. Then, as a part of
the birthday celebration, use the Sign option from the Main Menu to
make place mats for each child.
Book Plates. Make Sesame Street book plates for the inside of
your child's books. Choose the Cards option from the Main Menu.
A vertical or horizontal card is the perfect size for the inside cover of
a book. Then choose a graphic and print it on the right side only.
Or, simply print a border around the card. Type in your child's
name, print the card, and then paste the name plate into the book.
SIGNS
Seasonal Posters. Talk to your child about the four seasons:
Spring, Summer, Fall and Winter. You can do this by reading appropriate books and magazines together, or by taking a walk outside. Help your child observe each season's special qualities.
Then have your child pick out a Muppet for each. Use the Sign
Menu to create a one-page poster for each season, incorporating the
graphic and borders your child chooses. Type the name of the season at the bottom of each poster, using the largest type size. Print
each page. Ask your child to draw the appropriate clothing on each
21
Muppet. Help your child color and mount each poster on cardboard. Display the results.
Calendars. Talk about the twelve months of the year with your
child. Have your child choose a graphic from the Sesame Street
Print Kit Design Tools Sheet which is appropriate for the current
month. Make a one-page poster and type the name of the month at
the top. Choose a graphic and place it under the month's name.
Print this poster.
Now, use the Sign option again to make a second poster. Type in
numbers from one to thirty-one, using the largest type size. Print
this poster. Have your child cut out each number, and glue each
one onto the calendar to represent the days of the month.
You may want to make this calendar into a weather chart by asking your child to draw pictures representing the day's weather in
each box. Repeat this activity monthly.
Project Charts. Make household chores into fun projects. Help
your child design a simple chart listing his or her responsibilities
around the house. On a poster similar to the ones suggested
above, print the days of the week. Talk about the tasks your child
should complete routinely, and list or draw a picture of each one
next to the day of the week they should be accomplished. Your
child can select different pictures and borders from the Sesame
Street Print Kit Design Tools Sheet.
Family Schedules. Use the Sesame Street Print Kit to help your
child keep track of your family's busy schedule. If your child
takes music or gymnastic lessons, attends a play group, goes to a
friend's house on certain days of the week, or has routine medical
or dental appointments, incorporate them into a poster. Help your
child select a graphic from the Sesame Street Print Kit Design
Tools Sheet which represents each activity. Type the day of the
week and the activity next to each, and include a border for variety. Print, mount, and display results.
Bookmarks. Choose a single column of small graphics and
make Sesame Street Bookmarks. Select a graphic and place it in a
single vertical column. Print it. Ask the child to cut out the column and color each graphic. Glue the bookmark to cardboard;
or, if you have access to a heat sealer, seal it in plastic. Book22
marks make great gifts.
BANNERS
Alphabet Banner. Make a large alphabet banner that you can
wrap around the walls in your child's room. Select the Banner option from the Main Menu. Help your child choose the font and type
size. Bookend the alphabet with a large Muppet character. Type the
whole alphabet at once. Choose the outline or shadow text style and
ask your child to color each letter. Be patient, printing banners
takes awhile.
Special Events. Holidays, vacations and family outings never arrive soon enough for an anxious youngster. Keep your child busy.
Help make special banners and posters for upcoming events.
Welcoming Banners. Help your younger child welcome home
older brothers or sisters who have been away at school or camp.
Also, when you take a vacation or go out for the evening, suggest
that the baby-sitter help your child make a welcome home banner for
you!
STORYBOOK
Alphabet Book. Make a simple alphabet book. Choose the largest font, and type one letter on each page. Ask your child to choose
a Muppet graphic to accompany each letter. Print the page. Repeat
this for each letter of the alphabet. You might choose a Muppet
graphic in which the character is holding a blank sign. Then, after
each page is printed, the child can write the letter in the blank sign.
Now, ask your child to cut out pictures from magazines that begin
with each letter. Paste the pictures on the correct page and staple the
book together.
Autobiography. Have your child create an autobiography called
"A Book About Me." Each page should contain a fact about your
child. For example, ask questions like these and type each answer
on a separate page: When were you born? Do you have any pets?
What is your favorite color? Choose a graphic and border design
for each page. Assemble the book with colored yam. Read the
book with your child.
23
TROUBLE SHOOTING
If you have trouble using the program or printing your designs,
complete the following checklist:
I)Make sure the printer is turned ON.
2) Check all cables and connections, and check that your printer has been "selected".
3)Tum the printer OFF, then ON again.
4)Try the Printer Setup test (see Reference Card) if
you are not certain you have chosen the correct setup.
5)Be sure you have an ample supply of printer paper, and
that the paper is aligned in your printer correctly.
6)When designing banners, if your text does not print check to
make sure you have assigned a type size to each line.
7) If you are still unable to solve your problems, or if your
printer is not listed on the Reference Card or Printer Setup,
please send the name of your computer, the printer model
number, the command summary from your printer manual,
the printer manufacturer's name and address as well as your
name, address, and daytime telephone number to:
Technical Department
Hi Tech Expressions, Inc.
1700 N.W. 65th Avenue
Suite 9
Plantation, FL 33313
Reorder Information. Send $5 for each replacement disk or
manual. Be sure to specify which disk or manual you would like
to receive. Remember to include the name and model number of
your computer and printer. Send a check or money order to:
Reorder Department
Hi Tech Expressions, Inc.
1700 N.W. 65th Avenue
Suite 9
Plantation, FL 33313
24
SESAME STREET PRINT KIT
REGISTRATION
To be eligible for customer support on this product, include a copy
of your original sales receipt and return it with this form to: Hi Tech
Expressions, Sesame Street Print Kit Registration Department,
1700 N.W. 65th Avenue, Suite 9, Plantation, Florida 33313.
N A M E - - - - - - - - - - - - - - - - AGE
_
STREET
PHONE ( - - ) - - - - -
CITY
STATE-- ZIP - - - - -
OCCUPATION - - - - - - - - - - - - - - - - - - PLACE PURCHASED----------DATE - - - COMPUTER BRAND
MODEL - - - - - - - PRIN1ERBRAND
IN1ERFACE-----Where did you first hear about the Sesame Street Print Kit? (circle one)
STORE
MAGAZINE
NEWSPAPER
AD
ARTICLE
OTHER - - - - - - - - - - - - - - - Do you have any recommendations for improvementof this product? - - - Do you have any other Hi Tech Expressions products? - - - - - - - Which Ones? - - - - - - - - - - - - - - - - - - - - Are there any other types of programs not presently on the market you would
like to buy?
Please explain: - - - - - - - - - - - - Additional comments:
_
All of our customers are very valuable to us. By answering these questions, you
have helped us to serve you better in the future. Thanks.
THE PROGRAMMING TEAM
Sean Puckett--Project Director/Designer
Programmer for Atari/C64/Apple/IBM
Jeff Jones--Programmer for Atari/C64/Apple/IBM
Cecilia Rodriguez--Programmer for IBM
Vicki Finnk-Cortina--Art Director/Computer Graphics Artist
LIMITED WARRANTY
Hi Tech Expressions'Y warrants the physical diskette furnished by
Hi Tech Expressions to be free from defects in material and
workmanship under normal use for a period of 90 days from the
date of delivery to the original purchaser as evidenced by a copy of
the purchase receipt. Hi Tech Expressions will replace any such
defective diskette which is promptly returned to it free of charge.
Hi Tech ExpressionsTM does not warrant that the functions contained
in any computer software program will meet customer requirements
or that operation of any program will be uninterrrupted or error-free.
This product is sold "AS IS" as to quality and performance. The
entire risk of use is assumed by customer.
THE FOREGOING WARRANTY IS IN LIEU OF ALL OTHER
WARRANTIES EXPRESSED OR IMPLIED, INCLUDING BUT
NOT LIMITED TO THE IMPLIED WARRANTIES OF
MERCHANTIBILITY AND FITNESS FOR A PARTICULAR
PURPOSE. IN NO EVENT WILL HI TECH EXPRESSIONS BE
LIABLE FOR SPECIAL OR CONSEQUENTIAL DAMAGES
EVEN IF HI TECH EXPRESSIONS HAS BEEN ADVISED OF
THE POSSIBILITY OF SUCH DAMAGES.
A business of Iii Tech Creations, Inc.
1700 NW, 65TH AVENUE, SUITE 9
PLANTATION, FLORIDA 33313