1
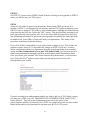
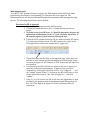
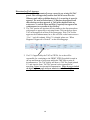
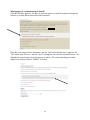
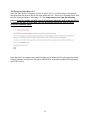
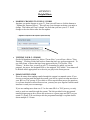
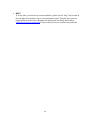
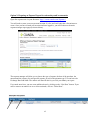
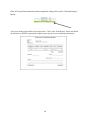
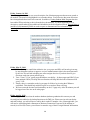
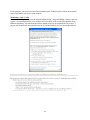
T&E: Expense Reimbursement Website MANUAL Updated: 02/28/11.sjf Sam Frenkel T&E Website Policy and Procedure Contact 215-898-1340 [email protected] Erin Wyher Mullaney Admin App Development Team Wharton Computing (WCIT) [email protected] Guide to T&E Expense Reimbursement Website Welcome to the online T&E Expense Reimbursement process. As you know an important part of submitting a T&E reimbursement request is the Higher Level Approval (HLA). HLA is a best practice reimbursement control that requires a HLA/Supervisor to document their authorization and approval of travel and meal expenses via their signature. The new online system provides a process to allow not only the traveler, but his or her HLA to review the expenditures and sign electronically. Prior Steps Prior to signing into the site, please be sure to prepare documentation (receipts, etc.) to be scanned and saved to your computer in a file/folder that is easily accessible for upload in STEP 2. Note: you will also need to have Flash installed on your computer in order to be able to upload files (http://get.adobe.com/flashplayer/). Please note: The original documentation still must be submitted to the Travel Office. If you are a preparer or payee, you must forward hard copies to the assigned Transaction Authorization Card (TAC) holder. The TAC holder is ultimately responsible for attaching the original documentation once signed. For Audit purposes, we are currently requiring a signed and TAC copy of C-1 for your hard copy files. In addition to preparing the above scanning of documentation, you may wish to prepare your currency conversion worksheet or expense report prior to starting the entry of a new C1. See Appendix 2 for Currency Conversion. A link to the currency converter is provided in the “Help” link on the navigation bar. It is important to note that you should use the STEP hyperlinks within the site versus using the back and forward arrow on your internet browser. Open the site in your web browser: http://web.wharton.upenn.edu/fa/travel/ Log in using your Wharton username and password. Click on "create new.” STEP 1 Form Part I: Choose payee designation: US Citizen or Non-Citizen, and sub-category and don’t forget to check the box next to Faculty/Staff or check off the necessary boxes for Student Travel reimbursement. 2 Type Payee name or use Payee Lookup Link to select the payee's name. Type the first or last name of your preferred payee and select them by click on his or her LAST name. This lookup is fed from the Wharton employee database, so it will automatically populate the name, Penn ID#, and phone number fields for you. The vendor number field is not yet available in this database and must be entered manually. Also, enter the mailing address (if needed), destination, and trip dates. Several options for Business Purpose are offered via the dropdown menu, but additional specific details about the trip or meal are also required. If you skip any of these fields, the system will not allow you to proceed; you'll get a popup window letting you know what needs to be filled in. Form Part II: Calendar links are provided to select trip dates. The remaining fields must be entered manually; expenses will total automatically. If receipts are being submitted in foreign currency, the top of the page features the link to the OANDA currency converter. Important: Even if the C-1-A for Entertainment and Business Meals is not required, you must take action – choose a radio button for "yes" it is attached or "no" it is not. If you skip the buttons, the system will not allow you to proceed; you'll get a popup window letting you know what you missed. Form Part III: This section should populate automatically (only after being “submitted”) from Part Two; however, if there was an advance, that must be entered manually in this section. Please be sure to scan your C-7 (Travel Advance Form) in advance so that you can upload this form in STEP 2. Form Part IV: Balance due must be added manually, as the system does not know how many accounts will be charged. The Balance Due field will not automatically populate in case you need to split the total amount due between 2 or more account numbers, therefore the 26-digit COA must also be entered manually as well. You will also notice that the PAYEE LAST NAME field is blank here as well. When you submit your C-1 form to the website, it will automatically populate the name based on the information entered for the payee. Finally, if you are charging a grant on any of the lines, please check the box for federal or non-federal grant. 3 Form Part V: A popup is provided in this section as a reminder of the categories of reimbursement requiring a C-5 justification form. You must choose a radio button to indicate either no C-5 is required, or that a C-5 is attached. If you skip the buttons, the system will not allow you to proceed; you'll get a popup window letting you know what you missed. A dropdown menu is provided for Department name. Note: simply keying in your ORG number will auto-populate text here or you can select your department from the drop-down menu alphabetical listing. However, you must enter the address, mail code, and telephone number. The signatures and embossed TAC card are, of course, done on the final paper printout that is submitted for reimbursement. Click “submit”. Your entries have now been saved. If you missed any required fields or information, the system will not allow you to proceed; you'll get a popup window letting you know what you missed. When have you made corrections or additions, please click “submit” to save your final changes. If you checked that a C-1A was required, or that a C5 Justification Form was required, you will need follow STEP 1A below. If you did not require either form, please skip to STEP 2. STEP 1A Note: You will not have to attach a scanned copy of the C-1A or C-5. These forms will become part of the uploaded documentation automatically through the T&E site. For C-1A forms, complete the form as usual using the TAB key to navigate fields or a simple point and click within the fields you wish to fill in on the form. If you have more attendees than the form allows you to list, please note “SEE ATTACHED” in the first PERSONS ENTERTAINED field. If you choose to attach a list, please make sure it is scanned and easily accessible so you can upload it to the site in STEP 2. For C-5 forms, complete the form as usual making sure to list the destination, dates of the trip and a valid, detailed description of the extenuating circumstances requiring this form. Please see the pop-up box associated with the Justification Rules to help guide you in completing the C-5 form within the site. Justifications that require your regular department HLA to sign electronically include, but are not limited to: missing receipt documents (including itemized receipts) or simple explanations of an extenuating circumstance that do not include the addition of fees. 4 If you chose to check any of the 3 boxes on the C-5 form, your HLA in STEP 3 will automatically populate as MAUREEN SANDUSKY as these circumstances require the Head of School/Center to sign off as the HLA for the entire submission of forms and documentation. Whether working on just a C-1A, C-5 or both forms, please be sure to click “submit” to save your work when you are finished. If you have to make any changes to the C-1A or C-5 at any point during the electronic process, please make sure to click “submit” each time to save your work. STEP 2 Attach appropriate documentation to the C-1 form as an image file (.jpeg, .gif, .png) or PDF, using the "browse for files" button. Similar to how you would search for a file in a desktop program, perform the same action to search for your saved scanned files from STEP 1. If you have more than one file to upload within the same folder, you may hold down the CTRL key and left click each file to attach them at one time. These files will now appear in the Uploader File Box within the website. If you've chosen the wrong file, highlight it and click "remove." Finally, in order to attach to them to the current C-1, click "upload". Next, you will see at pop-up box confirming your files have been added to the site. This will automatically advance you to STEP 3. 5 If you wish to preview your attachments, click on the STEP 2 hyperlink at the top of the page so that you can return to the previous step. You can click on the file name to view it or click on the hyperlink for “PDF of All Documents” to view them at one time. If you would like to delete any uploaded files at this point, you can click on the trashcan to the right of your file name. A dialogue box will appear to confirm an “OK” or “Cancel” to your current action. If you click “OK”, your file will be removed followed by a confirmation message in red type. Note: If you only have one file attached and chose to delete it, you will be redirected to the File Box to perform the upload action again from the beginning of STEP 2 If you choose to have a web demonstration model the actions outlined above, please click on the “Show Me” hyperlink above the File Box. This will run a short presentation in a separate window of how to upload your files. To continue the next step in the process, simply click the STEP 3 hyperlink to move forward. STEP 3 If the person preparing the form is also the payee, he or she will have to approve his or her own C-1 (and C-1A and C-5 if selected). If the preparer is completing forms for someone else, approval, by email, needs to be sent to the payee for review. STEP 3A On STEP 3A, if you are the payee, you will be prompted to approve the C-1 by clicking the check box next to “Yes! I approve these documents” and by clicking “submit.” 6 If you are a preparer, you will need to send an email using the “Send an email to <payee name>” link. This will produce a pop-up dialogue box, where you will be able to see the pre-penned email message with the approval steps. In addition, you can add your own note along with any further instructions if you wish. Click “send” to alert the payee of their pending C-1 form. The payee will have to log into the site (a hyperlink to the approvals page will be provided through the email dialogue box) and approve their expenses as explained above. STEP 3 Approvals Page View (only the payee on a C-1 can see this view) STEP 3B On STEP 3B, you will need to choose a HLA person via the “HLA Lookup” drop-down box provided. This list is populated by the Wharton Global Address book. Similar to the payee look up from STEP 1, type the first OR last name of your preferred HLA person and select them by clicking on his or her LAST name. With the HLA selected, you will need to send him or her an email similar to the email sent to the payee above by clicking the hyper link “Send an email to <HLA name>”. Please note, again, that if you selected any of the check boxes on the C-5 form, your HLA will automatically be selected as MAUREEN SANDUSKY. You will also have the option of adding your regular HLA to a reimbursement assigned to Maureen. This is not a required step, but may be beneficial to keep your HLA in the loop on all C-1s being processed. If you choose to add your regular HLA, this will be an additional step in the approvals process. For non-faculty, staff and students, HLA is always required. For faculty, HLA is only required for amounts greater than $500. This information is accessible through a hyperlink/“dollar bill” icon entitled: “Please Note the $500 rule for HLA” should you need it. Please see your financial staff, coordinator or Business Administrator on HLA Hierarchy rules for student travel. If you add an HLA in error or you select the wrong user, please use the “NO HLA” button to remove the current assigned HLA. You can select a new HLA user the HLA Lookup or you can leave the HLA selection unselected if not required. 7 STEP 3C On STEP 3C, please review STEPS 3A and 3B before clicking on the hyperlink to STEP 4, where you will choose your TAC person. STEP 4 Assign a TAC holder to approve the documents. Based on the ORG you keyed in or selected on STEP 1, a drop-down list will populate with the TAC holders assigned to your ORG. In order to assign a TAC holder to your reimbursement, highlight the name from the drop-down list and click the “Select this TAC” button. This person will be checking for all prior approvals that were required. Also, he or she will be final the approval on the policy and accounting information as well as the one responsible for printing the final paperwork to submit to the Travel Office. Please work with your department’s TAC holder if this procedure works better in another fashion. If your TAC holder is unavailable or you need to make a change in your TAC holder, the preparer or payee tied to a C-1 may make this change on STEP 4 of the site. You may choose an alternate within your department (from the drop-down listing) as a secondary option, or if the reimbursement is over your TAC holder’s limit, you are given access to send your documentation through to the BAs in the Finance and Administration Suite. Once you choose your alternate TAC holder from the drop-down menu, you will need to click “Select this TAC” again to ensure that your selected person will receive the documentation you created. If you are working on a reimbursement and do not wish to add it to a TAC holder’s queue, you may leave STEP 4 on “NO TRANSACTION AUTHORIZATION CARD (TAC) holder Selected.” This will let the reimbursement site only in the queue of the payee/preparer and HLA (if selected). Once STEP 4 is completed you do not have to take further action unless a rejection email is sent from your HLA or TAC person. 8 What happens next? Your HLA/TAC person will have to log into the T&E website via the link in the email generated by the system to check pending C-1s that need his or her approval. The information below will also be generated through the pre-penned email messages through the site. The following directions are more detailed. Directions for HLA Approval 1. Log in using Wharton username and Password 2. You will be linked directly to the C-1 listing showing your active queue. 3. No further action by an HLA on a C-1 should be taken unless the payee has approved the reimbursement (see the “x” in the view below Step 4 here). If the payee has approved, please continue following the steps. 4. Under the HLA column, where the HLA’s name is bolded, this shows C-1s that require further action. The HLA will need to click on the HLA approver box below the column titled “Approvals.” 5. This will directly link the HLA to the approval page, where he or she will able to click on attached documentation as well the actual forms to review for approval. All forms are in PDF format and will open in a new window. 6. As a final step, the HLA will have to return to the site to approve or reject the forms and documentation. If approved, the process is completed by clicking the check box next to “Yes! I approve …” and the “submit” button. If the C-1 is rejected, the HLA will have to click on the radio button next to “No, I do not approve…” and click “submit”. 7. If the C-1 is to be rejected, the HLA will have the opportunity to send an email to the preparer with the pre-penned email dialogue pop-up box. (See What Happens If Approval is Denied? Information below for instructions) 9 Directions for TAC Approver 1. The system will automatically sweep a queue for any existing BA/TAC person. This will happen daily and an email will be sent to his or her Wharton email address at 8:00am showing C-1s are waiting in queue for approval. The email will also denote C-1s that have been approved and those that have not been approved. A TAC holder should not take any action on a C-1 until the Payee and HLA (if required) have approved the reimbursement (see screenshot in Step 2 below). 2. The TAC person will sign into the site similar to the directions above with respect to approving or rejecting forms. Click on the box above TAC in the approvals section of the queue page. If the TAC holder approves the reimbursement, he or she will click on the button next to “Yes!..” and click submit. If the C-1 is denied, please see “What Happens If Approval is Denied?” on the following page. 3. If a C-1 if approved by the TAC in STEP 4, he or she will be responsible for continuing to the PRINT STEP (hyperlink located at the top and bottom of each page within the T&E site) to print all documentation. The TAC person will have to TAC the actual printed C-1 and sign the form. The TAC person is also responsible for attaching original receipts and documentation. Please be sure to include the digital signature page with your submission to the Travel Office. 10 What happens if a reimbursement is denied? If the HLA denies approval, the HLA is given the option to email the preparer through the website to let them know about edits that are needed. If the HLA has approved the documents, and the TAC holder decides not to approve, the TAC holder may choose to “unlock” the C1 through the site. See the screenshot below – the highlighted center display shows the request to unlock. The actual unlocking procedure begins once the hyper link on “HERE” is clicked. 11 The Process to Unlocking a C-1 Once the TAC holder or preparer choose to unlock the C-1, the following screen appears with directions on steps to unlock the form within the site. Please see screenshot below with specific details pertinent to unlocking a C-1. It is important to note that the unlocking process cannot be undone and will remove all electronic approvals tied to that specific C1. You will not have to re-key data, but you will need to follow the steps to obtain electronic signatures again. Once unlocked, the preparer may make changes and resubmit the C1 and supporting forms. If the documents are unlocked, the payee and the HLA must both resubmit their approvals in STEPS 3 and 4. 12 APPENDIX 1 Helpful Hints MAKING CHANGES TO YOUR C-1 FORM Anytime you make changes to your C-1 form you will have to click the button to “Update this Expense Report”. This will save your changes each time you make a change. This button will read “submit” the first time you save your C-1. It will change to the view below after the first update. VIEWING YOUR C-1 FORMS On the left hand navigation bar, below "Create New," you will see a link to "View Existing." Clicking on this link leads to forms that have not yet been approved. To see older forms, or those that have been approved by the TAC holder, click "History." In these lists, you will see all C-1 documents for which you are the preparer, the payee, the assigned HLA or the assigned TAC holder. Your name will be bolded where appropriate as to the role you play in the forms process. EMAIL NOTIFICATION Please be aware that sending emails through the system is a manual action. If you choose to send an email through the system, you will be copied on what was sent to your HLA or TAC person. If you chose to follow up with that person for questions or on forms that have still not been review, you may use your regular Outlook email interface to send your own message. If you are sending more than one C-1 to the same HLA or TAC person, you only need to send one email through the system. The link provided in the pre-penned email dialogue pop-up box, directs the reviewer to a queue page and NOT to your actual C-1 forms. You can always edit the pre-penned message to explain details about multiple C-1 forms. 13 HELP If, at any time, you feel that you need assistance, please use the “help” link located at the top right of the website, next to your username/logoff. This will direct you to a popup window with a link to Helpspot for instructions and FAQs and a link to [email protected] for any technical issues or system error problems. 14 APPENDIX 2 Currency Converter You can access the currency converter website by this link: http://www.oanda.com/currency/converter/ The OANDA website provides two helpful options for you to convert your foreign currency expenses. Option 1: Obtaining a standard exchange rate for a specific day When the new webpage opens, you are taken to the conversion box. Click into the search boxes to enter your currencies – USD and the currency you need to convert. You can choose your currency from the drop down menu by clicking the green down arrow next to the search box or you can click and type the currency name in the box(es). See options below: OR Once you have selected your currency names, by clicking on the name itself, enter 1 for USD, the date of the transaction you are converting and rate field (depending on if they used cash or a corporate/personal credit card). Most transactions are accurate by leaving the rate field set to “INTERBANK RATE.” 15 Once all of the information above is entered your conversion chart should look similar to the screenshot above. In order to make this part of your documentation for your current C-1 form, you will need to do one of the following: Print the webpage, scan and upload your document according to the directions in STEP 2. Contact the LSP for your department to inquire about software to create PDF files. This will provide a savable copy of the conversion rates and you can keep them on file should you need to access the same rates for more than one payee on the same trip. You can find a link to your LSP via the link: http://inside.wharton.upenn.edu/staff/distributedreps.html 16 Option 2: Preparing an Expense Report for various days and/or currencies Open the expense site in your browser: http://www.oanda.com/fxpense/. You will need to create your own personal account. It’s free and it will only take a few minutes to create. Once you have created your account and have logged in, you will be taken to the main expense manager report page (as shown below). The expense manager will allow you to choose the type of expense, the date of the purchase, the amount and the currency for each specific expense, as well as the payment type. You can leave the Exchange Rate field blank. The website will auto-fill this for you once you submit your report. If you need more lines, you can create additional ones by clicking on the “New Row” button. If you need to remove an unused row or to delete a mistake, click on “Delete Row”. 17 Once all of your lines entries have been completed, simply click on the “Generate Report” button. Your report should look similar to the image below. Click on the “Print Report” button and follow the directions in STEP 2 to upload this expense report as part of your scanned documentation. 18 APPENDIX 3 Website Upgrades The following list is a chronological listing of T&E website upgrades. The notification of these upgrades was originally sent by email on the dates listed below via the T&E Users Listserv. Monday, February 14, 2011 We are happy to release the ability to remove an HLA name from C-1s in the site. This functionality will only be usable when a name is assigned in error or a name needs to be changed. You can find this functionality on STEP 3 of any reimbursement. Please note that once you click the “NO HLA” link, the changes are immediate and the HLA is removed permanently from the reimbursement. Also, once the HLA electronically signs the C-1, this “NO HLA” functionality is removed. Monday, February 7, 2011 The T&E website has been upgraded with the current Wharton Brand standards! We have added direct links to the Wharton Inside page, F&A website, HR site and Operations website in the top banner (most common on all Wharton pages now). 1. The colors and page layouts have all been updated to fit within the branding standards – the information and user fields have not changed, just the designs! The look and feel will be new to all – feel free to navigate through the site and get a sense of the new set up. 2. Your navigation buttons (“Create New”, Step 1, Step 4, etc.) will now be located along the left hand side of the website versus being on the top of each page. 3. Your Help Menu has now been incorporated as part of your navigation bar (on the left). Here, we have included links for the Administrative Application Development Group and the User’s Manual. 19 Friday, January 14, 2011 We are happy to announce a new, more descriptive list of business purposes that are now posted to the website. The new list is highlighted in a screenshot below. You will notice that some selections have changed and others have been removed. In addition, Faculty-Student Meal Program has also been added. When selecting a choice from the drop down menu, it is most important to be as descriptive as possible when typing additional information in the free-form box below. This will help us (and all of you) immensely when we need to report on International Tax information (990 reporting). Friday, May 21, 2010 1. When clicking the email links within the site, your payee and HLA will now be given stepby-step directions on how to approve or reject reimbursements right in the email generated by the site! This will aid in helping new users navigate the site so you don’t have to give directions each time a new person logs in. 2. Your “View C-1 List” queue page should have sort ability – by date ranges and ORG (if you have multiple ORGs). We hope this new function will help limit the bulk of data stored in your C-1 list. 3. Finally, there is a reminder on the log-on page for folks to log in using their Wharton credentials. This should help with the log-on errors we have been receiving. 4. We have removed the time-out functionality on the C-1 page only. After 20 minutes you will be logged out of the site on all other pages. Friday, April 6, 2010 We are happy to announce that the student database (students graduation this current year and forward) has been added to the lookup function on the T&E site. Please note (as with our faculty and staff lookup), you will still have to add in their vendor ID number. Also, when applicable, you will need to scan and upload a Statement of Business Connection Form and, if the student (or traveler) is a Non-US Citizen, you will need to attach a copy of their Foreign National Information 20 Form, passport, visa and I-94 to their final reimbursement. Scanned copies of these forms should also be uploaded to the site for audit purposes Wednesday, April 7, 2010 Please note: if any payee exceeds the meal threshold ($35pp – lunch and $80pp – dinner), this will require a C-5 justification form to be added to the site as well as HLA electronic signature from Maureen Sandusky. This information has been added to the pop-up information box on the C-1 page as well as under the first check box on the C-5 form within the site (see screen shots below). 21